Tooling Items
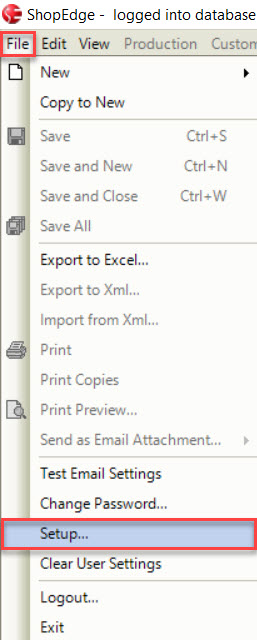
To view Tooling Items in the system, navigate to the  tab and click on the
 ![]() icon.
The Tooling Items lookup screen will be displayed.
icon.
The Tooling Items lookup screen will be displayed.
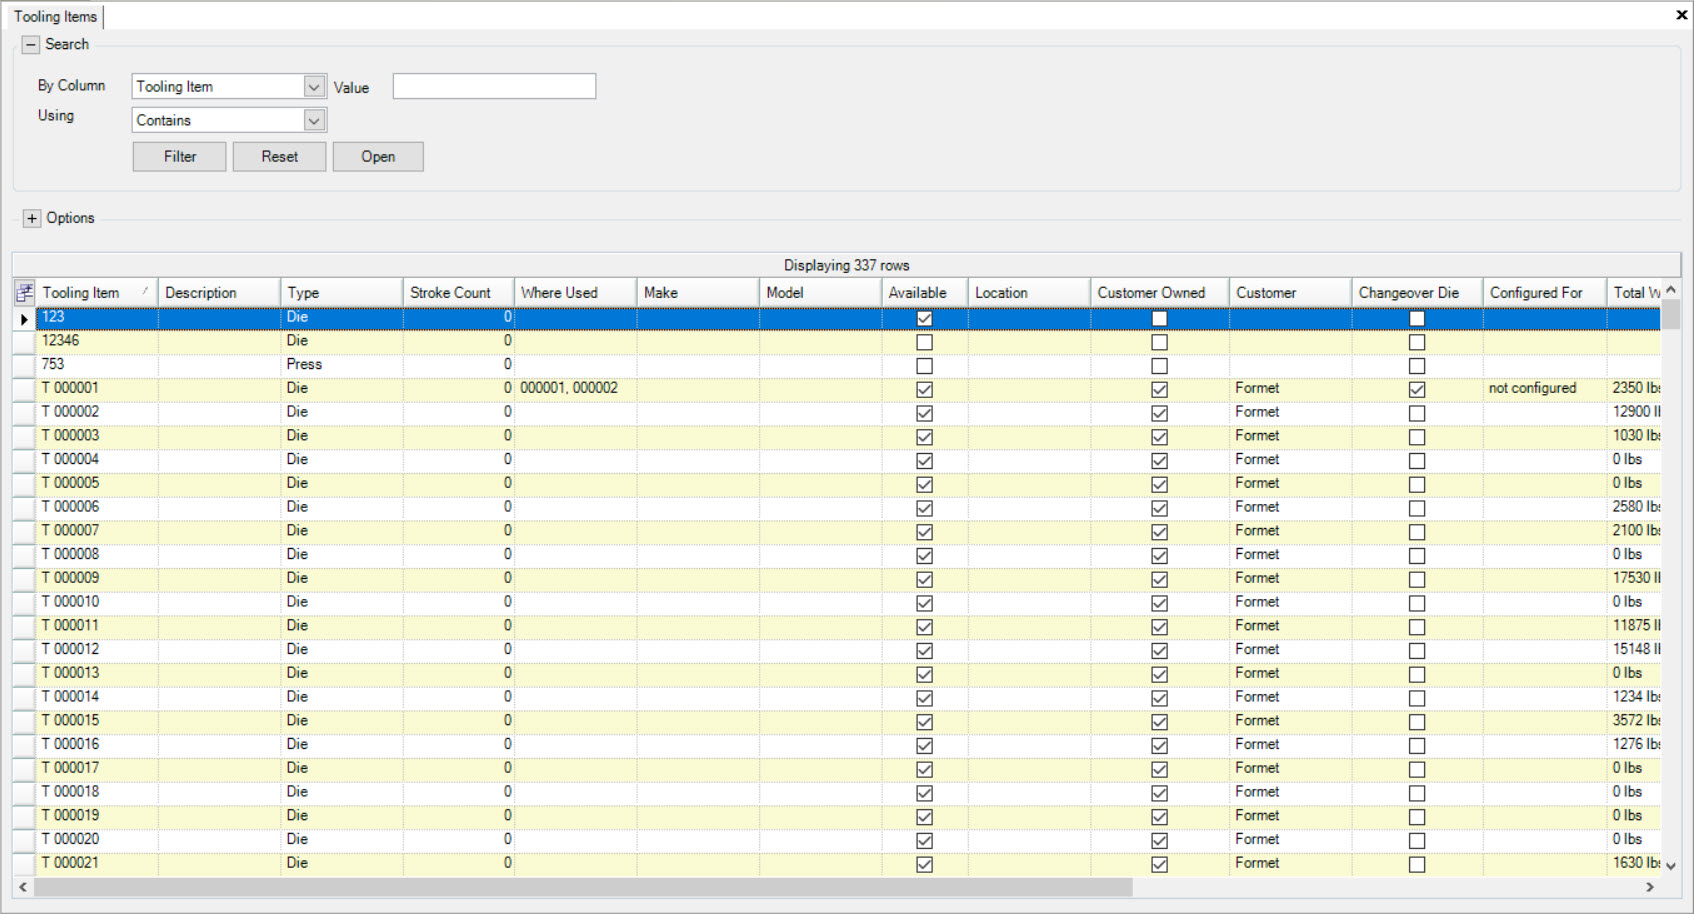
All available Tooling Items in the system will be displayed.
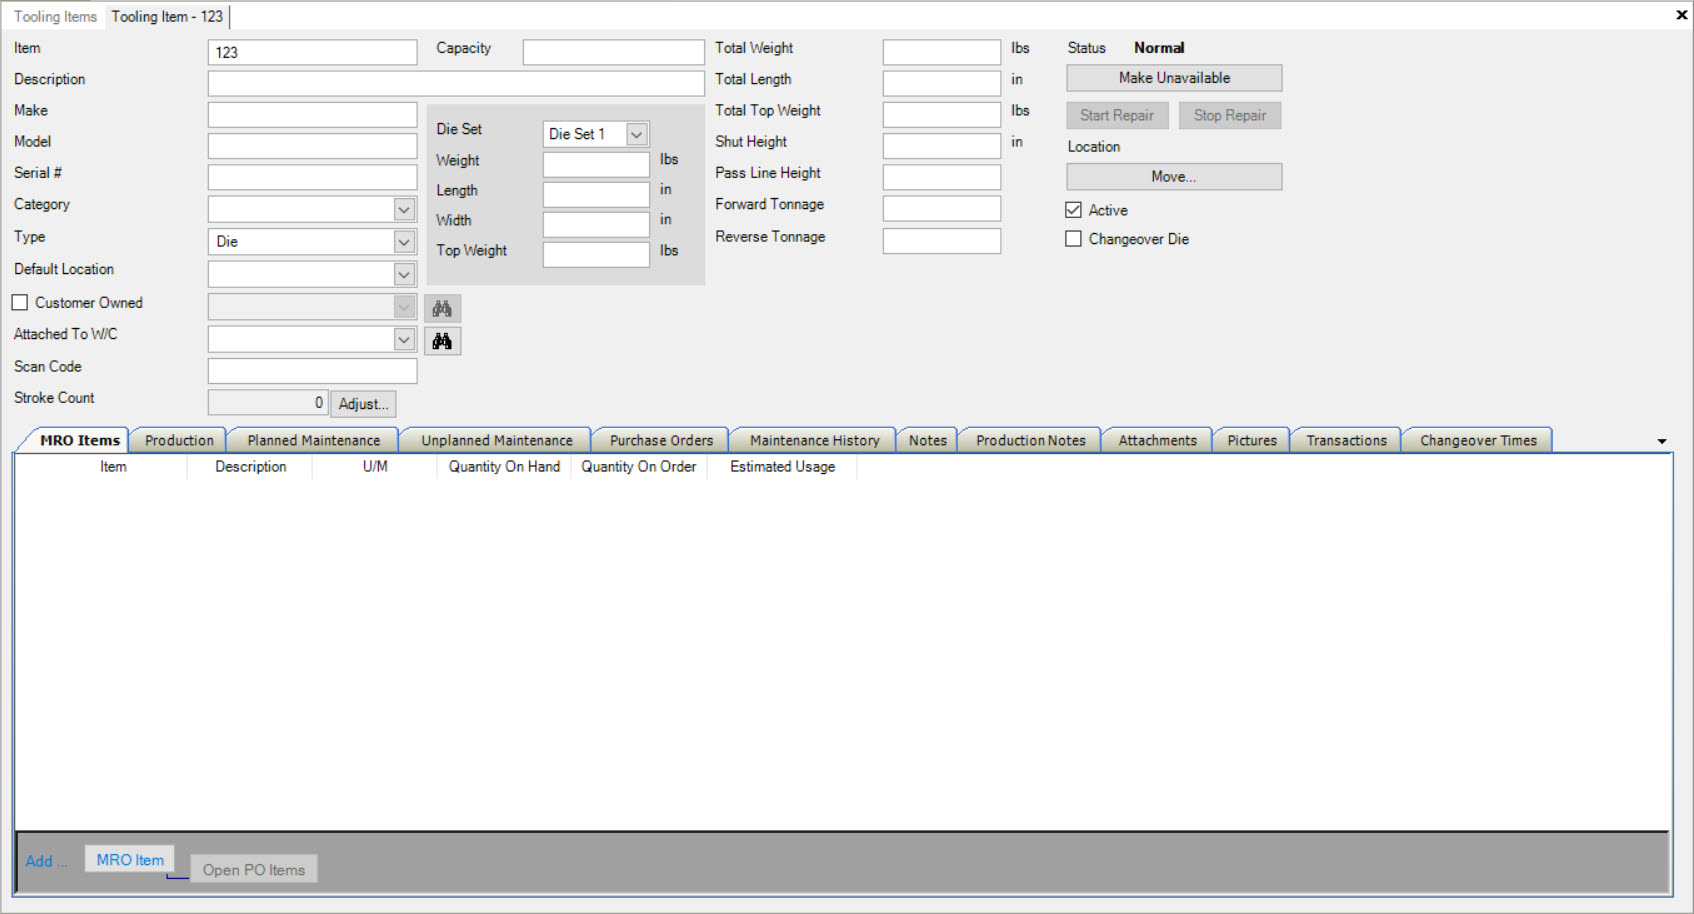
To open an existing Tooling Item, simply locate and double-click on the appropriate row.
The Tooling Item detail screen will be displayed.
Creating a New Tooling Item
There are three ways in the system to add a new Tooling Item. The first way is to click on the Ctrl + Shift + D keys.
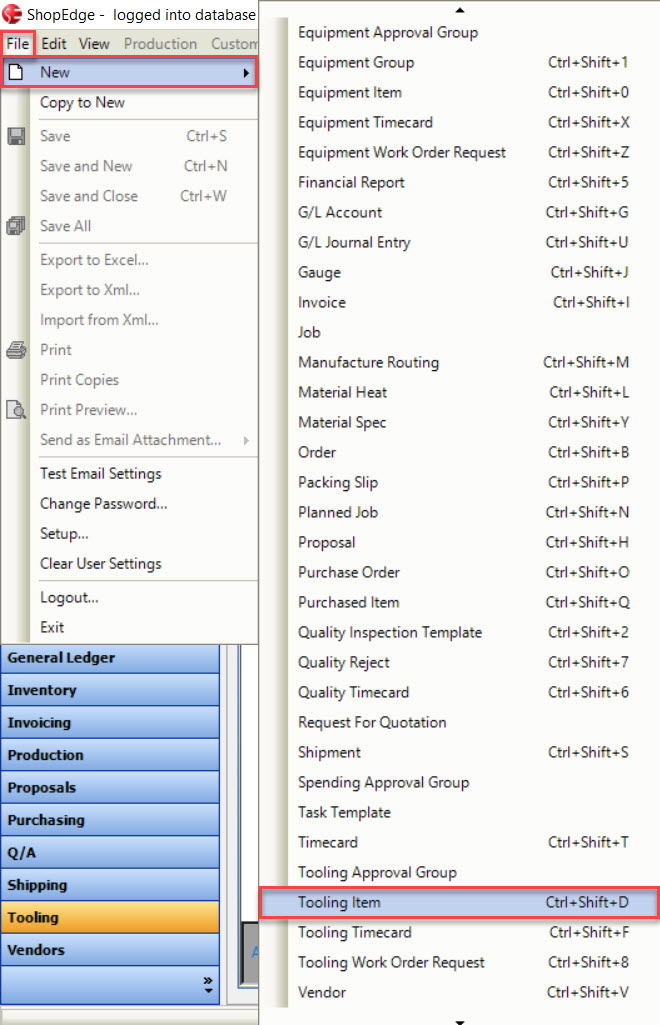
The second way is to navigate to File > New > Tooling Item.
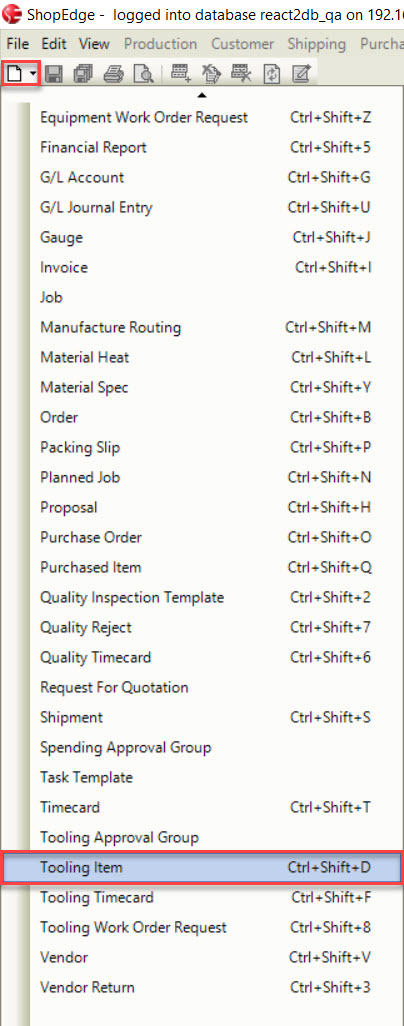
The last way is to navigate to the  button, and select the Tooling Item option.
All three of these options will open a new Tooling Item screen.
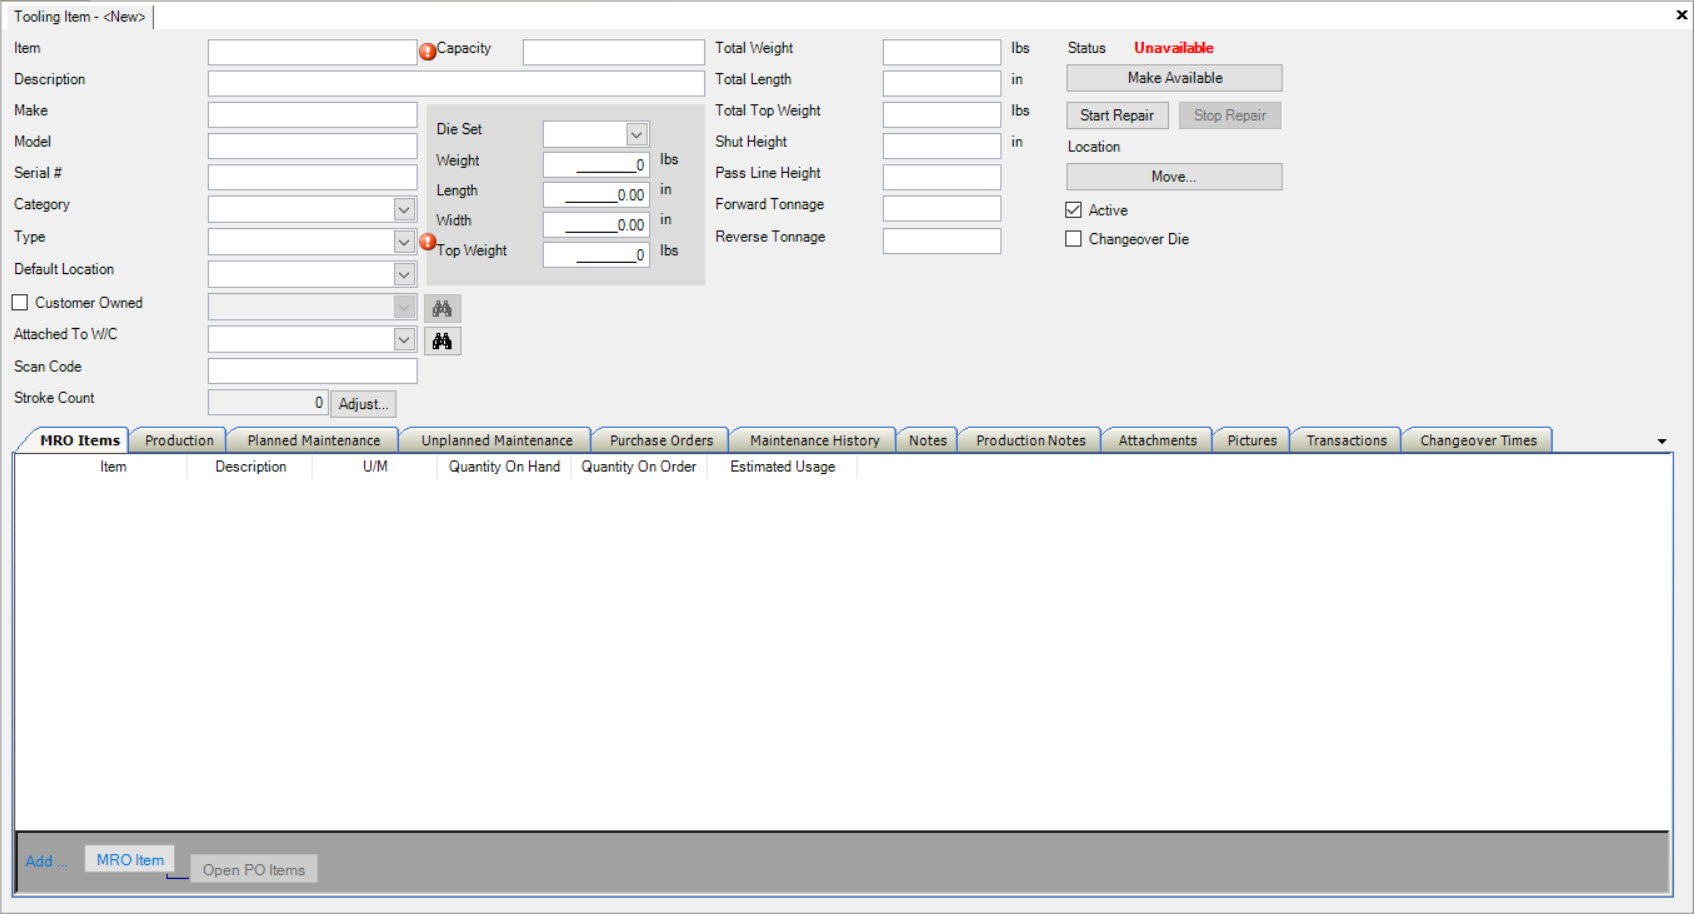
Users must complete the mandatory fields, Item and Type.
Note
Tooling Item Types are maintained under the ![]() icon on the
icon on the  tab.
tab.
If users wish to classify a Tooling Item as Customer Owned, you must select the Customer Owned checkbox.
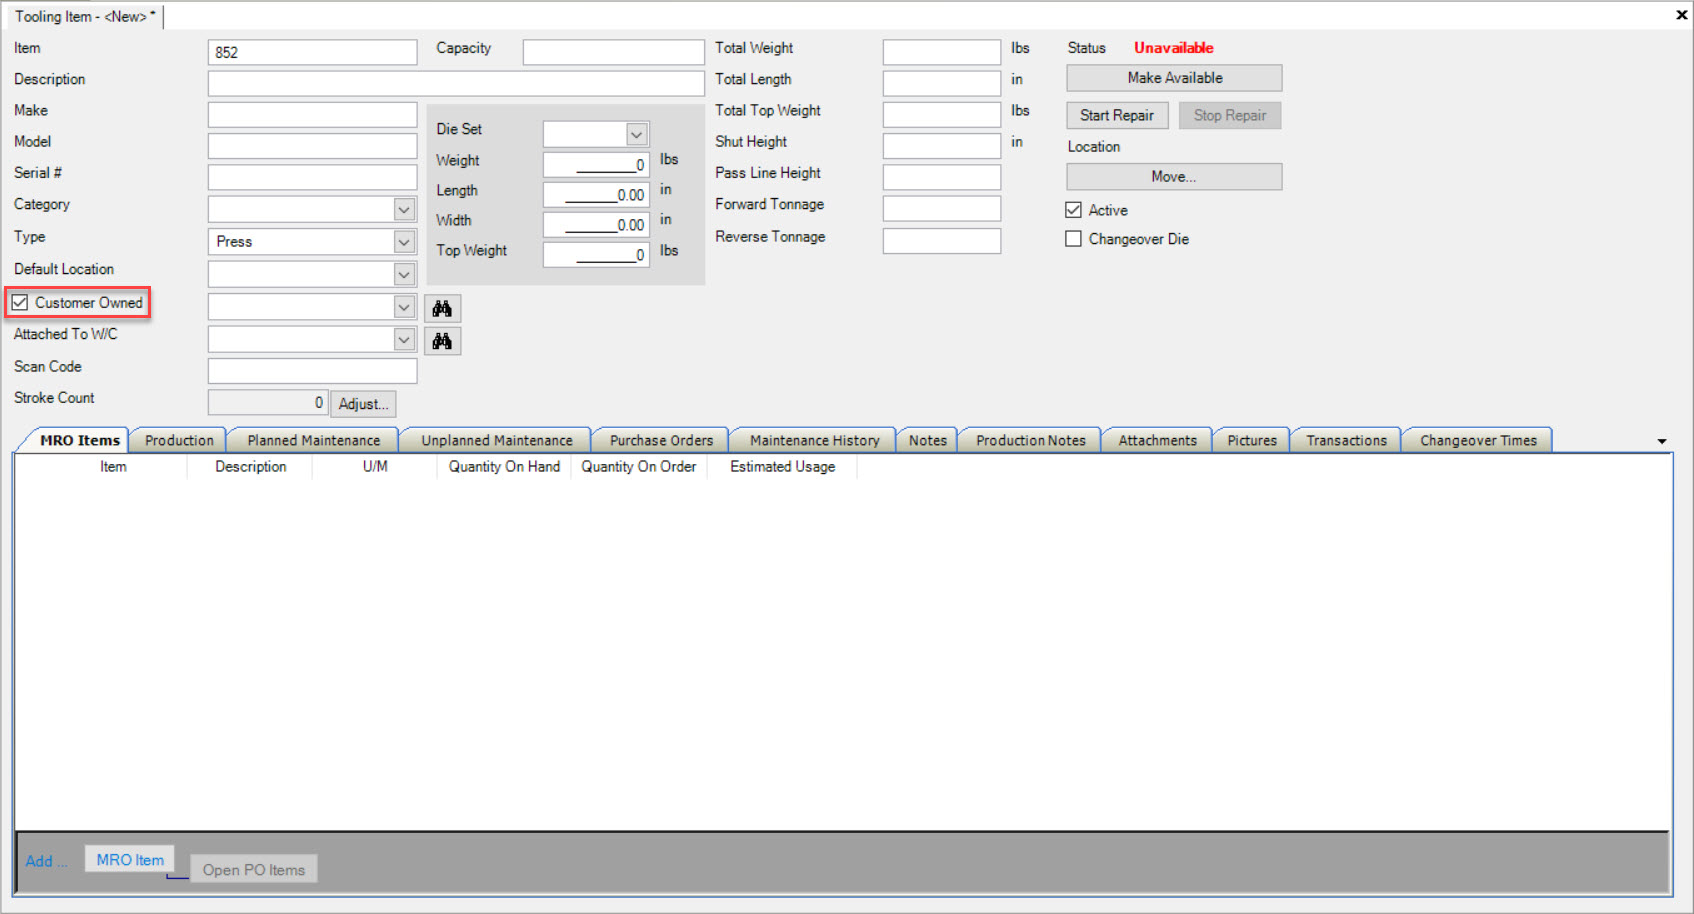
Users can then use the drop-down menu or click on the  button to find the Customer you wish to add.
If users choose to click on the  button to find a Customer to add, the Find Customer lookup window will appear.
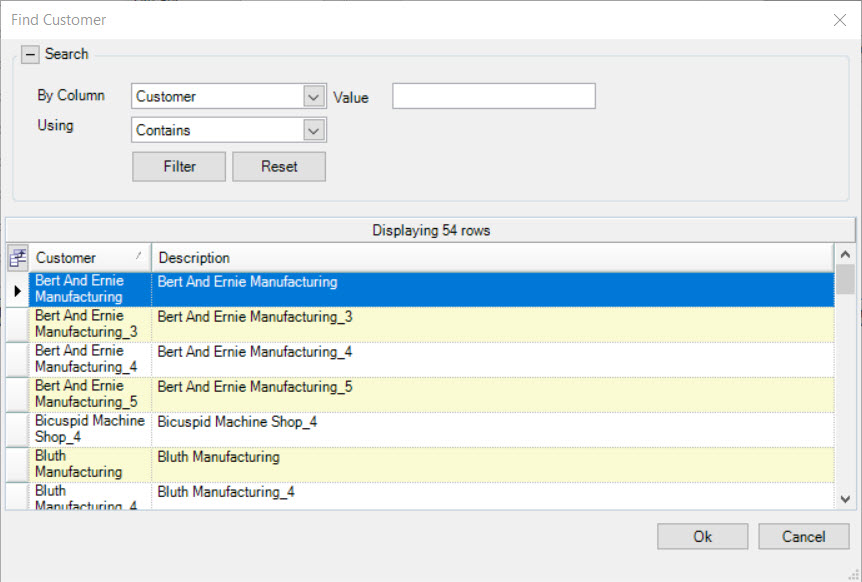
Locate the Customer you wish to add and highlight the appropriate row. Then, click on the  button.
The selected Customer will be added to the Tooling Item.
If users wish to permanently attach a Tooling Item to a Workcenter, use the drop-down menu to select the appropriate Workcenter, or click on the  button.
If users choose to click on the  button to find a Workcenter, the Find Workcenter lookup window will appear.
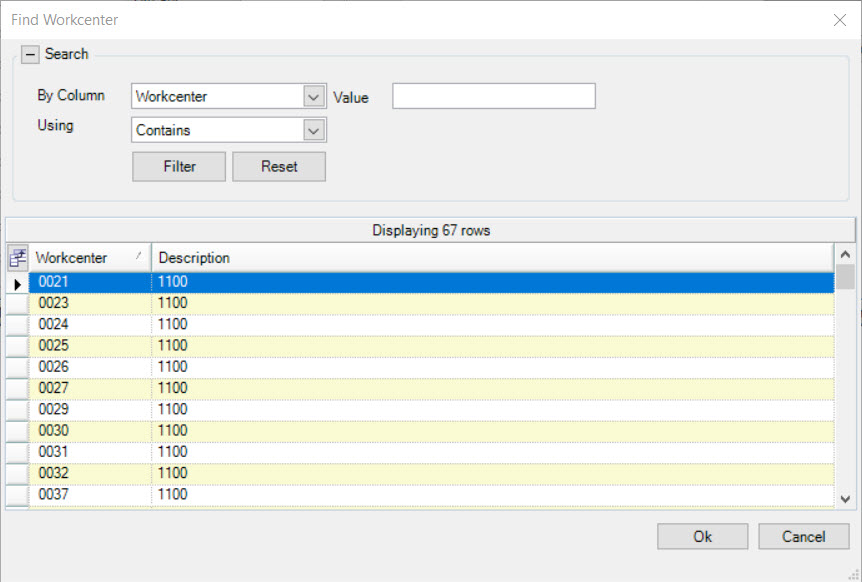
Locate the Workcenter you wish to add and highlight the appropriate row. Then, click on the  button.
The selected Workcenter will be added to the Tooling Item.
Once all necessary header information has been completed, make sure to save your changes before exiting the screen.
MRO Items Tab
MRO Items can be added to a Tooling Item to manage MRO Item inventory and enable users to view MRO Items associated with a Tooling Item when completing a Tooling Timecard for a particular Tooling Item.
To view MRO Items on a Tooling Item, navigate to the  tab and click on the
 ![]() icon.
The Tooling Items lookup screen will be displayed.
icon.
The Tooling Items lookup screen will be displayed.

Locate and double-click on the appropriate row to open a Tooling Item. The Tooling Item detail screen will be displayed.

Make sure to select the  tab.
tab.
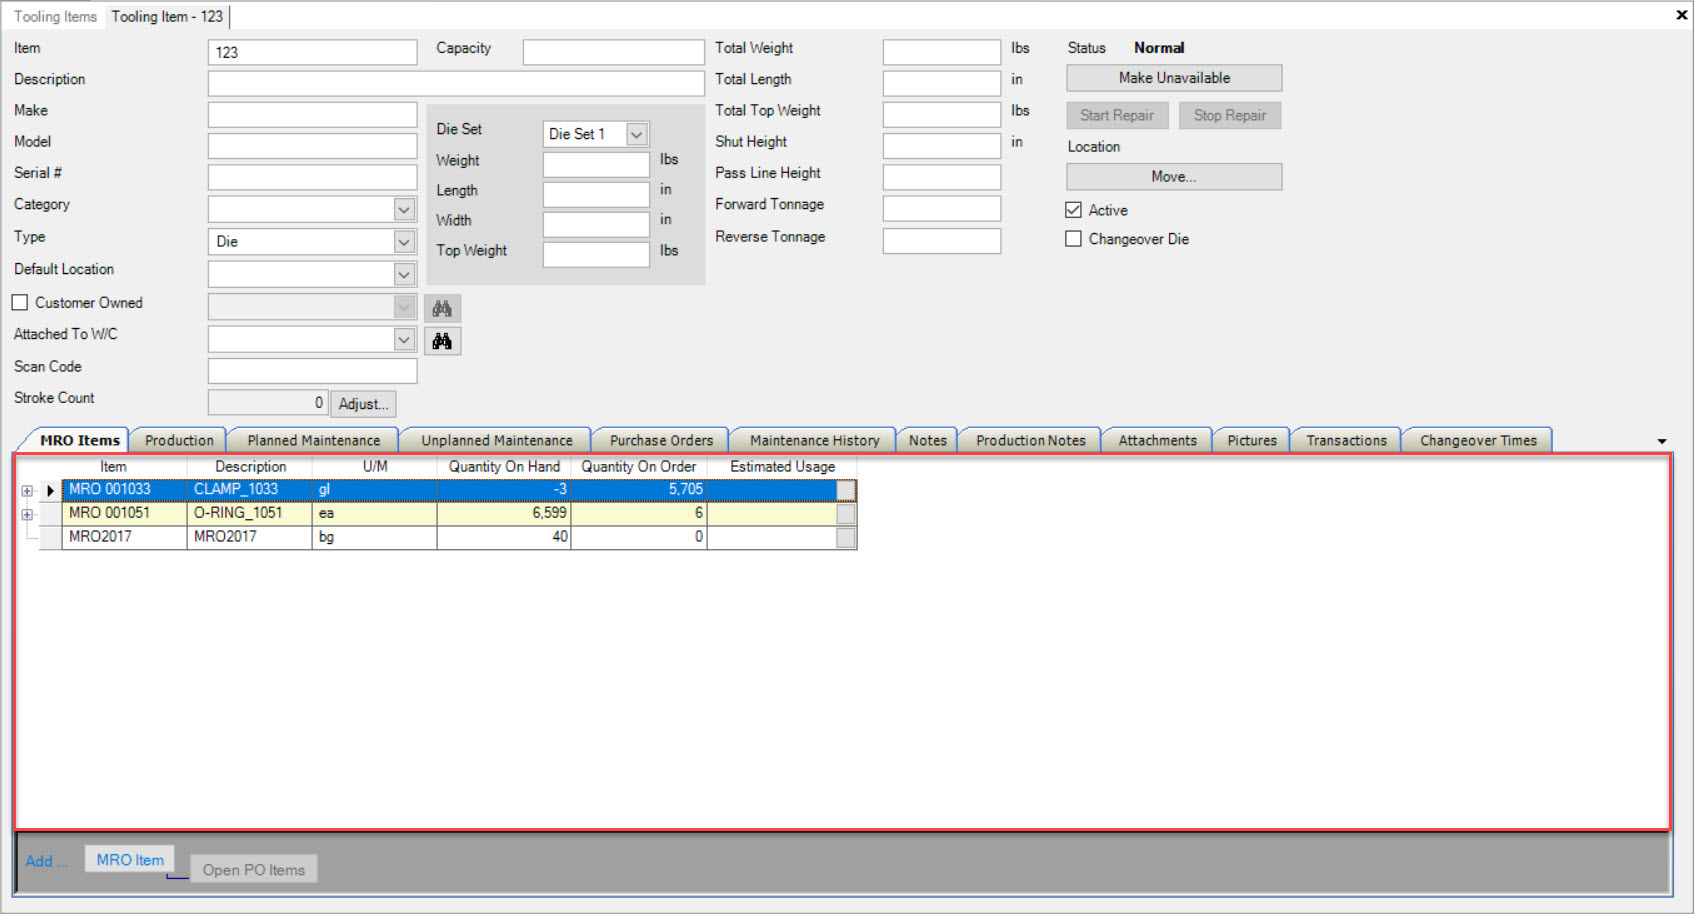
All MRO Items for the selected Tooling Item will be displayed.
Adding an MRO Item
To add an MRO Item to a Tooling Item, make sure to select the  tab.
tab.
Then, click on the  button located at the bottom of the screen.
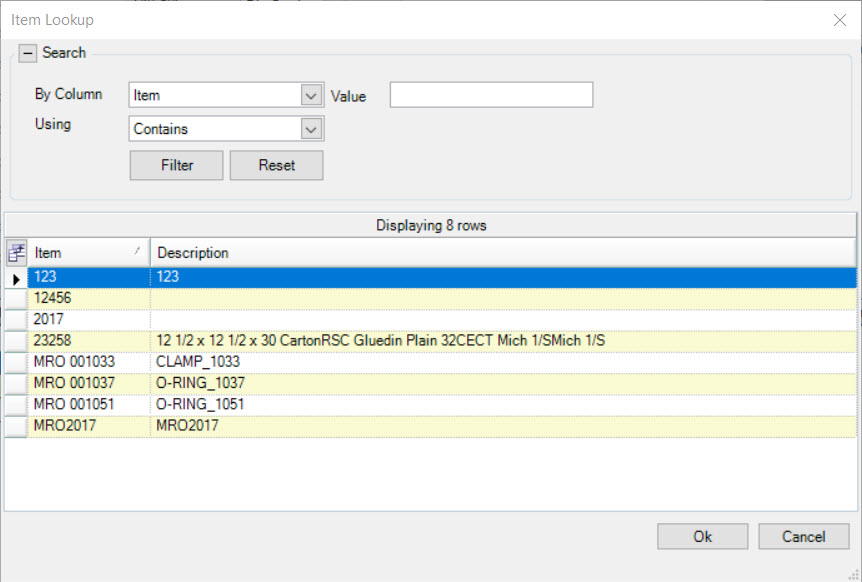
The Item Lookup window will appear where users can select an MRO Item to add. Then, click on the  button.
Note
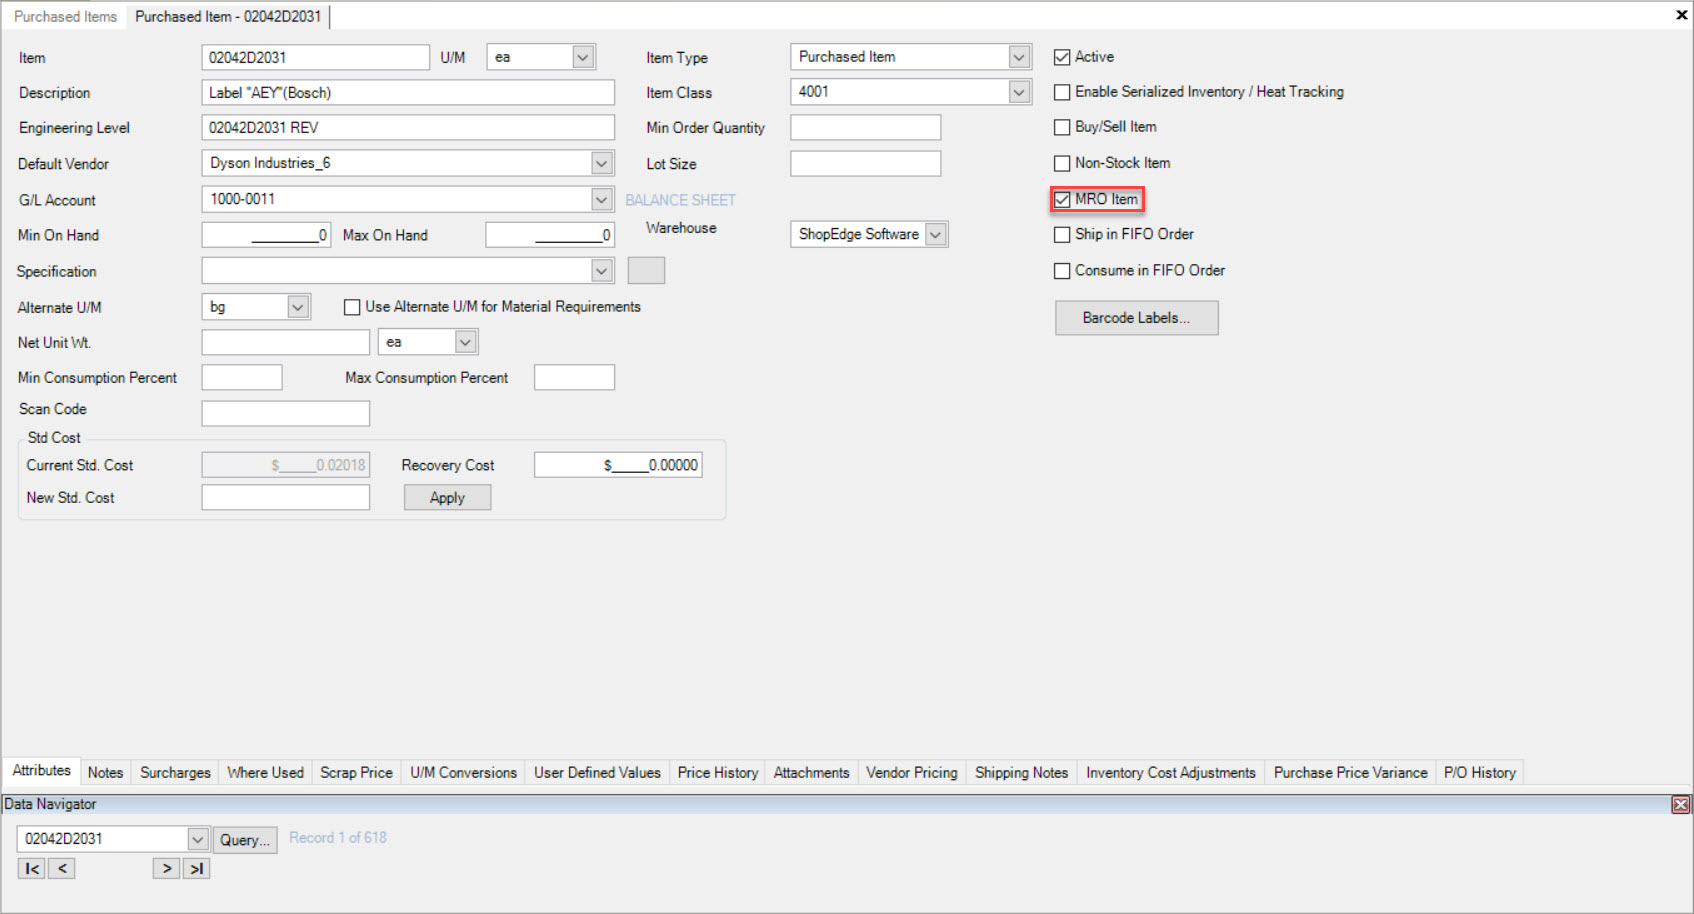
In order for an MRO Item to be visible on the Item Lookup, the MRO Item checkbox must be selected on the Purchase Item detail screen.
The selected MRO Item will be added to the Tooling Item.
Note
If the MRO Item you have added to the Tooling Item has a plus sign located beside the row, that means the MRO Item is on a current P/O. If you wish to view the P/O and Open Quantity simply click on the plus sign to expand the view.
Users can also set an Estimated Usage by clicking on the grey box under the Estimated Usage column. The Estimated Usage window will appear.
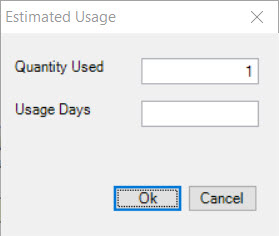
Enter in a Quantity Used and Usage Days and then, click on the  button.
The Estimated Usage will be added to the MRO Item.
Note
Users are able to add as many MRO Items as needed for a Tooling Item.
Make sure to save your changes before exiting the screen.
Editing the Estimated Usage of an MRO Item
To edit the Estimated Usage of an **MRO Item on a Tooling Item, make sure to select the  tab.
tab.
Locate the MRO Item you wish to edit the Estimated Usage for and click on the grey box under the Estimated Usage column. The Estimated Usage window will appear.

Make the necessary changes using the available textboxes and then, click on the  button.
Make sure to save your changes before exiting the screen.
Deleting an MRO Item
To delete an MRO Item from a Tooling Item, make sure to select the  tab.
tab.
Locate the MRO Item you wish to delete and highlight the appropriate row. Use your Delete key and when the system prompts you, select OK.
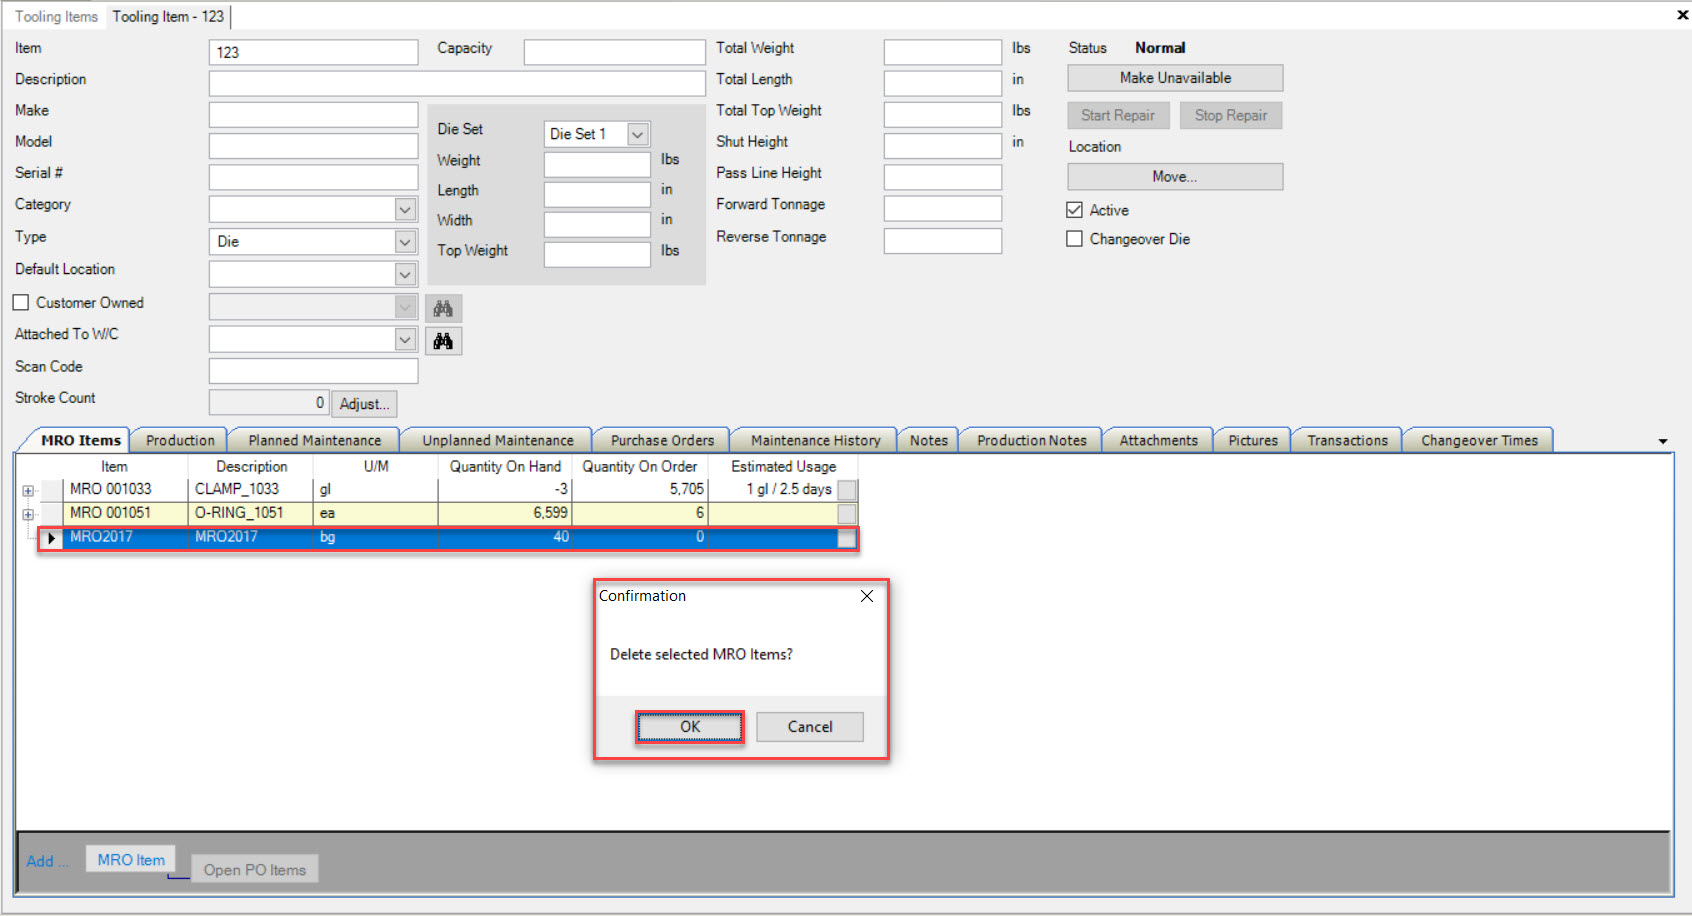
The selected MRO Item will be deleted.
Make sure to save your changes before exiting the screen.
Production Tab
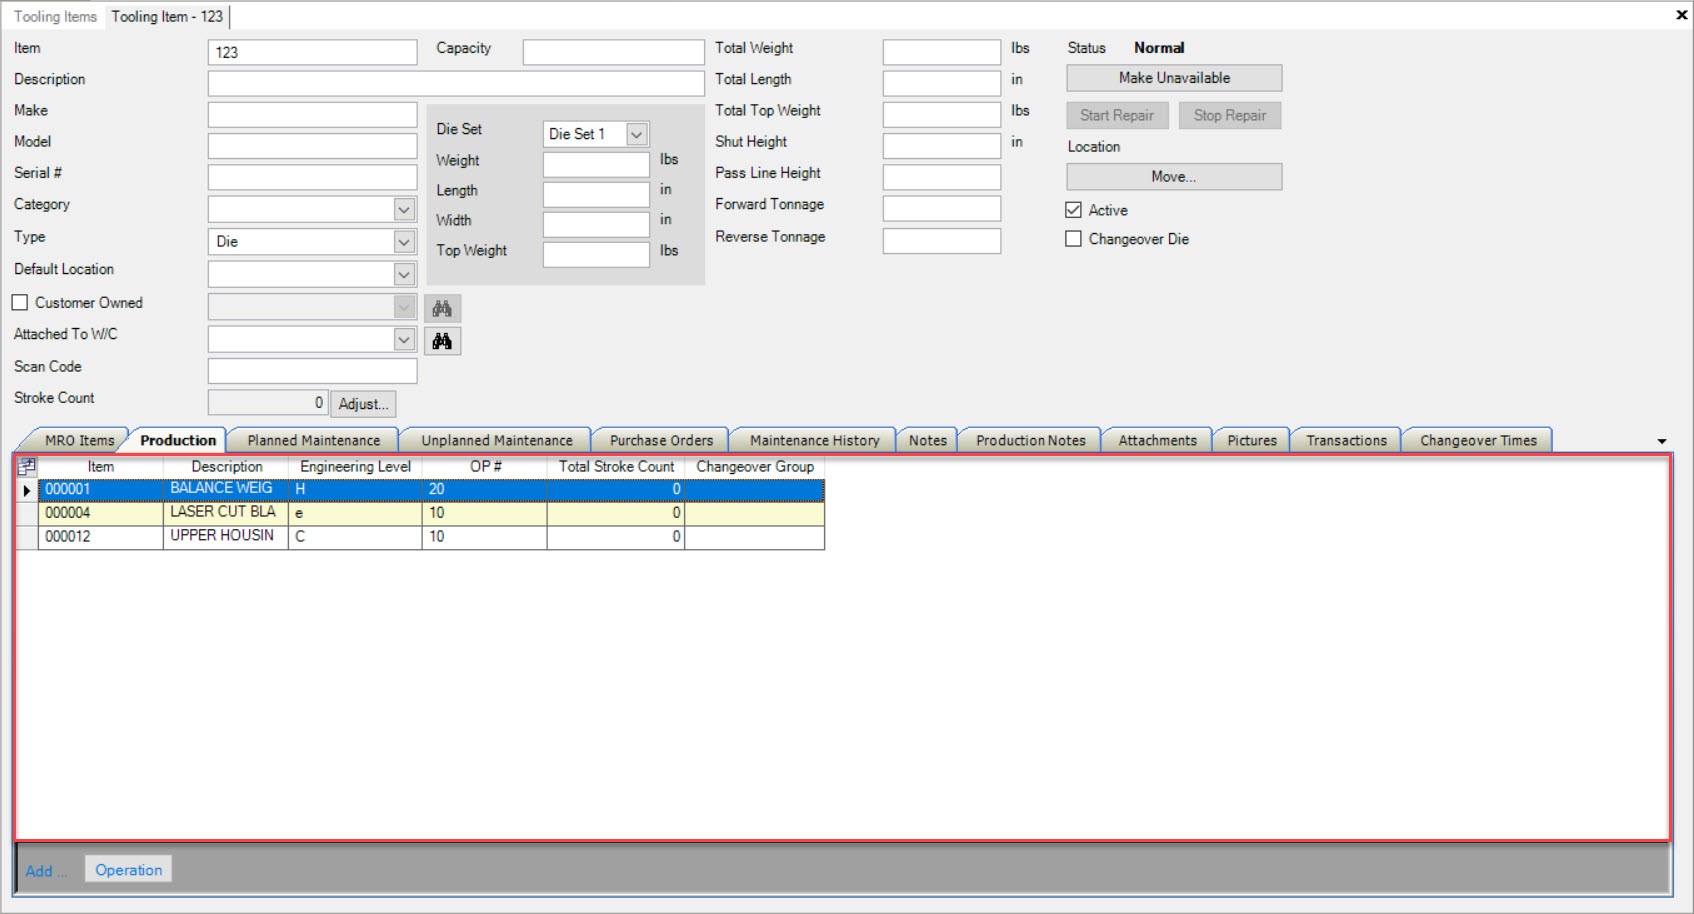
The Production tab shows users which Item Operations are associated with a Tooling Item.
To view Item Operations, navigate to the  tab and click on the
 ![]() icon.
The Tooling Items lookup screen will be displayed.
icon.
The Tooling Items lookup screen will be displayed.

Adding an Operation to a Tooling item associates the Tooling Item with that part that is manufactured. This link provides visibility into production by showing Tooling availability for a scheduled Job, and also for recording piece counts against a Tooling Item when the Production Item is entered on a Tooling Timecard.
Locate and double-click on the appropriate row to open a Tooling Item. The Tooling Item detail screen will be displayed.

Make sure to select the  tab.
tab.
All of the Item Operations associated with the Tooling Item will be displayed.
Adding an Operation
To add an Operation to a Tooling Item, make sure to select the  tab.
tab.
Then, click on the  button located at the bottom of the screen.
The Item Lookup window will appear where users can select an Item by Operation. Then, click on the  button.
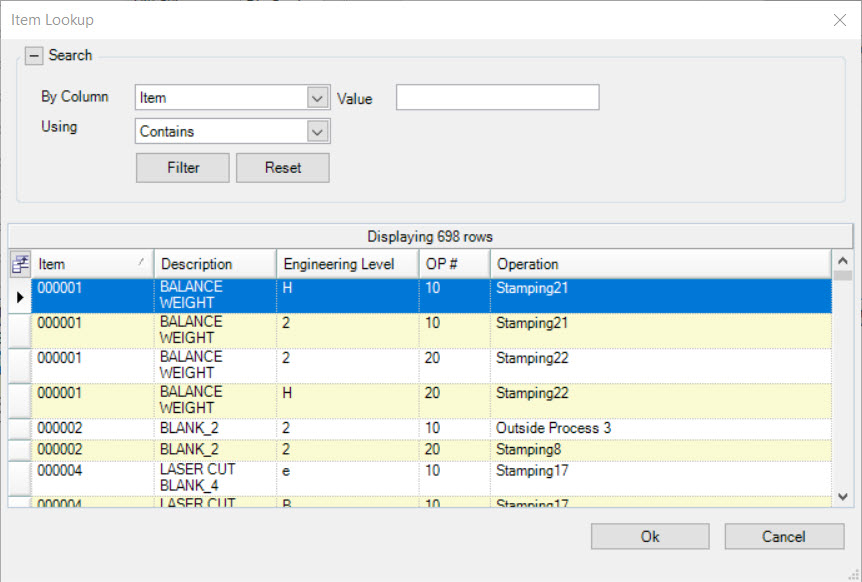
The selected Operation will be added to the Tooling Item.
Note
Once an Operation has been added to a Tooling Item, users are able to double-click on the Operation row and the system will open the Manufacture Routing detail screen.
Note
Users are able to add as many Operations as needed for a Tooling Item.
Once the Operation has been added to the Tooling Item, users are able to enter in a Changeover Group using the available textbox under the Changeover Group column, and add Changeover Hours for each Operation.
Make sure to save your changes before exiting the screen.
Note
Users can also add a Tooling Item to an operation from the Manufacture Routing screen. To do so, please navigate to Production > Manufacture Routings > Adding a New Manufacture Routing > Adding Tooling Items.
Editing the Changeover Group of an Operation
To edit the Changeover Group of an Operation on a Tooling Item, make sure to select the  tab.
tab.
Locate the Operation you wish to edit the Changeover Group for and make the necessary changes using the textbox under the Changeover Group column.
Once the necessary changes have been made, make sure to save before exiting the screen.
Note
To make any changes to the Manufacture Routing, please see Production > Manufacture Routings > Adding a New Manufacture Routing.
Editing the Changeover Hours of an Operation
To edit the Changeover Hours of an Operation on a Tooling Item, make sure to select the  tab.
tab.
Locate the Operation you wish to edit the Changeover Hours for and make the necessary changes using the textbox under the Changeover Hours column.
Once the necessary changes have been made, make sure to save before exiting the screen.
Note
To make any changes to the Manufacture Routing, please see Production > Manufacture Routings > Adding a New Manufacture Routing.
Deleting an Operation
To delete an Operation from a Tooling Item, make sure to select the  tab.
tab.
Locate the Operation you wish to delete and highlight the appropriate row. Use your Delete key and when the system prompts you, select Yes.
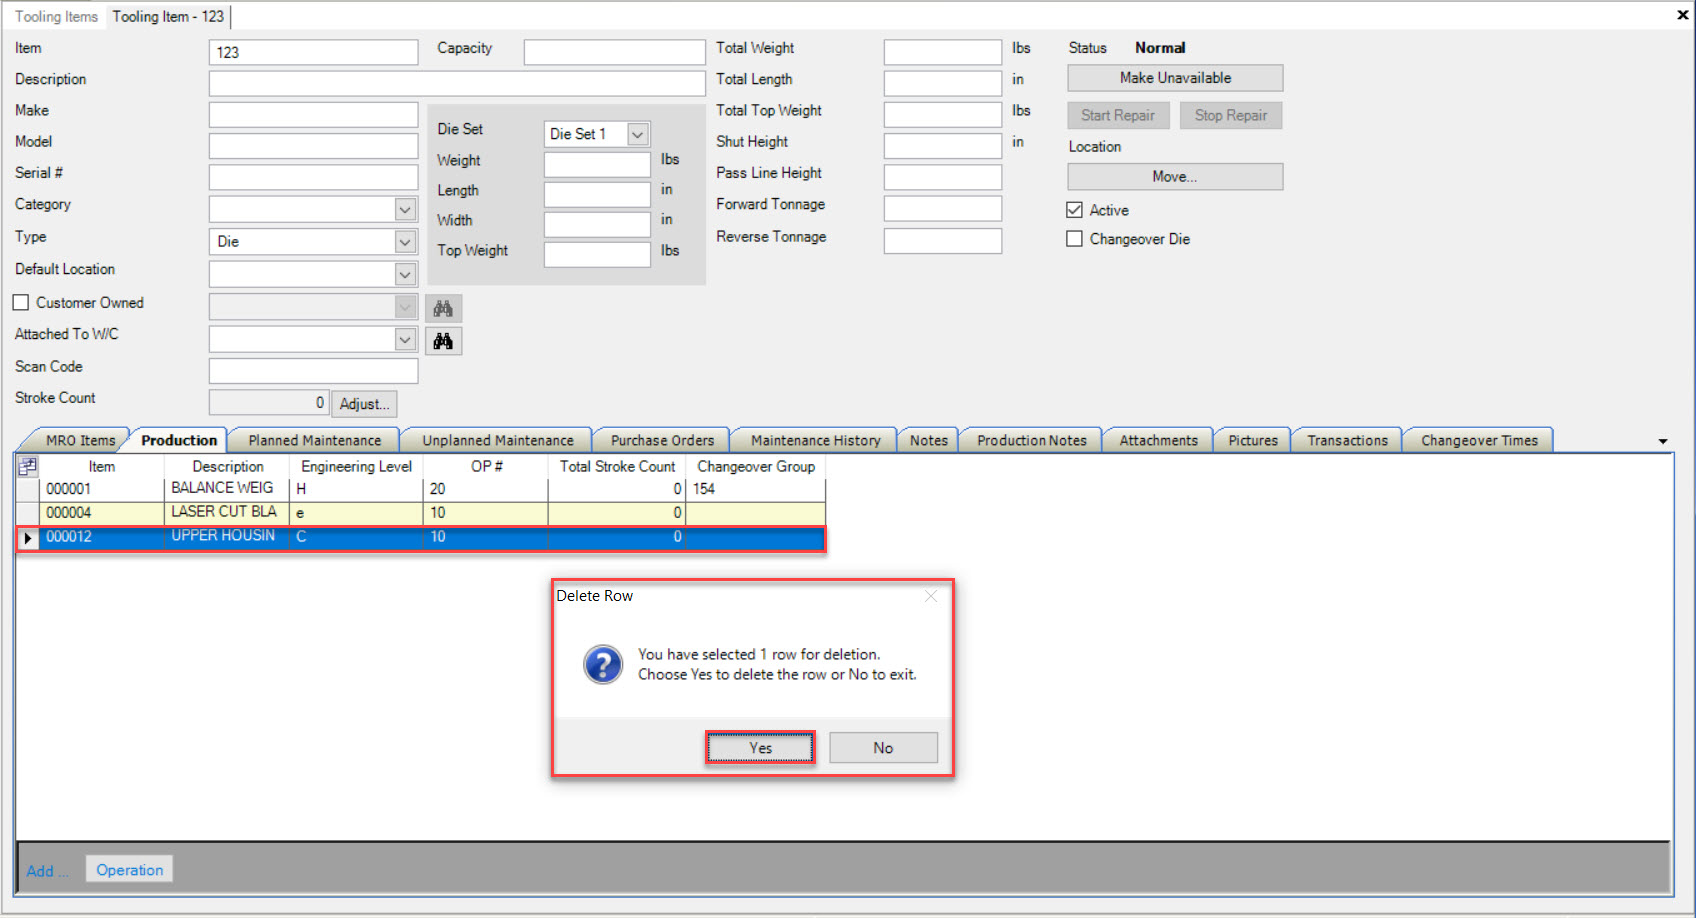
The selected Operation will be deleted.
Make sure to save your changes before exiting the screen.
Planned Maintenance Tab
Planned Maintenance allows users to create maintenance programs for Tooling Items such as one-time maintenance or recurring maintenance based on a schedule. The system will create Work Orders to help track time, explanations, and MRO Items associated with a Work Order and Planned Maintenance.
To view Planned Maintenance for a Tooling Item, navigate to the  tab and click on the
 ![]() icon.
The Tooling Items lookup screen will be displayed.
icon.
The Tooling Items lookup screen will be displayed.

Locate and double-click on the appropriate row to open a Tooling Item. The Tooling Item detail screen will be displayed.

Make sure to select the  tab.
tab.
All of the Planned Maintenance for the Tooling Item will be displayed.
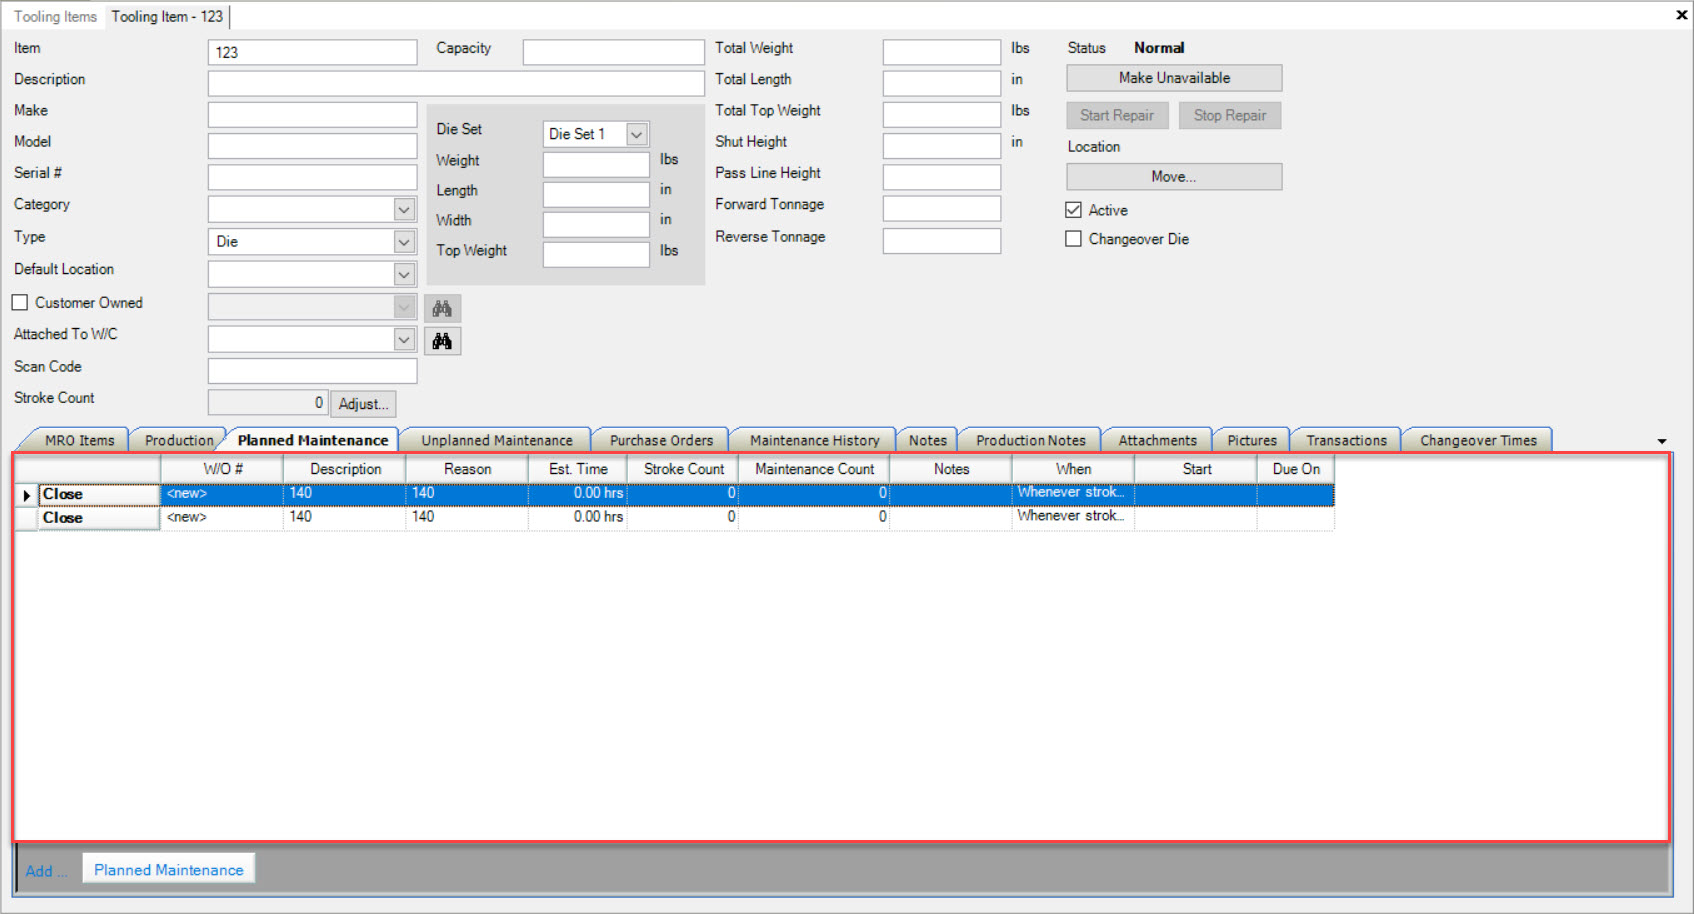
Adding Planned Maintenance
To add Planned Maintenance to a Tooling Item, make sure to select the  tab.
tab.
Then, click on the  button located at the bottom of the screen.
The Planned Maintenance window will appear.
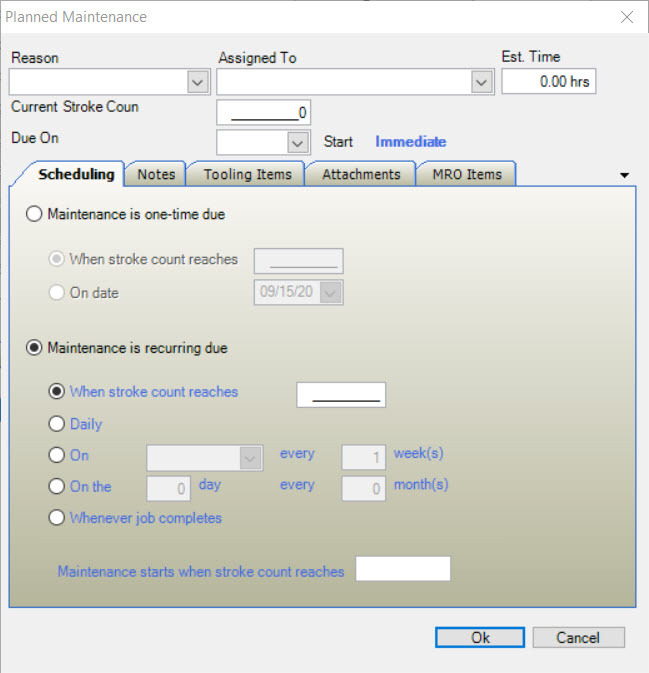
Users must select a Reason. All other header information is optional but the more fields users complete, the better it is for tracking the Work Order through the system. Any information not completed at the time of creating the Planned Maintenance can be added at a later time.
Note
The Reasons displayed in the drop-down are filtered on the Tooling Item Type entered for the Planned Maintenance Reasons in Tooling Admin. For more detailed information see Tooling Admin.
Note
Based on Admin settings, only certain Employees, or all Employees in a department will be able to have Tooling Maintenance Requests assigned to them. To view these settings, navigate to the  tab and select either the
 ![]() icon, or the
icon, or the ![]() icon to select the necessary settings.
icon to select the necessary settings.
Planned Maintenance Scheduling Tab
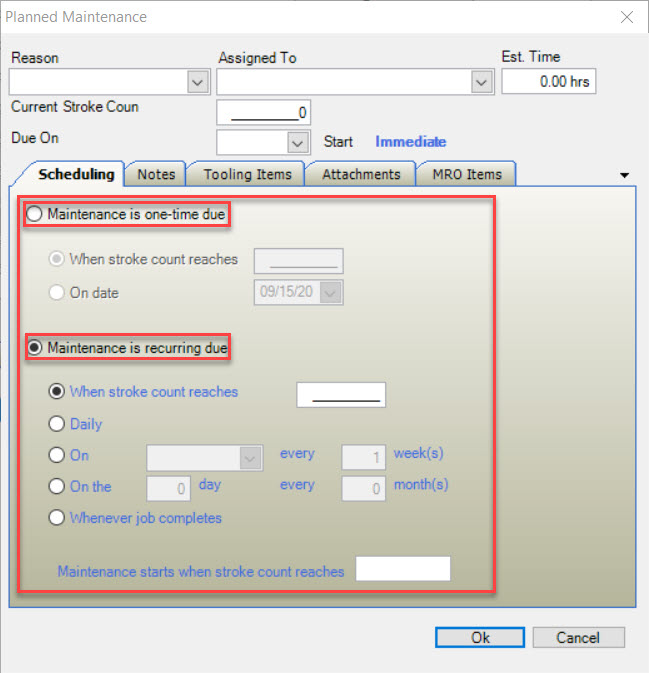
When creating Planned Maintenance, users can use the  tab to select Maintenance as one-time due, meaning the Planned Maintenance only occurs once
and there will be one Work Order created in the system; or Maintenance as recurring due, meaning the Planned Maintenance can occur more than once and once a Work Order
is complete, another one will be created in the system based on the Planned Maintenance schedule.
Planned Maintenance Notes Tab
Users can add Notes to a Planned Maintenance by selecting the  tab on the Planned Maintenance window.
Simply enter in any necessary notes by using the available textbox.
Note
To edit or delete Notes on a Planned Maintenance, simply use the available textbox to make the necessary changes.
Planned Maintenance Tooling Items Tab
Users have the ability to add or remove multiple Tooling Items to Planned Maintenance.
To do so, select the  tab from the Planned Maintenance window.
Then, select the Tooling Items you wish to add to the Planned Maintenance by highlighting the appropriate row(s) under the Available Tooling Items table. Then, click on
the  arrow to move the Tooling Items to the Selected Tooling Items table. Users can select more than one Tooling Item at a time
by holding down the Ctrl key and highlighting the appropriate Items they wish to add. Then, click on the
  arrow. Users can
also double-click on a Tooling Item to add it to the Selected Tooling Items table.
The selected Tooling Items will appear on the right-side of the window.
To remove Tooling Items from Planned Maintenance, simply select the Tooling Items from the right-side of the window and click on the  arrow.
The selected Tooling Items will be removed from the Planned Maintenance.
Users can also add all Tooling Items by clicking on the  button, and can remove all Tooling Items by clicking on the
  button.
Planned Maintenance Attachments Tab
Users can add Attachments to a Planned Maintenance by clicking on the  tab on the Planned Maintenance window. Attachments
will be part of the Work Order created so users viewing and/or completing the Work Order can view them.
Then, click on the  button located at the bottom of the window.
Users will then be able to select an Attachment from their computer. Once an Attachment has been selected, click on the  button.
The selected Attachment will be added to the Planned Maintenance.
To delete an Attachment from a Planned Maintenance, simply highlight the appropriate row and use your Delete key.
The selected Attachment will be deleted.
Planned Maintenance MRO Items Tab
Users also have the ability to add MRO Items to a Planned Maintenance. To do so, select the  tab on the Planned Maintenance window.
MRO Items added to Planned Maintenance will show on the Work Order and also on a Tooling Timecard when users are completing a Tooling Timecard against the Planned
Maintenance Work Order. Users will be able to enter in a consumed Quantity to record it against the Work Order, and also create an Inventory Transaction for the MRO Item.
Then, click on the  button located at the bottom of the window.
The Item Lookup window will appear where users can select an MRO Item and then click on the  button. Only Items flagged as MRO
Items on the Purchased Item screen will appear in the Item Lookup window. Once selected, users can enter in a Quantity that should be consumed as part of the
Planned Maintenance Work Order.
The selected MRO Item will be added to the Planned Maintenance.
To delete an MRO Item from a Planned Maintenance, simply highlight the appropriate row and use your Delete key.
The selected MRO Item will be deleted.
Once all the necessary header information and tabs have been completed, click on the  button.
The Planned Maintenance will be added to the Tooling Item and a Work Order will be created.
Make sure to save before exiting the screen.
Editing Planned Maintenance
To edit Planned Maintenance, navigate to the  tab and click on the
 ![]() icon.
The Tooling Items lookup screen will be displayed.
icon.
The Tooling Items lookup screen will be displayed.

Locate and double-click on the appropriate row to open the Tooling Item you wish to edit Planned Maintenance for. The Tooling Item detail screen will be displayed.

Make sure to select the  tab.
tab.
Locate and double-click on the Planned Maintenance you wish to edit. The Planned Maintenance window will appear. Make the necessary changes and click on the  button.
Make sure to save before exiting the screen.
Closing Planned Maintenance
Closing Planned Maintenance will close the Work Order without recording a Tooling Timecard against it.
To close Planned Maintenance, make sure to select the  tab.
tab.
Locate the Planned Maintenance you wish to close and select the  button.
The Close Work Order window will appear.
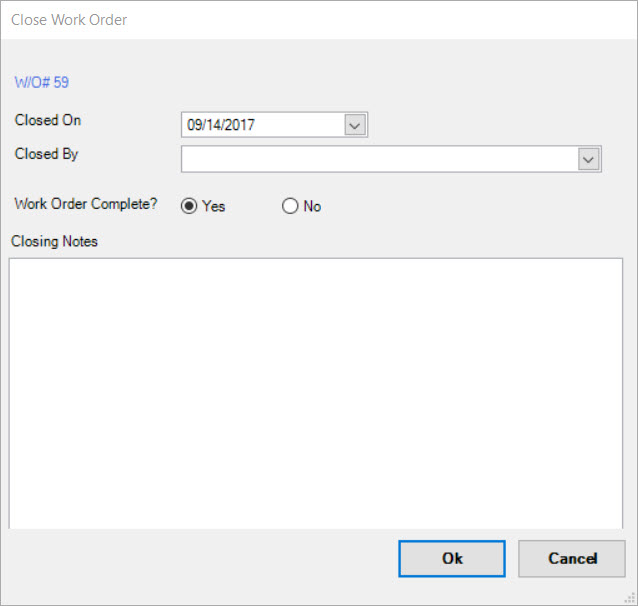
Users must select a Closed On, Closed By, select whether or not the Work Order is complete, and enter in Closing Notes. Then, click on the  button.
The selected Planned Maintenance will be removed from the Planned Maintenance tab.
Make sure to save your changes before exiting the screen.
Deleting Planned Maintenance
To delete Planned Maintenance from a Tooling Item, make sure to select the  tab.
tab.
Locate the Planned Maintenance you wish to delete and highlight the appropriate row. Use your Delete key and when the system prompts you, select Yes.
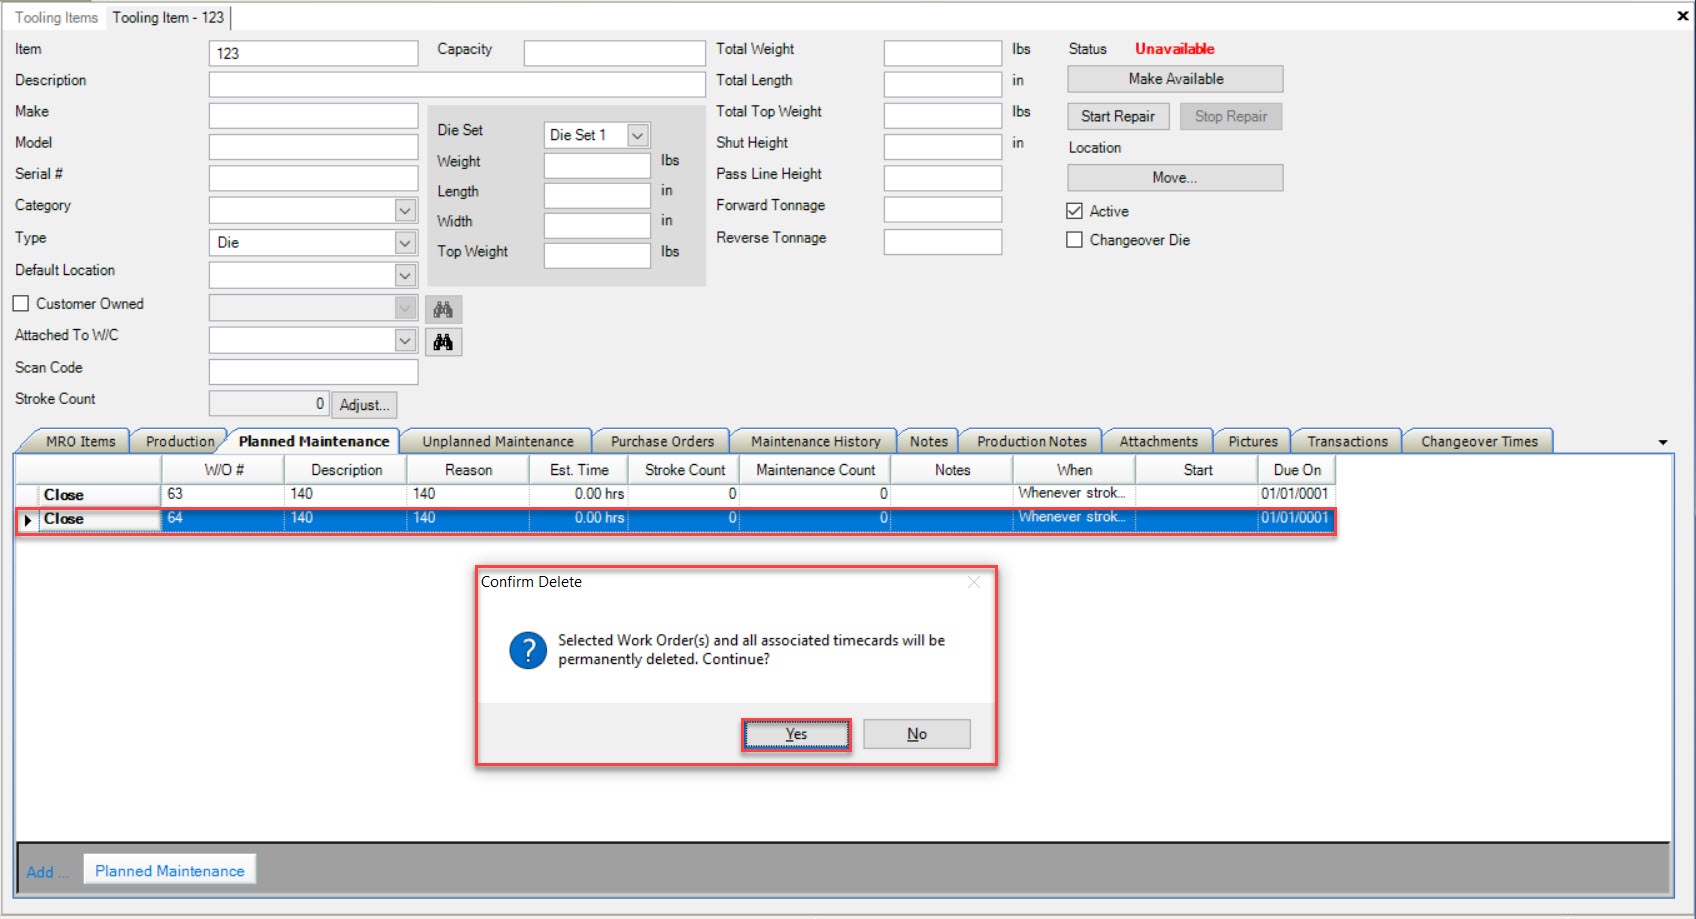
The selected Planned Maintenance will be deleted and all Work Orders and Timecards associated with it will be deleted as well.
Make sure to save your changes before exiting the screen.
Unplanned Maintenance Tab
Unplanned Maintenance are Work Orders created in the system that are not planned. Work Orders are created to track time and materials related to various Tooling Items.
To view Unplanned Maintenance for a Tooling Item, navigate to the  tab and click on the
 ![]() icon.
The Tooling Items lookup screen will be displayed.
icon.
The Tooling Items lookup screen will be displayed.

Locate and double-click on the appropriate row to open a Tooling Item. The Tooling Item detail screen will be displayed.

Make sure to select the  tab.
tab.
All of the Unplanned Maintenance for the Tooling Item will be displayed.
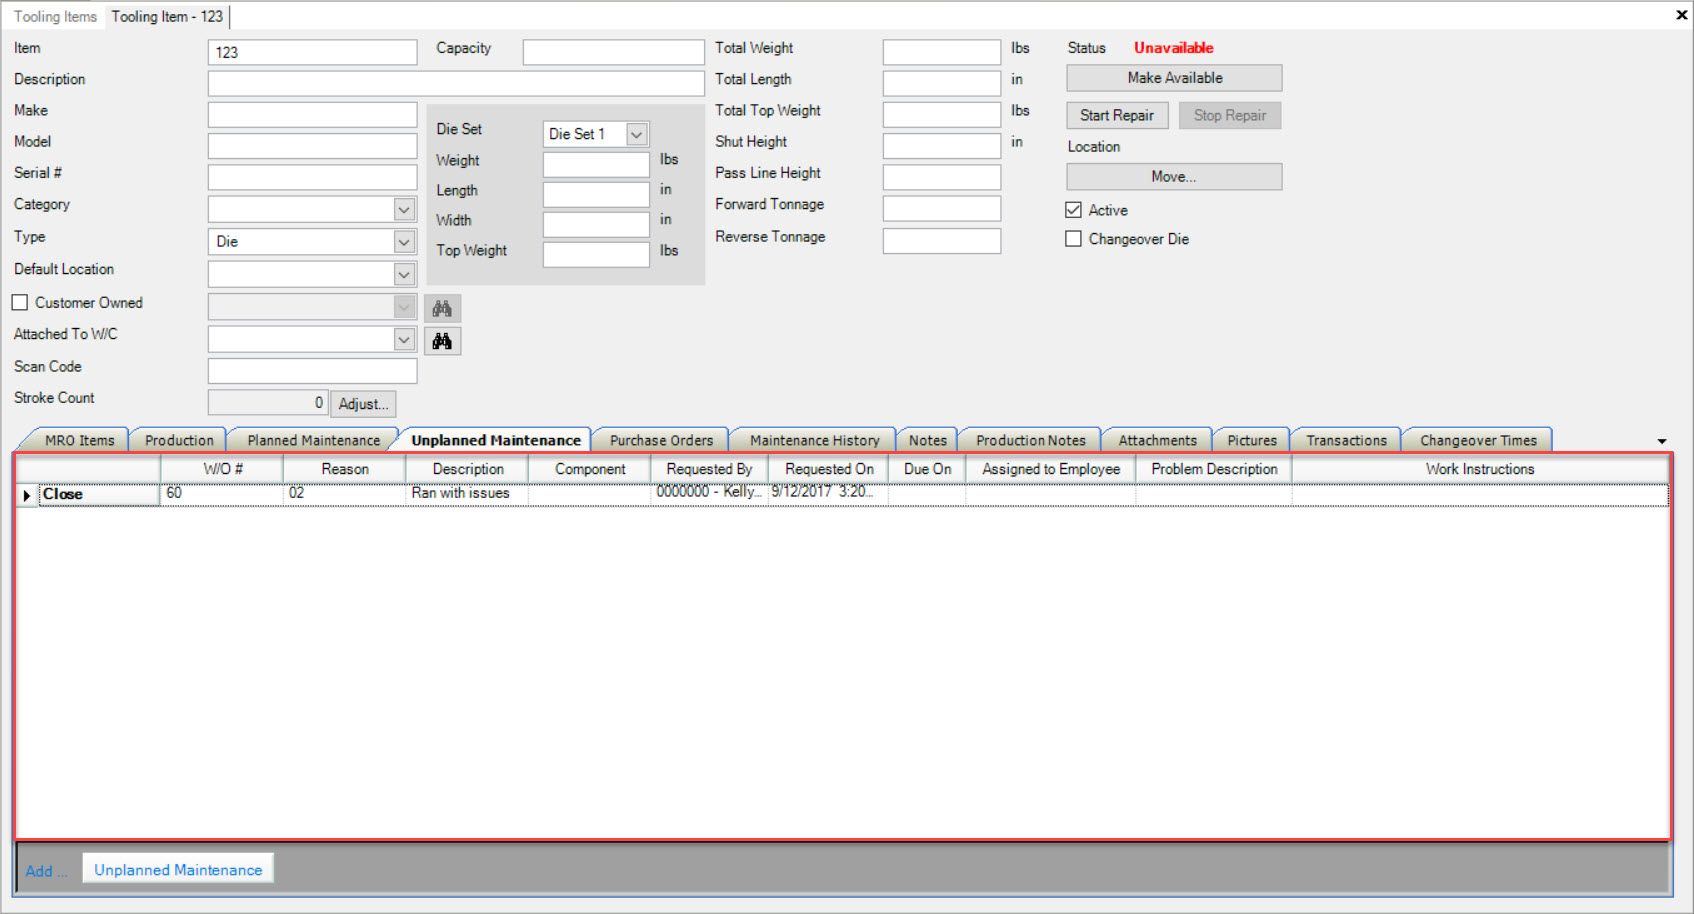
Adding Unplanned Maintenance
There are a few different ways to add Unplanned Maintenance to the system, but this section, will focus on adding Unplanned Maintenance on a Tooling Item.
To add Unplanned Maintenance to a Tooling Item, make sure to select the  tab.
tab.
Then, click on the  button located at the bottom of the screen.
The New Work Order window will be displayed.
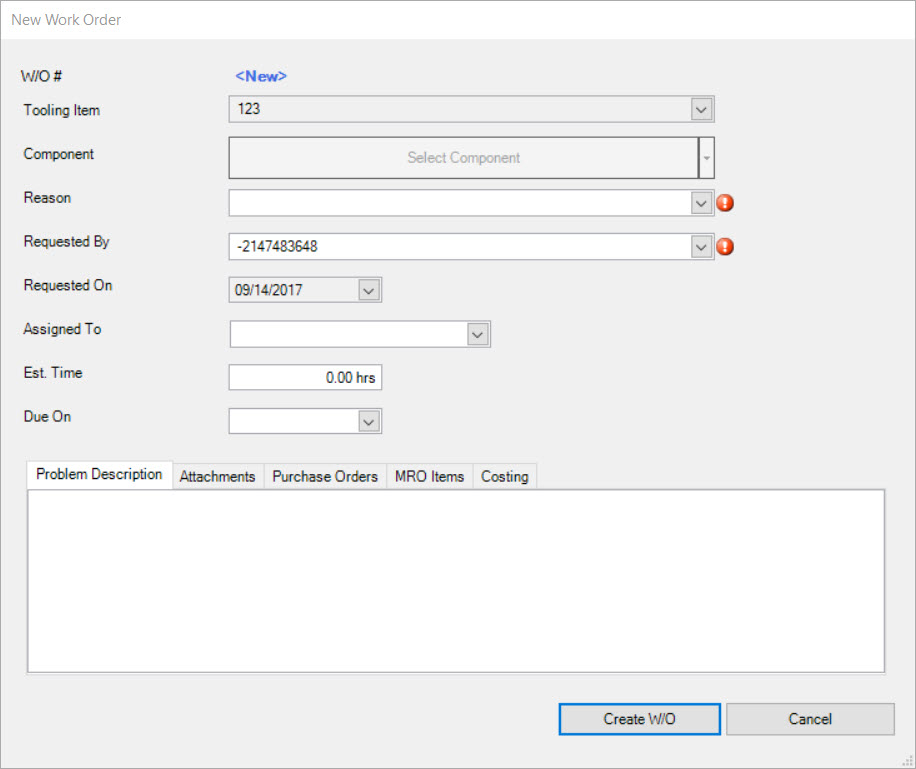
Users must select a Reason and Requested By using the available drop-down menus.
Users can then click on the  button to create the Unplanned Maintenance without completing any other fields.
The Unplanned Maintenance will be added to the Tooling Item.
Make sure to save your changes before exiting the screen.
Unplanned Maintenance Problem Description Tab
Users can enter in a Problem Description by selecting the  tab on the New Work Order window.
Enter in a Problem Description using the available textbox.
Note
Users can also edit and delete a Problem Description by making the necessary changes using the available textbox.
Unplanned Maintenance Attachments Tab
Users have the ability to add or remove Attachments to an Unplanned Maintenance on the New Work Order window.
Make sure to select the  tab.
tab.
To add an Attachment, click on the  button located at the bottom of the window.
Users are then able to select an Attachment from their computer. Once an Attachment has been selected, click on the  button.
The selected Attachment will be added to the Unplanned Maintenance Work Order.
To delete an Attachment from an Unplanned Maintenance, simply highlight the appropriate row and use your Delete key.
The selected Attachment will be deleted.
Unplanned Maintenance Purchase Orders Tab
Users have the ability to add or remove Purchase Orders on an Unplanned Maintenance from the New Work Order window.
Make sure to select the  tab.
tab.
To add a Purchase Order, click on the  button located at the bottom of the window.
The Purchase Order Lookup window will appear where users can select a Purchase Order and then click on the  button.
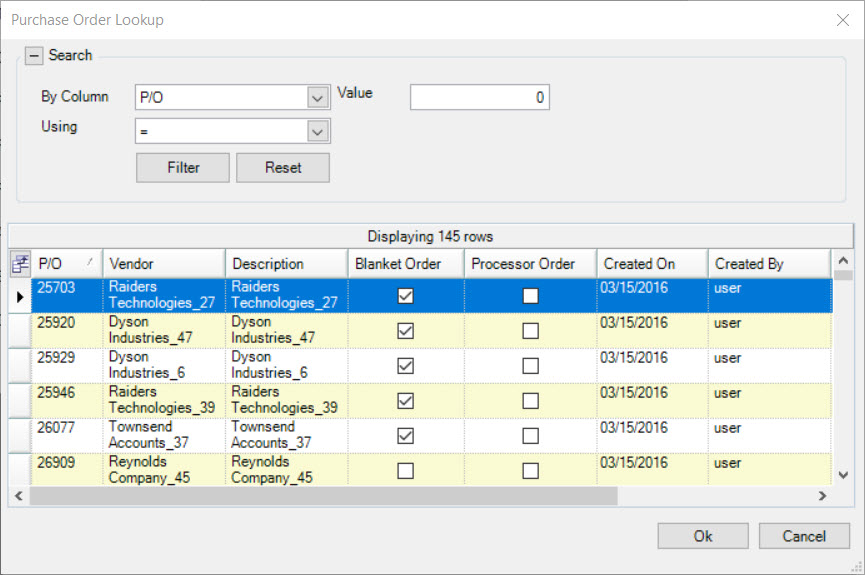
The selected Purchase Order will be added to the Unplanned Maintenance.
To remove a Purchase Order from an Unplanned Maintenance, simply highlight the appropriate row. Use your Delete key and when the system prompts you, select Yes.
The selected Purchase Order will be removed from the Unplanned Maintenance.
Unplanned Maintenance MRO Items Tab
Users have the ability to add or remove MRO Items on an Unplanned Maintenance from the New Work Order window.
Make sure to select the  tab.
tab.
To add an MRO Item, click on the  button located at the bottom of the window.
The Item Lookup window will appear where users can select an MRO Item and then click on the  button.
The selected MRO Item will be added to the Unplanned Maintenance.
To remove an MRO Item from an Unplanned Maintenance, simply highlight the appropriate row. Use your Delete key and when the system prompts you, select Yes.
The selected MRO Item will be removed from the Unplanned Maintenance.
Note
Only the Purchase Items that have been flagged as MRO Items will show in the Item Lookup table.
Unplanned Maintenance Costing Tab
Users have the ability to add an Item and Production Job # to an Unplanned Maintenance for Costing purposes if the Tooling Item is linked to more than one Item Operation under the Production tab.
To do so, make sure to select the  tab on the New Work Order window.
Select an Item using the available drop-down menu and enter in a Production Job #.
Once all necessary header information and tabs have been completed, click on the  button.
The Unplanned Maintenance will be added to the Tooling Item and a Work Order will be created.
Make sure to save before exiting the screen.
Editing Unplanned Maintenance
To edit Unplanned Maintenance, navigate to the  tab and click on the
 ![]() icon.
The Tooling Items lookup screen will be displayed.
icon.
The Tooling Items lookup screen will be displayed.

Locate and double-click on the appropriate row to open the Tooling Item you wish to edit Unplanned Maintenance for. The Tooling Item detail screen will be displayed.

Make sure to select the  tab.
tab.
Locate and double-click on the Unplanned Maintenance you wish to edit. The Work Order window will appear. Make the necessary changes and click on the  button.
Make sure to save before exiting the screen.
Closing Unplanned Maintenance
To close Unplanned Maintenance, make sure to select the  tab.
tab.
Locate the Unplanned Maintenance you wish to close and select the  button.
The Close Work Order window will appear.

Users must select a Closed By, select whether or not the Work Order is complete, and enter in Closing Notes. Then, click on the  button.
The selected Unplanned Maintenance will be removed from the Unplanned Maintenance tab on the Tooling Item.
Make sure to save your changes before exiting the screen.
Deleting Unplanned Maintenance
To delete Unplanned Maintenance, make sure to select the  tab.
tab.
Locate the Unplanned Maintenance you wish to delete and highlight the appropriate row. Use your Delete key and when the system prompts you, select Yes.
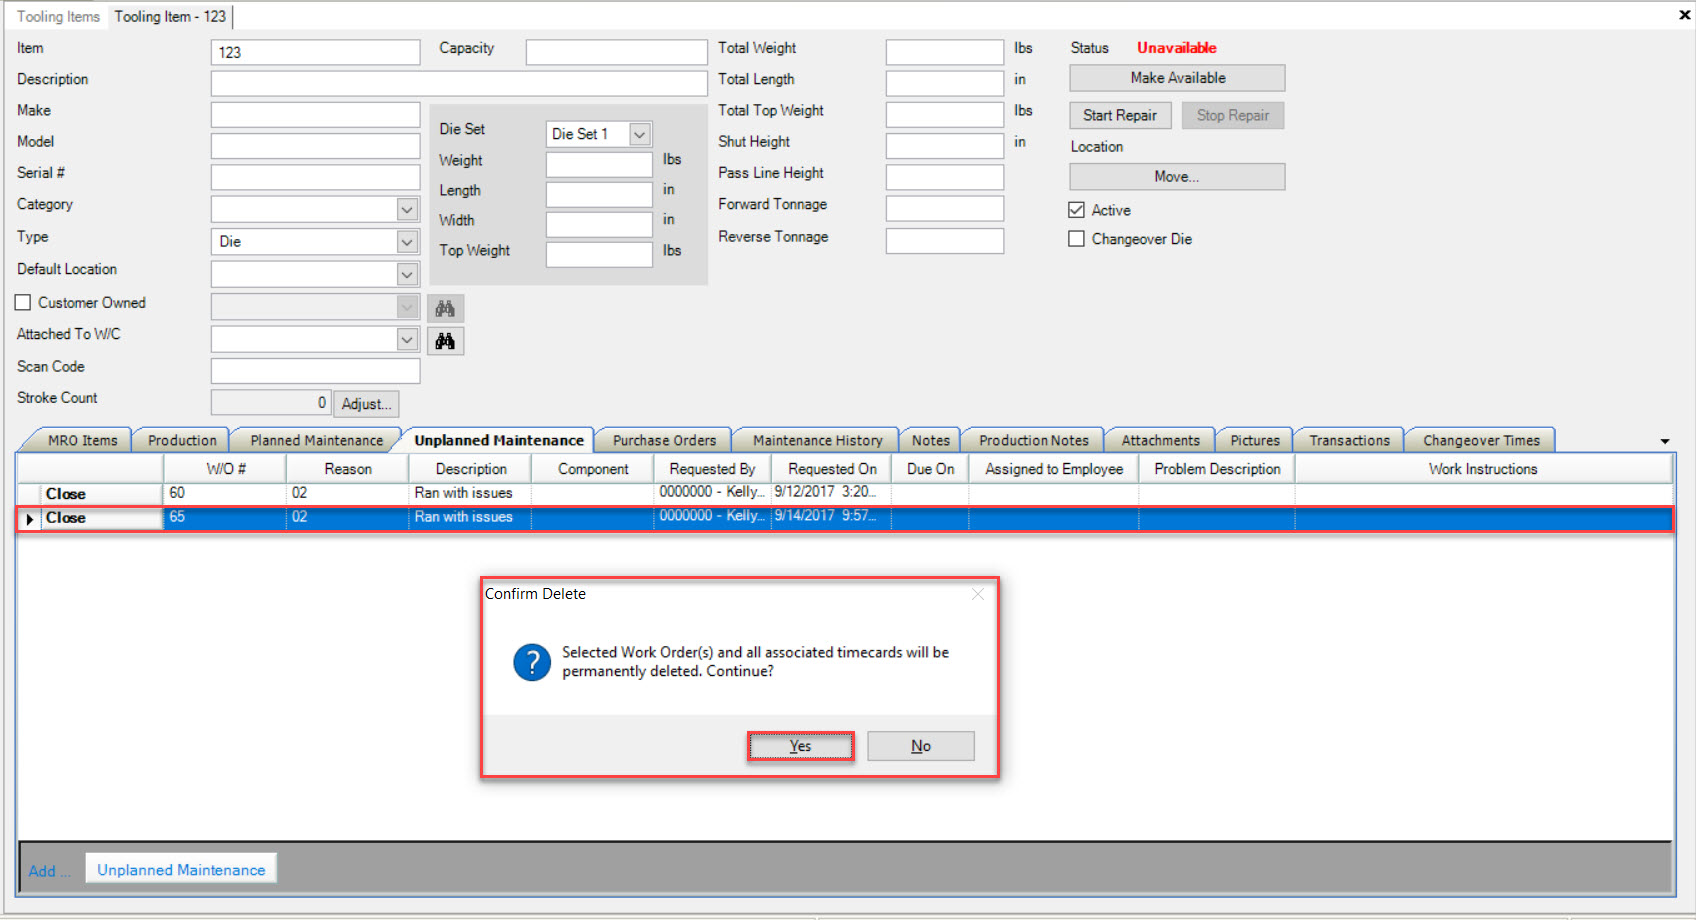
The selected Unplanned Maintenance will be deleted and all Work Orders and Timecards associated with it will be deleted as well.
Make sure to save your changes before exiting the screen.
Purchase Orders Tab
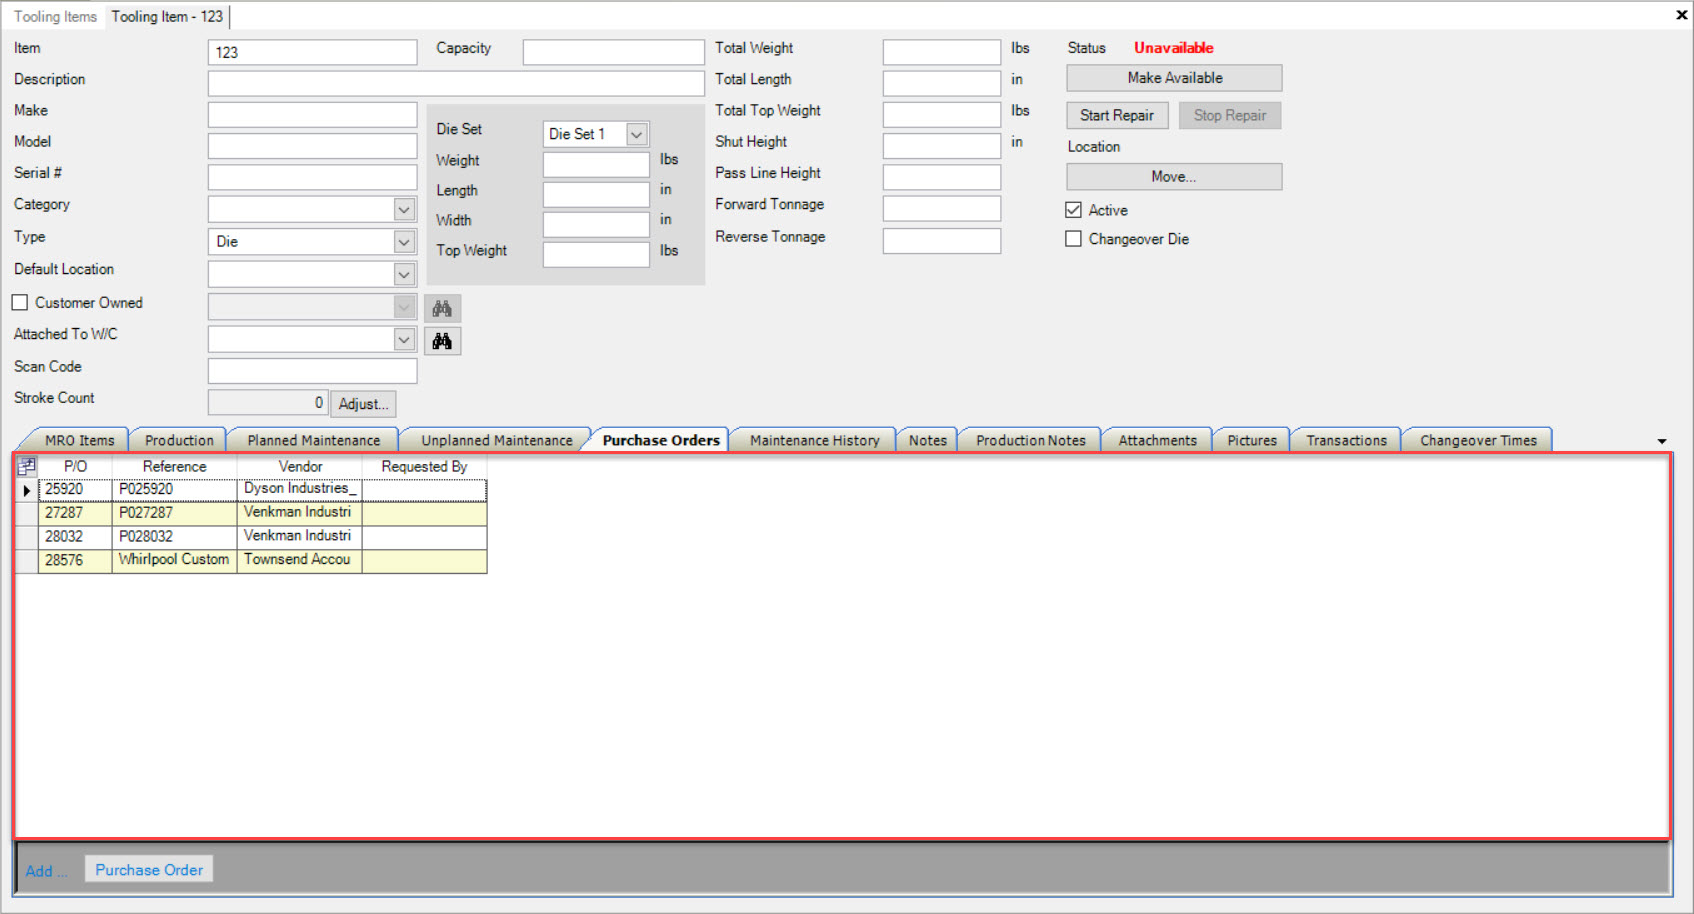
Users can link open Purchase Orders to Tooling Items. This will enable users to view the Purchase Order directly and double-click on it from the Tooling Item screen to view it.
To view Purchase Orders on a Tooling Item, navigate to the  tab and click on the
 ![]() icon.
The Tooling Items lookup screen will be displayed.
icon.
The Tooling Items lookup screen will be displayed.

Locate and double-click on the appropriate row to open a Tooling Item. The Tooling Item detail screen will be displayed.

Make sure to select the  tab.
tab.
All of the Purchase Orders associated with the Tooling Item will be displayed.
Adding a Purchase Order
To add a Purchase Order to a Tooling Item, make sure to select the  tab.
tab.
Then, click on the  button located at the bottom of the screen.
The Purchase Order Lookup window will appear where users can select a Purchase Order and then click on the  button.
The selected Purchase Order will be added to the Tooling Item.
Make sure to save your changes before exiting the screen.
Note
Users also have the ability to open a Purchase Order by double-clicking on the appropriate row. The Purchase Order detail screen will be displayed.
Deleting a Purchase Order
To delete a Purchase Order from a Tooling Item, make sure to select the  tab.
tab.
Locate the Purchase Order you wish to delete and highlight the appropriate row. Use your Delete key and when the system prompts you, select Yes.
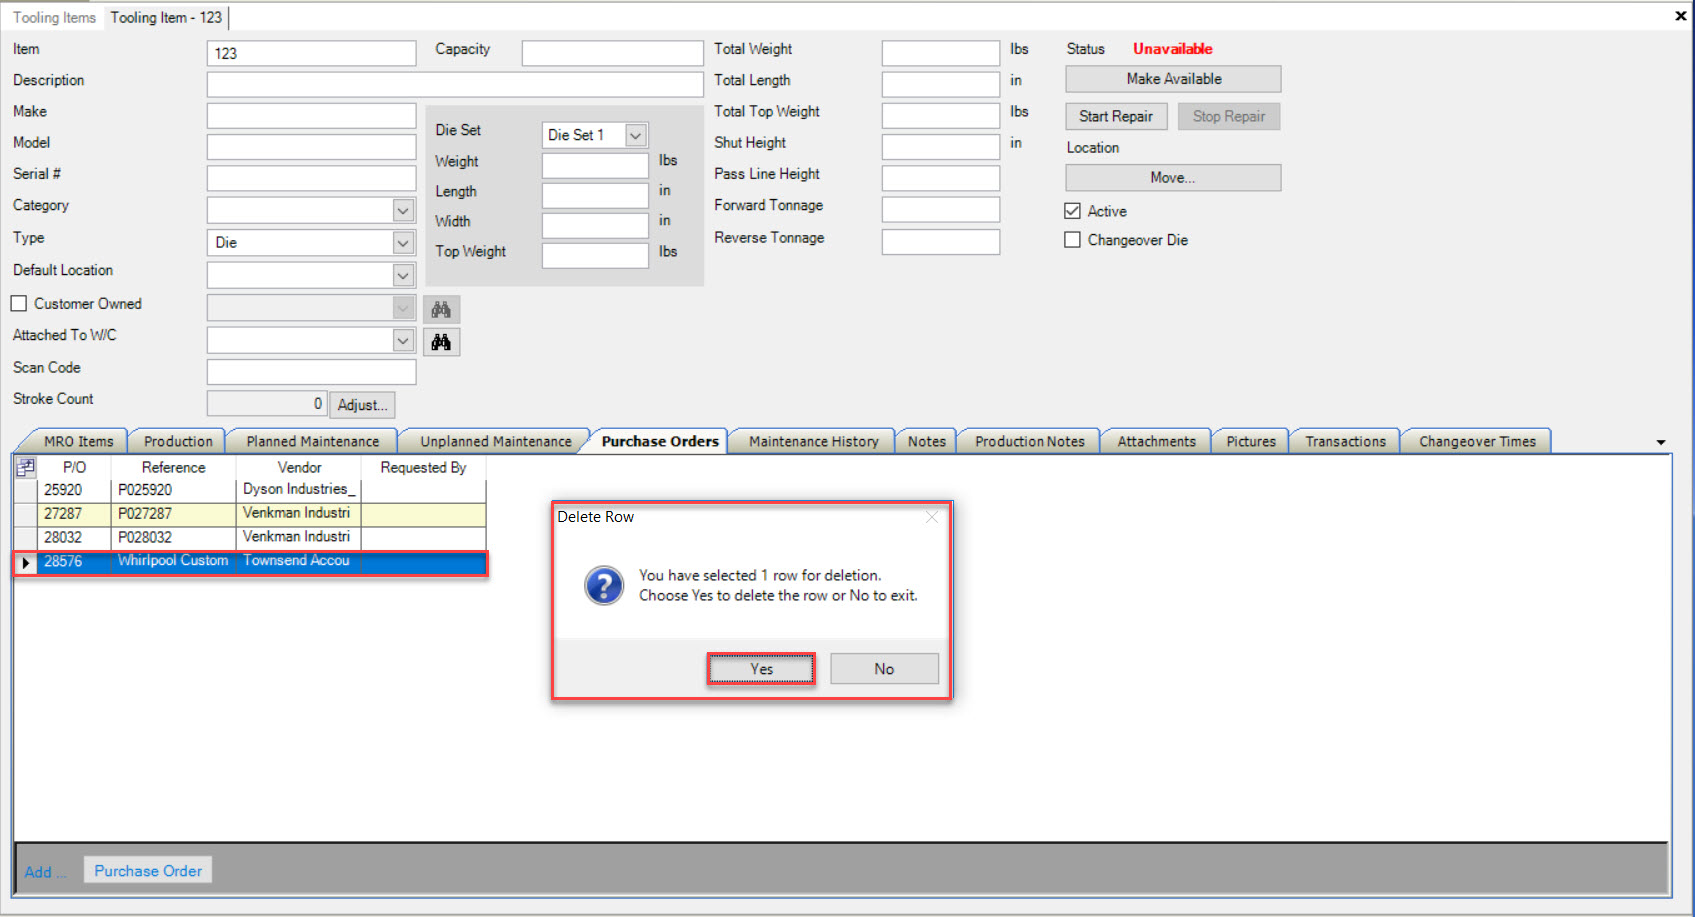
The selected Purchase Order will be deleted.
Make sure to save your changes before exiting the screen.
Maintenance History Tab
To view Maintenance History for a Tooling Item (if there is some available), navigate to the  tab and click on the
 ![]() icon.
The Tooling Items lookup screen will be displayed.
icon.
The Tooling Items lookup screen will be displayed.

Locate and double-click on the appropriate row to open a Tooling Item. The Tooling Item detail screen will be displayed.

Make sure to select the  tab.
tab.
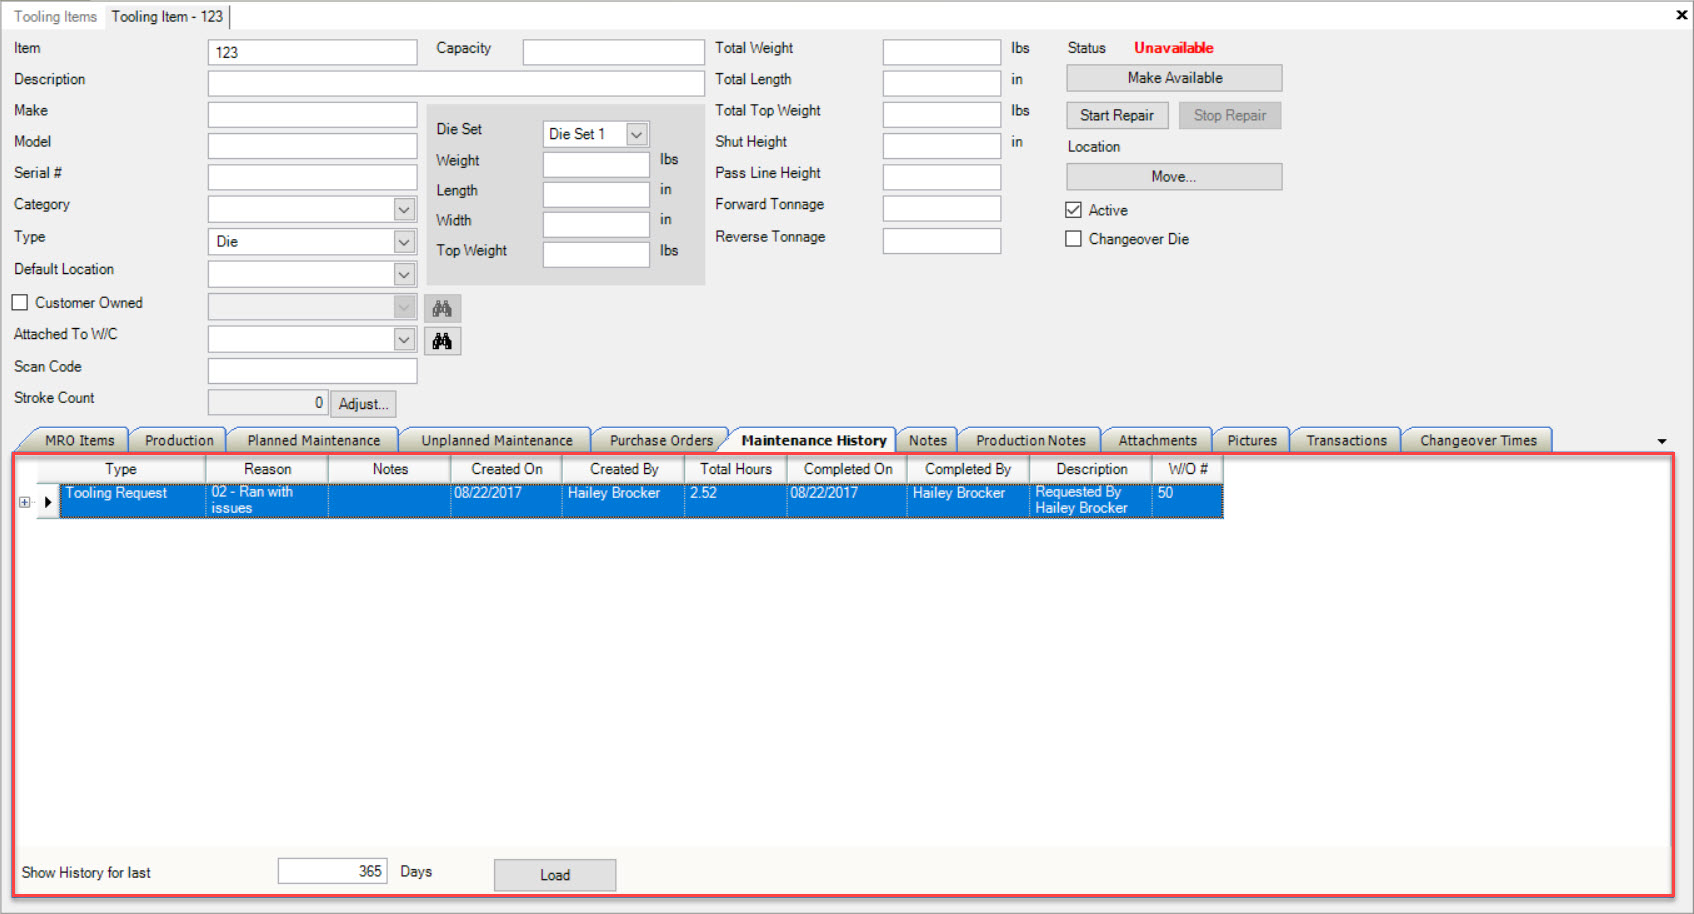
Users can then use the search option at the bottom of the screen to enter in the days to show the history for. Click on the  button to load the Maintenance History.
The Maintenance History will be displayed. Users can double-click on a line to view the actual Work Order in the system and all details for the Work Order such as Tooling Timecards recorded against it, or MRO Items, etc. Additional details about who entered a Tooling Timecard against the Work Order and the total hours of the Work Order can be viewed by expanding the line row using the plus sign.
Note
Users can also re-open a Work Order by right-clicing on the appropriate row and selecting the Re-Open Work Order.
Tooling Items Notes Tab
To view internal Notes on a Tooling Item, navigate to the  tab and click on the
 ![]() icon.
The Tooling Items lookup screen will be displayed.
icon.
The Tooling Items lookup screen will be displayed.

Locate and double-click on the appropriate row to open a Tooling Item. The Tooling Item detail screen will be displayed.

Make sure to select the  tab.
tab.
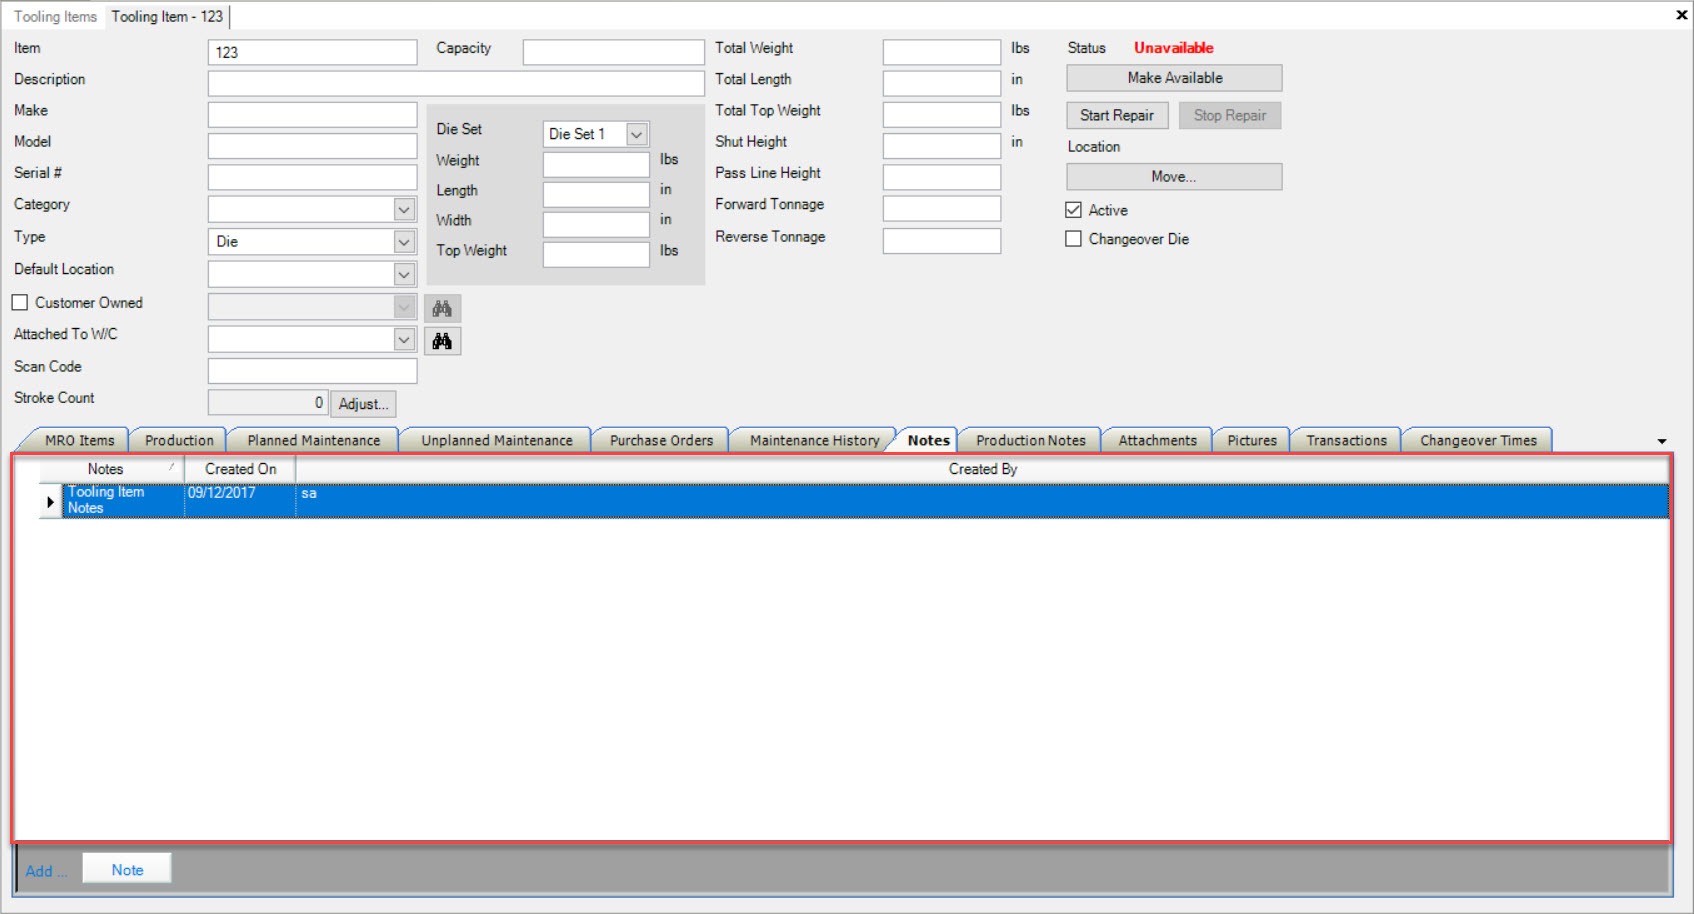
All internal Tooling Item Notes will be displayed.
Adding a Tooling Item Note
To add an internal Note to a Tooling Item, make sure to select the  tab.
tab.
Then, click on the  button located at the bottom of the screen.
The Notes window will appear where users can add any necessary internal Tooling Item Notes using the available textbox. Then, click on the  button.
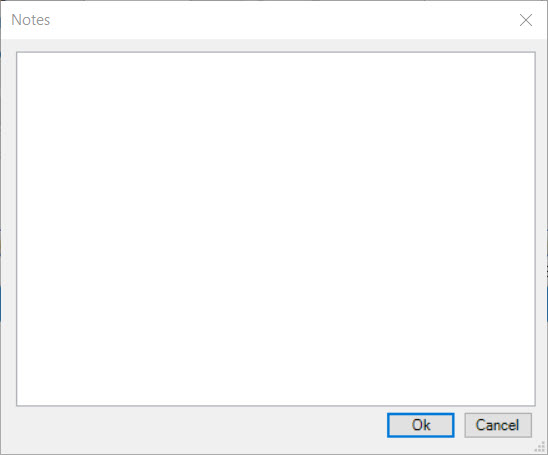
The Notes will be added to the Tooling Item.
Make sure to save your changes before exiting the screen.
Editing a Tooling Item Note
To edit an internal Tooling Item Note, make sure to select the  tab.
tab.
Locate the Note you wish to edit and double-click on the appropriate row.
The Notes window will appear where users can make the necessary changes using the available textbox. When the necessary changes are completed, click on the  button.

Make sure to save your changes before exiting the screen.
Deleting a Tooling Item Note
To delete an internal Tooling Item Note, make sure to select the  tab.
tab.
Locate the Note you wish to delete and highlight the appropriate row. Then, use your Delete key.
The selected Note will be deleted.
Make sure to save your changes before exiting the screen.
Production Notes Tab
Production Notes can be recorded against a Tooling Item and will show on the various Production screens including the Master Production Schedule, the Workcenter Schedule, and the Operator Schedule.
To view, add, edit, or delete Production Notes on a Tooling Item, navigate to the  tab and click on the
 ![]() icon.
The Tooling Items lookup screen will be displayed.
icon.
The Tooling Items lookup screen will be displayed.

Locate and double-click on the appropriate row to open a Tooling Item. The Tooling Item detail screen will be displayed.

Make sure to select the  tab.
tab.
Using the available textbox, users can add, edit, or delete Production Notes.
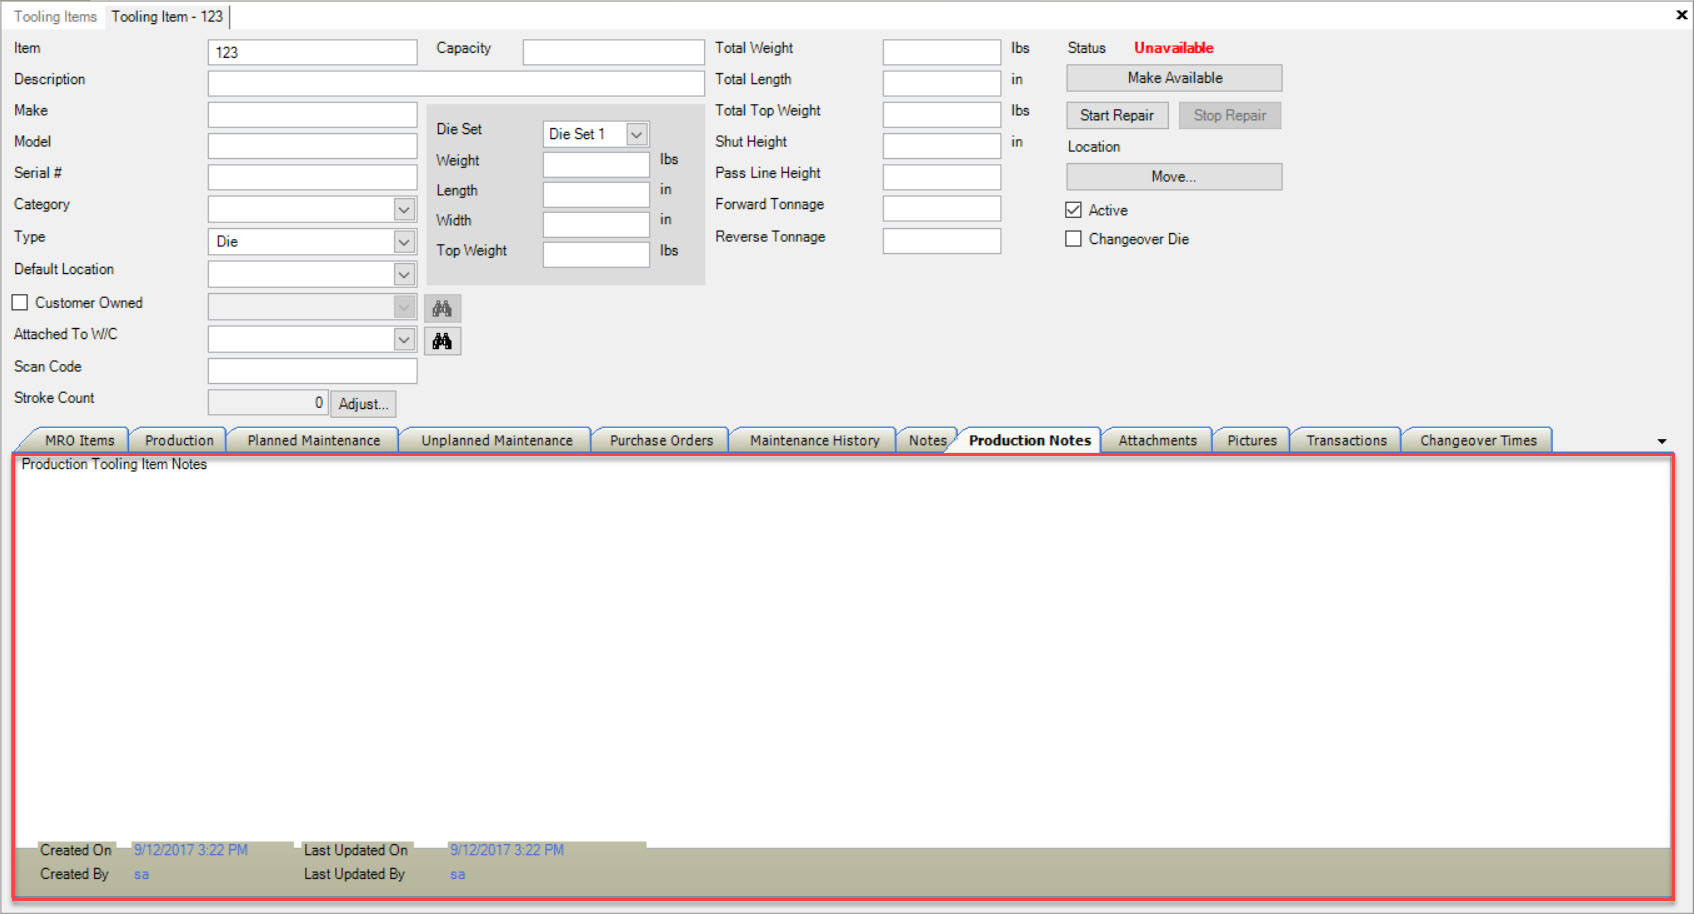
Make sure to save your changes before exiting the screen.
Tooling Items Attachments Tab
To view Attachments on a Tooling Item, navigate to the  tab and click on the
 ![]() icon.
The Tooling Items lookup screen will be displayed.
icon.
The Tooling Items lookup screen will be displayed.

Locate and double-click on the appropriate row to open a Tooling Item. The Tooling Item detail screen will be displayed.

Make sure to select the  tab.
tab.
Users will be able to view all available Attachments.
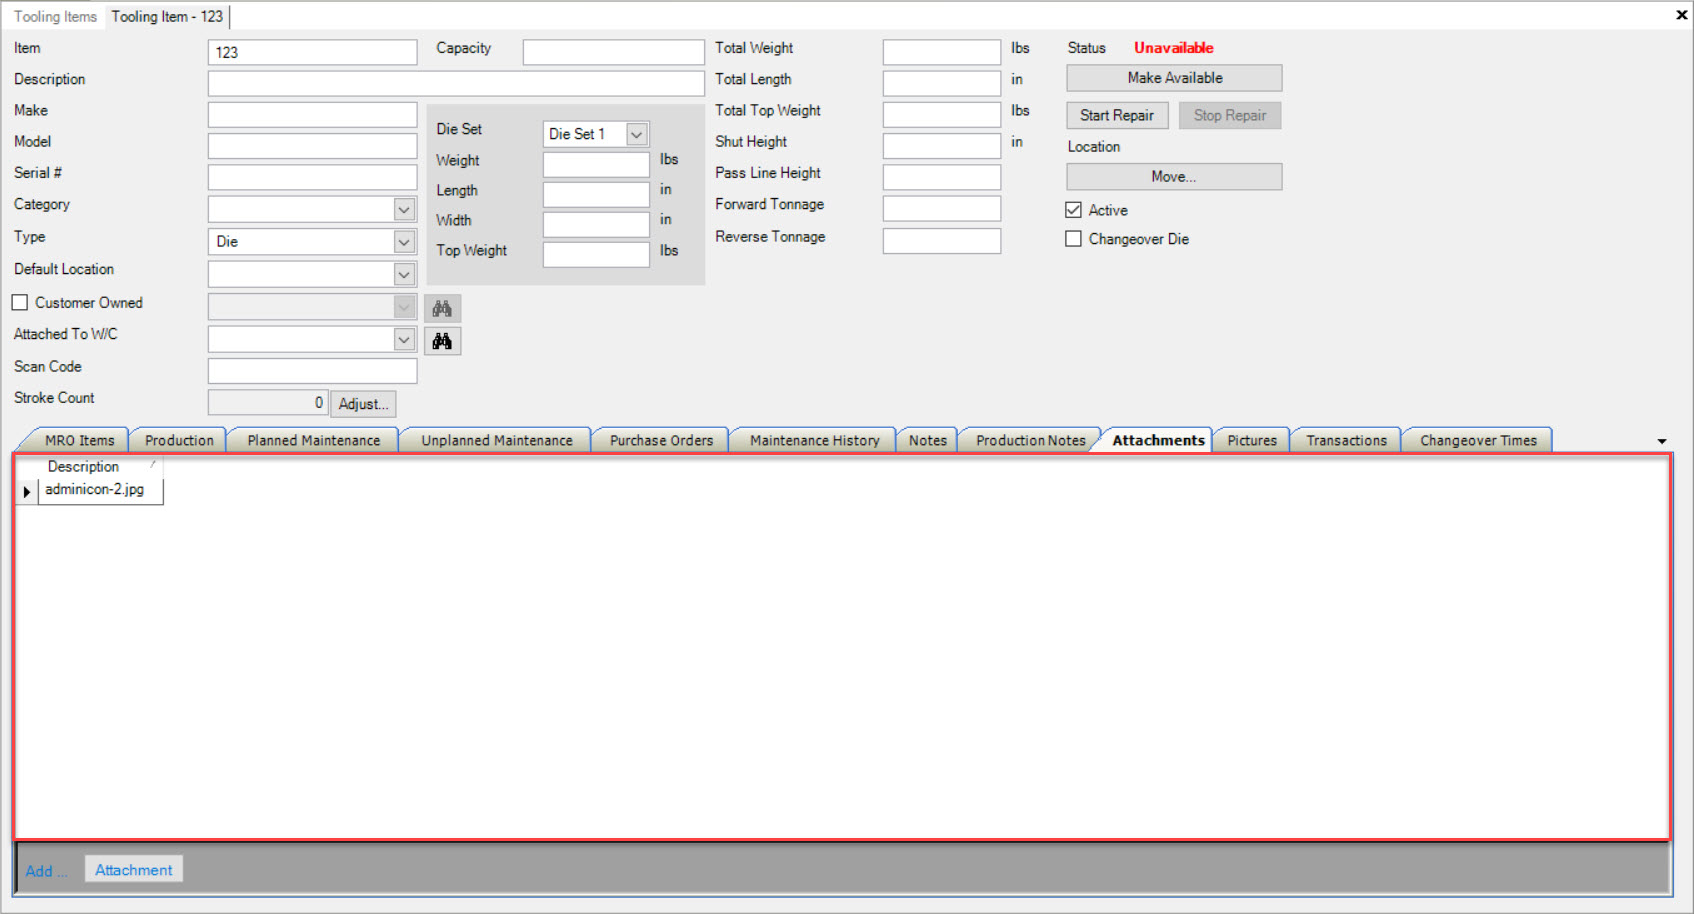
Adding an Attachment to a Tooling Item
To add an Attachment to a Tooling Item, make sure to select the  tab.
tab.
Then, click on the  button located at the bottom of the screen.
Users will then be able to select an Attachment from their computer. Once an Attachment has been selected, click on the  button.
The selected Attachment will be added to the Tooling Item.
Make sure to save your changes before exiting the screen.
Deleting an Attachment from a Tooling Item
To delete an Attachment from a Tooling Item, make sure to select the  tab.
tab.
Locate the Attachment you wish to delete and highlight the appropriate row. Use your Delete key and when the system prompts you, select Yes.
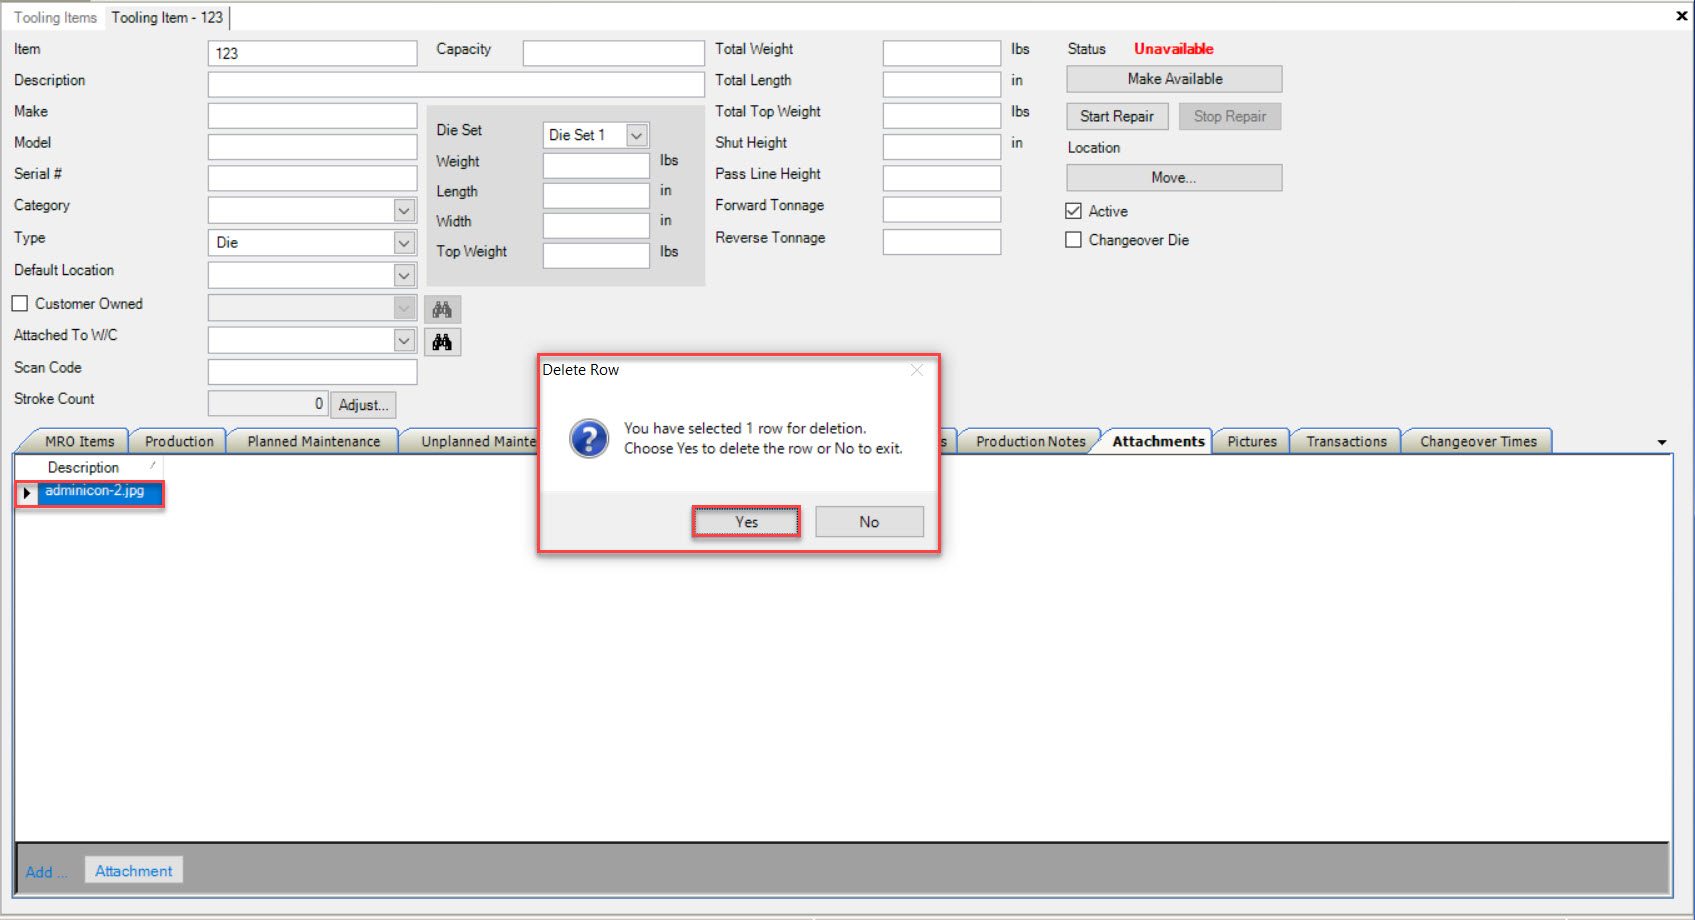
The selected Attachment will be deleted.
Make sure to save your changes before exiting the screen.
Tooling Items Pictures Tab
To view Pictures on a Tooling Item, navigate to the  tab and click on the
 ![]() icon.
The Tooling Items lookup screen will be displayed.
icon.
The Tooling Items lookup screen will be displayed.

Locate and double-click on the appropriate row to open a Tooling Item. The Tooling Item detail screen will be displayed.

Make sure to select the  tab.
tab.
Users will be able to view all available Pictures for the Tooling Item.
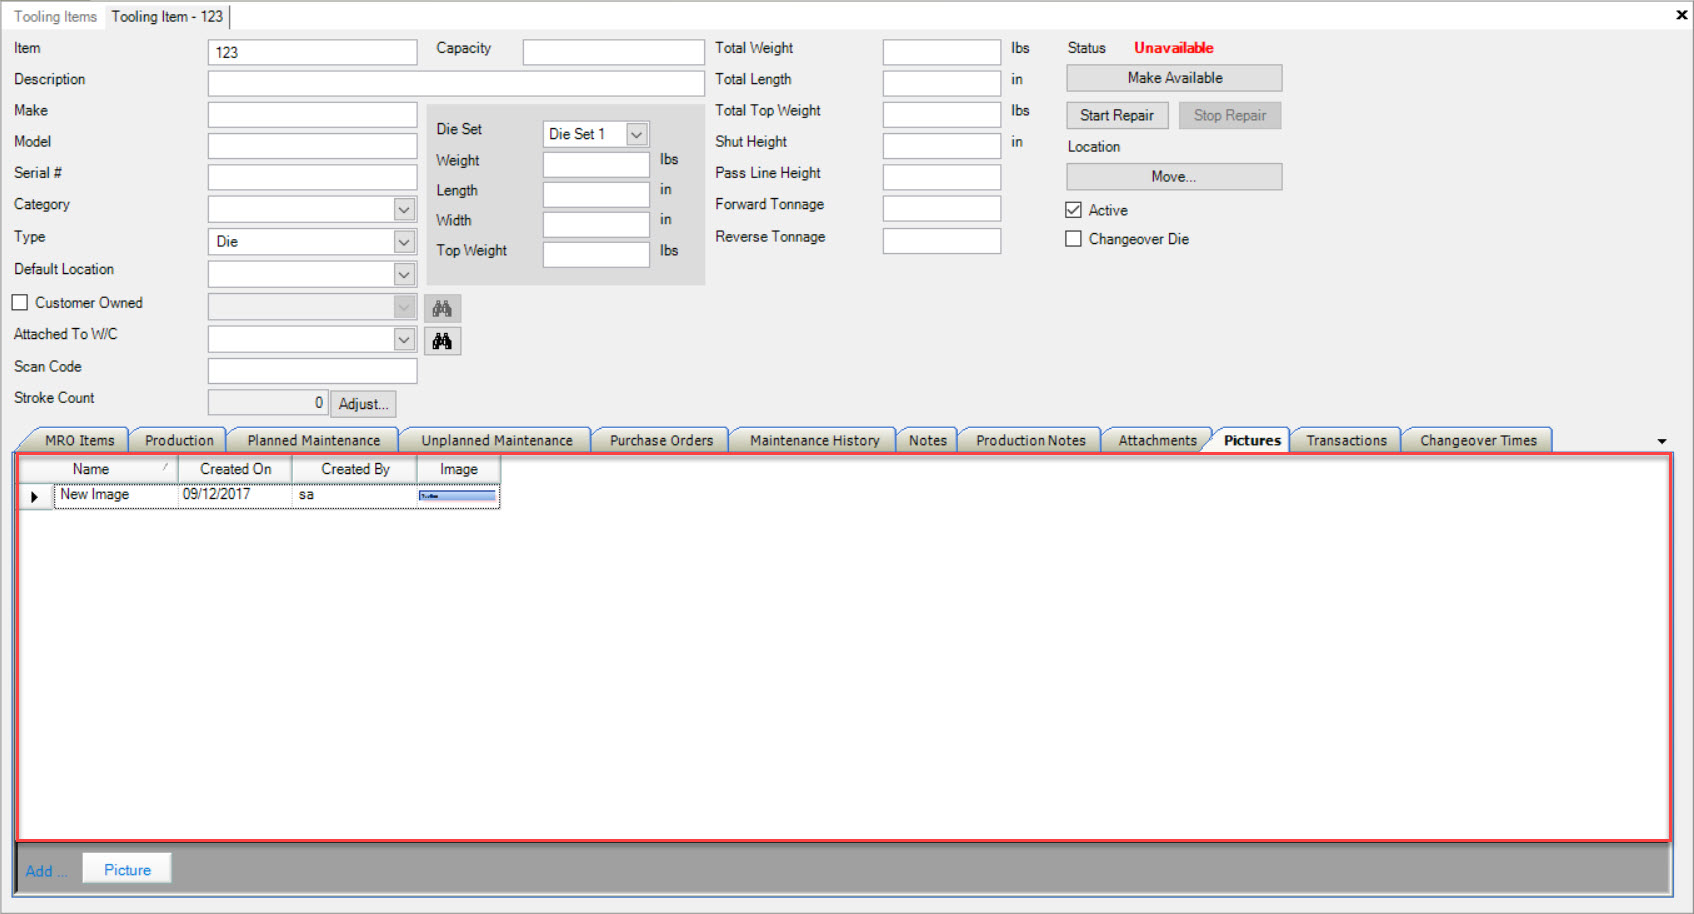
Adding a Picture to a Tooling Item
To add a Picture to a Tooling Item, make sure to select the  tab.
tab.
Then, click on the  button located at the bottom of the screen.
Users will then be able to select a Picture from their computer. Once a Picture has been selected, click on the  button.
The selected Picture will be added to the Tooling Item.
Make sure to save your changes before exiting the screen.
Deleting a Picture from a Tooling Item
To delete a Picture from a Tooling Item, make sure to select the  tab.
tab.
Locate the Picture you wish to delete and highlight the appropriate row. Then, use your Delete key.
The selected Picture will be deleted.
Make sure to save your changes before exiting the screen.
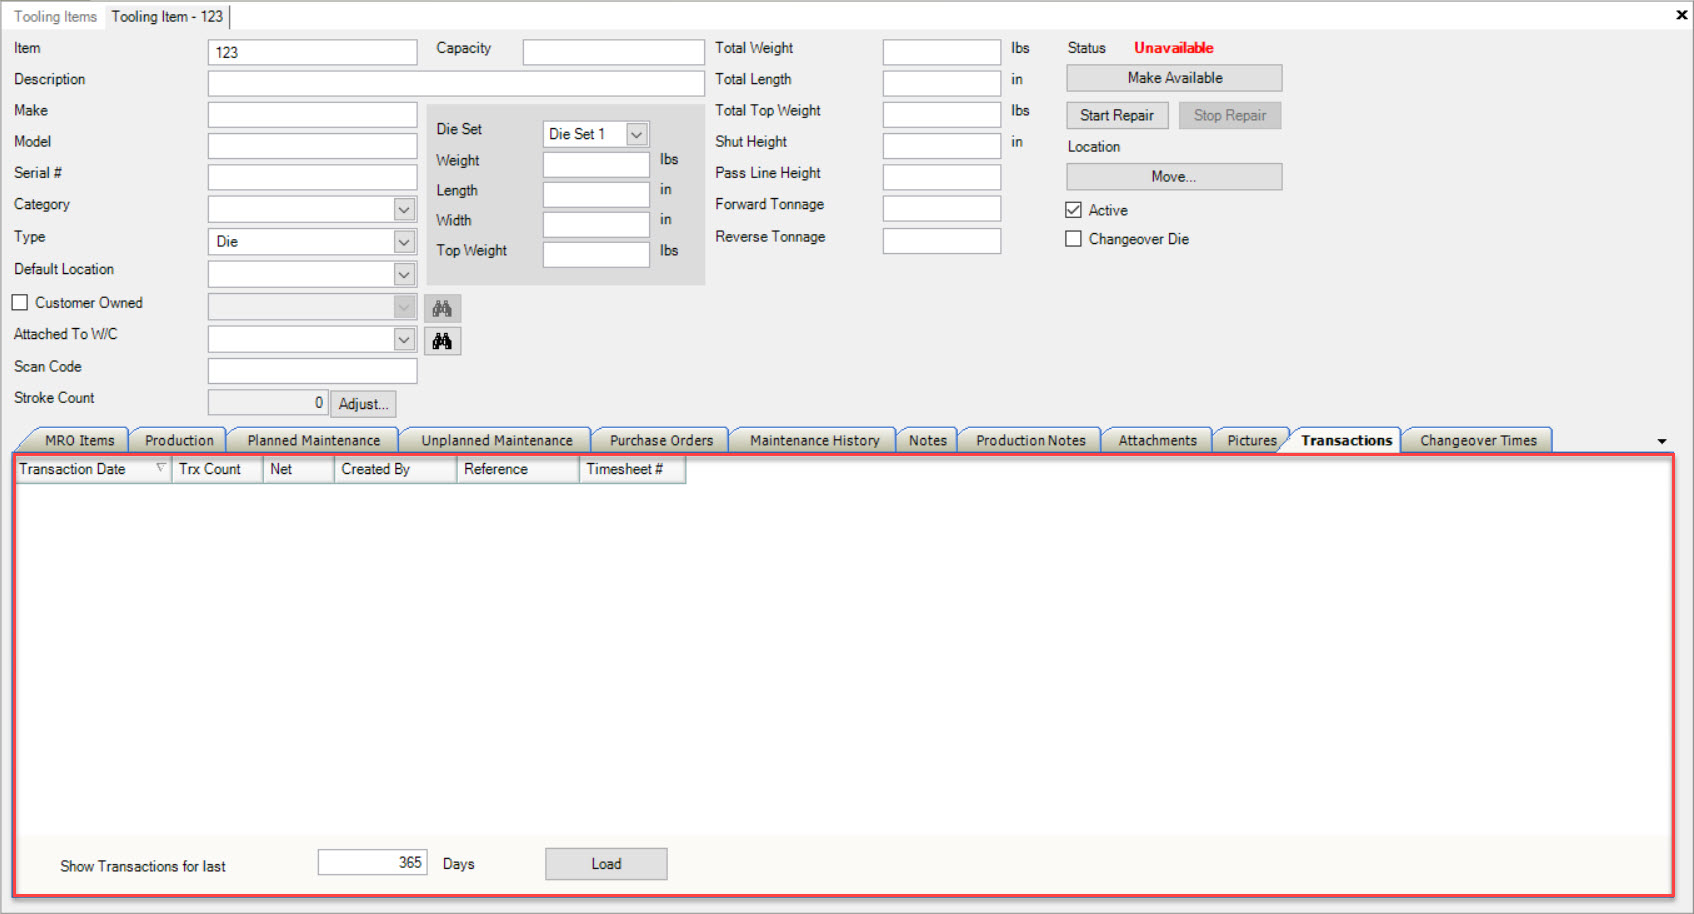
Transactions Tab
Transactions are created when Production Timecards are entered in the system for Items that have an associated Tooling Item (i.e. under the Production tab). The Transaction count updates the Stroke Count for Tooling.
To view Transactions for a Tooling Item, navigate to the  tab and click on the
 ![]() icon.
The Tooling Items lookup screen will be displayed.
icon.
The Tooling Items lookup screen will be displayed.

Locate and double-click on the appropriate row to open a Tooling Item. The Tooling Item detail screen will be displayed.

Make sure to select the  tab.
tab.
Users can then use the search option located at the bottom of the screen by entering in a day amount to view the Transaction History. Then, click on the  button.
The Transactions will be populated and displayed.
Changeover Times Tab
Changeover Times can be added to the system under the Changeover Times tab. These times are also used on the Master Production Schedule where users can create Changeover Work Orders directly from the Master Production Schedule screen.
To view Changeover Times for a Tooling Item, navigate to the  tab and click on the
 ![]() icon.
The Tooling Items lookup screen will be displayed.
icon.
The Tooling Items lookup screen will be displayed.

Locate and double-click on the appropriate row to open a Tooling Item. The Tooling Item detail screen will be displayed.

Make sure to select the  tab.
tab.
The Changeover Times will be displayed.
Adding a Changeover Time
To add a Changeover Time to a Tooling Item, make sure to select the  tab.
tab.
In order for users to create Changeover Work Orders on the Master Production Schedule, the Changeover Die checkbox in the header information on the Tooling Item must be selected.
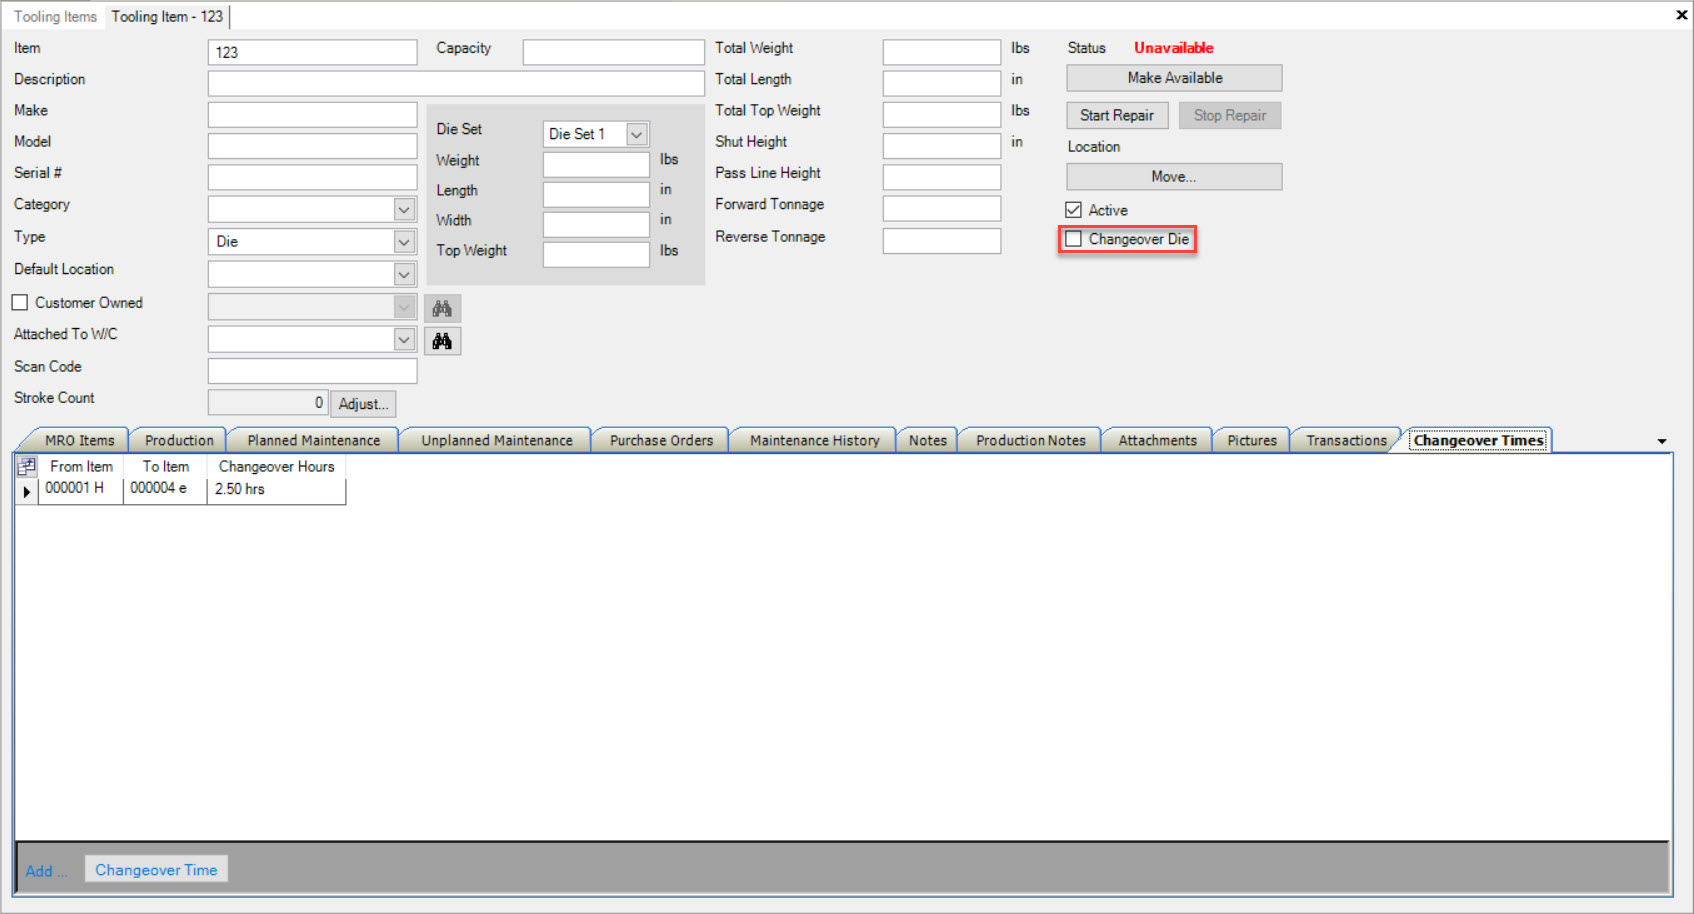
Once the checkbox has been select, users must select a Configured For Tooling Item using the available drop-down menu.
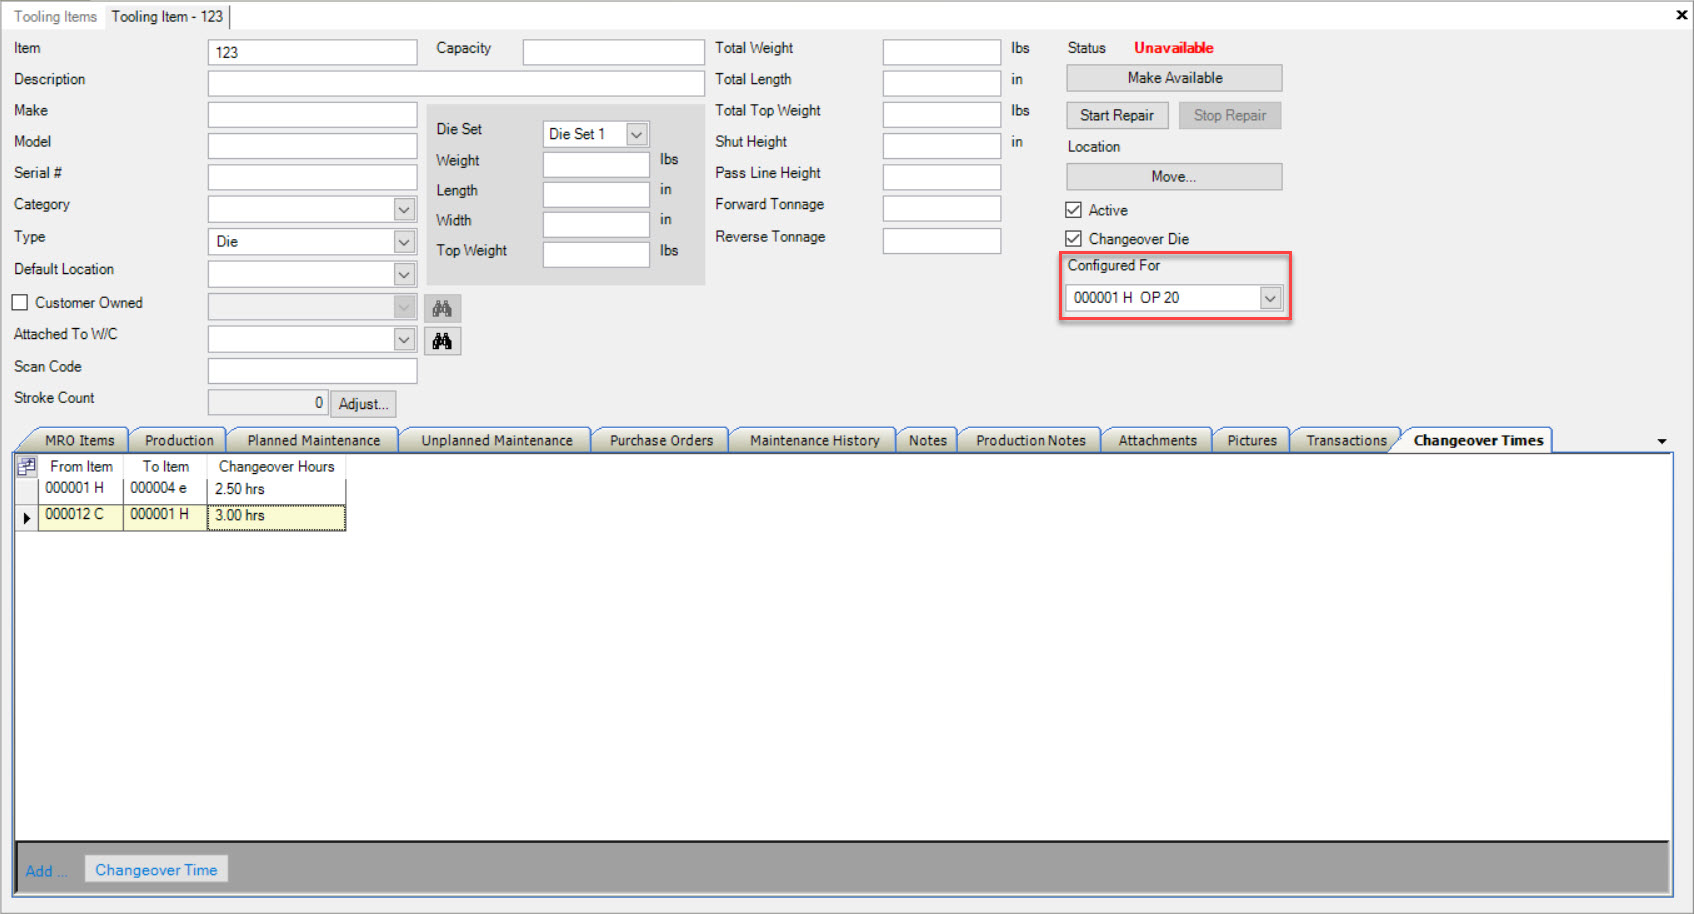
Click on the  button located at the bottom of the screen.
A new row will appear where users must select a From Item, To Item, and enter in Changeover Hours.
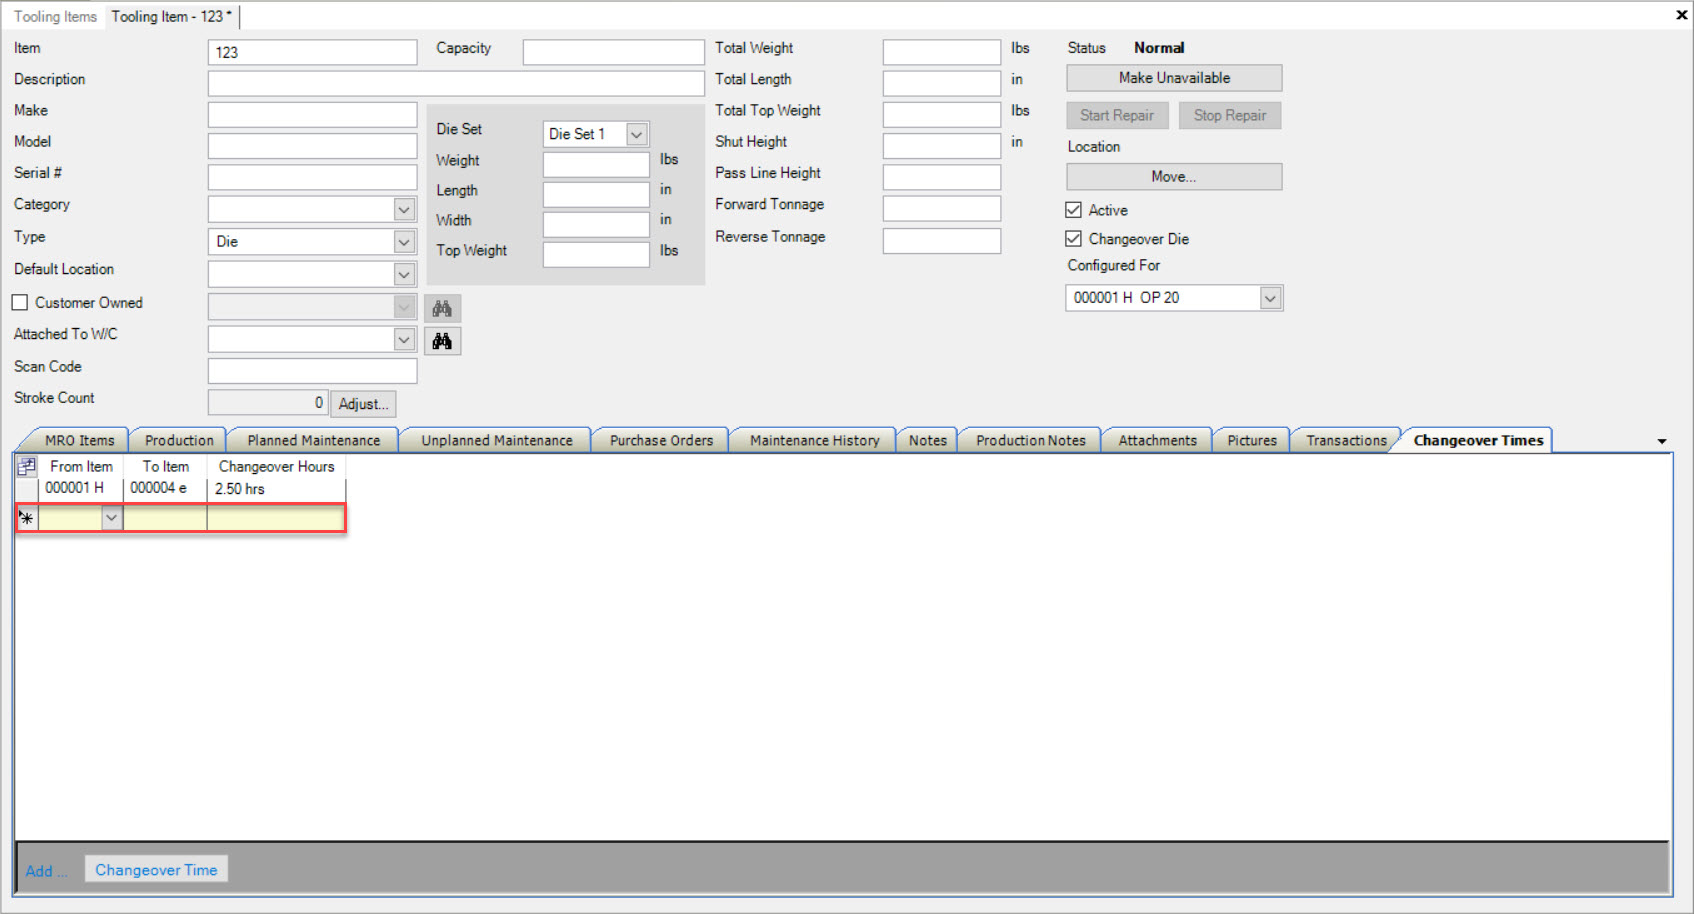
Once the necessary information is complete, make sure to save your changes before exiting the screen.
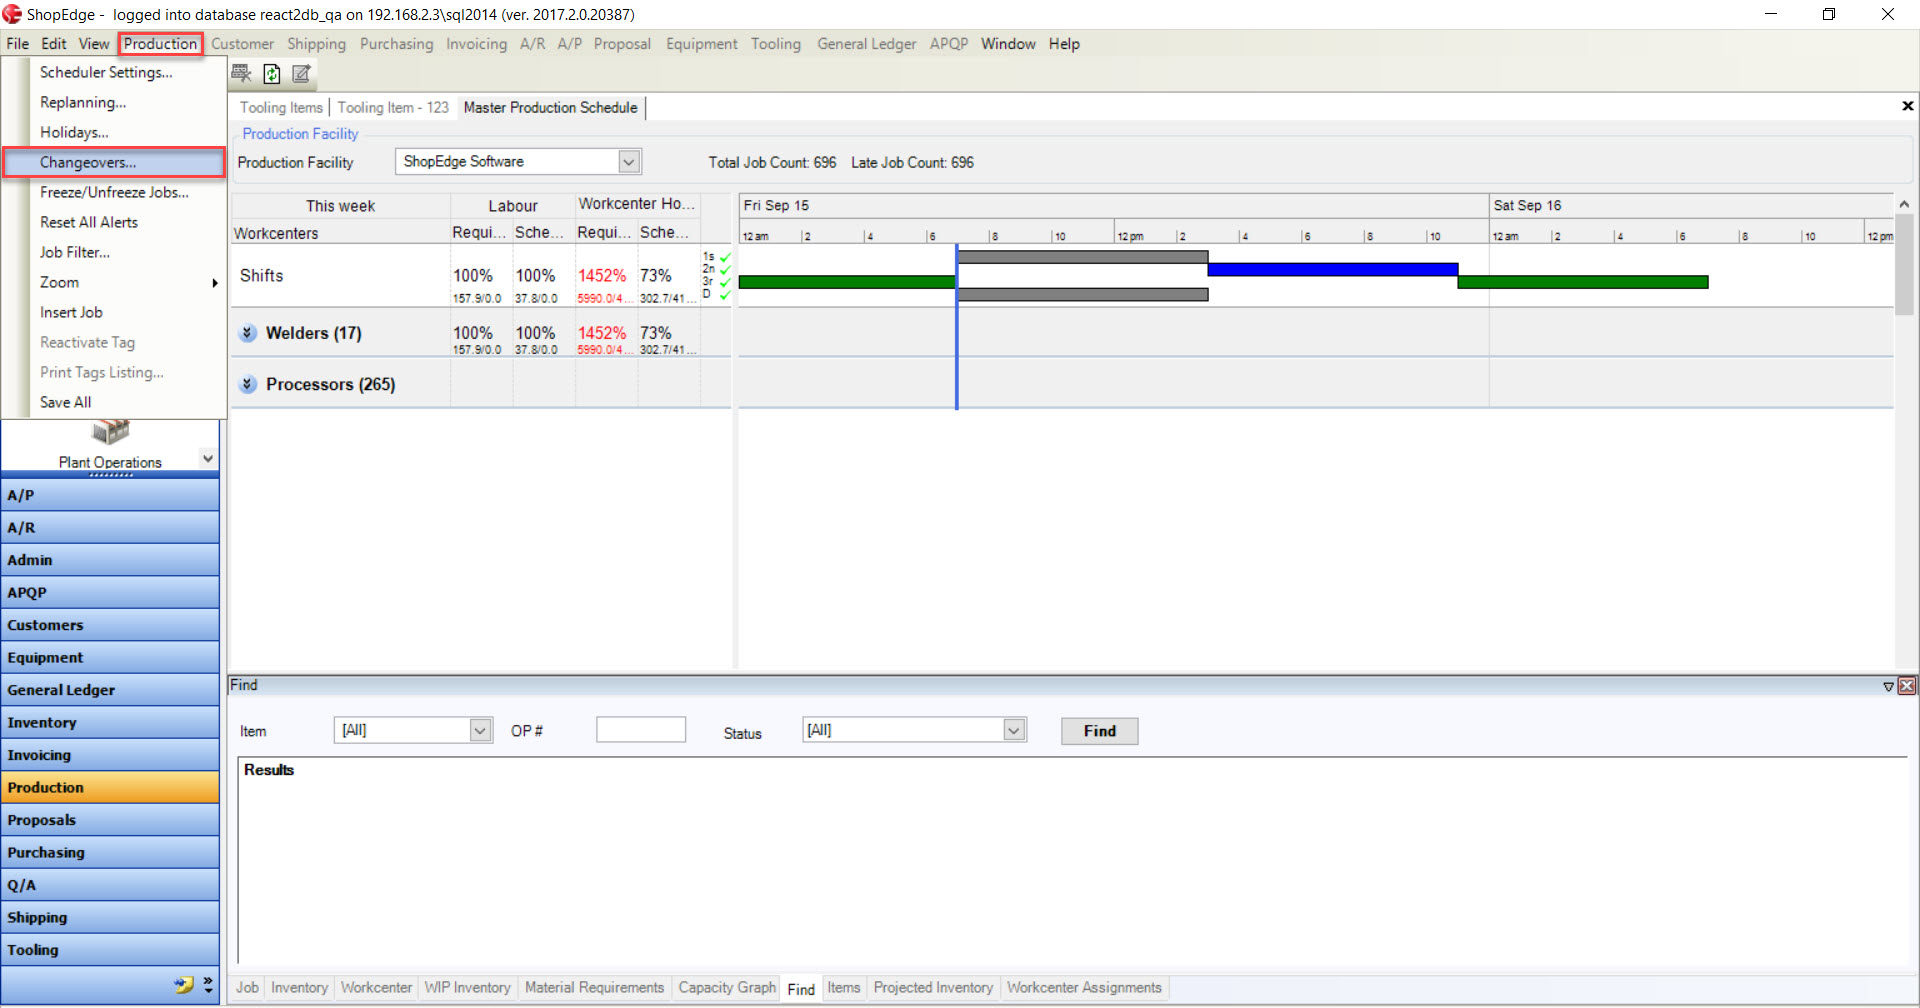
Users will then be able to navigate to the Master Production Schedule screen under the Production module and select Production > Changeovers....
Note
Both Jobs of the Tooling Items Production Operations must be inserted on the Master Production Schedule in order for the appropriate Changeover Times to display.
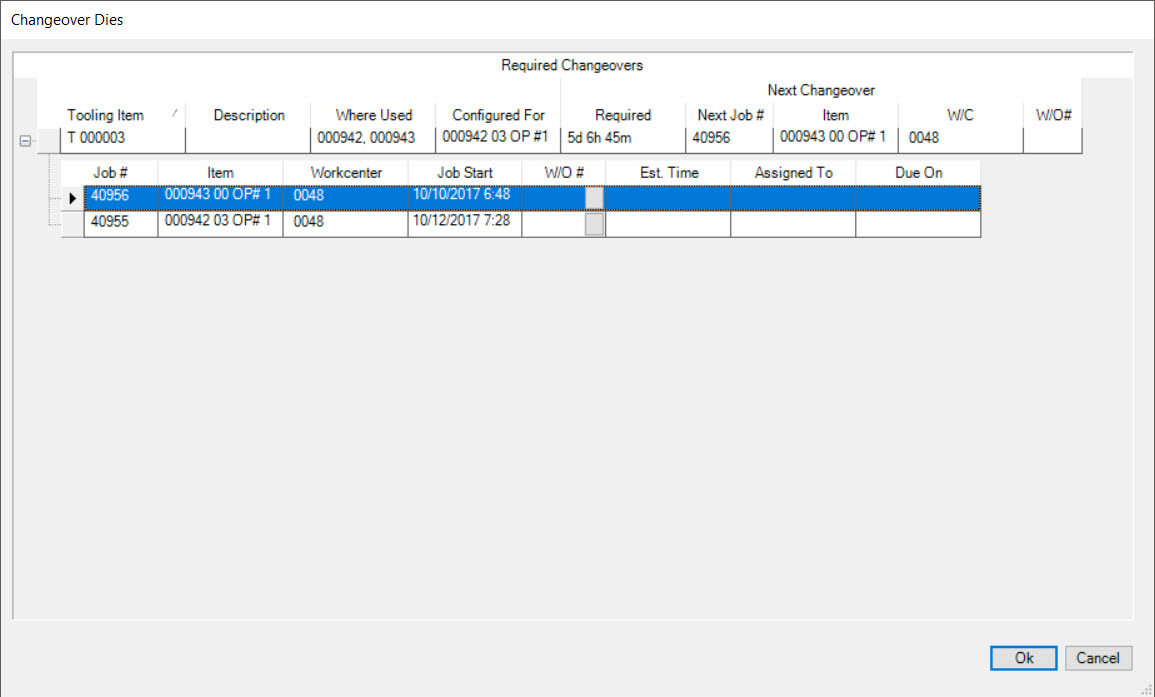
The Changeover Dies window will appear where users can select a Tooling Item. Click on the plus sign where users are able to view the Job #’s in which the Changeovers will occur. Select the
appropriate Job # and then click on the  button to create a new Work Order.
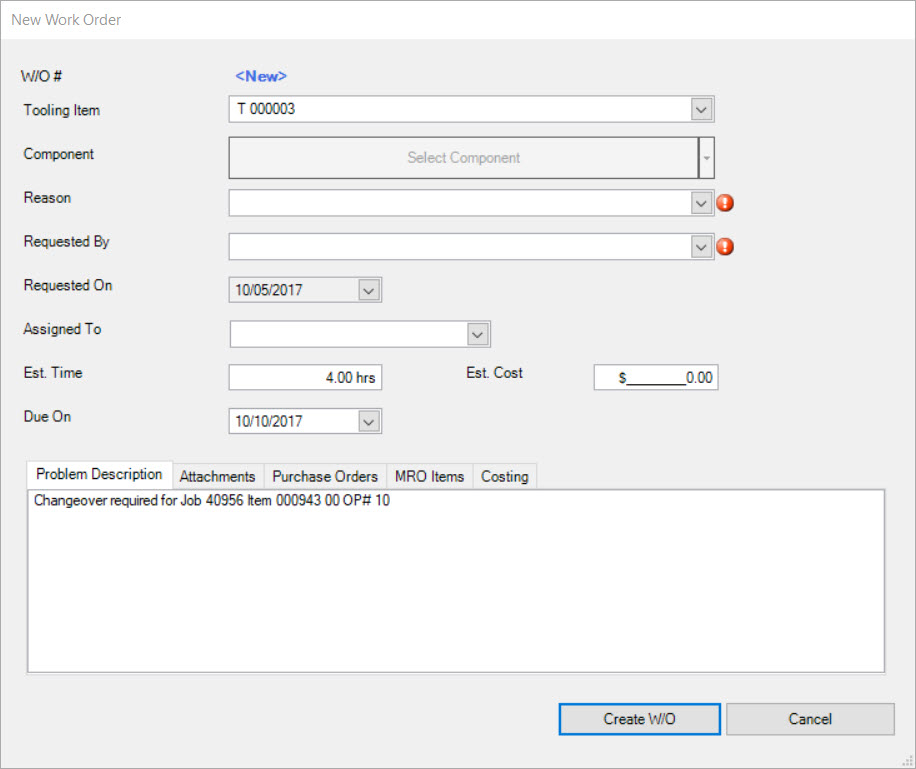
Users must select a Reason and Requested By using the available drop-down menus.
The Est. Time and Due On date should default to the information on the Changeover Times tab located on the Tooling Item detail screen.
Note
For more information on completing a new Work Order, please navigate to Tooling > Open Work Orders > Creating a New Work Order.
Once the necessary information has been entered, click on the  button.
A window will appear stating that a Work Order has been created.
Editing a Changeover Time
To edit a Changeover Time on a Tooling Item, make sure to select the  tab.
tab.
Locate the Changeover Time you wish to edit and make the necessary changes using the available drop-down menus and textbox.
Make sure to save your changes before exiting the screen.
Deleting a Changeover Time
To delete a Changeover Time from a Tooling Item, make sure to select the  tab.
tab.
Locate the Changeover Time you wish to delete and highlight the appropriate row. Use your Delete key and when the system prompts you, select Yes.
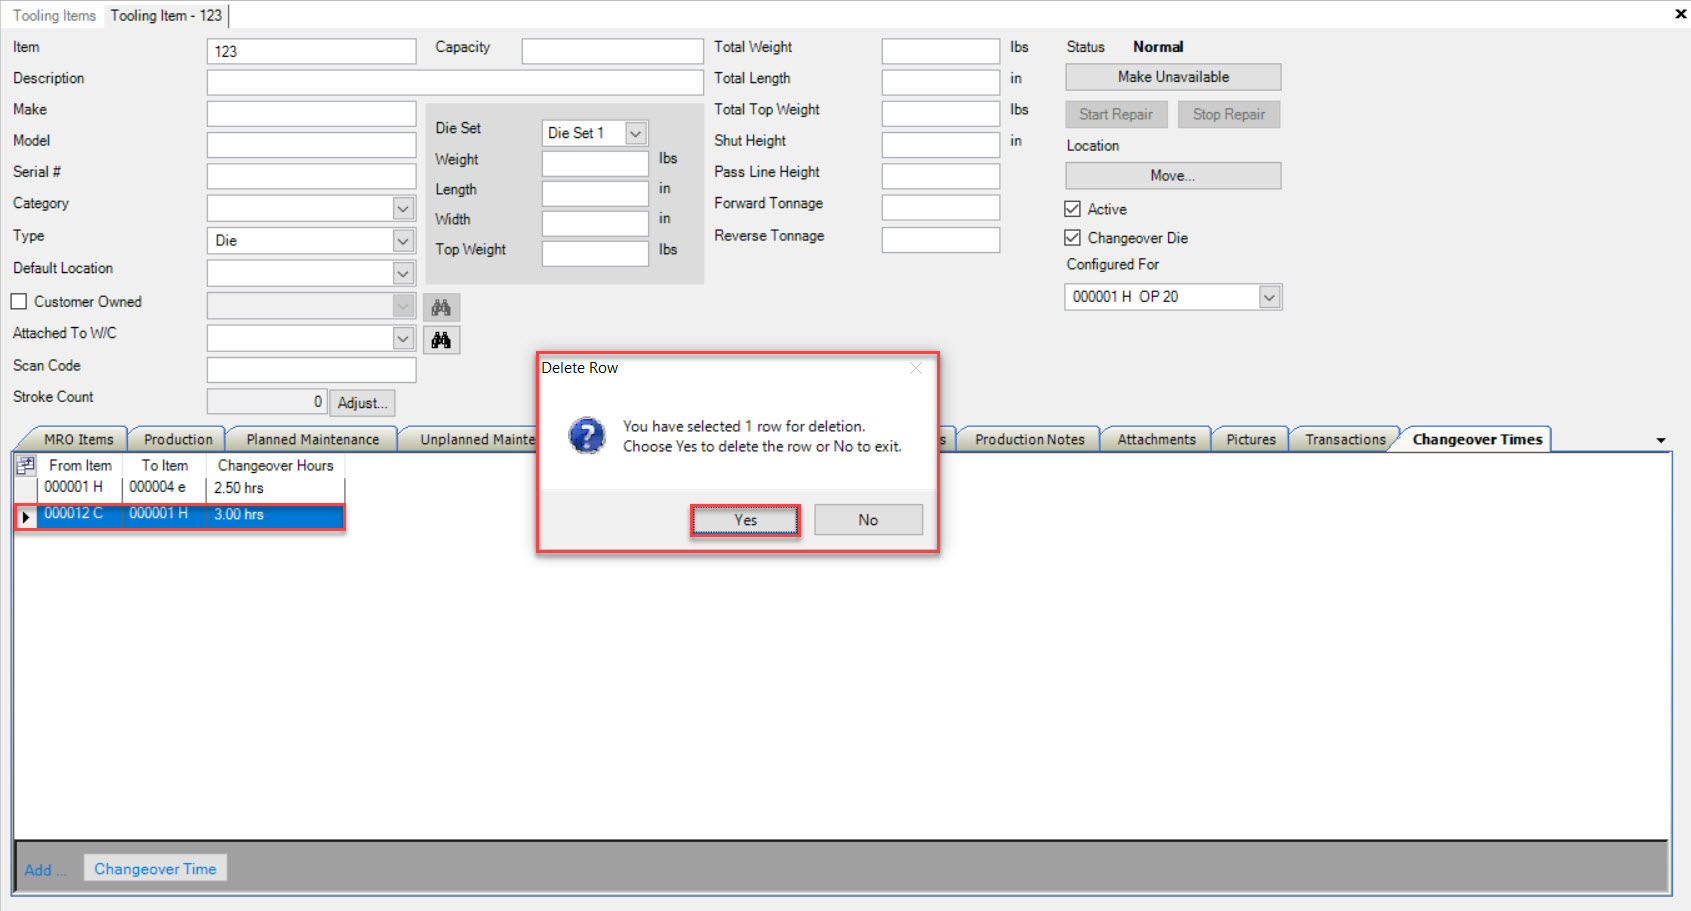
The selected Changeover Time will be deleted from the Tooling Item.
Make sure to save your changes before exiting the screen.
 button.
 button.