Adding a New A/P Voucher
There are three different ways to add a new A/P Voucher to the system. The first way is to press the Ctrl + Shift + K keys. The second way is to navigate to File > New > A/P Voucher.
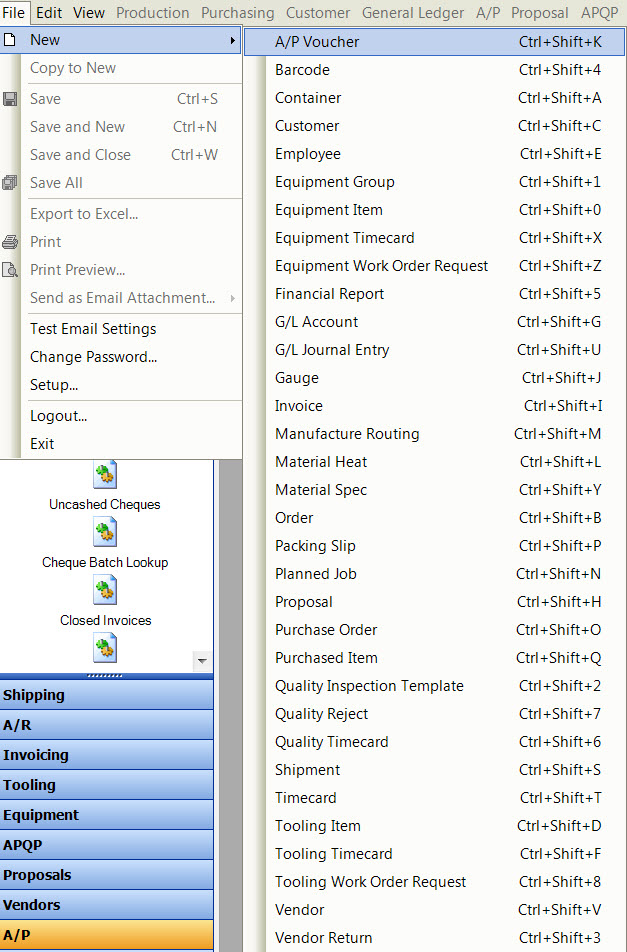
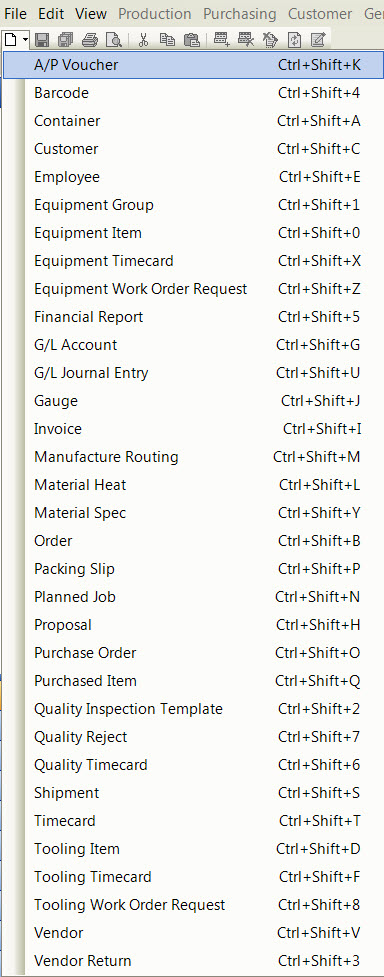
The last way is to click on the  button, and then on the A/P Voucher option.
All of these options will open a new A/P Voucher screen.
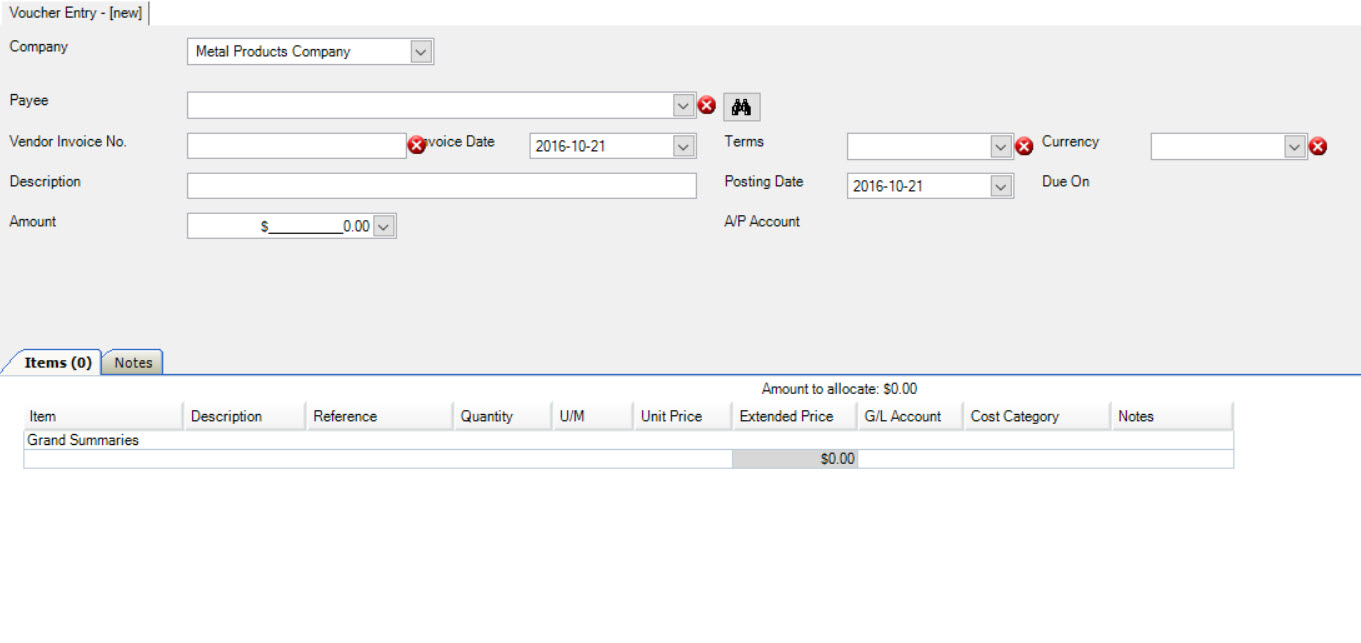
Users must fill in the necessary fields such as the Payee, Vendor Invoice No., Terms, and Currency.
When entering a new A/P Voucher you have the ability to:
- Add an Invoice by manually entering in the Item lines
- Automatically entering an A/P Voucher from a Non-Invoiced Packing Slip
- Automatically generating a Credit from a Vendor Return
- Automatically generating an Invoice from a Purchase Order
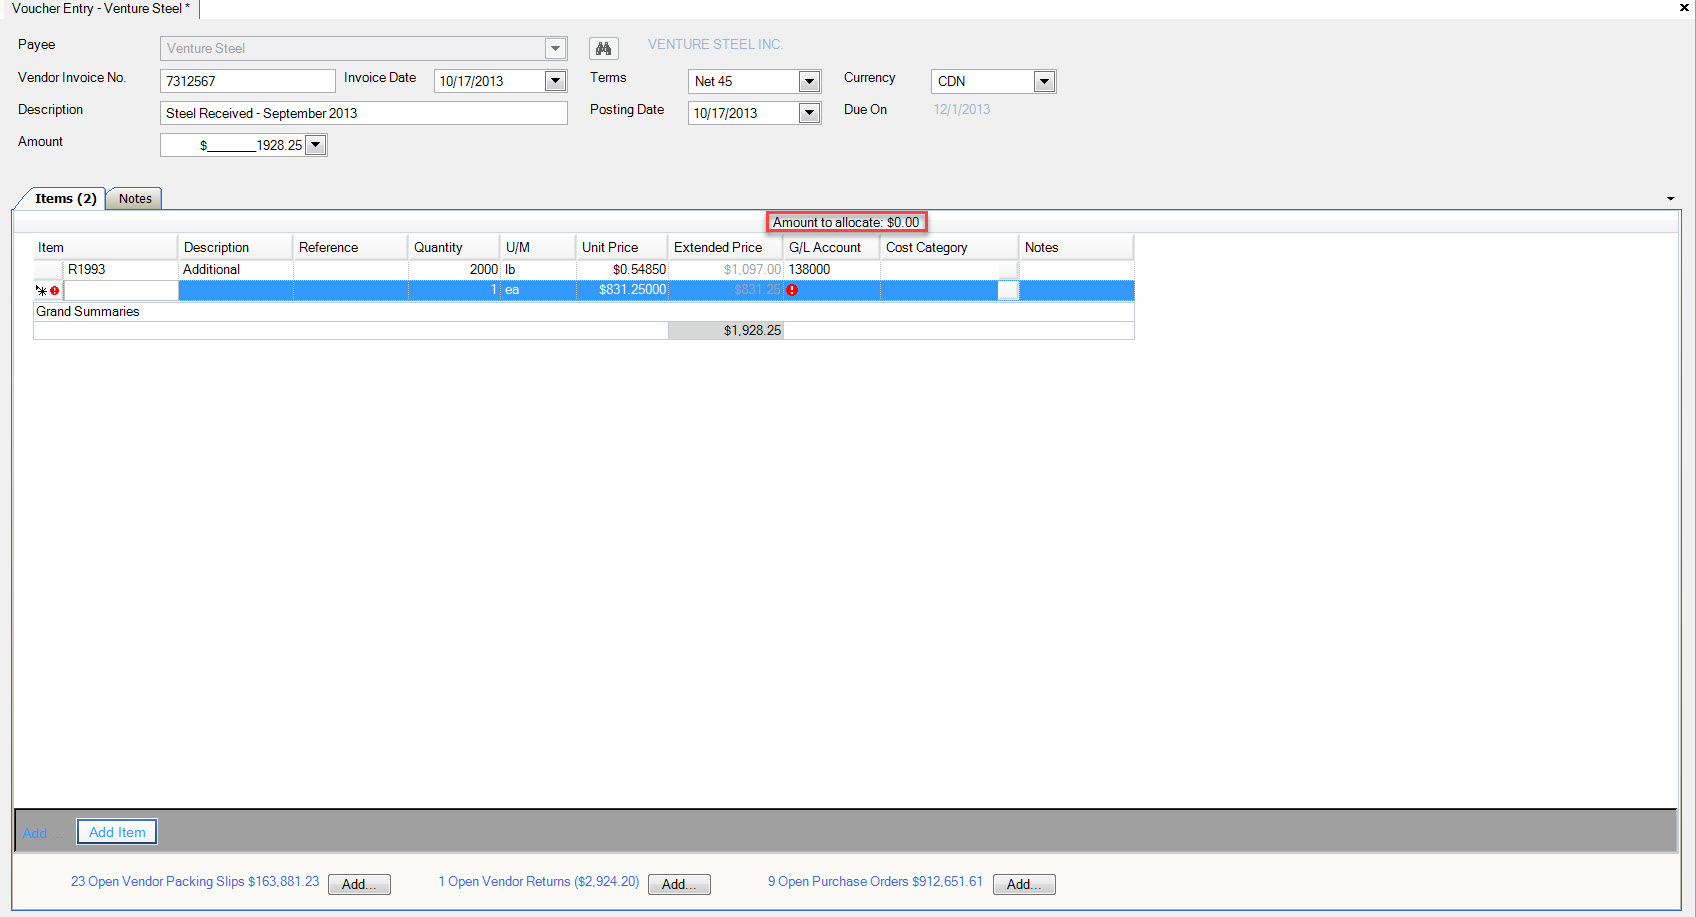
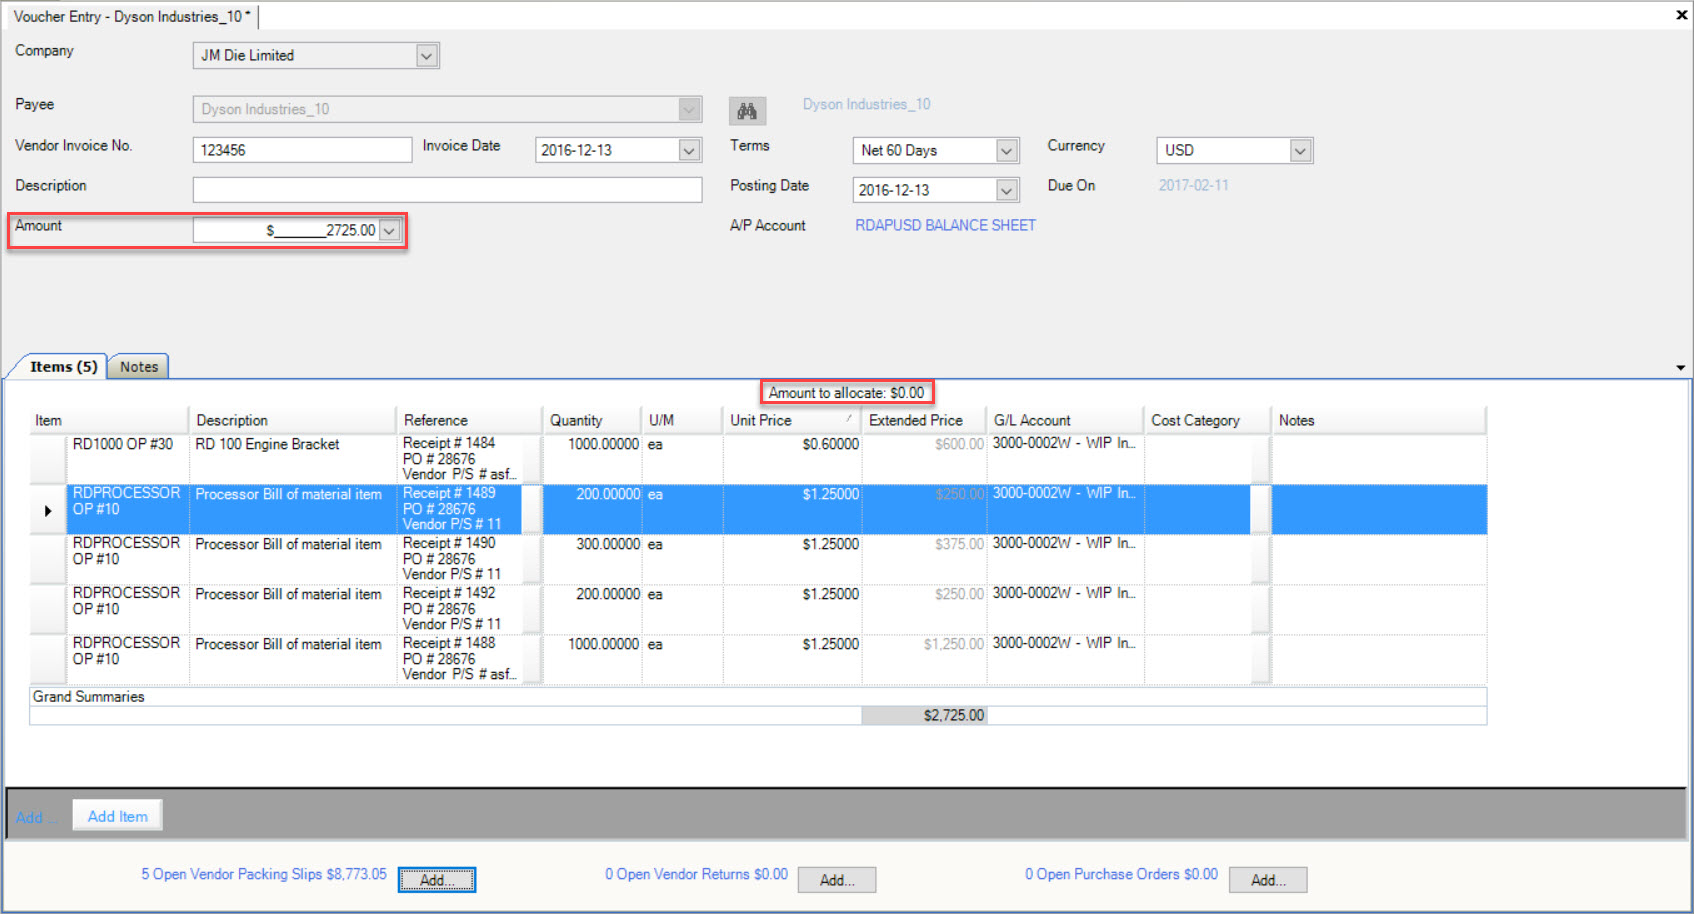
The Invoice Amount must balance to the total of the line Items; that is when the Invoice lines have been entered or generated the Amount to allocate must be 0.
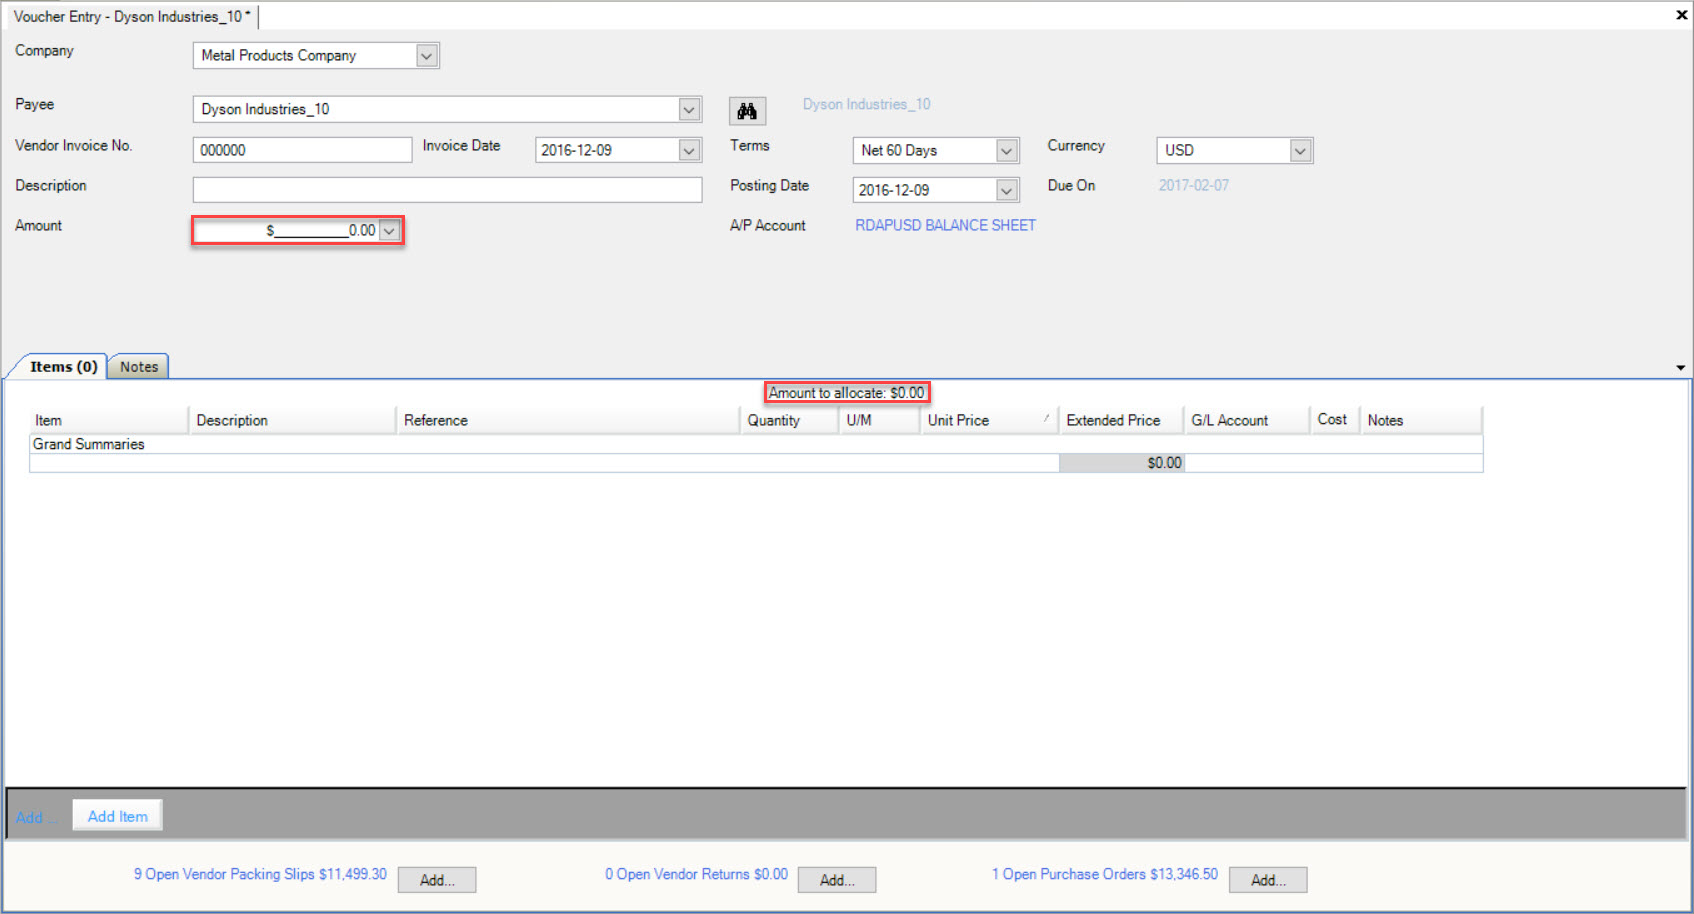
Users can also create an A/P Voucher directly from a Non-Invoiced Packing Slip in the system by navigating to the Non-Invoiced Packing Slip screen and double-clicking on the row of the Packing Slip you wish to open. All Items from the Receipt will be added to the A/P Voucher automatically.
Entering a Manual A/P Voucher
To enter a new A/P Voucher Entry, press the Ctrl + Shift + K keys, navigate to File > New > A/P Voucher, OR click on New > A/P Voucher.

Select the Payee using the drop-down menu or look-up option, and fill out the necessary information including the Vendor Invoice No., Description, and Amount. Vendors must be added prior to completing a Voucher Entry. The Terms and Currency will default from the information on the Vendor screen, but users have the ability to change them on the Voucher Entry. The Posting Date will default to the current date, but can also be modified.
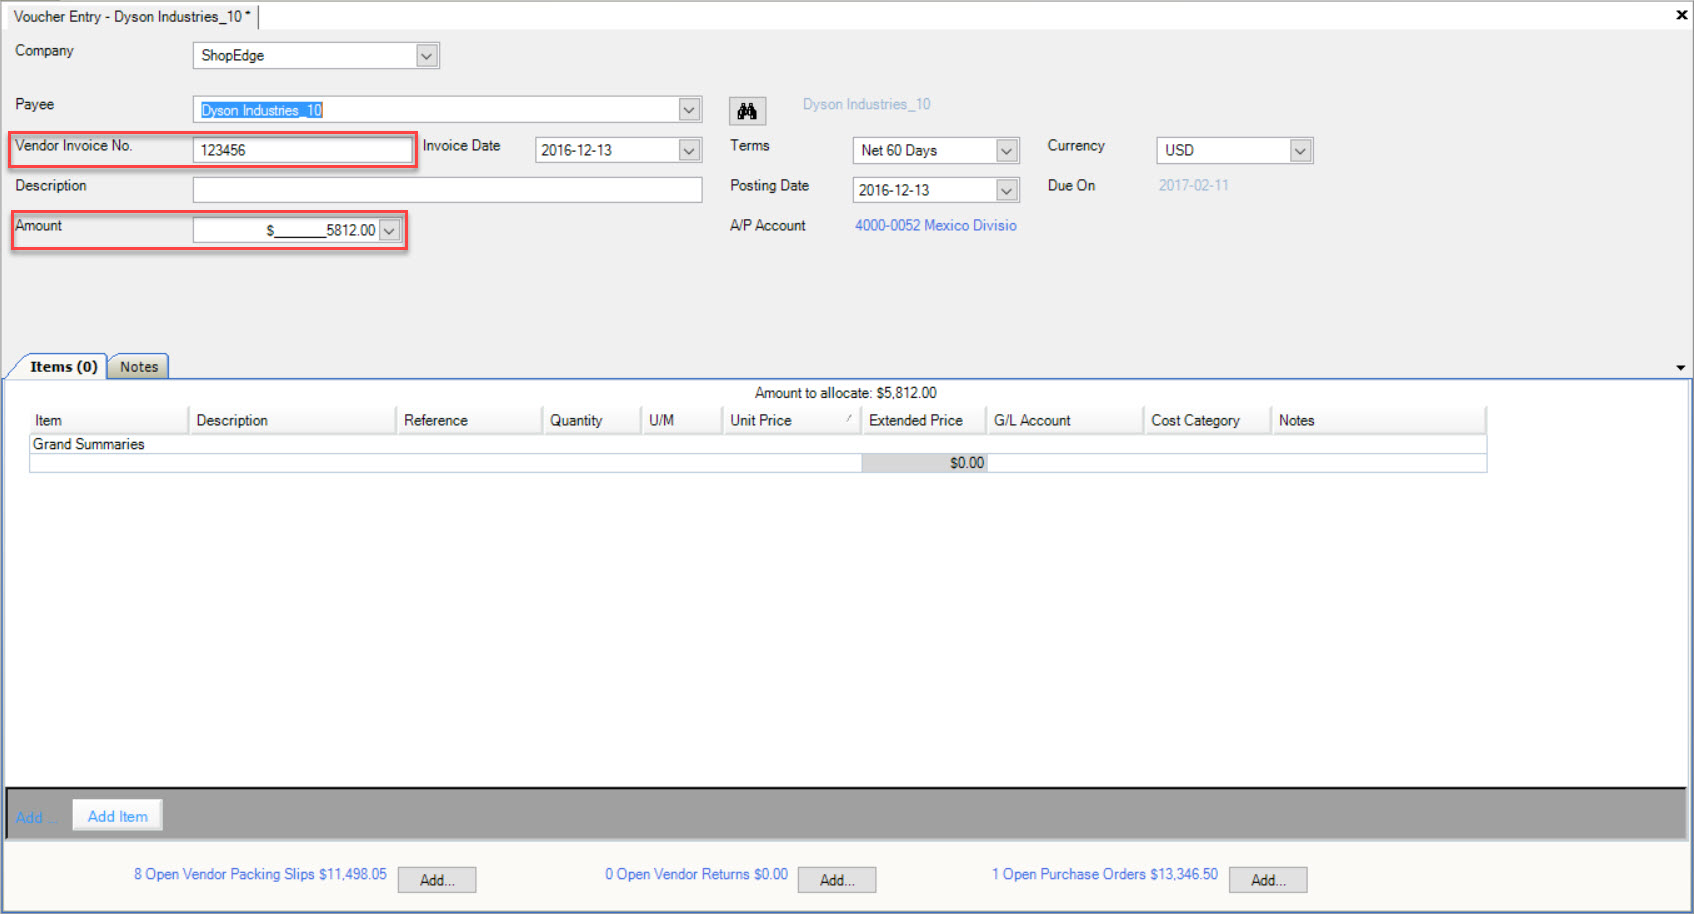
Then, click on the  button located at the bottom of the screen.
A new row will appear where you are able to enter in the Item, Description, Reference, Quantity, Unit of Measure, and to select the appropriate G/L account. Users can also enter in a Note using the Notes tab provided.
The Quantity will default to 1 and the Unit Price and Extended Price will have the entire amount allocated.
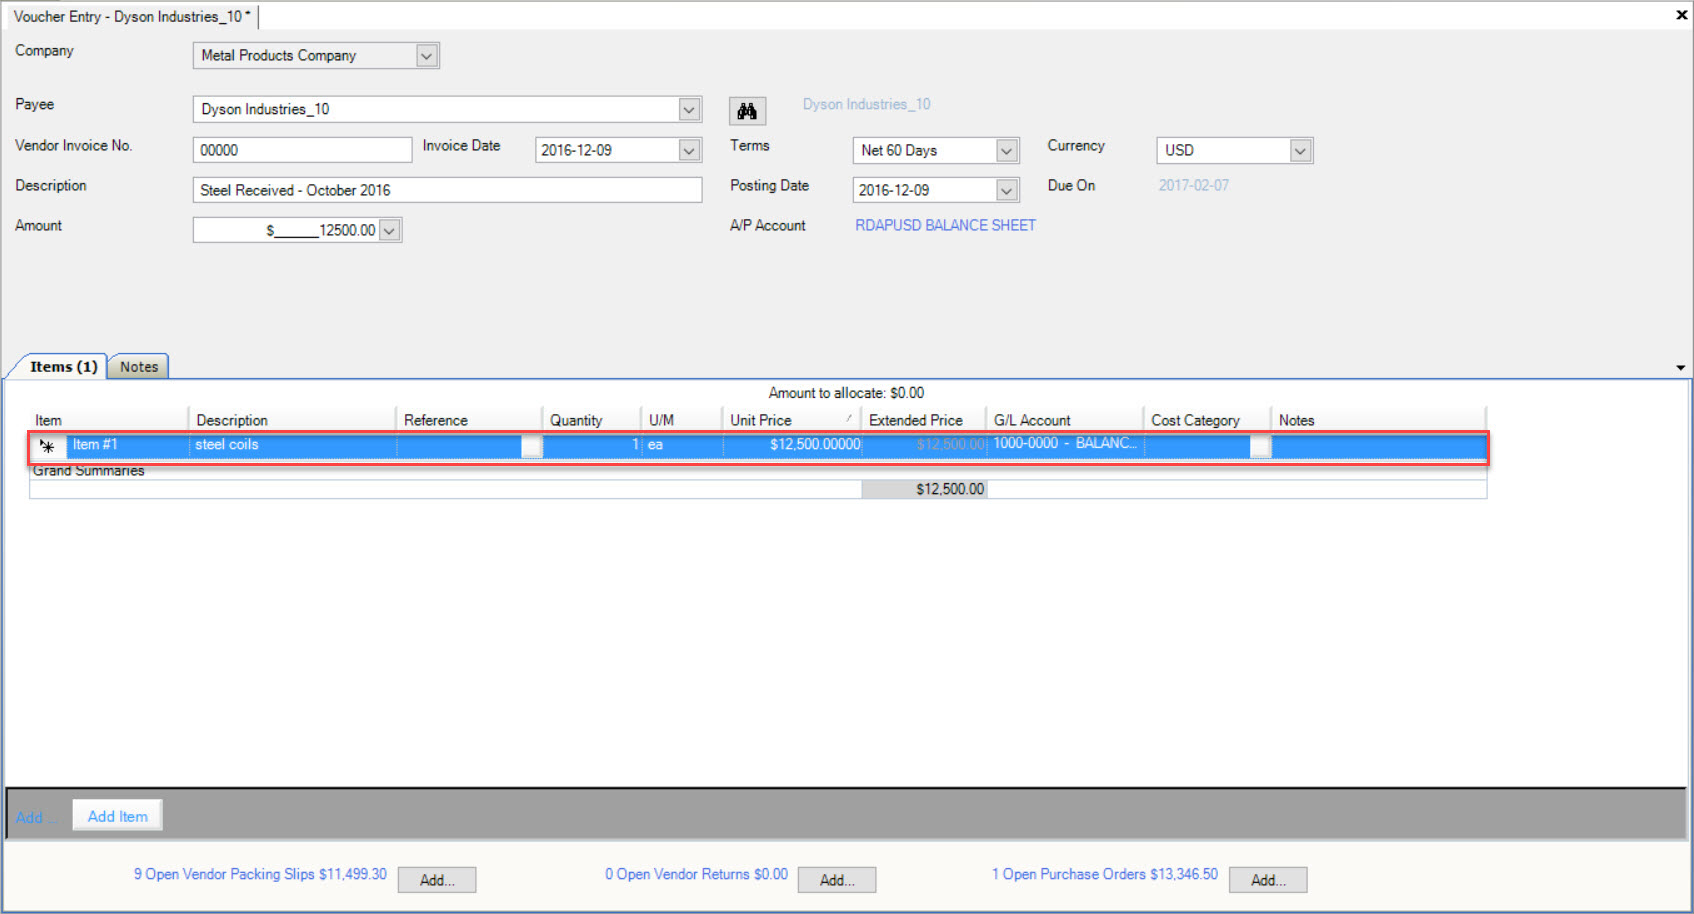
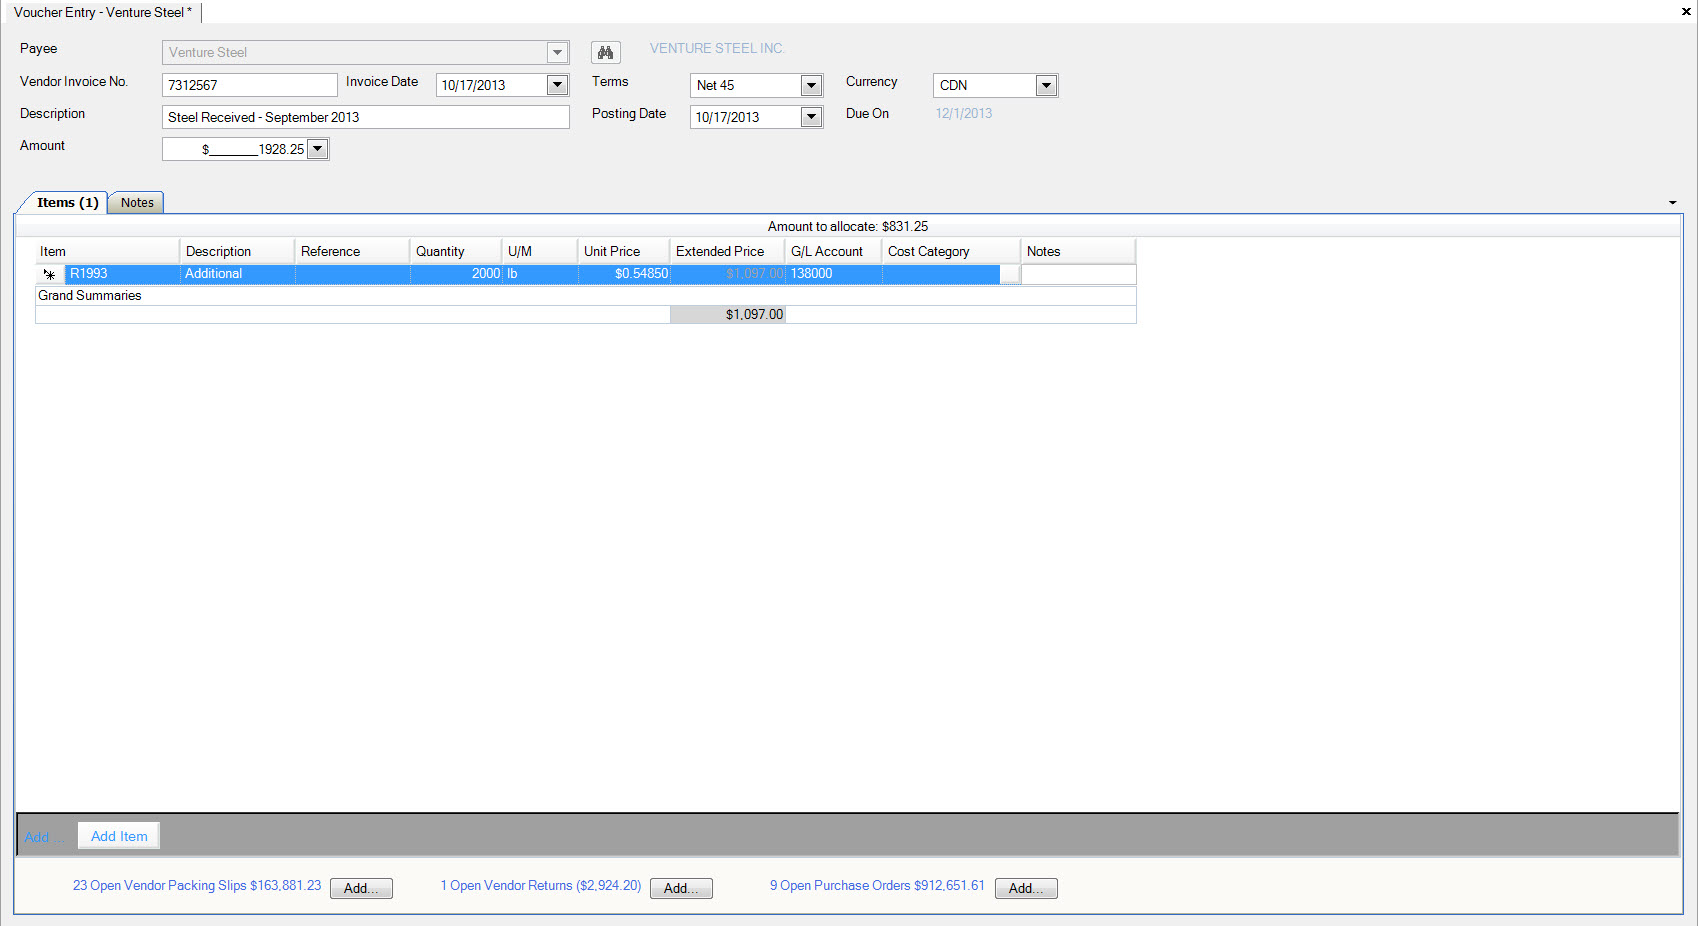
If the entire amount is not allocated to one Item line, then change the Quantity and Unit Price. Then add another row by clicking the  button.
Enter the required information and add additional rows until the entire Amount has been expensed and the Amount to allocate is 0.
Check the Posting Date and make sure to save your entry before exiting the screen.
Entering an A/P Voucher from a Non-Invoiced Packing Slip
An Invoice can be generated from a Non-Invoiced Packing Slip for all or selected Items.
If all Items are invoiced on a Non-Invoiced Packing Slip with no changes, the Packing Slip will be closed and will no longer be displayed on the Non-Invoiced Packing Slips lookup screen.
Non-Invoiced Packing Slips are receipts that have been done in the system, that haven’t yet had an A/P Voucher created for them.
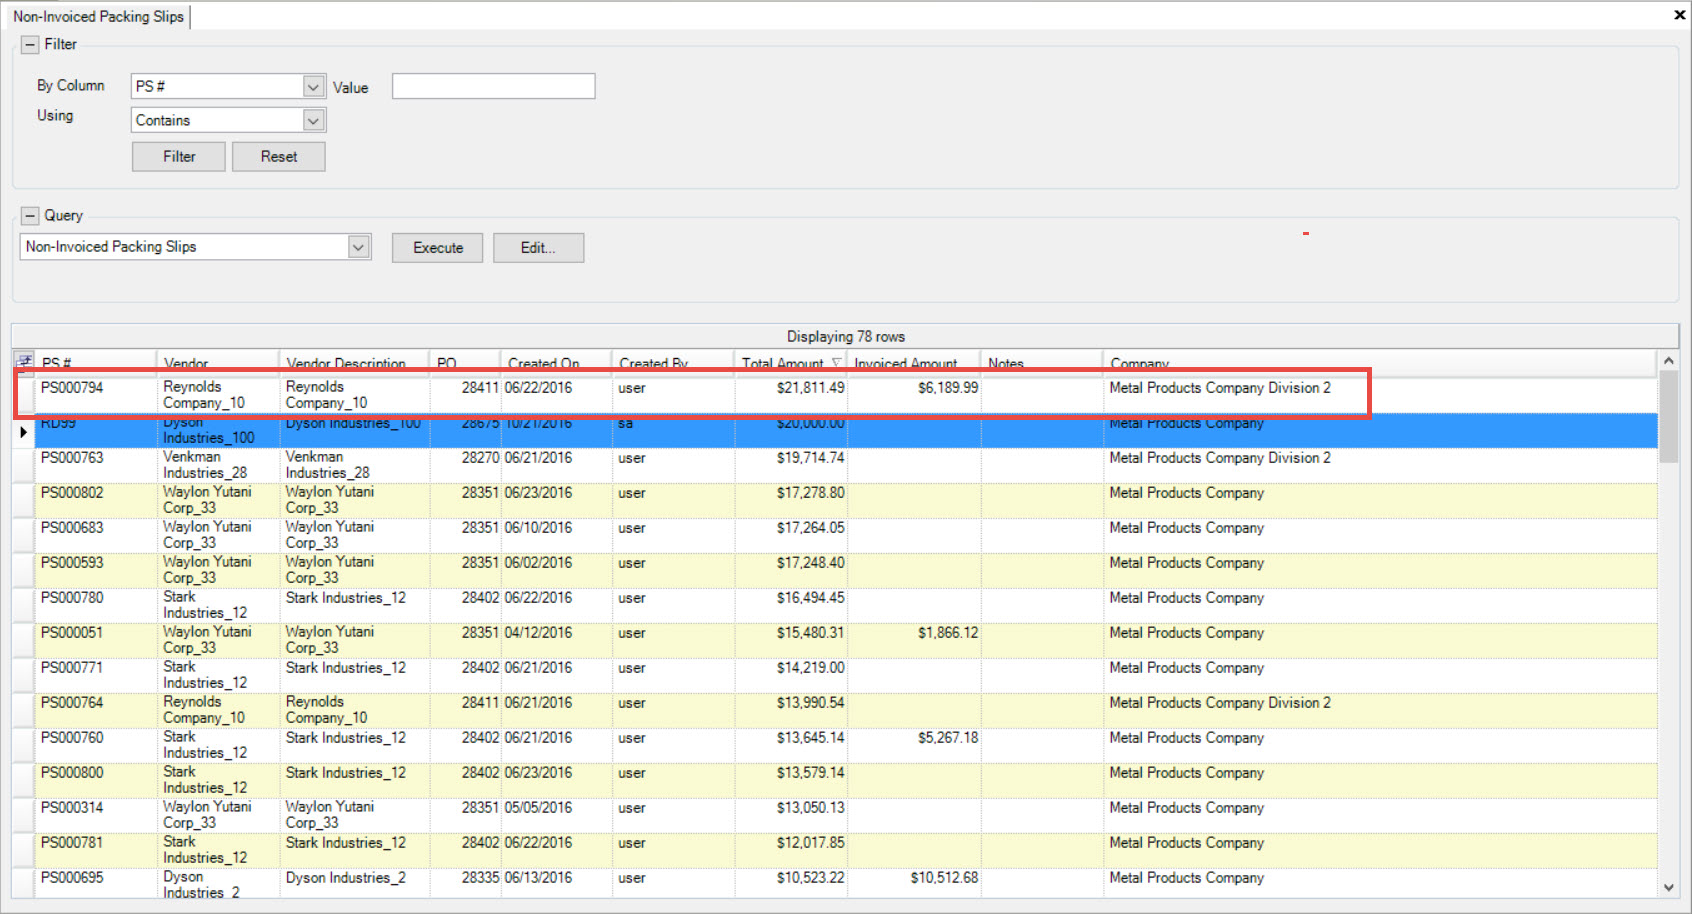
To view Non-Invoiced Packing Slips in the system, navigate to the  tab and click on the
 ![]() icon. This will
open the Non-Invoiced Packing Slips lookup screen.
icon. This will
open the Non-Invoiced Packing Slips lookup screen.
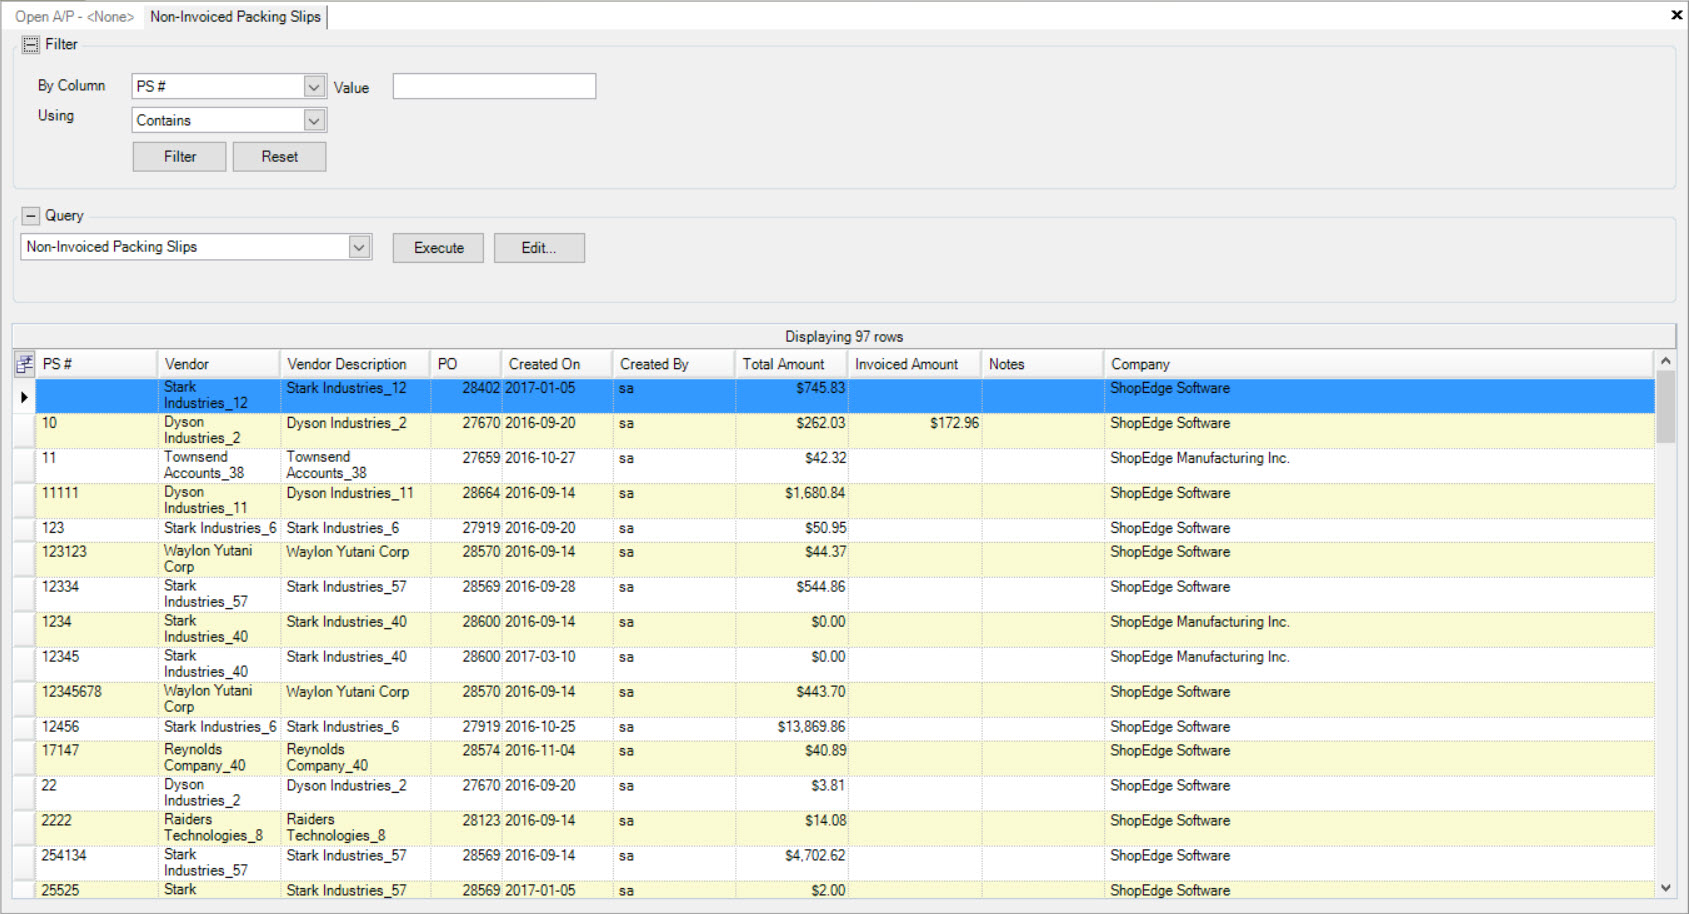
Locate the P/S # and double-click on the appropriate row. This will open the Voucher Entry screen where users are able to view the details as well as complete an A/P Voucher.
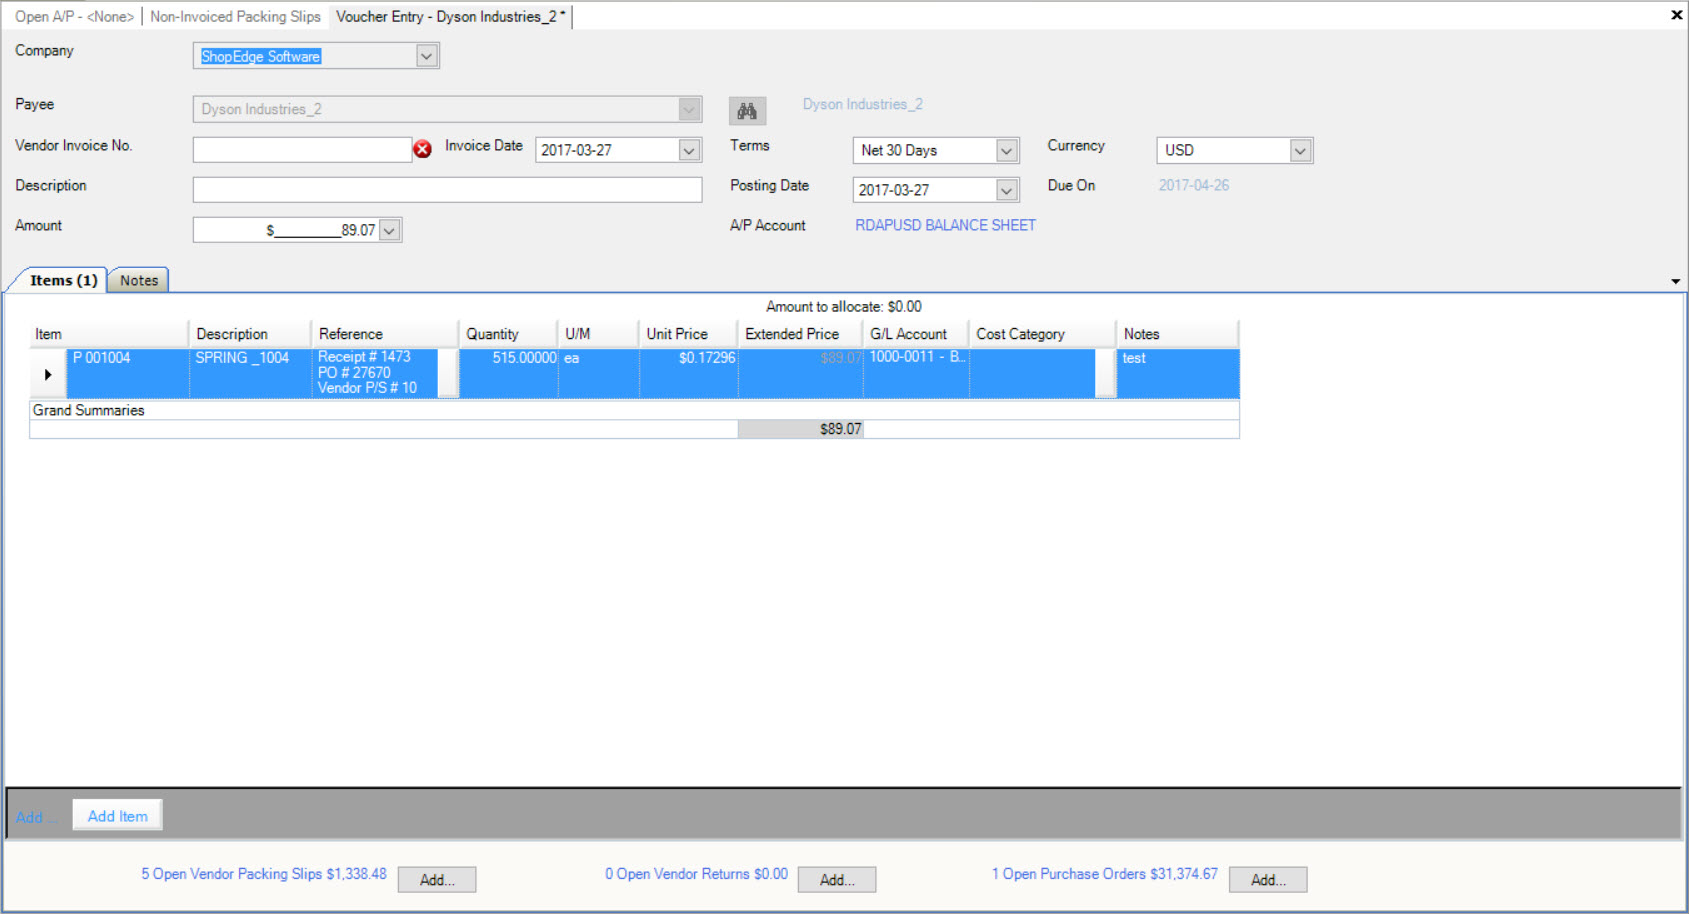
To generate an Invoice from a Non-Invoiced Packing Slip, navigate to the  tab and click on the
 ![]() icon. This will
open the Non-Invoiced Packing Slips lookup screen.
icon. This will
open the Non-Invoiced Packing Slips lookup screen.

To view a Non-Invoiced Packing Slip, locate the P/S # and double-click on the appropriate row to open a new Voucher Entry screen. The Items from the Vendor Packing Slip will be automatically added.
The Vendor Invoice No. is a required field that must be entered in. The Amount field will default to match the total amount of the Items that were received into the system.
Now, users can save the A/P Voucher. Once it is saved, the Non-Invoiced Packing Slip will be moved to the Open Invoices screen, and show as an Open Invoice on a Vendor account.
If Items are invoiced to a Vendor Packing Slip or the Quantity is reduced for an Item, the Packing Slip will remain open and will be displayed on the Non-Invoiced Packing Slips lookup screen. It will show the invoiced amount and will be available for selection from the Open Vendor Packing Slips window in the Voucher Entry screen.
Changing the Unit Price or increasing the Quantity in the Voucher Entry screen for an item on the Non-Invoiced Packing Slip, will not keep it open.
Adding Additional Vendor Packing Slips to an A/P Voucher
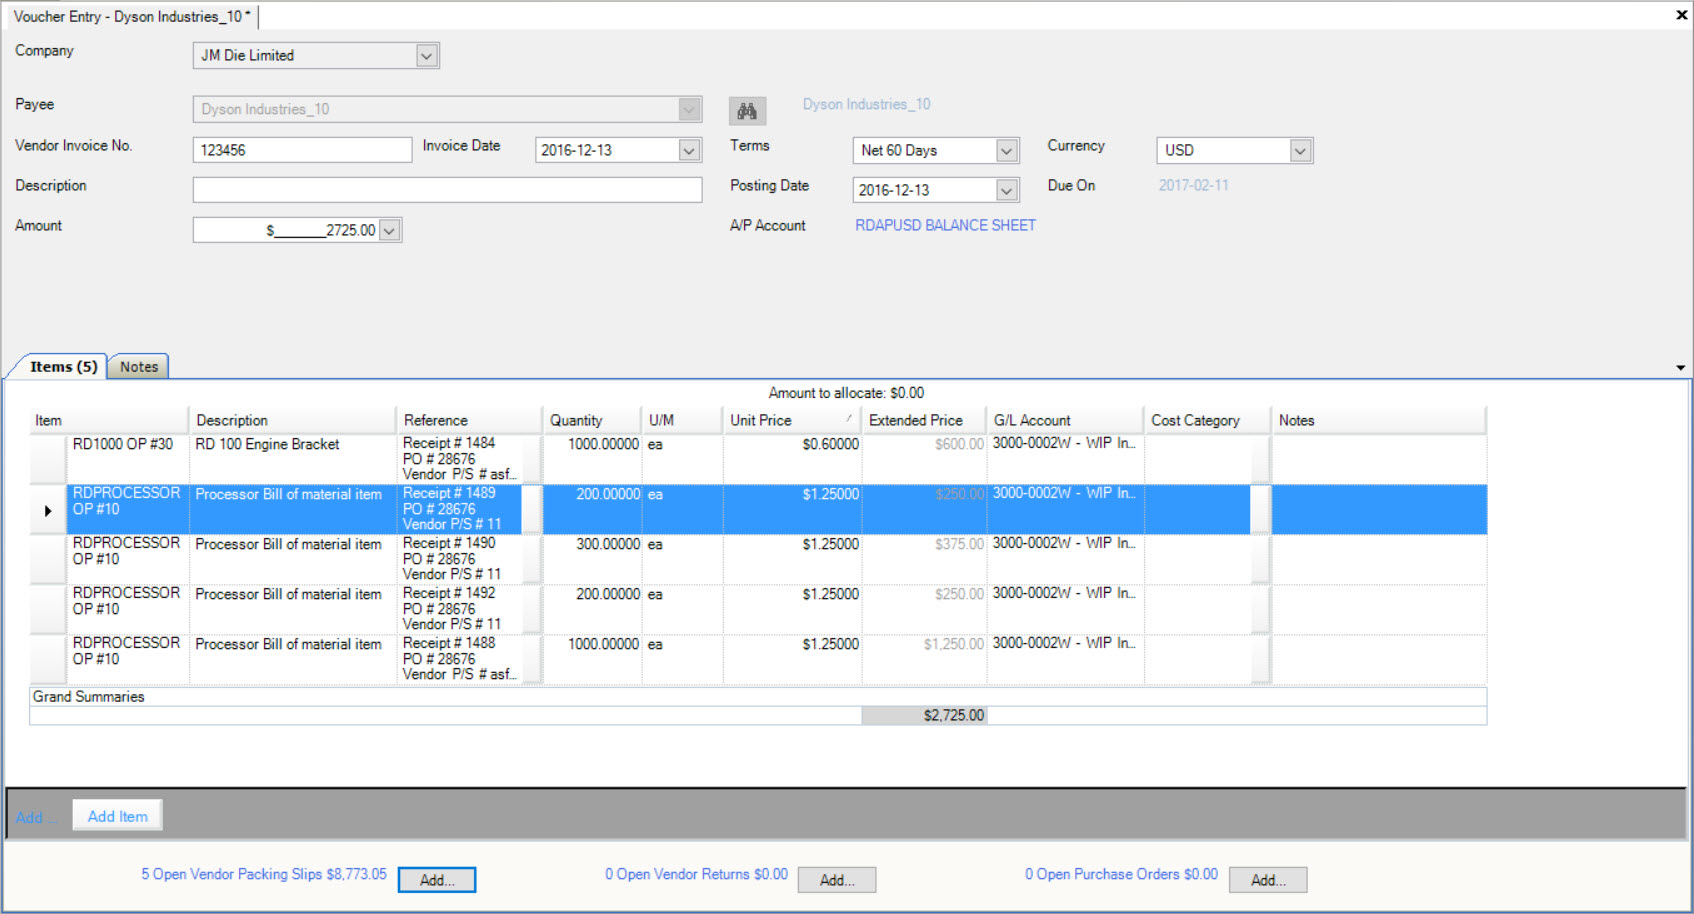
All open Vendor Packing Slips associated with a Vendor can be viewed at the bottom left of the screen when in the A/P Voucher Entry screen.
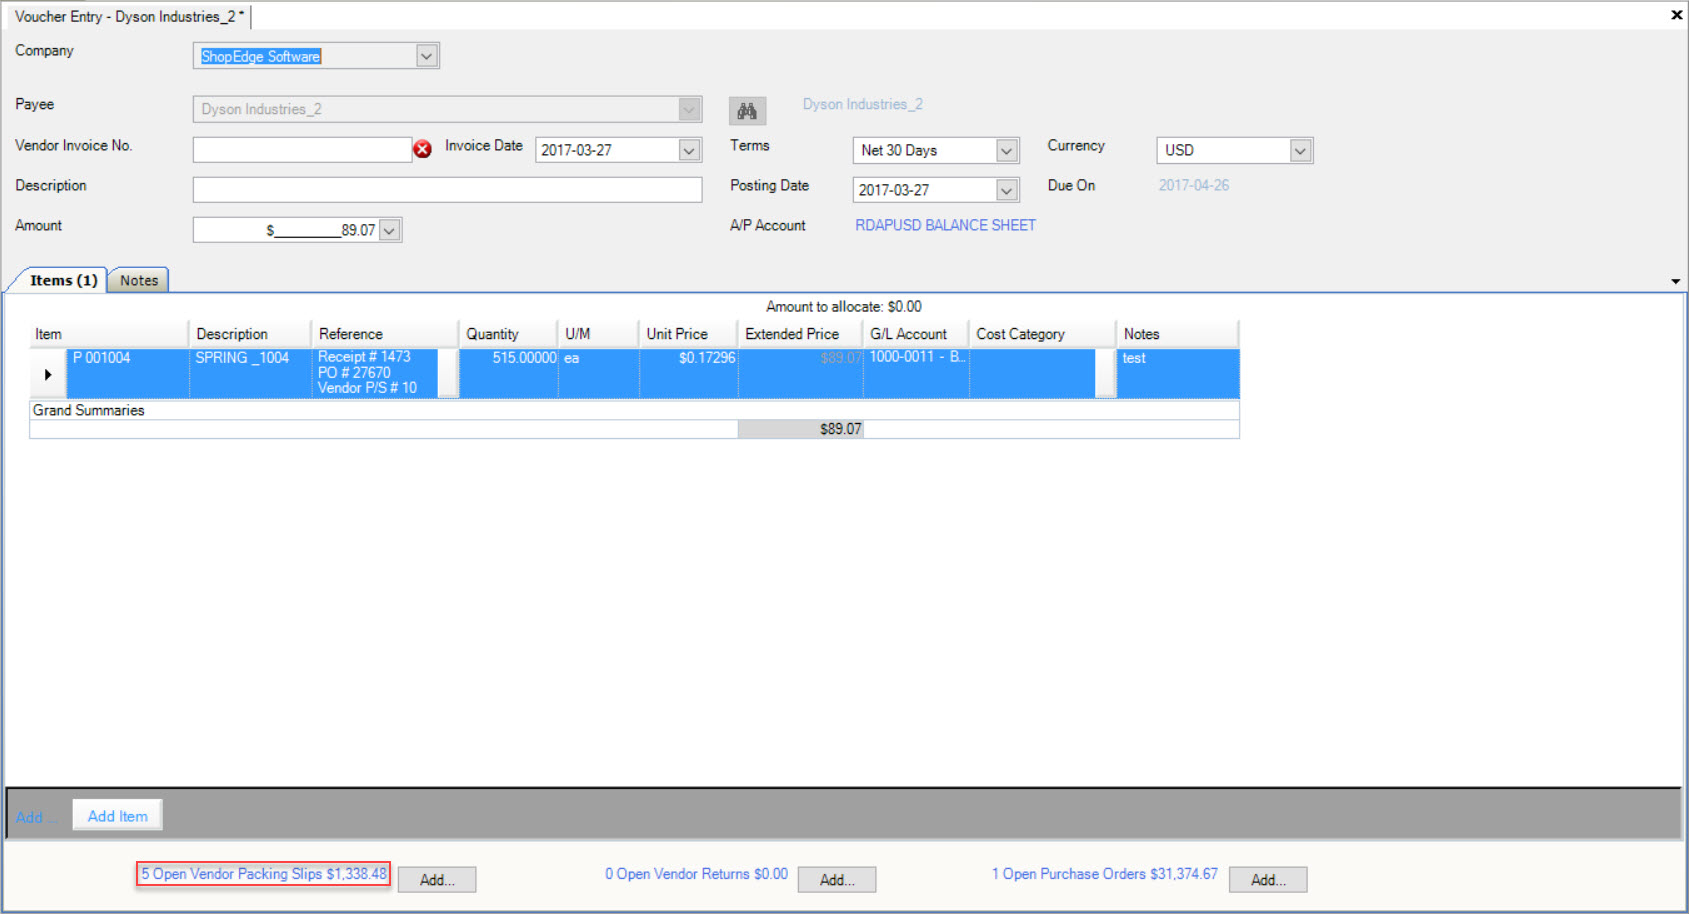
To add an additional Vendor Packing Slip, click on the  button next to the Open Vendor Packing Slips located at the bottom left of the screen.
The Open Vendor Packing Slips window will appear. There are now two options for the Vendor Packing Slip: fully invoiced or partially invoiced.
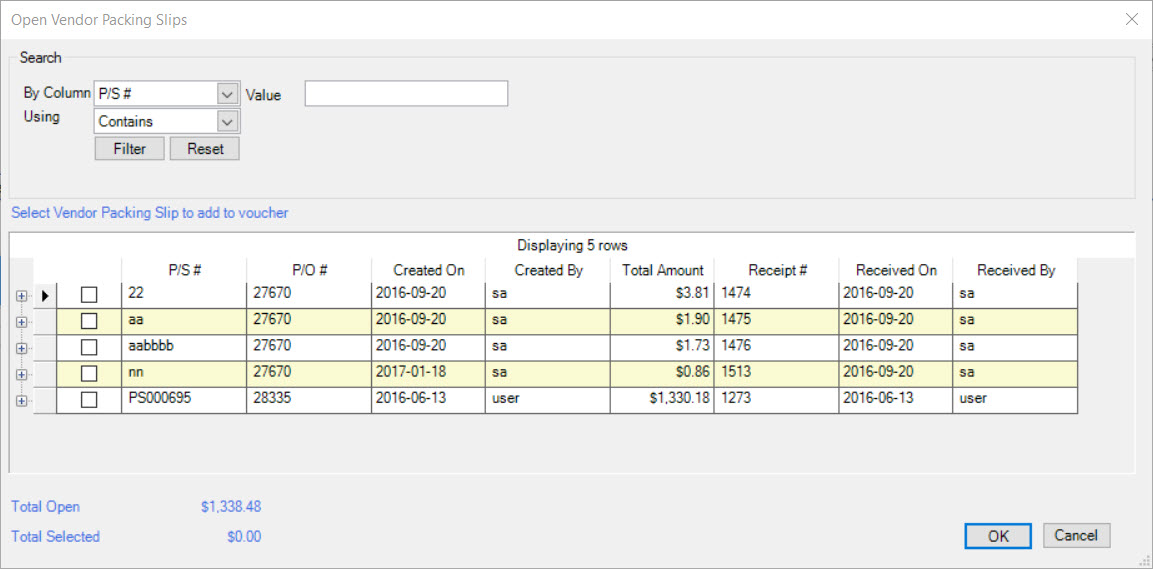
- Vendor Packing Slip Fully Invoiced
Select the packing slip by clicking the checkbox. Click on the  button.
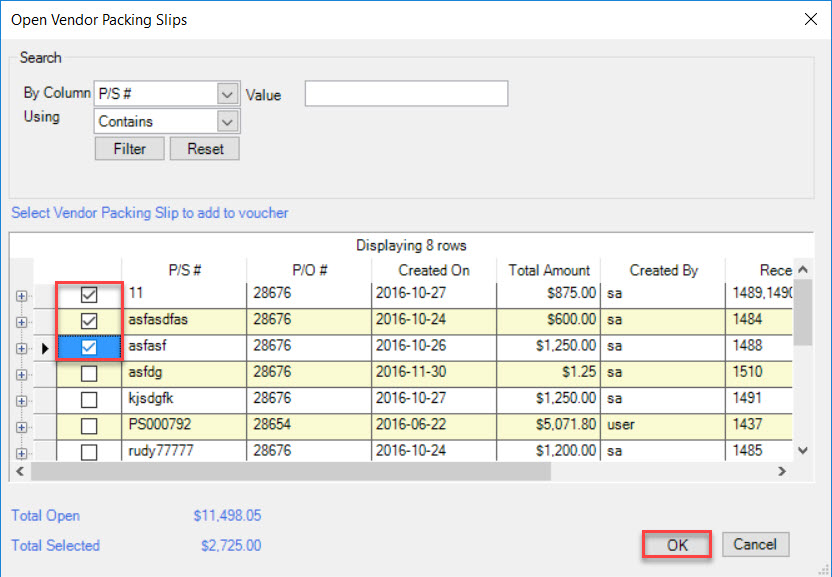
Note
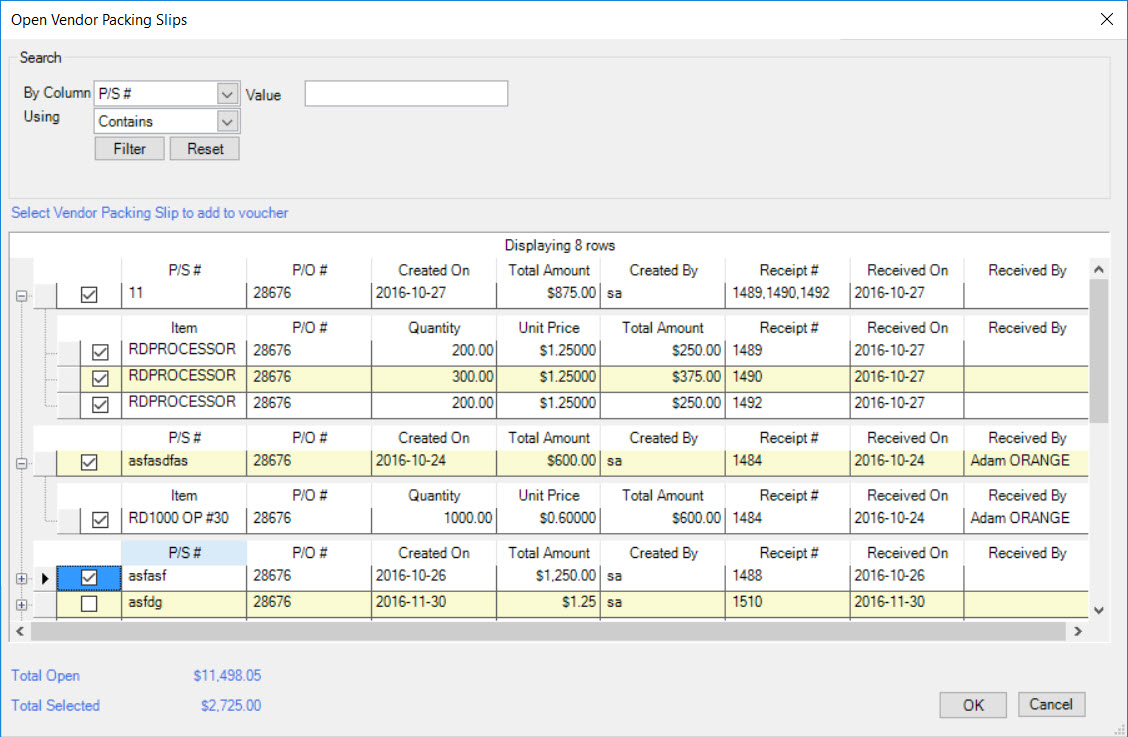
The Items on the packing slip can also be displayed by clicking on the plus sign beside the packing slip row.
The Amount in the header and the Amount to allocate will be 0. Check the Posting Date and make sure to save your entry before exiting the screen.
- Vendor Packing Slip Partially Invoiced
Click on the plus sign beside the packing slip row to display the Items.

Select the Items to be included by clicking the check box next to each Item. Then, click the  button.
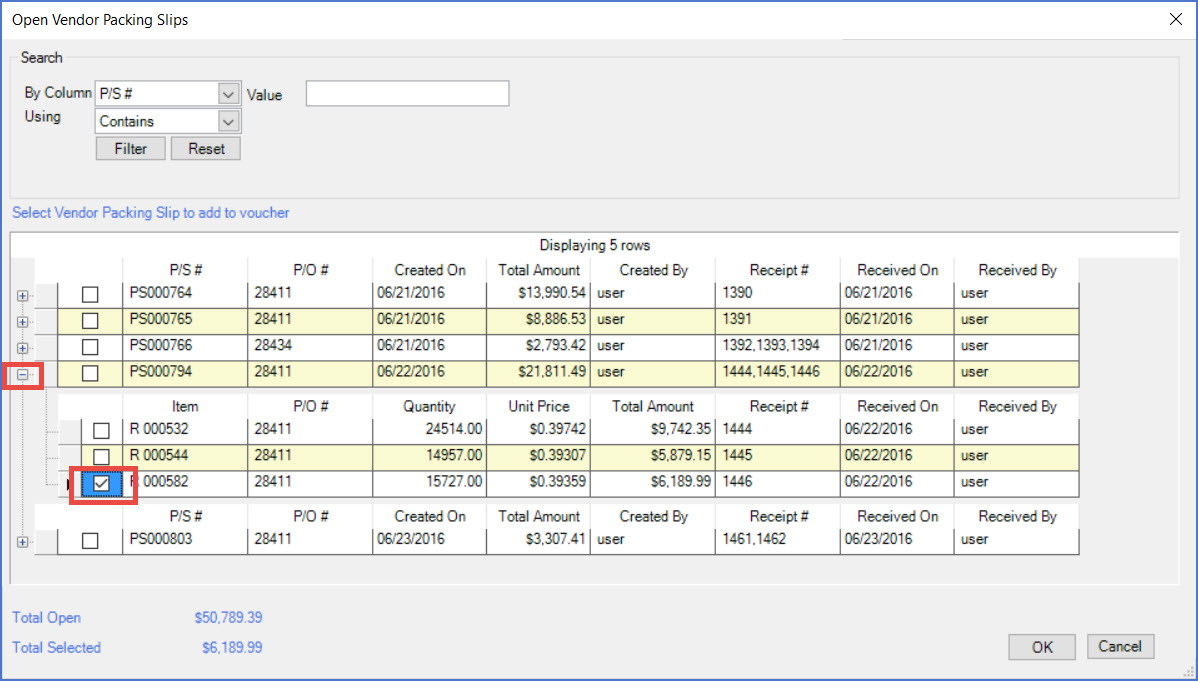
The Amount on the header and the Amount to allocate will be 0. Check the Posting Date and make sure to save your entry before exiting the screen.
The packing slip will remain open for the non-invoiced Item(s) and will be displayed on the Non-Invoiced Vendor Packing Slips lookup screen showing the invoiced amount.
Generating a Credit from a Vendor Return
A Credit can be generated from a Vendor Return for all or selected Items.
If all the Items are credited on a Vendor Return with no changes, the Vendor Return is closed and will no longer be displayed on the Non-Invoiced Vendor Packing Slips lookup screen.
When selected, Items are credited on a Vendor Return or the Quantity is reduced for an Item, the Vendor Return will remain open and will be displayed on the Non-Invoiced Vendor Packing Slips lookup screen. It will show the invoiced amount and will be available for selection from the Open Vendor Returns window in the Voucher Entry screen.
To generate a Credit from a Vendor Return, open a new A/P Voucher Entry screen (following one of the steps above).

Select the Payee using the drop-down menu, fill out the necessary information, and leave the Amount box blank in the header at the top of the screen.
Click the  button to open the Open Vendor Returns window.
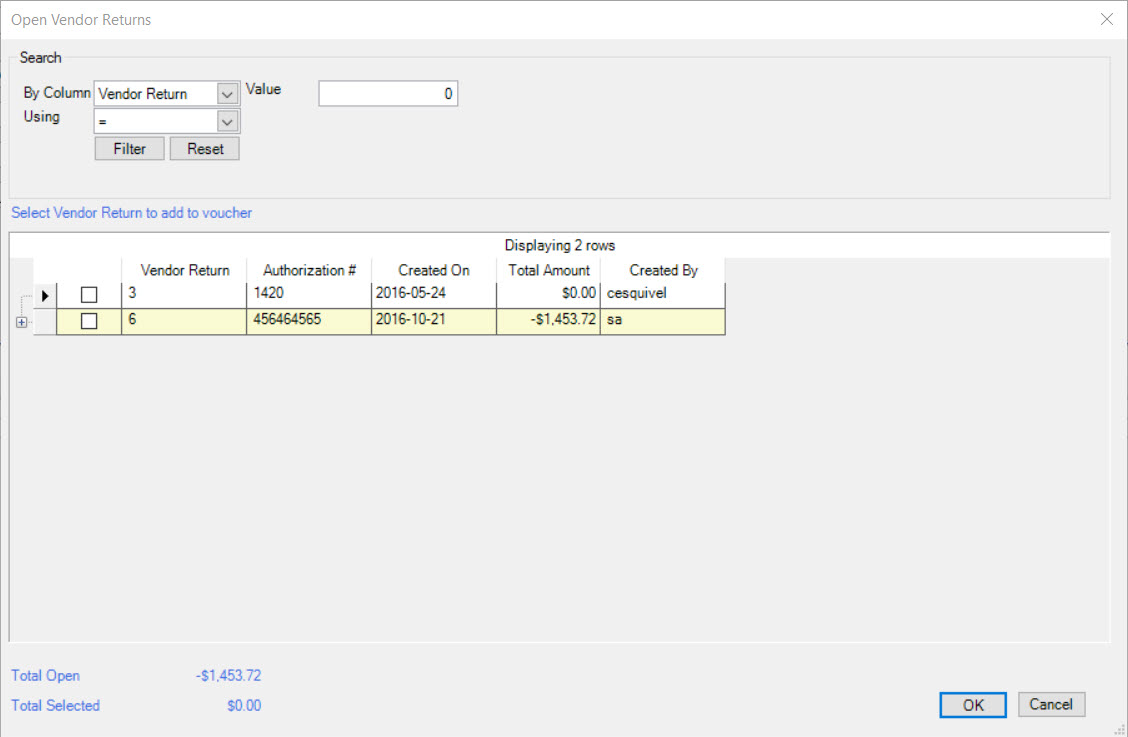
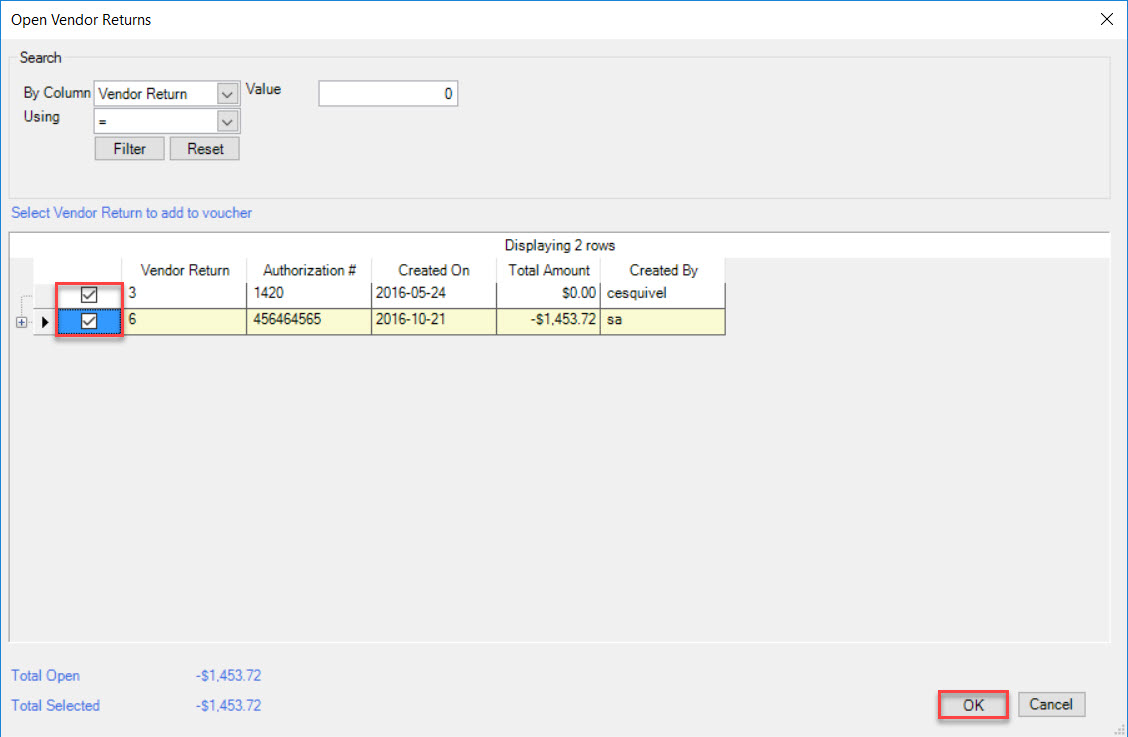
Select the Vendor Return by selecting the checkbox beside the appropriate row and click on the  button.
Note
The Items on the Vendor Return can also be displayed by clicking on the plus sign beside the appropriate row. This will allow only selected Items from the Vendor Return to be included on the Voucher Entry screen by clicking the check box next to the Item.
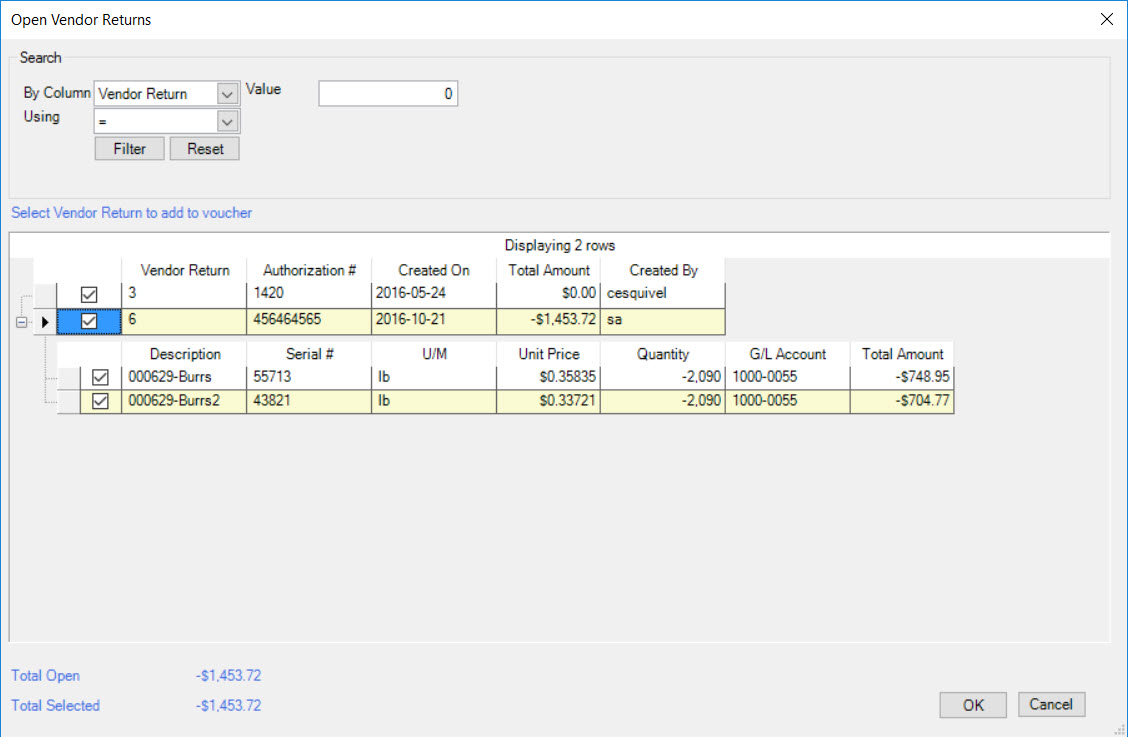
The Amount in the header and the Amount to allocate will be 0. Check the Posting Date and make sure to save your entry before exiting the screen.
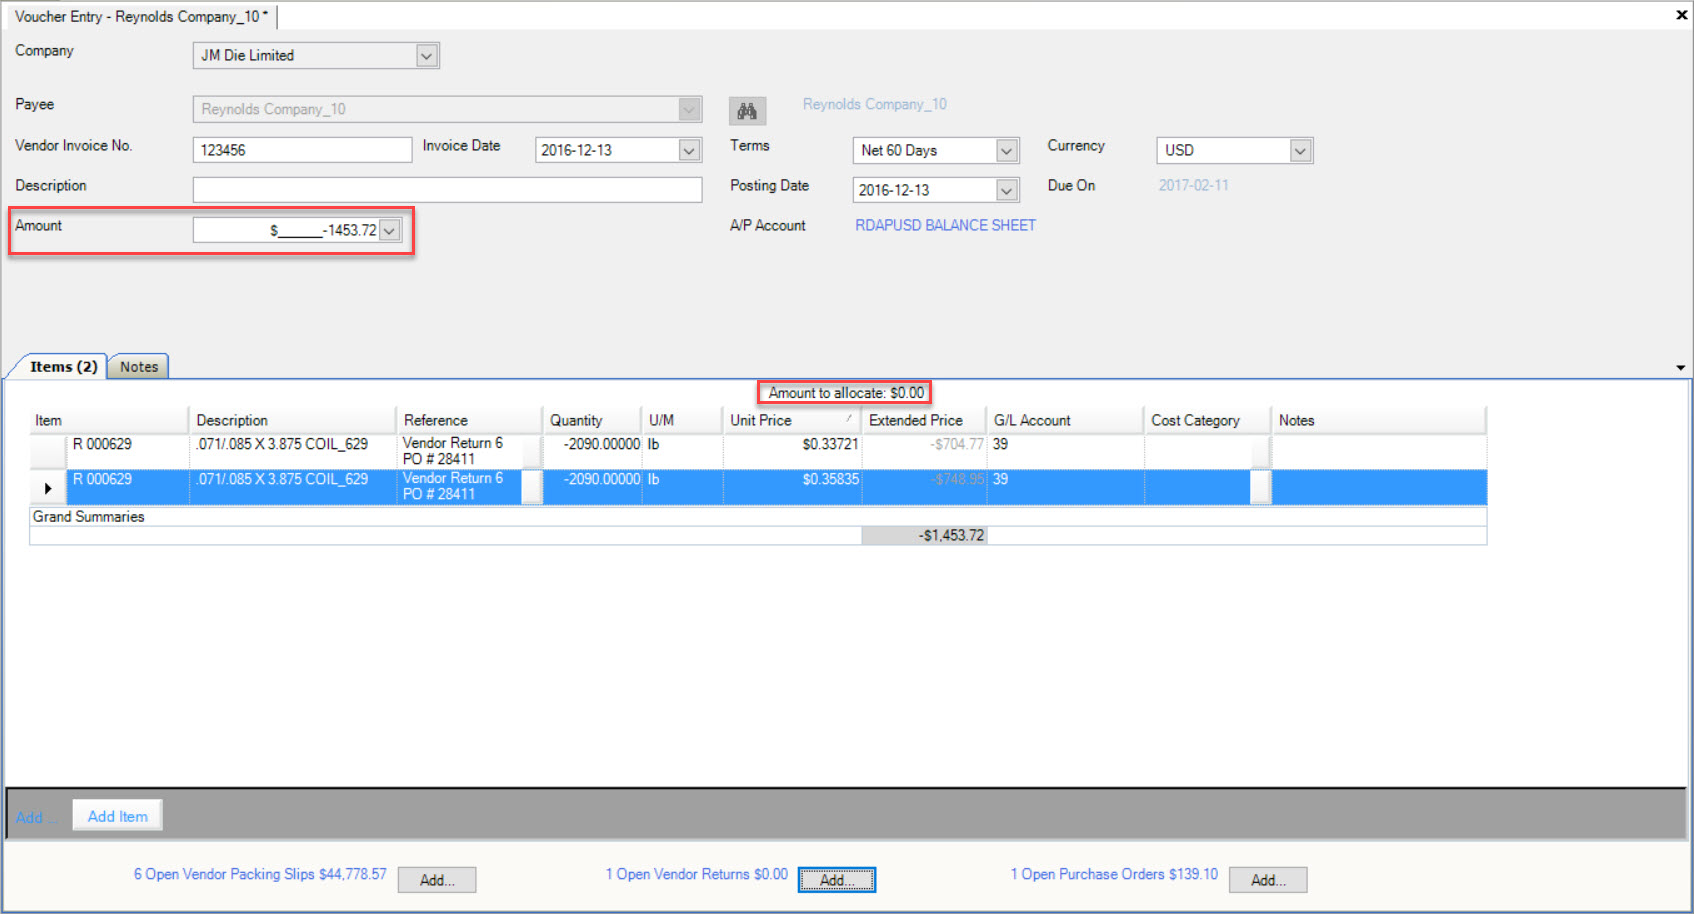
Note
The Amount will be a negative number as this is a Vendor Return.
Generating an Invoice from a Purchase Order
An Invoice can be generated from a Purchase Order for all or selected Items.
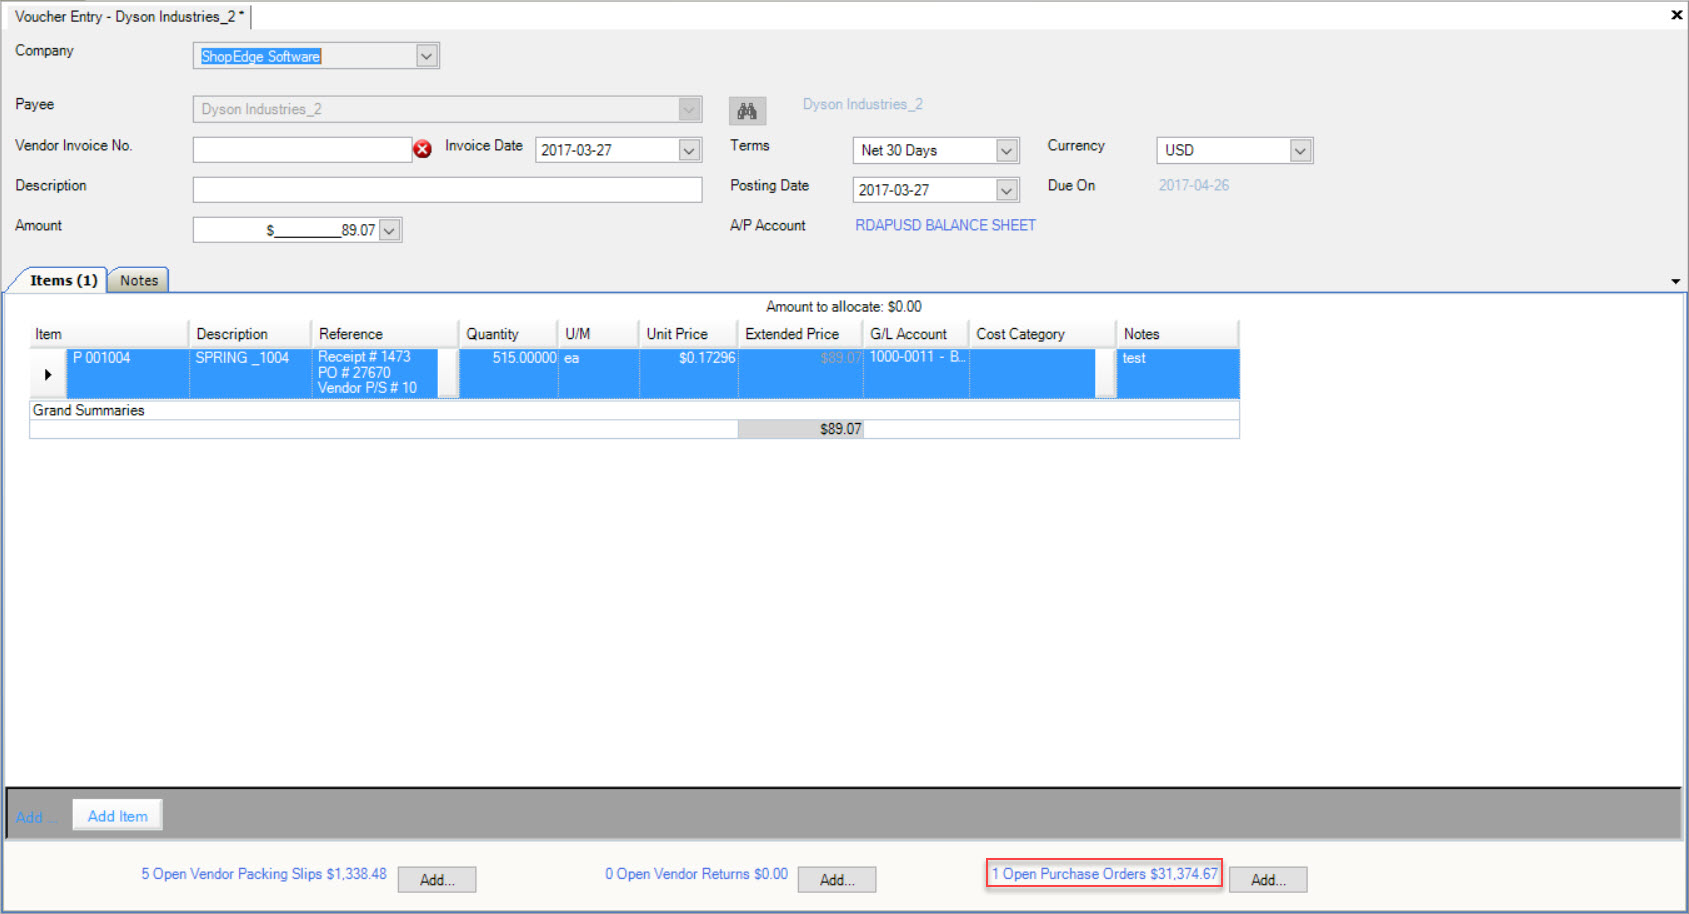
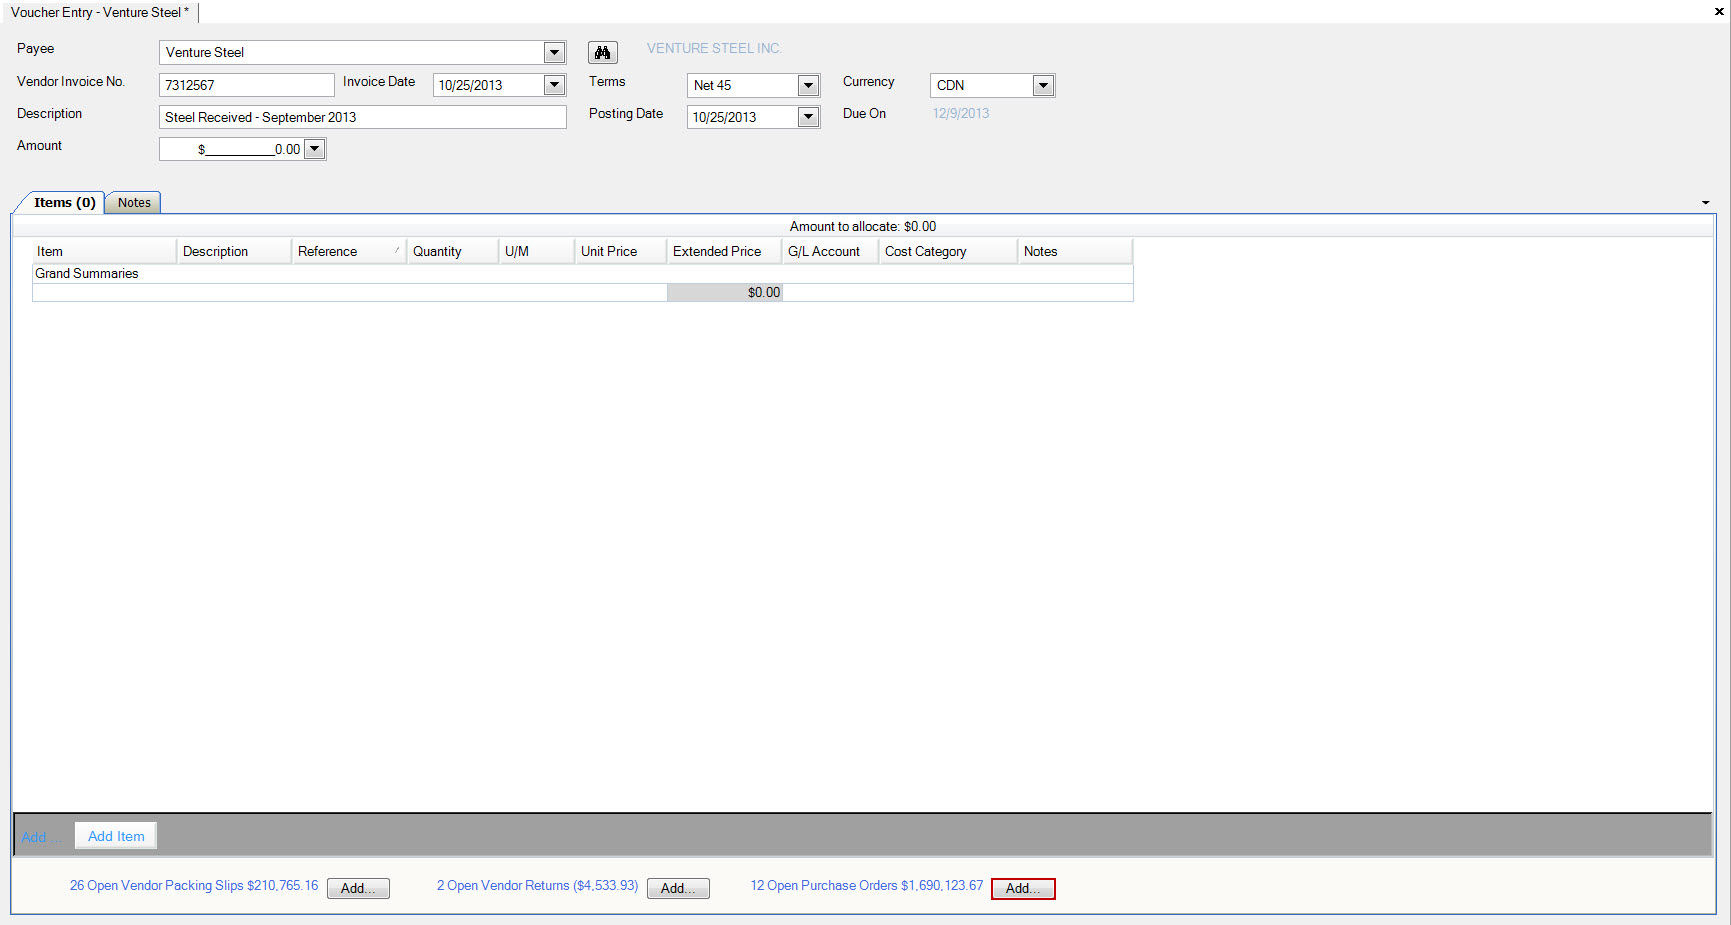
Open Purchase Orders related to the selected Vendor are only displayed at the bottom right of the A/P Voucher screen. Open Purchase Orders are only displayed in the Open Purchase Orders window if they have an open Quantity.
When all the Items are selected on a normal Purchase Order and no changes to the Quantity are made, the Purchase Order will be closed.
If the Quantity for an Item is reduced in the Voucher Entry screen, the Purchase Order will remain open and will be displayed on the Open Purchase Orders window in the Voucher Entry screen for selection.
Changing the Unit Price or increasing the Quantity in the Voucher Entry screen for an Item on the Purchase Order will not keep it open.
When invoicing against the Purchase Order, a receipt is created automatically by completing the receipt details on the Receipt Information screen.
To generate an Invoice from a Purchased Order, open a new A/P Voucher Entry screen (following one of the steps above).

Select the Payee using the drop-down menu, and fill out the necessary information. Leave the Amount box blank in the header located at the top of the screen.
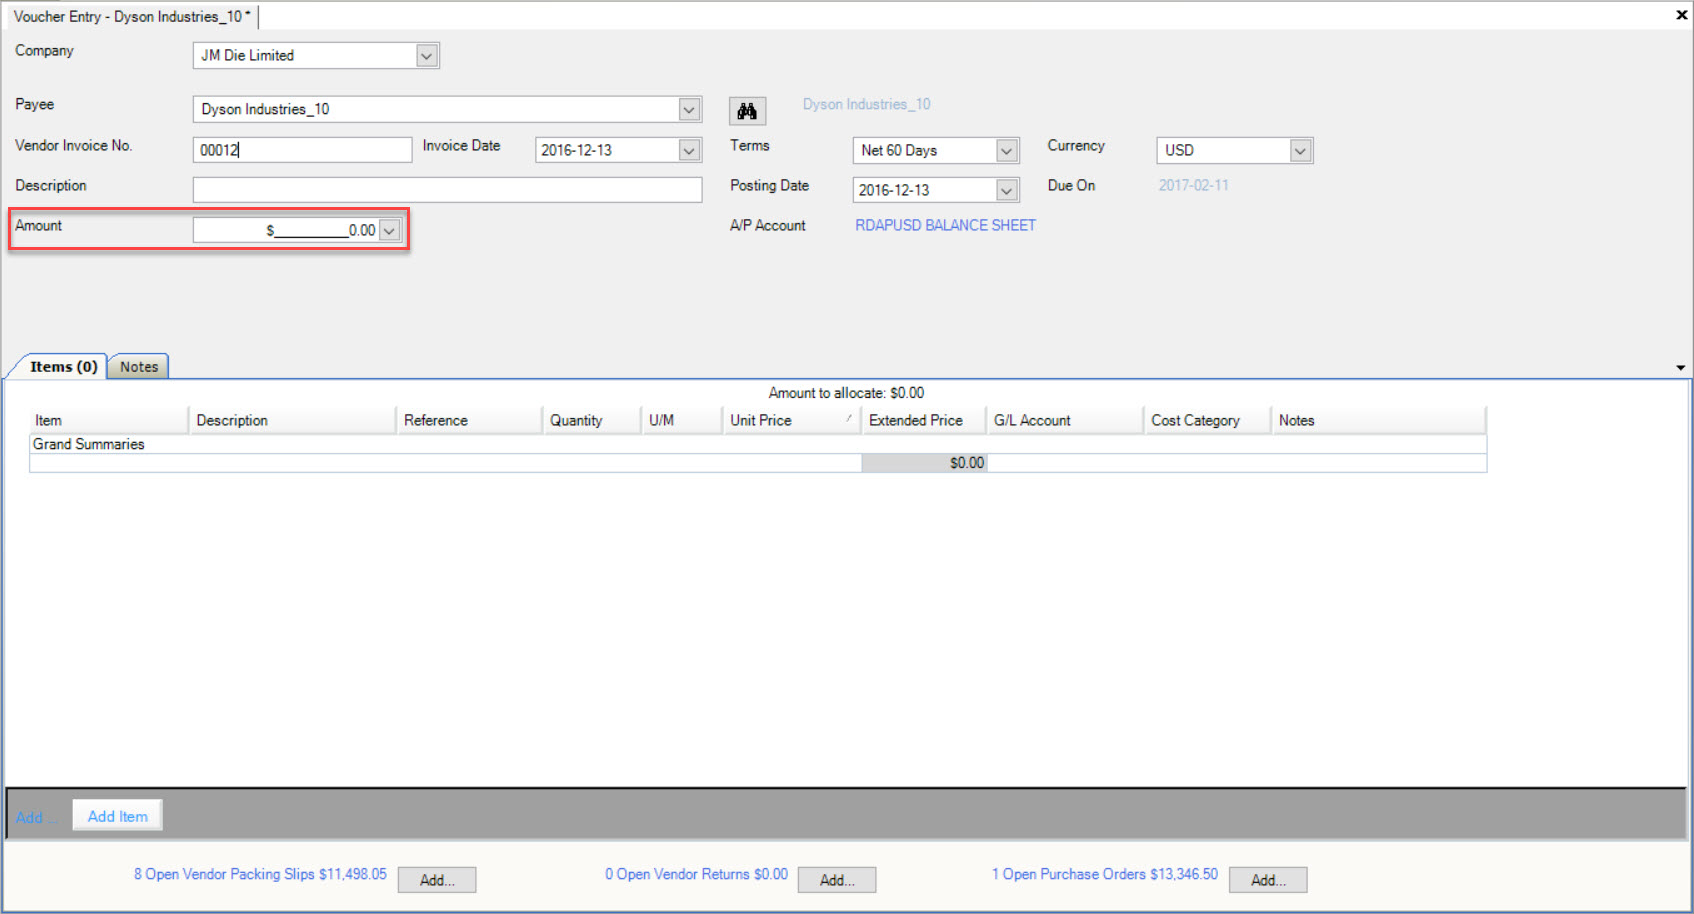
Click the  button next to the Open Purchase Orders located at the bottom of the screen.
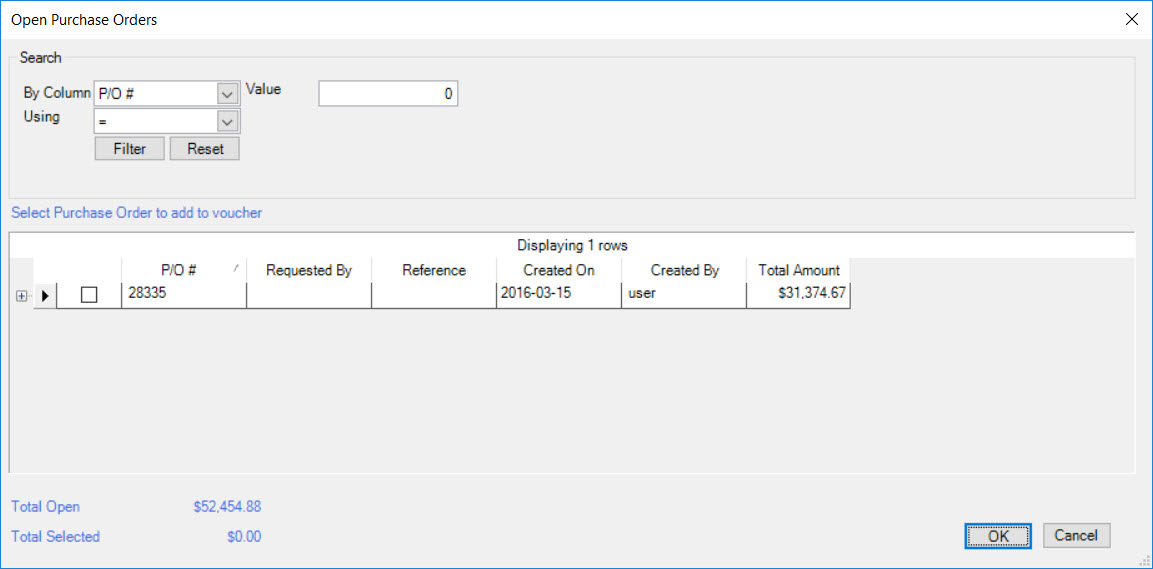
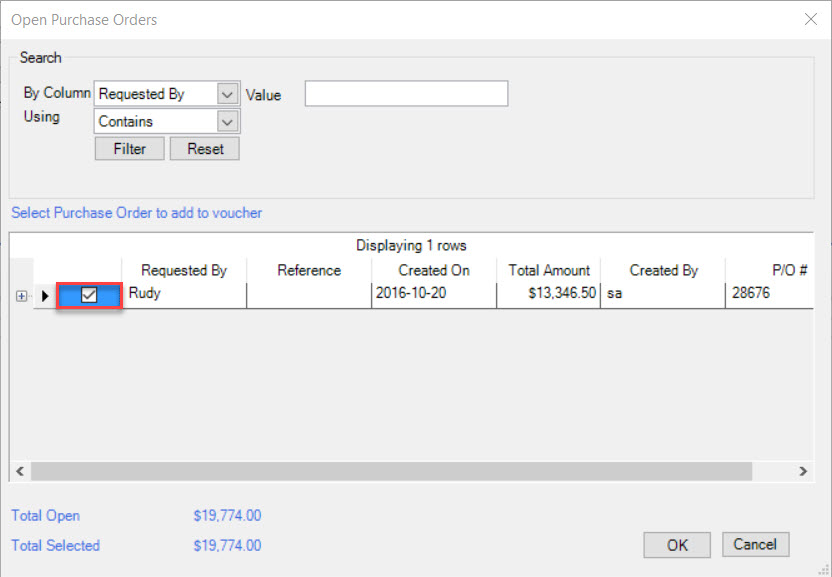
The Open Purchase Orders window will be displayed. Select the Purchase Order and click the  button.
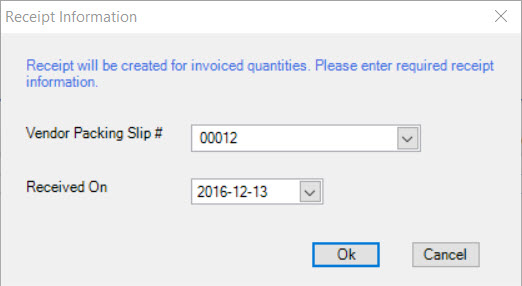
The Receipt Information window will appear. Users must verify the Vendor Packing Slip# and the Received On date. Then, click on the  button.
Note
The Items on the Purchase Order can also be displayed by clicking on the plus sign located beside the Purchase Order row. This will allow only selected Items to be included on the Voucher Entry by clicking the check box next to the appropriate Item(s).
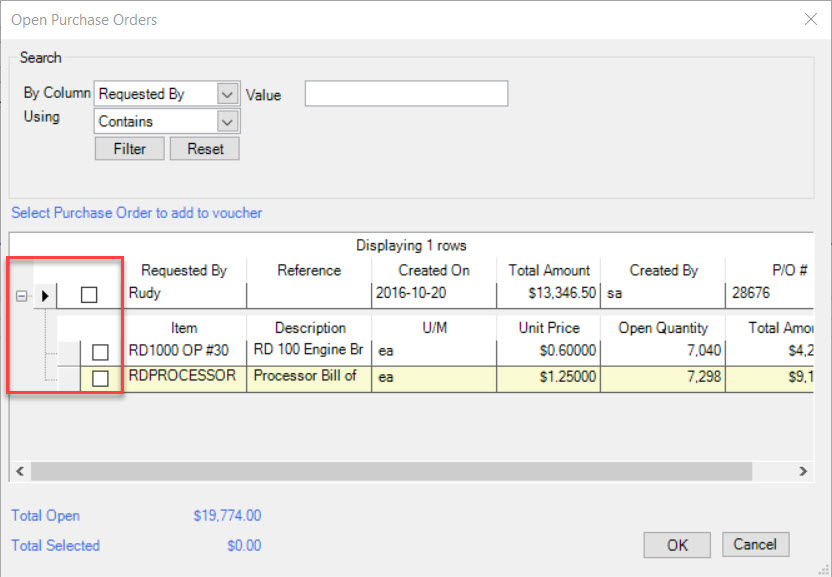
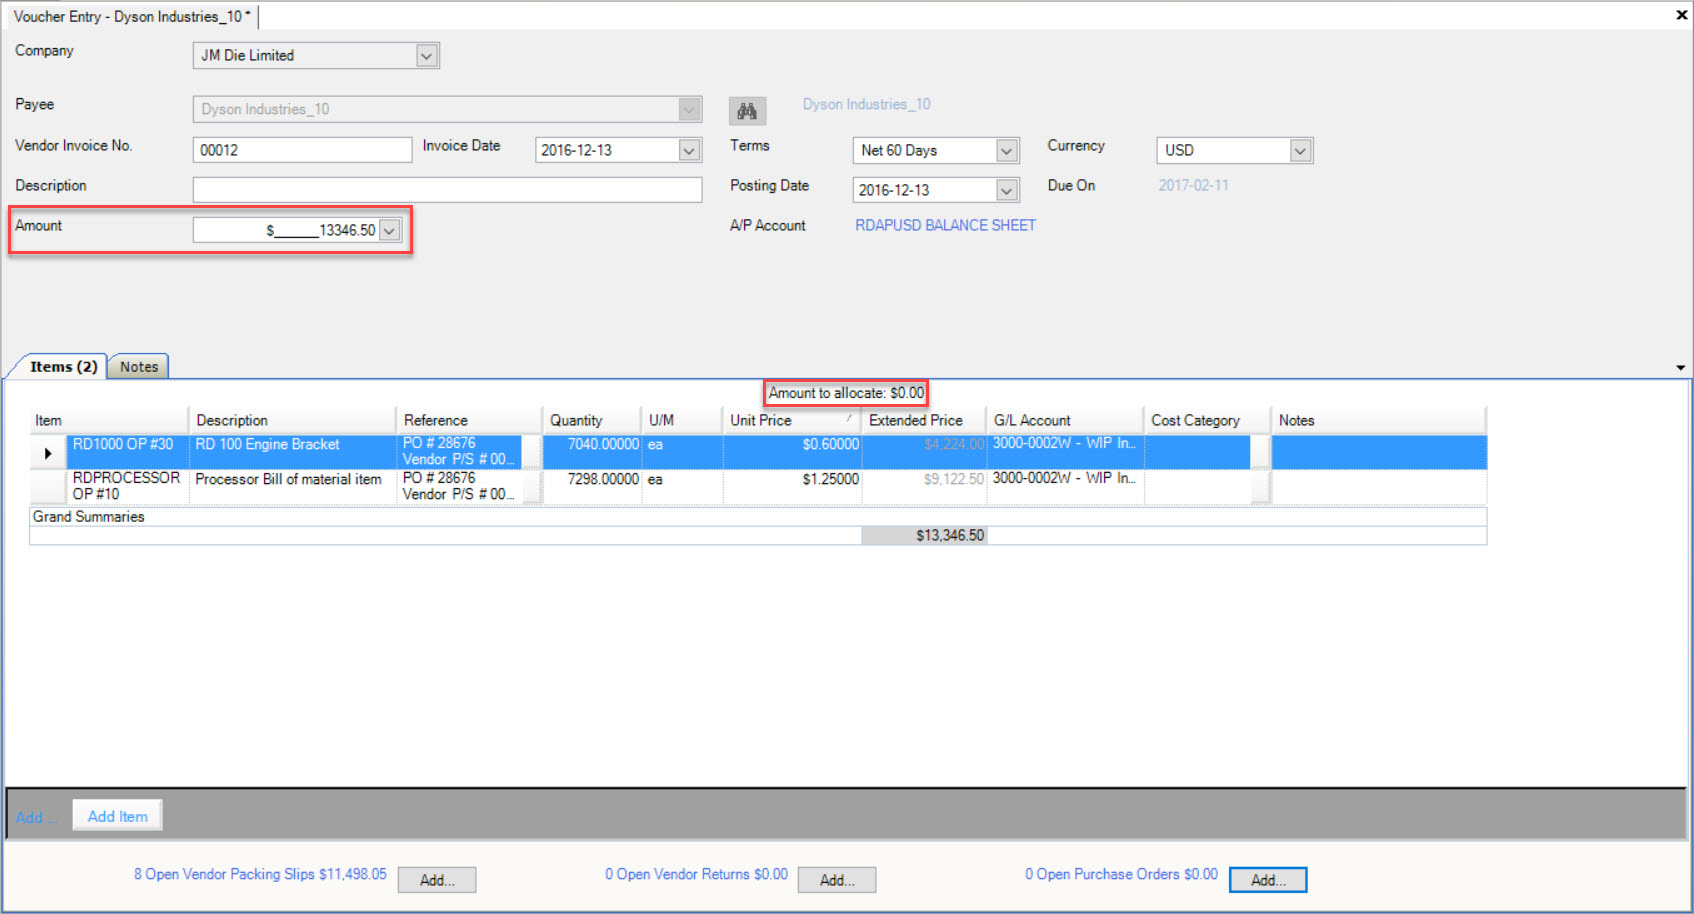
The Purchase Order amount will automatically update the Amount in the header and the Amount to allocate will be 0.
Check the Posting Date and make sure to save your entry before exiting the screen.
Changing the Quantity or Unit Price
The Quantity and Unit Price can be changed on an Item line for an Invoice or Credit.
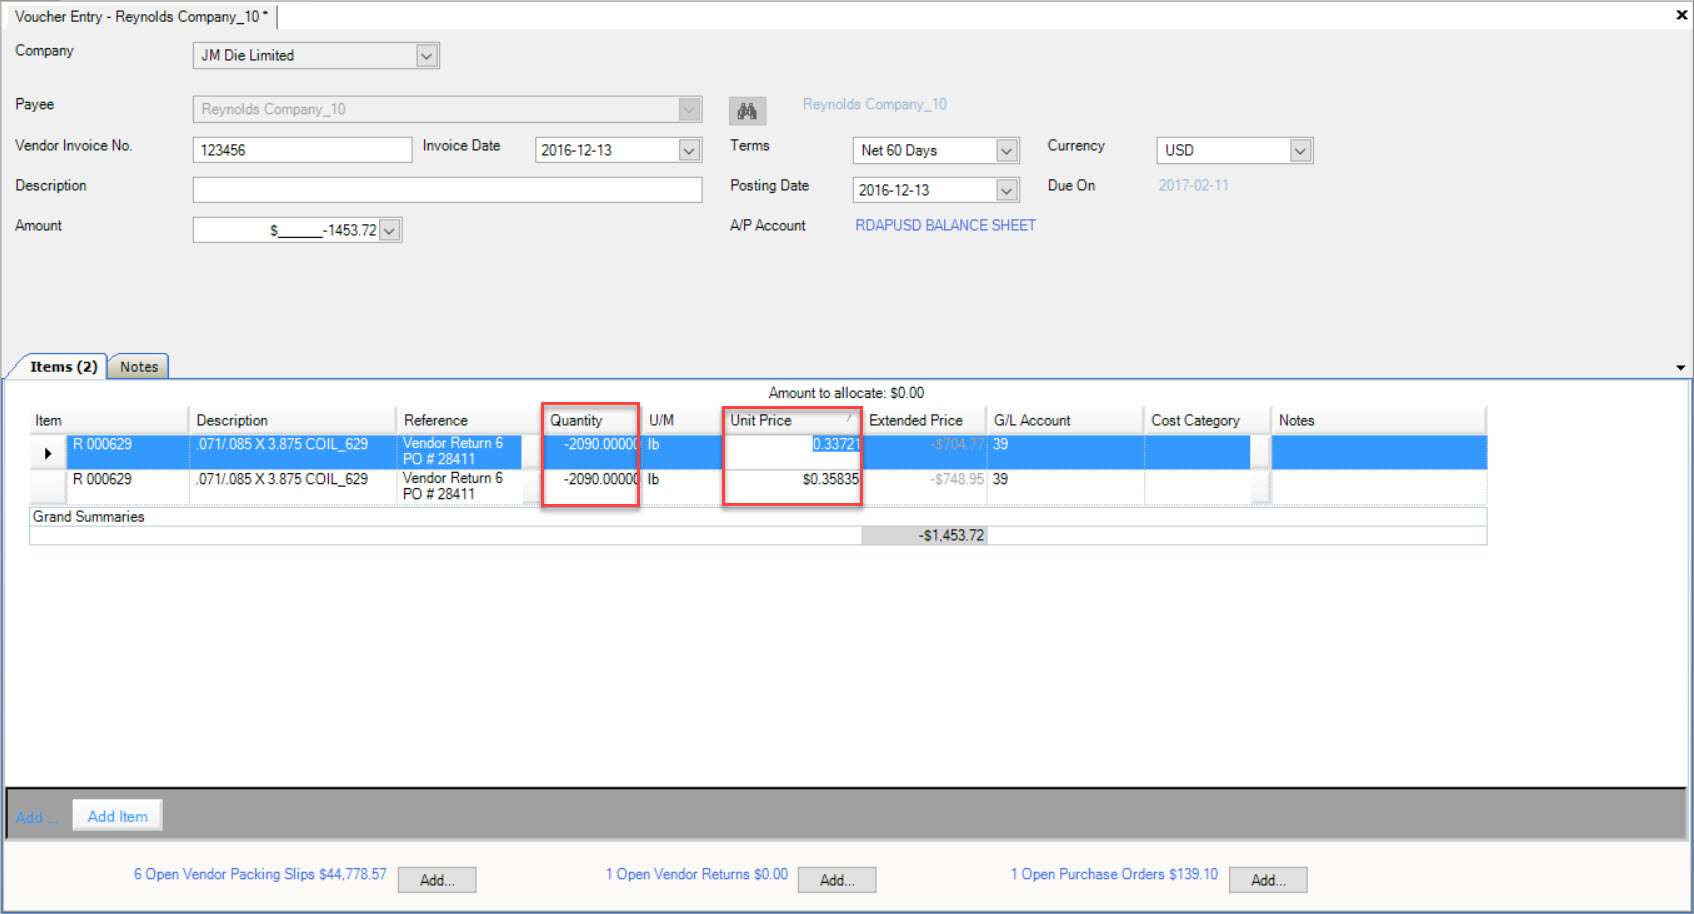
To change the amounts, simply click in the appropriate textboxes and manually type in the correct amounts.
After changing the Quantity or Unit Price, the Amount and Extended Price total will be out of balance and the Amount to allocate will also have balance.
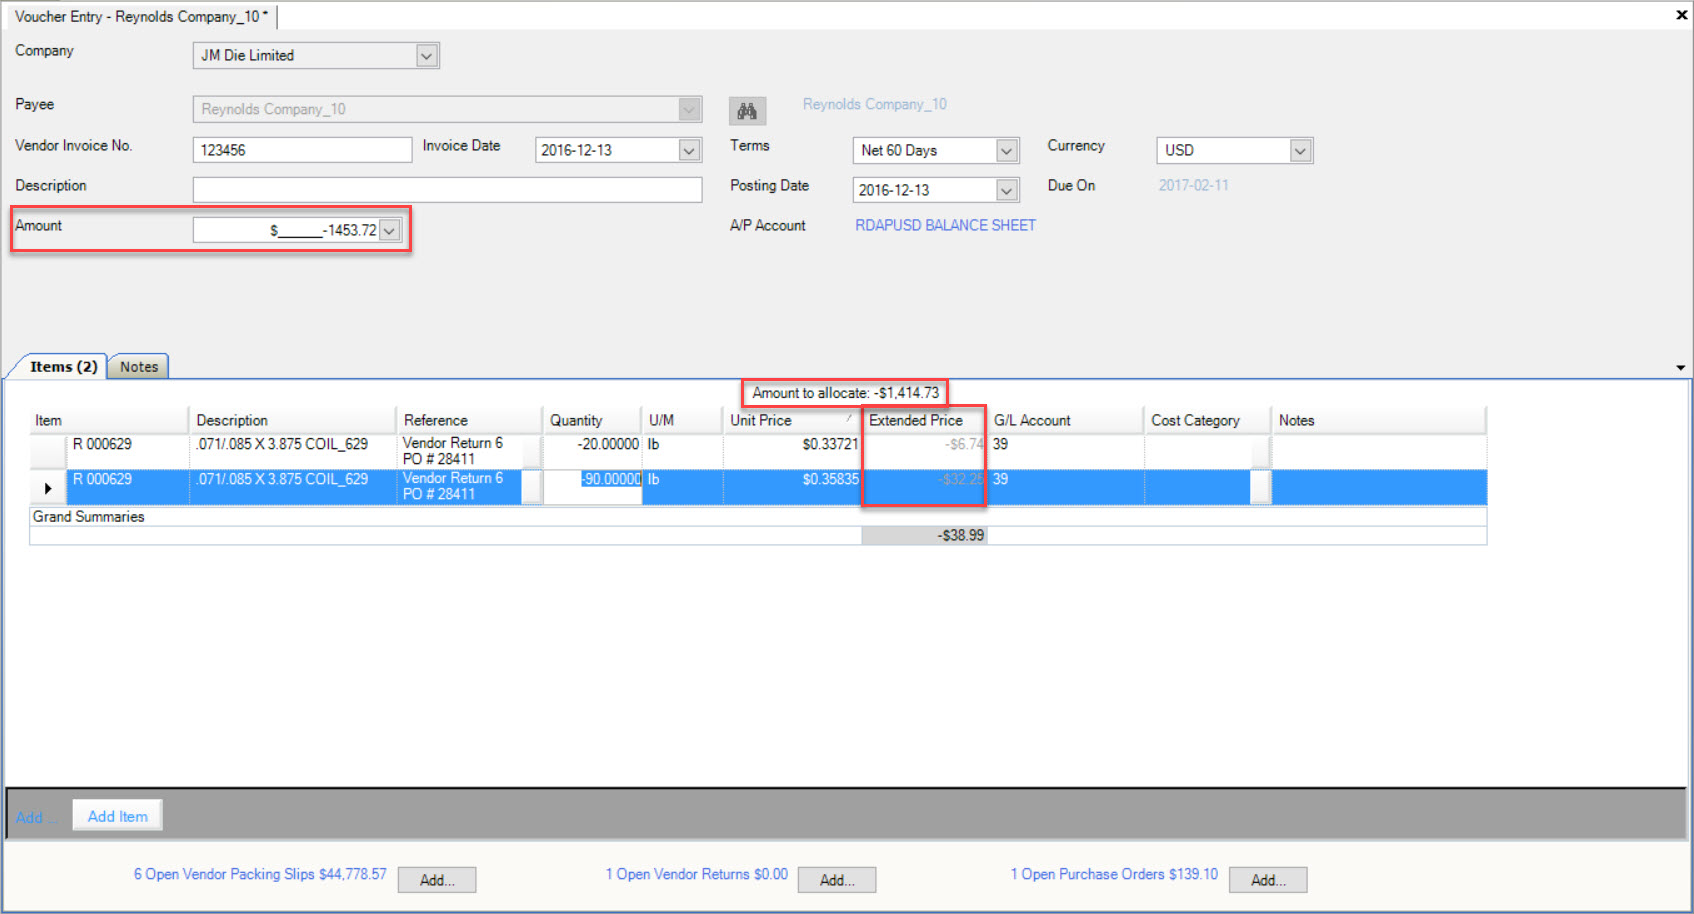
To get the Invoice or Credit to balance, the Amount must be changed to the same as the Extended Price total.
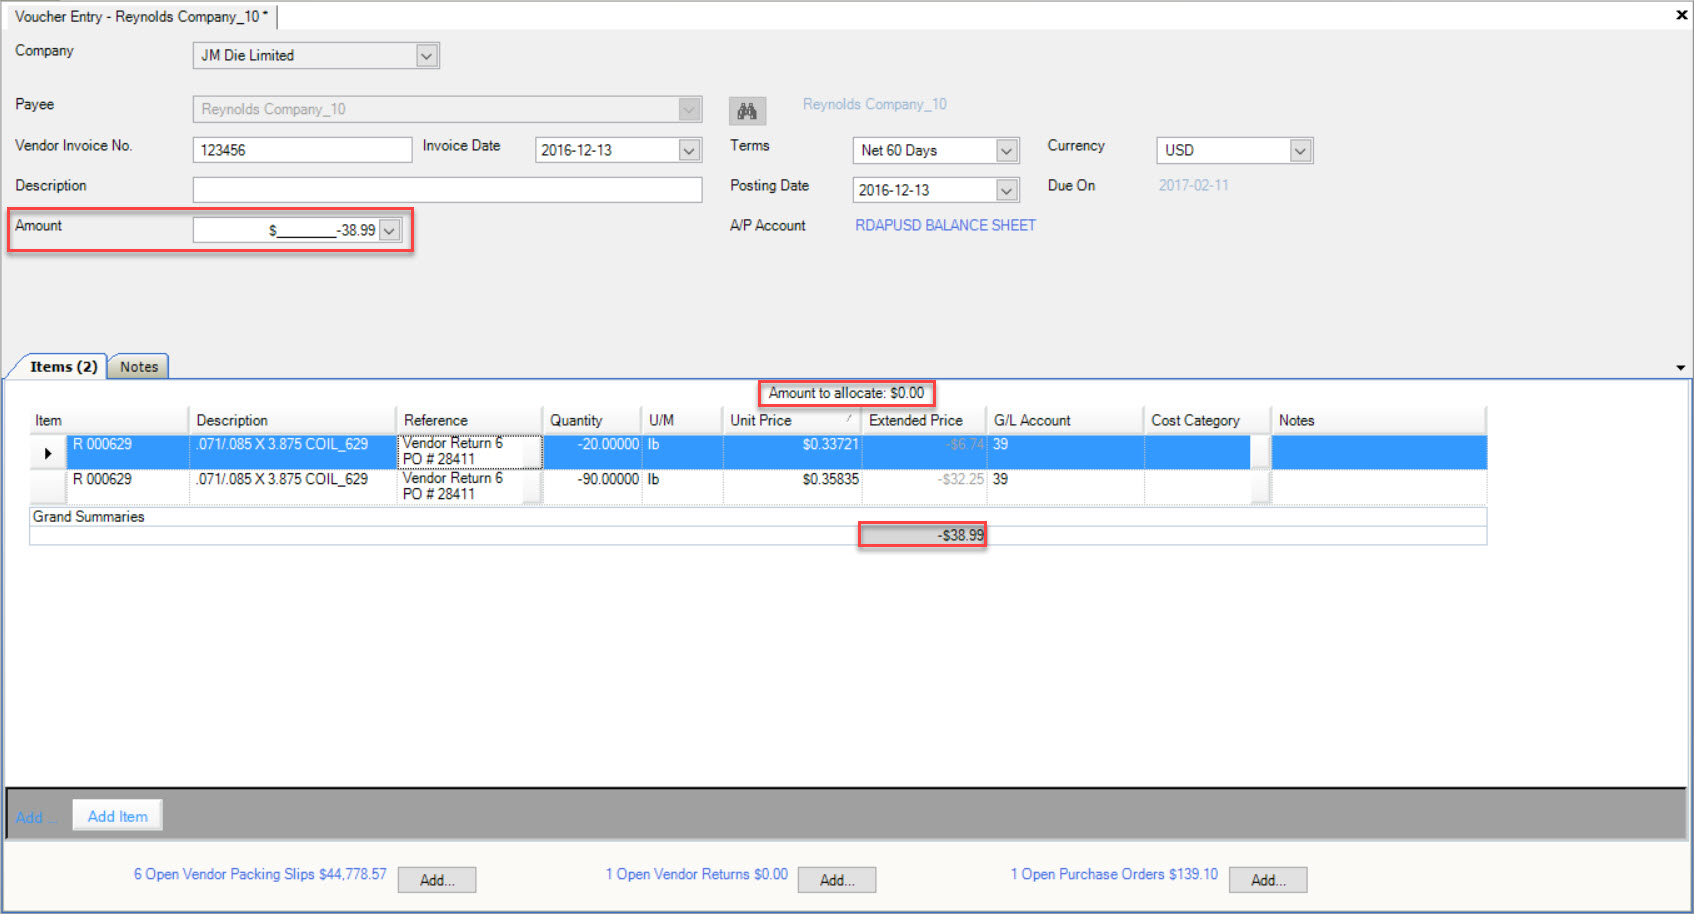
The Amount to allocate is now 0 and the Amount and Extended Price total will be the same.
Make sure to save your changes before exiting the screen.
Deleting an Item Line on an A/P Voucher
An Item line on an Invoice or Credit can be deleted by clicking anywhere in the row to highlight your selection.
Use your Delete key and the row(s) will be delete immediately.
After deleting the item line for the Invoice or Credit, the Amount and Extended Price total will be out of balance and the Amount to allocate will also have balance.
To get the Invoice or Credit to balance, the Amount must be changed to match the Extended Price total.
The Amount to allocate will change to 0 and the Amount and Extended Price total will be in balance.
Make sure to save your changes before exiting the screen.
Adding Notes to a Voucher Entry
Users have the ability to add Notes to a new or existing A/P Voucher in the system.
To do so, navigate to the  tab and click on the
 ![]() icon.
icon.
Find the Voucher Entry you wish to add a Note to and double-click to open it.
Make sure that the Notes tab is selected.
In the text box space provided, you may manually type in any appropriate notes for the particular Voucher Entry.
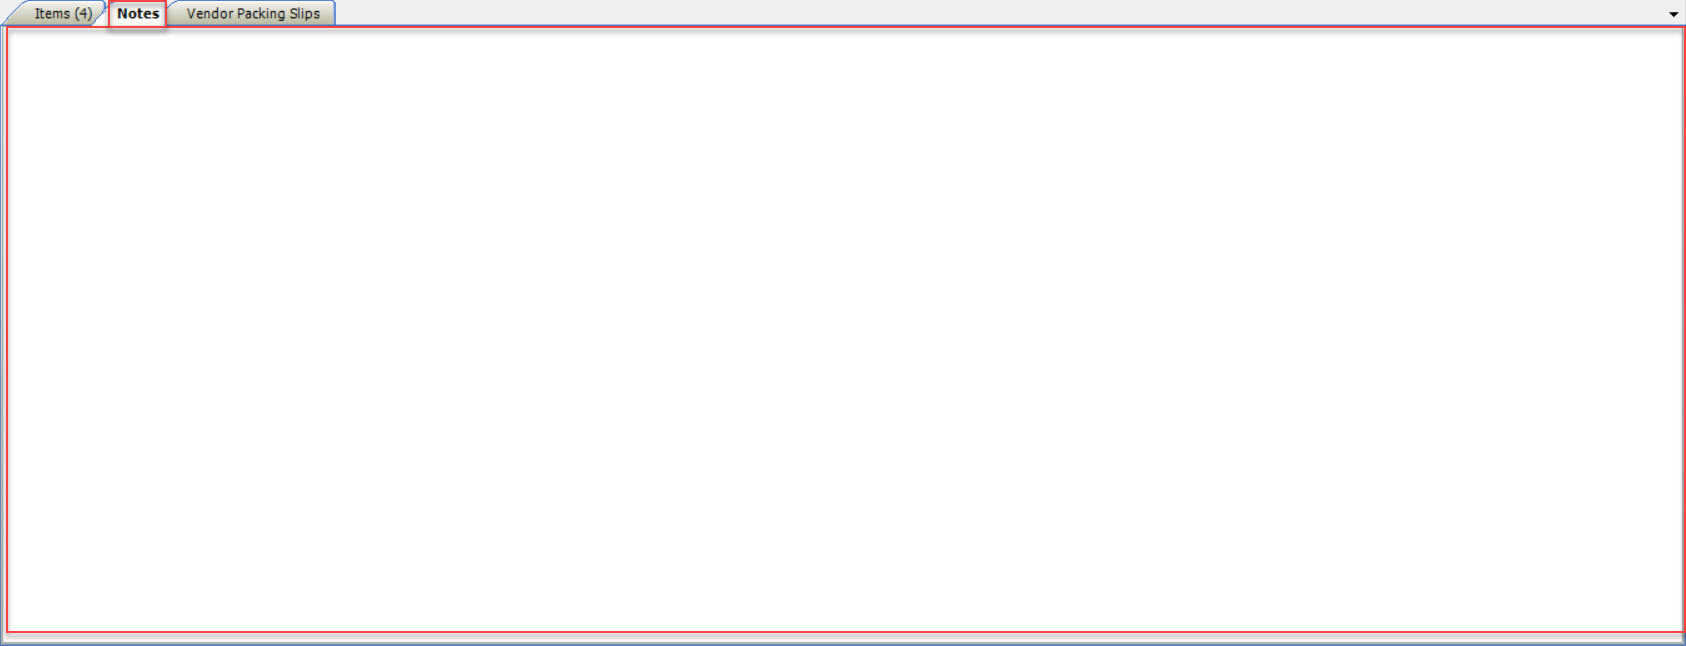
Make sure to save your changes before exiting the screen.