Accounts
To find a Vendor Account, navigate to the  tab, then click on the
 ![]() icon. The Open A/P
screen will be displayed.
icon. The Open A/P
screen will be displayed.
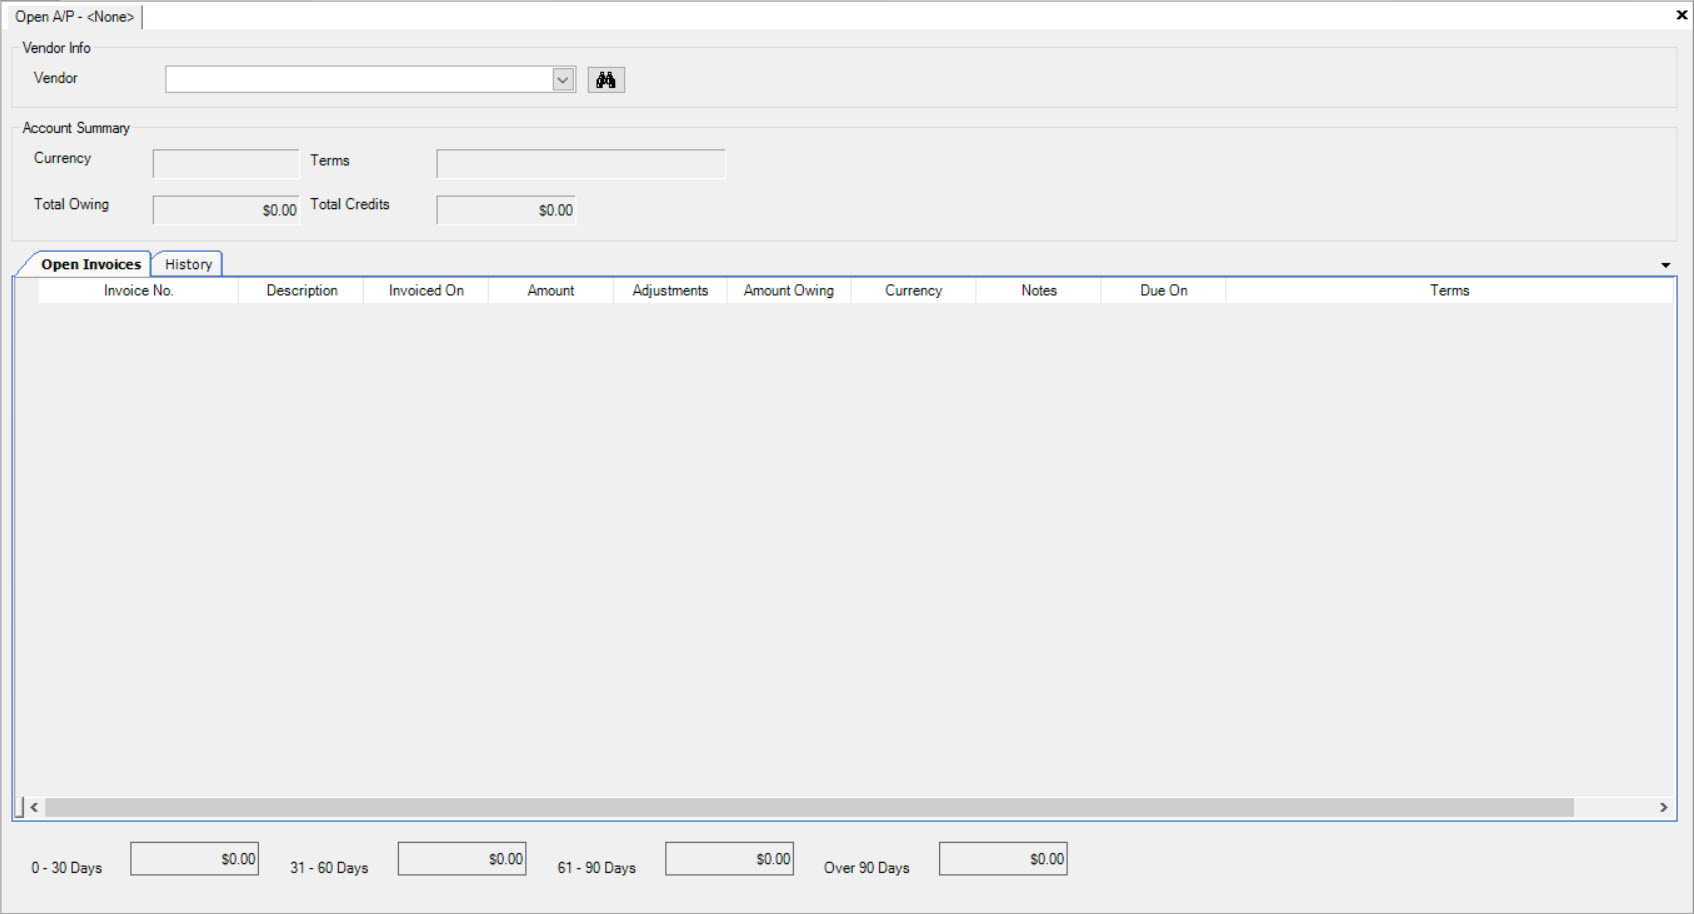
Users must select a Vendor from the drop-down menu.
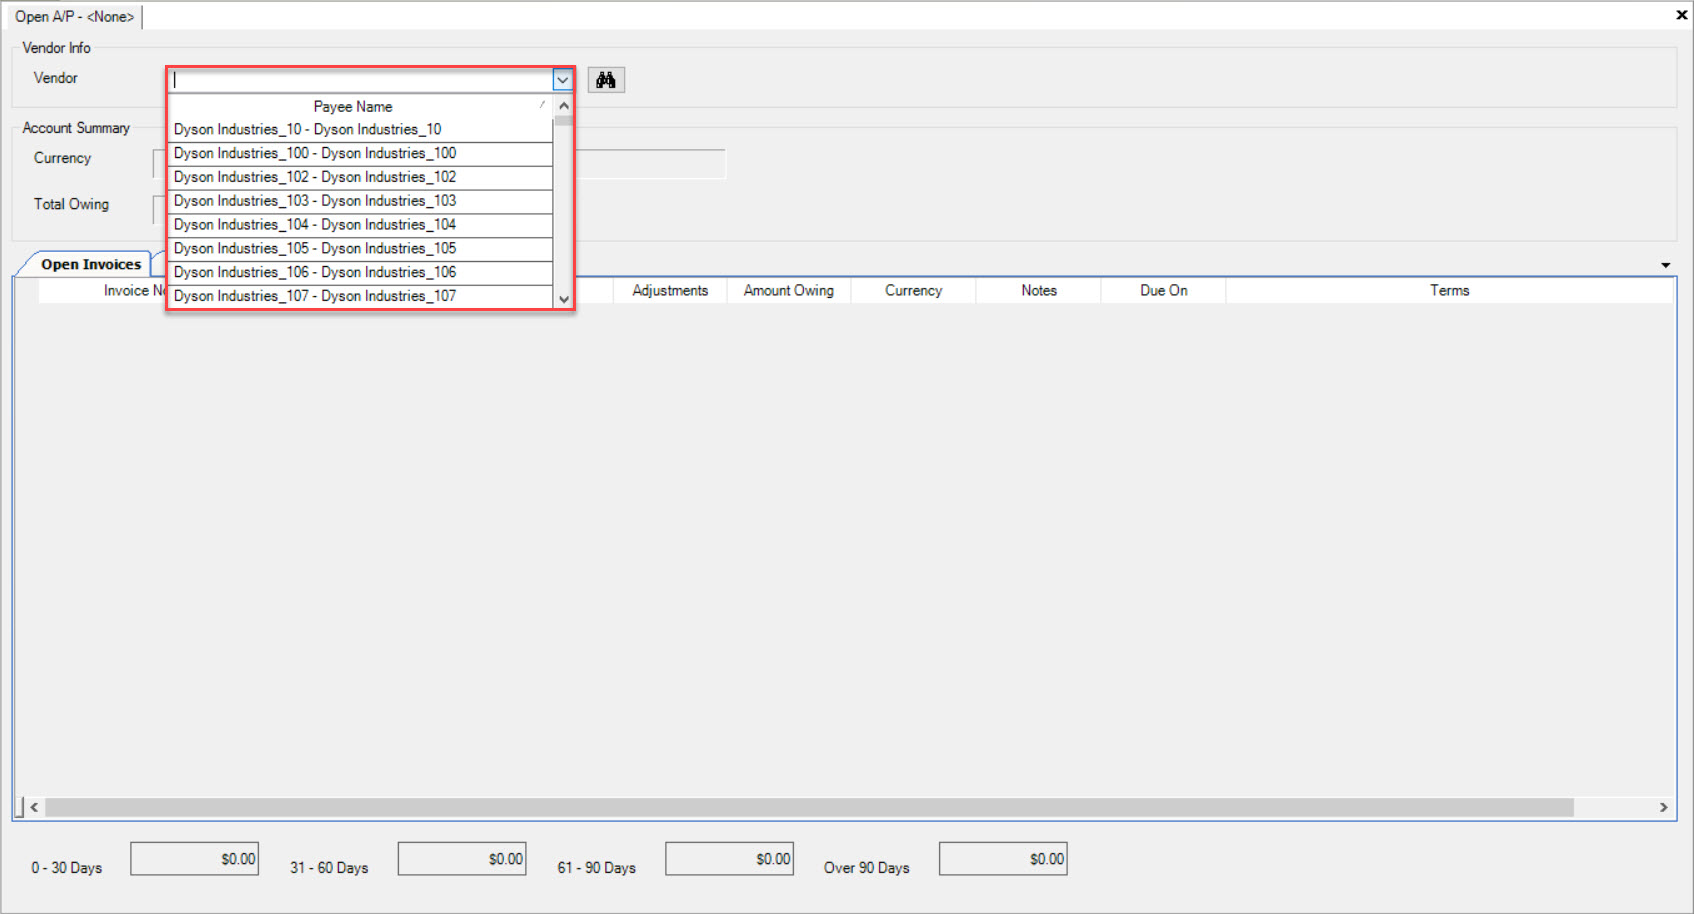
Once a Vendor is selected, the system will populate all account information for that particular Vendor.
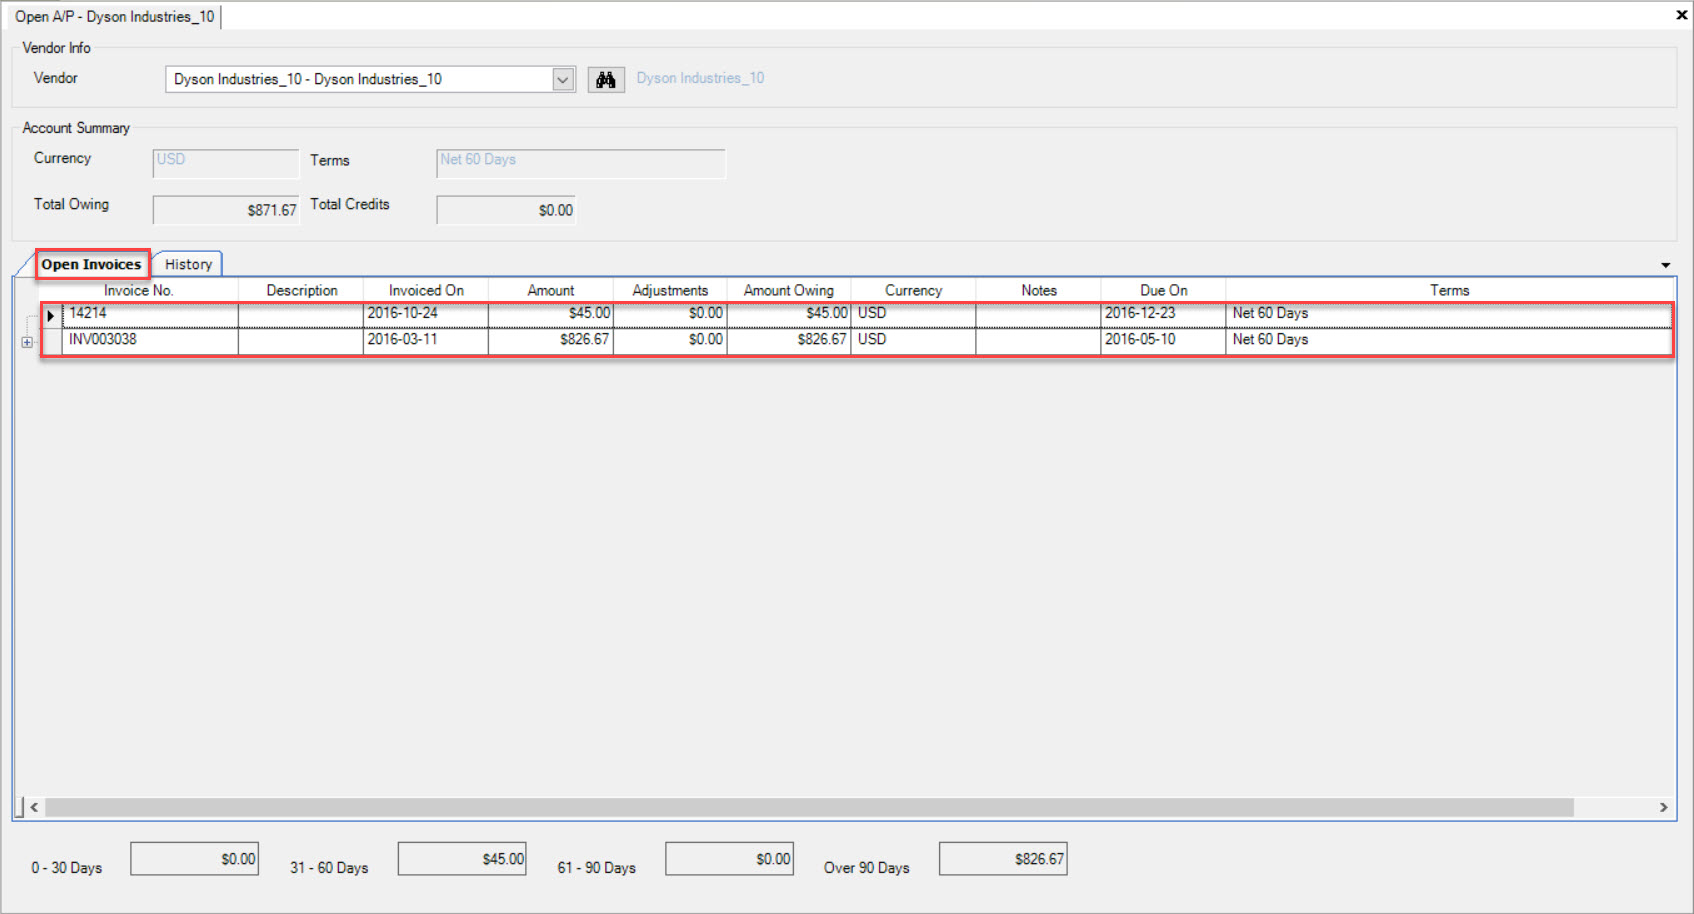
The Account Summary section shows the Currency of the Vendor, the Terms, and the Total Owing and Total Credits on the account. The information is read-only.
To modify the Currency or Terms, users must navigate to the Vendor module.
Viewing Vendor Open Invoices
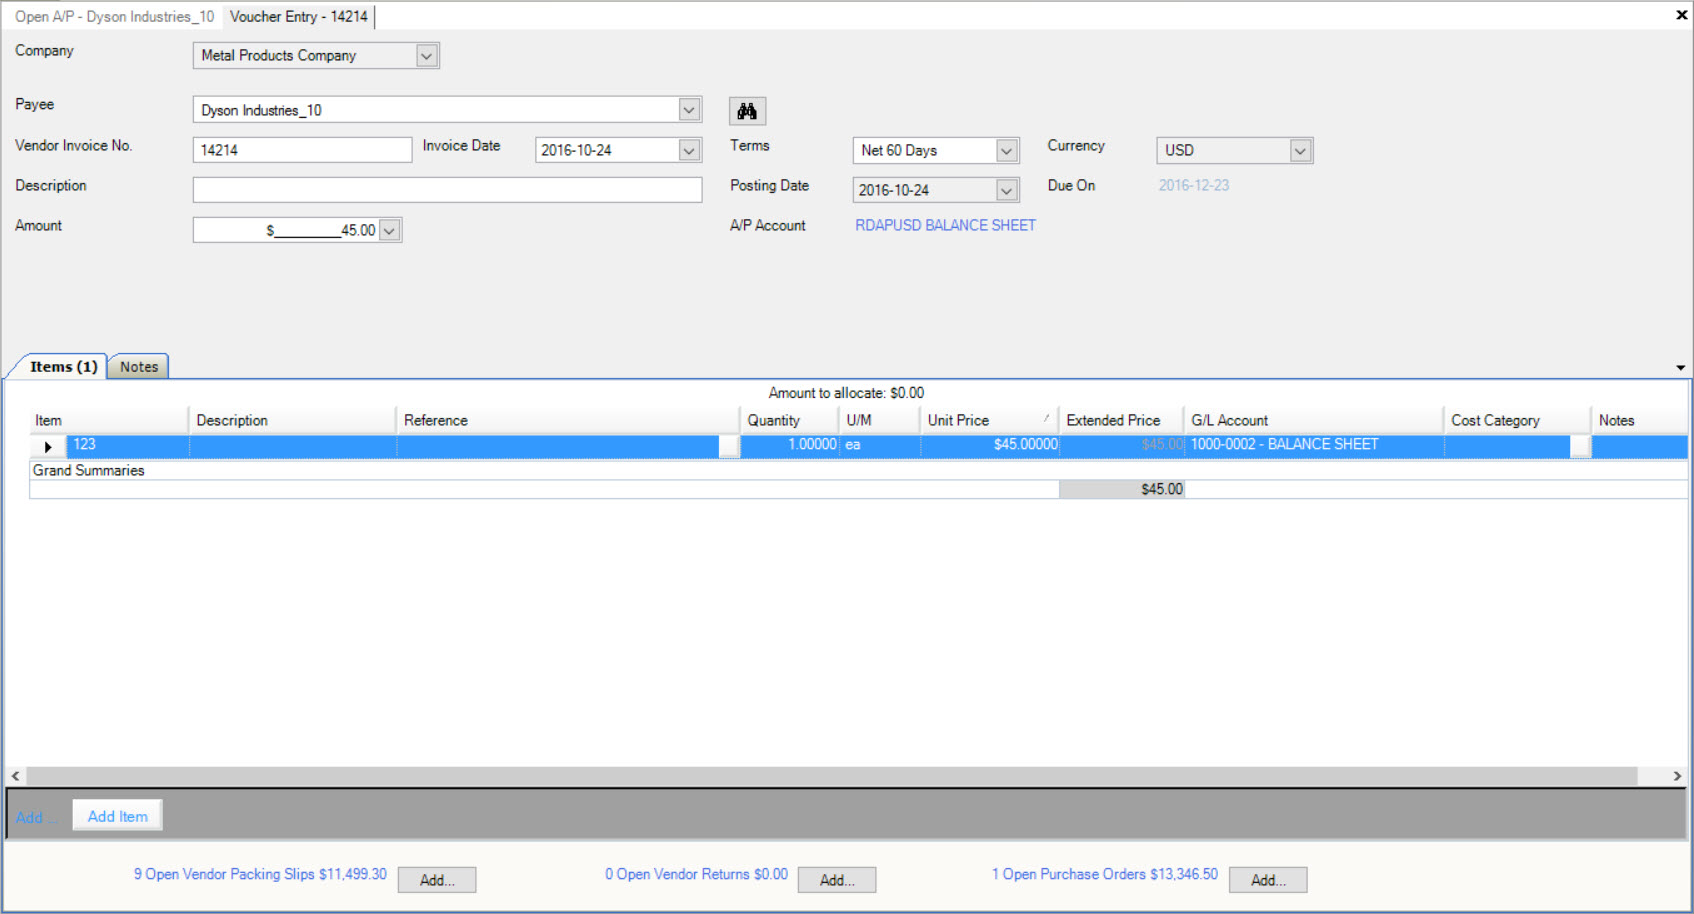
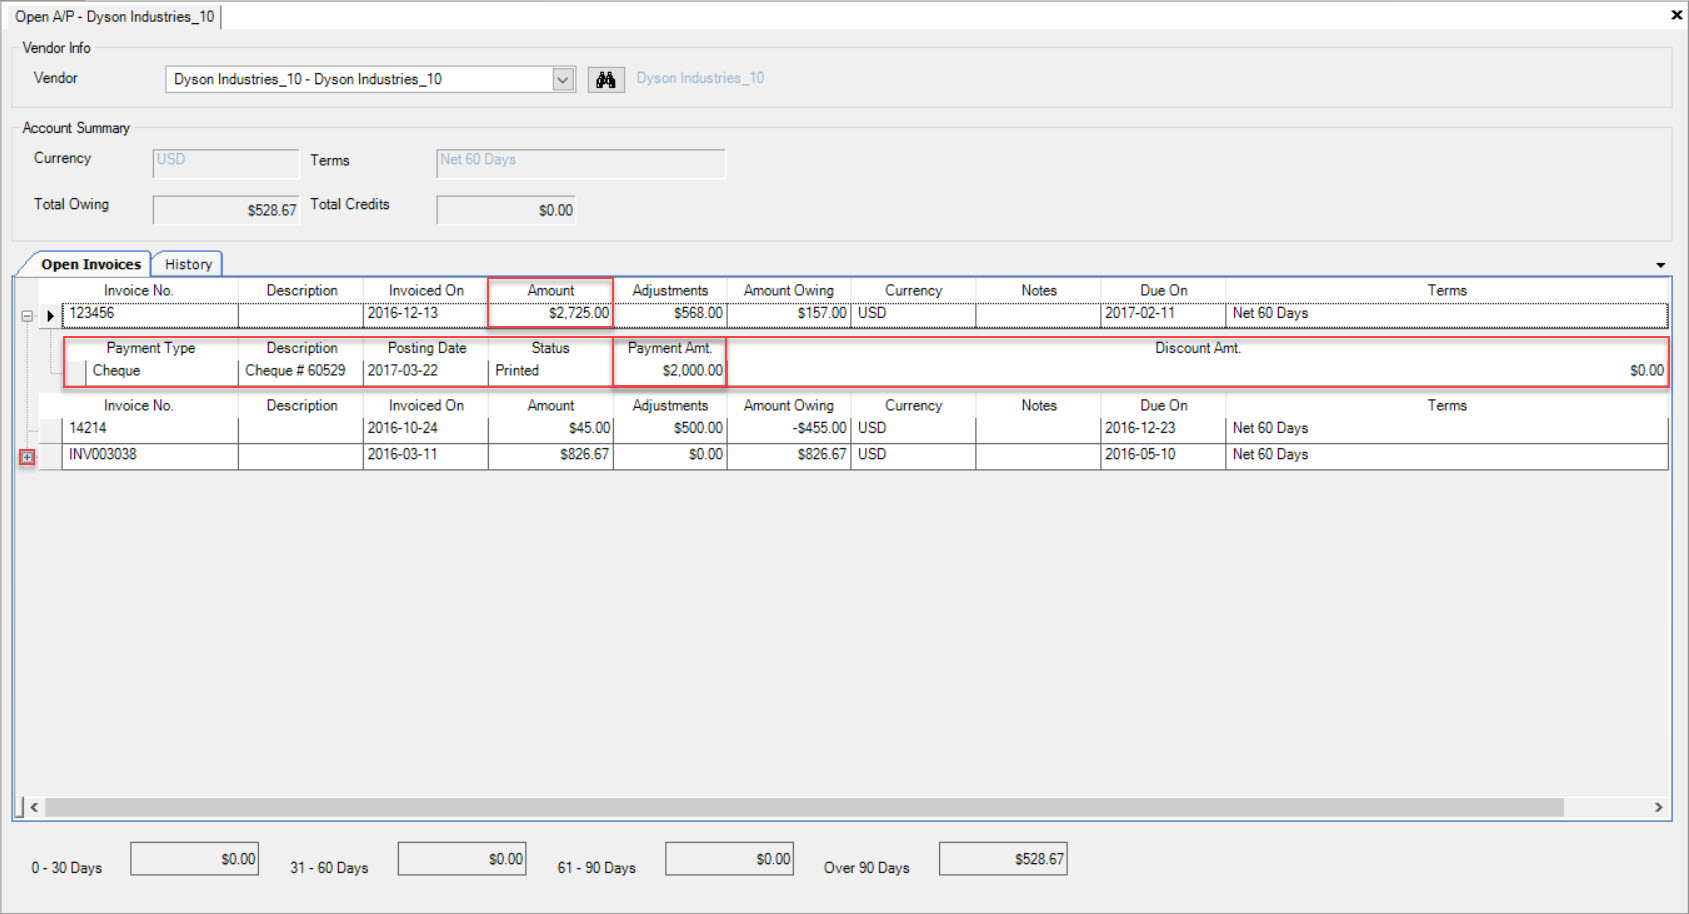
If you wish to view the Voucher Entry for a particular Open Invoice for a Vendor, you may double-click on the appropriate row under the Open Invoices tab to open an Open Invoice.
The Voucher Entry screen for that Open Invoice will be displayed.
If a Partial Payment was made, there will be a plus sign located beside the row to expand in order to view the Partial Payment details for the Open Invoice.
Voucher Adjustments
To adjust a new or existing open A/P Voucher, navigate to the  tab and click on the
 ![]() icon. This will open the
Open A/P screen.
icon. This will open the
Open A/P screen.

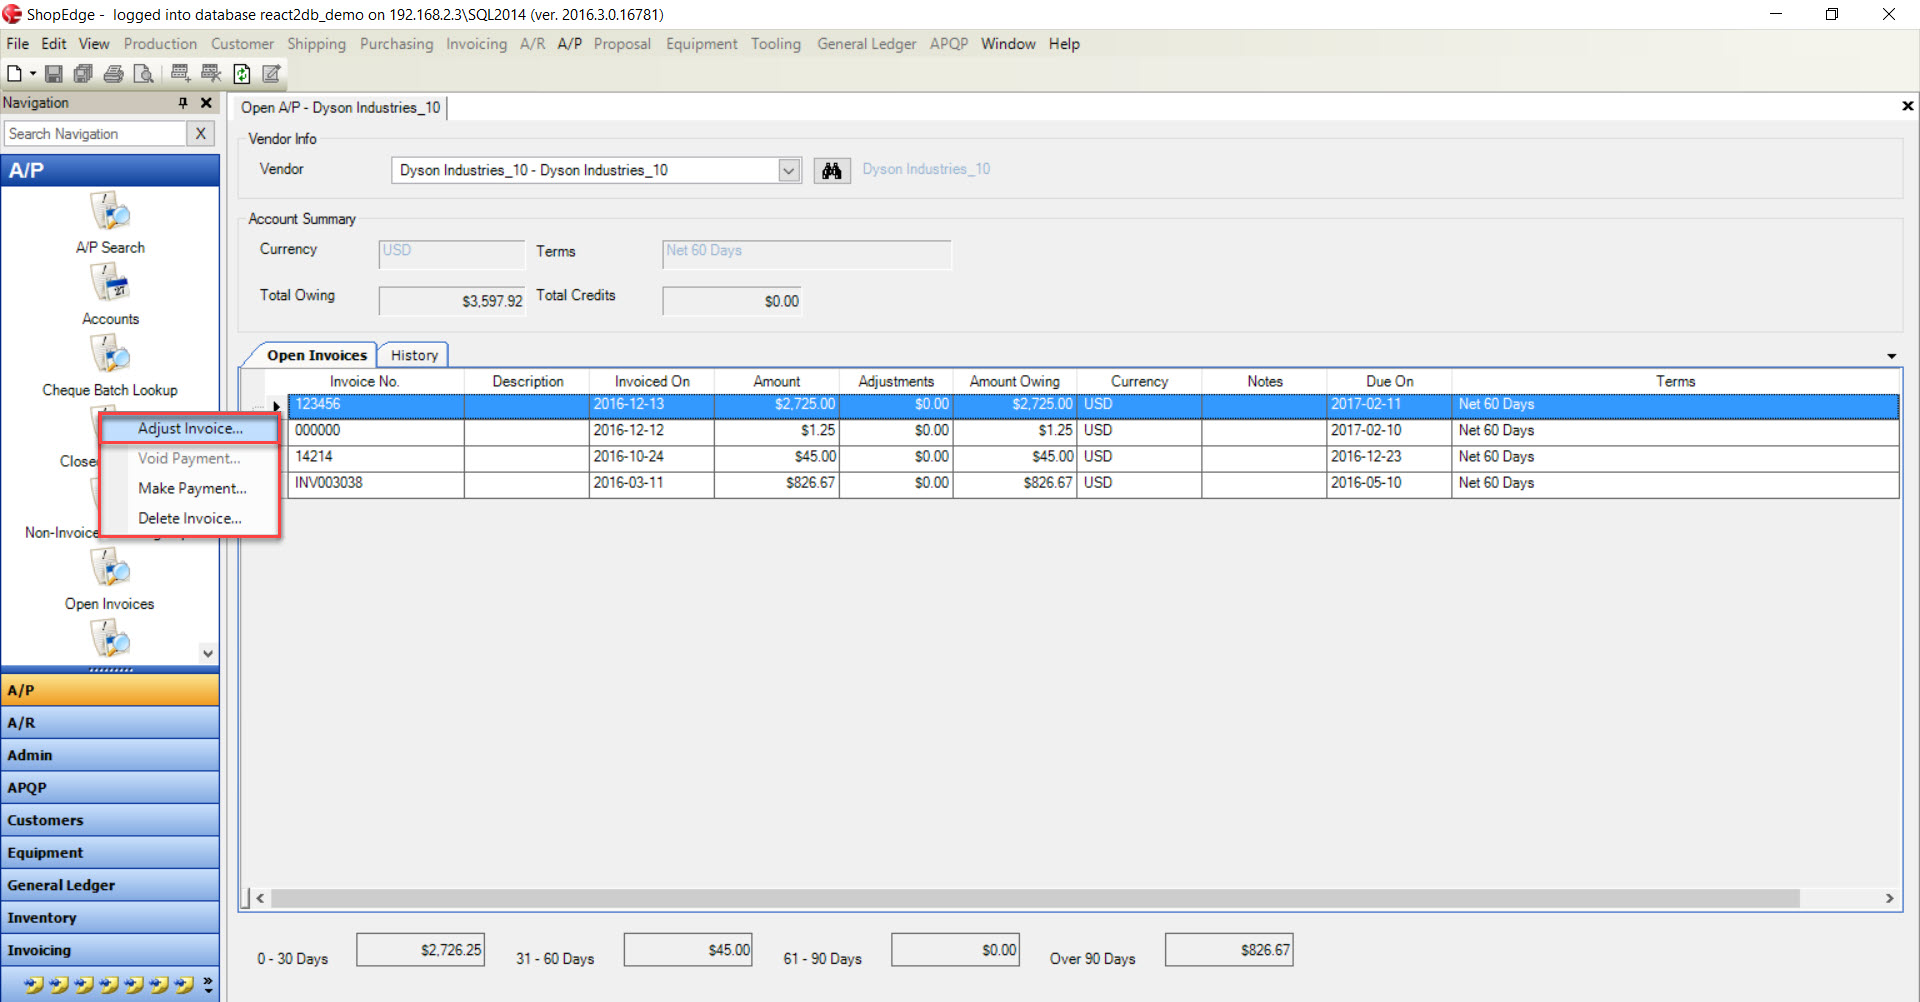
Users will need to select a Vendor using the drop-down menu. From here you are able to right-click on the appropriate Invoices and select Adjust Invoice option from the menu.
Note
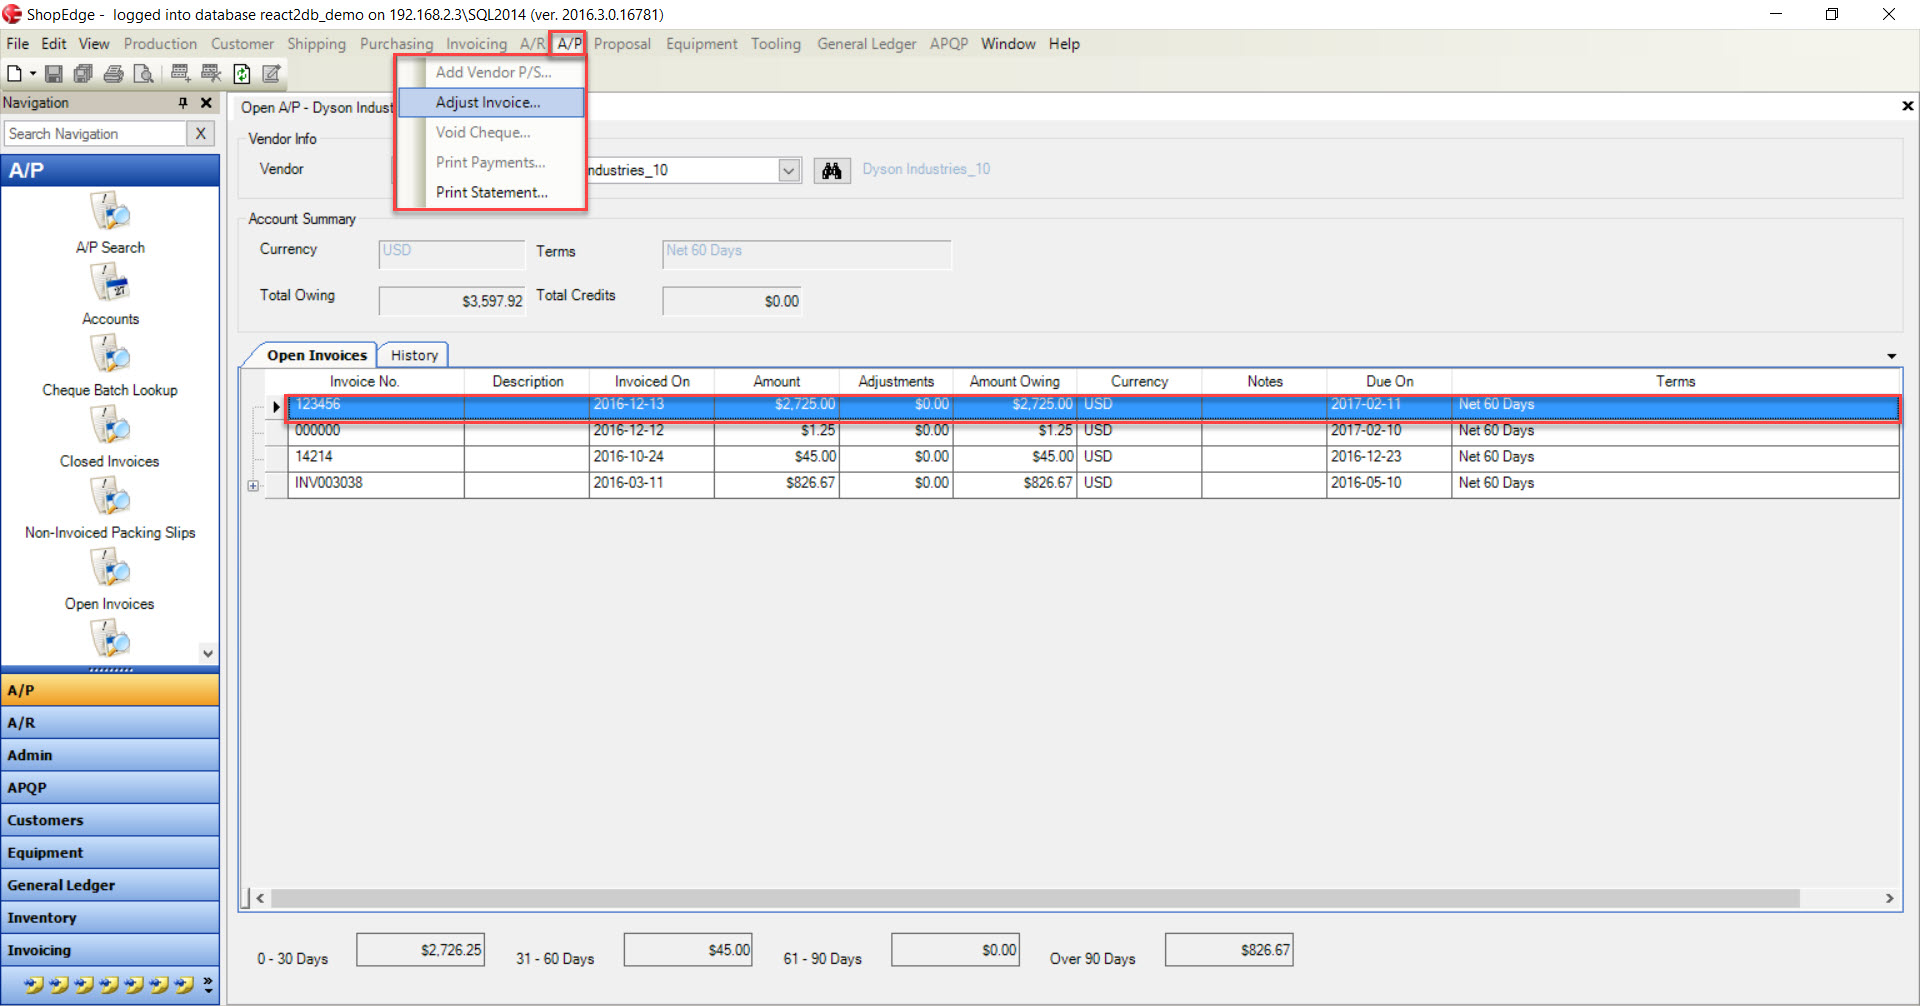
You can also highlight the row of the appropriate Invoice you wish to adjust and click on the A/P menu located at the top of the screen. Select Adjust Invoice.
The Invoice Adjustment window will be displayed.
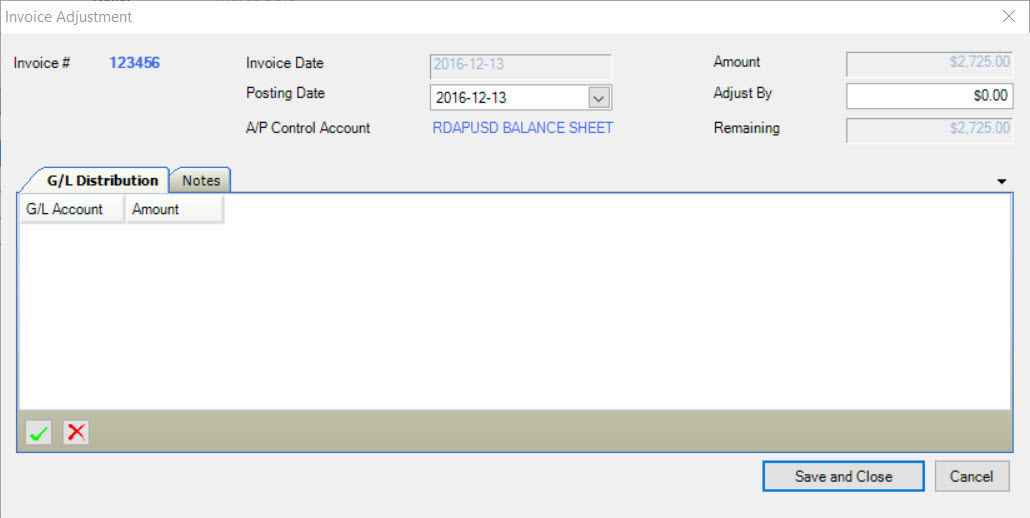
To increase the open amount of the Invoice, you need to enter in a negative amount and expense negative amounts against the various accounts.
To decrease the open amount of the Invoice, you need to enter a positive amount and expense positive amounts against the various accounts.
Enter the Adjust By amount and click on the  button so that a new G/L Distribution line will be displayed. Enter the GL Distribution information.
When ready to update the Invoice, make sure the Posting Date is correct and click on the  button.
The Open A/P screen will now display the adjustment and update the Total Owing amount.
Making a Payment
To make a manual Payment against an A/P Voucher, navigate to the  tab and click on the
 ![]() icon. This will open the Open A/P screen.
icon. This will open the Open A/P screen.

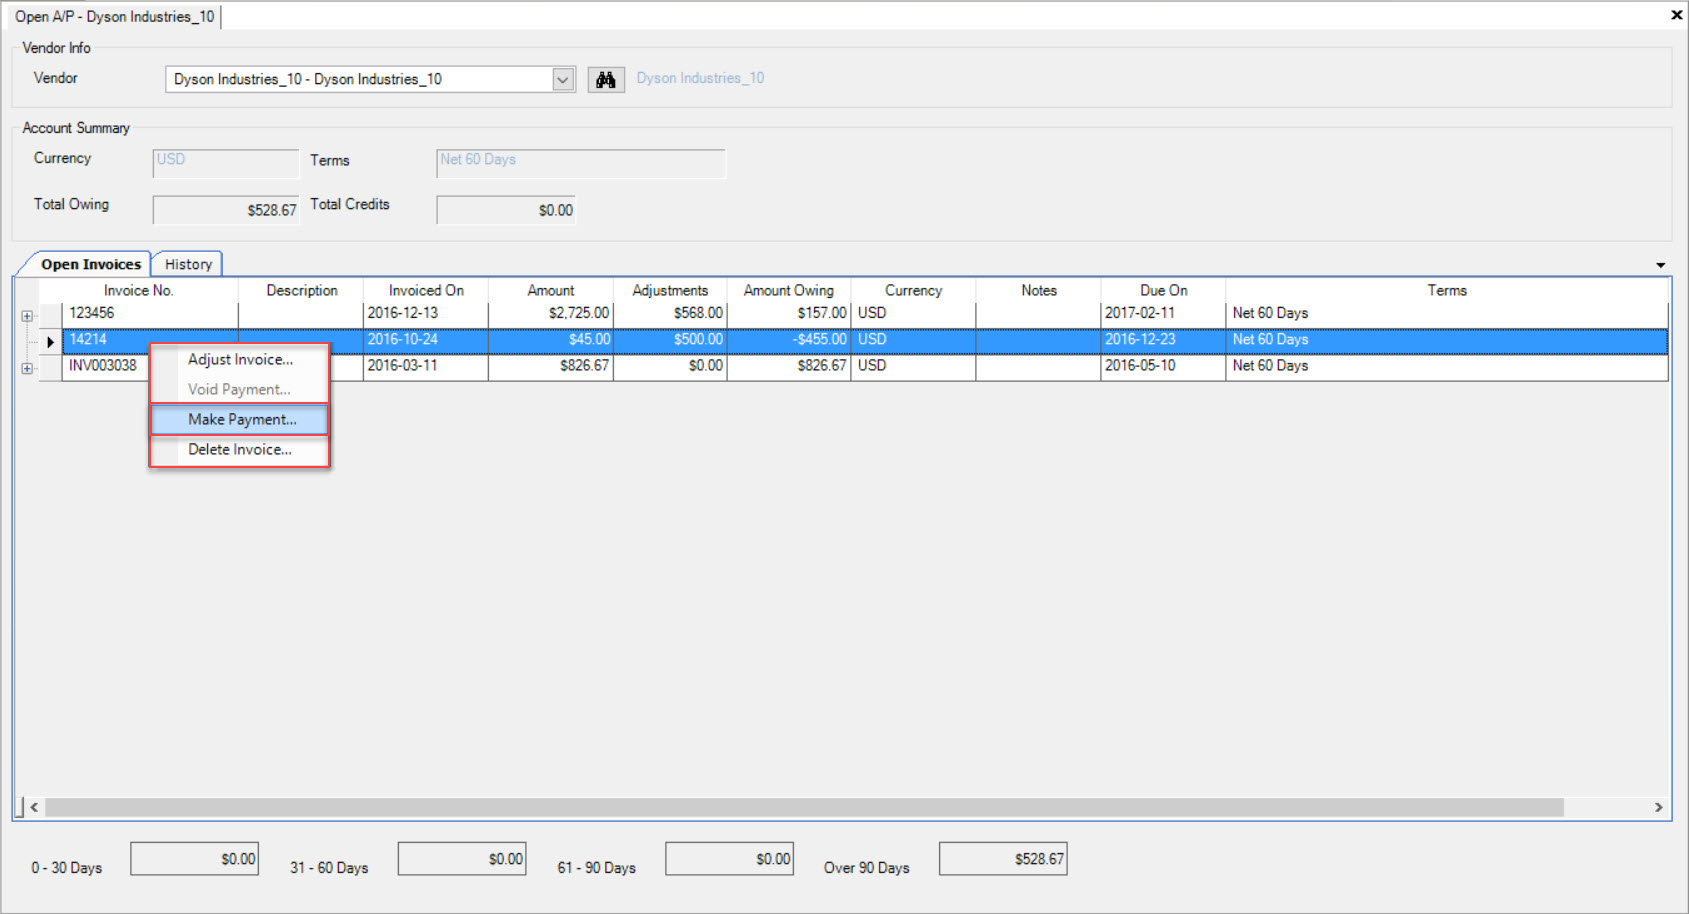
Users will need to select a Vendor using the available drop-down menu. Under the Open Invoices tab, locate the Invoice you wish to record the Payment against. Right-click on the row and select the Make Payment... option.
The Make Payment window will appear where users can enter the Payment details. Select the G/L Account that the Payment is coming from as well as a Posting Date. Enter in a Reference but it is not necessary. Then, select either Cheque or Other Payment Type. By selecting Cheque, the system will prompt you for the Cheque Info on a tab at the bottom of the window including the Cheque Number and Date. By selecting Other Payment Type, the system will allow you to select the type from the drop-down menu list.
Users also have the ability to print the Payment by selecting the appropriate checkbox.
Note
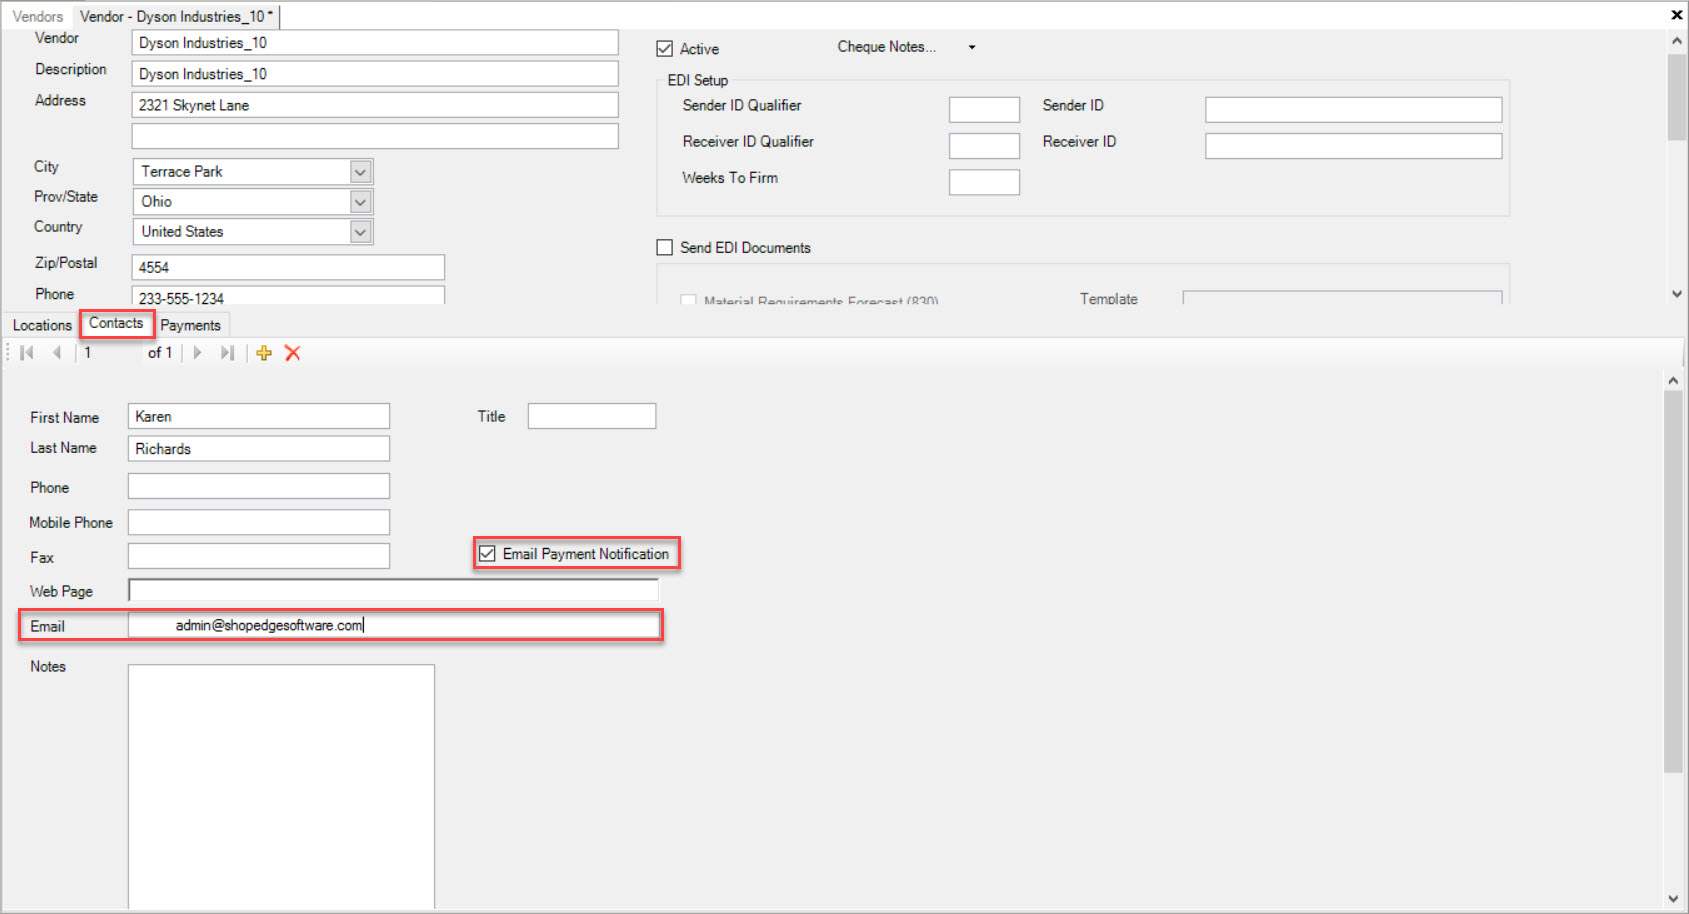
A Payment can only be emailed if Other Payment Type is selected. For an Email to be sent, the Contact information has to be entered in and the Email Notification box, needs to be selected on the Vendor detail screen.
A Payment can also be partially recorded by entering in a lesser amount in the Amount column under the Payments tab. To add a Discount, simply enter in an appropriate Discount in the Discount column under the Payments tab.
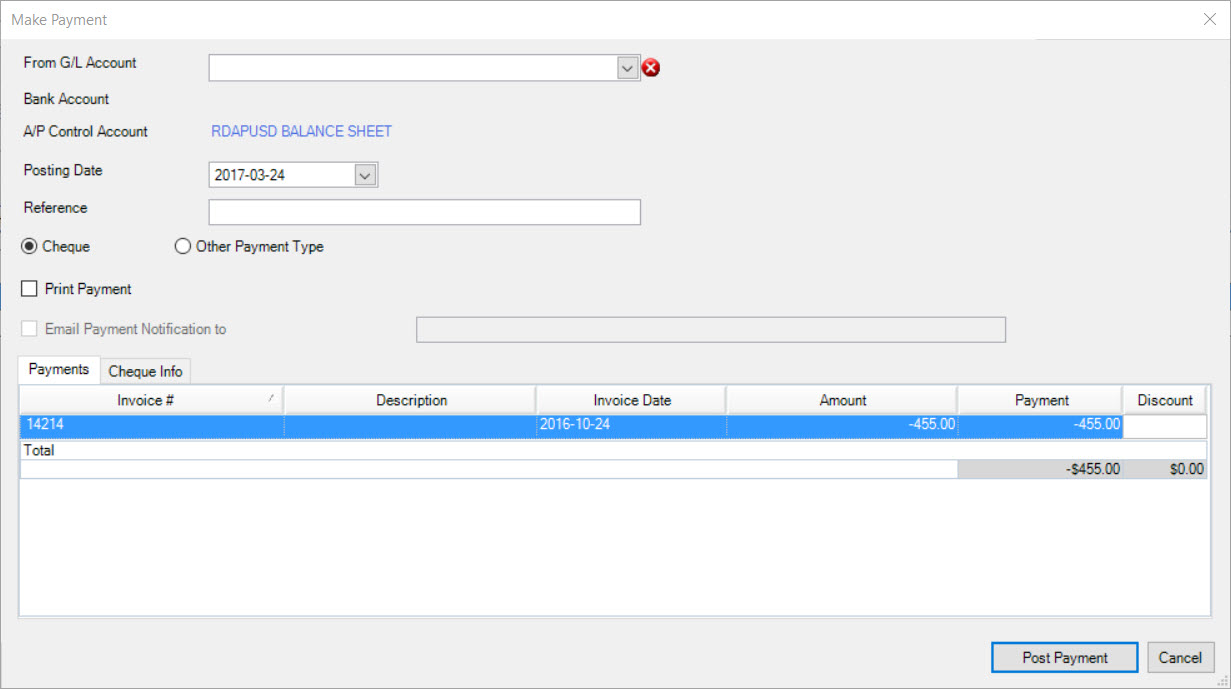
When the necessary information has been entered, click on the  button.
Deleting an Invoice from an A/P Voucher
To delete an Invoice from an A/P Voucher, navigate to the  tab and click on the
 ![]() icon. This will open the Open A/P screen.
icon. This will open the Open A/P screen.

Users will then need to select a Vendor using the available drop-down menu.
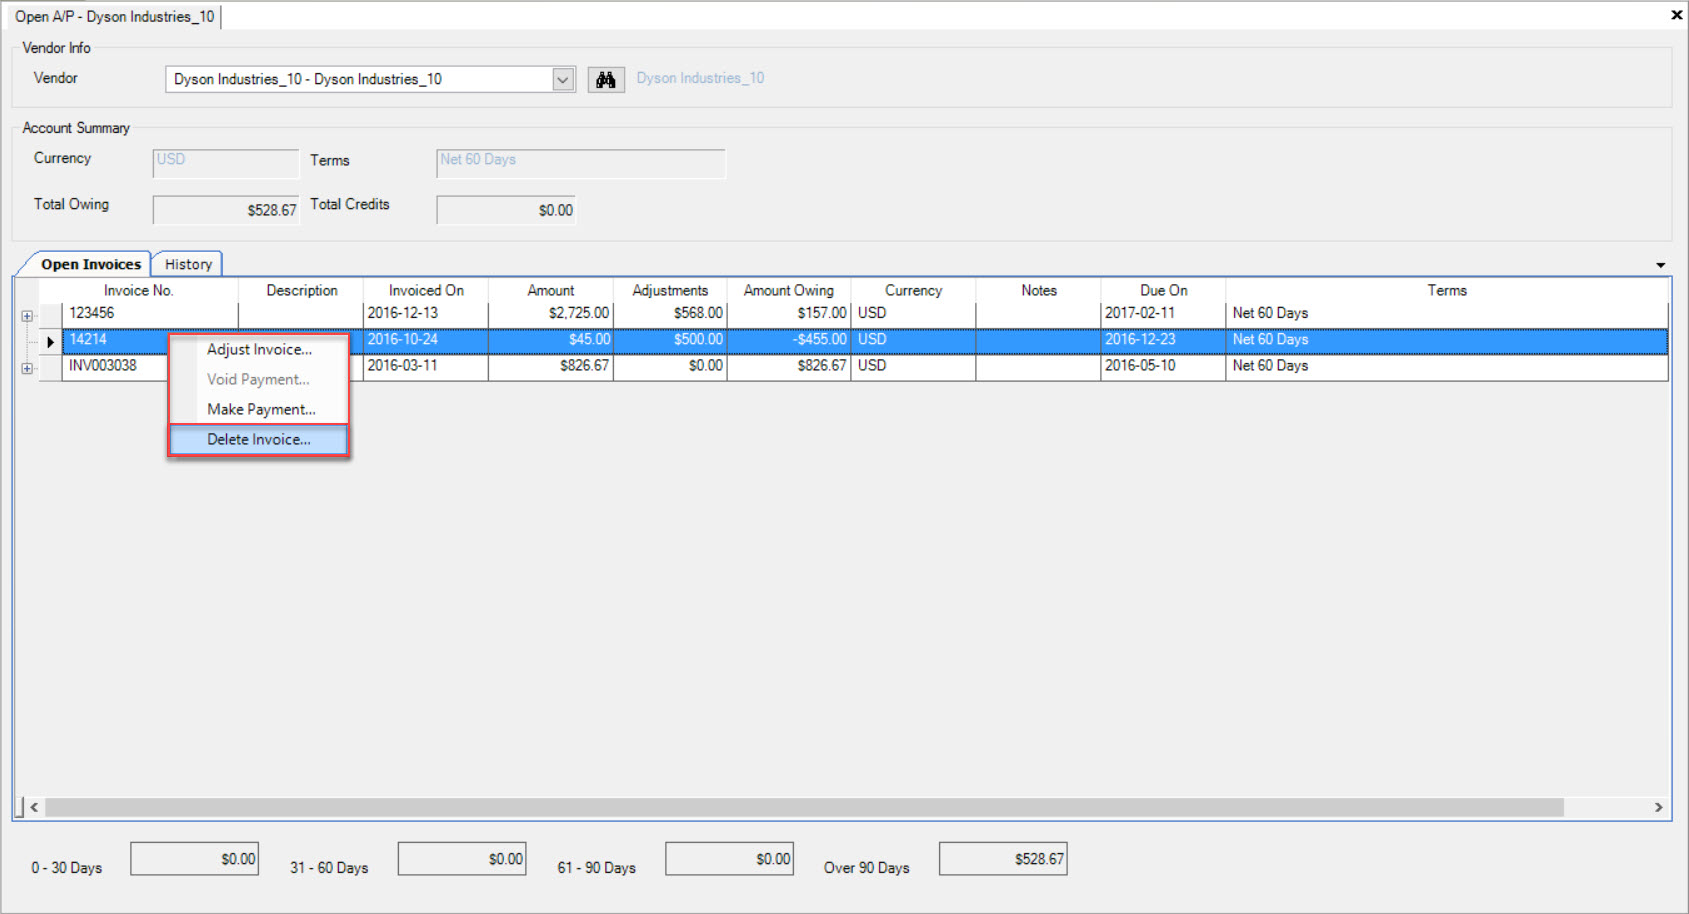
Locate the Invoice that you wish to delete and right-click on the appropriate row. Select the Delete Invoice... option from the drop-down menu.
The Delete Invoice window will appear confirming the deletion of the selected Invoice. Users must click on the  button to confirm.
The selected Invoice will be deleted.
Viewing Vendor Account History
To view the History of a Vendor Account, navigate to the  tab, then click on the
 ![]() icon. The Open A/P
screen will be displayed.
icon. The Open A/P
screen will be displayed.

Users must select a Vendor from the drop-down menu.

Then, make sure to select the History tab.
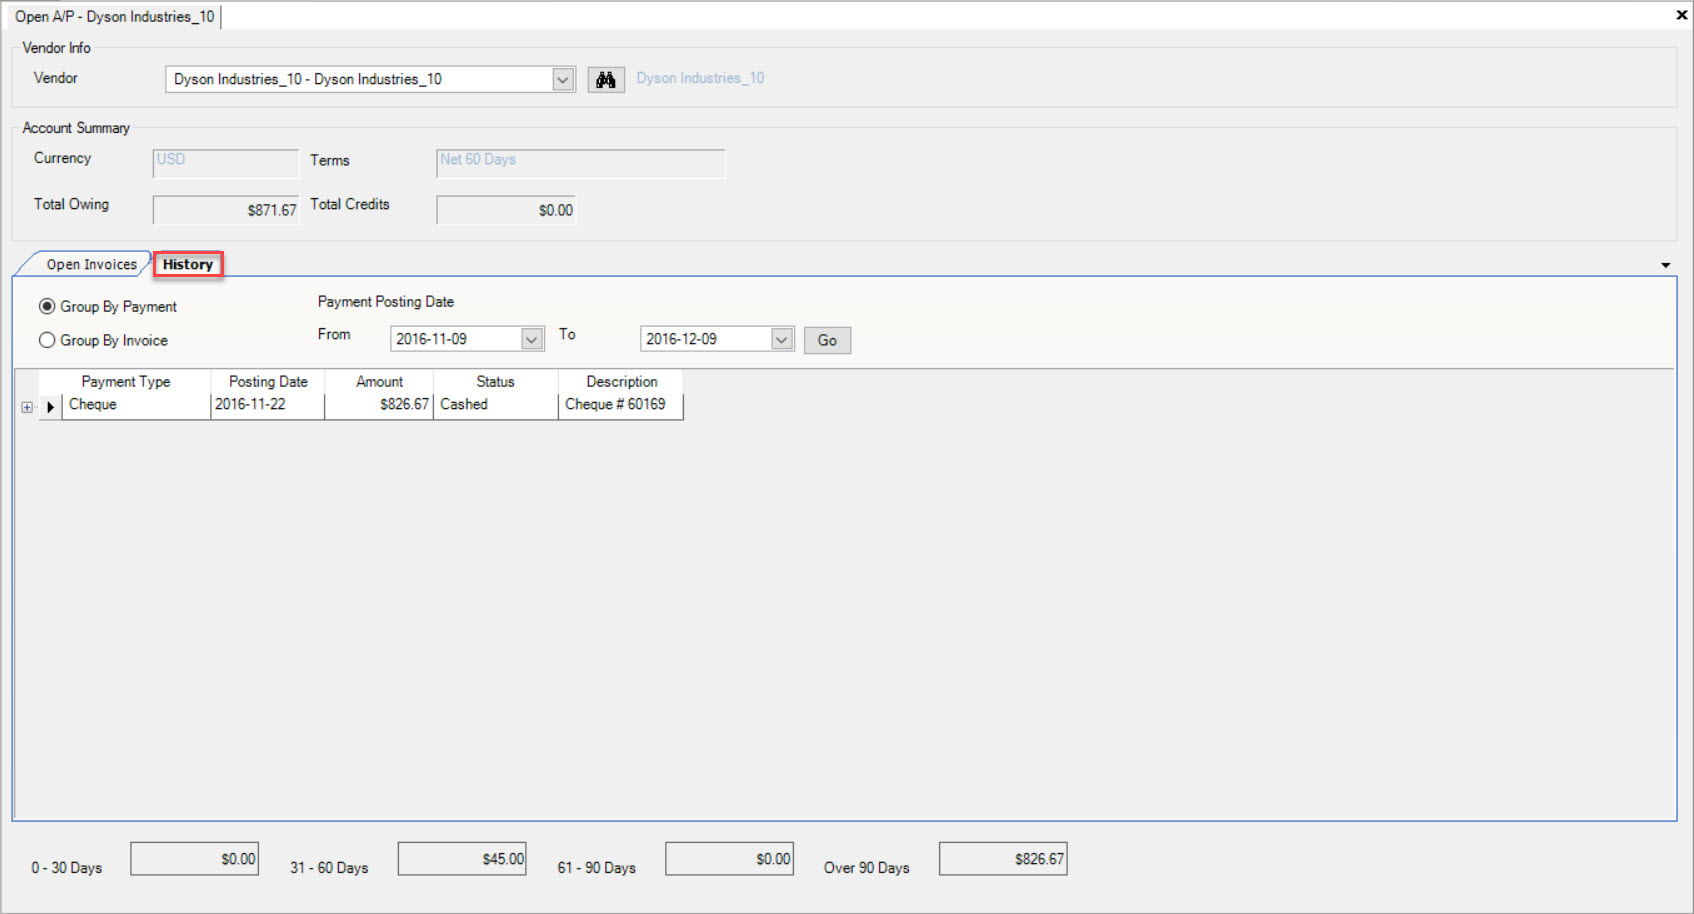
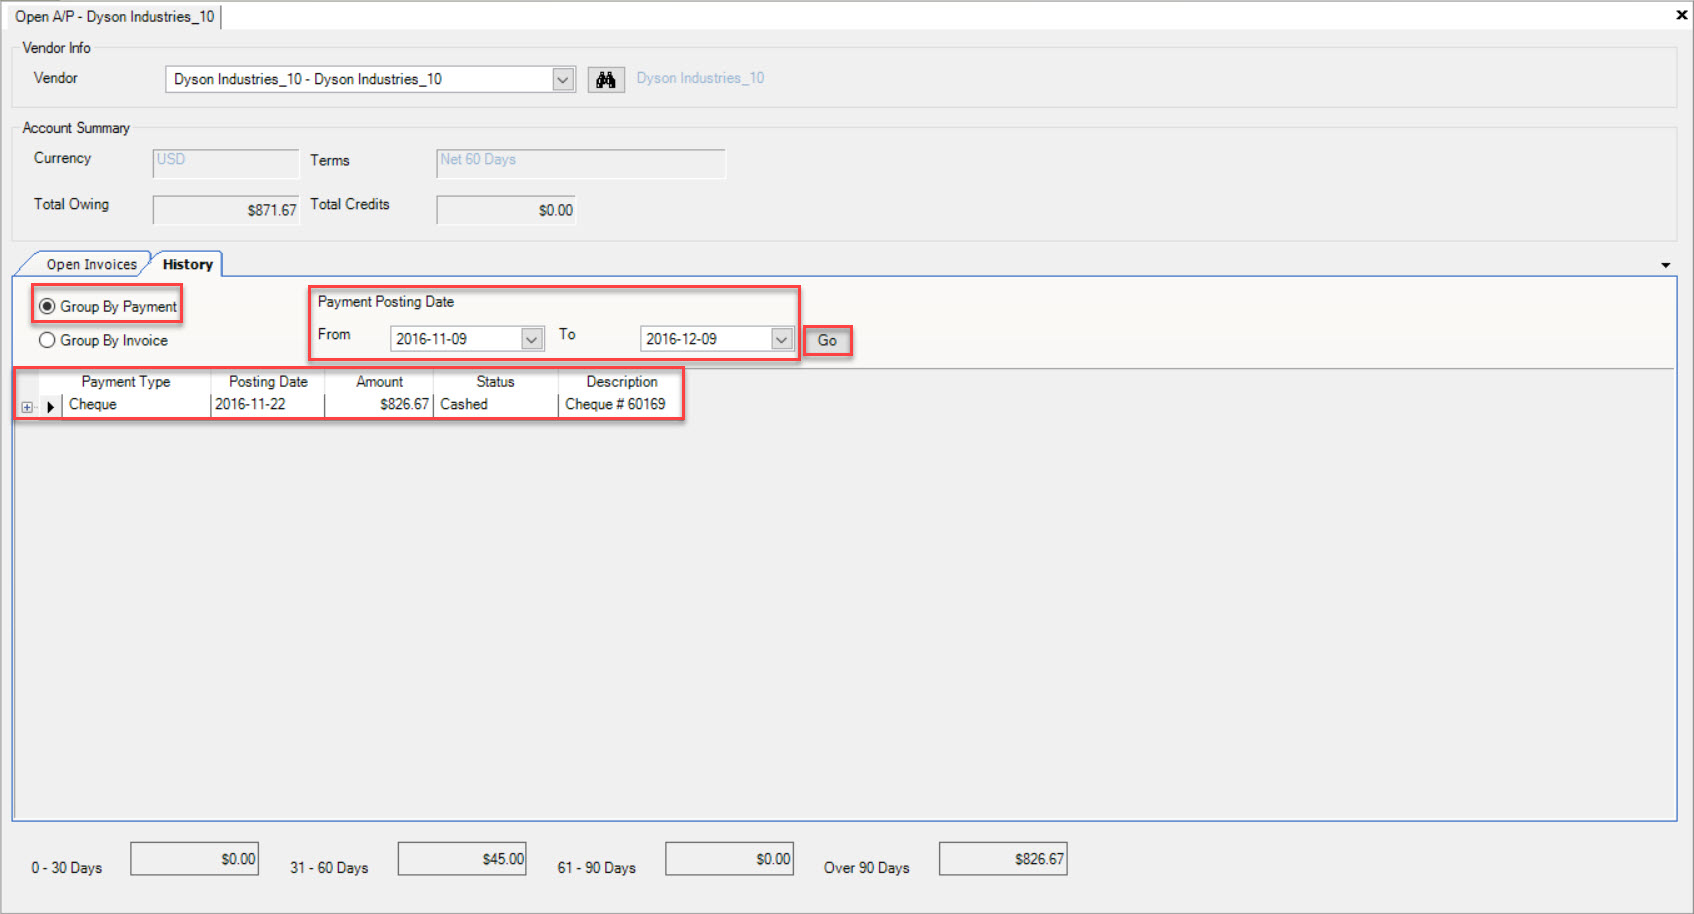
You are now able to view the Payment and Invoice History by selecting either Group by Payment or Group by Invoice.
By checking the Group by Payment option, users must select a Payment Posting Date from and to range. Once this is done, click on the  button. The system will populate the appropriate Payment information.
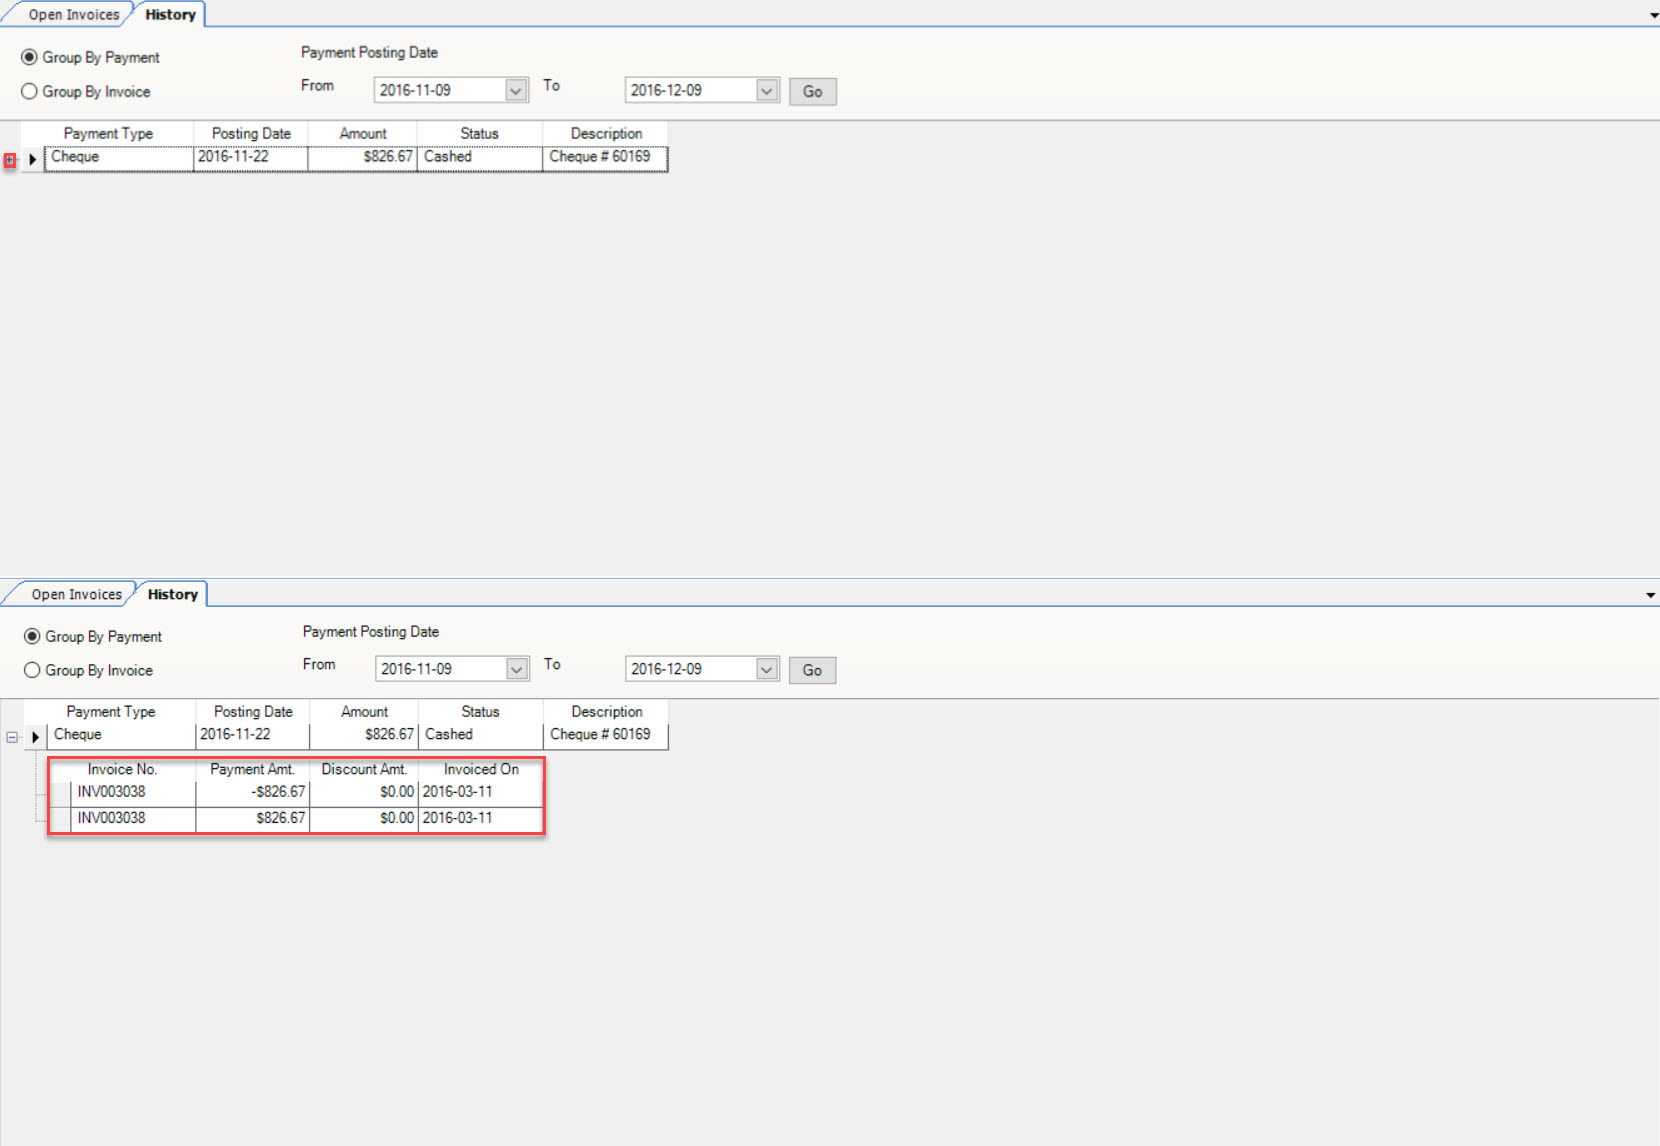
By selecting the plus sign located beside the Payment Type, the system will display the appropriate Invoices made by the specific Payment Type.
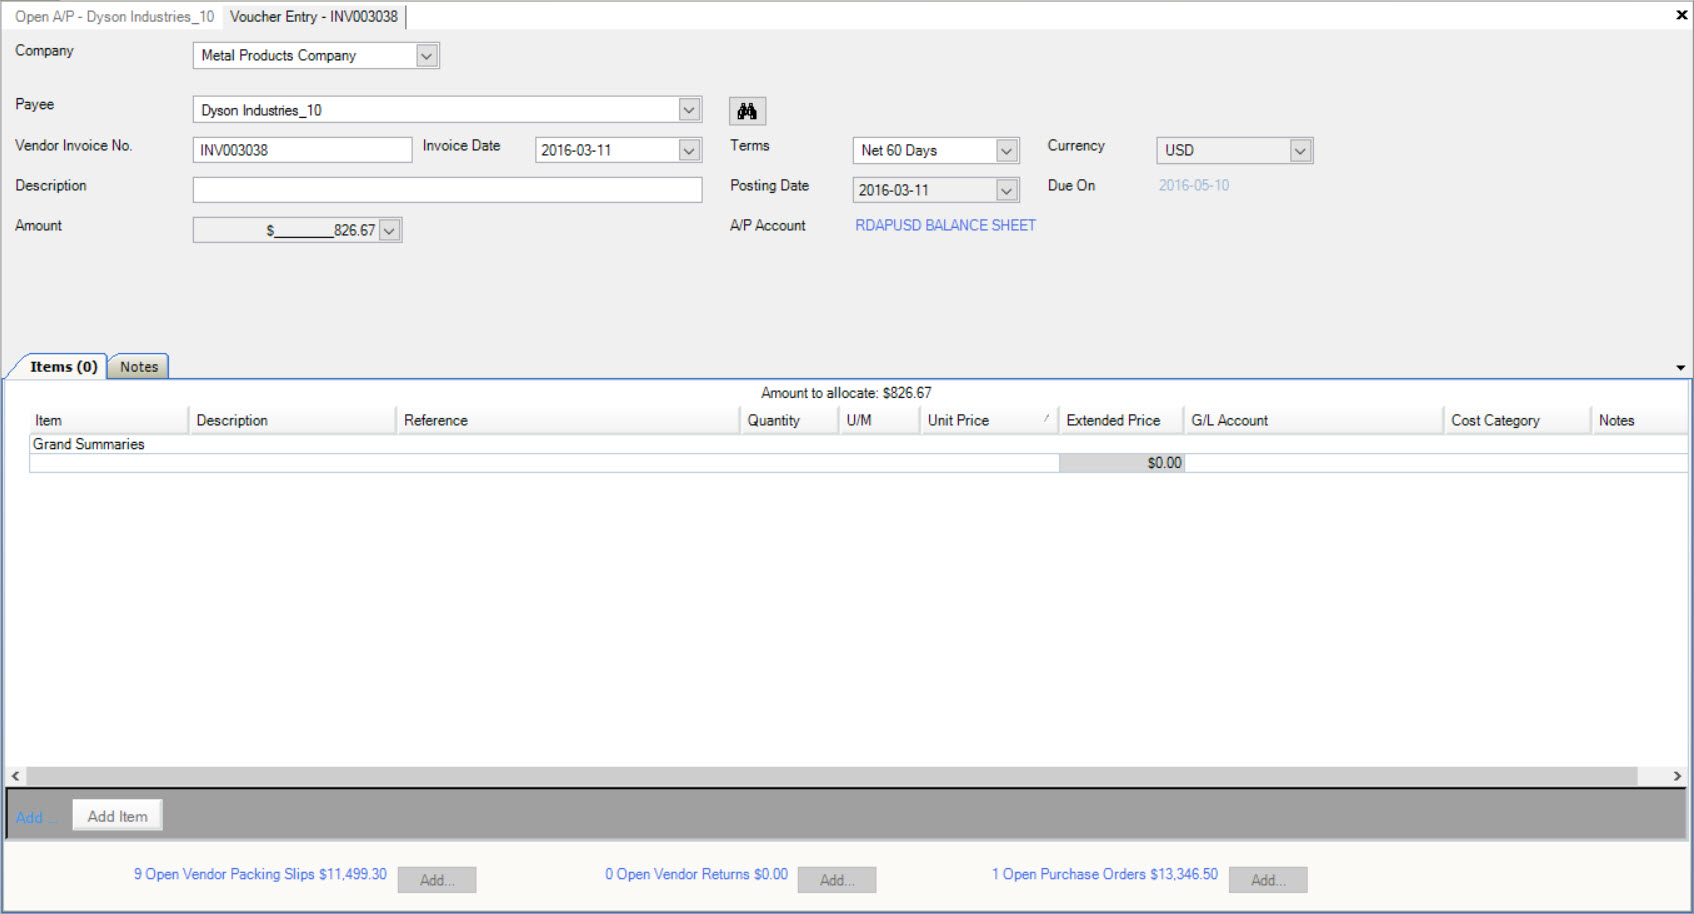
Users may double-click on the appropriate row of an Invoice to view the details in the Voucher Entry (read only) screen.
By checking the Group by Invoice option, users must select an Invoice Date from and to. Once this is done, click on the  button. The system will populate the appropriate Invoice information. By selecting the plus sign located beside the Invoice No., the system will display the appropriate Payments that were
recorded against the Invoice.
Users may double-click on the appropriate row of an Invoice to view the details in the Voucher Entry (read only) screen.

Voiding a Payment
To void a Payment made against an A/P Voucher, navigate to the  tab and click on the
 ![]() icon. This will open the Open A/P
screen.
icon. This will open the Open A/P
screen.

Users will need to select a Vendor using the available drop-down menu. Then, click on the History tab to search for the Payment you wish to void. Users then have the option to
view the Payment and Invoice History by selecting either Group by Payment or Group by Invoice. A range must be selected and users will need to click on the  button. The system will populate the appropriate Payments.
Once you have found the Payment you wish to void, right-click on the appropriate row and select the Void Payment... option.
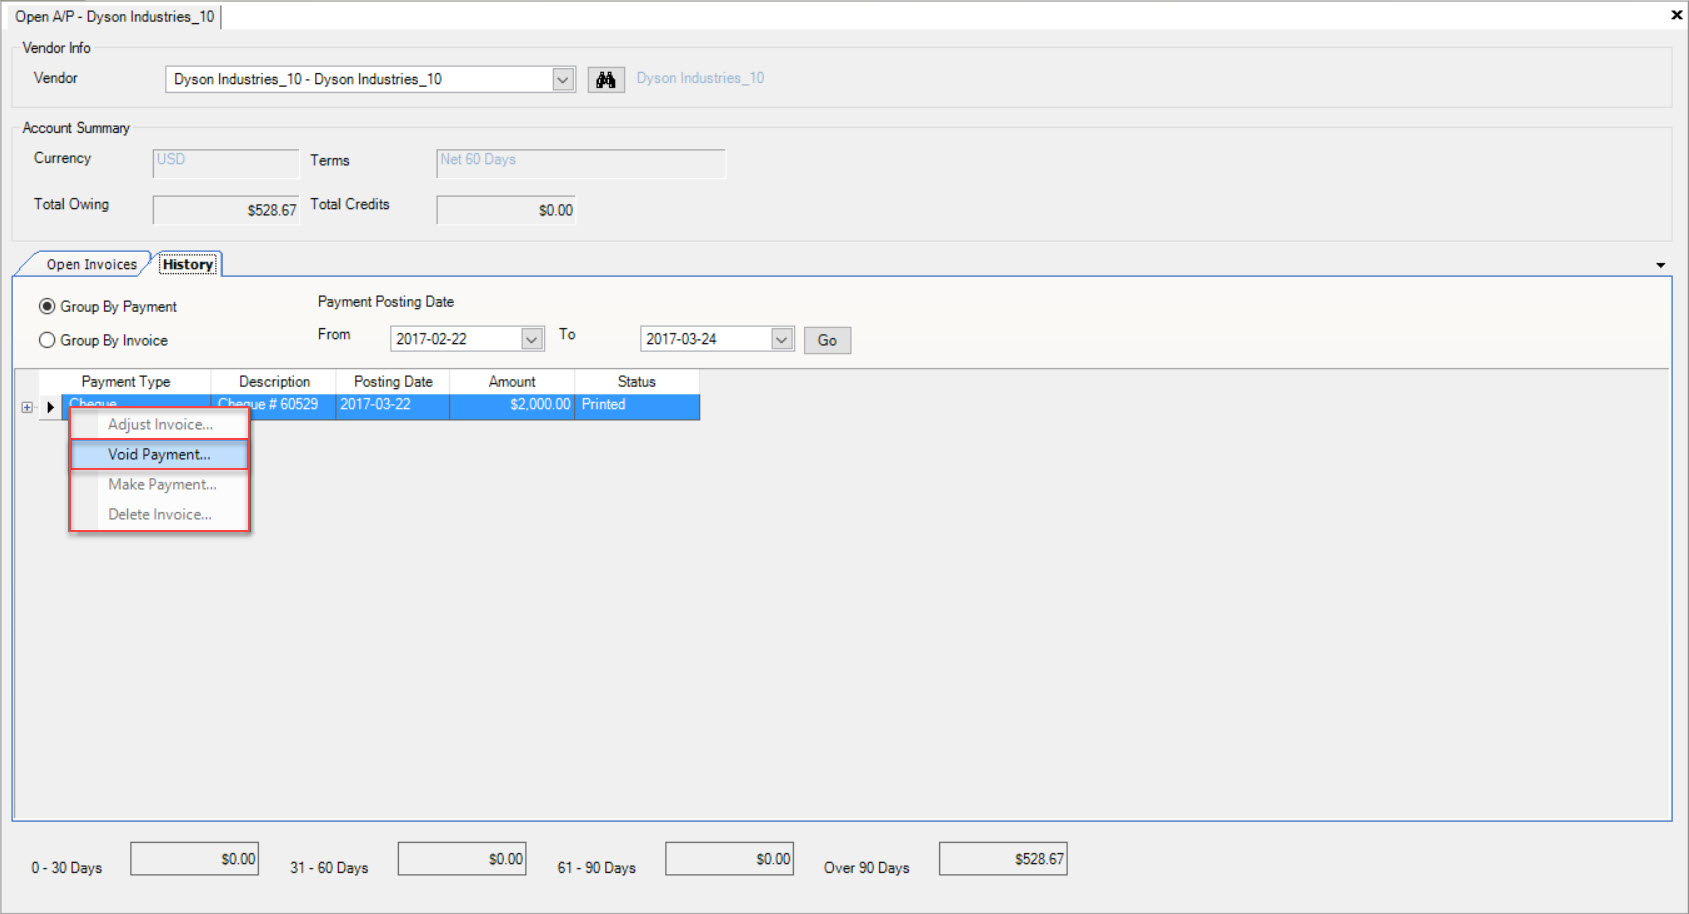
The Void Vendor Payment window will appear where users must verify the information and then select  button.
The system will put the Invoice back in the Open Invoices table once the Payment has been voided.
Note
Users can void a Partial Payment on an Open Invoice by expanding the Open Invoice row and right-clicking to select the Void Payment... option.
Emailing a Statement
To Email an Invoice Statement, navigate to the  tab and click on the
 ![]() icon. This will open the Open A/P screen.
icon. This will open the Open A/P screen.

Users will need to select a Vendor using the available drop-down menu. Once a Vendor has been selected, click on File > Send as Email Attachment > Statement.
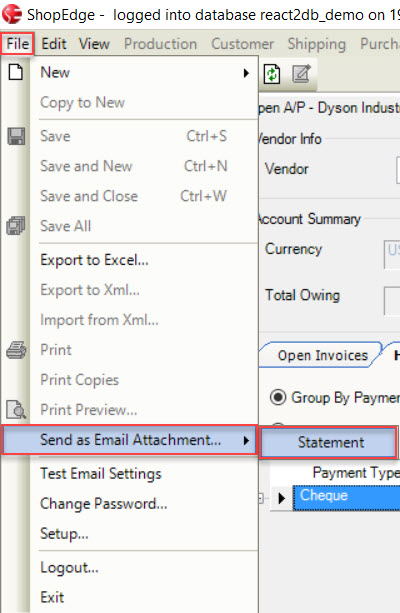
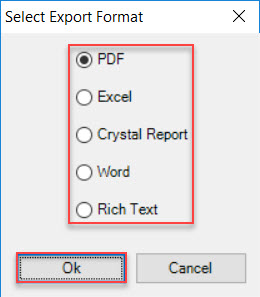
The system will then prompt you to select a format for the Invoice Statement. Once a format has been selected, click on the  button.
The system will create an Email with the Invoice Statement attached from your Microsoft Outlook.
Complete the Email and send.
Printing a Statement
To print an Invoice Statement, navigate to the  tab and click on the
 ![]() icon. This will open the Open A/P screen.
icon. This will open the Open A/P screen.

Users will need to select a Vendor using the available drop-down menu. Once a Vendor has been selected, click on the A/P menu located at the top of the screen and select the Print Statement option.
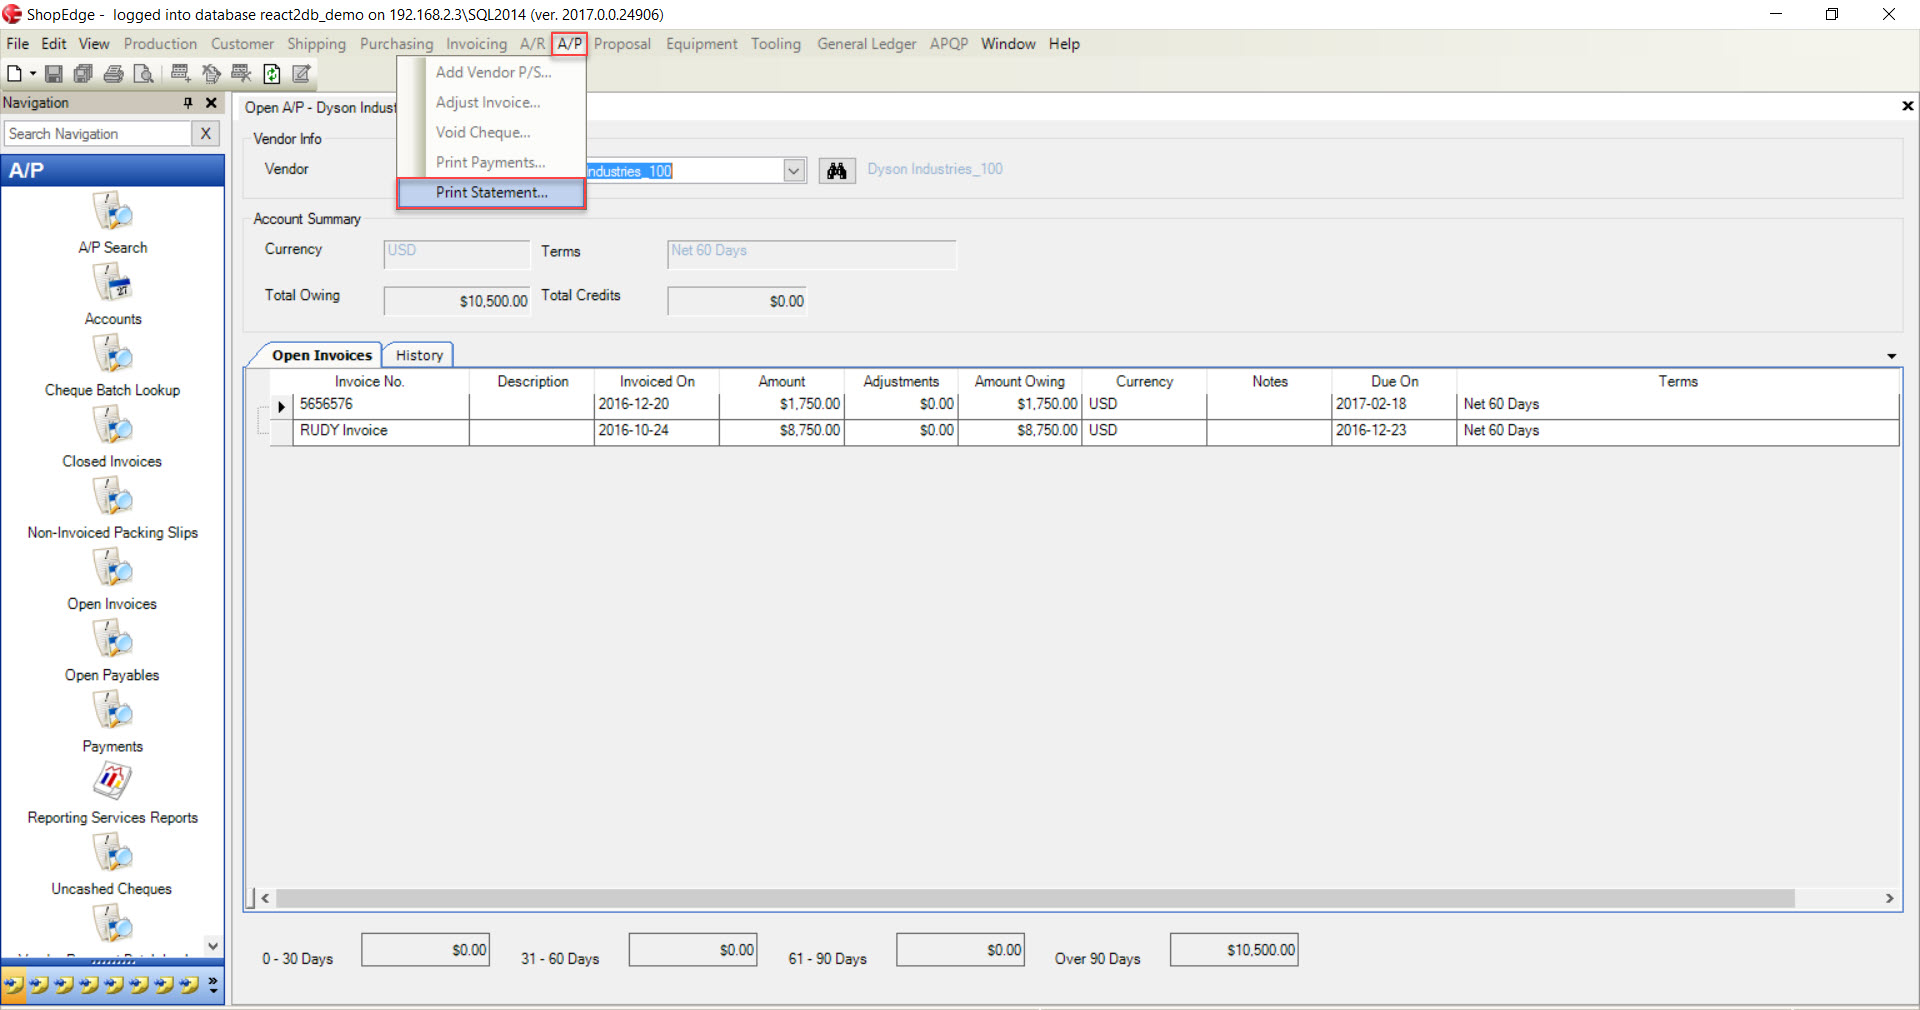
The system will prompt you to select a Printer as well as Printer settings, then, click on the  button to print the Invoice Statement.