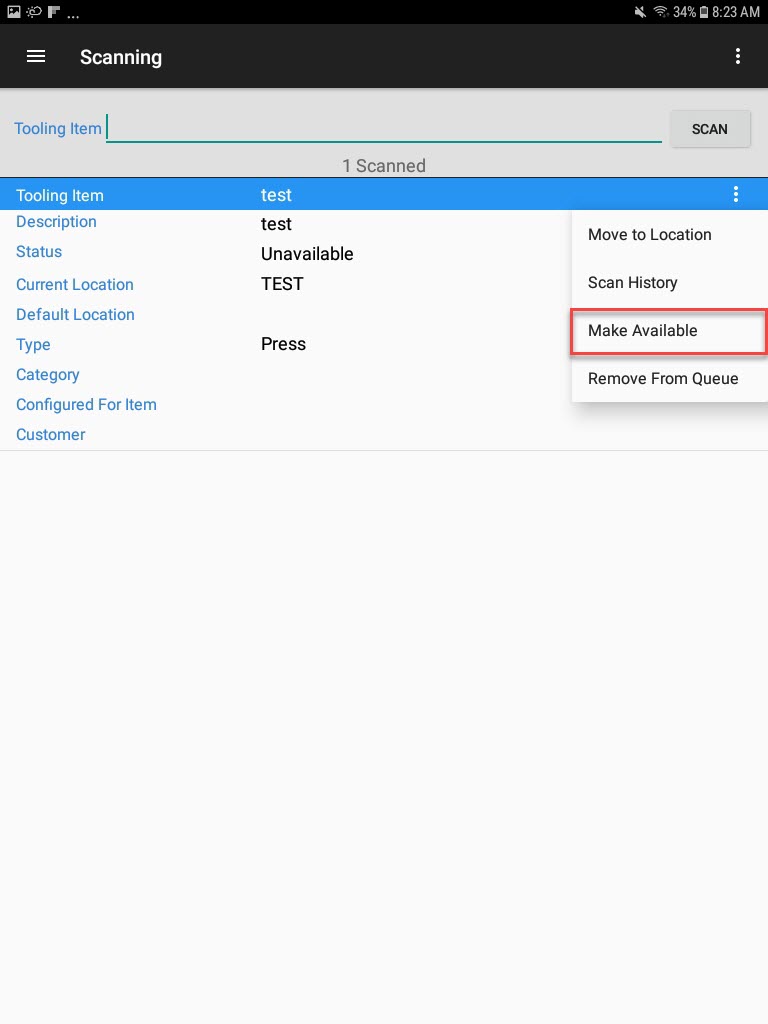
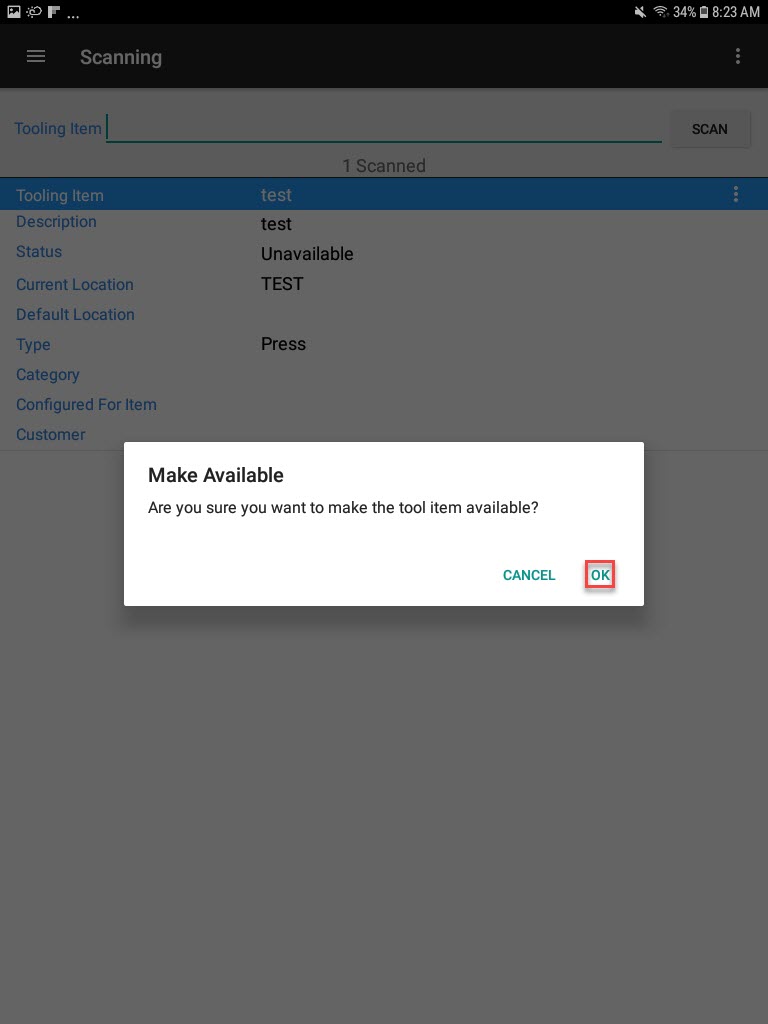
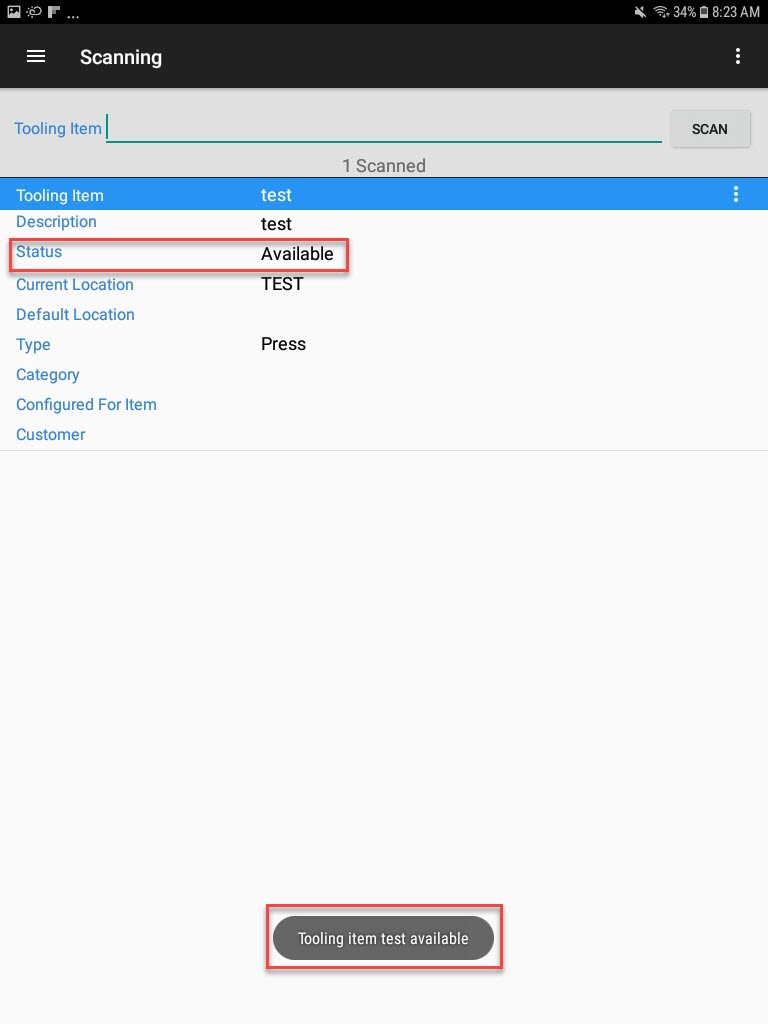
Tooling and Equipment
The Tooling/Equipment module is used to create and maintain Work Orders, Timecards, and scanning of serial numbers and MRO items.
Work Orders
Work Orders in the Android Application can be found by navigating to the Tooling/Equipment module, and select the Work Orders option from the navigation drawer to the left of the screen.
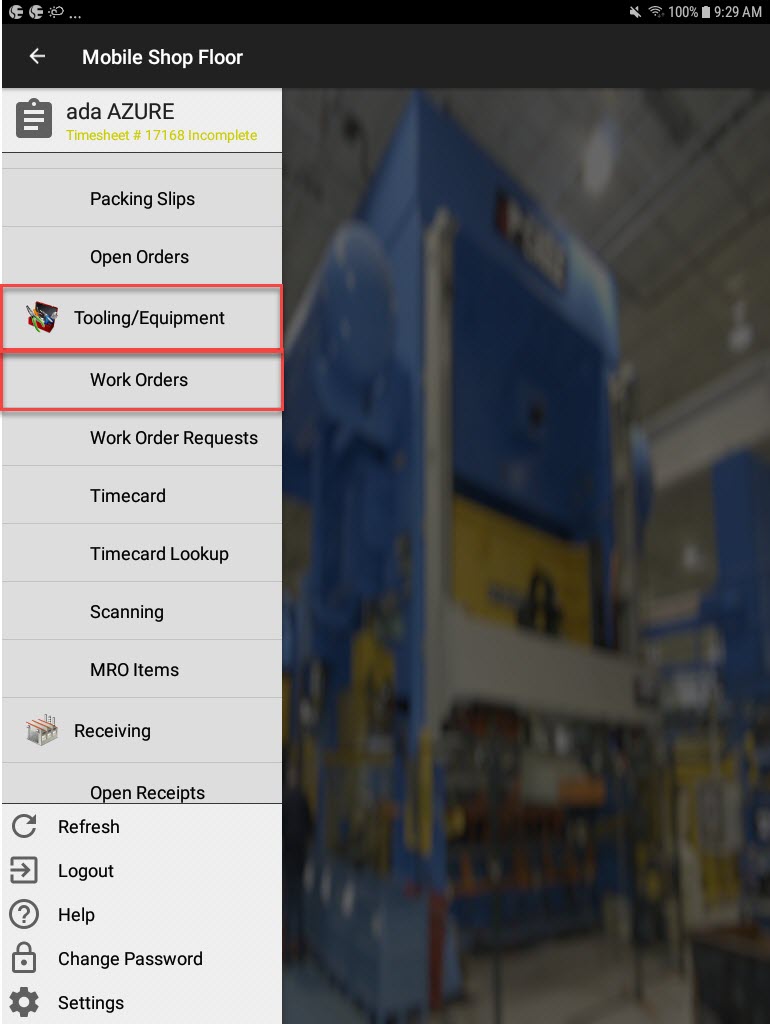
The Tooling/Equipment Open Work Orders screen will appear.
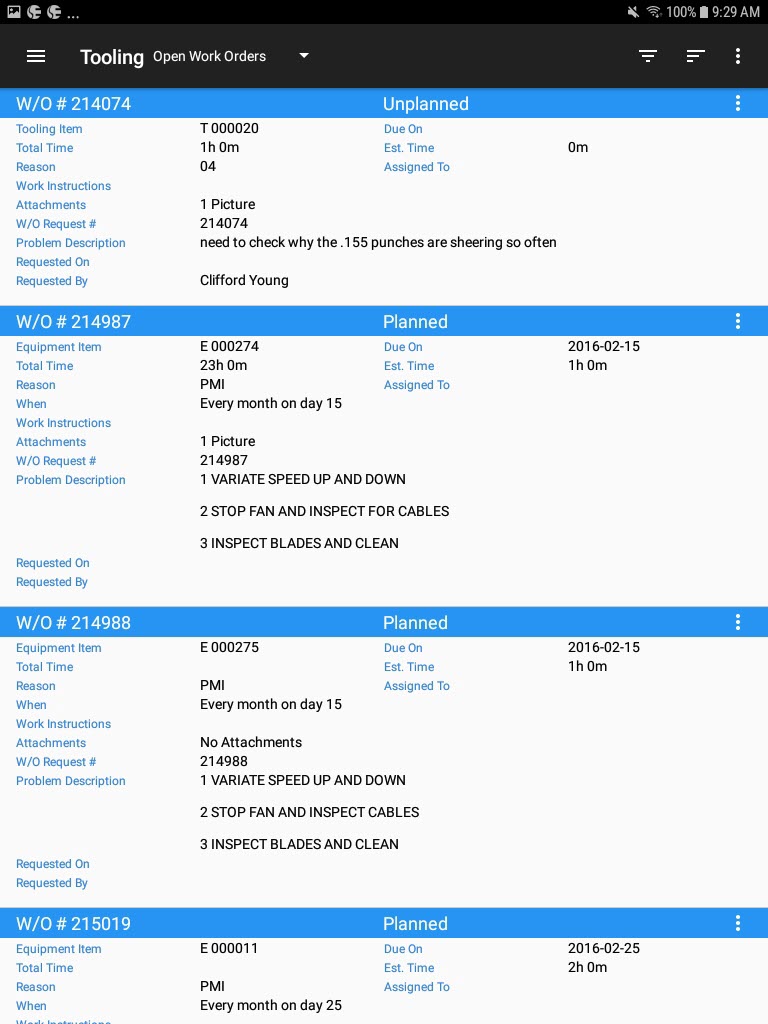
All of the Open Work Orders in the system will be displayed.
Creating a New Work Order
To create a new Work Order, navigate to the Tooling/Equipment module, and select the Work Orders option from the navigation drawer to the left of the screen.

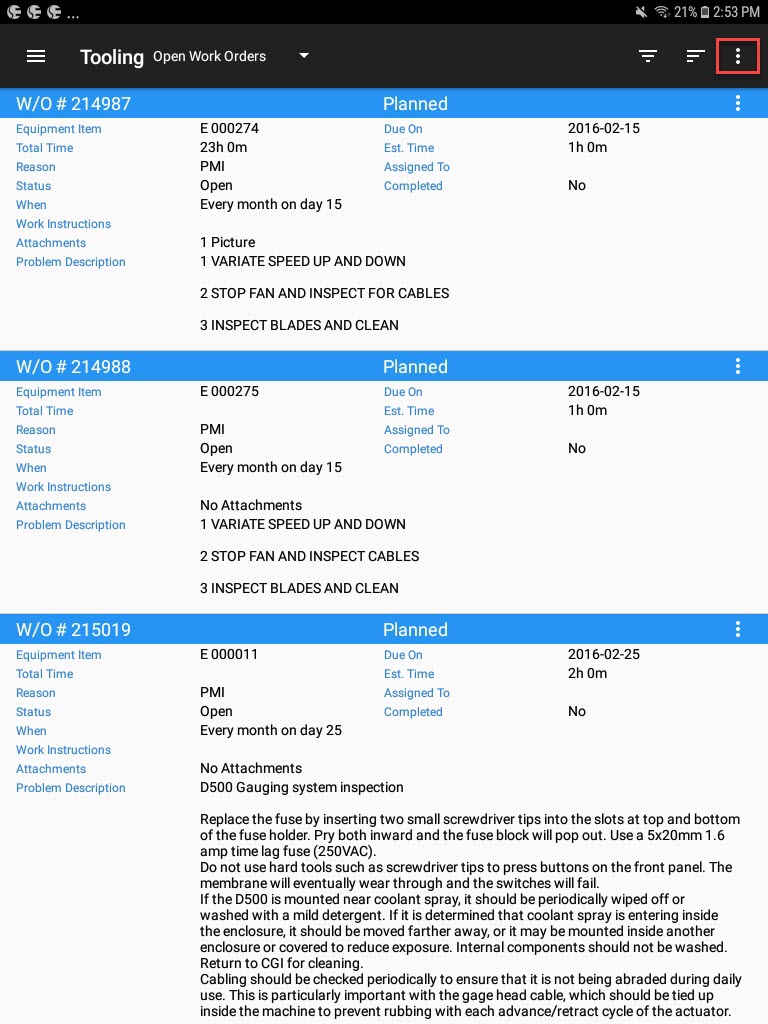
Select the action menu located in the top-right corner of the screen.
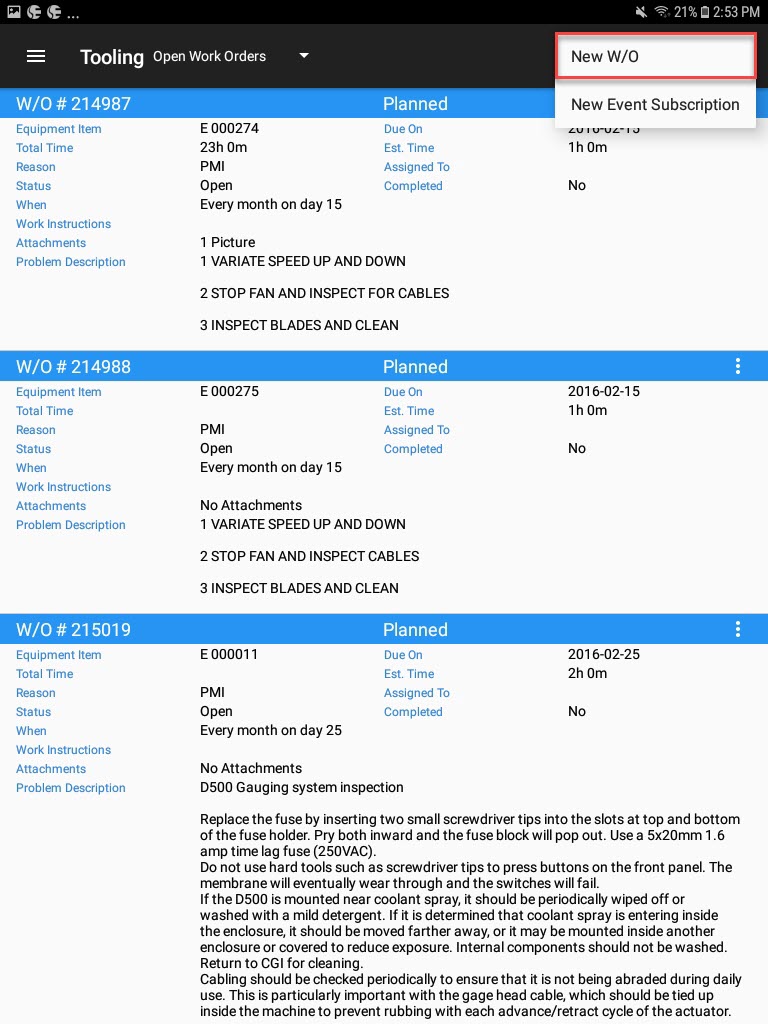
Then, select the New W/O option.
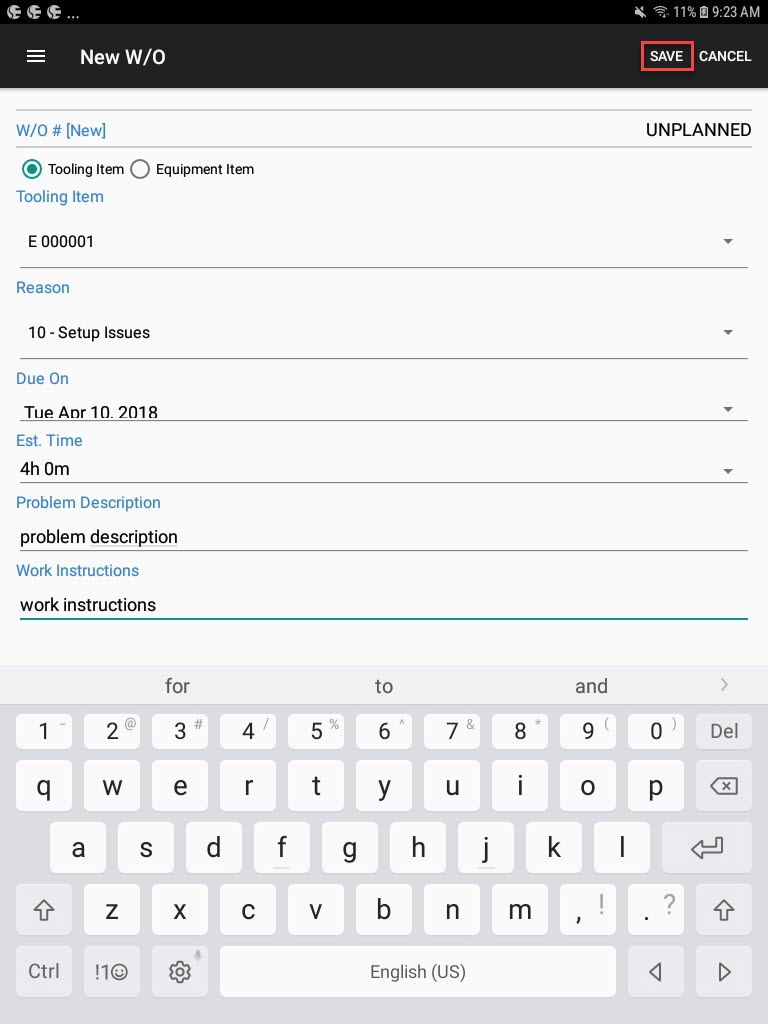
A new W/O will appear.
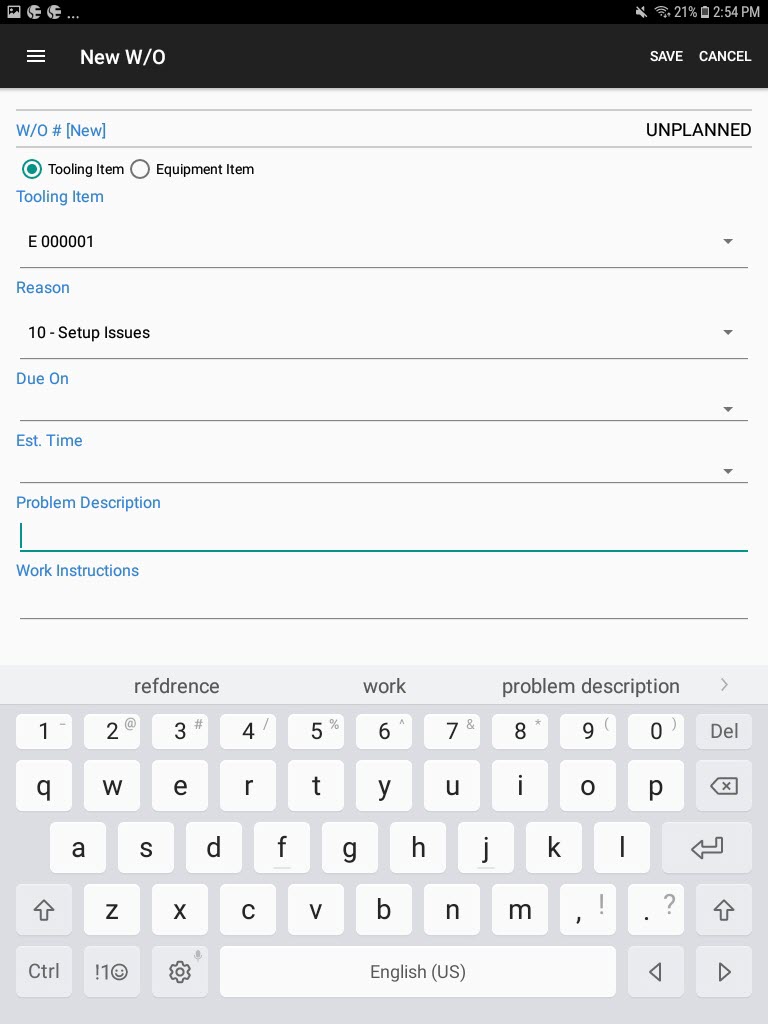
Users can create a Work Order for a Tooling Item or an Equipment Item by selecting one of the options at the top of the screen.
Then, select the Item, Reason, Due On, and Est. Time using the available drop-down menus. Enter in a Problem Description and any necessary Work Instructions.
Once all the necessary fields are filled in, click on the Save option located in the top-right corner of the screen.
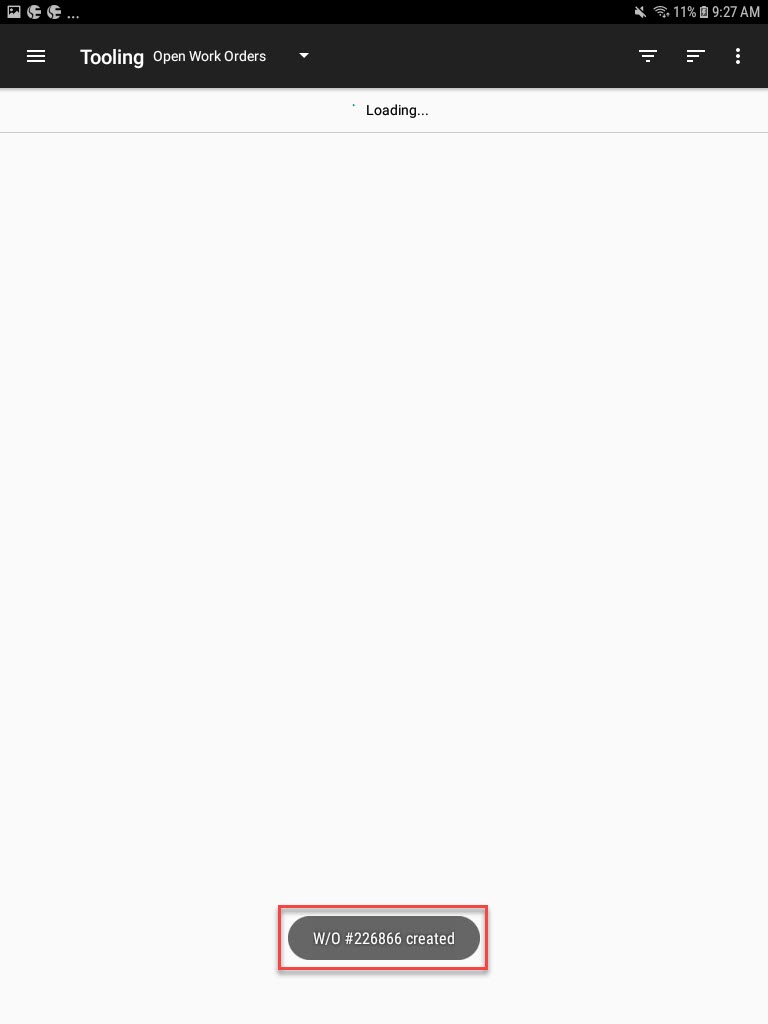
A toast message will appear with the new Work Order # and confirmation that it was created.
Creating a New Event Subscription
Creating an Event Subscription will notify users anytime that a Work Order is changed.
To create a new Event Subscription, navigate to the Tooling/Equipment module, and select the Work Orders option from the navigation drawer to the left of the screen.

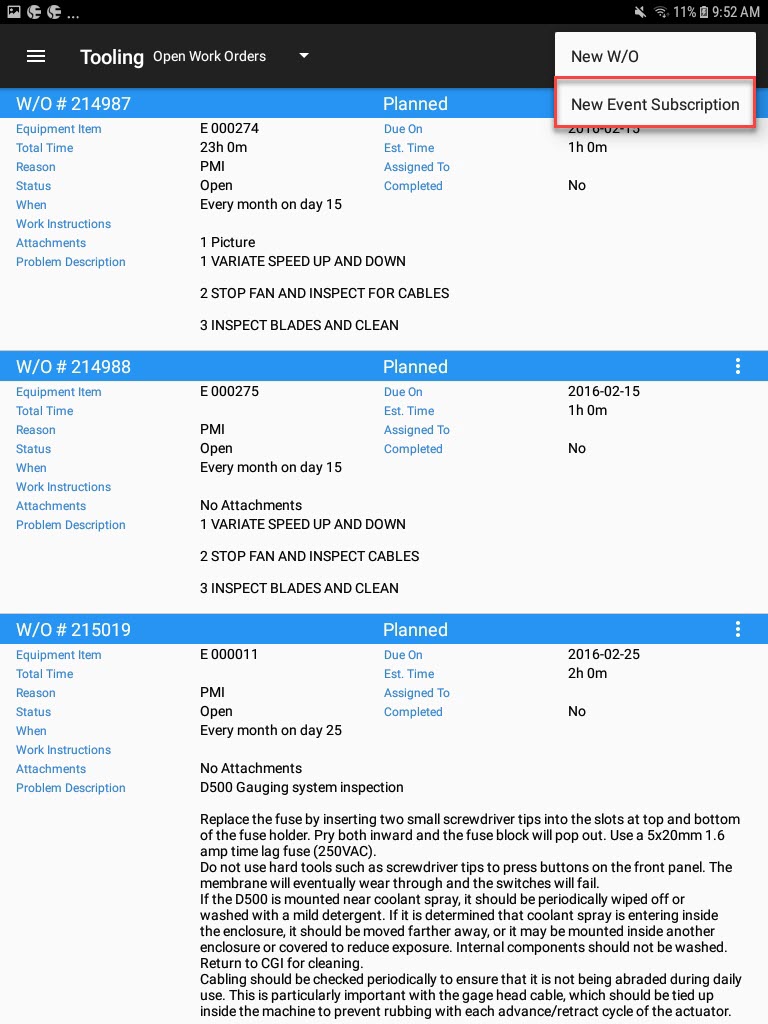
Select the action menu located in the top-right corner of the screen.

Then, select the New Event Subscription option.
A new Event Subscription screen will open.
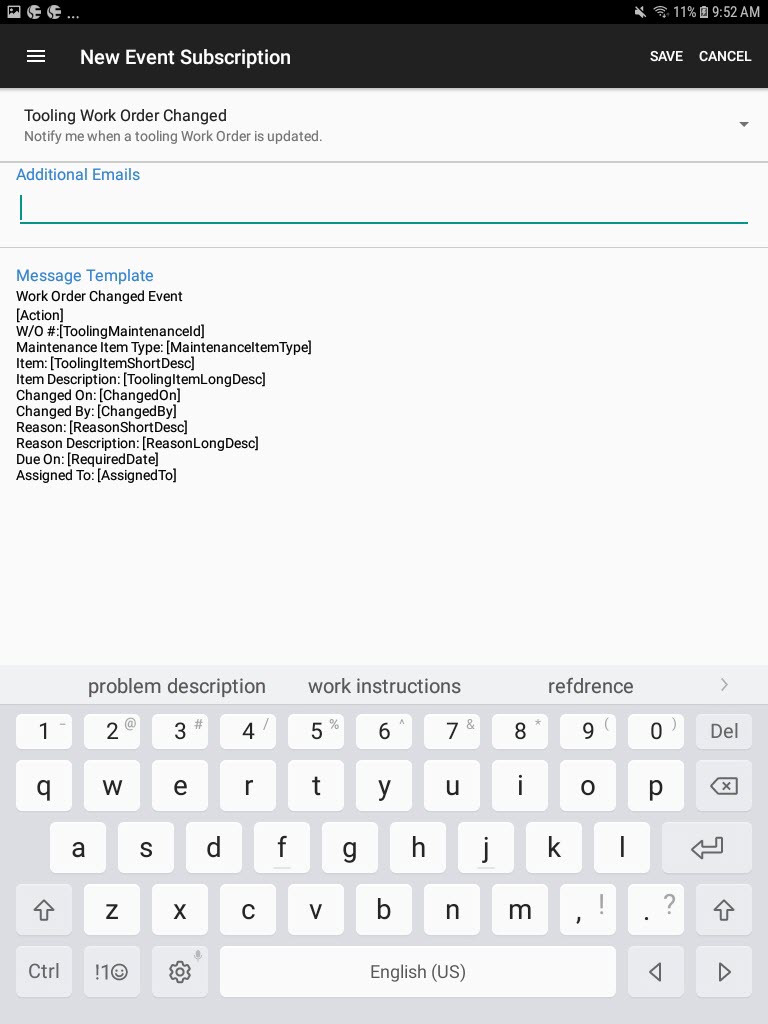
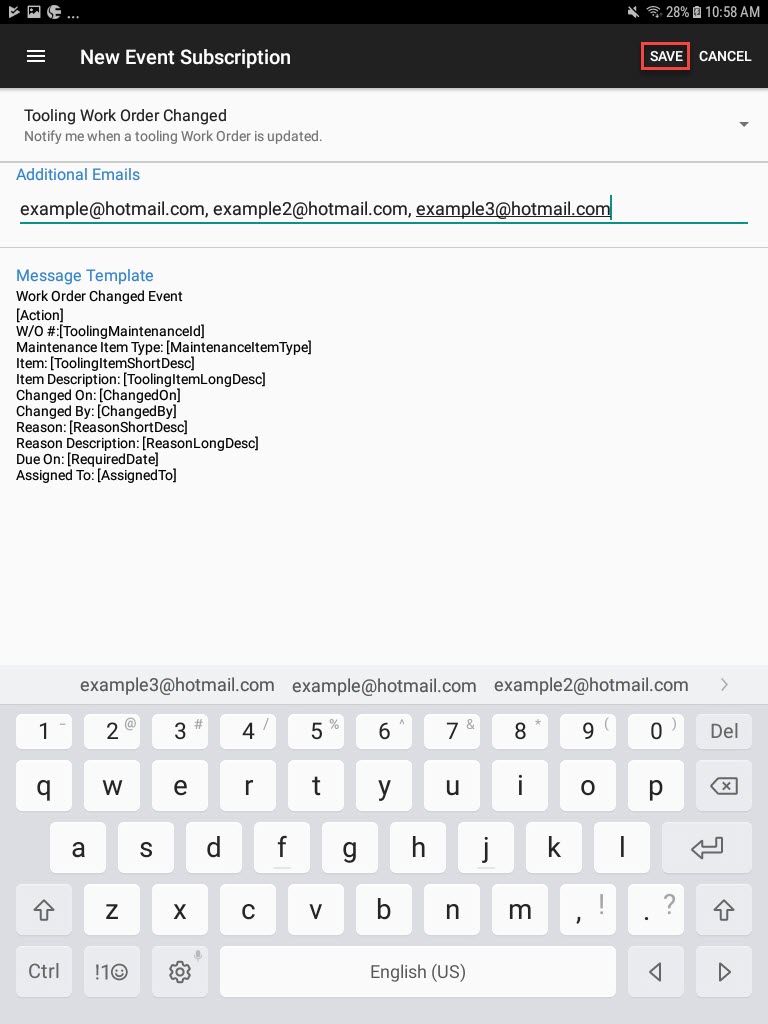
Users can enter in additional emails using the available text if necessary. To enter more than one, make sure to use commas to separate the list.
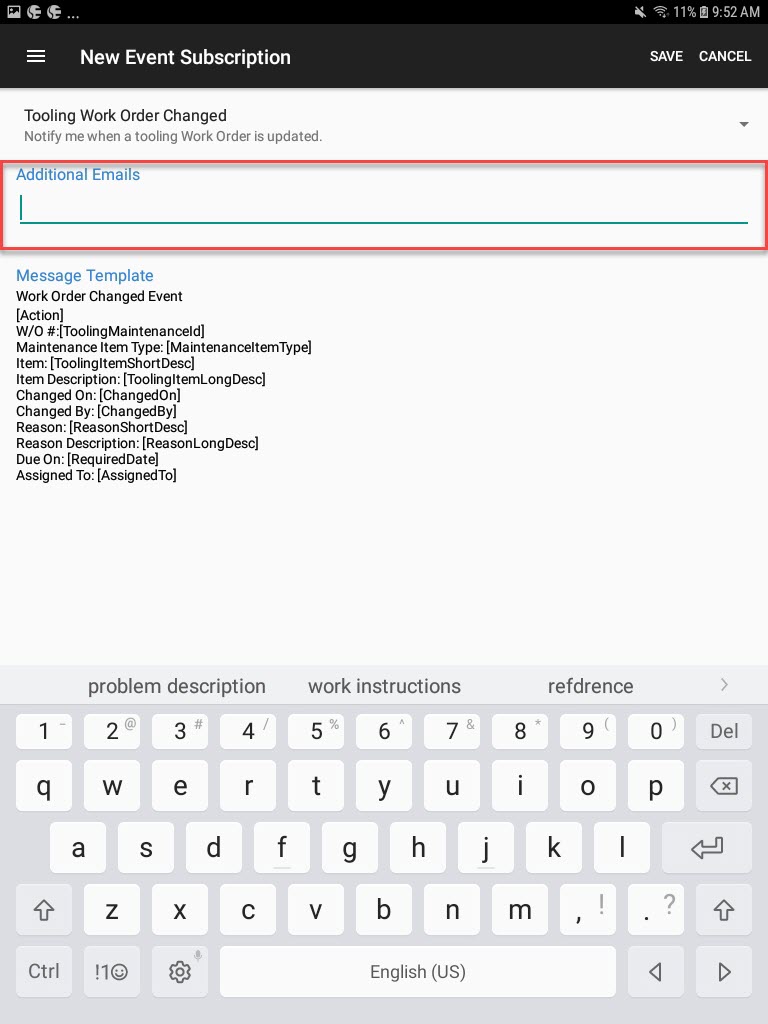
Once the necessary information is filled in, select the Save option located in the top-right corner of the screen.
Viewing Open Work Orders
To view Open Work Orders, navigate to the Tooling/Equipment module, and select the Work Orders option from the navigation drawer to the left of the screen.

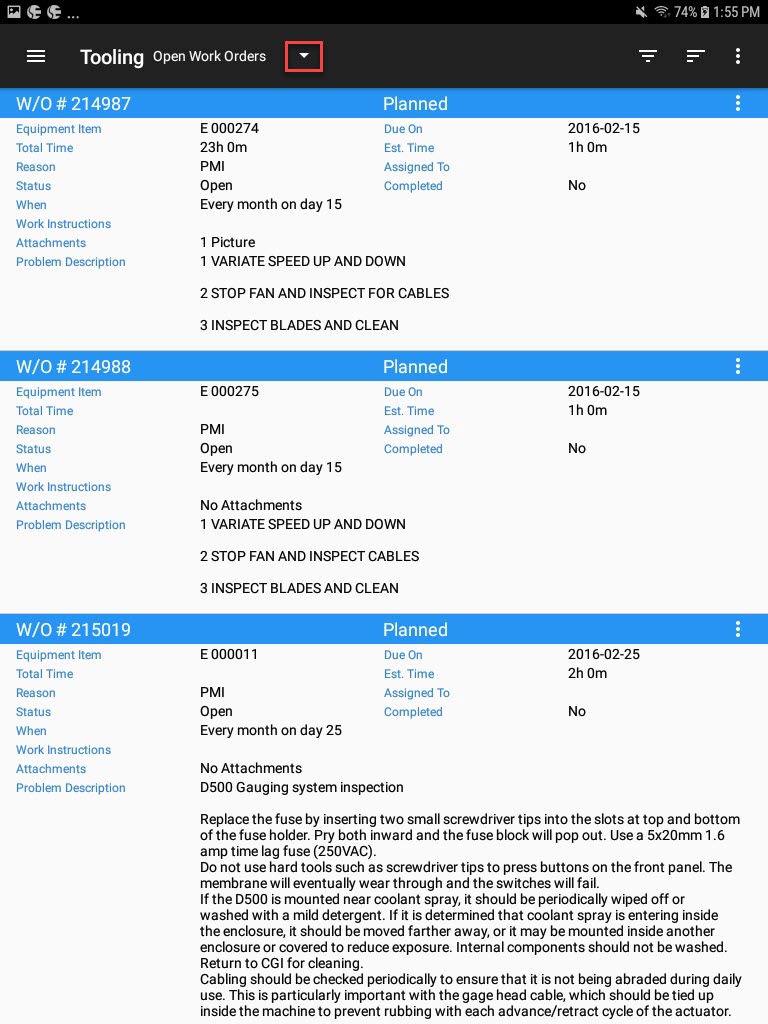
By default, the menu will show all Open Work Orders at the top of the screen.

Users will be able to view all available Open Work Orders in the system.
Viewing Closed Work Orders
To view Closed Work Orders, navigate to the Tooling/Equipment module, and select the Work Orders option from the navigation drawer to the left of the screen.

At the top of the screen, using the drop-down menu, select Closed Work Orders.
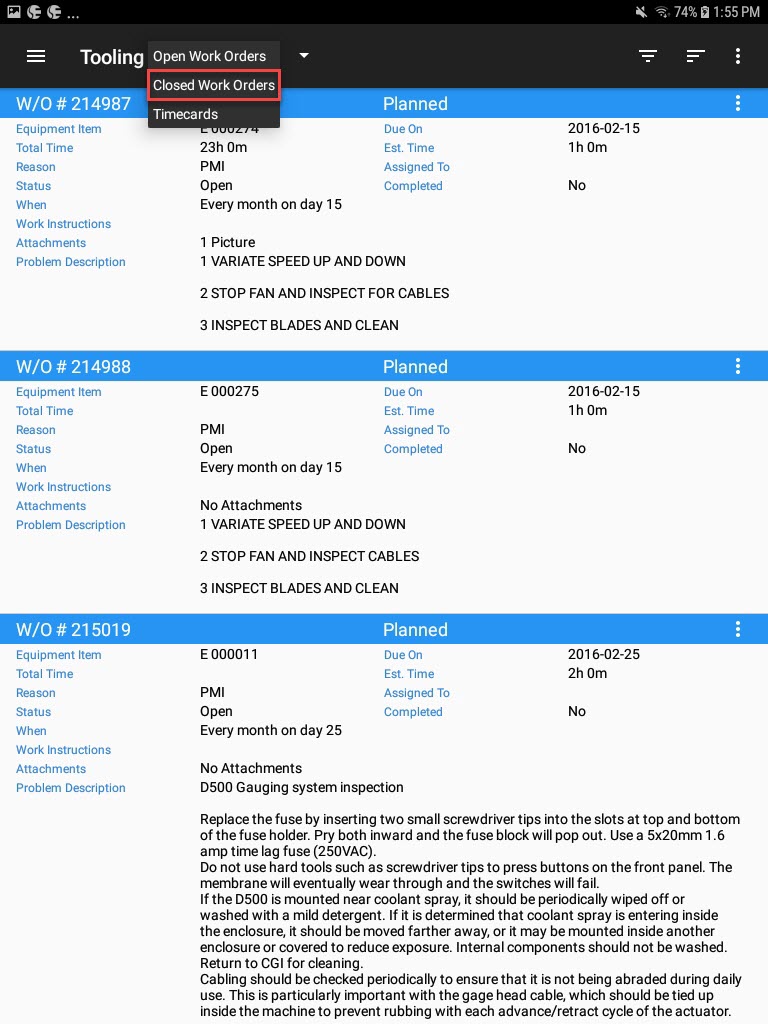
Users will be able to view all available Closed Work Orders in the system.
Viewing Timecards
To view Timecards that have Work Orders attached to them, navigate to the Tooling/Equipment module, and select the Work Orders option from the navigation drawer to the left of the screen.

At the top of the screen, using the drop-down menu, select the Timecards option.
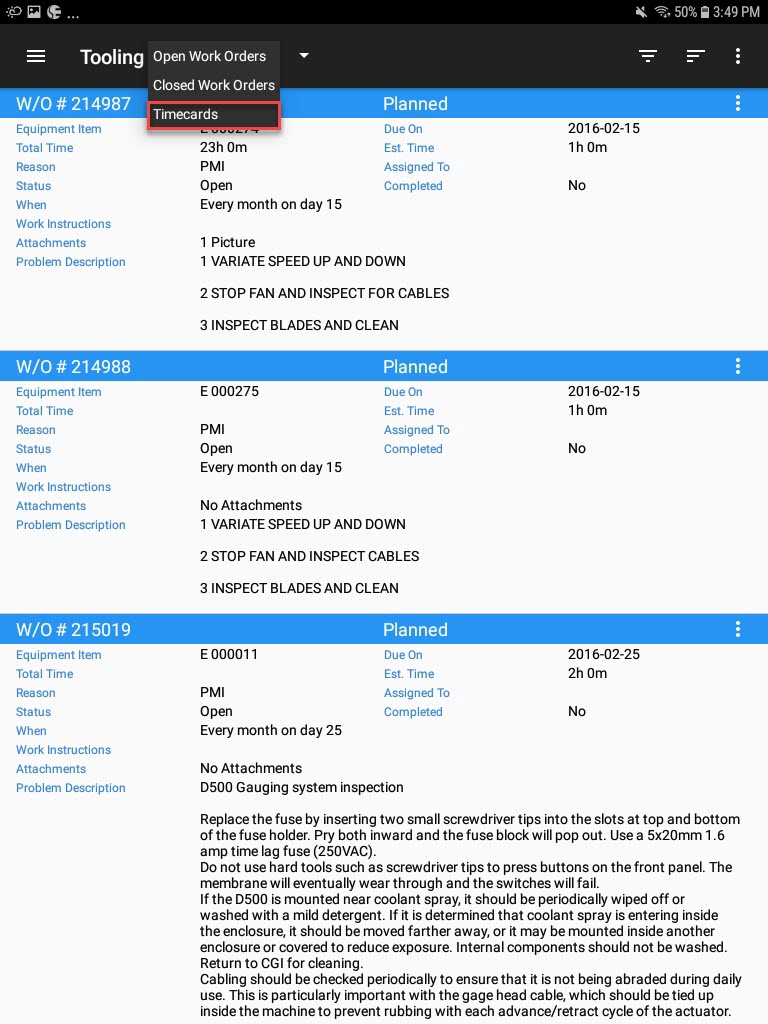
Users will be able to view all available Tooling and Equipment Timecards in the system.
Opening an Existing Work Order
To open an existing Work Order, navigate to the Tooling/Equipment module, and select the Work Orders option from the navigation drawer to the left of the screen.

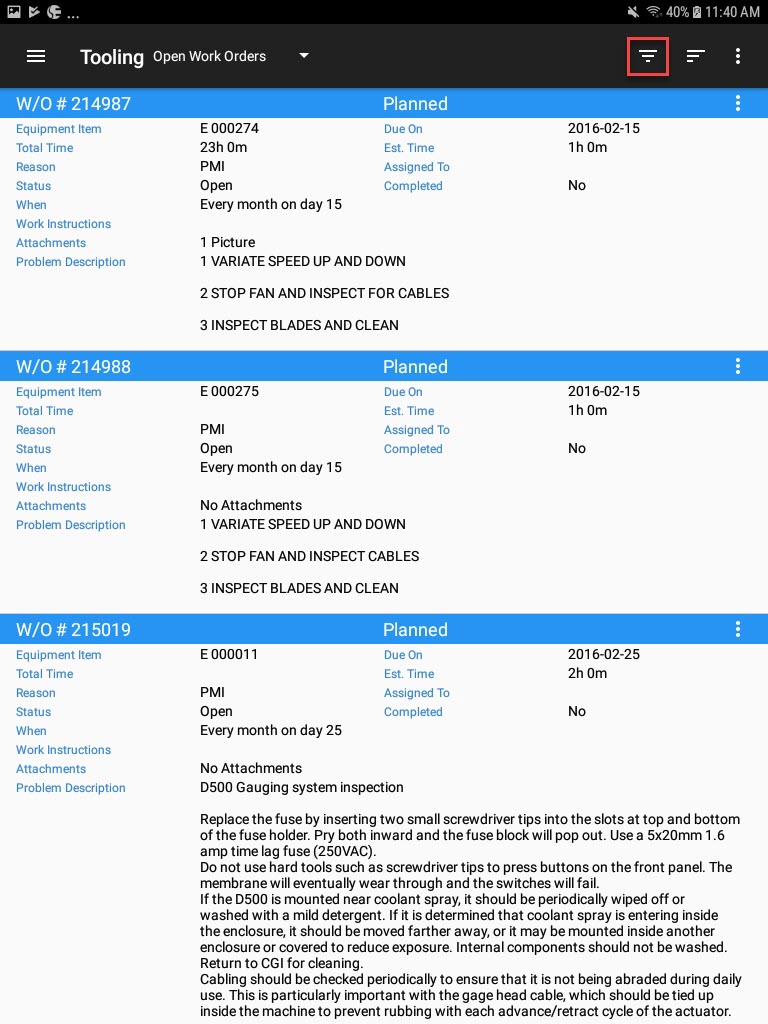
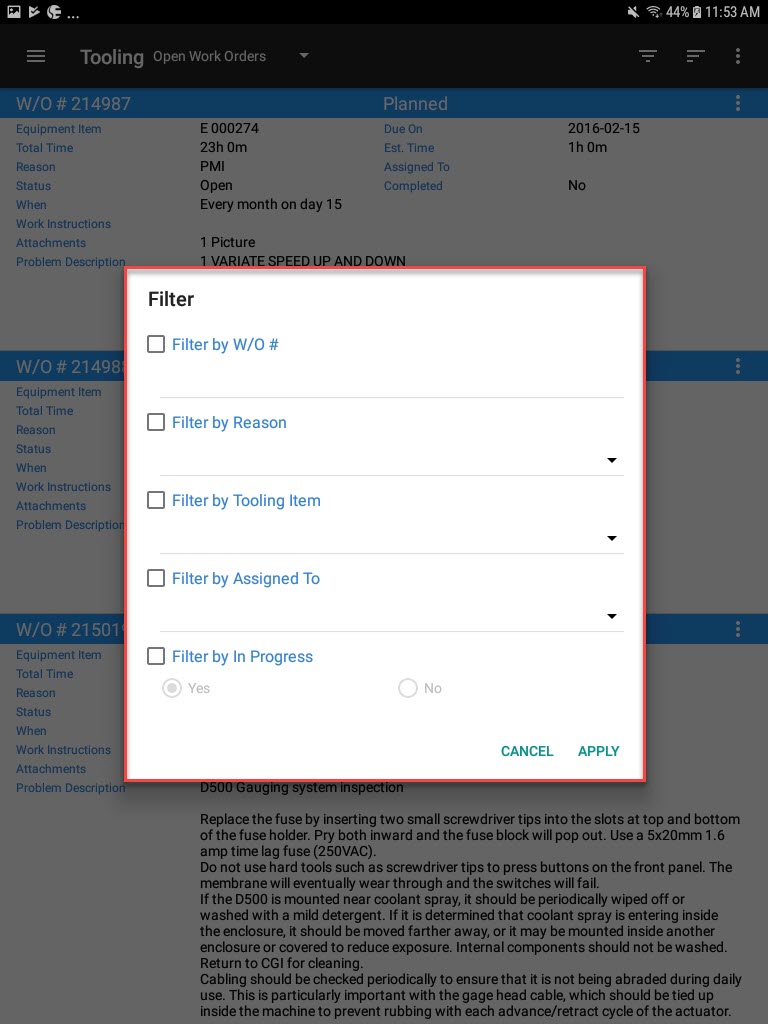
Locate the Work Order you wish to open; users can do this by scrolling through the list, or by using the available search and sort filters located at the top-right of the screen.
The search filter can be viewed by selecting the first button at the top-right of the screen.
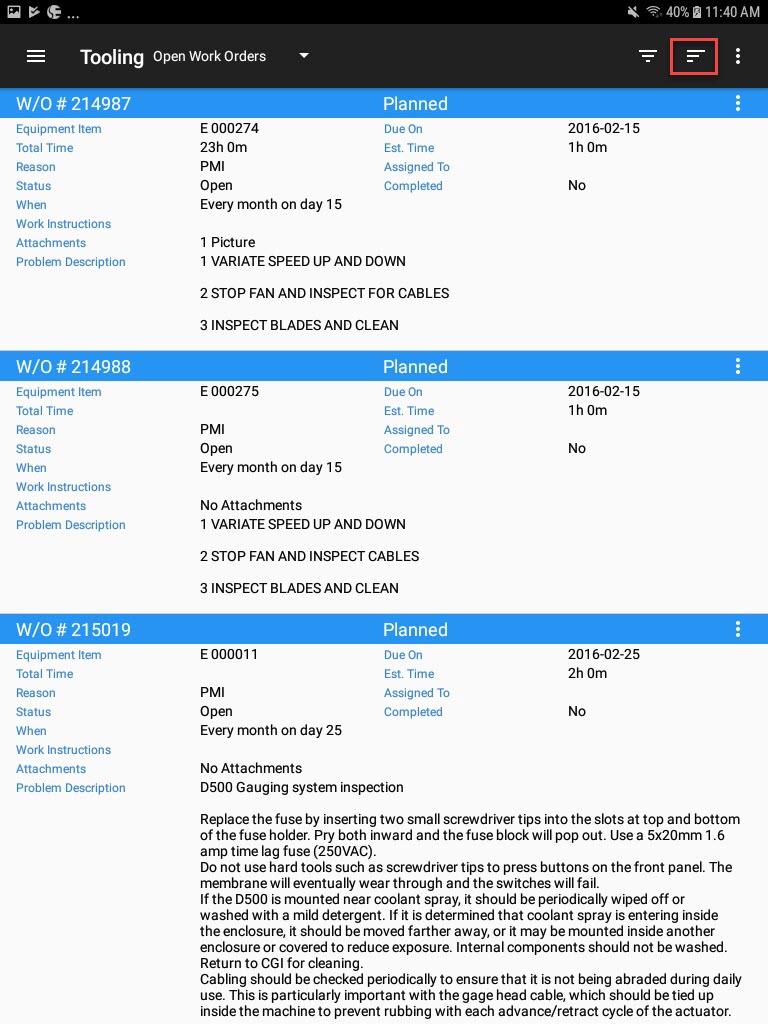
The sort filter can be viewed by selecting the second button at the top-right of the screen.
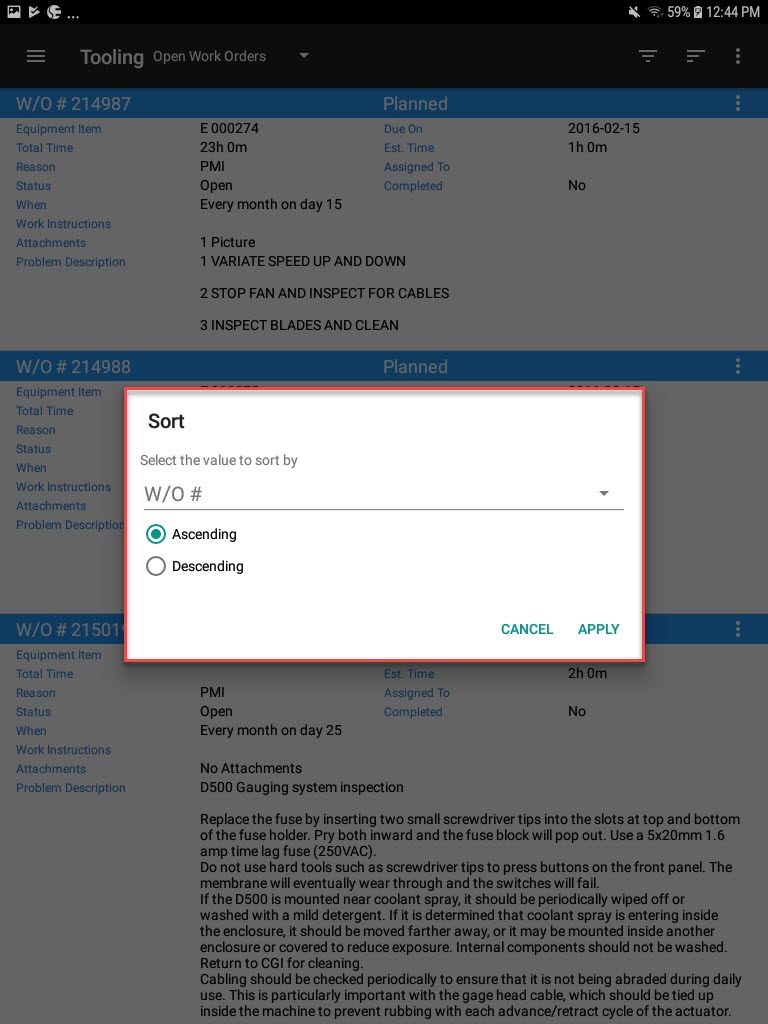
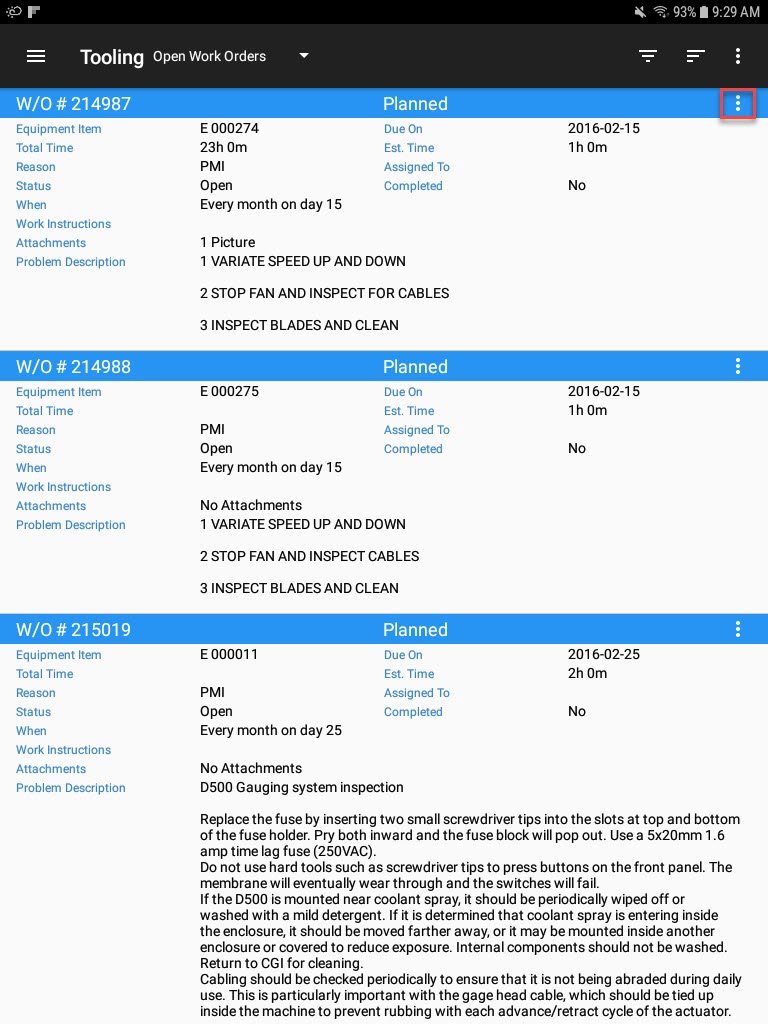
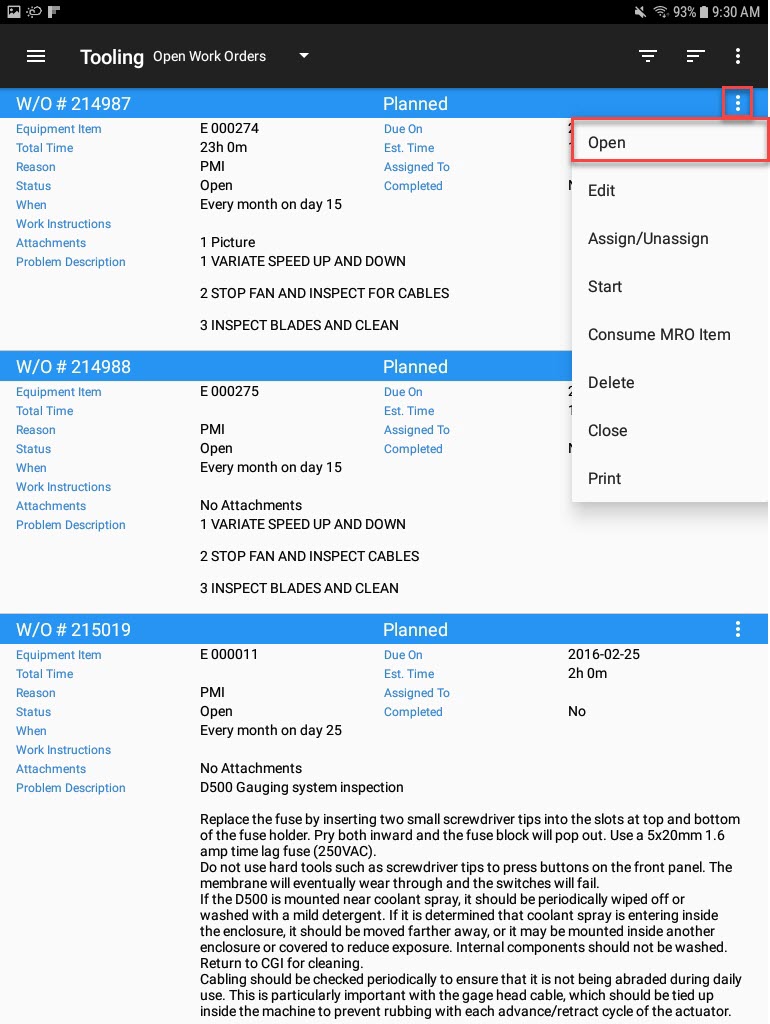
Once the appropriate Work Order has been located, select the action menu to the right of the Work Order. From the action menu, select Open.
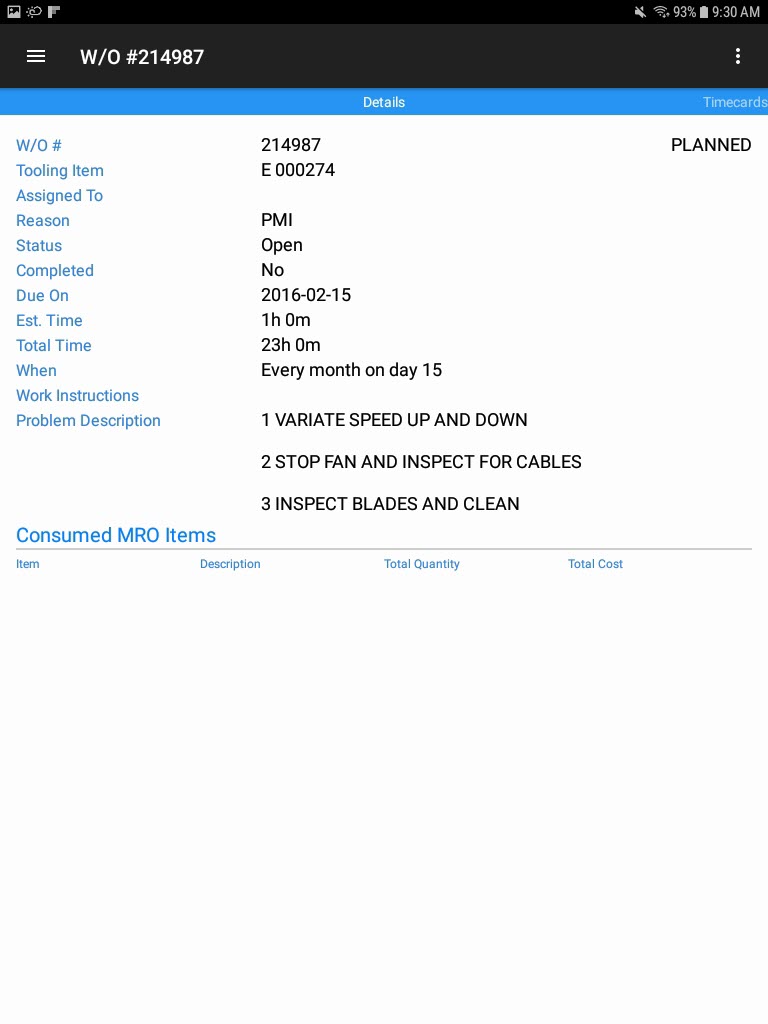
The selected Work Order will be opened.
Editing a Work Order
To edit a Work Order, navigate to the Tooling/Equipment module, and select the Work Orders option from the navigation drawer to the left of the screen.

Locate the Work Order you wish to edit; users can do this by scrolling through the list, or by using the available search and sort filters located at the top-right of the screen.
Note
For more information on the search and sort filters, please see ShopEdge Mobile Android Application > Tooling and Equipment > Word Orders > Opening an Existing Work Work.
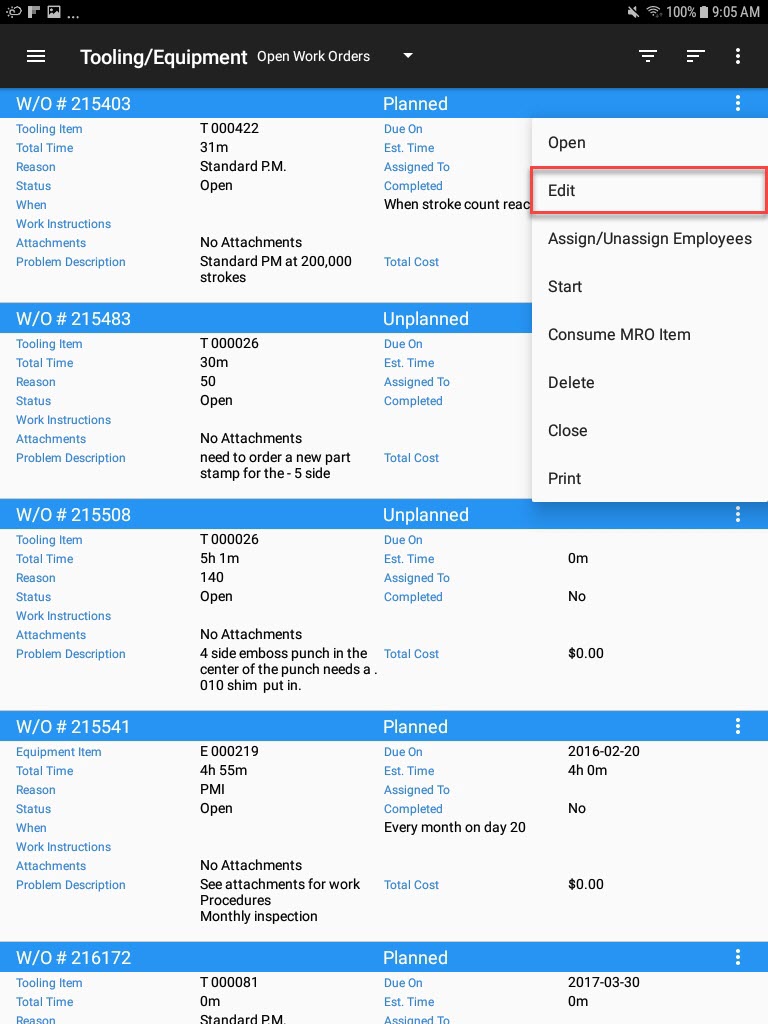
Once the appropriate Work Order has been located, select the action menu to the right of the Work Order. From the action menu, select Edit.
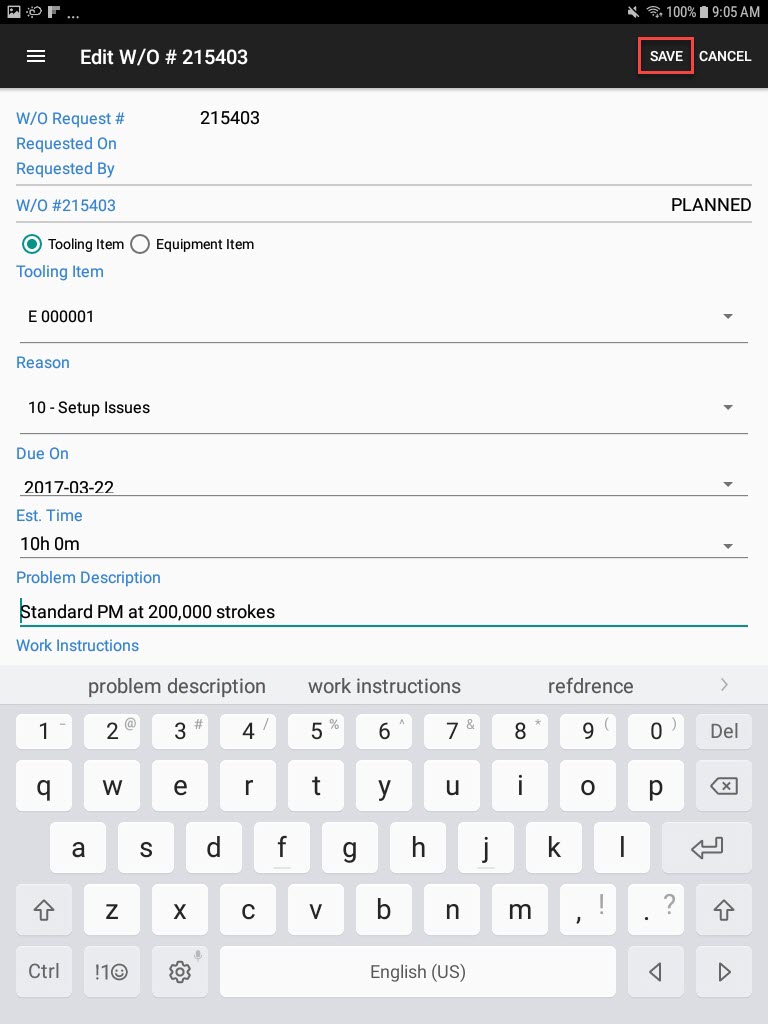
The Edit W/O # _____ screen will appear. Make the necessary changes and select Save located to the top-right of the screen.
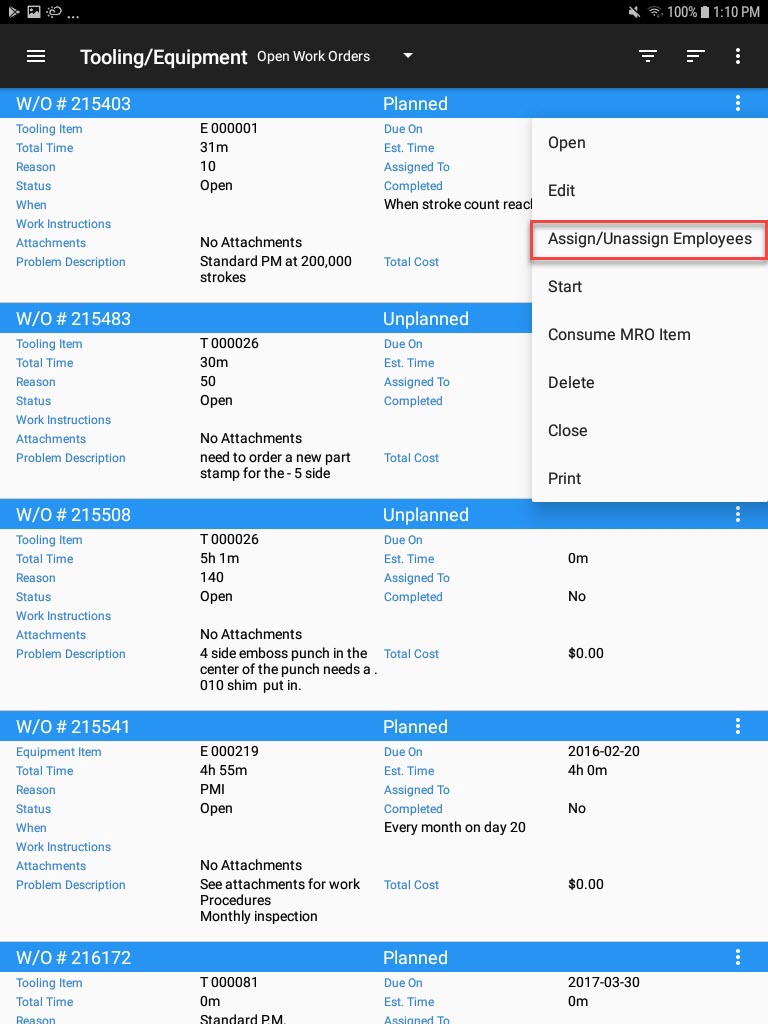
The Work order will be updated.
Note
Users can also edit a Work Order from a Work Order detail screen by following the same steps from the action menu Edit option.
Assigning or Unassigning Work Orders
To assign a Work Order, navigate to the Tooling/Equipment module, and select the Work Orders option from the navigation drawer to the left of the screen.

Locate the Work Order you wish to assign; users can do this by scrolling through the list, or by using the available search and sort filters located at the top-right of the screen.
Note
For more information on the search and sort filters, please see ShopEdge Mobile Android Application > Tooling and Equipment > Word Orders > Opening an Existing Work Work.
Once the appropriate Work Order has been located, select the action menu to the right of the Work Order. From the action menu, select Assign/Unassign Employees.
The Assigned Employees window will appear. Users can select an Employee from the drop-down menu or by using the search filter/find button.
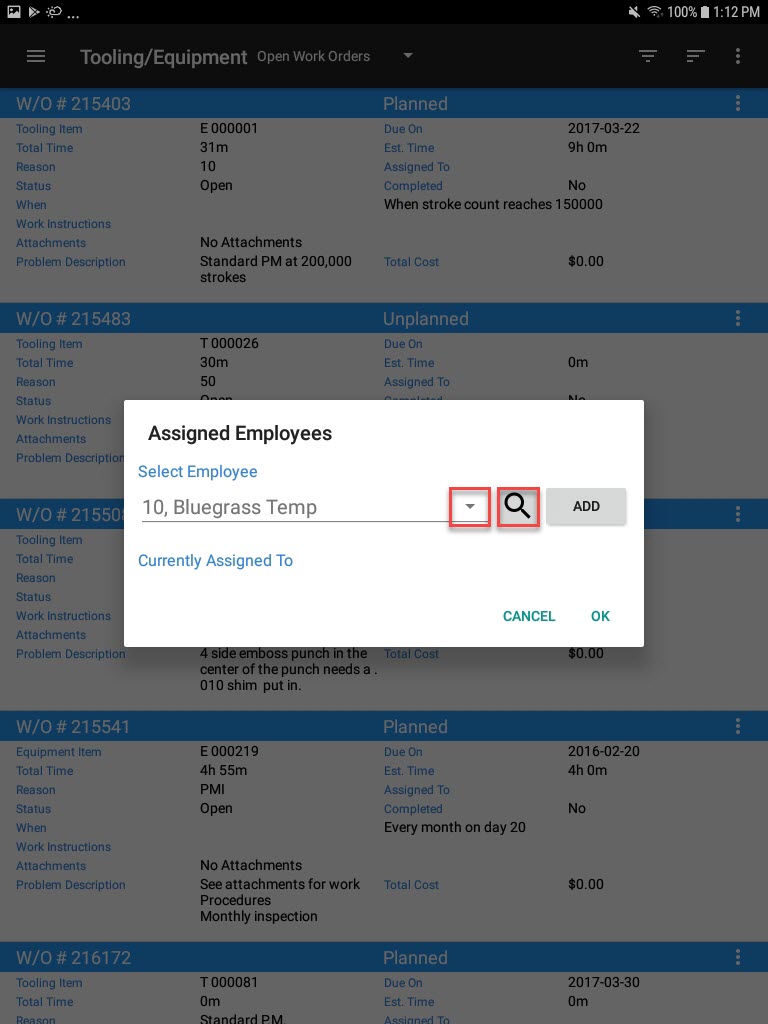
Once an Employee has been selected, press the Add button. The selected Employee(s) will be added to the list under Currently Assigned To.
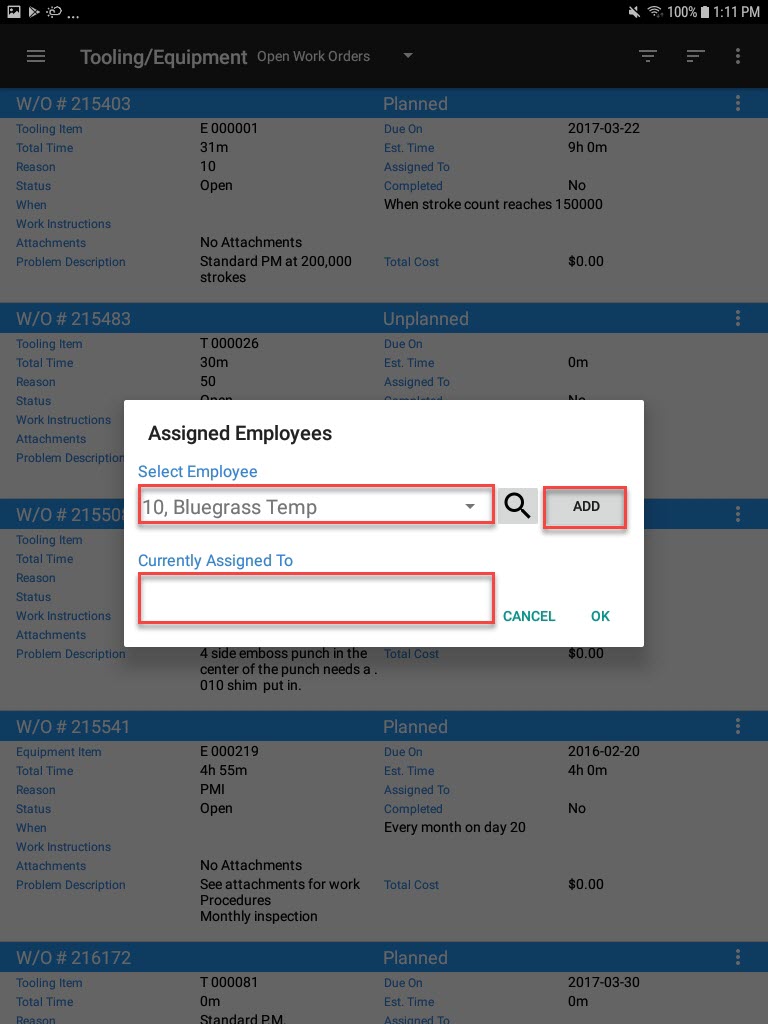
To unassign a Work Order, simply select the Delete button on the Assigned Employees window for the Employees of your choice.
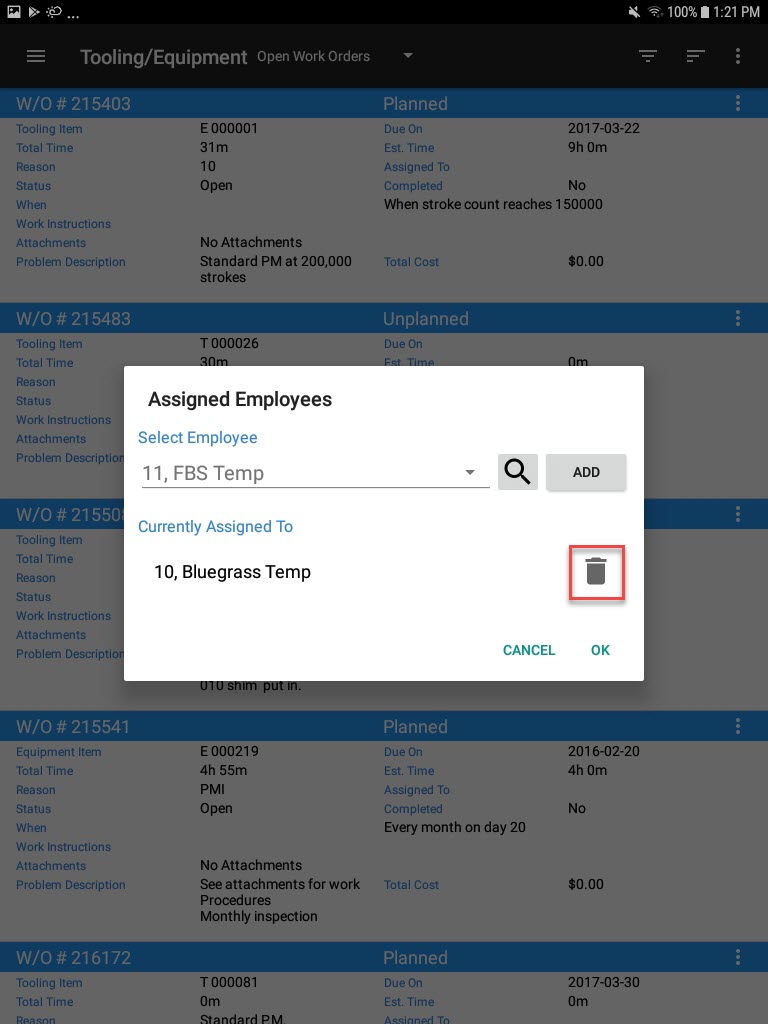
The selected Employee will be unassigned immediately.
Note
Users can also assign/unassign Employees to a Work Order from the Work Order detail screen by selecting the Assign/Unassign Employees action menu option.
Starting a Work Order
To start a Work Order, navigate to the Tooling/Equipment module, and select the Work Orders option from the navigation drawer to the left of the screen.

Locate the Work Order you wish to start; users can do this by scrolling through the list, or by using the available search and sort filters located at the top-right of the screen.
Note
For more information on the search and sort filters, please see ShopEdge Mobile Android Application > Tooling and Equipment > Word Orders > Opening an Existing Work Work.
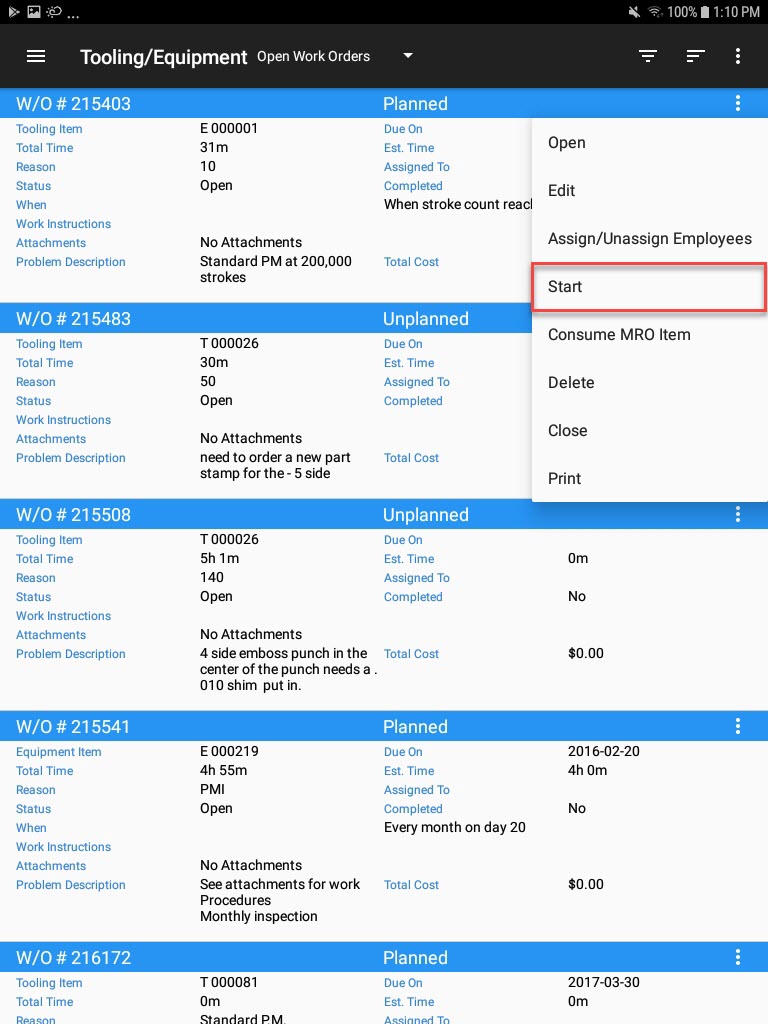
Once the appropriate Work Order has been located, select the action menu to the right of the Work Order. From the action menu, select Start.
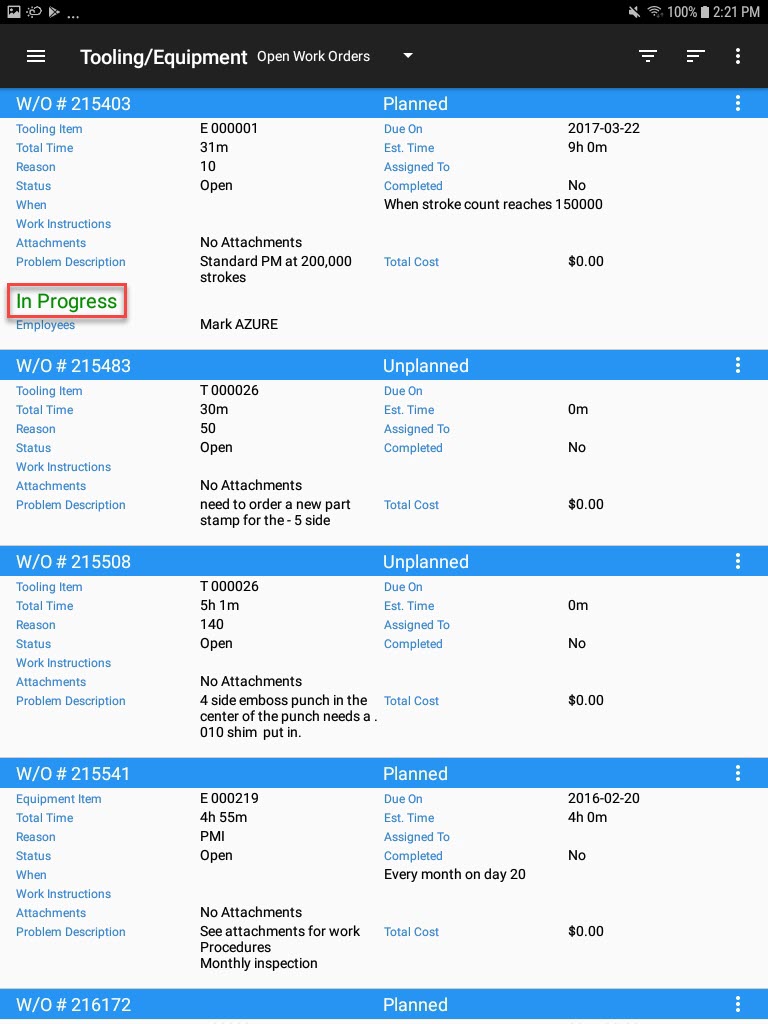
The Start Work Order screen will appear. Select an Employee and make sure that the Starts On time is correct. Then, select OK located at the top-right of the screen.
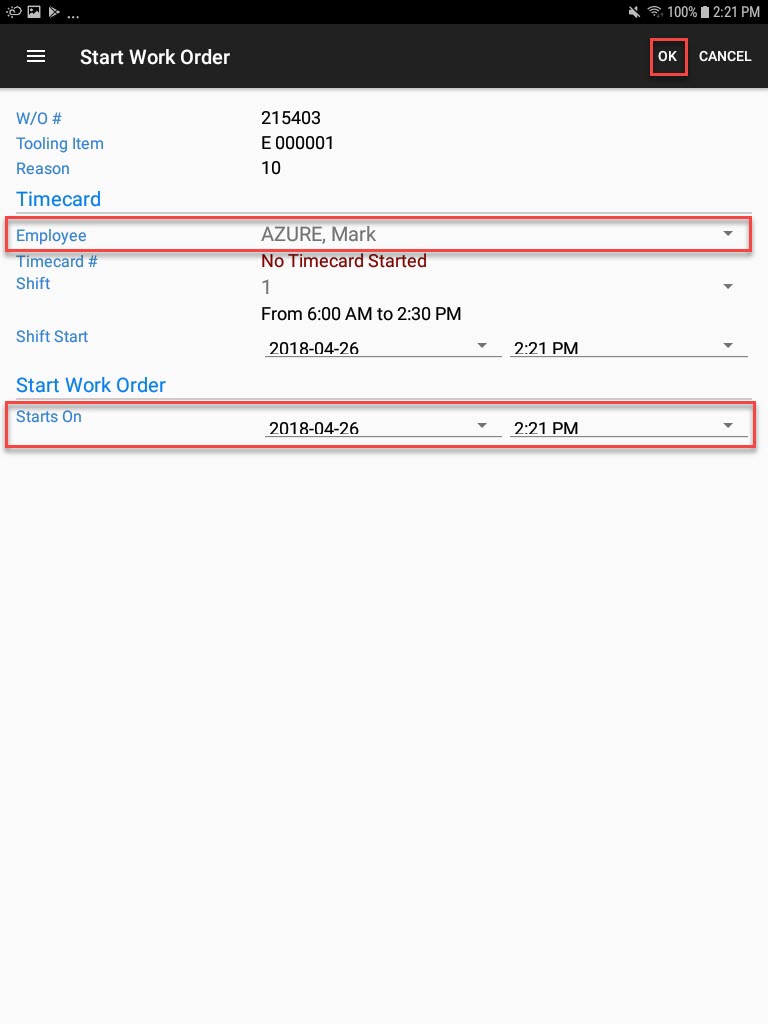
The Work Order will be started and the status will change to In Progress.
Note
Users can also start Work Orders from the Work Order detail screen by selecting the Start option from the action menu to the top-right of the screen.
Consuming MRO Items against a Work Order
To consume MRO Items against a Work Order, navigate to the Tooling/Equipment module, and select the Work Orders option from the navigation drawer to the left of the screen.

Locate the Work Order you wish to consume MRO Items against; users can do this by scrolling through the list, or by using the available search and sort filters located at the top-right of the screen.
Note
For more information on the search and sort filters, please see ShopEdge Mobile Android Application > Tooling and Equipment > Word Orders > Opening an Existing Work Work.
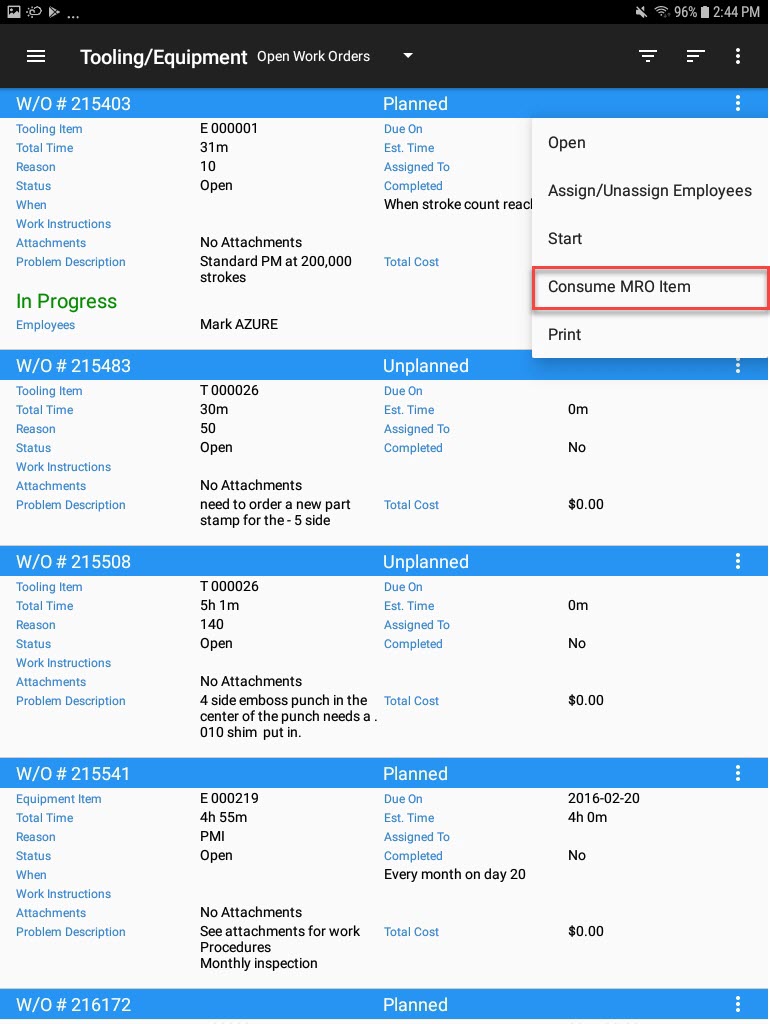
Once the appropriate Work Order has been located, select the action menu to the right of the Work Order. From the action menu, select Consume MRO Item.
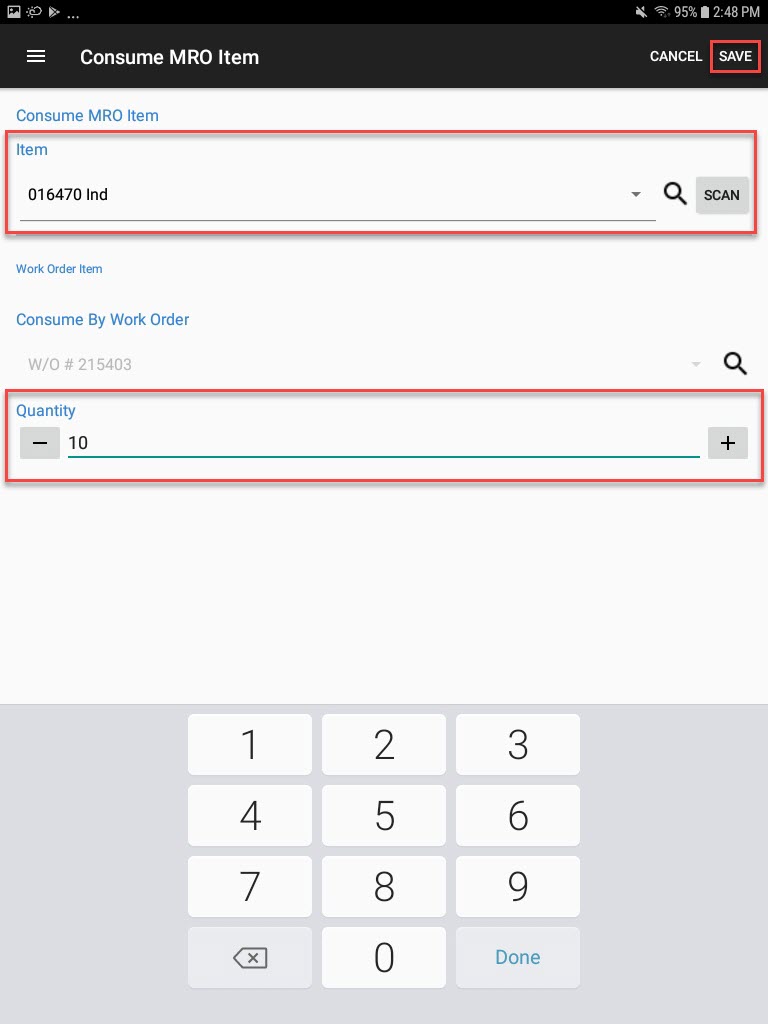
The Consume MRO Item window will appear. Select an MRO Item using the available drop-down menu or the search filter button. Users can also select an MRO Item by scanning. Then, enter in a quantity. Select Save at the top-right of the screen.
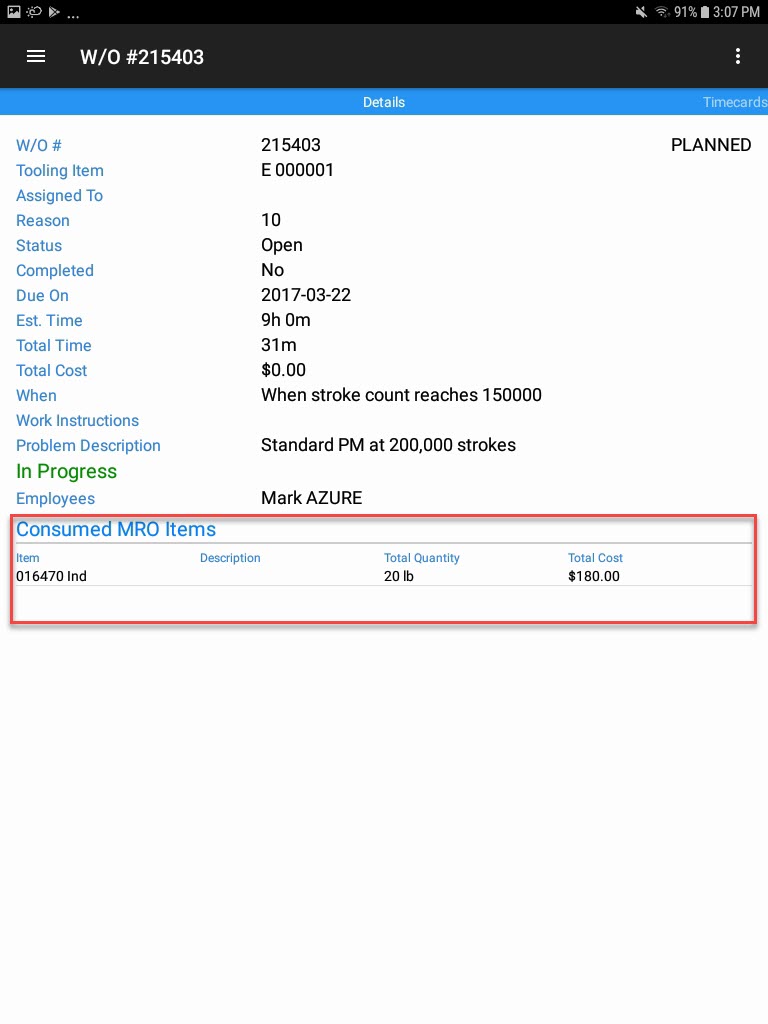
The selected MRO Item will now be consumed against the Work Order.
Note
Users can also consume MRO Items from the Work Order detail screen by selecting the Consume MRO Item action menu option.
Deleting a Work Order
To delete a Work Order, navigate to the Tooling/Equipment module, and select the Work Orders option from the navigation drawer to the left of the screen.

Locate the Work Order you wish to delete; users can do this by scrolling through the list, or by using the available search and sort filters located at the top-right of the screen.
Note
For more information on the search and sort filters, please see ShopEdge Mobile Android Application > Tooling and Equipment > Word Orders > Opening an Existing Work Work.
Once the appropriate Work Order has been located, select the action menu to the right of the Work Order. From the action menu, select Delete.
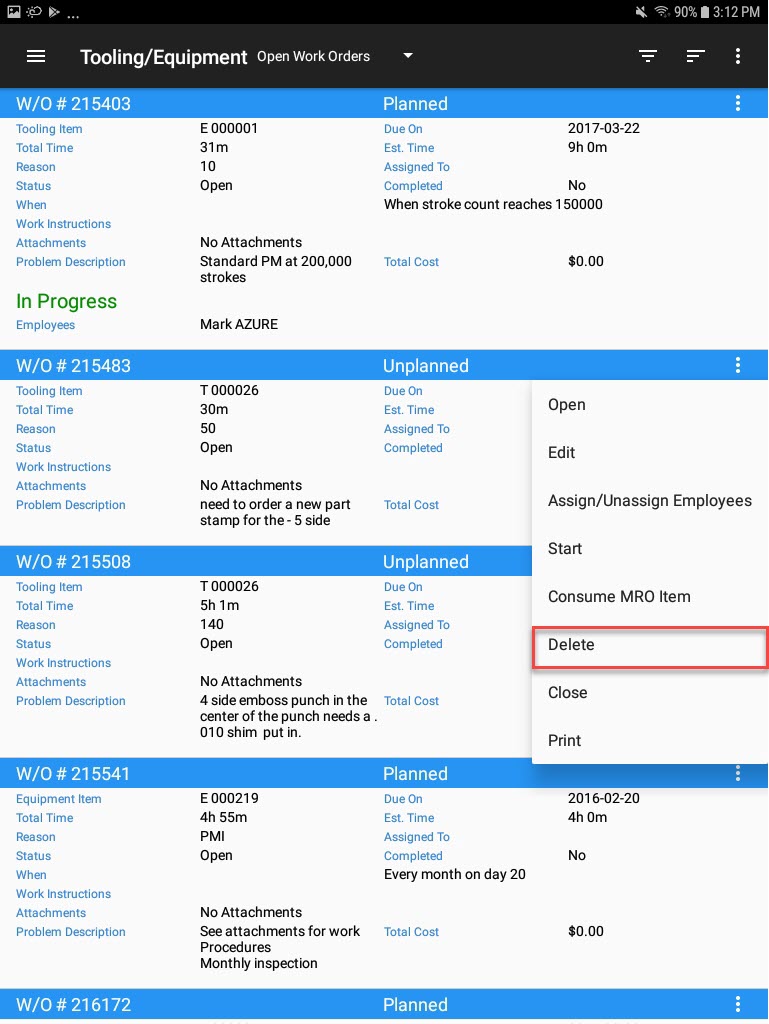
The Confirm Delete window will appear. Select OK to continue.
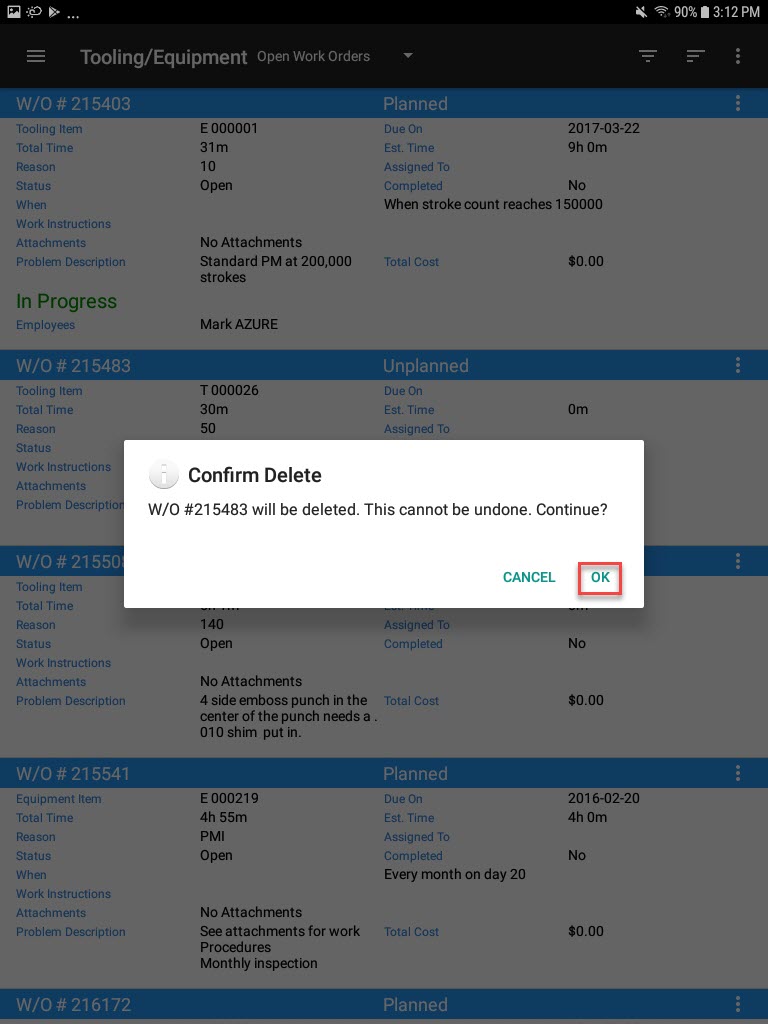
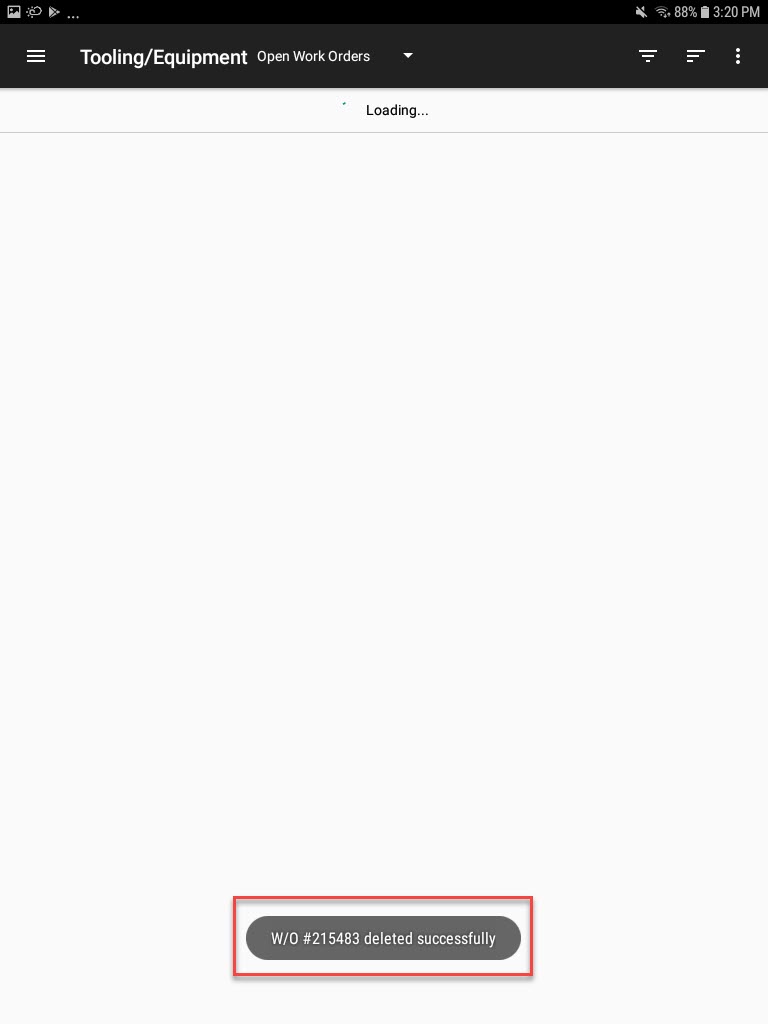
The selected Work Order will be deleted.
Note
Users can also delete a Work Order from the Work Order detail screen by selecting Delete from the action menu.
Closing a Work Order
To close a Work Order, navigate to the Tooling/Equipment module, and select the Work Orders option from the navigation drawer to the left of the screen.

Locate the Work Order you wish to close; users can do this by scrolling through the list, or by using the available search and sort filters located at the top-right of the screen.
Note
For more information on the search and sort filters, please see ShopEdge Mobile Android Application > Tooling and Equipment > Word Orders > Opening an Existing Work Work.
Once the appropriate Work Order has been located, select the action menu to the right of the Work Order. From the action menu, select Close.
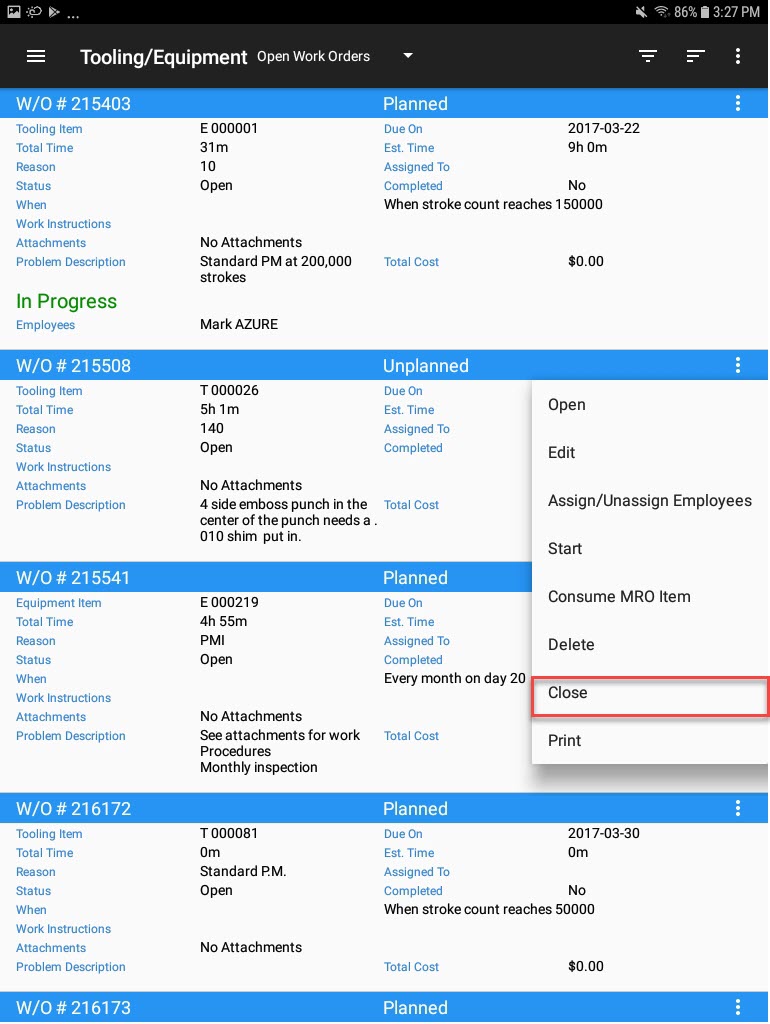
The Close Work Order window will appear. Enter in notes and select OK.
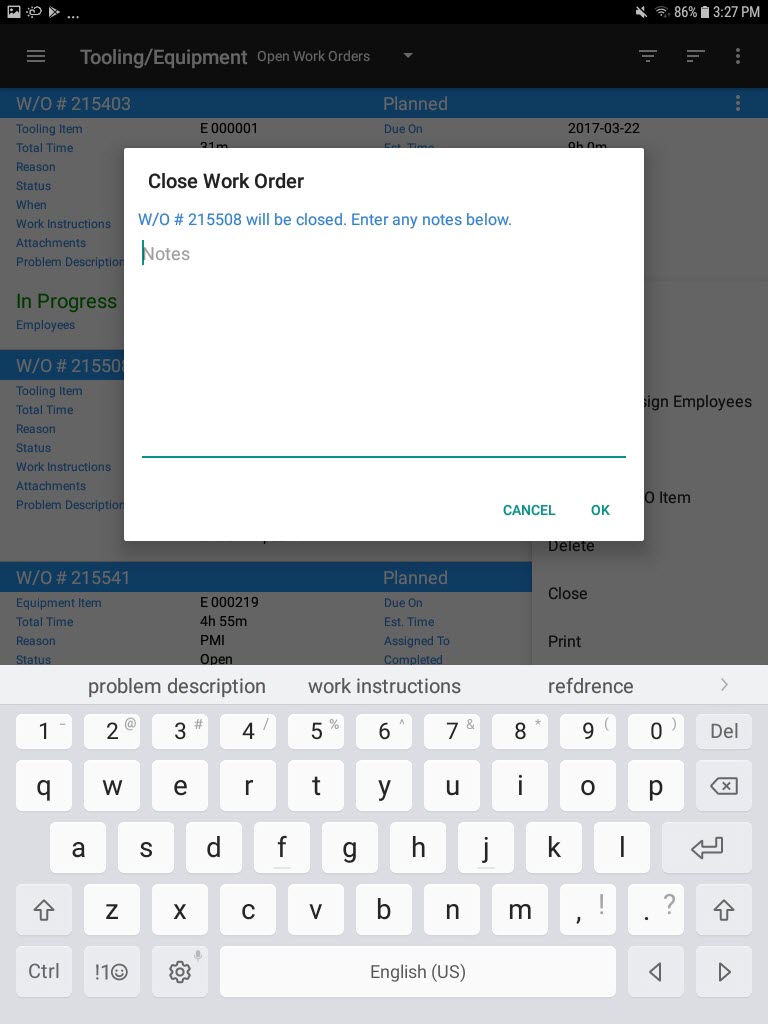
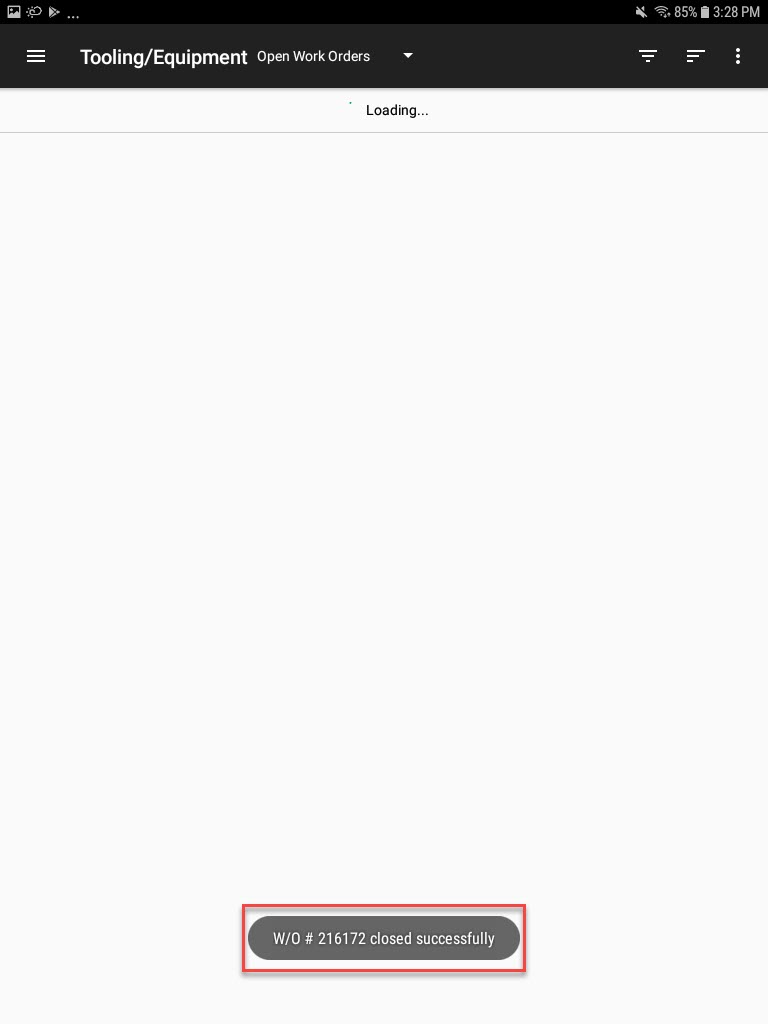
The selected Work Order will be closed.
Note
Users can also close a Work Order from the Work Order detail screen by selecting Close from the action menu.
Printing a Work Order
To print a Work Order, navigate to the Tooling/Equipment module, and select the Work Orders option from the navigation drawer to the left of the screen.

Locate the Work Order you wish to print; users can do this by scrolling through the list, or by using the available search and sort filters located at the top-right of the screen.
Note
For more information on the search and sort filters, please see ShopEdge Mobile Android Application > Tooling and Equipment > Word Orders > Opening an Existing Work Work.
Once the appropriate Work Order has been located, select the action menu to the right of the Work Order. From the action menu, select Print.
Adding, Editing, or Deleting Notes from a Work Order
To add a note to a Work Order, navigate to the Tooling/Equipment module, and select the Work Orders option from the navigation drawer to the left of the screen.

Locate the Work Order you wish to add a note to; users can do this by scrolling through the list, or by using the available search and sort filters located at the top-right of the screen.
Note
For more information on the search and sort filters, please see ShopEdge Mobile Android Application > Tooling and Equipment > Word Orders > Opening an Existing Work Work.
Once the appropriate Work Order has been located, select the action menu to the right of the Work Order. From the action menu, select Open.

The W/O # ____ screen will be displayed. Scroll to the Notes section and from the action menu, select Add Note.
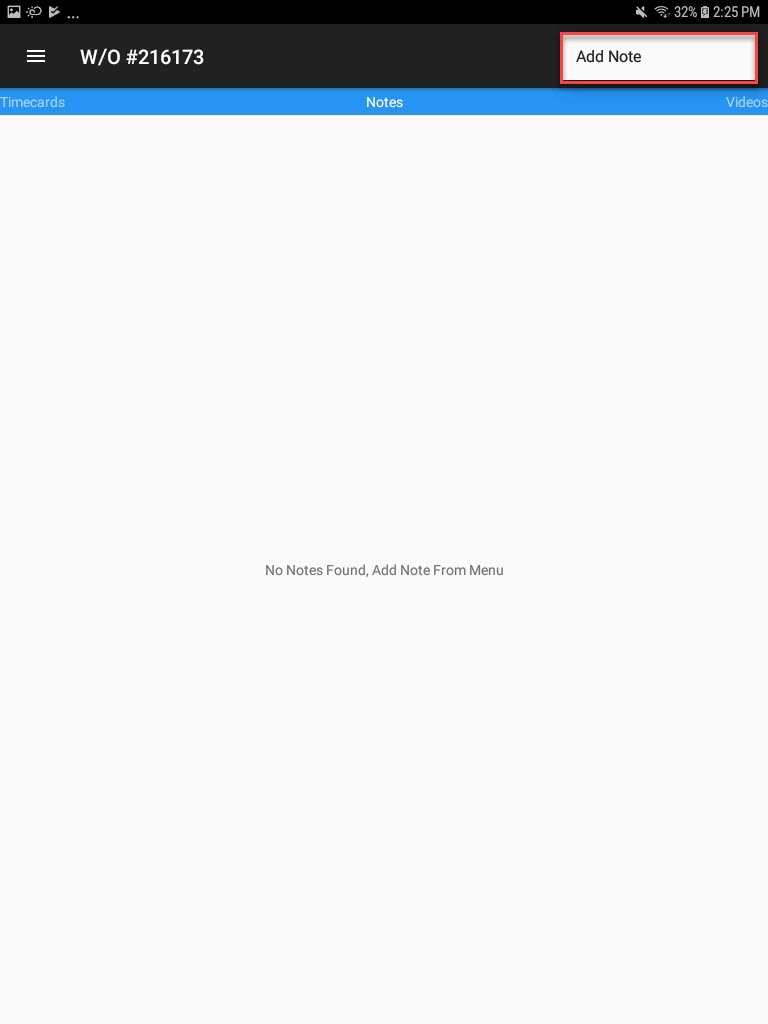
The Add Note window will appear. Enter in any necessary notes and select OK.

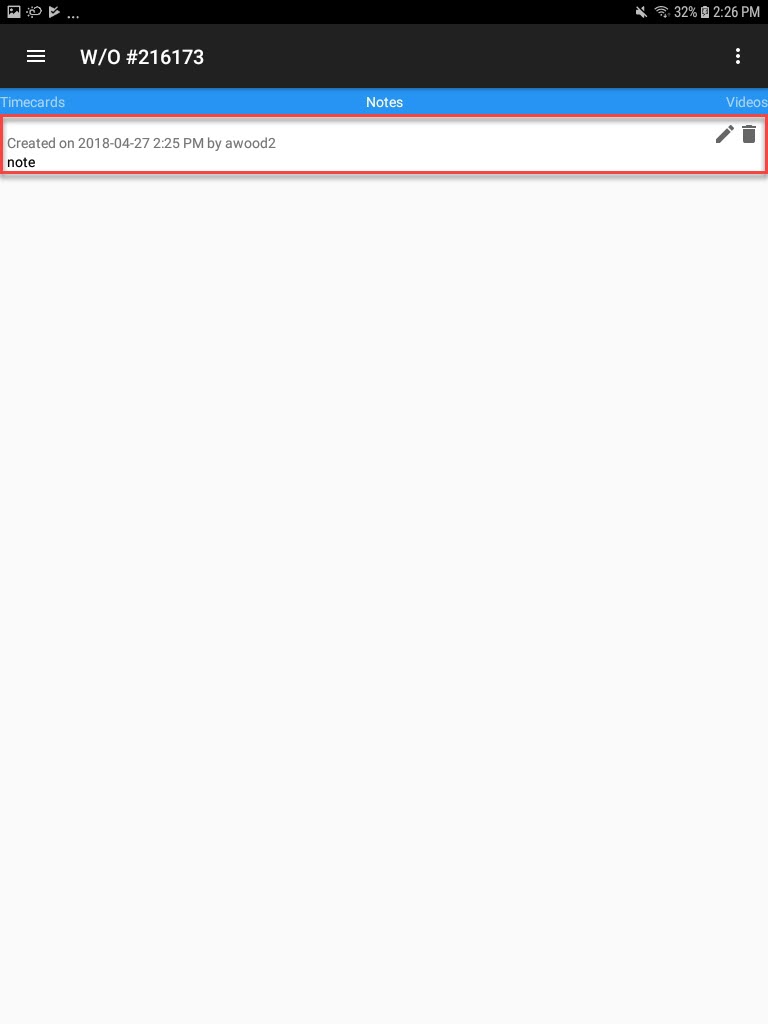
The note will be added.
Note
To edit a Work Order note, select the pencil icon and make the necessary changes. To delete a note, select the trash can icon.
Adding, Editing, or Deleting Videos from a Work Order
To add a video to a Work Order, navigate to the Tooling/Equipment module, and select the Work Orders option from the navigation drawer to the left of the screen.

Locate the Work Order you wish to add a video to; users can do this by scrolling through the list, or by using the available search and sort filters located at the top-right of the screen.
Note
For more information on the search and sort filters, please see ShopEdge Mobile Android Application > Tooling and Equipment > Word Orders > Opening an Existing Work Work.
Once the appropriate Work Order has been located, select the action menu to the right of the Work Order. From the action menu, select Open.

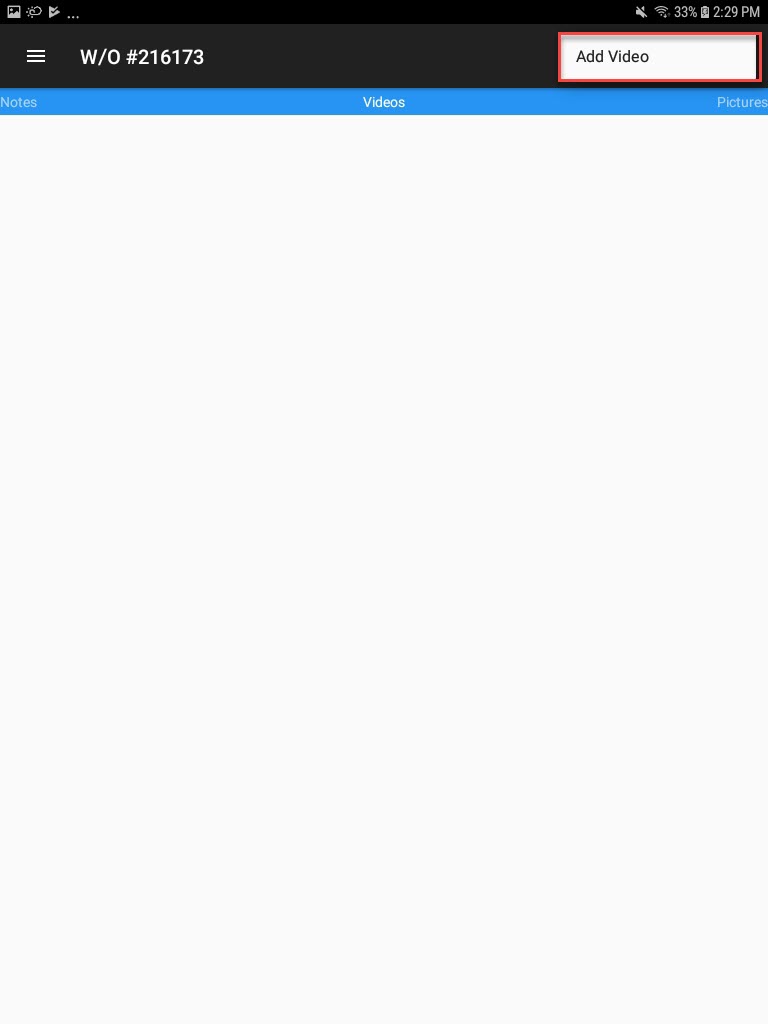
The W/O # ____ screen will be displayed. Scroll to the Videos section and from the action menu, select Add Video.
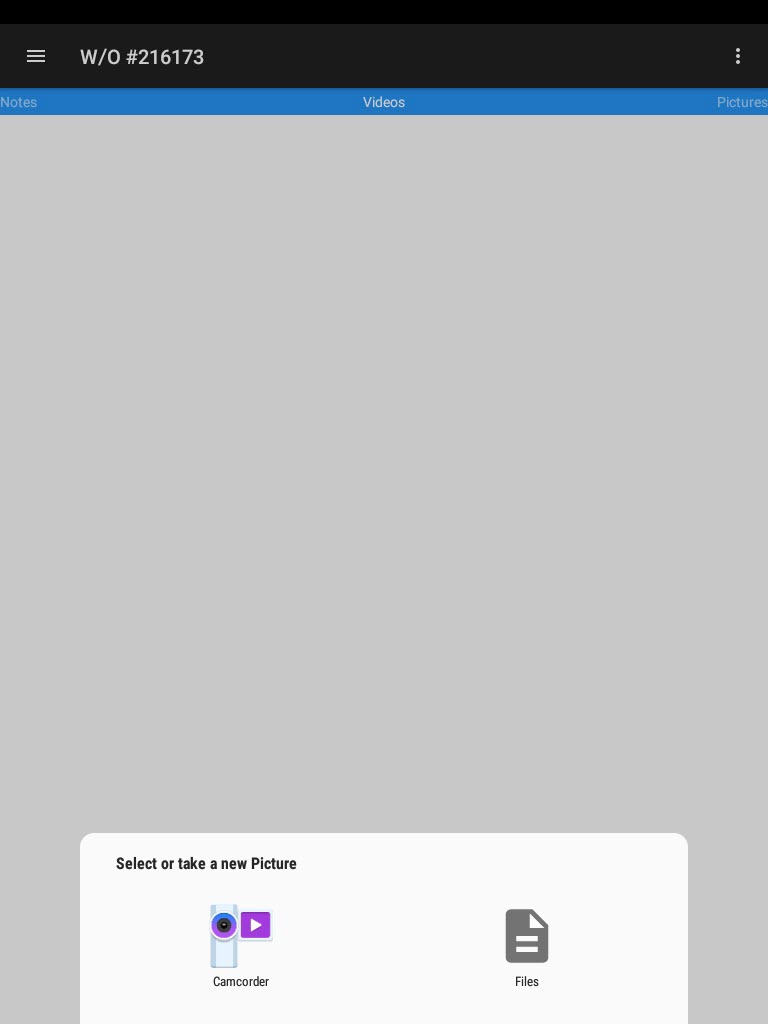
Users can add a video by using the camcorder option or the files option. The selected video will be added to the Work Order.
Note
To edit a Work Order video, select the pencil icon and make the necessary changes. To delete a video, select the trash can icon.
Adding, Editing, or Deleting Pictures from a Work Order
To add a picture to a Work Order, navigate to the Tooling/Equipment module, and select the Work Orders option from the navigation drawer to the left of the screen.

Locate the Work Order you wish to add a picture to; users can do this by scrolling through the list, or by using the available search and sort filters located at the top-right of the screen.
Note
For more information on the search and sort filters, please see ShopEdge Mobile Android Application > Tooling and Equipment > Word Orders > Opening an Existing Work Work.
Once the appropriate Work Order has been located, select the action menu to the right of the Work Order. From the action menu, select Open.

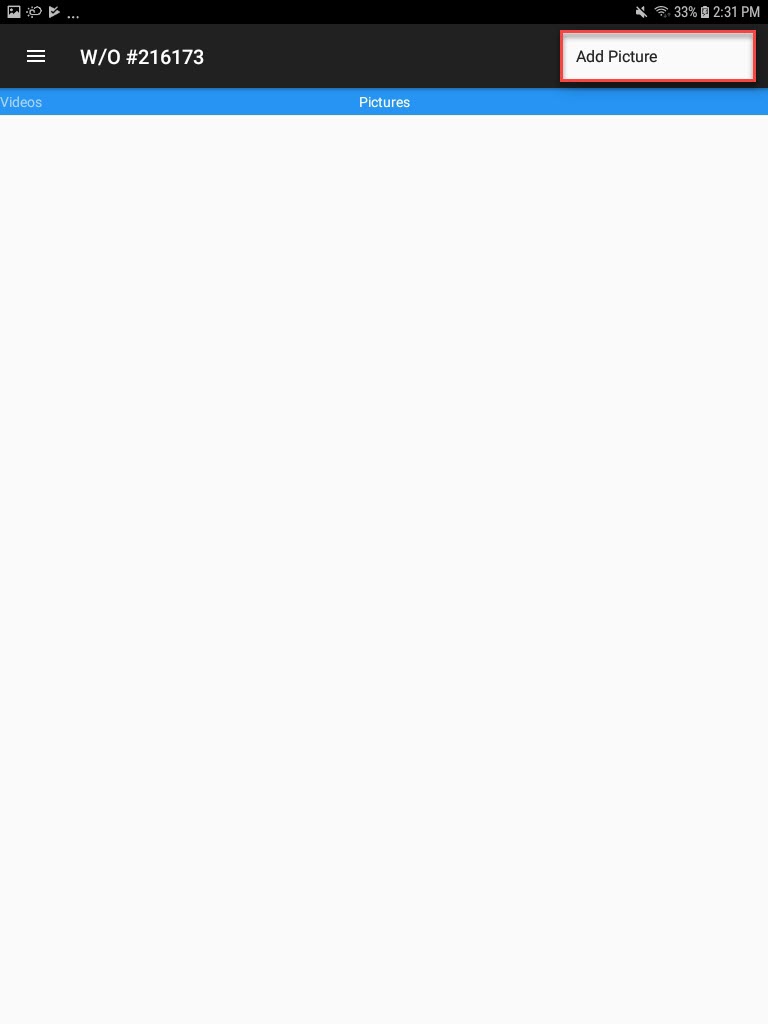
The W/O # ____ screen will be displayed. Scroll to the Videos section and from the action menu, select Add Picture.
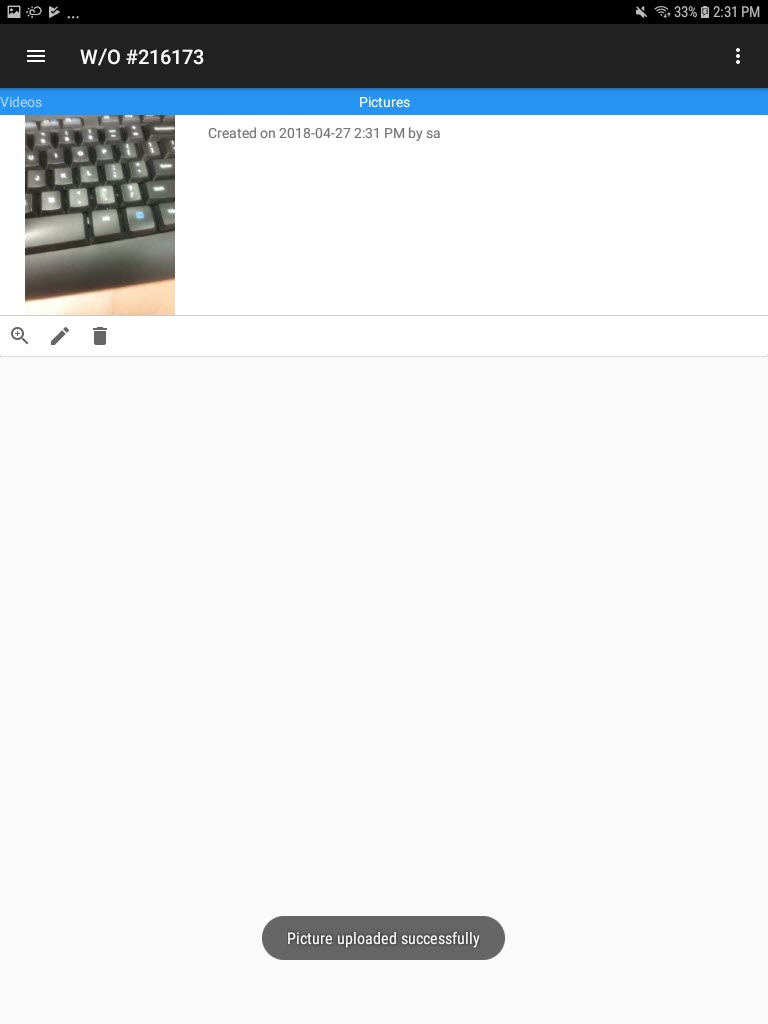
Users can add a picture by using the camera option or the files option. The selected picture will be added to the Work Order Request.
Note
To edit a Work Order picture, select the pencil icon and make the necessary changes. To delete a picture, select the trash can icon.
Work Order Requests
To view Work Order Requests, navigate to the Tooling/Equipment module, and select the Work Order Requests option from the navigation drawer to the left of the screen.
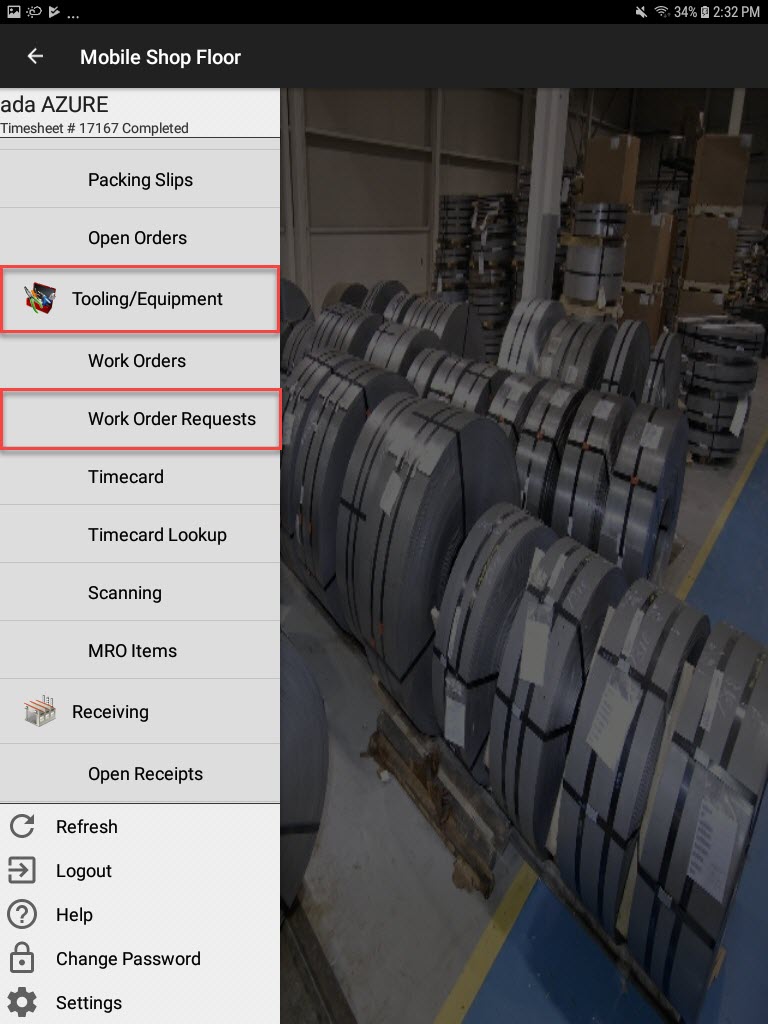
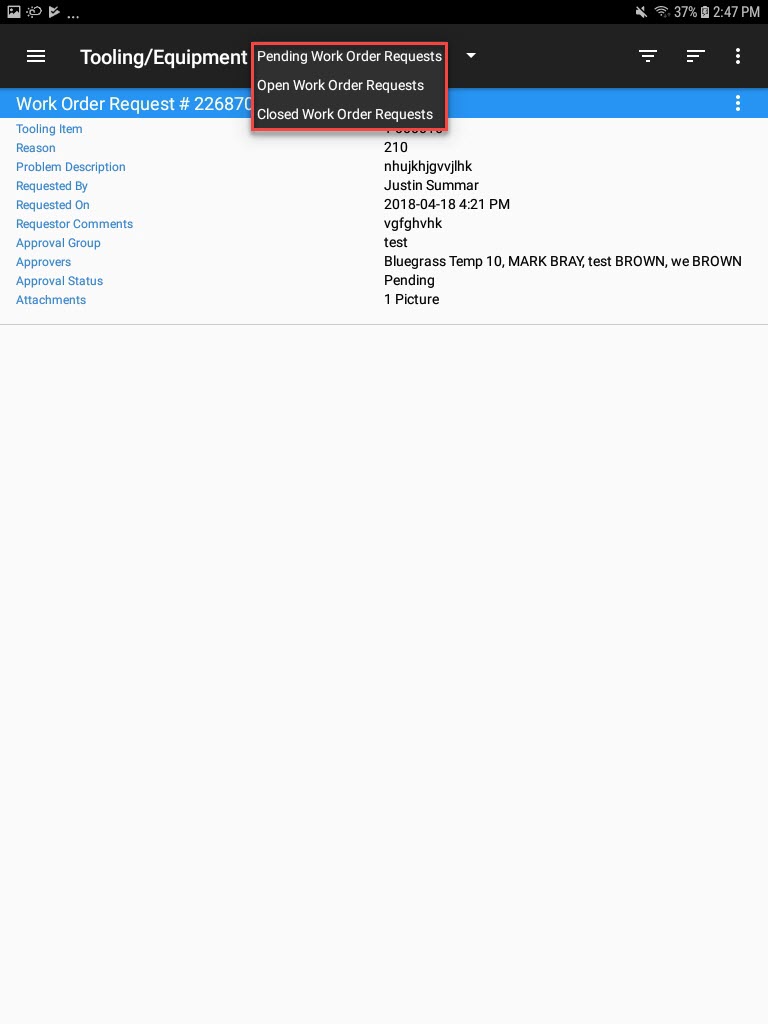
The Tooling/Equipment screen will be displayed. From the menu, users can select Pending Work Order Requests, Open Work Order Requests, or Closed Work Order Requests.
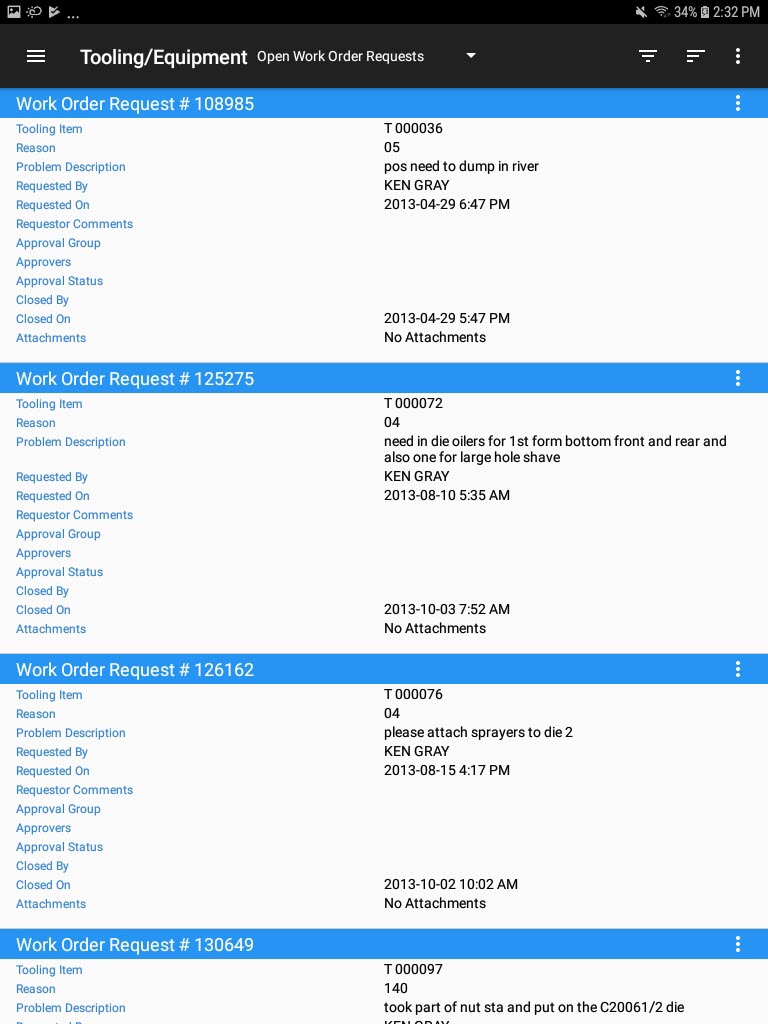
Creating a New Work Order Request
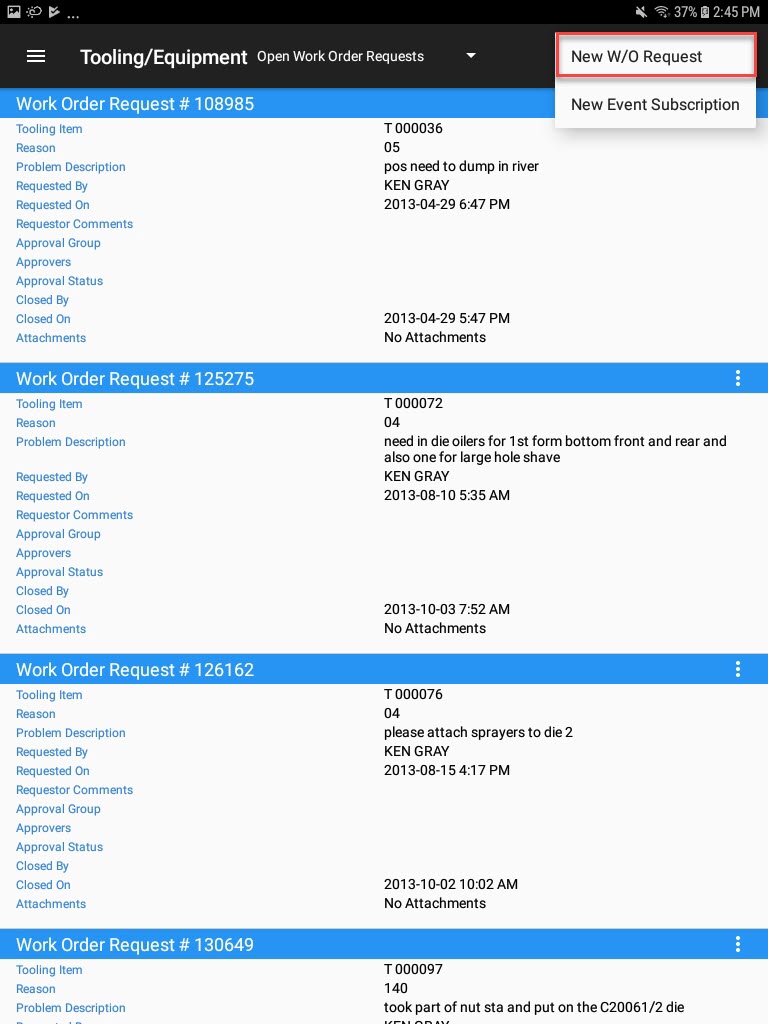
To create a new Work Order Request, navigate to the Tooling/Equipment module, and select the Work Order Requests option from the navigation drawer to the left of the screen.

From the action menu, select New W/O Request.
The New W/O Request screen will be displayed.
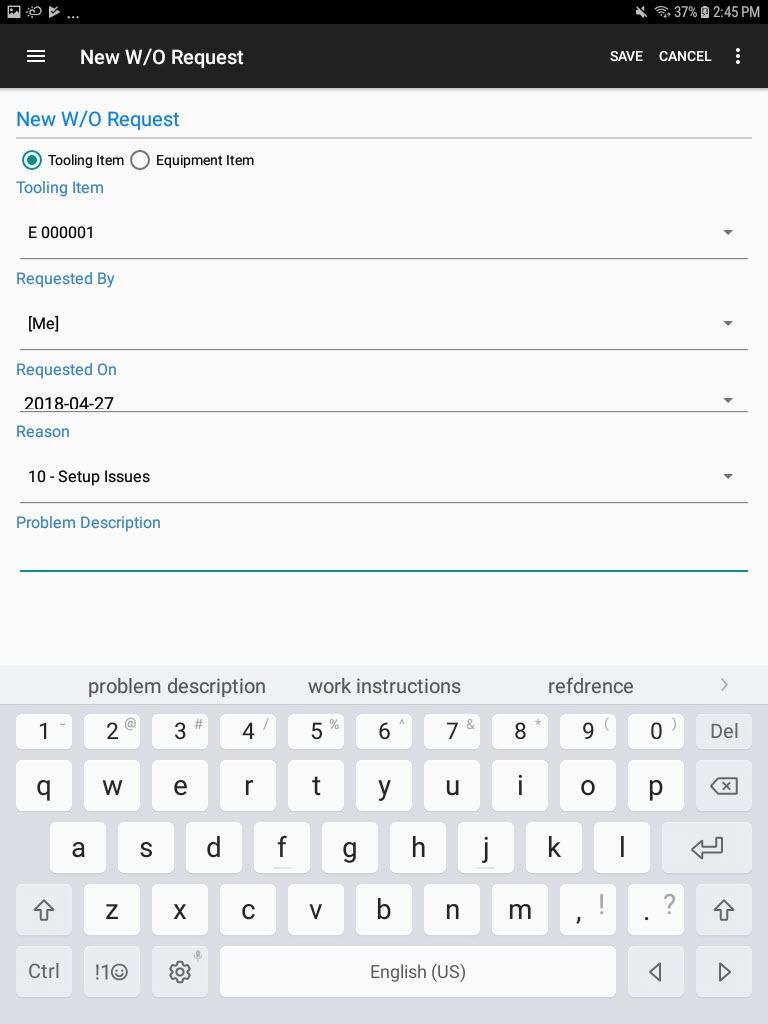
Select whether it is for a Tooling or Equipment Item, the Item, Requested By, Requested On, Reason, and enter in a Problem Description.
Then, select Save located at the top-rigt of the screen.
The new Work Order Request will be created.
Editing a Pending Work Order Request
To edit an Pending Work Order Request, navigate to the Tooling/Equipment module, and select the Work Order Requests option from the navigation drawer to the left of the screen.

From the menu, make sure to select Pending Work Order Requests.
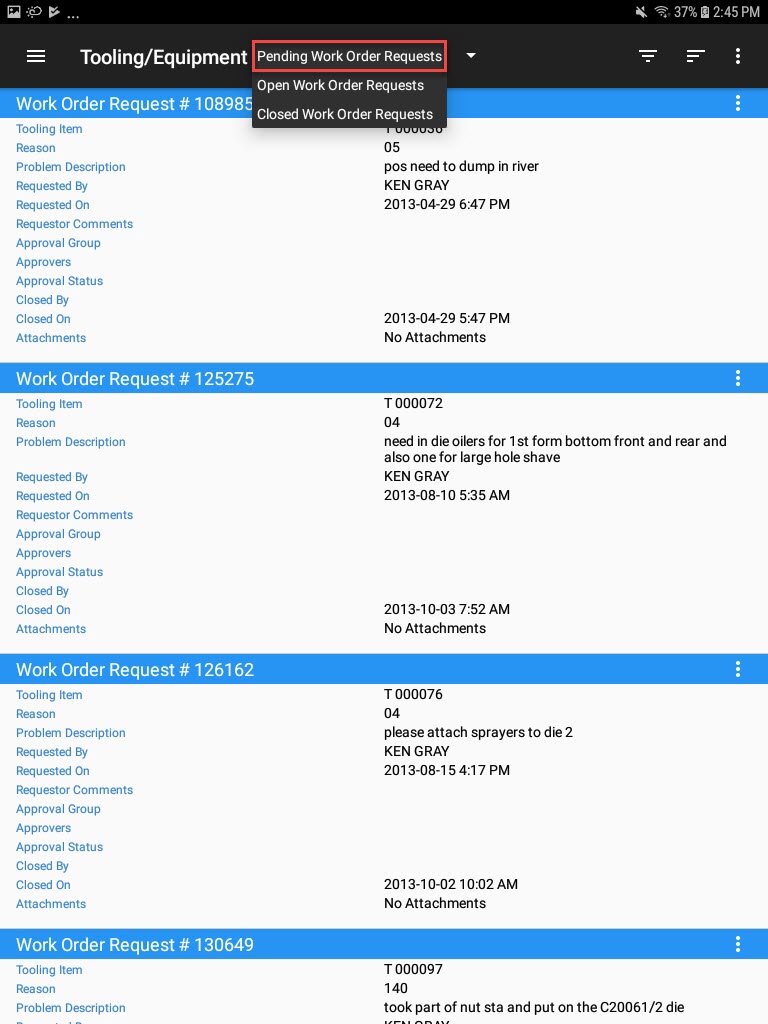
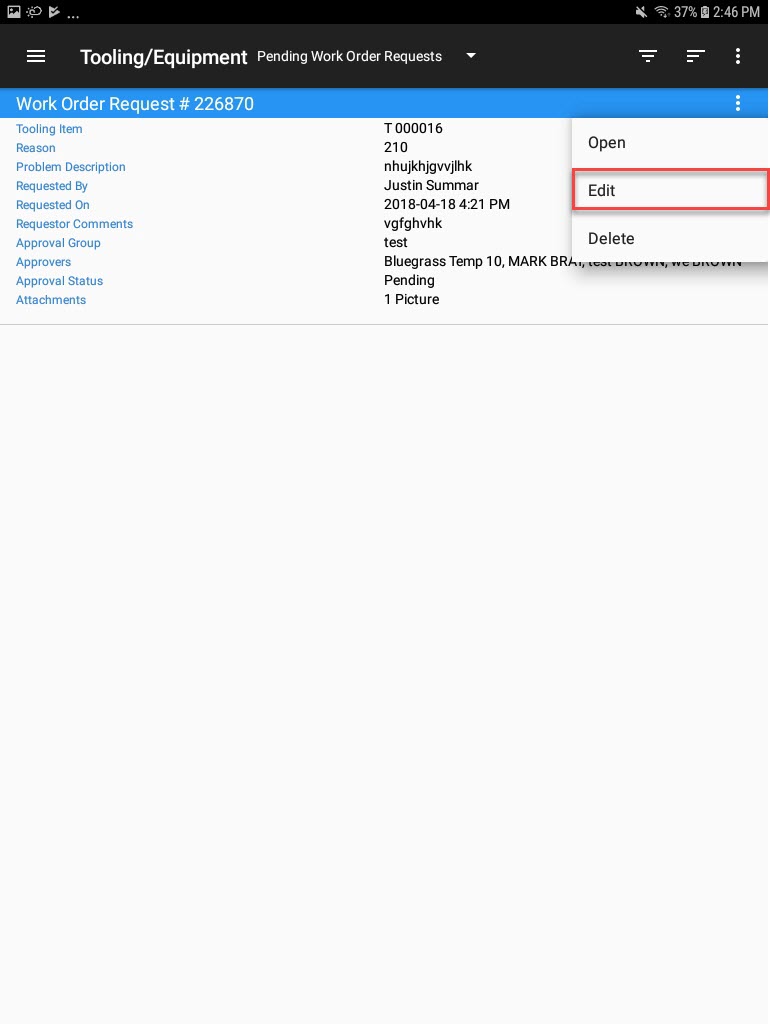
Next, locate the Pending Work Order Request you wish to edit, and from the action menu select Edit.
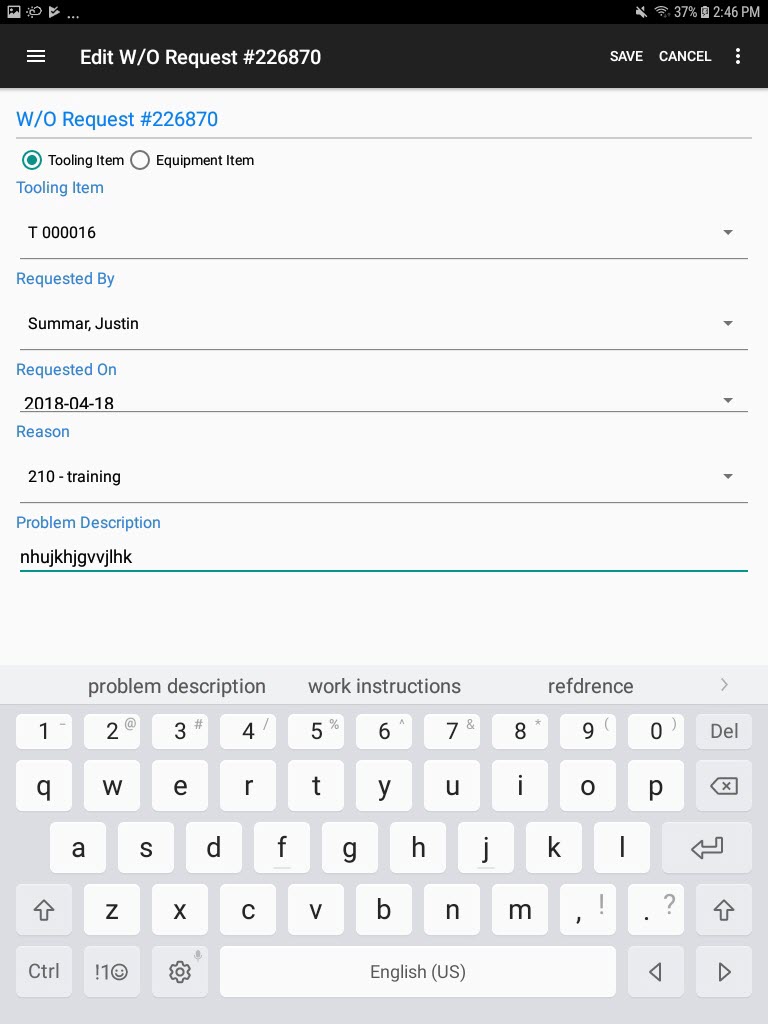
The Edit W/O Request # ____ screen will open. Make the necessary changes and then, select Save located at the top-right of the screen.
The Pending Work Order Request will be updated successfully.
Deleting a Pending/Open/Closed Work Order Request
To delete a Pending/Open/Closed Work Order Request, navigate to the Tooling/Equipment module, and select the Work Order Requests option from the navigation drawer to the left of the screen.

From the menu, make sure to select either Pending/Open/Closed Work Order Requests.
Locate the Work Order Request you wish to delete and select Delete from the action menu.
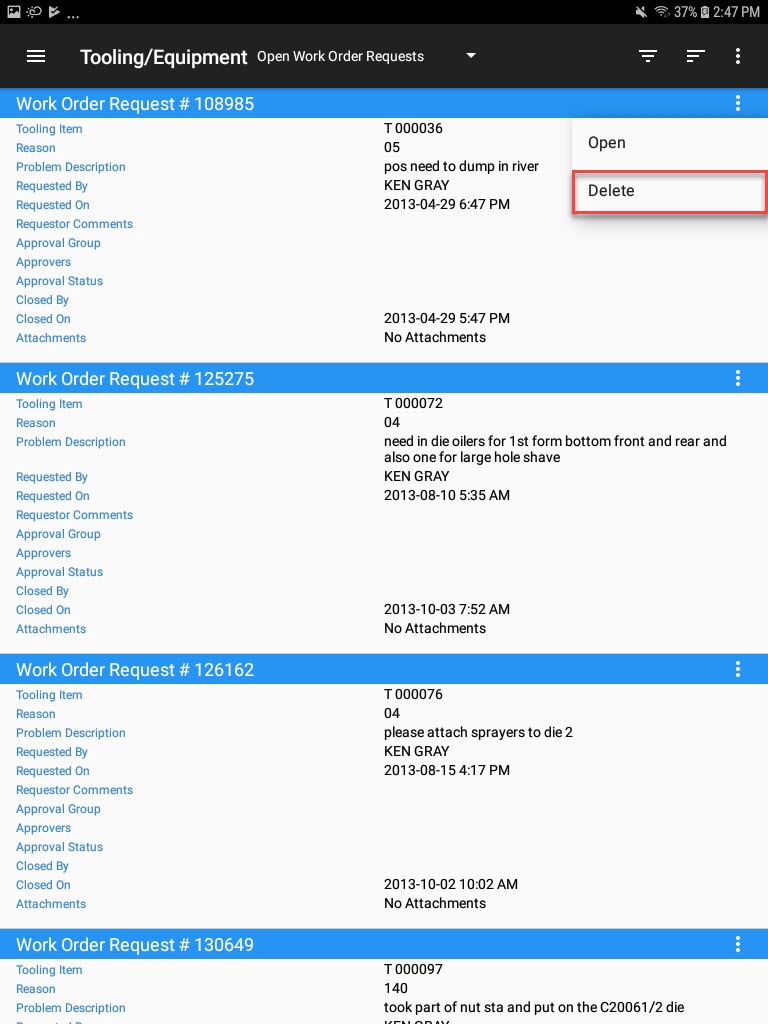
The Delete Work Order Request window will appear. Select OK to continue.
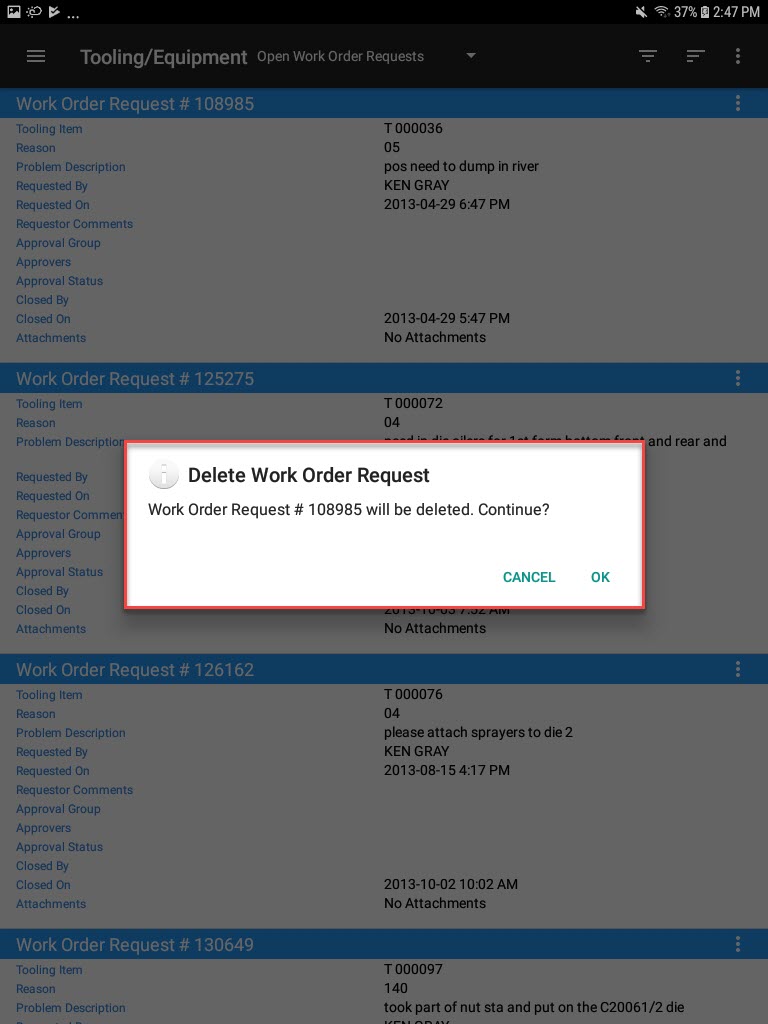
The selected Work Order Request will be deleted.
Adding, Editing, and Deleting Notes on a Work Order Request
To add notes to a Work Order Request, navigate to the Tooling/Equipment module, and select the Work Order Requests option from the navigation drawer to the left of the screen.

From the menu, make sure to select either Pending/Open/Closed Work Order Requests.

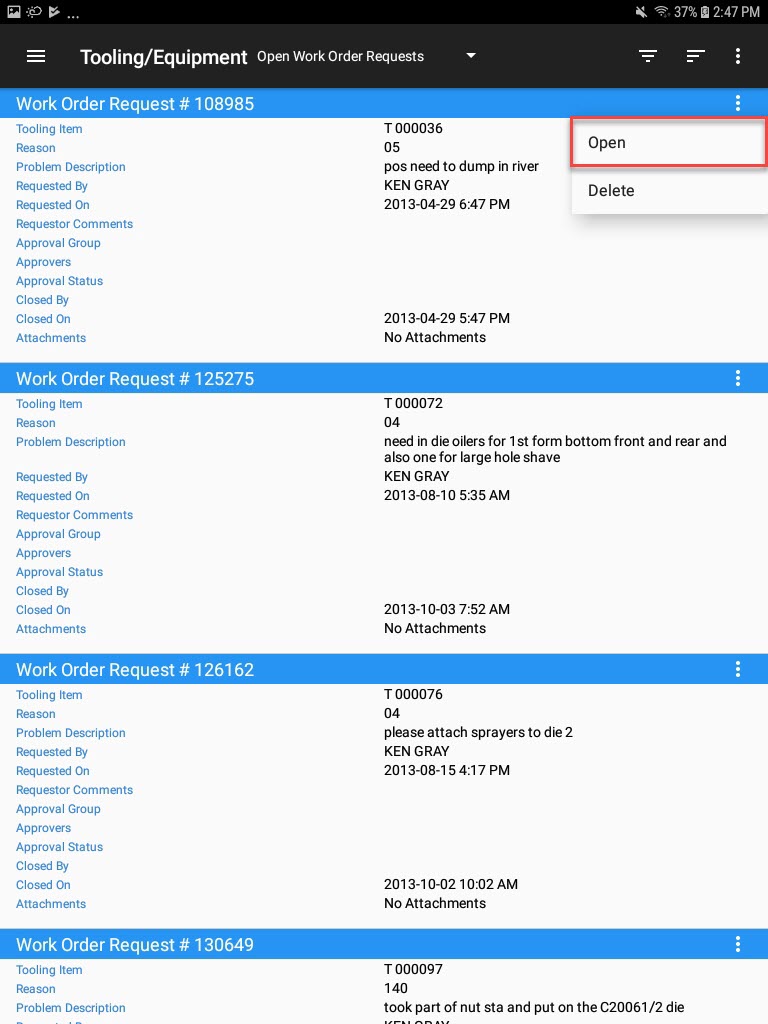
Locate the Work Order Request you wish to add notes to and from the action menu, select Open.
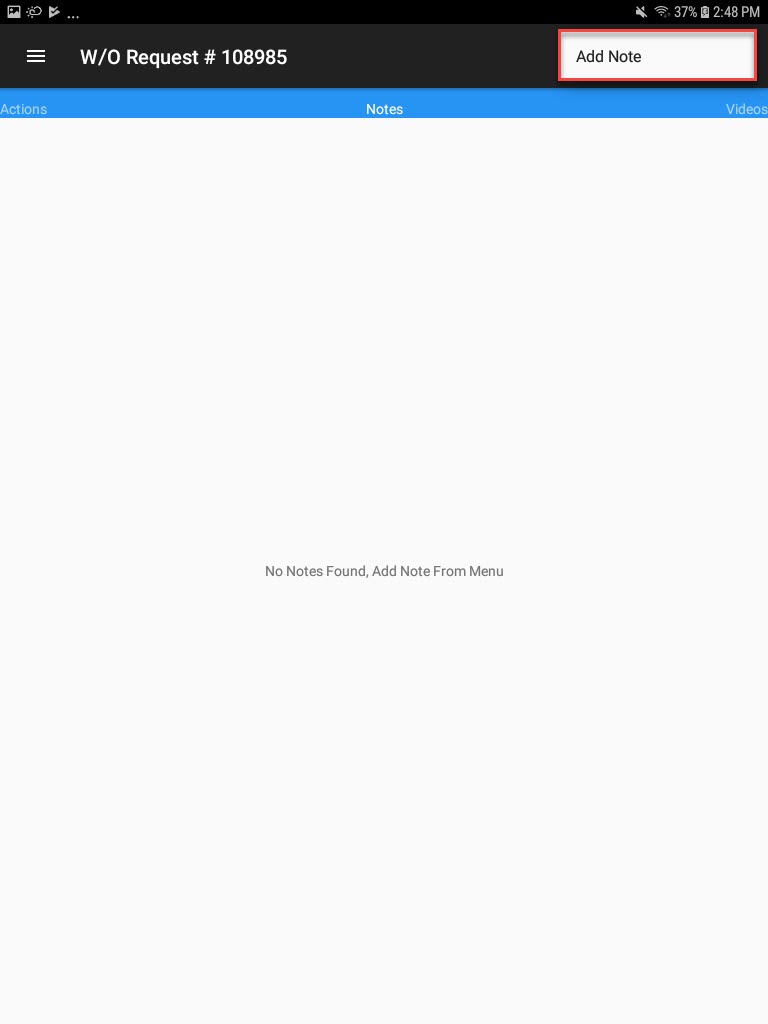
The W/O Request # ____ screen will be displayed. Scroll to the Notes section and from the action menu, select Add Note.
The Add Note window will appear. Enter in any necessary notes and select OK.
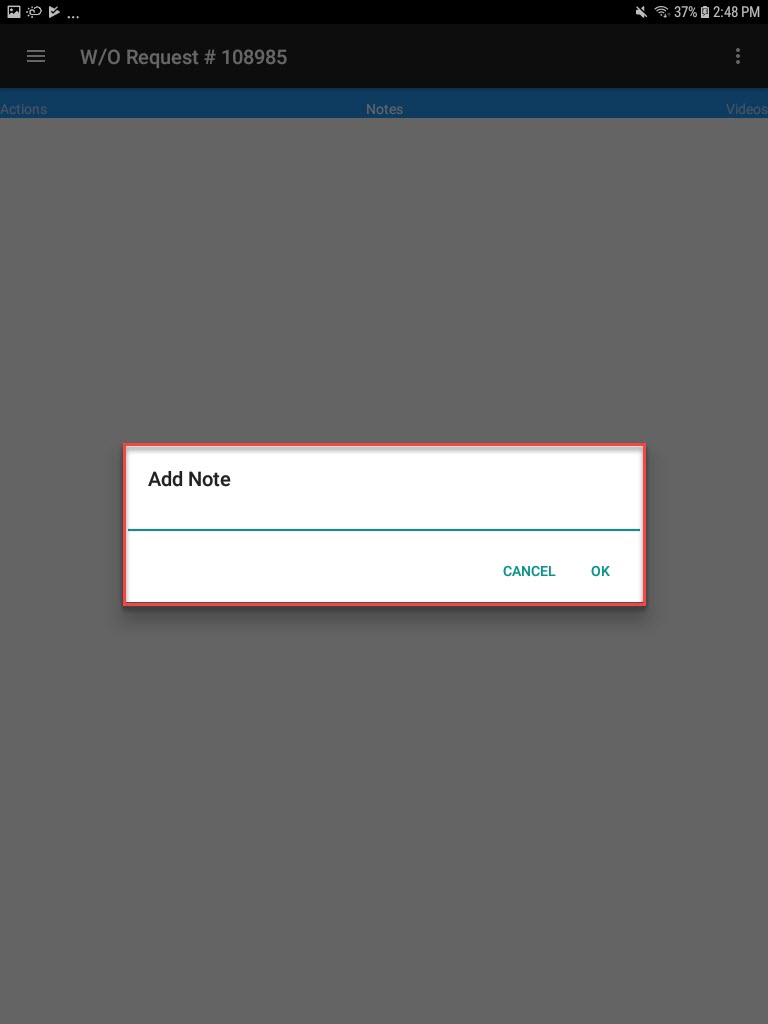
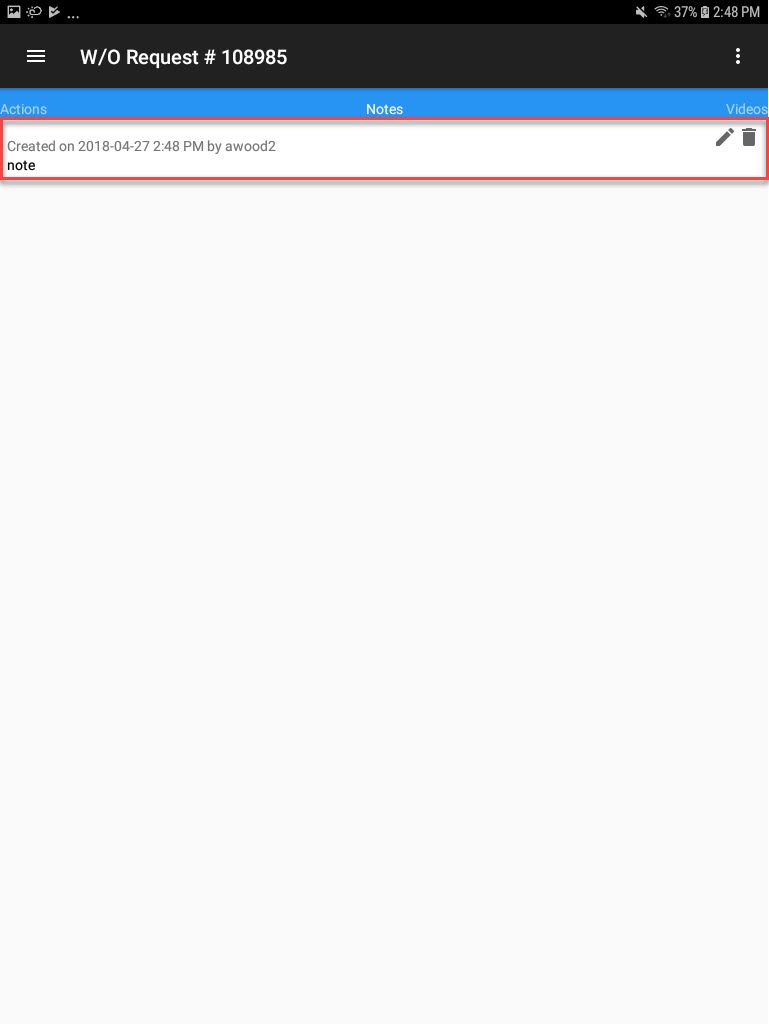
The note will be added.
Note
To edit a Work Order Request note, select the pencil icon and make the necessary changes. To delete a note, select the trash can icon.
Adding, Editing, and Deleting Videos on a Work Order Request
To add videos to a Work Order Request, navigate to the Tooling/Equipment module, and select the Work Order Requests option from the navigation drawer to the left of the screen.

From the menu, make sure to select either Pending/Open/Closed Work Order Requests.

Locate the Work Order Request you wish to add videos to and from the action menu, select Open.

The W/O Request # ____ screen will be displayed. Scroll to the Videos section and from the action menu, select Add Video.
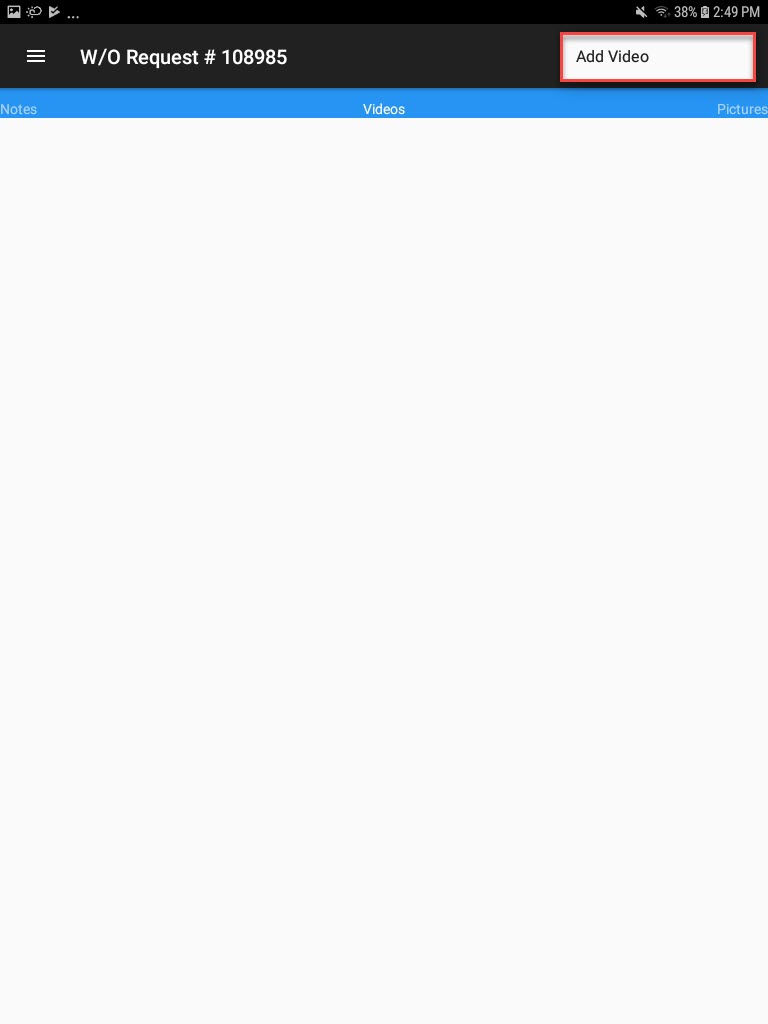
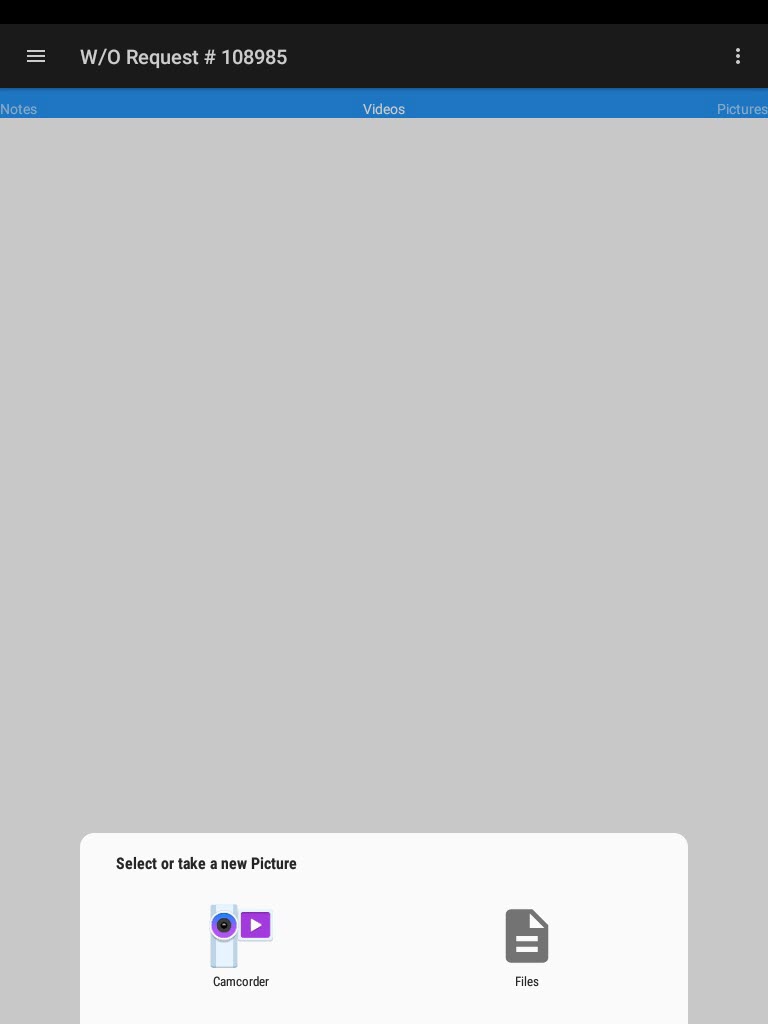
Users can add a video by using the camcorder option or the files option. The selected video will be added to the Work Order Request.
Note
To edit a Work Order Request video, select the pencil icon and make the necessary changes. To delete a video, select the trash can icon.
Adding, Editing, and Deleting Pictures on a Work Order Request
To add a picture to a Work Order Request, navigate to the Tooling/Equipment module, and select the Work Order Requests option from the navigation drawer to the left of the screen.

From the menu, make sure to select either Pending/Open/Closed Work Order Requests.

Locate the Work Order Request you wish to add a picture to and from the action menu, select Open.

The W/O Request # ____ screen will be displayed. Scroll to the Pictures section and from the action menu, select Add Picture.
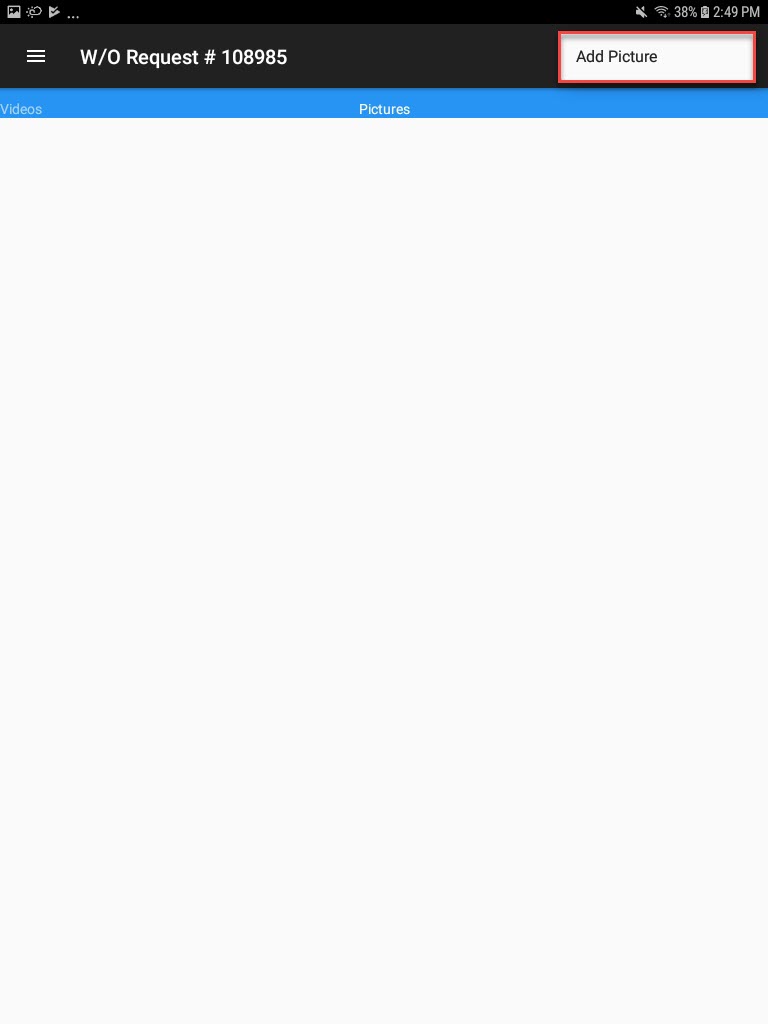
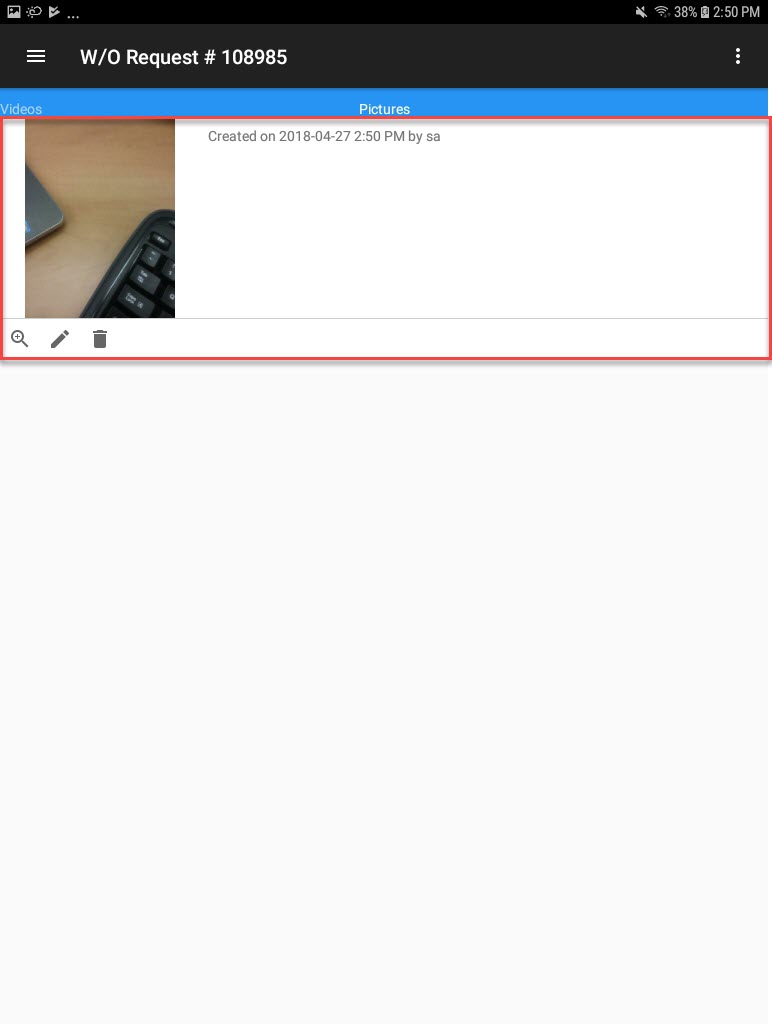
Users can add a picture by using the camera option or the files option. The selected picture will be added to the Work Order Request.
Note
To edit a Work Order Request picture, select the pencil icon and make the necessary changes. To delete a picture, select the trash can icon.
Timecard
To view the current Timecard, navigate to the Tooling/Equipment module, and select the Timecard option from the navigation drawer to the left of the screen.
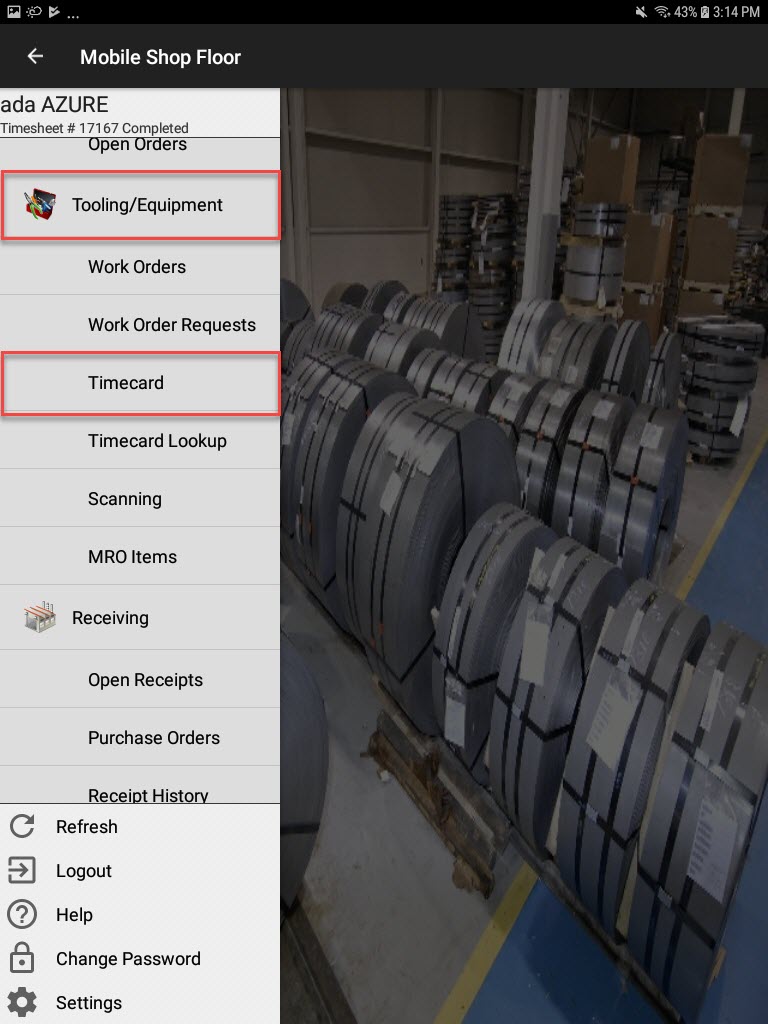
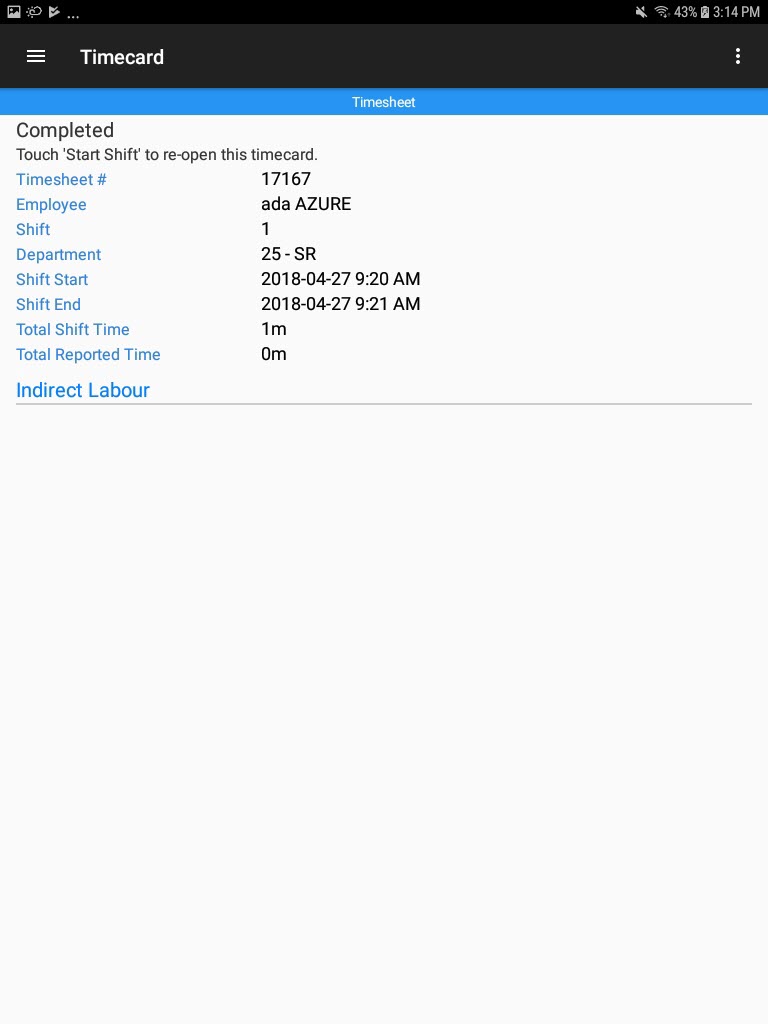
The Timecard screen will open displaying the current Timecard, or a blank Timecard.
Starting a Tooling Timecard Shift
To start a Tooling Timecard, navigate to the Tooling/Equipment module, and select the Timecard option from the navigation drawer to the left of the screen.

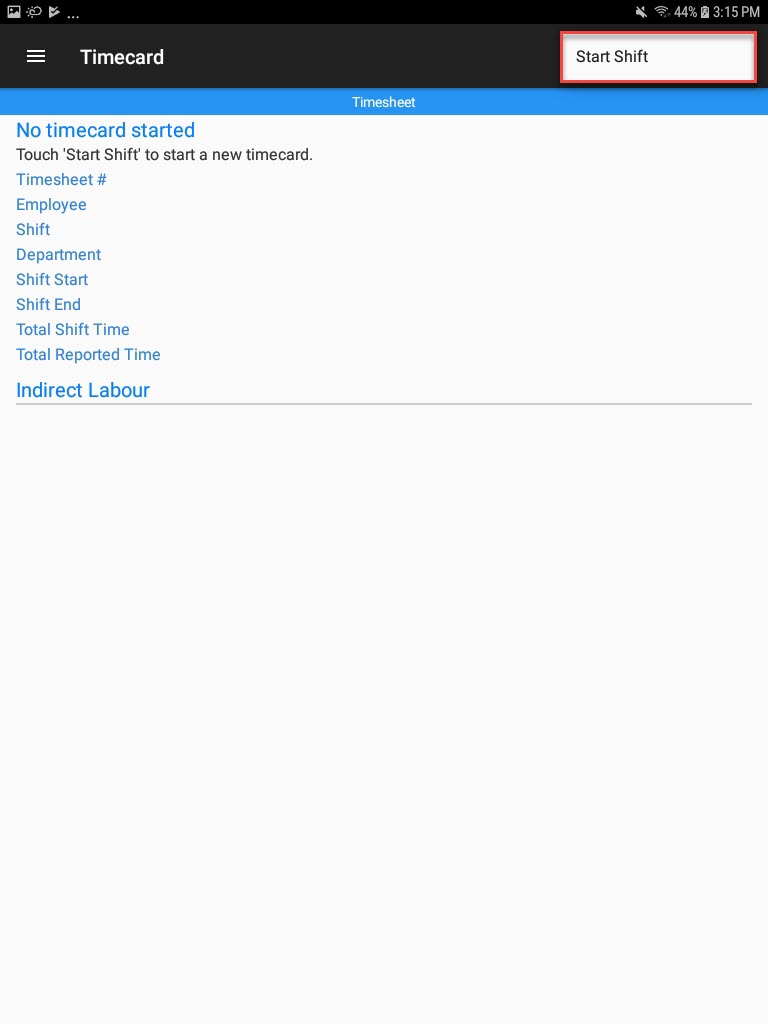
The Timecard screen will open. From the action menu, select Start Shift.
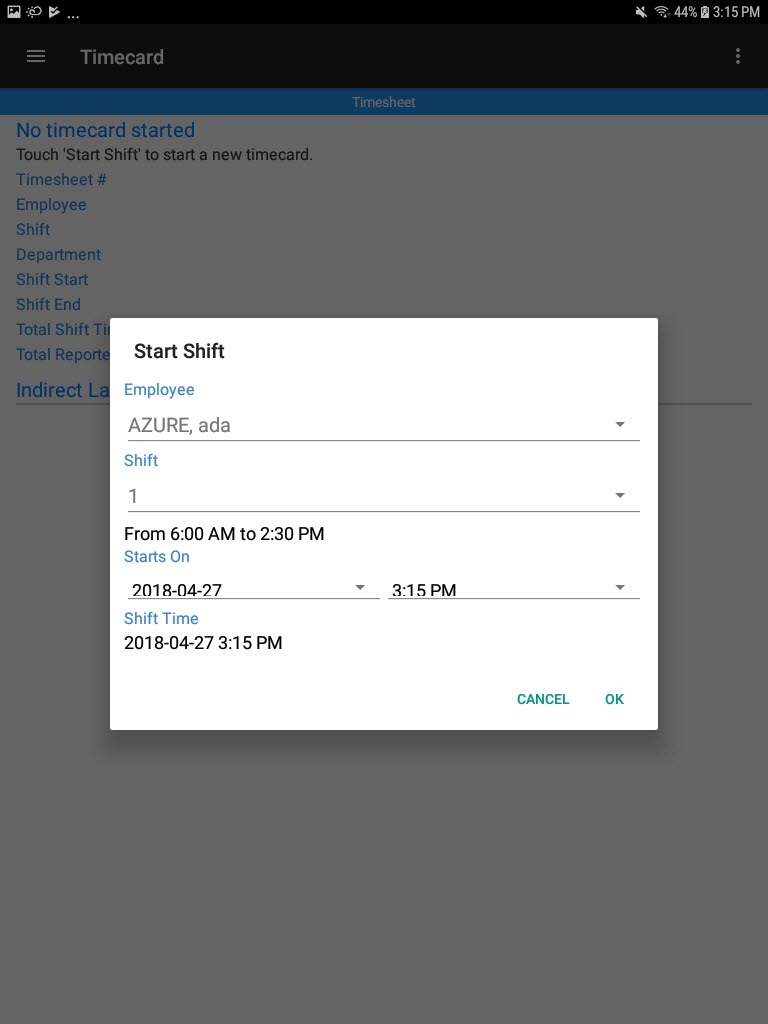
The Start Shift window will appear. Users must select An Employee, Shift, and Starts On time. Then, select OK.
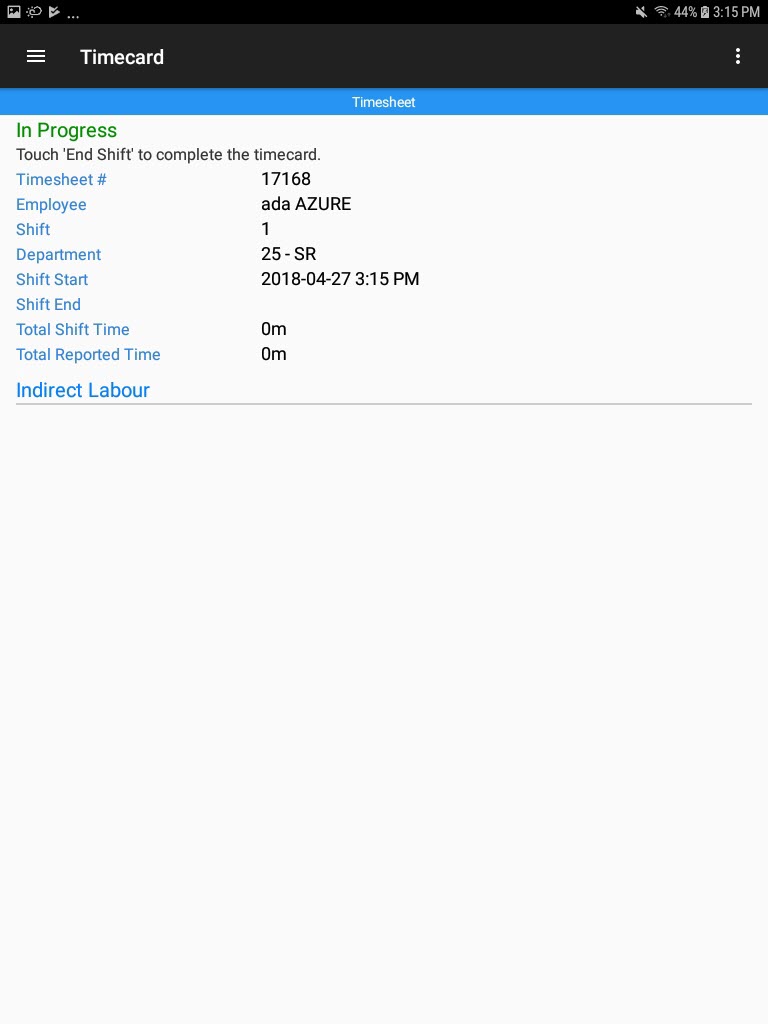
The Timecard will start immediately.
Adding Downtime to a Tooling Timecard
To add downtime to a Tooling Timecard, navigate to the Tooling/Equipment module, and select the Timecard option from the navigation drawer to the left of the screen.

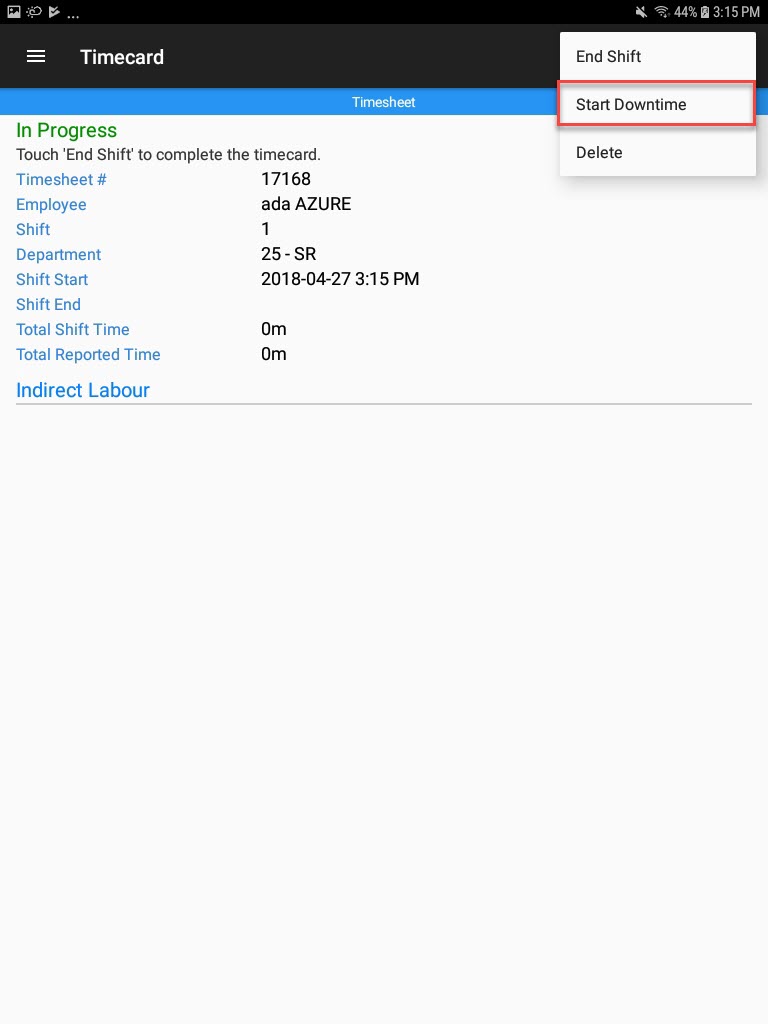
The Timecard screen will open. From the action menu, select Start Downtime.
The Start Downtime window will appear. Users must select an Activity and a Starts On time. Then, select OK.
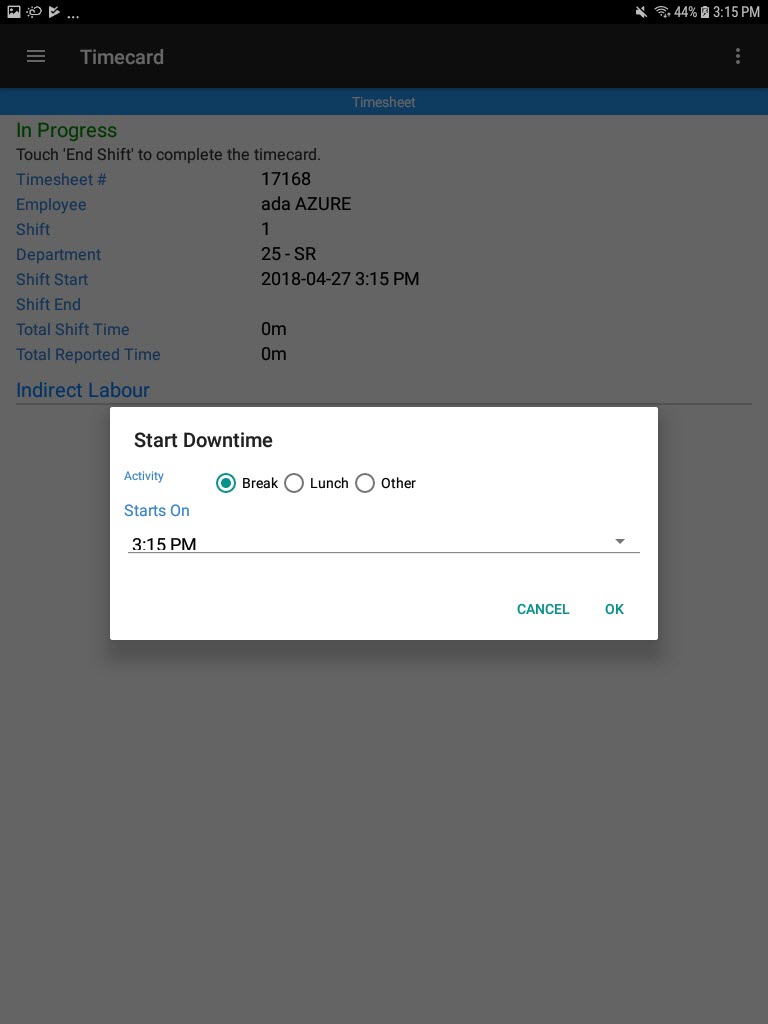
The downtime will begin and In Progress will display in green.
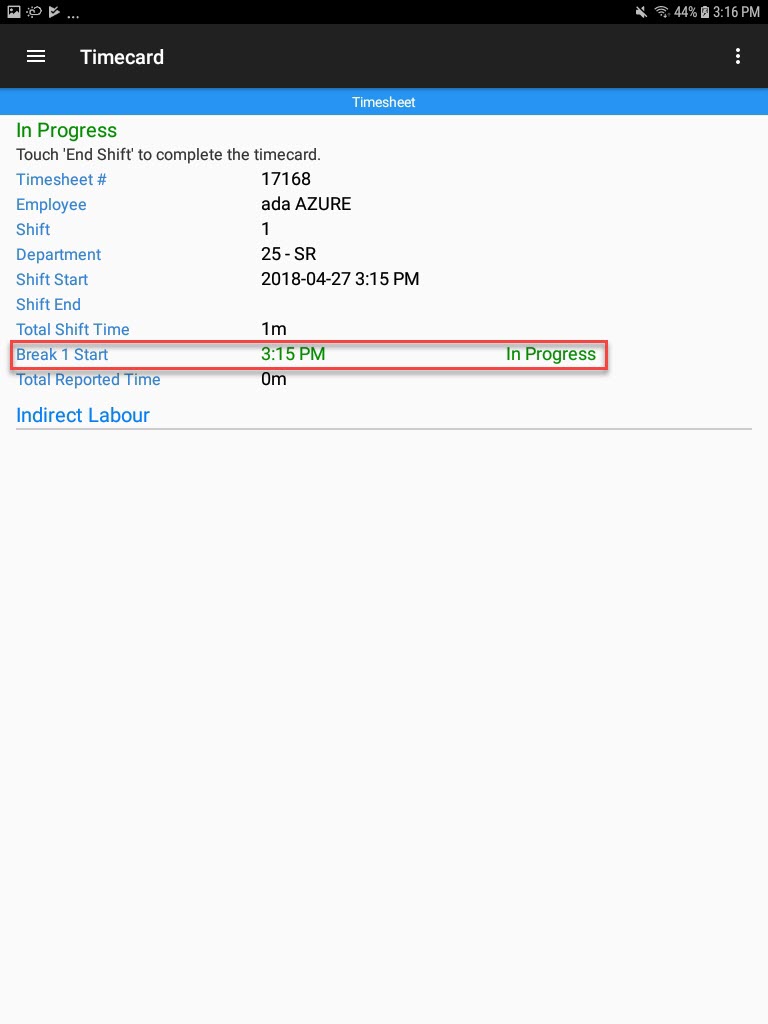
Stopping Downtime on a Tooling Timecard
To stop downtime on a Tooling Timecard, navigate to the Tooling/Equipment module, and select the Timecard option from the navigation drawer to the left of the screen.

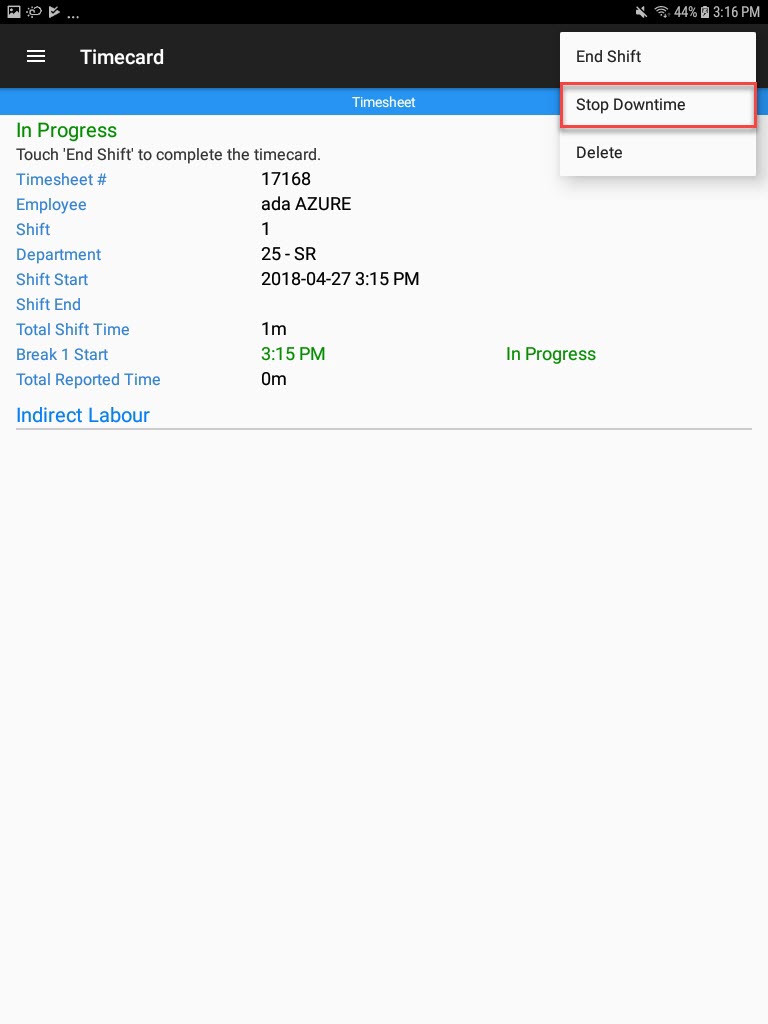
The Timecard screen will open. From the action menu, select Stop Downtime.
The End Indirect Labour window will appear. Select the appropriate Started On, and Ends On times. Then, select OK.
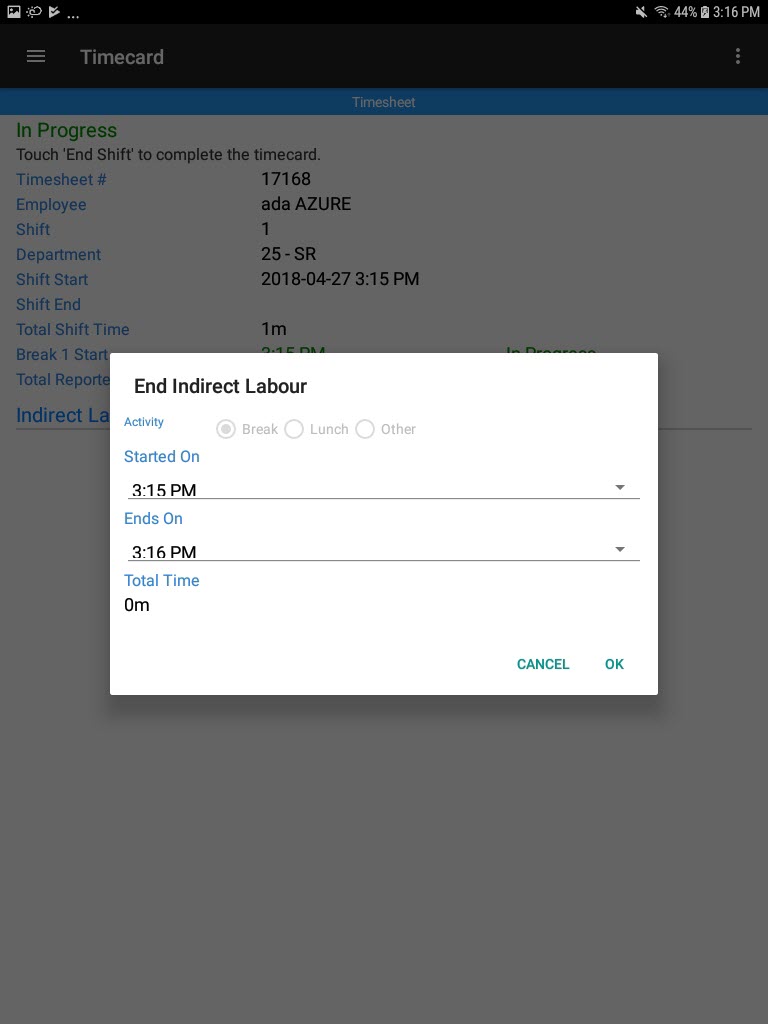
The downtime on the Tooling Timecard will stop successfully.
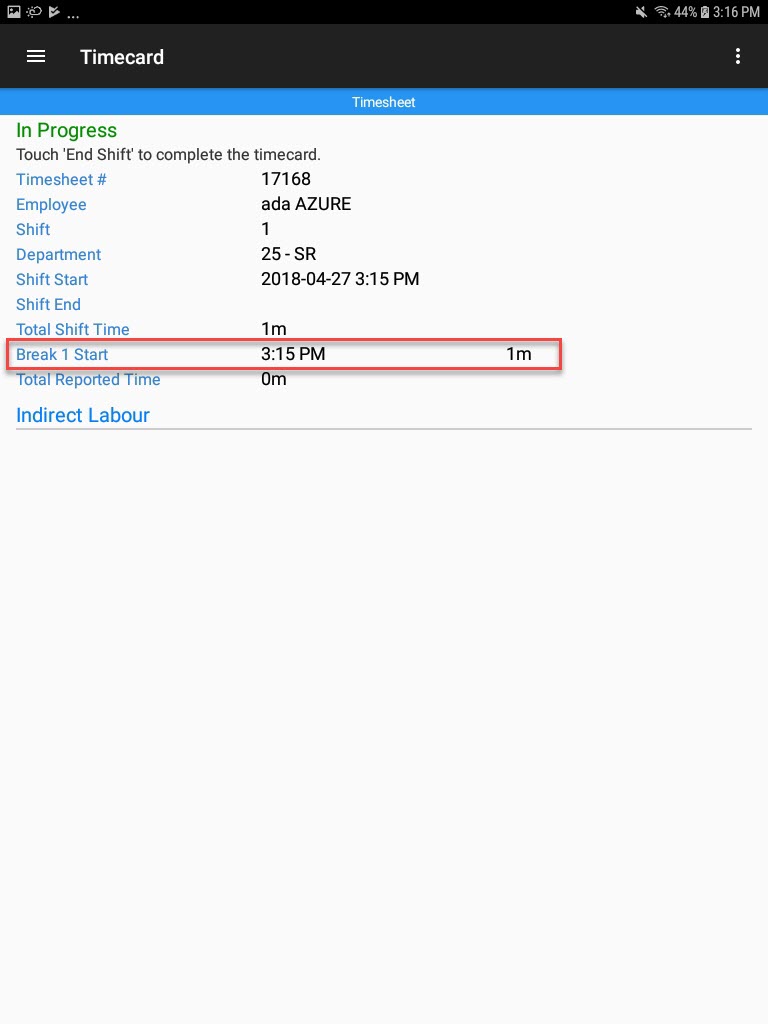
Viewing Work Orders on a Tooling Timecard
To view a Work Order on a Tooling Timecard, navigate to the Tooling/Equipment module, and select the Timecard option from the navigation drawer to the left of the screen.

The Timecard screen will open. Scroll over and the W/O will be displayed with a header titled Timesheet Item # _____.
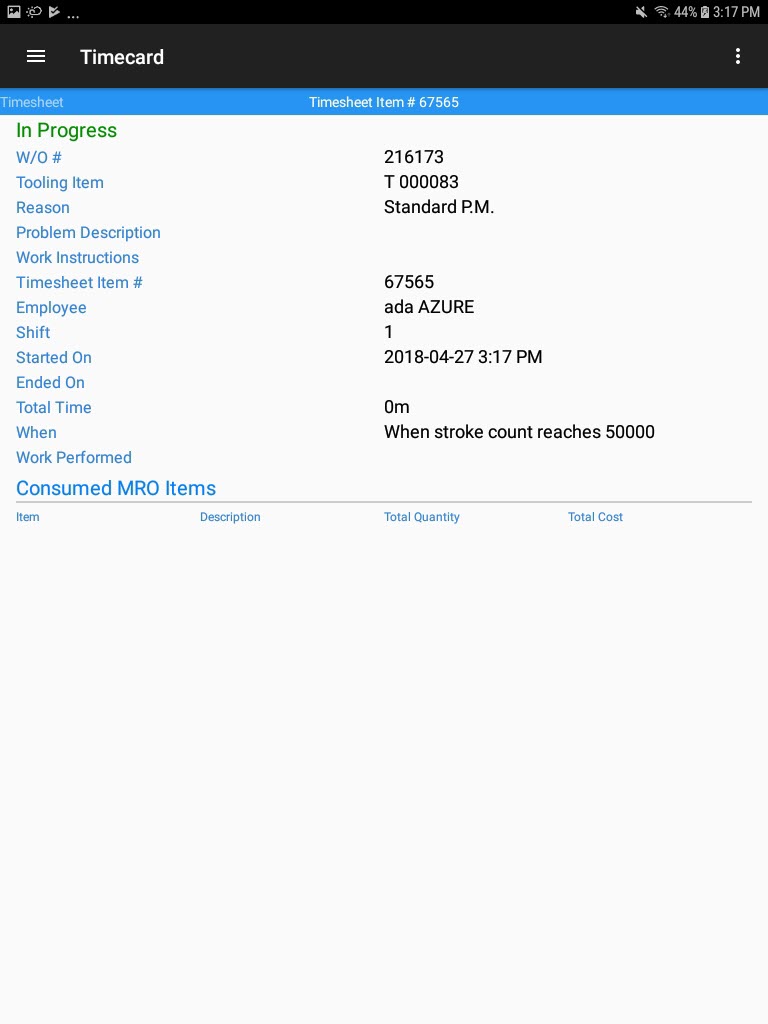
Opening a Work Order from a Tooling Timecard
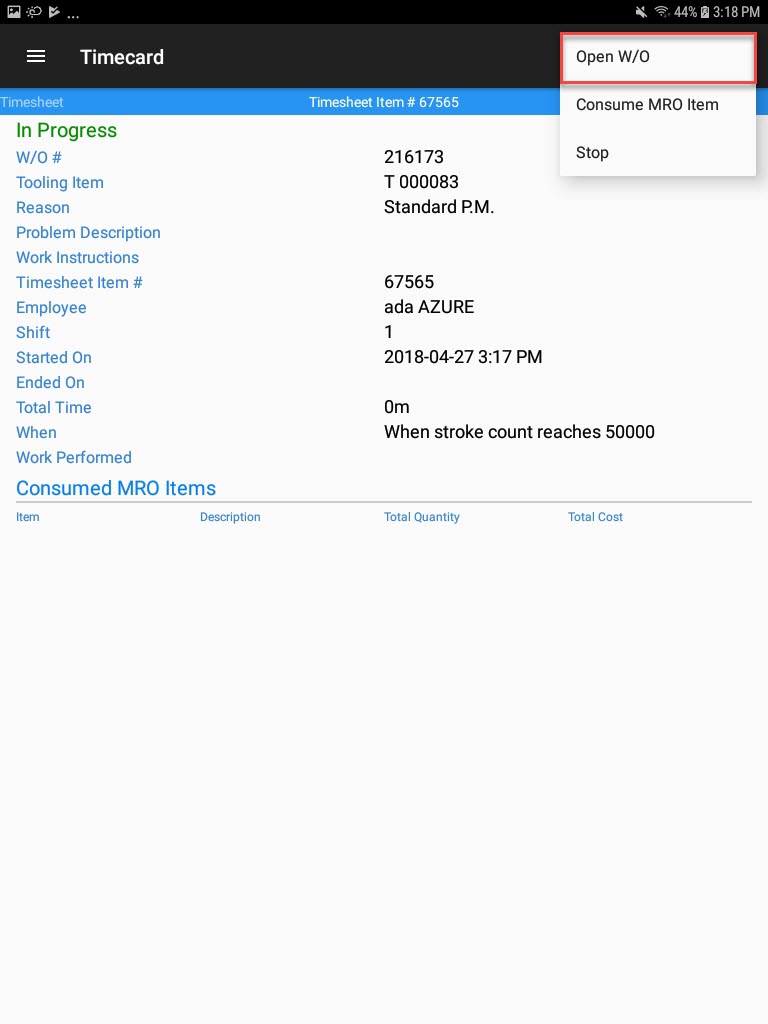
To open a Work Order from a Tooling Timecard, navigate to the Tooling/Equipment module, and select the Timecard option from the navigation drawer to the left of the screen.

The Timecard screen will open. Scroll over and the W/O will be displayed with a header titled Timesheet Item # _____.

From the action menu, select Open W/O.
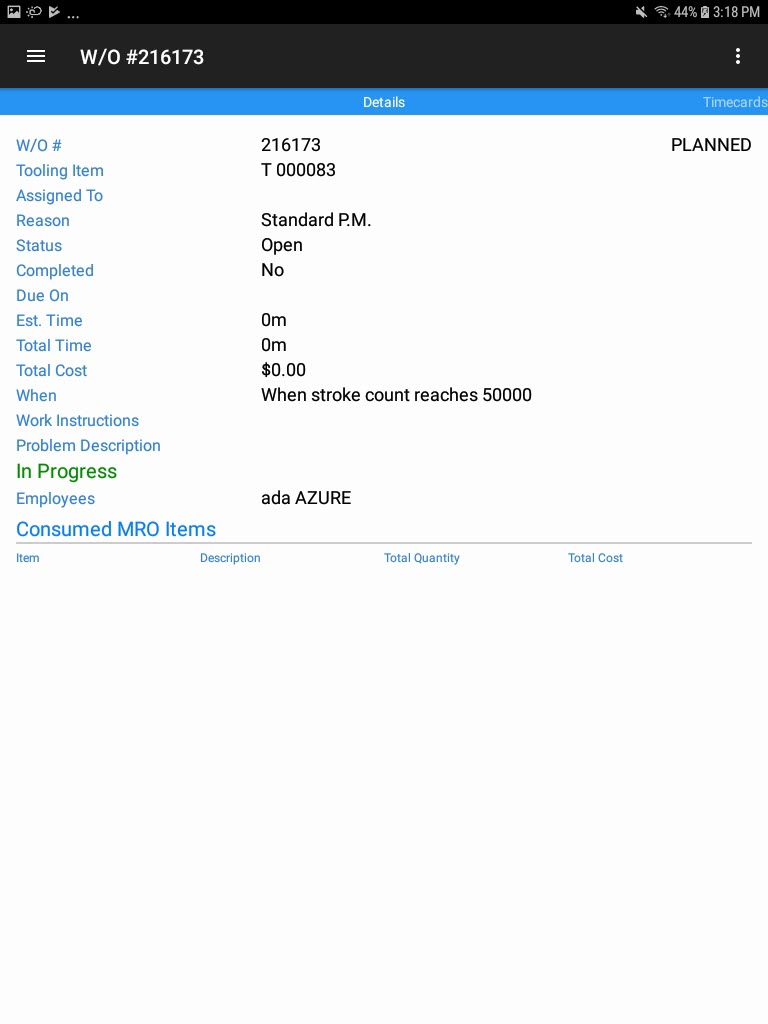
The W/O detail screen will be displayed.
Consuming an MRO Item on a Work Order from a Tooling Timecard
To consume an MRO Item on a Work Order from a Tooling Timecard, navigate to the Tooling/Equipment module, and select the Timecard option from the navigation drawer to the left of the screen.

The Timecard screen will open. Scroll over and the W/O will be displayed with a header titled Timesheet Item # _____.

From the action menu, select Consume MRO Item.
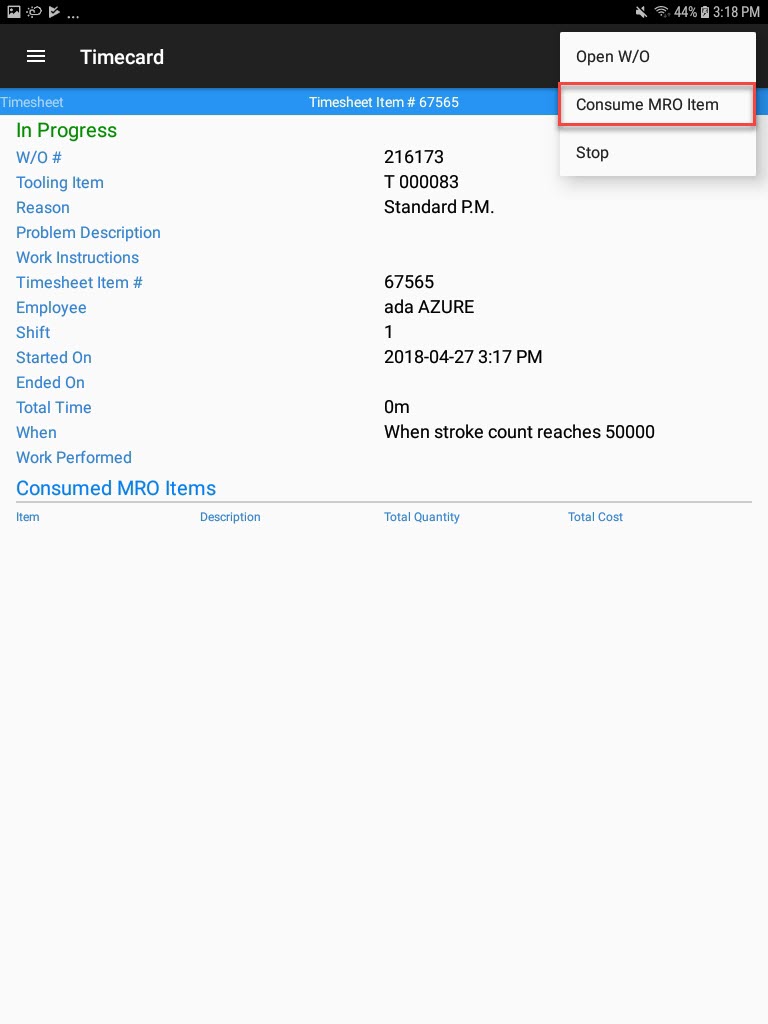
The Consume MRO Item screen will be displayed. Users must select the correct Item, and enter in a Quantity greater than zero. Then, select Save locate to the top-right of the screen.
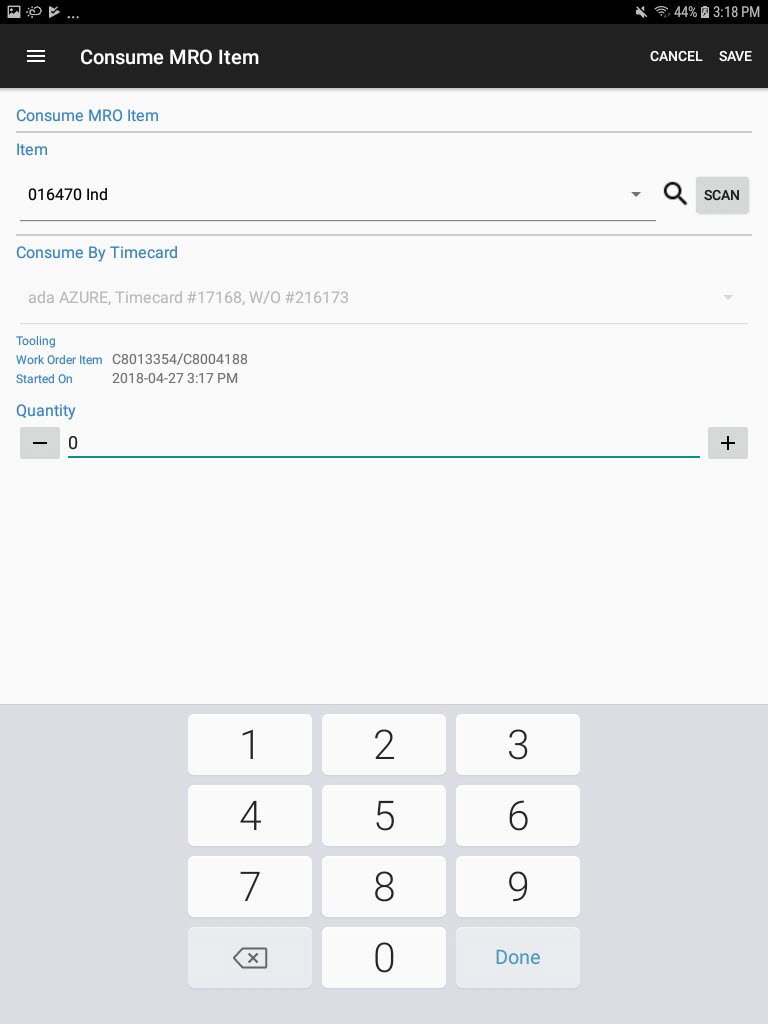
The selected MRO Item will be consumed against the Work Order on the current Tooling Timecard.
Editing a Completed Work Order from a Tooling Timecard
To edit a completed Work Order from a Tooling Timecard, navigate to the Tooling/Equipment module, and select the Timecard option from the navigation drawer to the left of the screen.

The Timecard screen will open. Scroll over and the W/O will be displayed with a header titled Timesheet Item # _____.

From the action menu, select Edit.
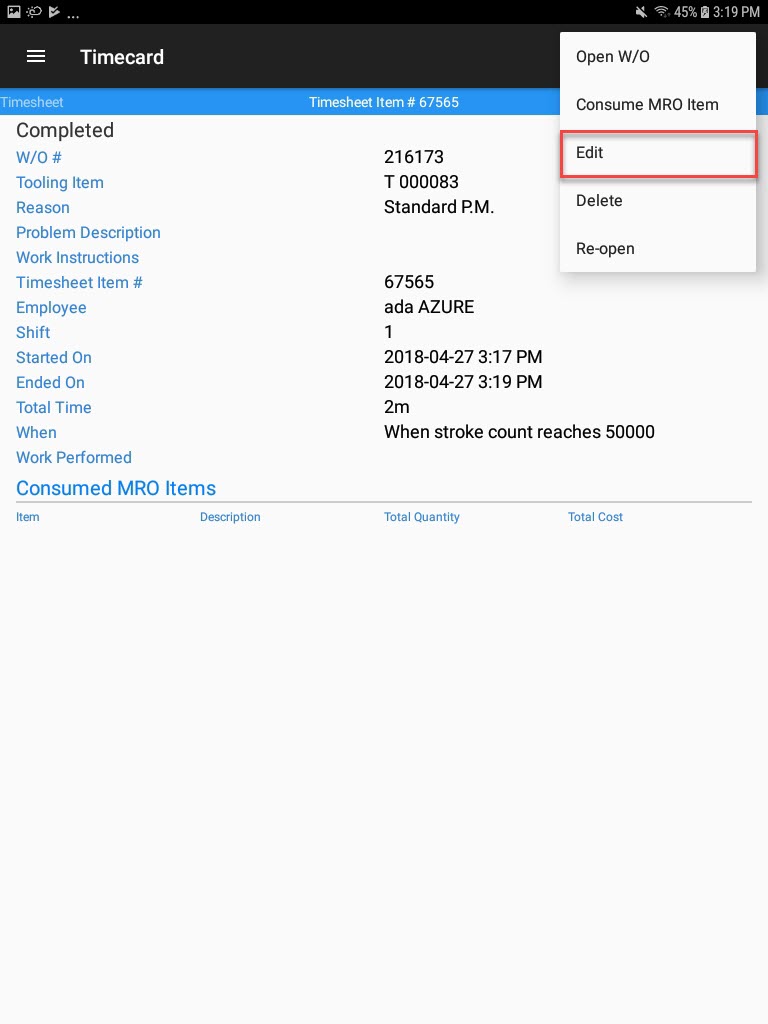
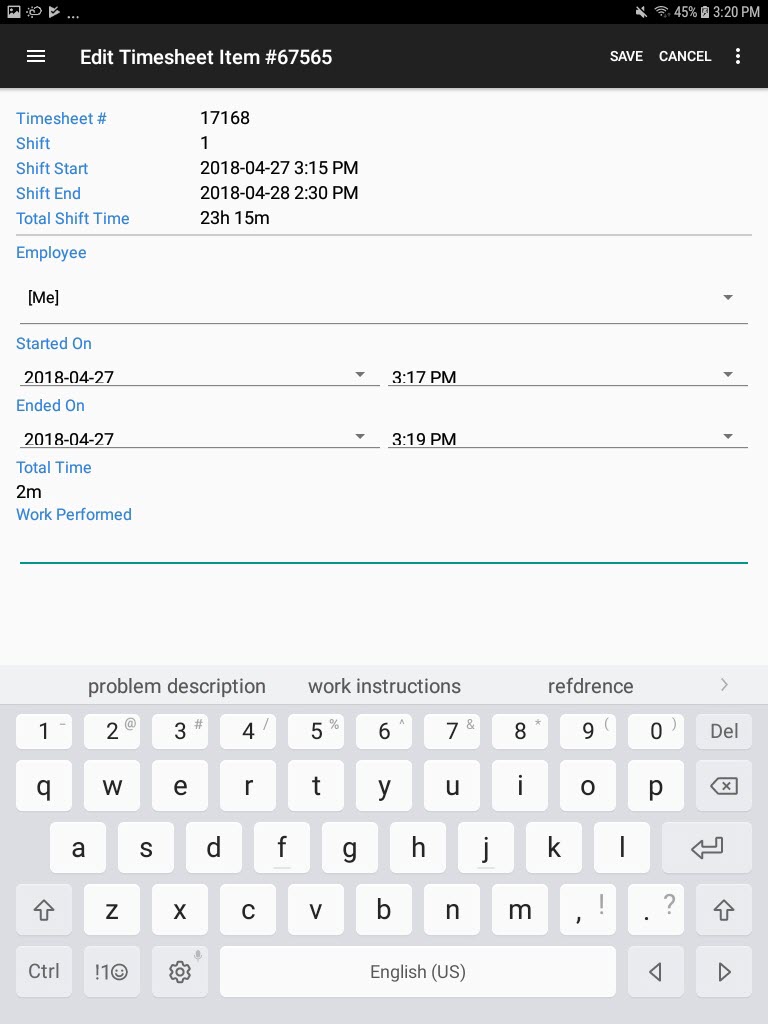
The Edit Timesheet Item # _____ window will be displayed. Make the necessary changes and select Save located at the top-right of the screen.
Stopping a Work Order from a Tooling Timecard
To stop a Work Order from a Tooling Timecard, navigate to the Tooling/Equipment module, and select the Timecard option from the navigation drawer to the left of the screen.

The Timecard screen will open. Scroll over and the W/O will be displayed with a header titled Timesheet Item # _____.

From the action menu, select Stop.
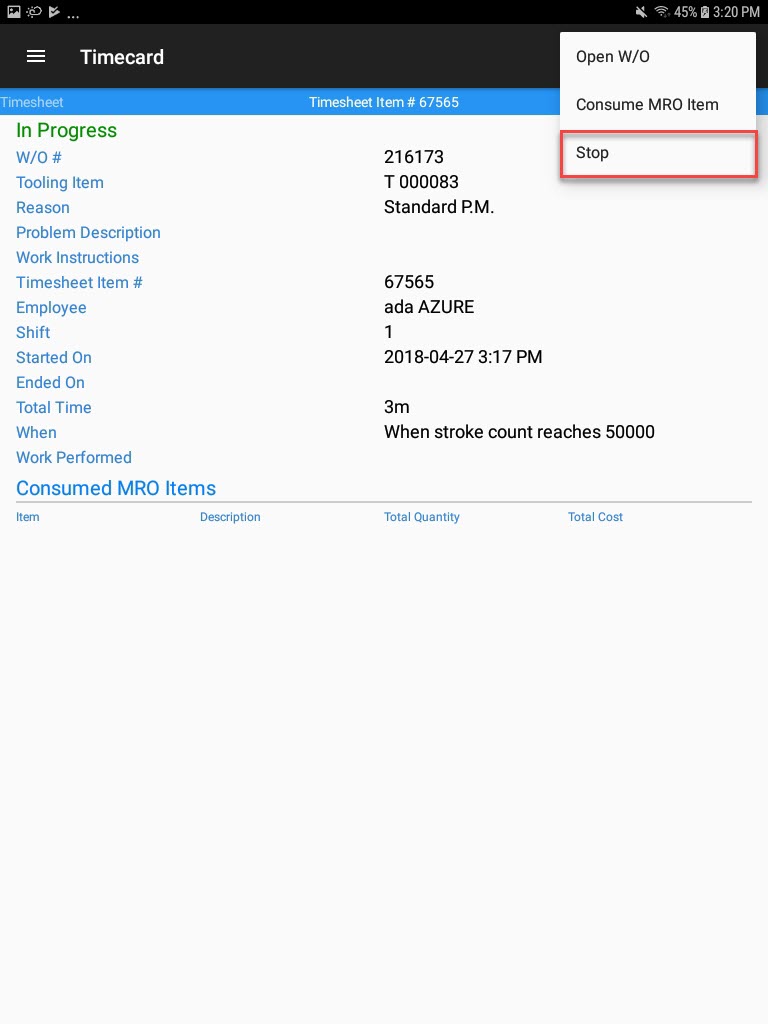
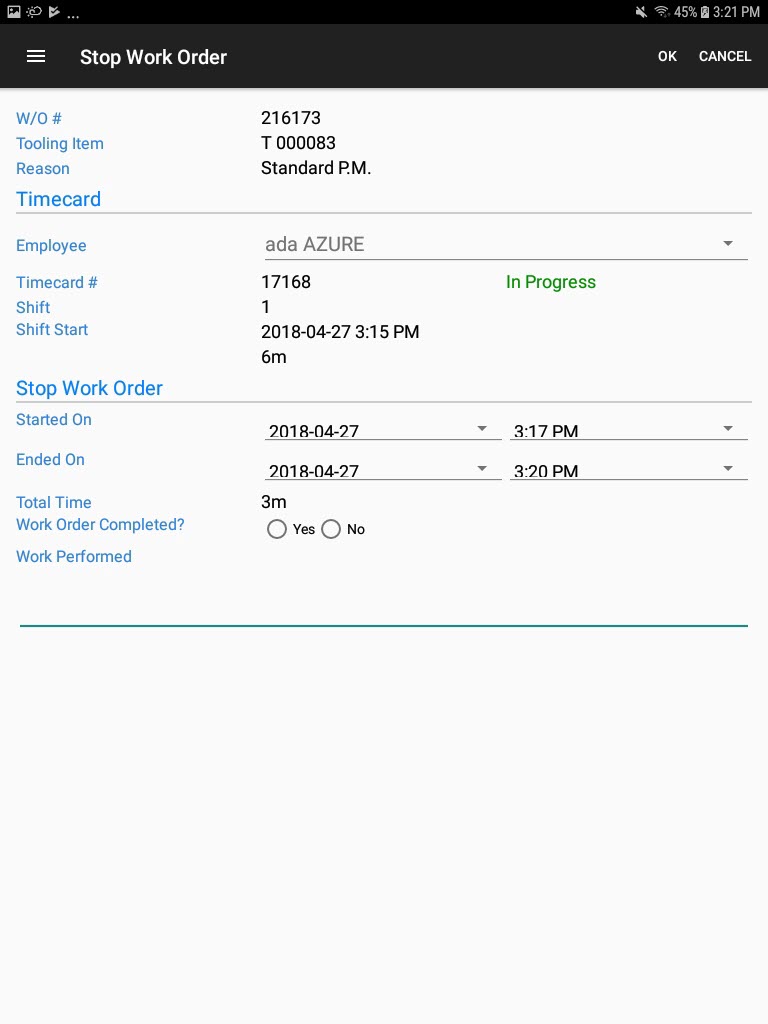
The Stop Work Order screen will be displayed. Make sure the information is correct, identify whether or not the Work Order was completed, and enter any Work Performed notes. Then, select OK.
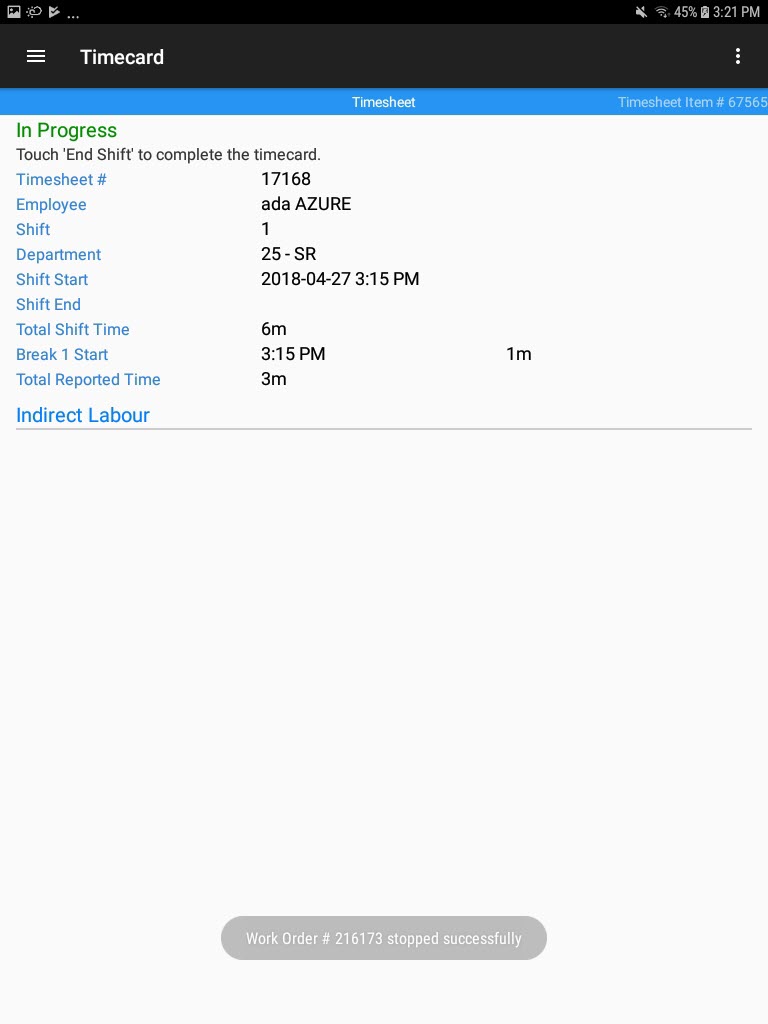
The Work Order will be stopped successfully.
Deleting a Work Order from a Tooling Timecard
To delete a Work Order from a Tooling Timecard, navigate to the Tooling/Equipment module, and select the Timecard option from the navigation drawer to the left of the screen.

The Timecard screen will open. Scroll over and the W/O will be displayed with a header titled Timesheet Item # _____.

From the action menu, select Delete.
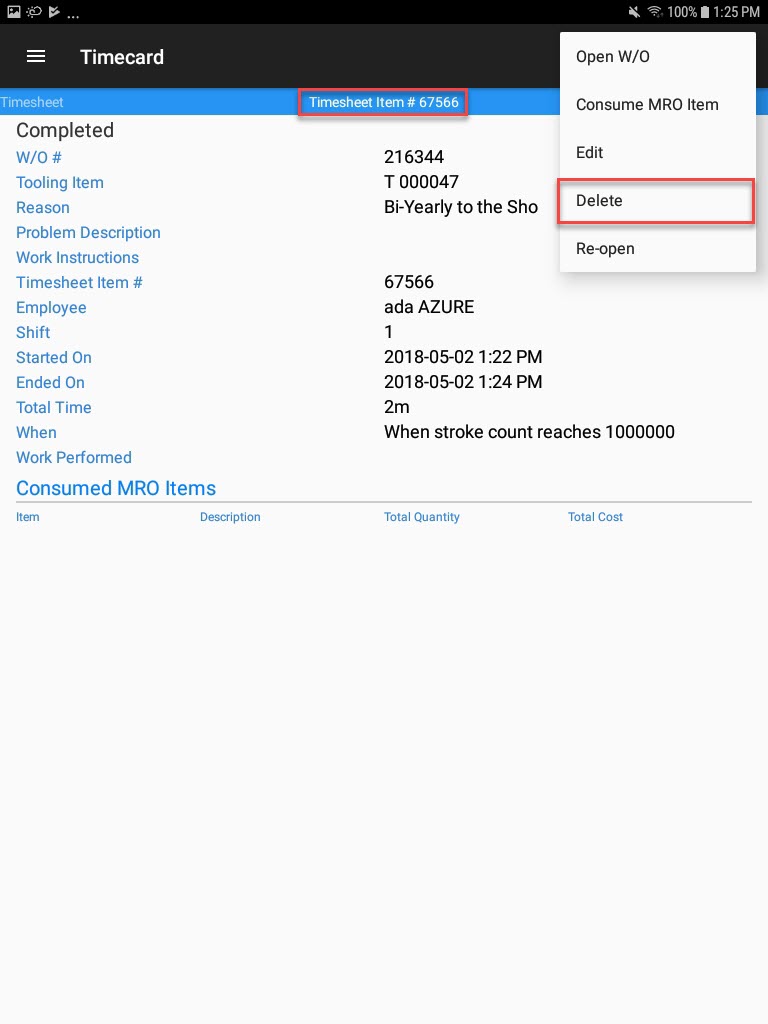
The Delete W/O # ____ window will appear. To continue, select OK.
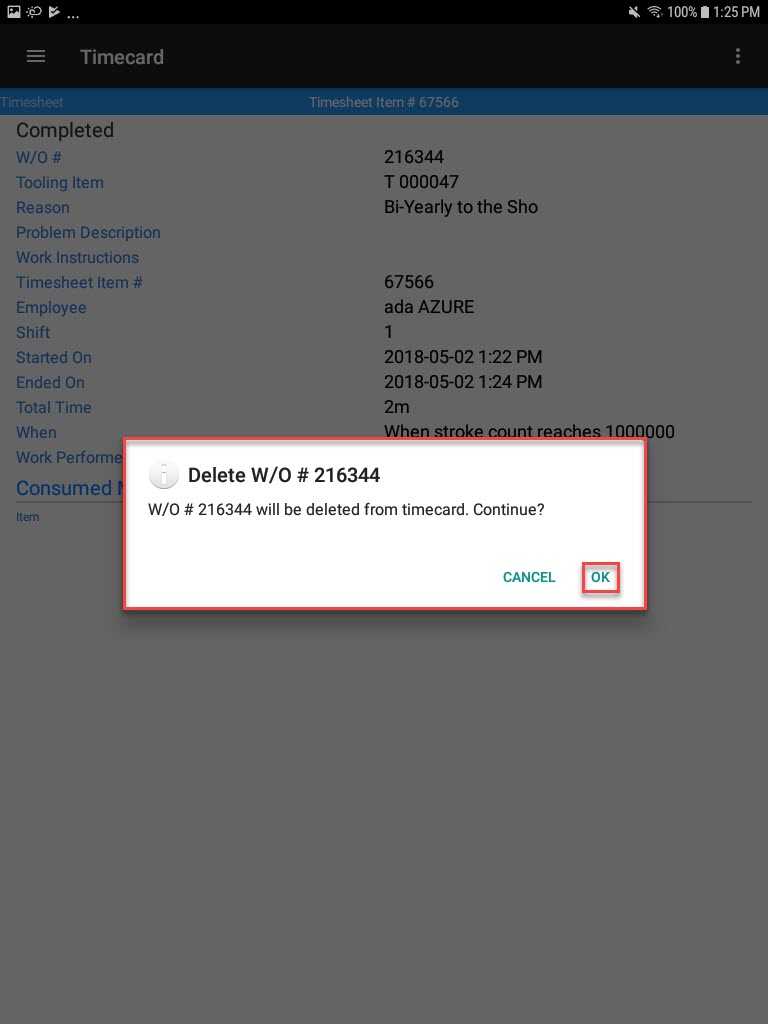
The selected Work Order will be deleted from the Tooling Timecard successfully.
Note
Users can also delete a Work Order from a Tooling Timecard when editing a Work Order by selecting Delete from the action menu located at the top-right of the Edit Timesheet Item # _____ window.
Ending a Tooling Timecard Shift
To end a Tooling Timecard shift, navigate to the Tooling/Equipment module, and select the Timecard option from the navigation drawer to the left of the screen.

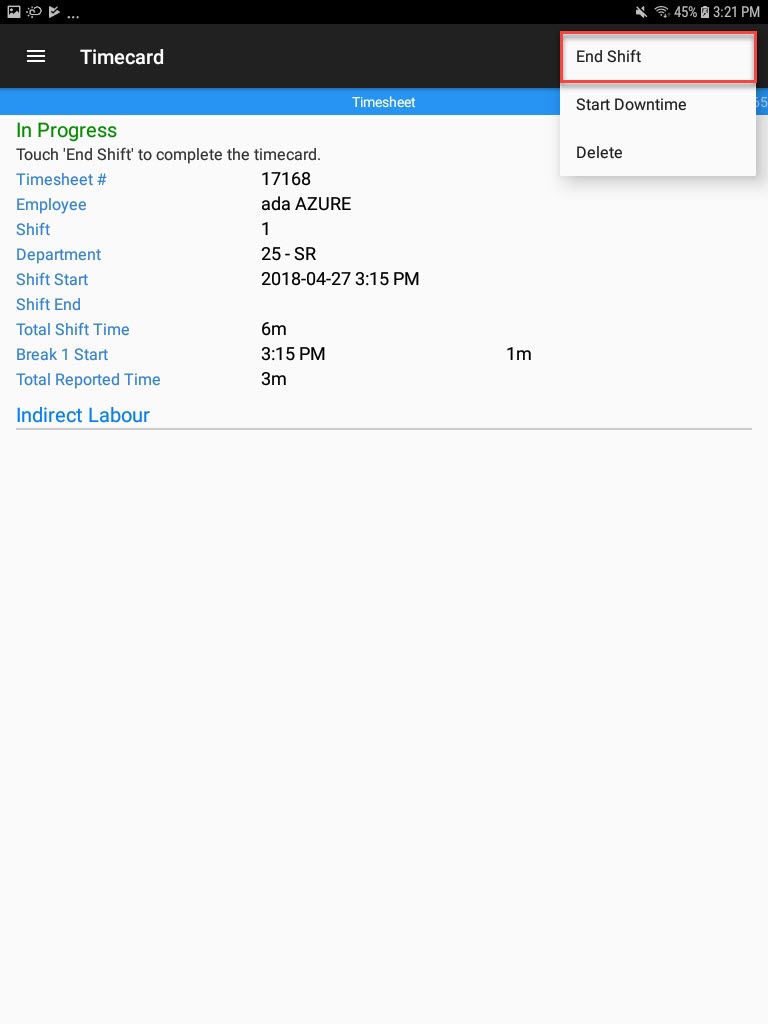
From the action menu, select End Shift.
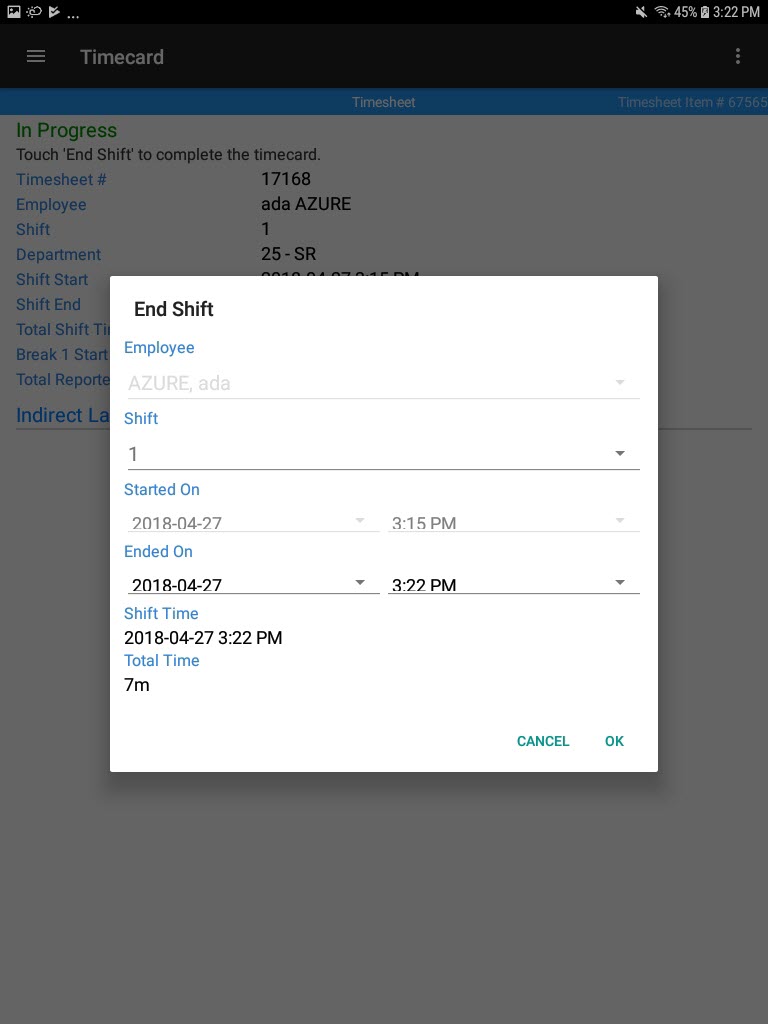
The End Shift window will appear. Select the Ended On time and then, select OK.
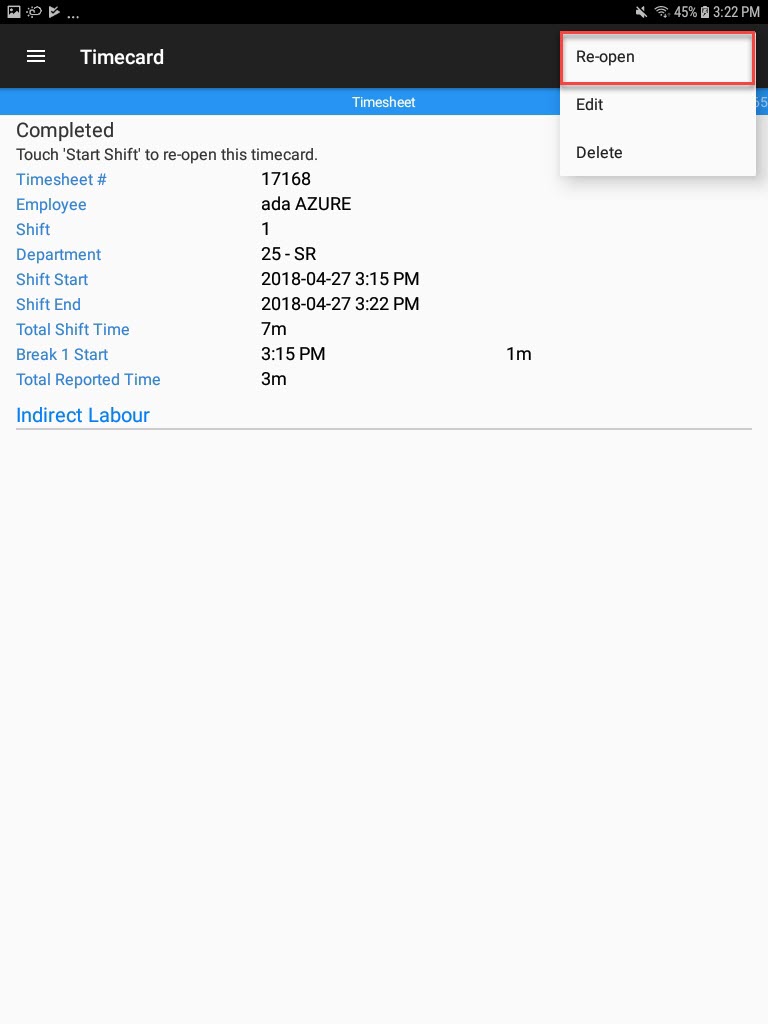
The Tooling Timecard will be ended successfully.
Re-opening a Tooling Timecard
To re-open a Tooling Timecard, navigate to the Tooling/Equipment module, and select the Timecard option from the navigation drawer to the left of the screen.

From the action menu, select Re-open.
The Re-open Timecard window will appear. Users must select OK to continue.
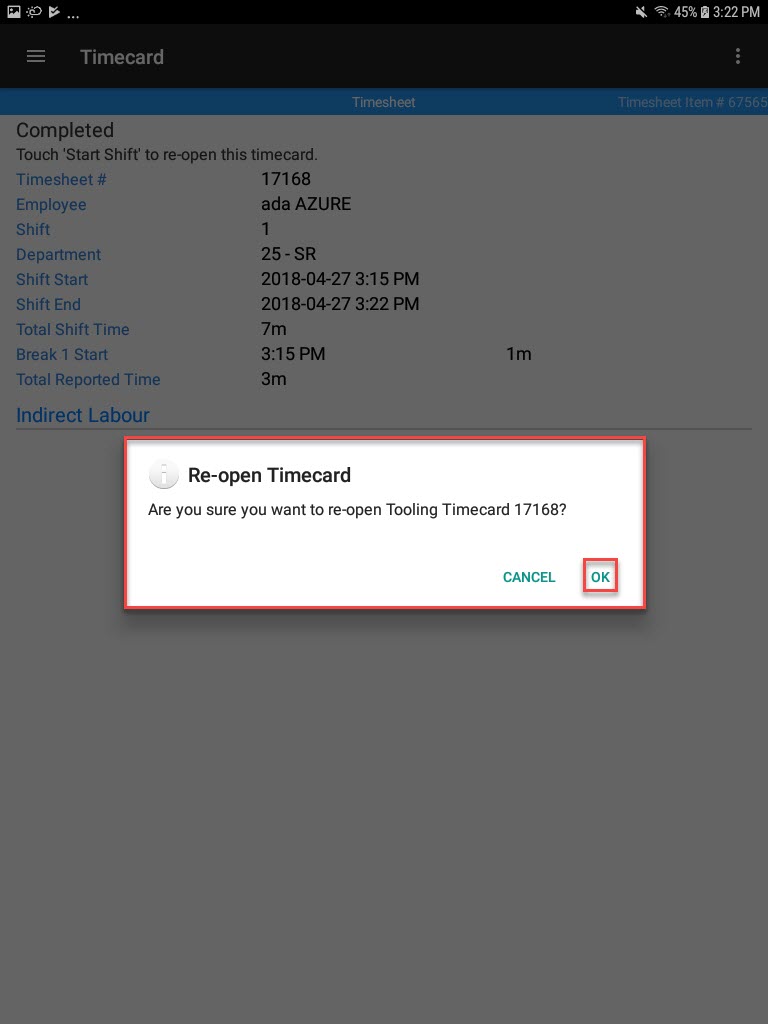
The Tooling Timecard will be re-opened.
Editing a completed Tooling Timecard
To edit a completed Tooling Timecard, navigate to the Tooling/Equipment module, and select the Timecard option from the navigation drawer to the left of the screen.

From the action menu, select Edit.
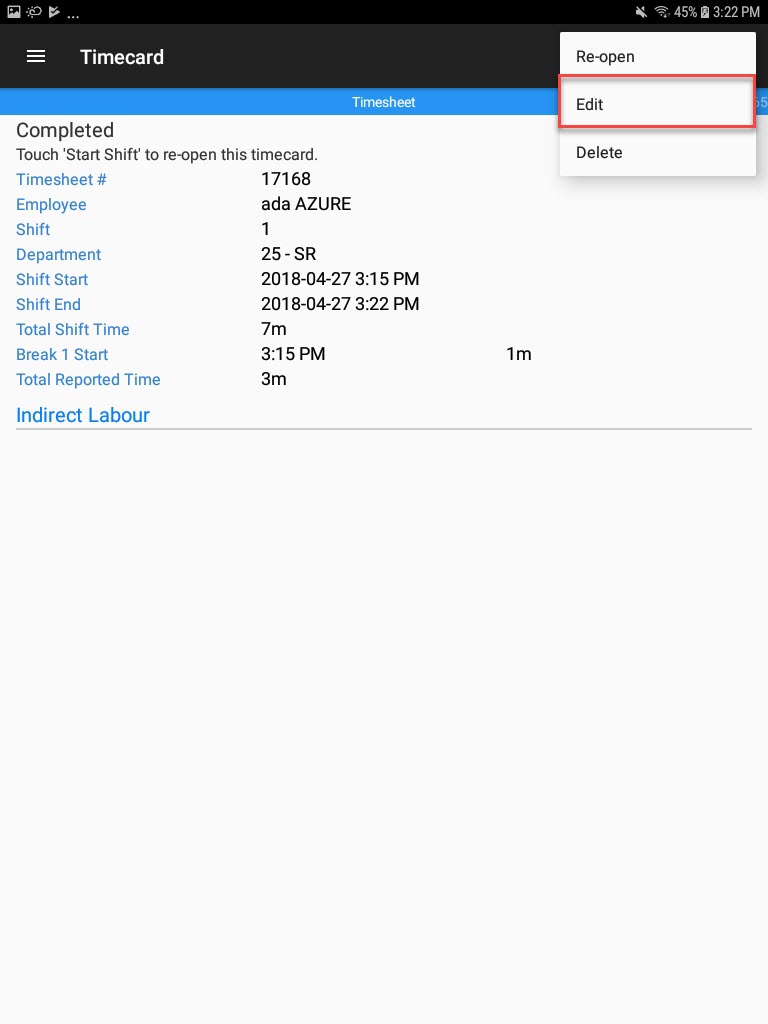
The Edit Timesheet # ____ window will appear. Make the necessary changes and select Save located at the top-right of the screen.
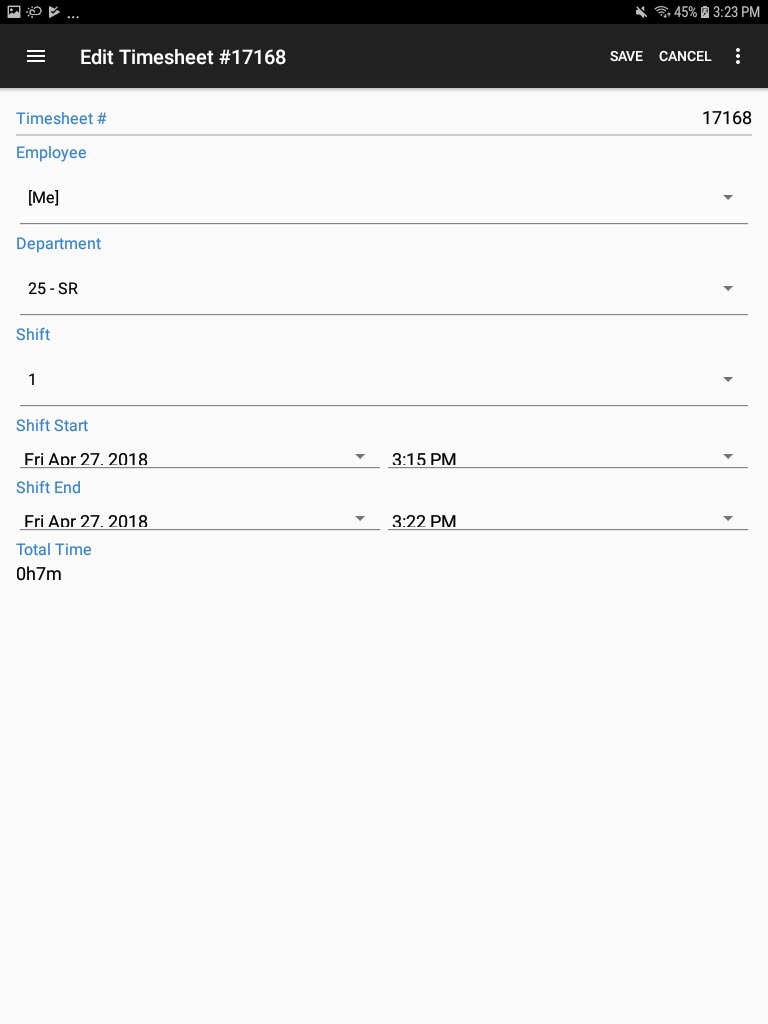
The Tooling Timecard will be edited successfully.
Deleting a Tooling Timecard Shift
To delete a Tooling Timecard, navigate to the Tooling/Equipment module, and select the Timecard option from the navigation drawer to the left of the screen.

From the action menu, select Delete.
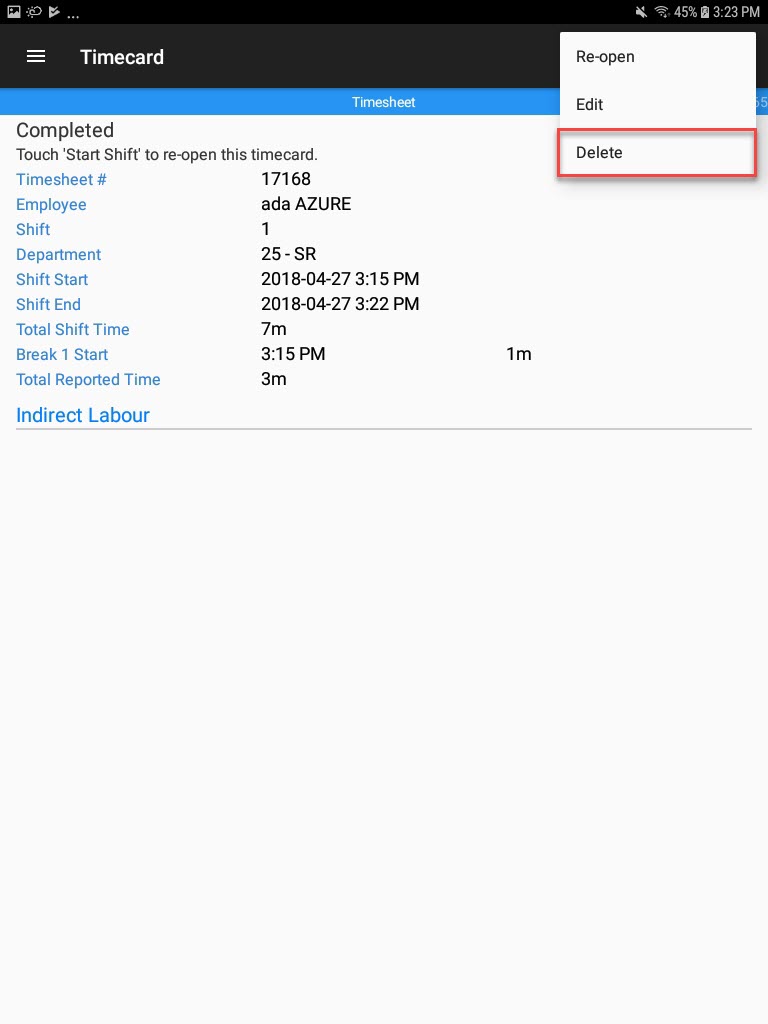
The Delete window will appear. To continue, select OK.
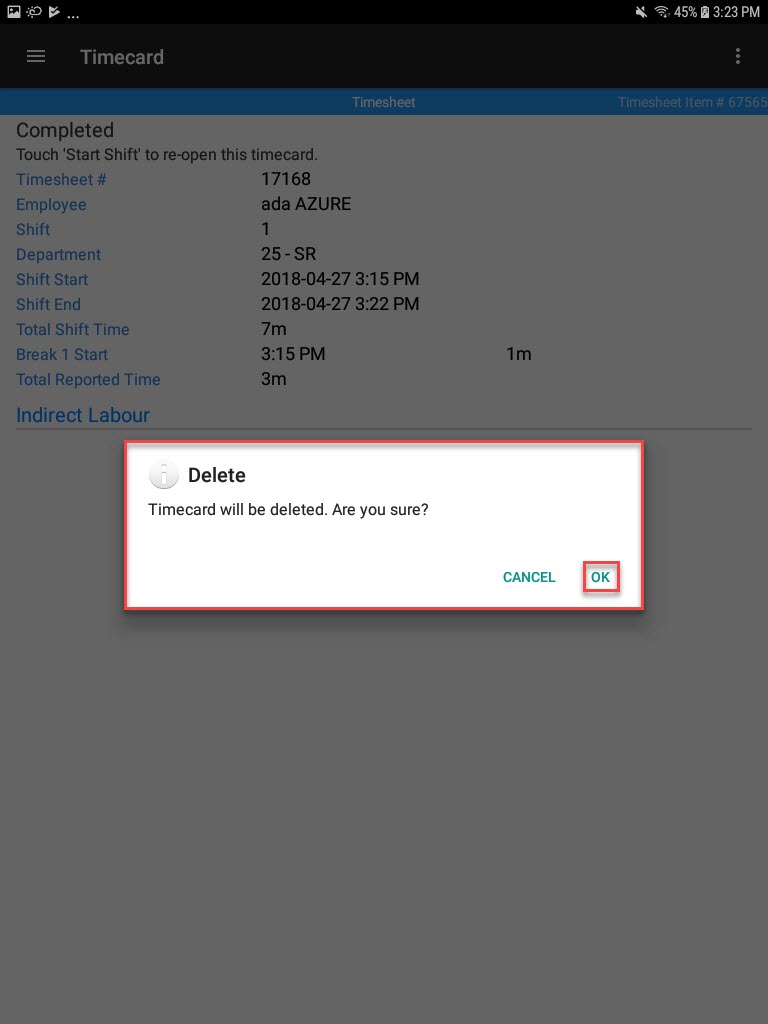
The Tooling Timecard will be deleted and the screen will refresh to a blank Tooling Timecard.
Timecard Lookup
To view the Timecard Lookup, navigate to the Tooling/Equipment module, and select the Timecard option from the navigation drawer to the left of the screen.
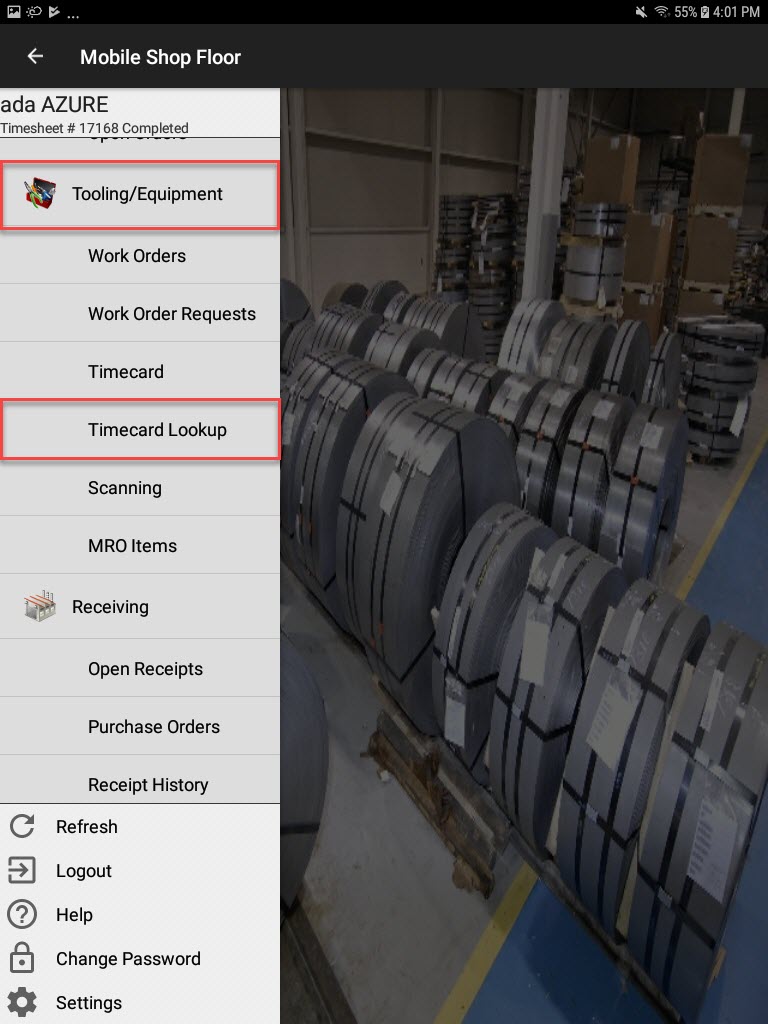
The Timecard Lookup screen will open, displaying all Tooling Timecards in the system.
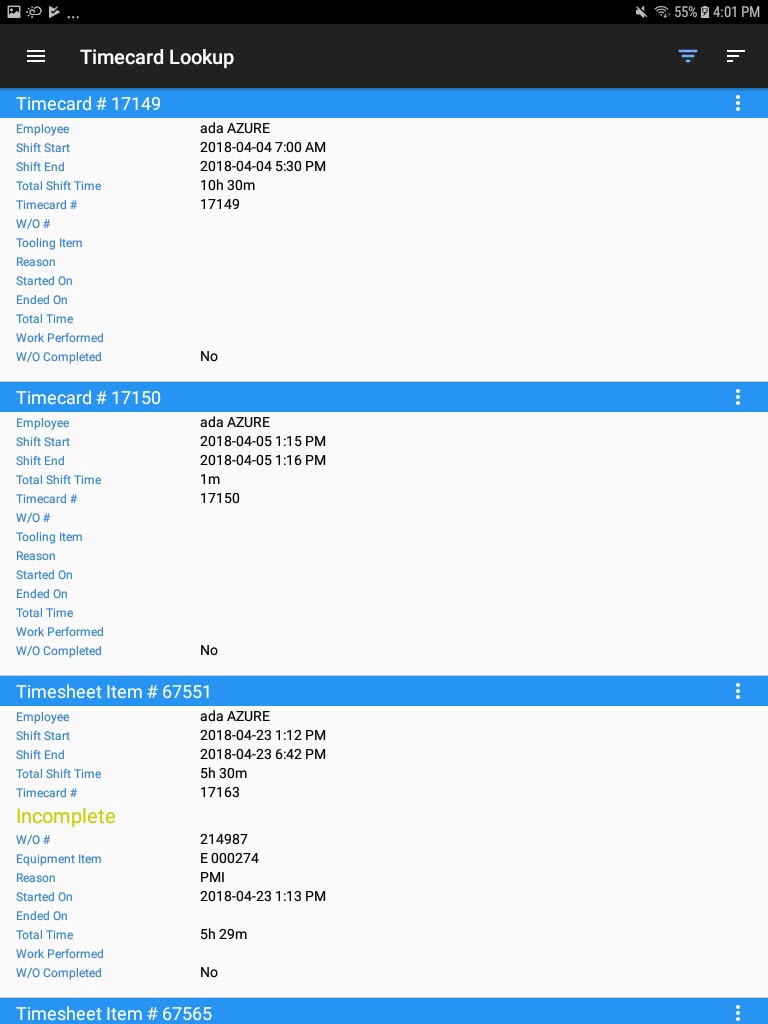
Opening an Existing Tooling Timecard
To open an existing Tooling Timecard, navigate to the Tooling/Equipment module, and select the Timecard option from the navigation drawer to the left of the screen.

The Timecard Lookup screen will open.

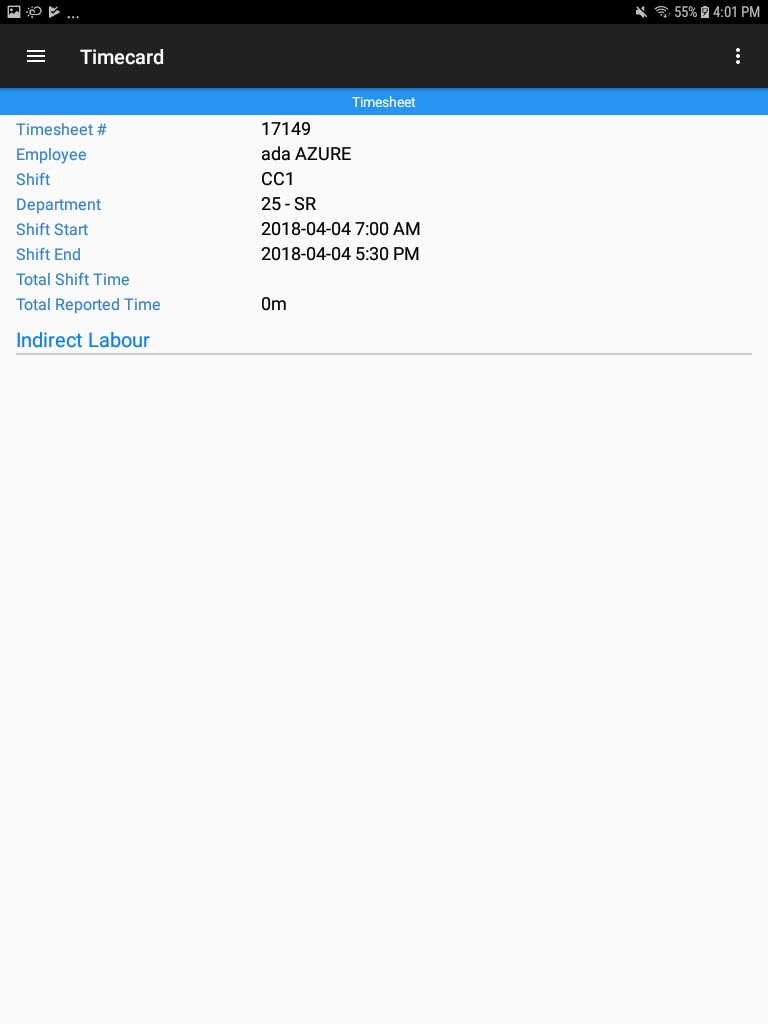
Locate the Tooling Timecard you wish to open and from the action menu, select Open.
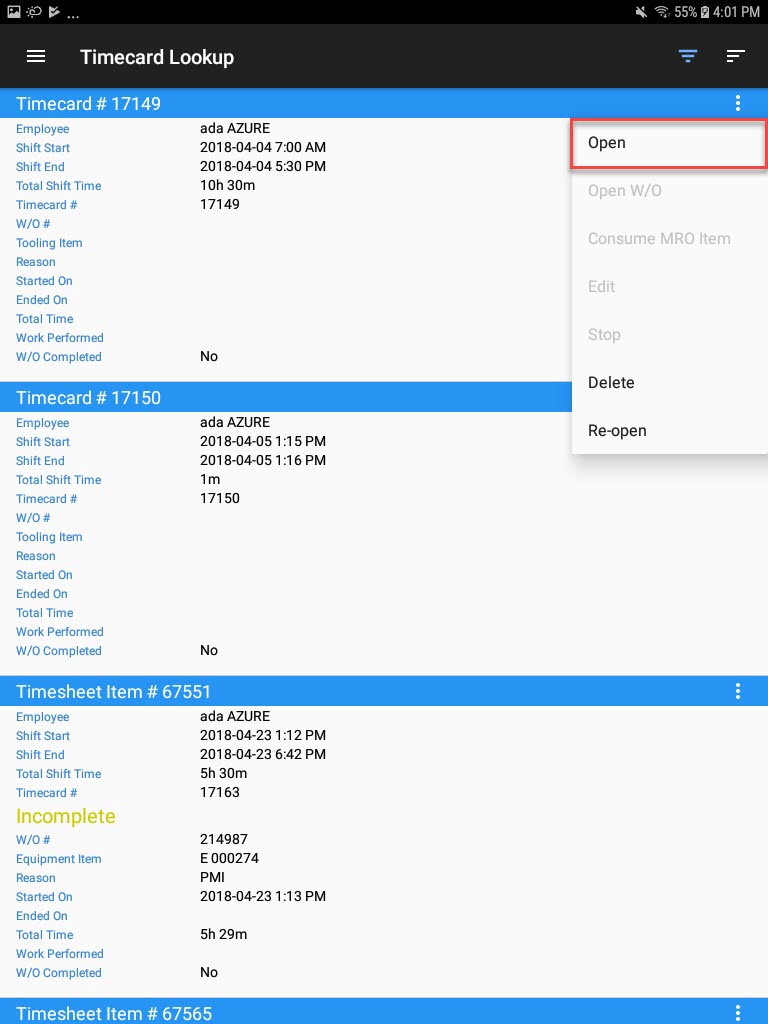
The Timecard detail screen will be displayed.
Opening a Work Order assigned to a Tooling Timecard
To open a Work Order that is assigned to a Tooling Timecard, navigate to the Tooling/Equipment module, and select the Timecard option from the navigation drawer to the left of the screen.

The Timecard Lookup screen will open.

Locate the Tooling Timecard you wish to open a Work Order for and from the action menu, select Open W/O.
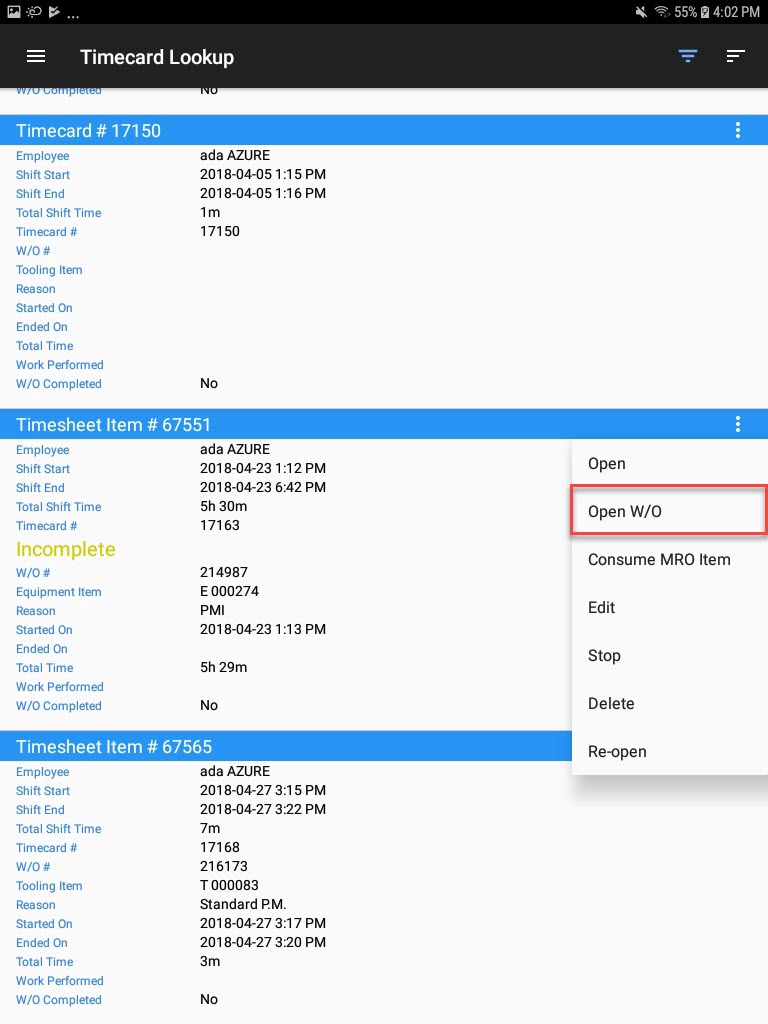
The W/O # ____ detail screen will be displayed.
Consuming an MRO Item from a Tooling Timecard with an Assigned Work Order
To consume an MRO Item from a Tooling Timecard with an assigned Work Order, navigate to the Tooling/Equipment module, and select the Timecard option from the navigation drawer to the left of the screen.

The Timecard Lookup screen will open.

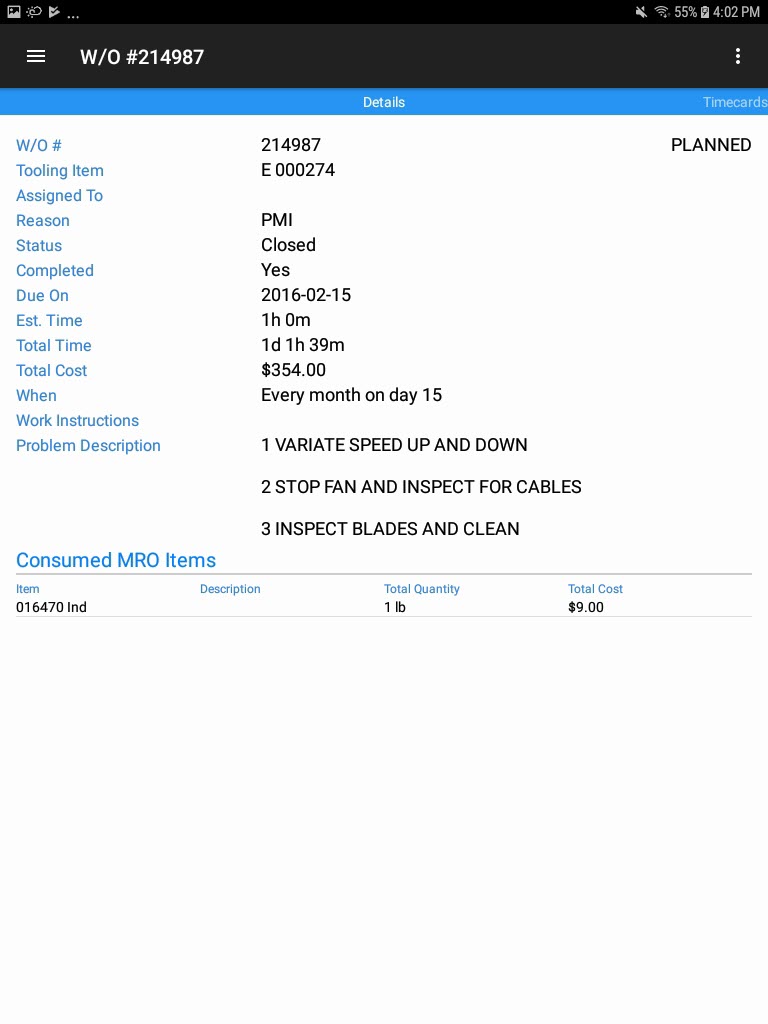
Locate the Tooling Timecard you wish to consume an MRO Item and from the action menu, select Consume MRO Item.
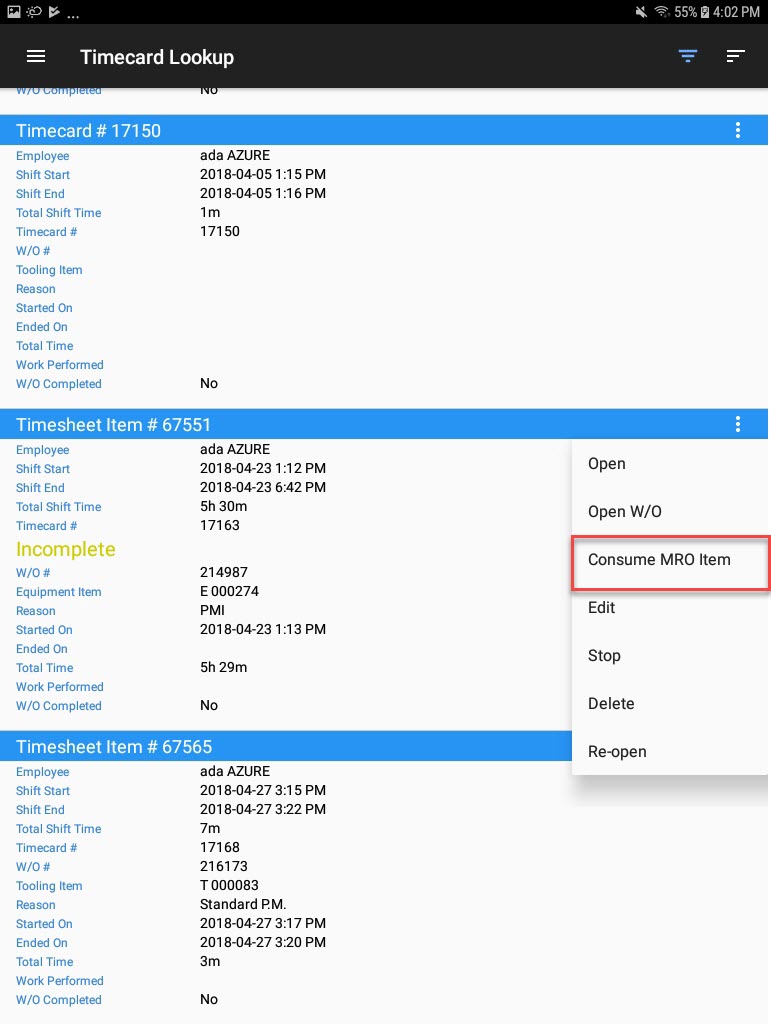
The Consume MRO Item window will appear. Users must verify the correct Item and enter in a Quantity greater than zero. Then, select Save located at the top-right of the screen.
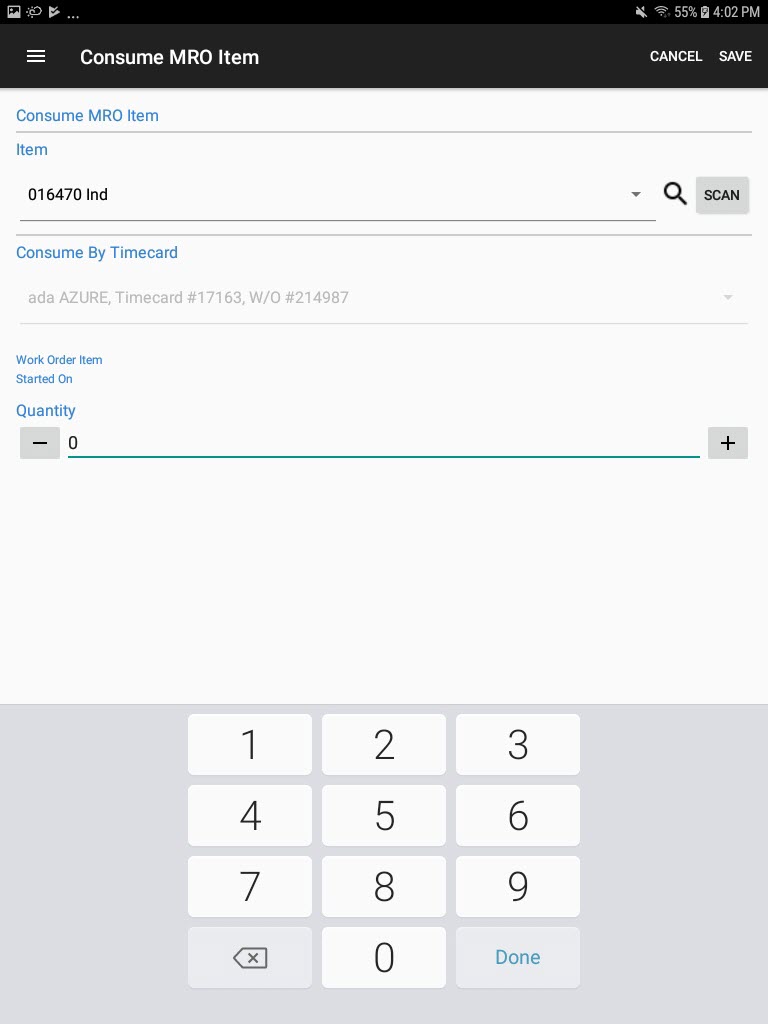
The MRO Item will be consumed.
Editing a Tooling Timecard
To edit a Tooling Timecard, navigate to the Tooling/Equipment module, and select the Timecard option from the navigation drawer to the left of the screen.

The Timecard Lookup screen will open.

Locate the Tooling Timecard you wish to edit and from the action menu, select Edit.
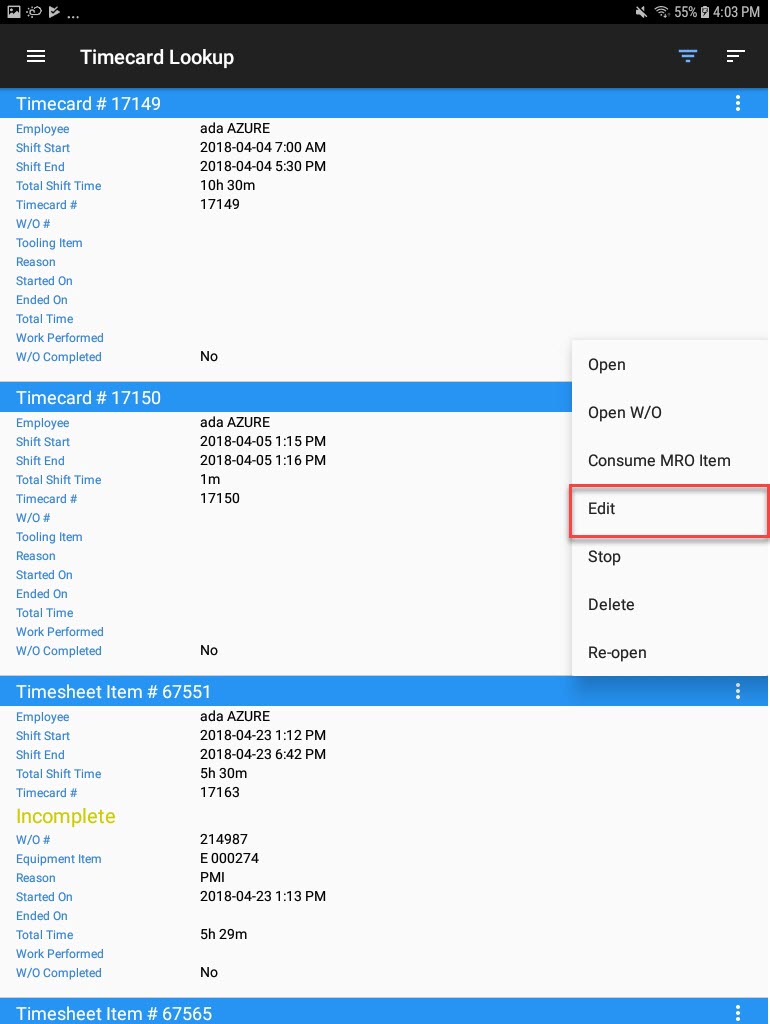
The Edit Timesheet Item # ____ screen will be displayed.
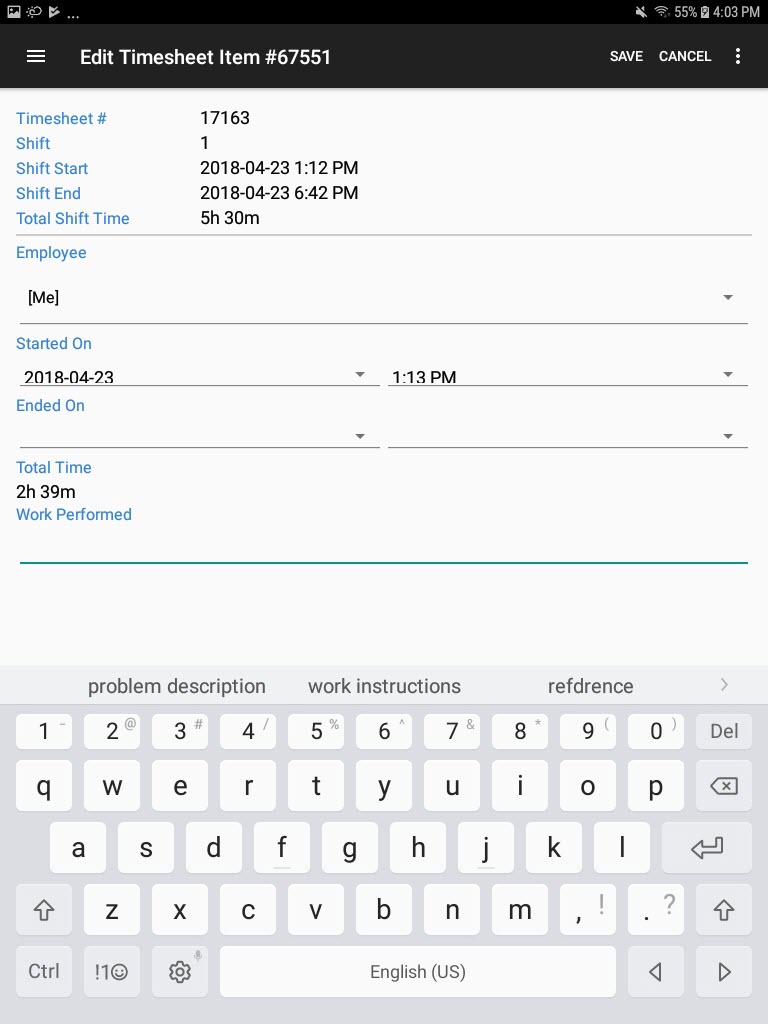
Make the necessary changes and select Save located at the top-right of the screen.
Stopping a Tooling Timecard with an Assigned Work Order
To stop a Tooling Timecard with a Work Order assigned to it, navigate to the Tooling/Equipment module, and select the Timecard option from the navigation drawer to the left of the screen.

The Timecard Lookup screen will open.

Locate the Tooling Timecard with an assigned Work Order you wish to stop and from the action menu, select Open.

The Timecard detail screen will be displayed. Scroll to the Timesheet Item # section and from the action menu, select Stop.
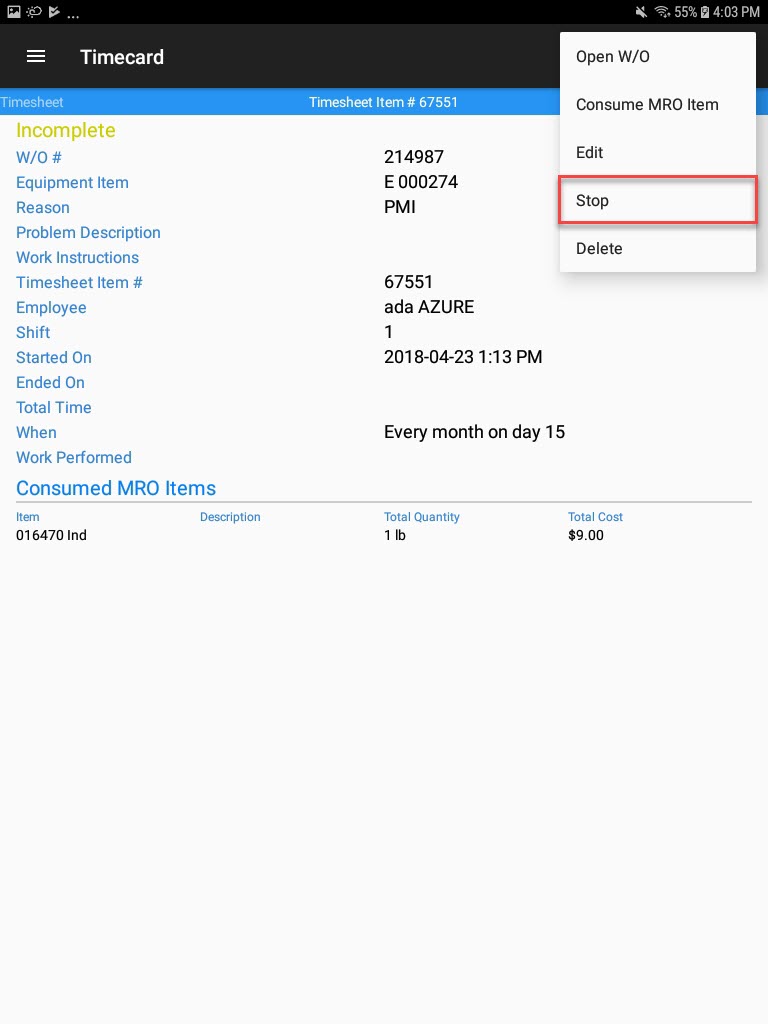
The Stop Work Order screen will appear. Verify the fields, select whether of not the Work Order was completed, and enter in notes for Work Performed. Then, select OK located at the top-right of the screen.
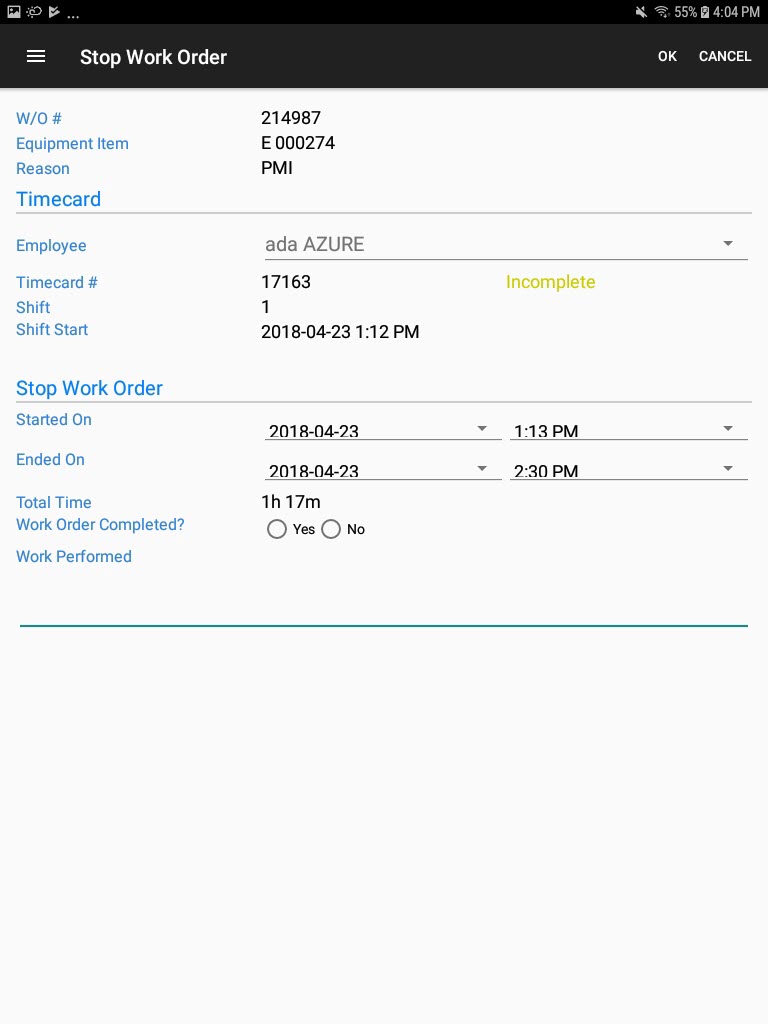
The Work Order and Tooling Timecard will be stopped.
Re-opening a Work Order from a Tooling Timecard
To re-open a Work Order from a Tooling Timecard, navigate to the Tooling/Equipment module, and select the Timecard option from the navigation drawer to the left of the screen.

The Timecard Lookup screen will open.

Locate the Tooling Timecard with an assigned Work Order you wish to re-open and from the action menu, select Open.

The Timecard detail screen will be displayed. From the action menu, select Re-open.
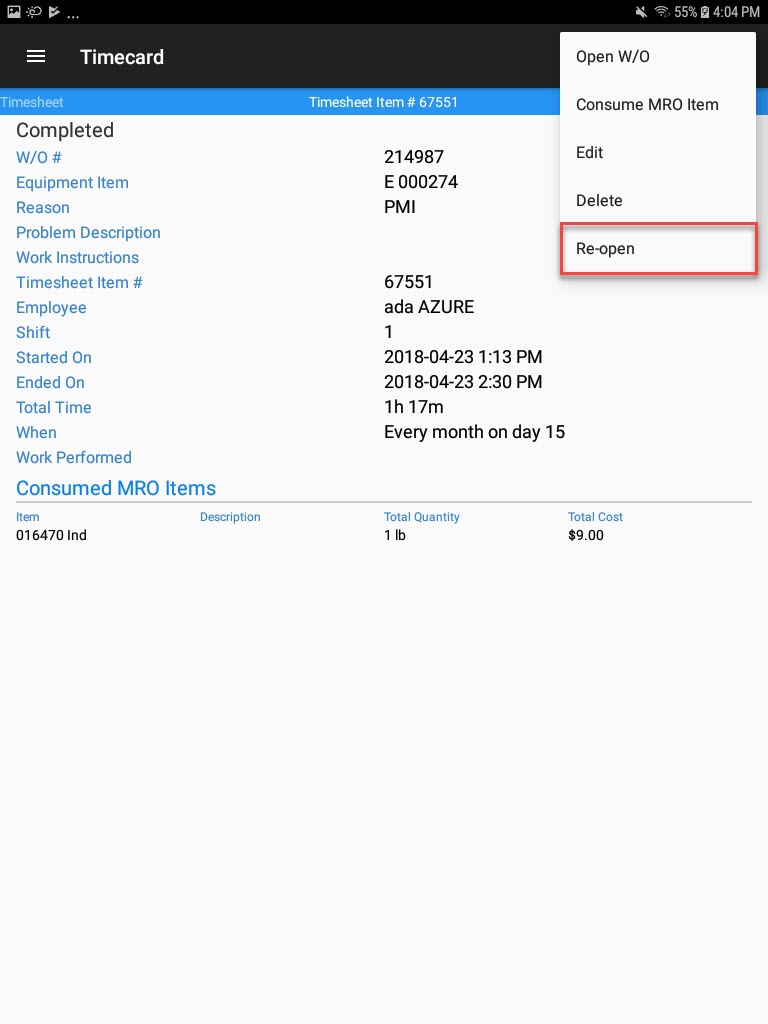
The Re-open Timesheet Item # ____ window will be displayed. Select OK to continue.
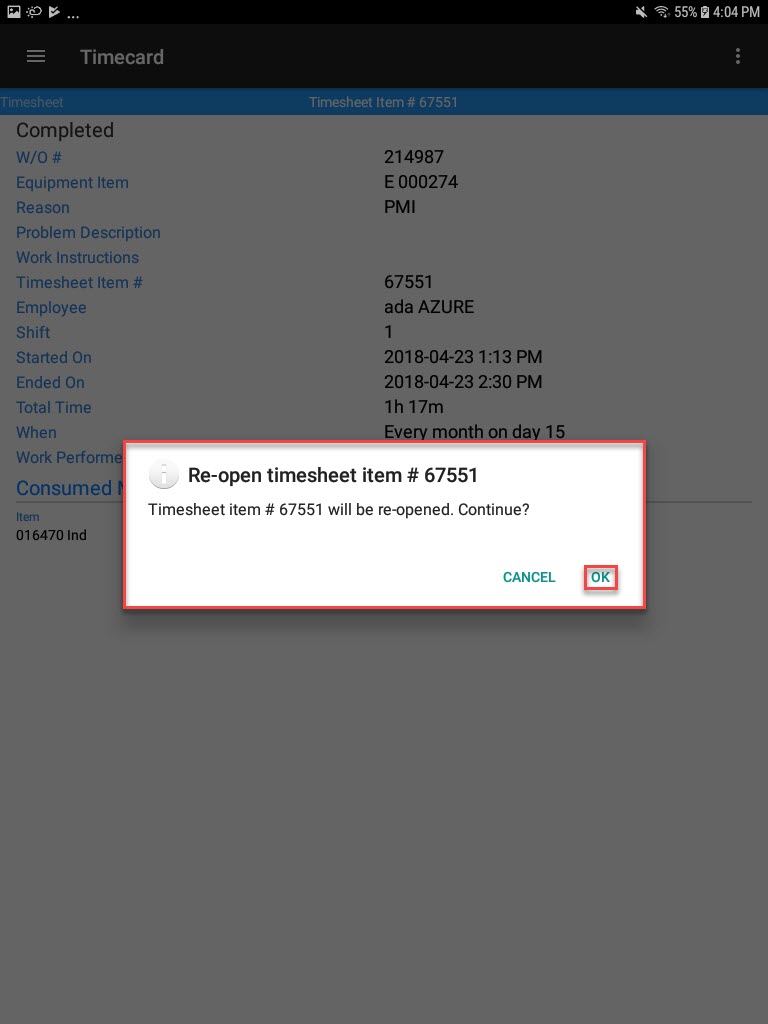
The selected Work Order for the Tooling Timecard will be re-opened.
Deleting a Work Order from a Tooling Timecard
To delete a Work Order from a Tooling Timecard, navigate to the Tooling/Equipment module, and select the Timecard option from the navigation drawer to the left of the screen.

The Timecard Lookup screen will open.

Locate the Tooling Timecard with an assigned Work Order you wish to delete and from the action menu, select Delete.
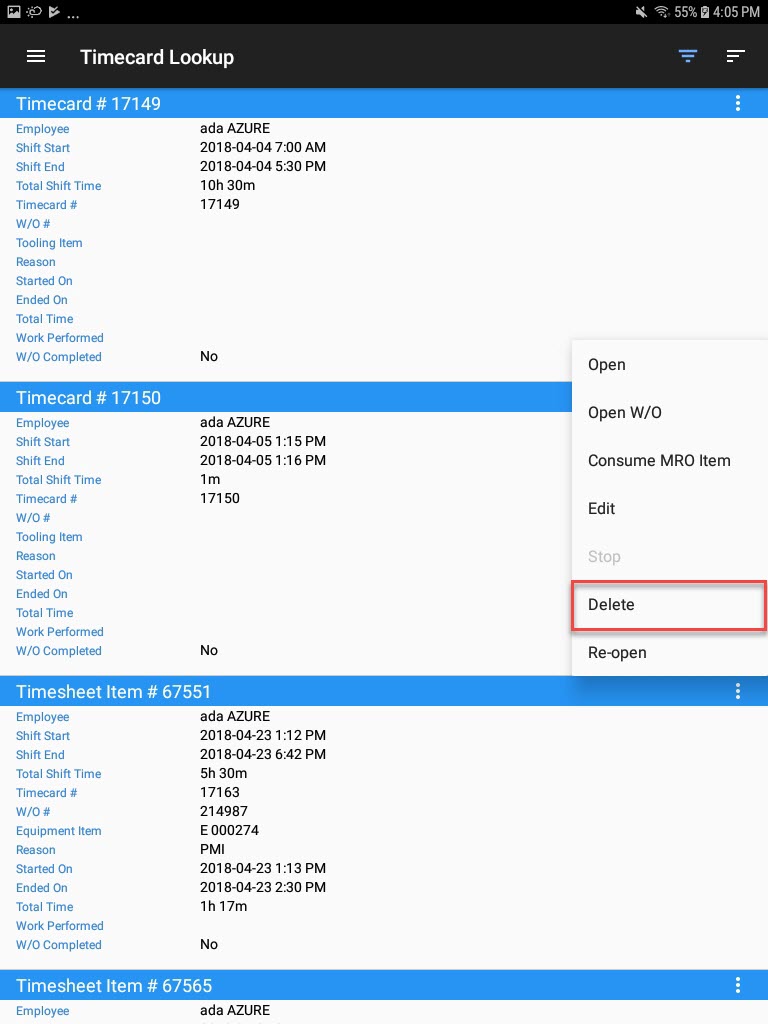
The Delete W/O # ____ window will appear. To continue, select OK.
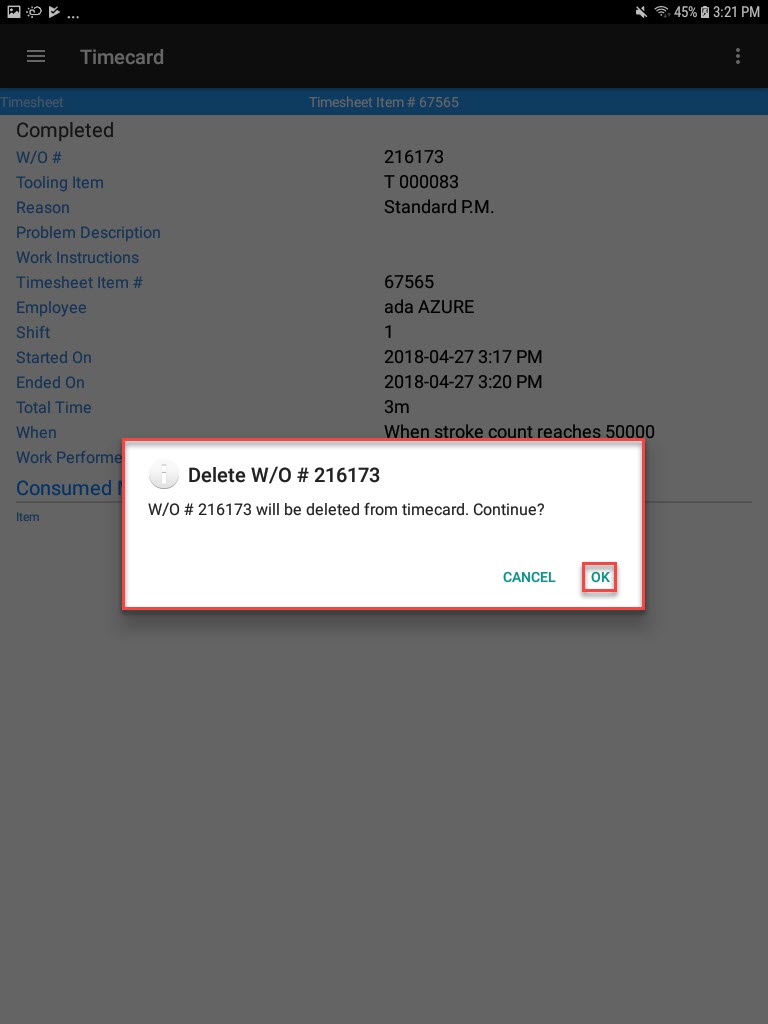
The selected Work Order for the Tooling Timecard will be deleted.
Deleting a Tooling Timecard
To delete a Tooling Timecard, navigate to the Tooling/Equipment module, and select the Timecard option from the navigation drawer to the left of the screen.

The Timecard Lookup screen will open.

Locate the Tooling Timecard you wish to delete and from the action menu, select Delete.
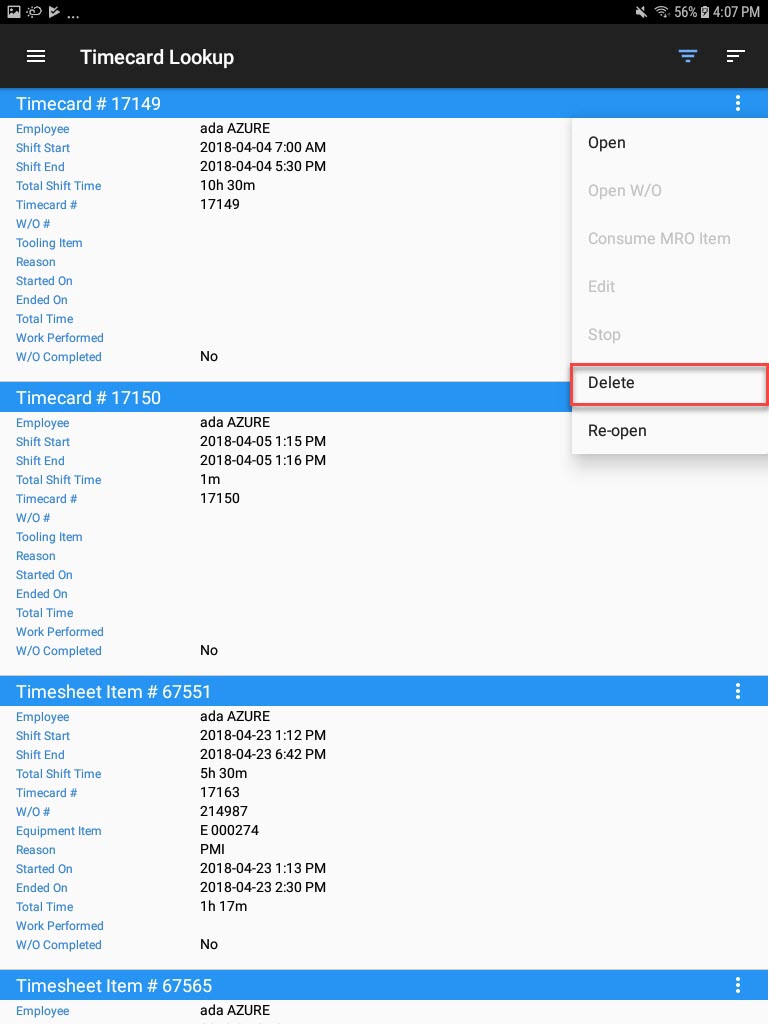
The Delete Timecard # ____ window will appear. To continue, select OK.
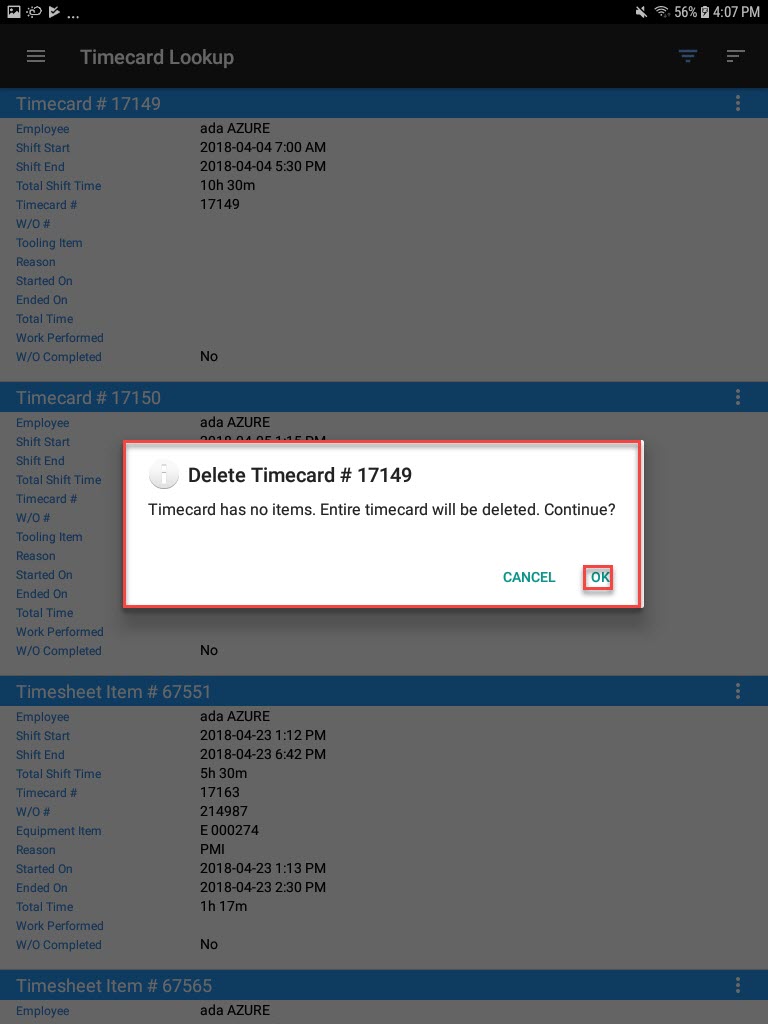
The selected Tooling Timecard will be deleted.
Scanning
To scan Tooling Items, navigate to the Tooling/Equipment module, and select the Scanning option from the navigation drawer to the left of the screen.

The Scanning screen will be displayed.
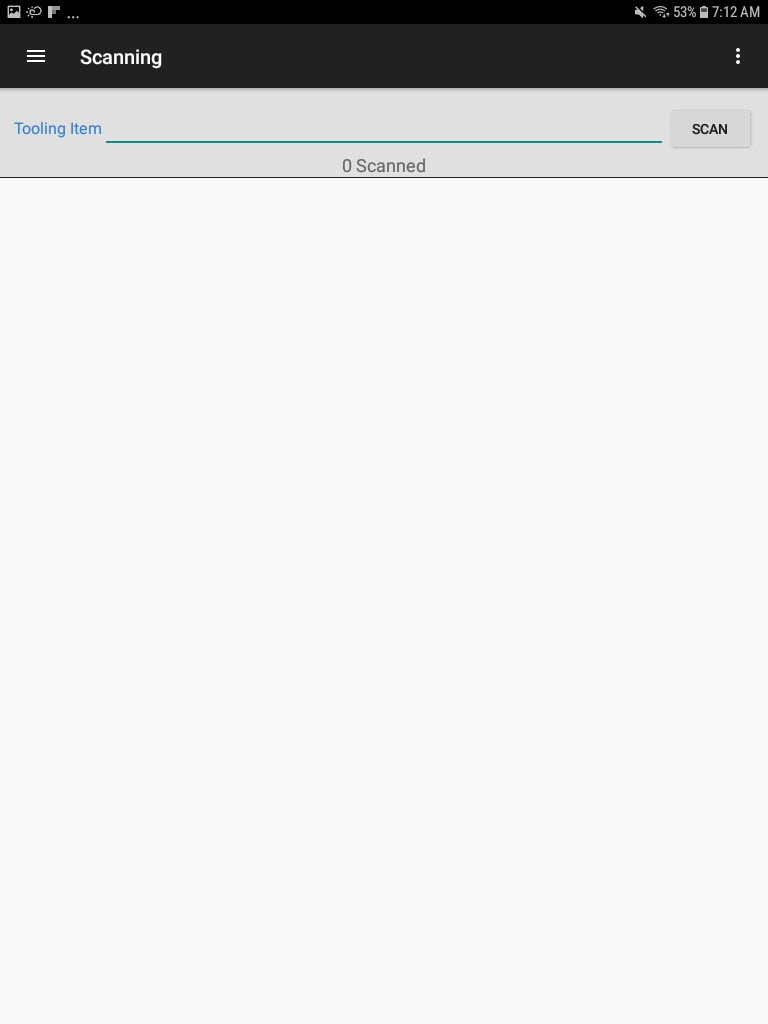
The Scanning screen is used for creating, searching, and maintaining Tooling Items in the system.
Scanning Tooling Items
There are two ways to scan/search for Tooling Items.
The first way is to enter in a Tooling Item, and the second way is to use the scan option.
To do so, navigate to the Tooling/Equipment module, and select the Scanning option from the navigation drawer to the left of the screen.

The Scanning screen will be displayed.

Simply enter in a Tooling Item and select Done from the keyboard or, use the scan option.
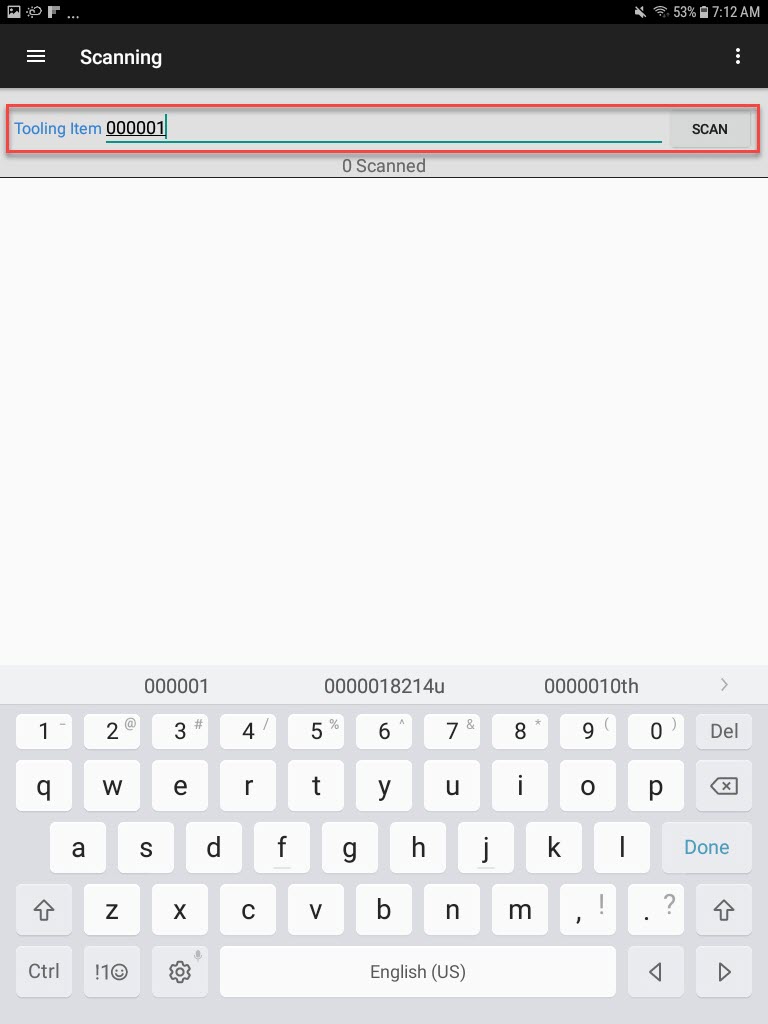
The system will populate the details of the Tooling Item.
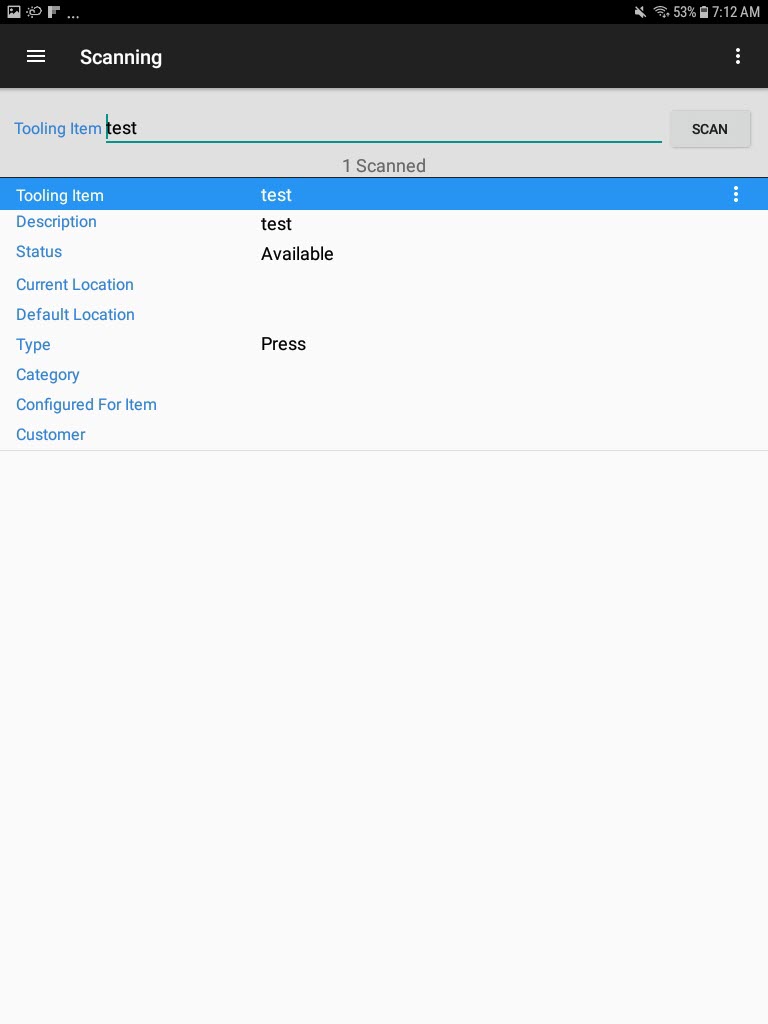
Moving a Scanned Tooling Item to a Location
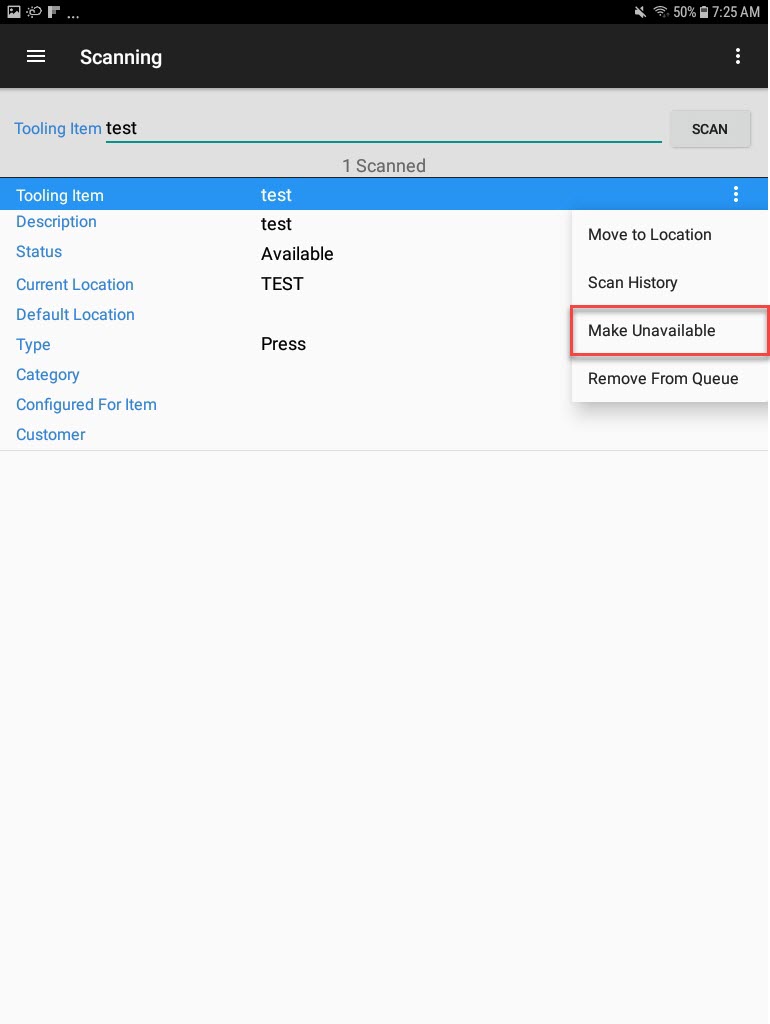
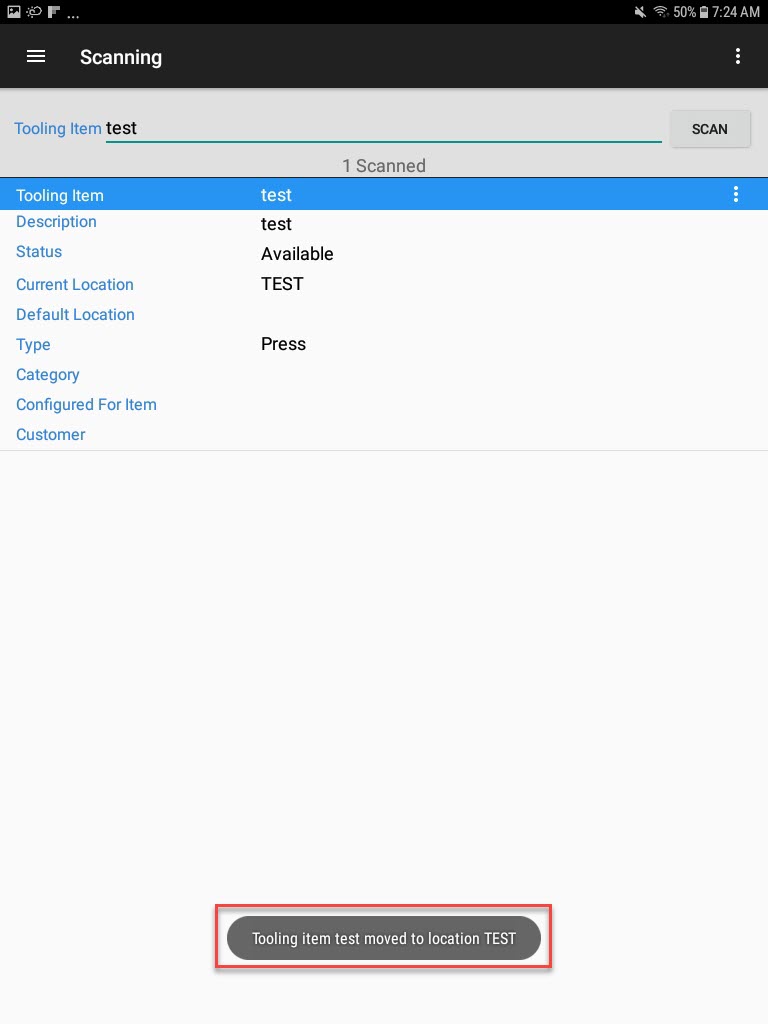
To move a scanned Tooling Item to a different location, from the action menu, select Move to Location.
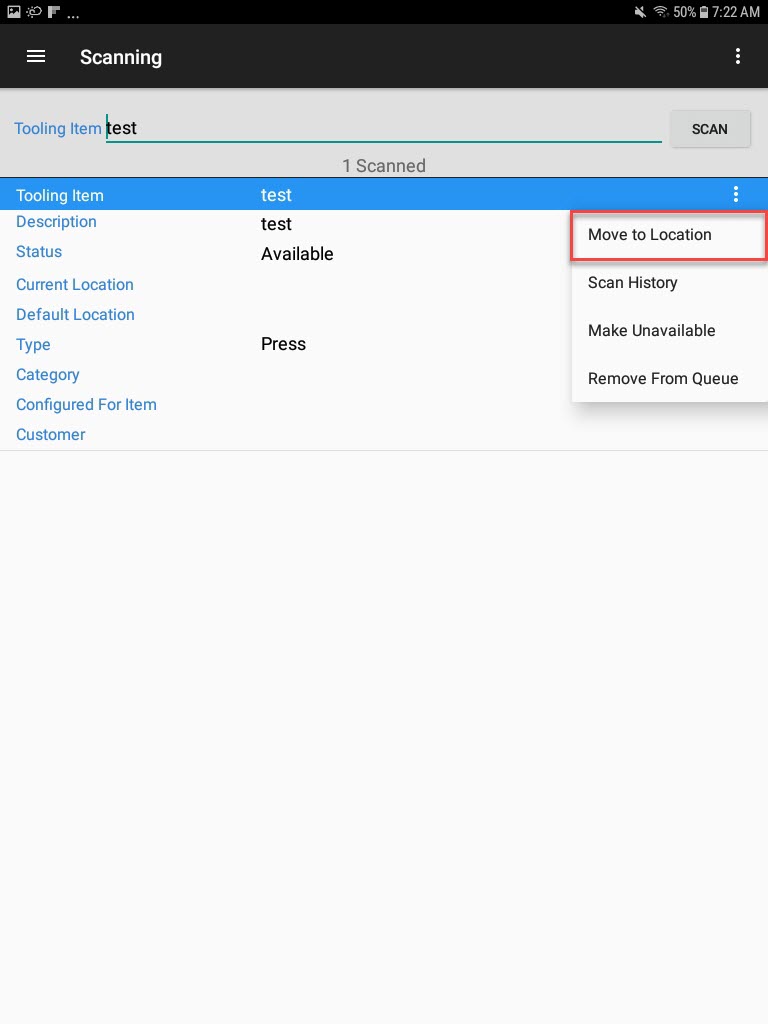
The Move window will appear where users must select a location using the available drop-down menu. Then, select OK.
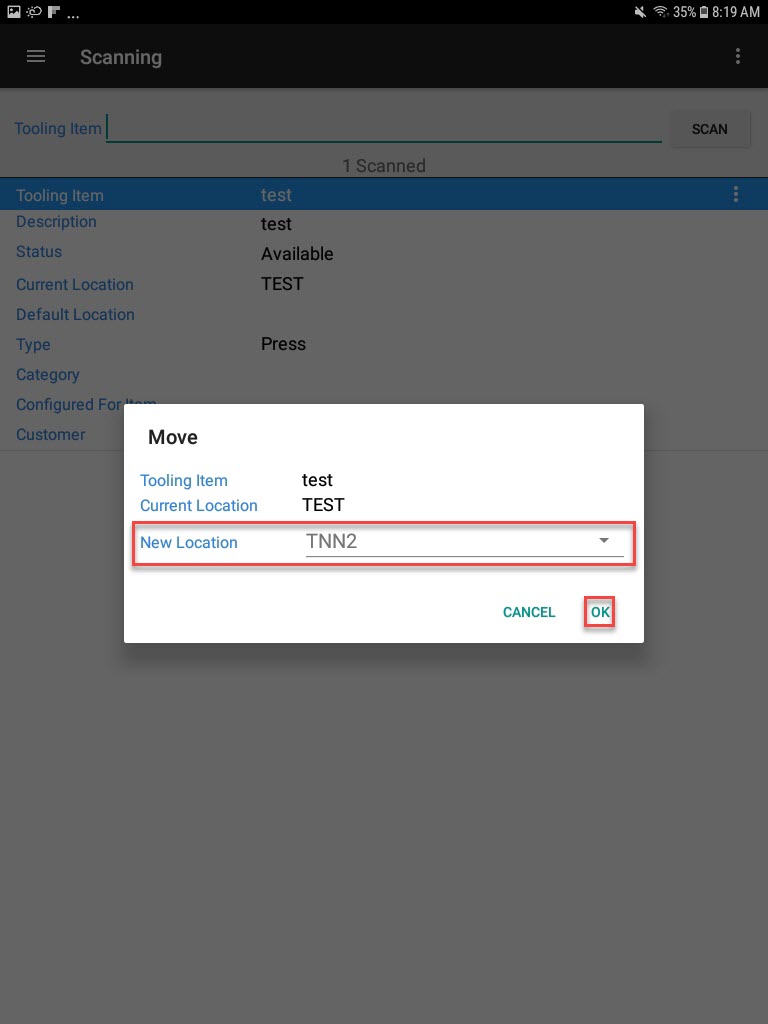
The Tooling Item will be moved to the selected location.
Viewing Scan History of a Tooling Item
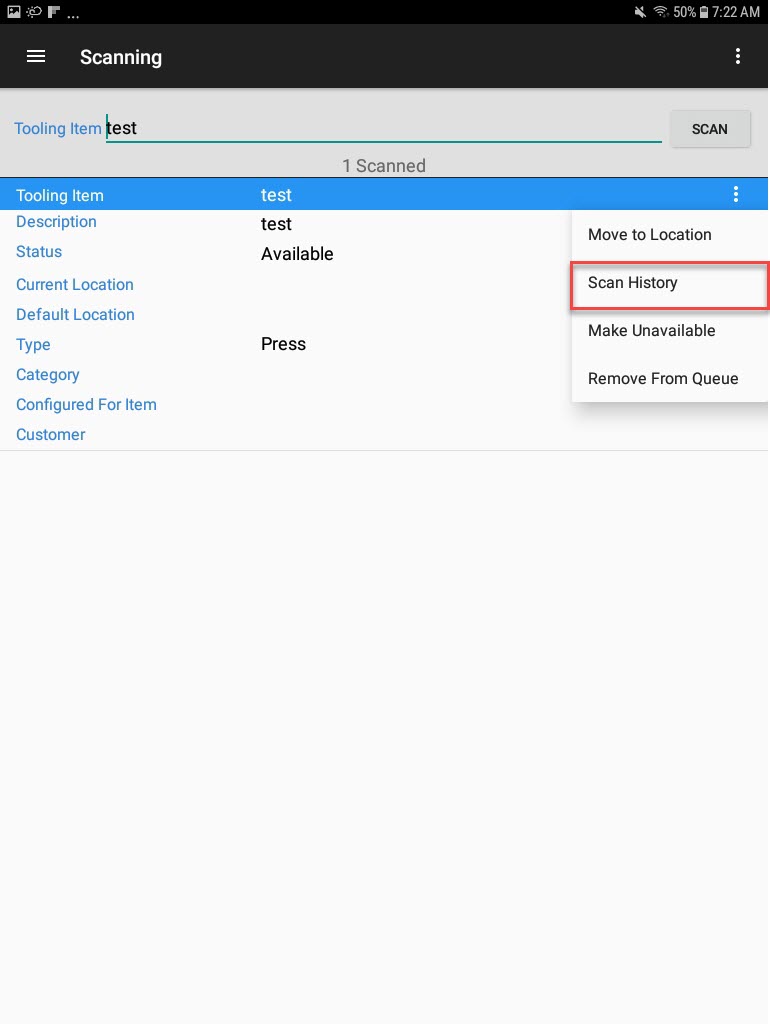
To view the scan history of a Tooling Item, from the action menu, select Scan History.
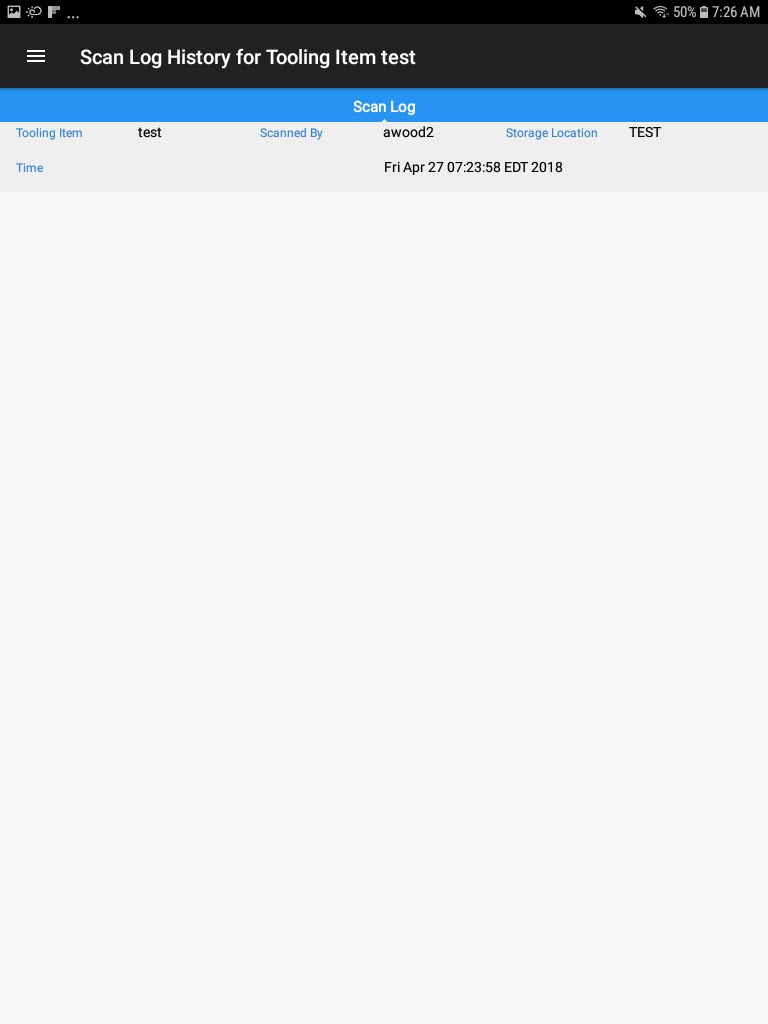
The Scan Log History for Tooling Item ____ screen will appear.
Removing Tooling Items from the Queue
To remove Tooling Items from the Queue, from the action menu, select Remove From Queue.
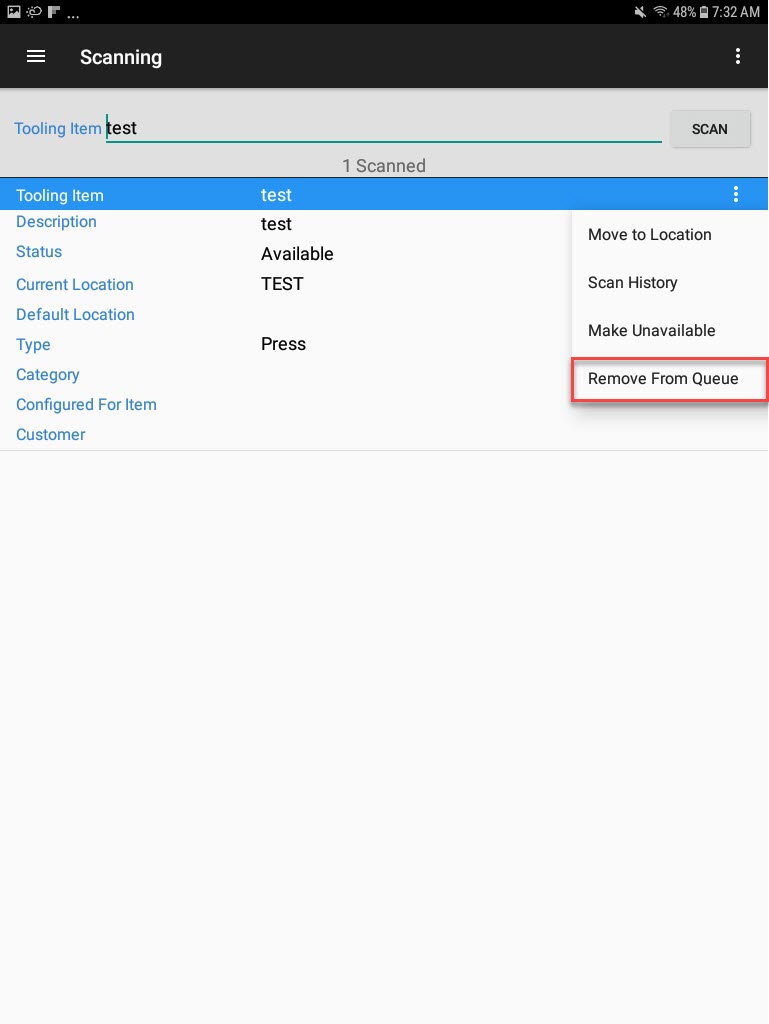
The Tooling Item in the Queue will be cleared.
Clearing the Tooling Item Scanning Queue
To clear all Tooling Items from the Queue, from the Scanning screen action menu, select Clear Queue.
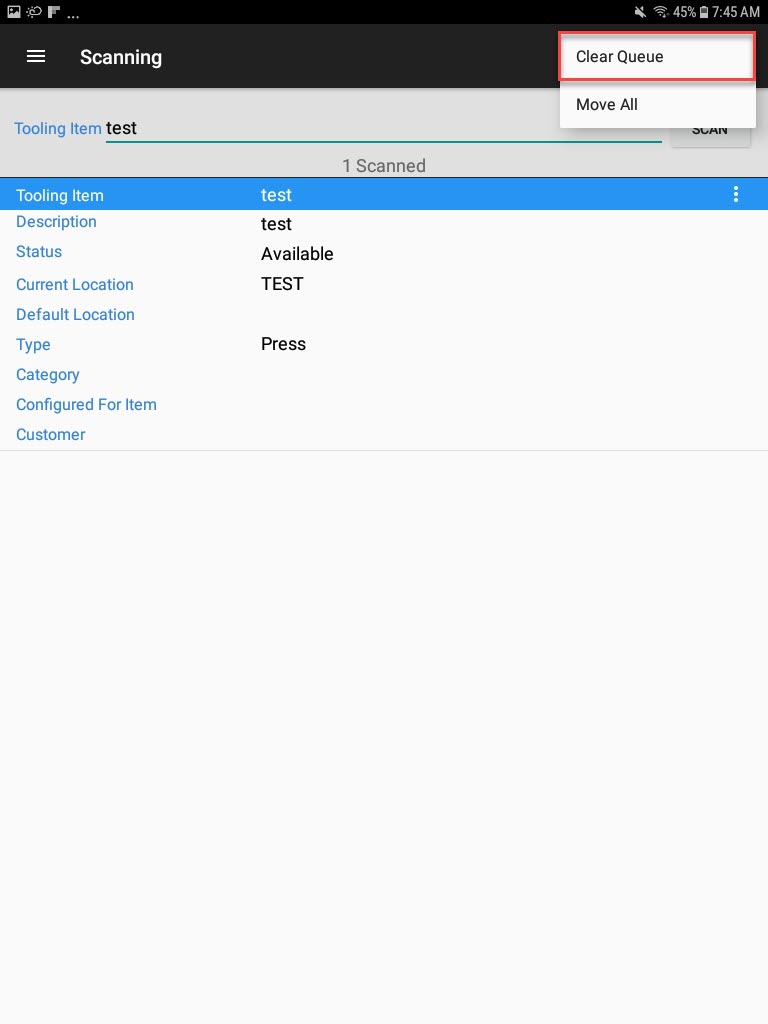
All Tooling Items in the Queue will be cleared.
Moving all Tooling Items in the Tooling Item Scanning Queue
To move all Tooling Items in the Scanning Queue to one location, from the Scanning screen action menu, select Move All.
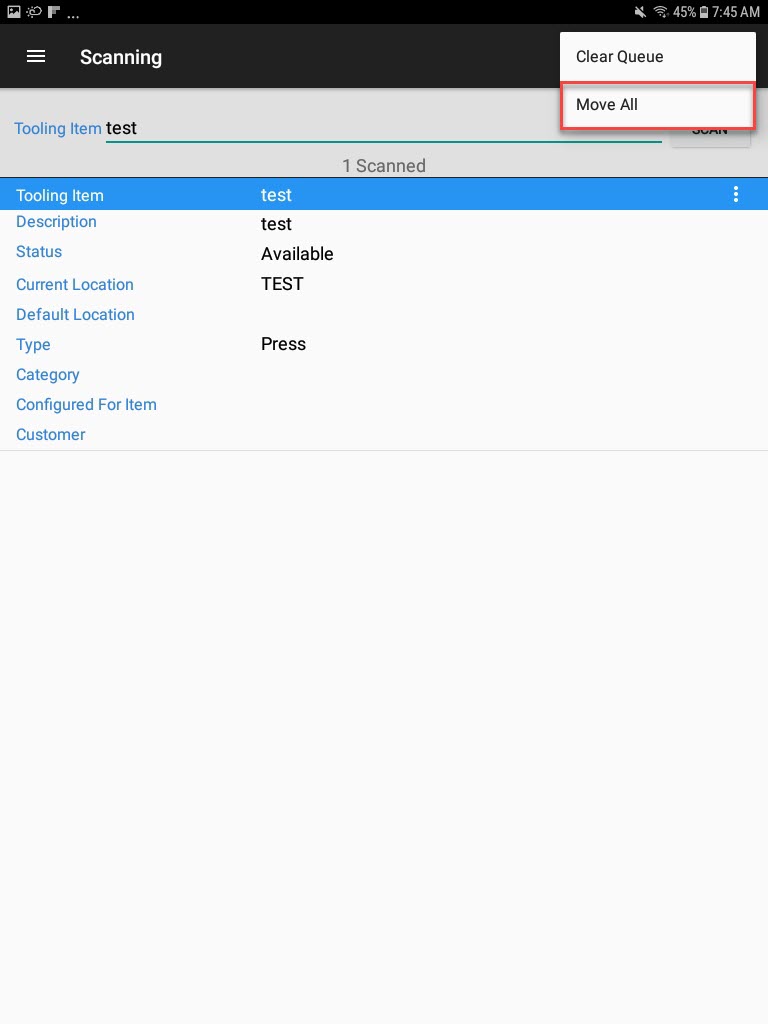
The Move window will appear. Users must select a location using the available drop-down menu.

All of the Tooling Items in the Queue will be moved to the selected location.

MRO Items
To view MRO Items, navigate to the Tooling/Equipment module, and select the MRO Items option from the navigation drawer to the left of the screen.
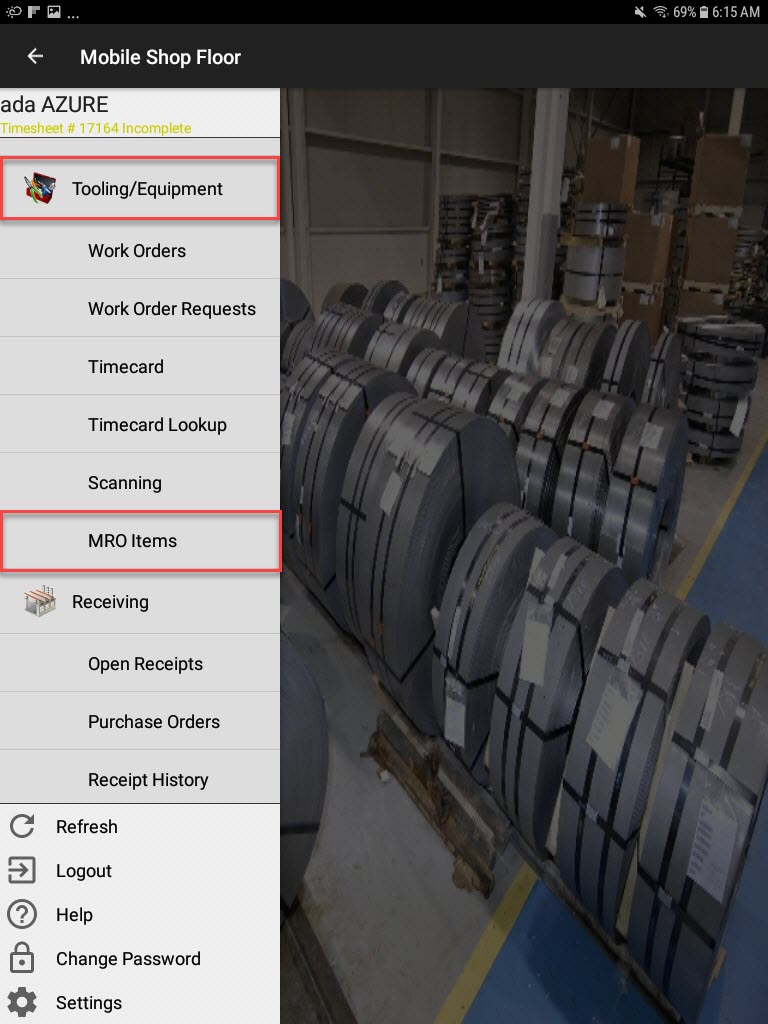
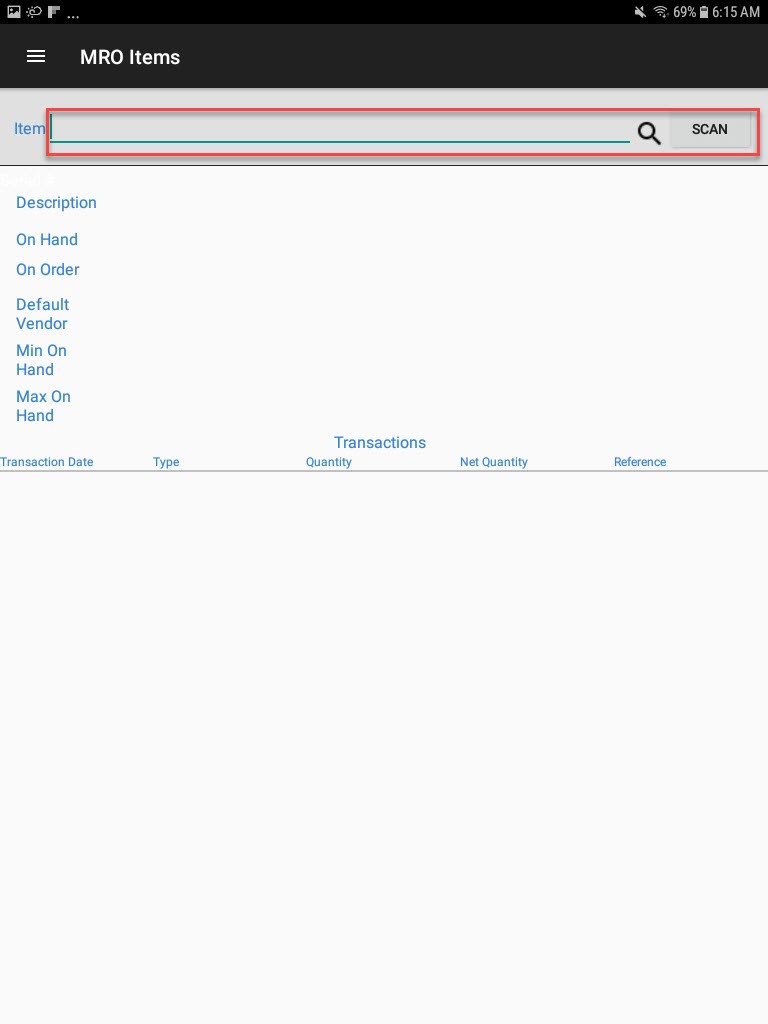
The MRO Items screen will appear.
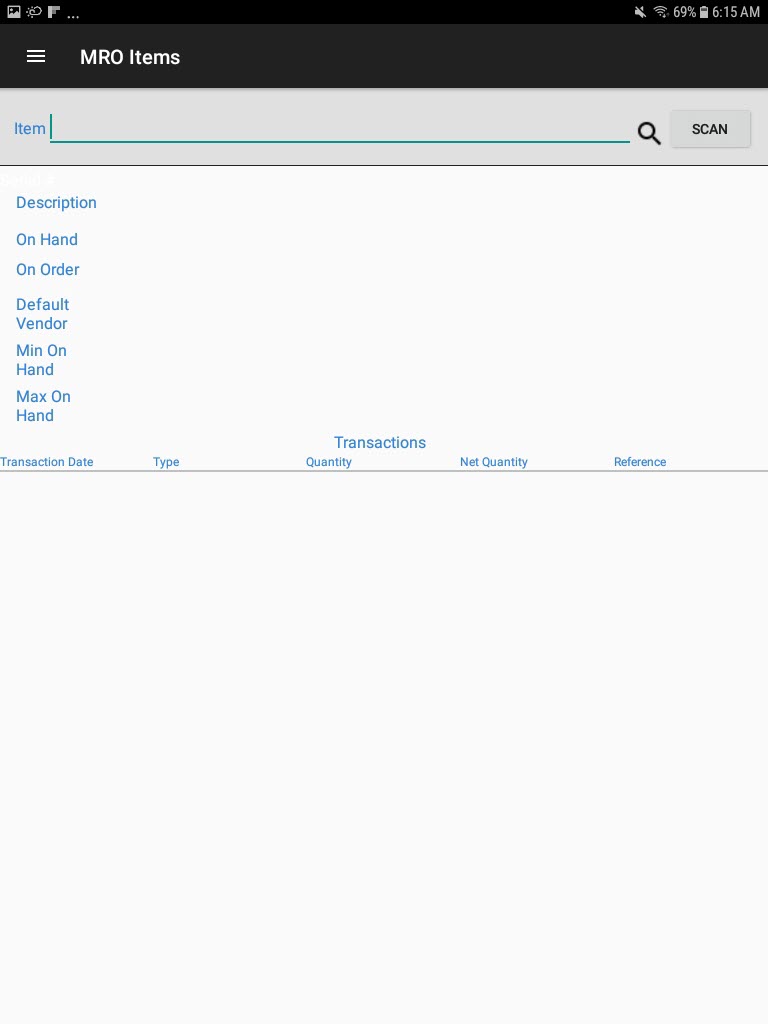
The MRO Item screen is where users can search for MRO Items in the system, and consume and adjust them.
Searching for MRO Items
There are three ways to search for MRO Items on the MRO Items screen.
First, navigate to the Tooling/Equipment module, and select the MRO Items option from the navigation drawer to the left of the screen.

The MRO Items screen will appear.

The first way is to enter in an MRO Item on the line. The second way is to use the search filter, and the last way is to scan an MRO Item using the scan option.
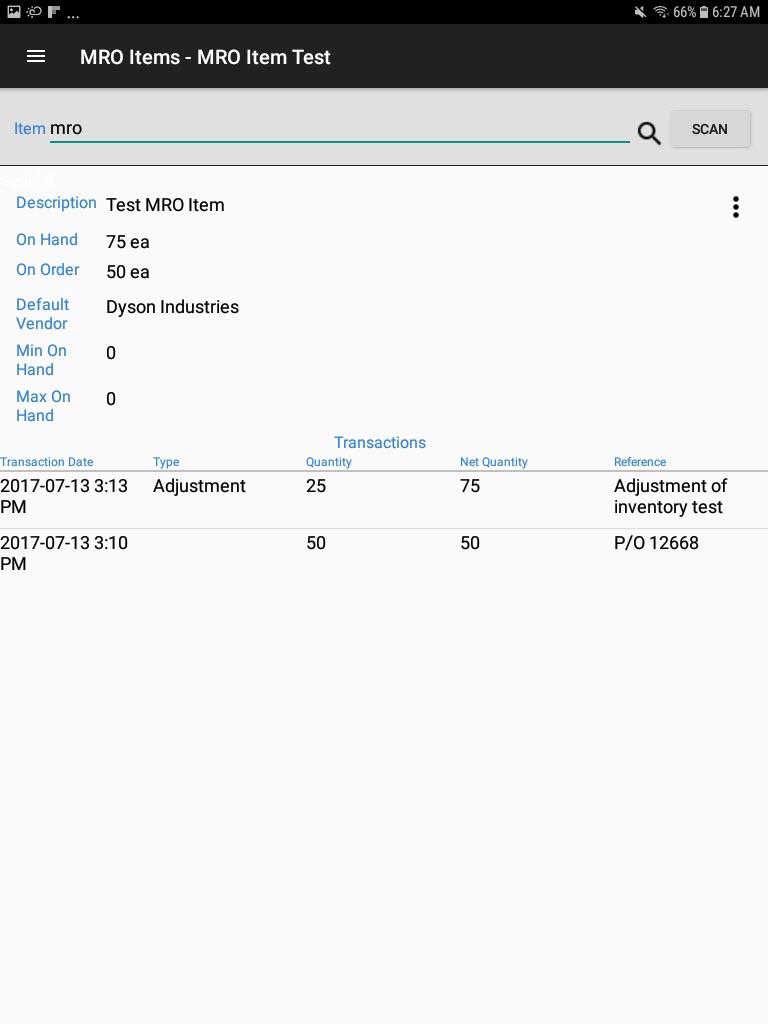
Once users have searched for an MRO Item using one of the three ways, the system will populate the information for the MRO Item.
Consuming MRO Items
To consume an MRO Item, navigate to the Tooling/Equipment module, and select the MRO Items option from the navigation drawer to the left of the screen.

The MRO Items screen will appear.

Once users have searched for an MRO Item using one of the three ways, the system will populate the information for the MRO Item.

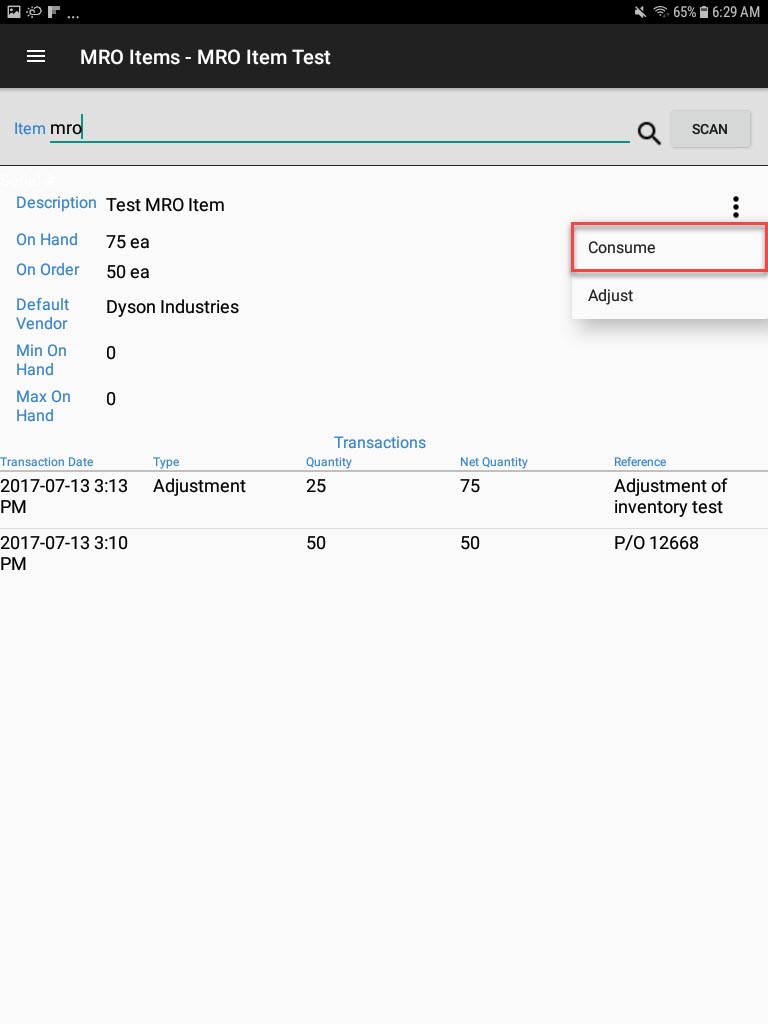
Select Consume from the action menu located to the right of the screen.
The Consume MRO Item screen will be displayed.
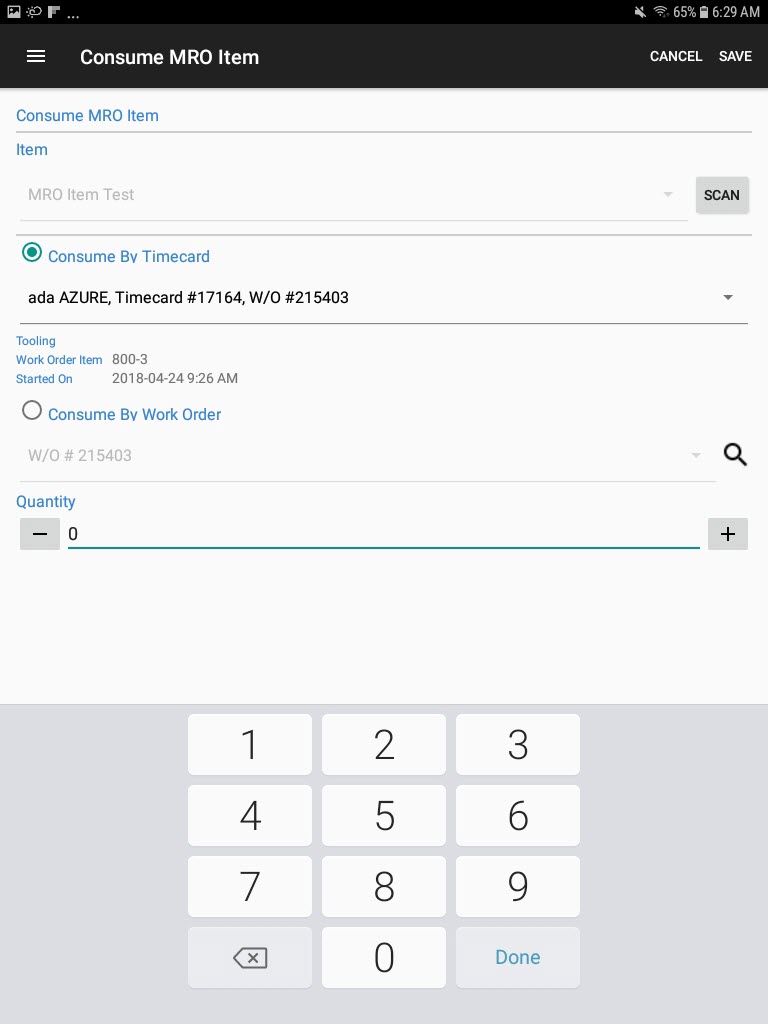
Users can either consume by Timecard, or by Work Order.
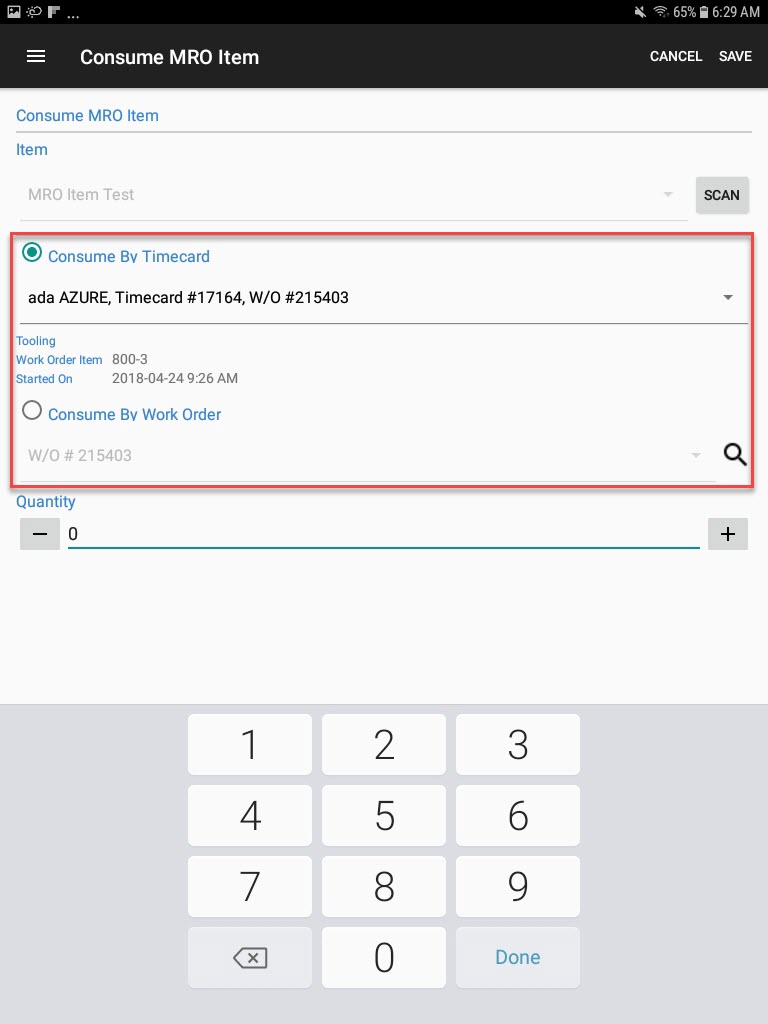
Then, enter in a quantity that is greater than zero and select Save located at the top-right of the screen.
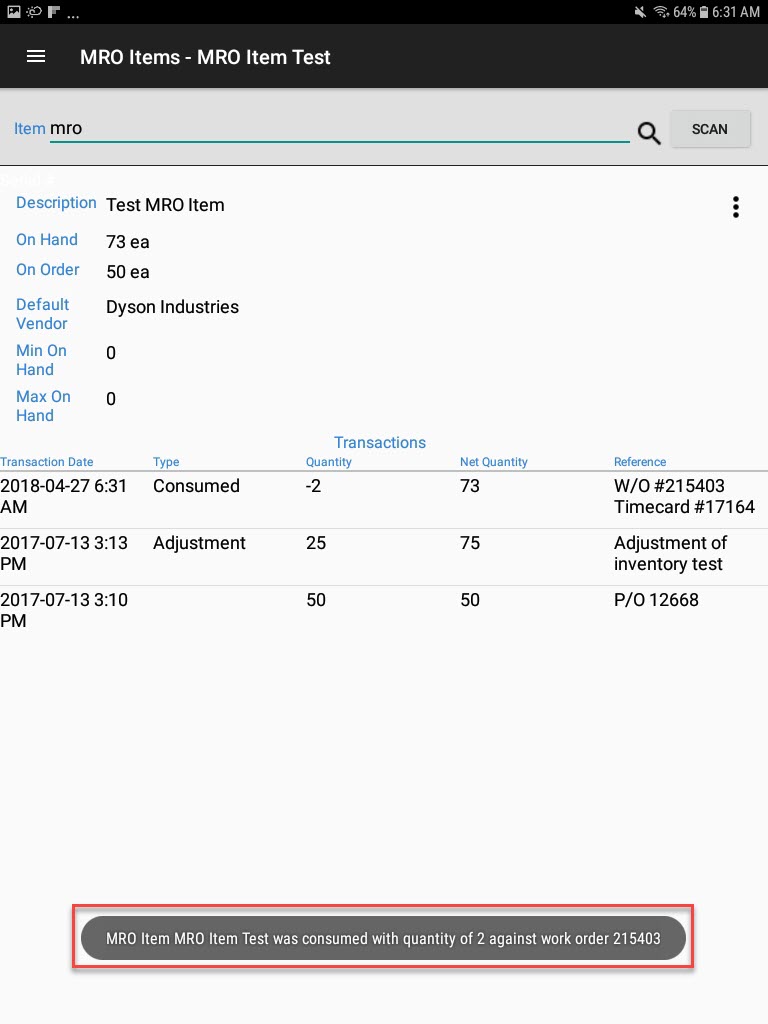
The MRO Item will be consumed.
Adjusting MRO Items
To adjust an MRO Item, navigate to the Tooling/Equipment module, and select the MRO Items option from the navigation drawer to the left of the screen.

The MRO Items screen will appear.

Once users have searched for an MRO Item using one of the three ways, the system will populate the information for the MRO Item.

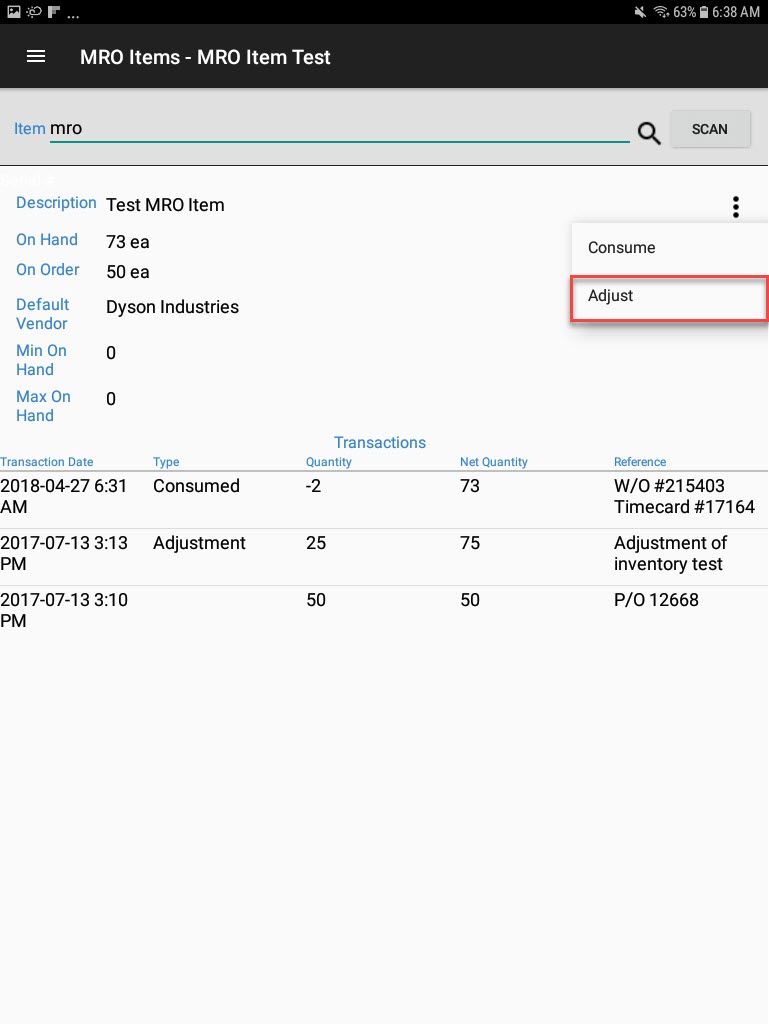
Select Adjust from the action menu located to the right of the screen.
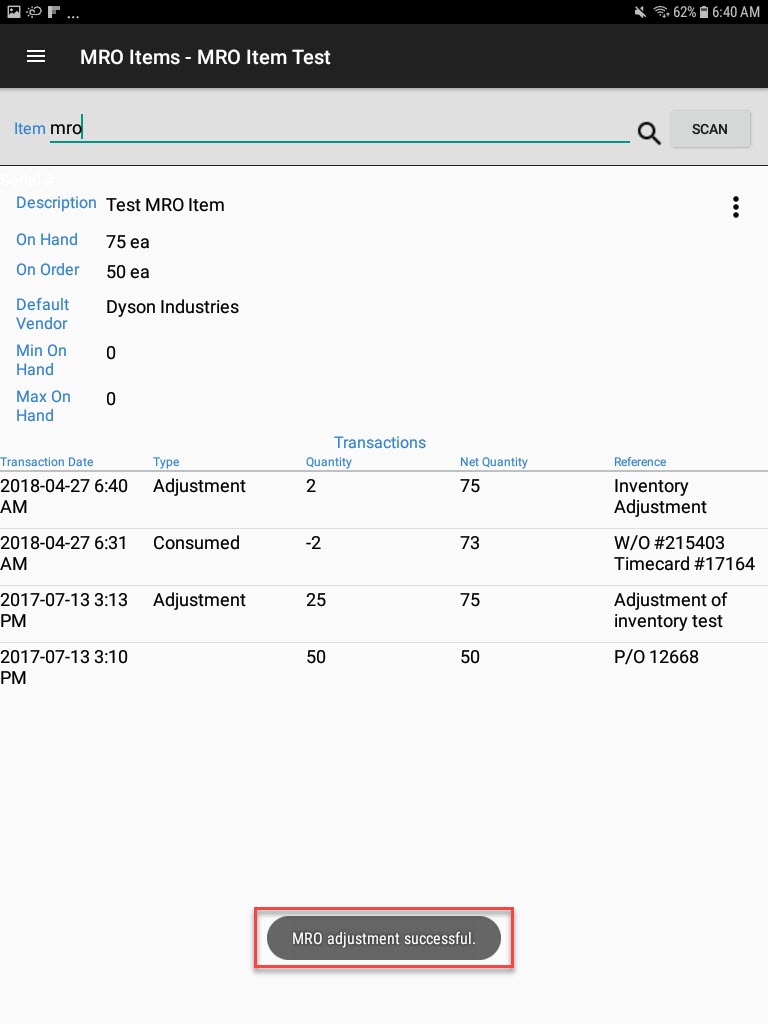
The Adjust MRO Item screen will appear. Select the Reason and enter in a Quantity greater than zero. Then, select Save located at the top-right of the screen.
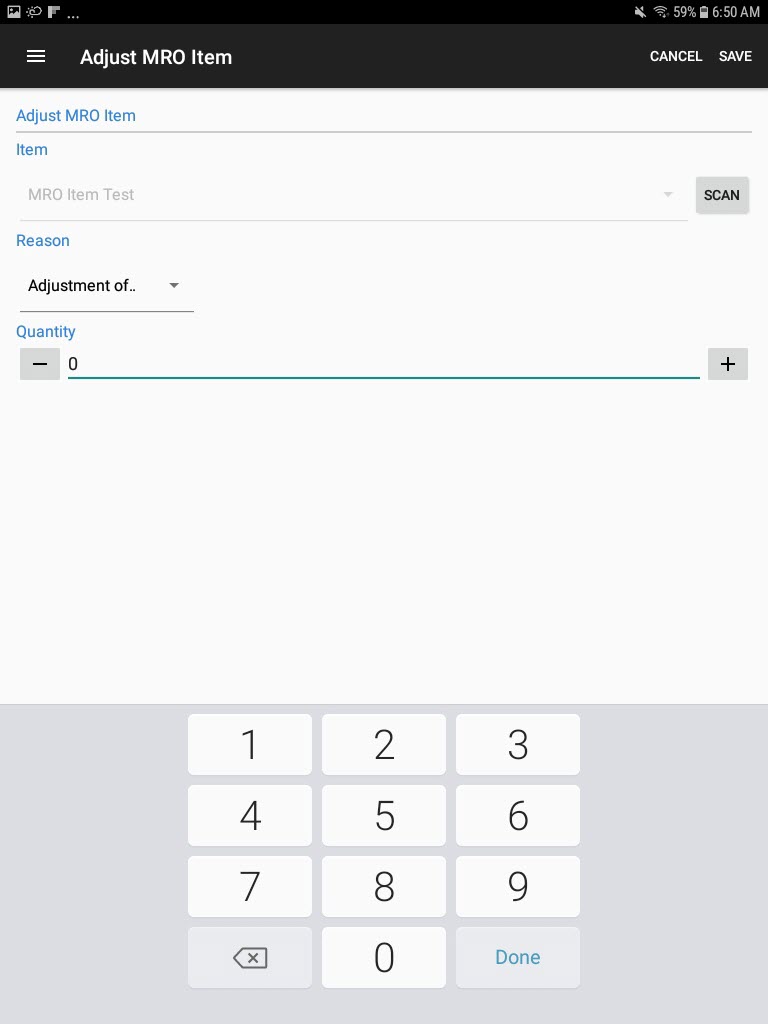
The MRO Item will be adjusted.
