Open Work Orders
The Open Work Orders screen shows a list of all Open Work Orders that are currently in the system. Open Work Orders are created when Planned and Unplanned Maintenance are added to an Equipment Item.
To view all Open Work Orders, navigate to the  tab and click on the
 ![]() icon. The Open Work Orders
lookup screen will be displayed.
icon. The Open Work Orders
lookup screen will be displayed.
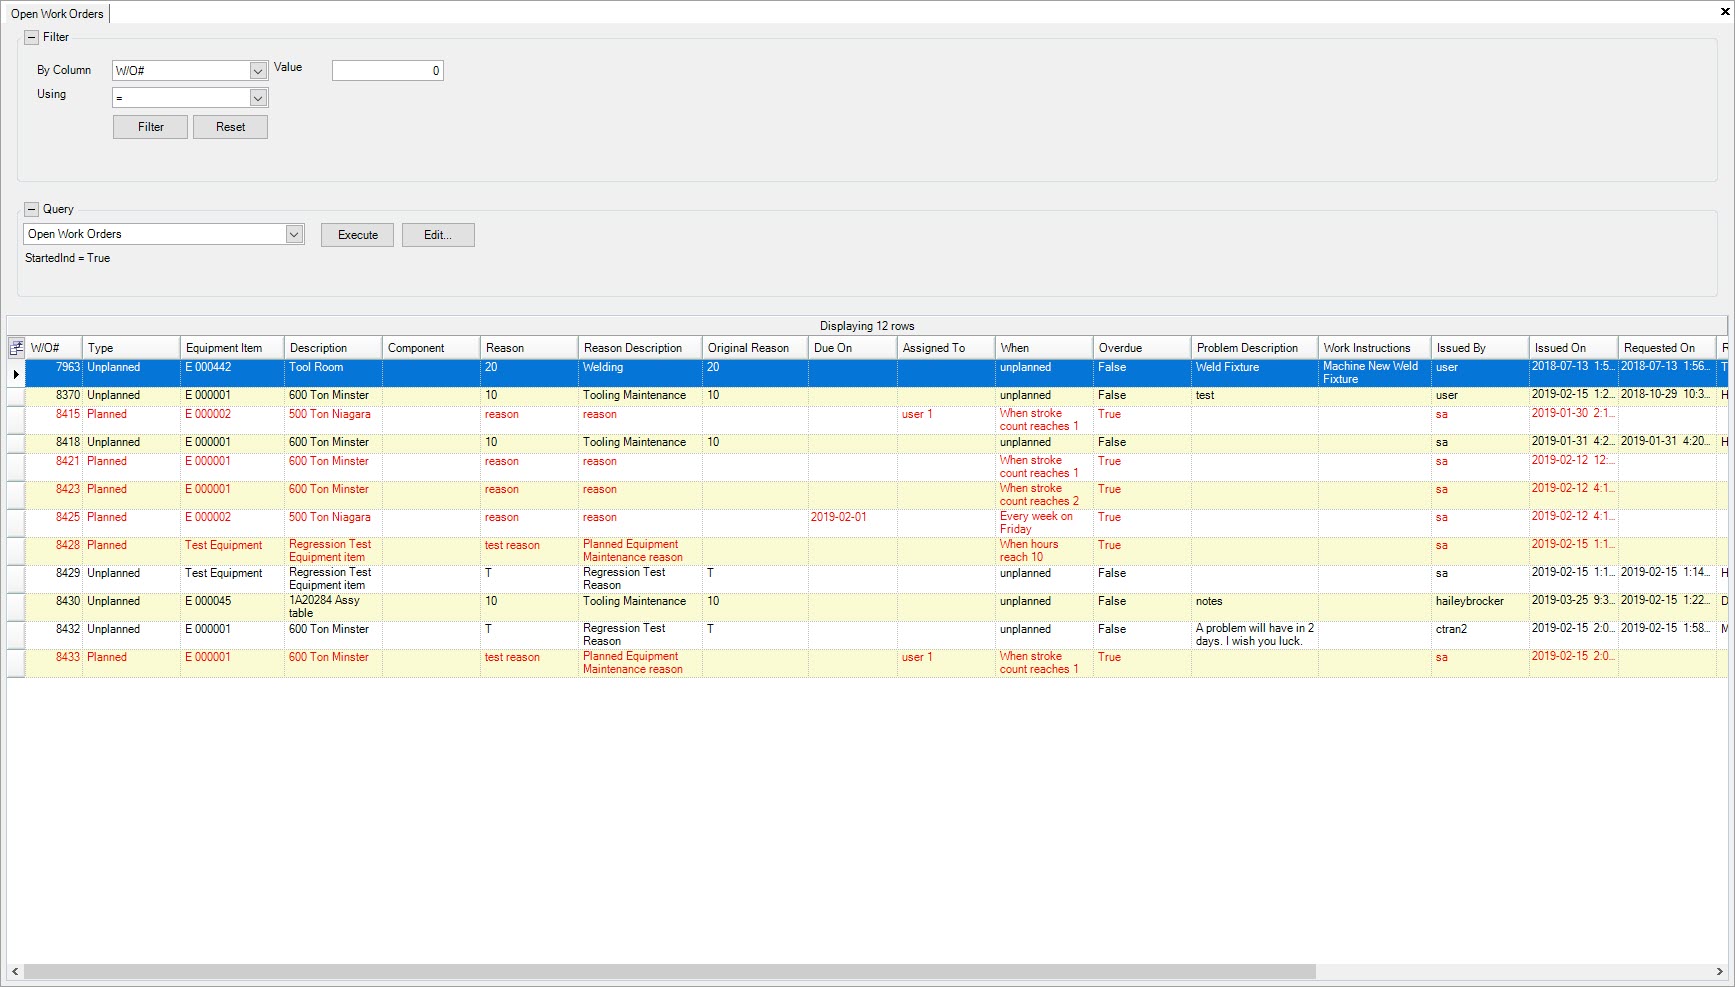
A list of all available Open Work Orders will be displayed.
Viewing an Existing Open Work Order
To view an existing Open Work Order in the system, navigate to the  tab and click on the
 ![]() icon. The
Open Work Orders lookup screen will be displayed.
icon. The
Open Work Orders lookup screen will be displayed.

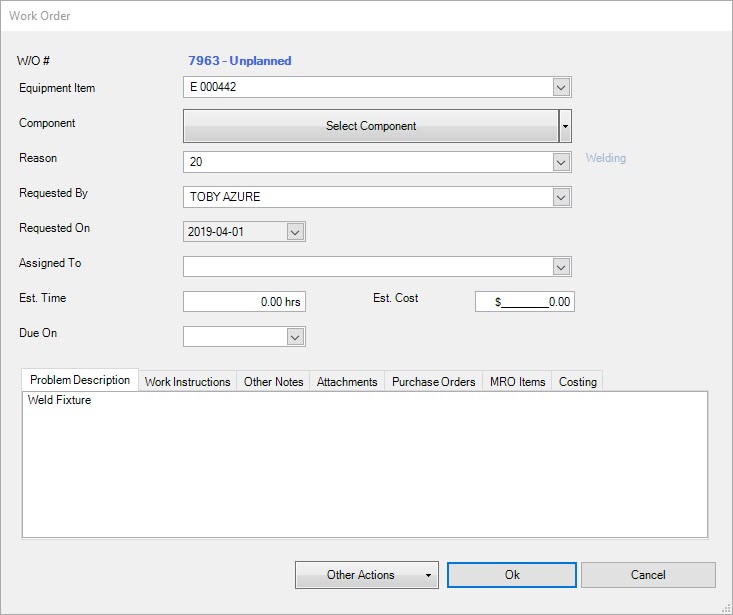
Locate the Open Work Order you wish to view and double-click on the appropriate row.
The Work Order window will be displayed where users are able to view the details regarding the selected Open Work Order.
Creating a New Work Order
To create a new Work Order from the Open Work Orders screen, navigate to the  tab and click on the
 ![]() icon. The Open Work Orders
lookup screen will be displayed.
icon. The Open Work Orders
lookup screen will be displayed.

Right-click anywhere in the list of Open Work Orders and select the New Work Order option from the menu.
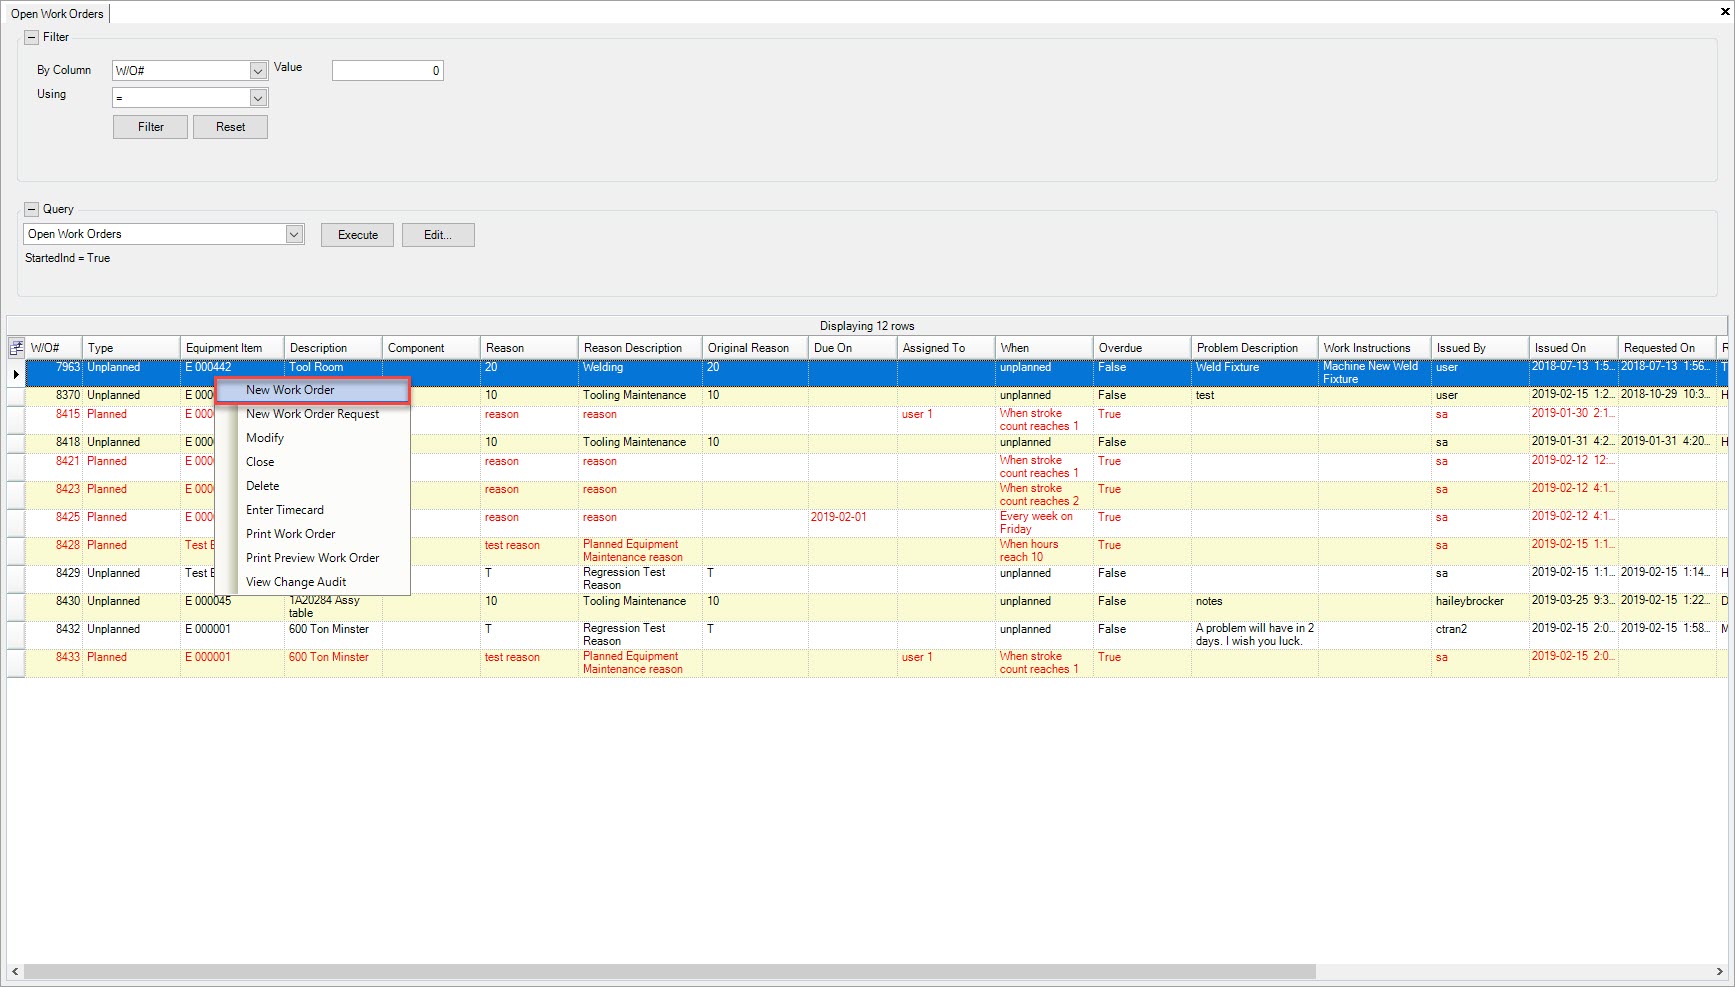
The New Work Order window will appear.
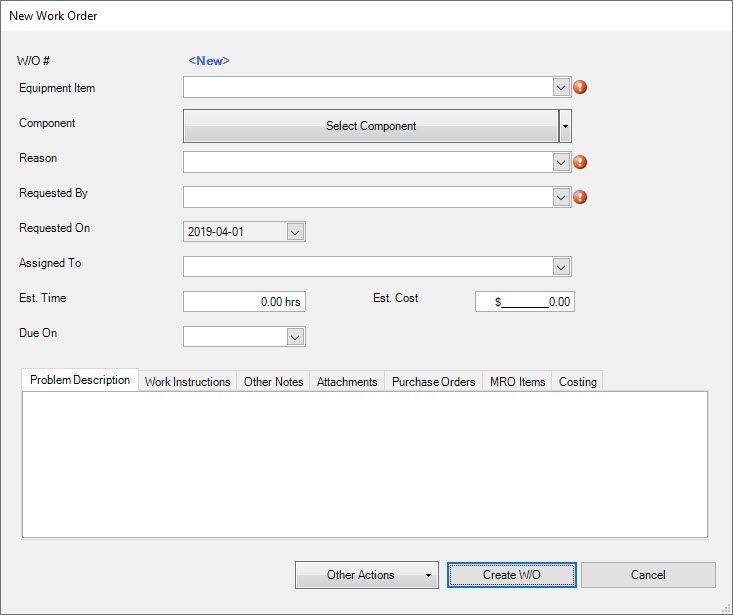
Users must select an Equipment Item, Reason, and Requested By by using the available drop-down menus.
Users can then click on the  button to create the Unplanned Maintenance without completing any other fields.
The New Work Order will be added to the Open Work Orders screen.
Problem Description Tab
Users can enter in a Problem Description when adding a new Work Order on the New Work Order window from the Open Work Orders screen by selecting the
 tab on the New Work Order window.
Enter in a Problem Description using the available textbox.
Note
Users can also edit and delete a Problem Description by making the necessary changes using the available textbox.
Work Instructions Tab
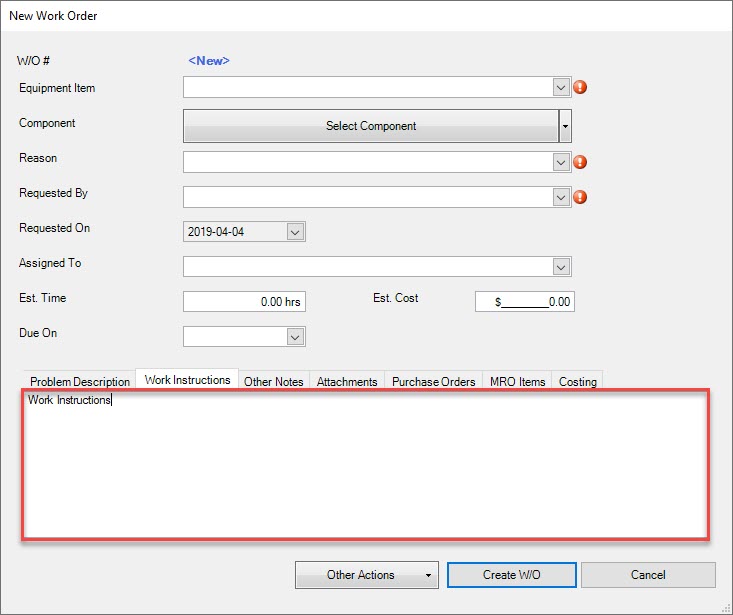
Users can enter in Work Instructions when creating a Work Order in the system on the new Work Order window.
When on the new Work Order window, select the  tab.
tab.
Use the available textbox to enter in any necessary Work Instructions.
Other Notes Tab
Users can add Other Notes when creating a Work Order in the system on the new Work Order window.
When on the new Work Order window, select the  tab.
tab.
To add Other Notes, click on the  button.
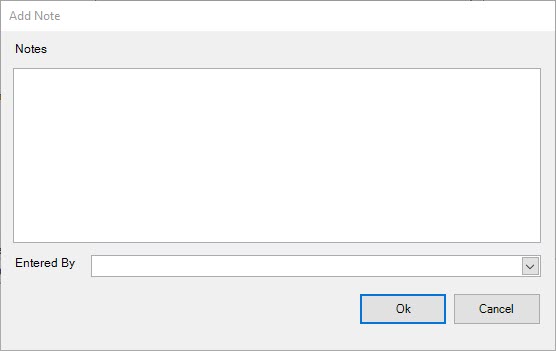
The Add Note window will appear where users can enter in Other Notes for the new Work Order. Users must select an Entered By option and then, click on the  button.
The Other Note will be added to the Work Order.
Attachments Tab
Users have the ability to add or remove Attachments to a new Work Order on the New Work Order window from the Open Work Orders screen by selecting the
 tab.
tab.
Then, click on the  button.
Users are then able to select an Attachment from their computer. Once an Attachment has been selected, click on the  button.
The selected Attachment will be added to the new Work Order.
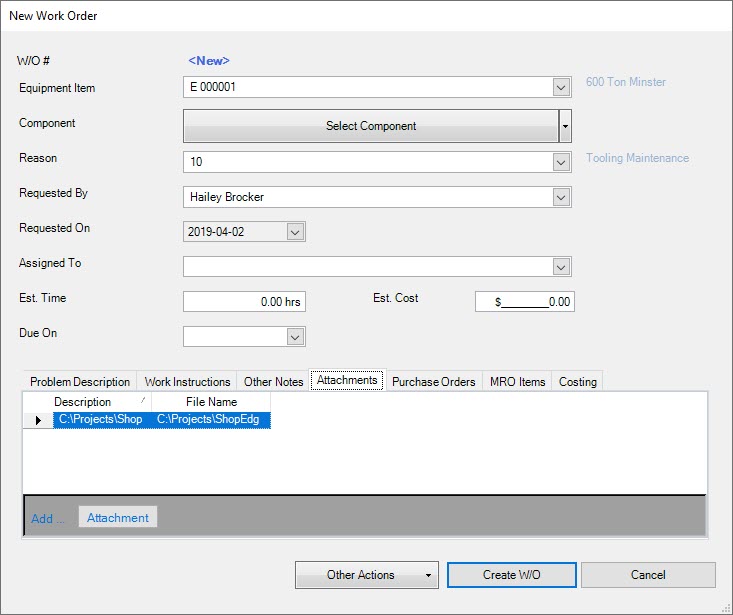
To delete an Attachment from a Work Order, simply highlight the appropriate row and use your Delete key.
The selected Attachment will be deleted.
Purchase Orders Tab
Users have the ability to add or remove Purchase Orders on a new Work Order on the New Work Order window from the Open Work Orders screen by selecting the
 tab.
tab.
Then, click on the  button located at the bottom of the window.
The Purchase Order Lookup window will appear where users can select a Purchase Order. Then, click on the  button.
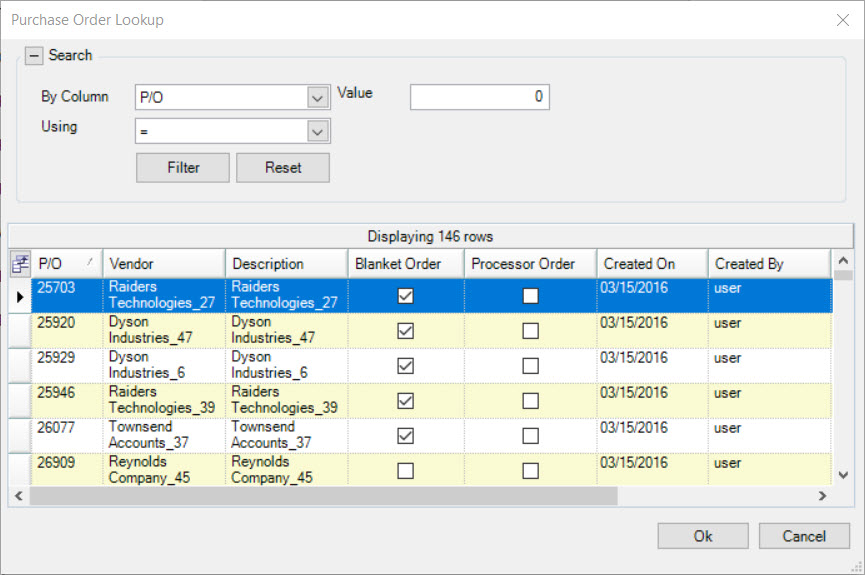
The selected Purchase Order will be added to the new Work Order.
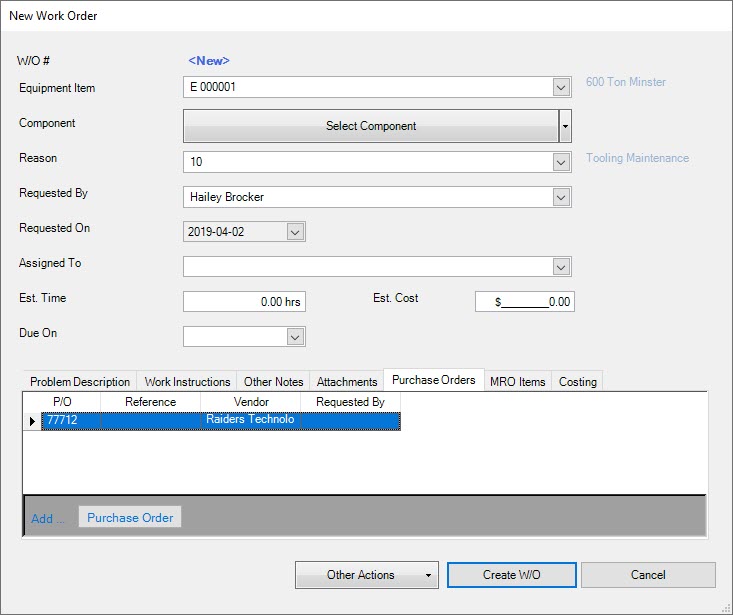
To delete a Purchase Order from a Work Order, simply highlight the appropriate row and use your Delete key.
The selected Purchase Order will be deleted.
MRO Items Tab
Users have the ability to add or remove MRO Items on a new Work Order on the New Work Order window from the Open Work Orders screen by selecting the
 tab.
tab.
Then, click on the  button located at the bottom of the window.
The Item Lookup window will appear where users can select an MRO Item. Then, click on the  button.
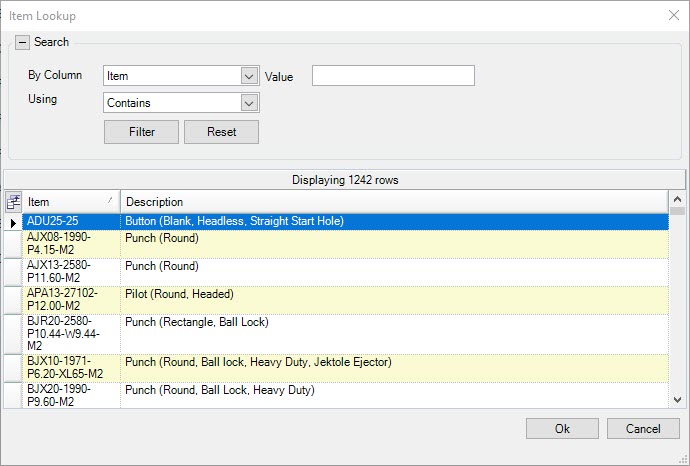
The selected MRO Item will be added to the Open Work Orders screen.
Note
When an MRO Item has been added, users have the ability to enter in a Quantity using the available textbox under the Quantity column.
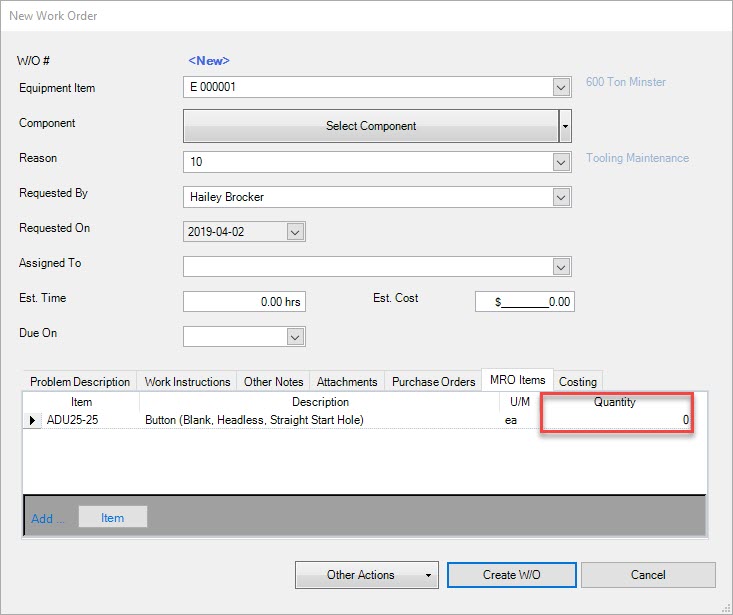
To delete an MRO Item from a Work order, simply highlight the appropriate row and use your Delete key.
The selected MRO Item will be deleted.
Costing Tab
Users have the ability to add an Item and Production Job # to a new Work Order on the New Work Order window from the Open Work Orders screen by selecting the
 tab.
tab.
Then, select an Item using the available drop-down menu and enter in a Production Job #.
Once all the necessary header information and tabs have been completed, click on the  button.
The new Work Order will be added to the Open Work Orders screen and a Work Order will be created.
Note
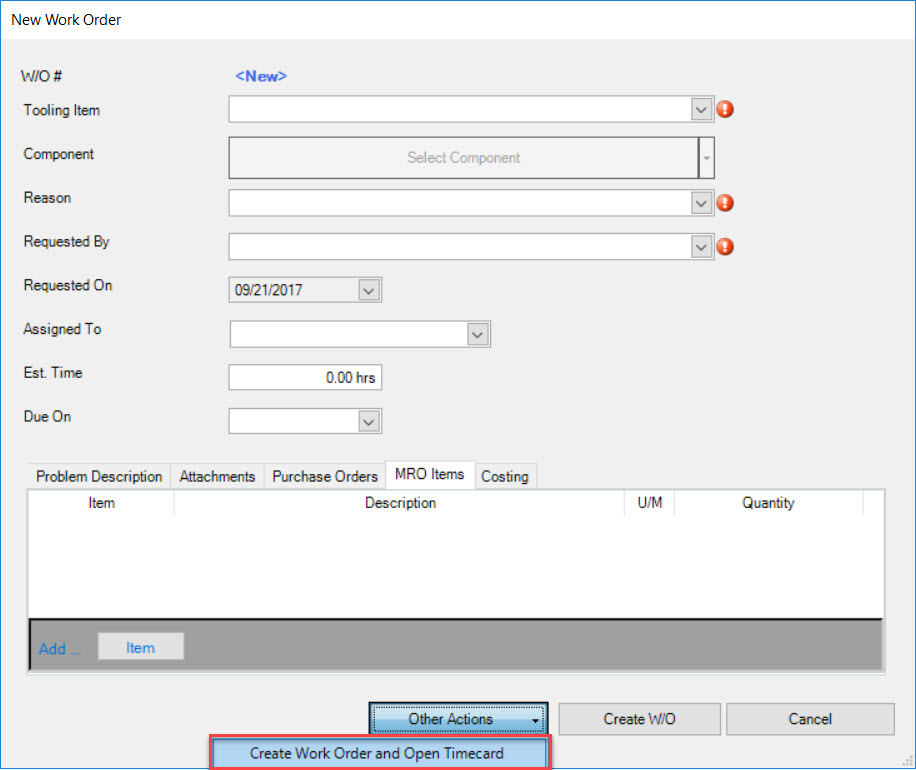
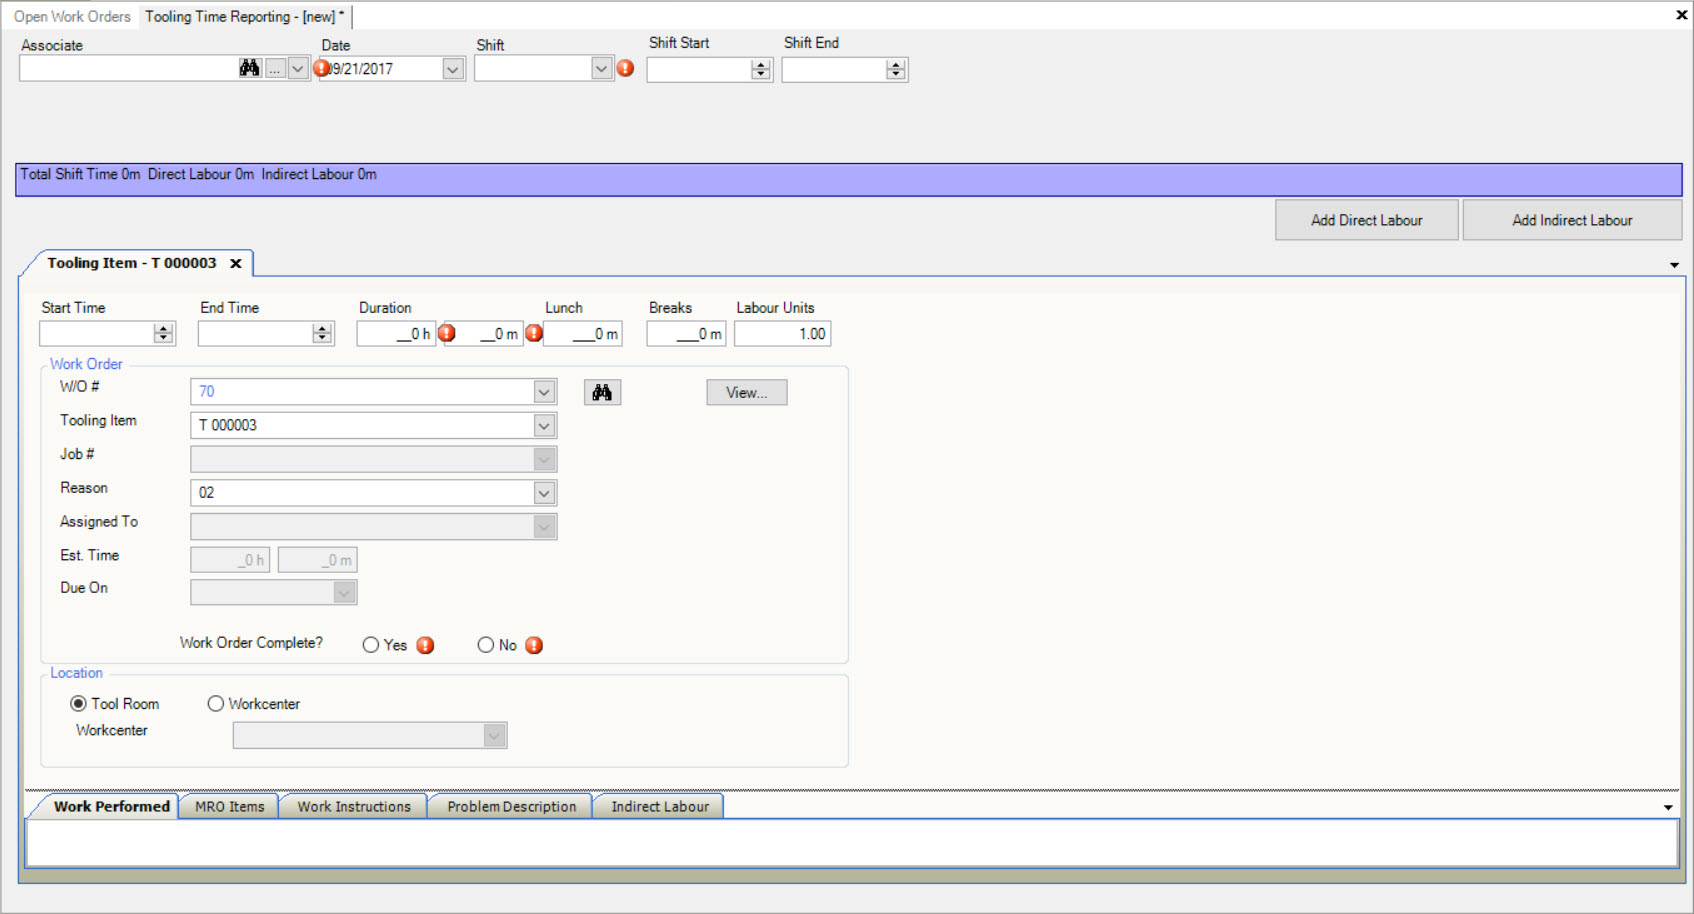
Users also have the option to click on the  button and select the Create Work Order and Open Timecard option. This will add the Work Order to the Open Work Orders screen and then open a new Timecard for the Work Order. For more information on how to create a Timecard, please see Equipment > Timecard Entry > Creating a New Timecard.
Creating a New Work Order Request
To create a new Work Order Request from the Open Work Orders screen, navigate to the  tab and click on the
 ![]() icon. The Open Work Orders
lookup screen will be displayed.
icon. The Open Work Orders
lookup screen will be displayed.

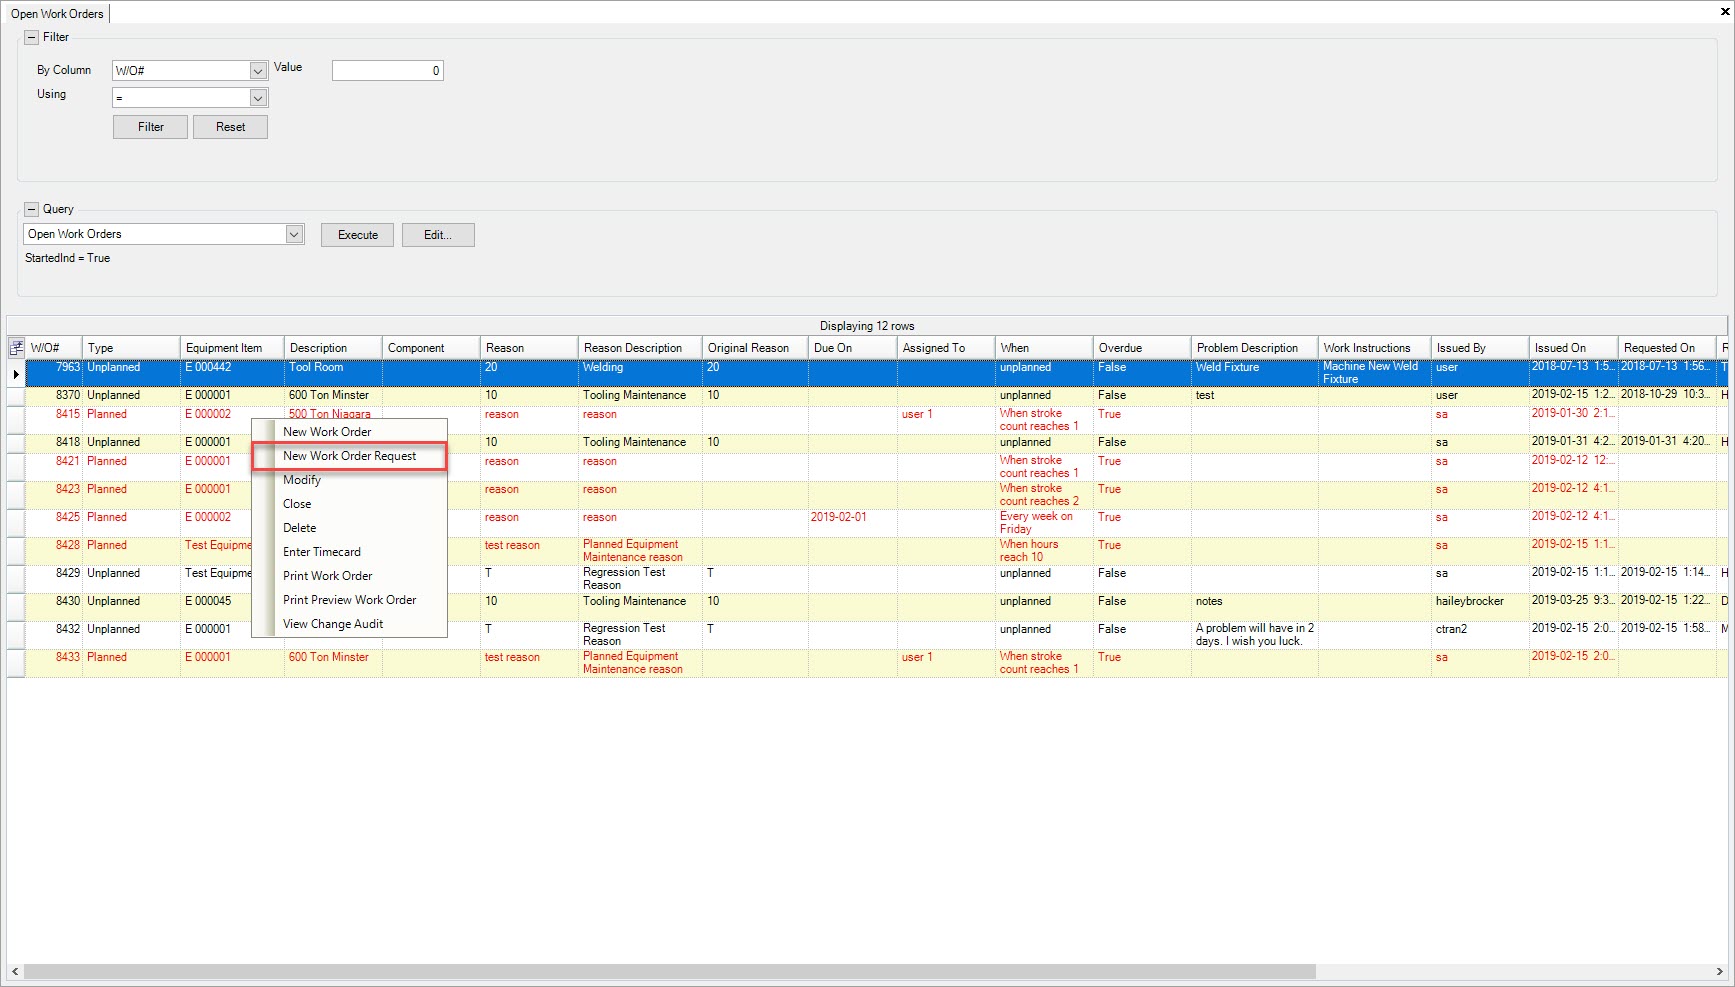
Right-click anywhere in the list of Open Work Orders and select the New Work Order Request option.
The New Work Order Request window will appear.
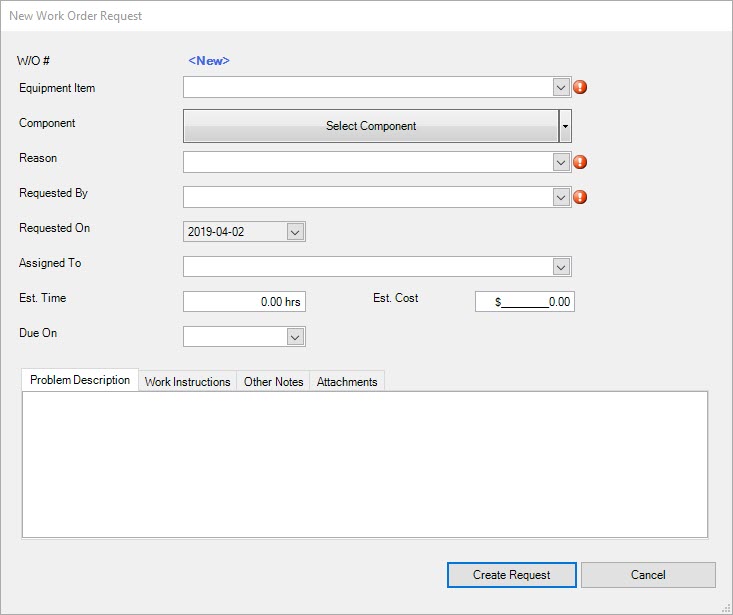
Users must select an Equipment Item, Reason, and Request By by using the available drop-down menus. A Problem Description must be entered under the  tab using the available textbox.
If users wish to add an Attachment to a new Work Order Request, make sure to select the  tab.
tab.
Then, click on the  button located at the bottom of the window.
Users will then be able to select an Attachment from their computer. Once an Attachment has been selected, click on the  button.
The selected Attachment will be added to the Work Order Request.
Note
To delete an Attachment from a Work Order Request, simply locate the Attachment you wish to delete and highlight the appropriate row. Use your Delete key and the Attachment will be deleted.
Once the necessary fields and tabs have been completed, users can then click on the  button.
The Work Order Request will be added to the Manage Work Order Requests screen.
Modifying an Open Work Order
To modify an Open Work Order, navigate to the  tab and click on the
 ![]() icon. The Open Work Orders
lookup screen will be displayed.
icon. The Open Work Orders
lookup screen will be displayed.

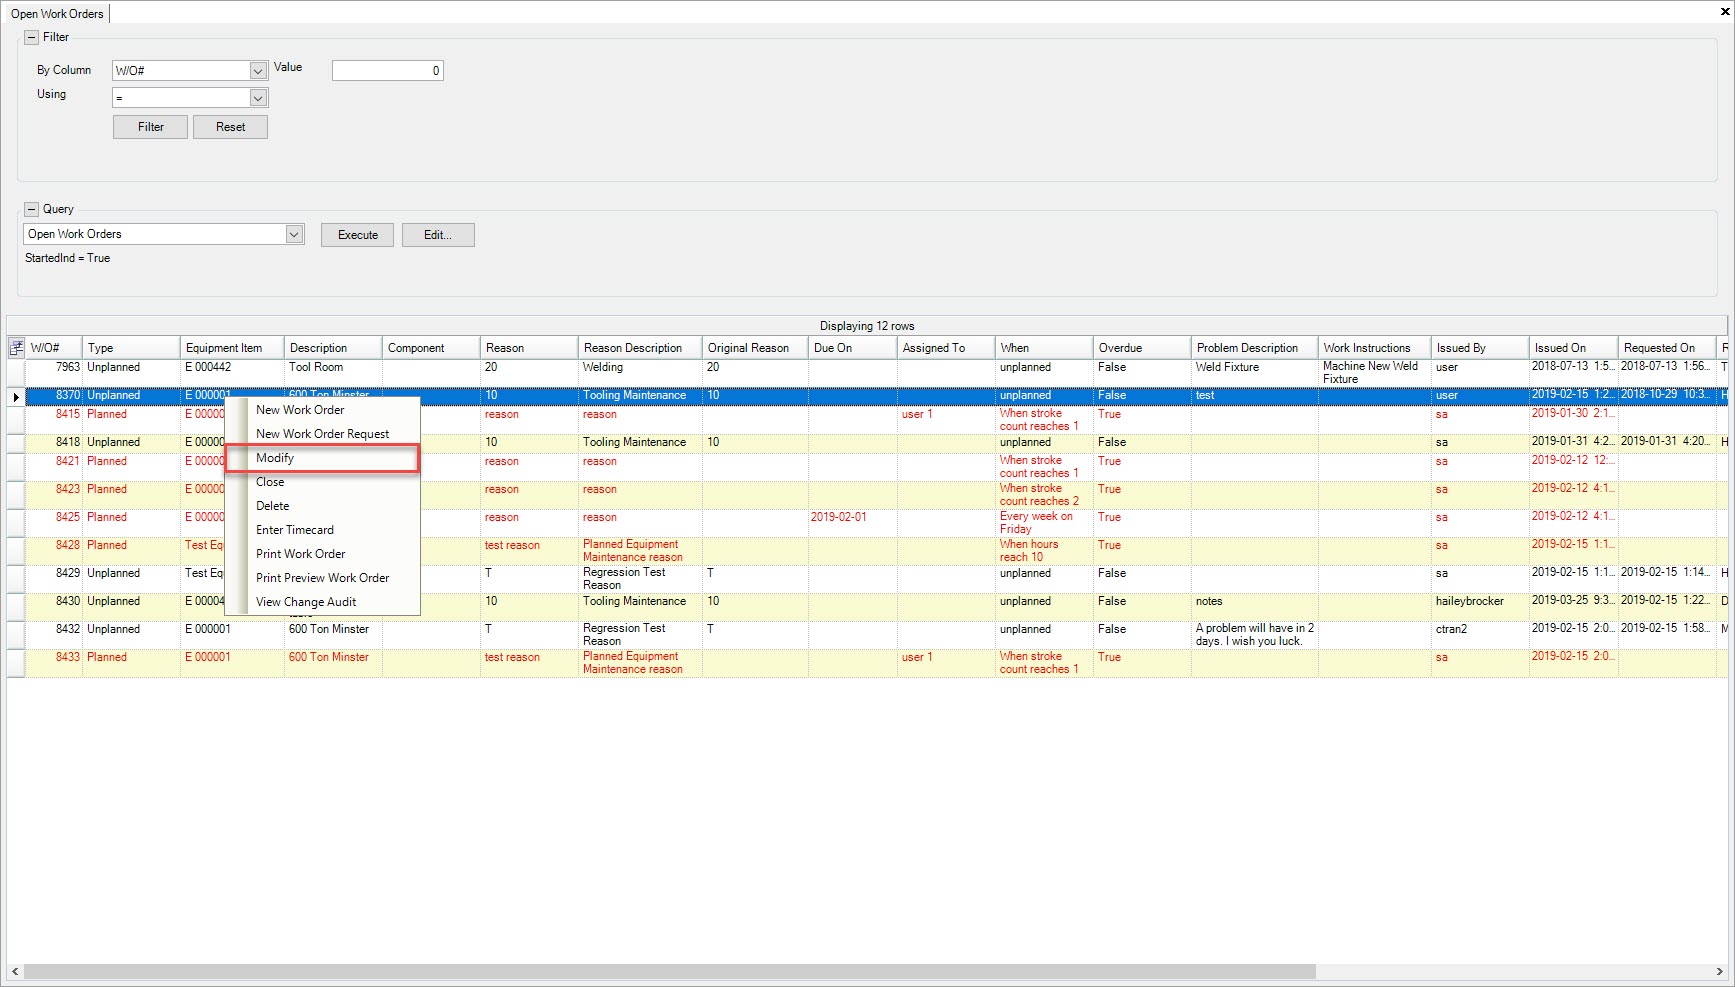
Locate the Open Work Order you wish to modify and right-click on the row. Select the Modify option from the menu.
The Work Order window will appear where users can make the necessary modifications with the header information or the available tabs.

Once the necessary modifications have been made, click on the  button.
The Work Order modifications will be updated on the Open Work Orders screen.
Note
For more information on modifying specific tabs on the Work Order window, please see Equipment > Open Work Orders > Creating a New Work Order.
Closing an Open Work Order
Users have the ability to close Open Work Orders in the system, two different ways.
First, users must navigate to the  tab and click on the
 ![]() icon. The Open Work Orders
lookup screen will be displayed.
icon. The Open Work Orders
lookup screen will be displayed.

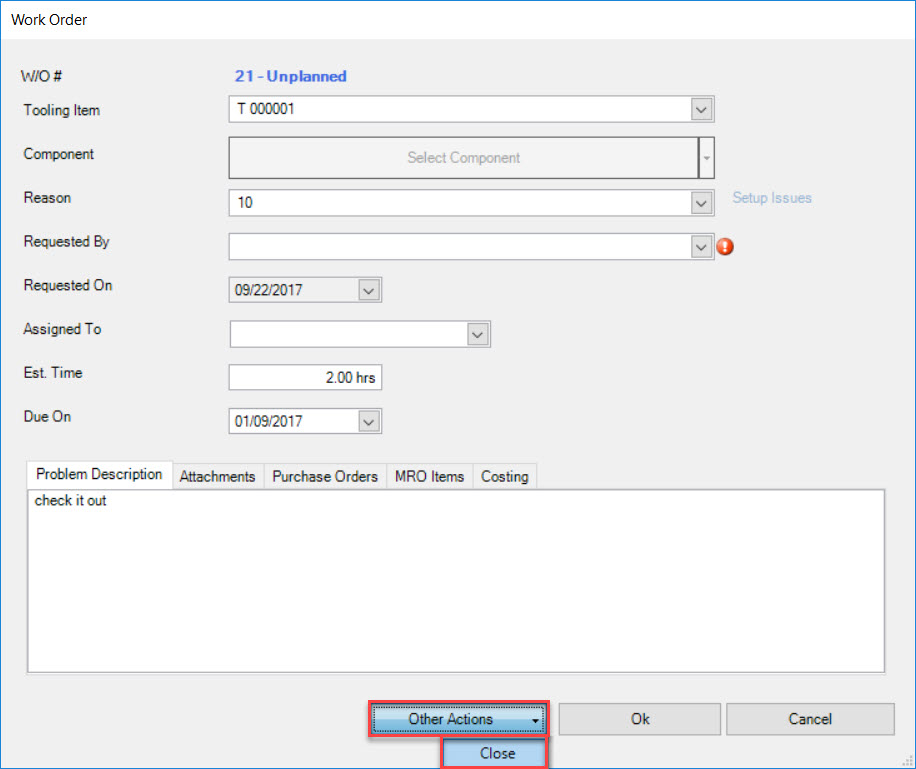
The first way is to locate the Open Work Order you wish to close and double-click on the appropriate row. The Work Order window will appear.
Users must click on the  button and select the Close option.
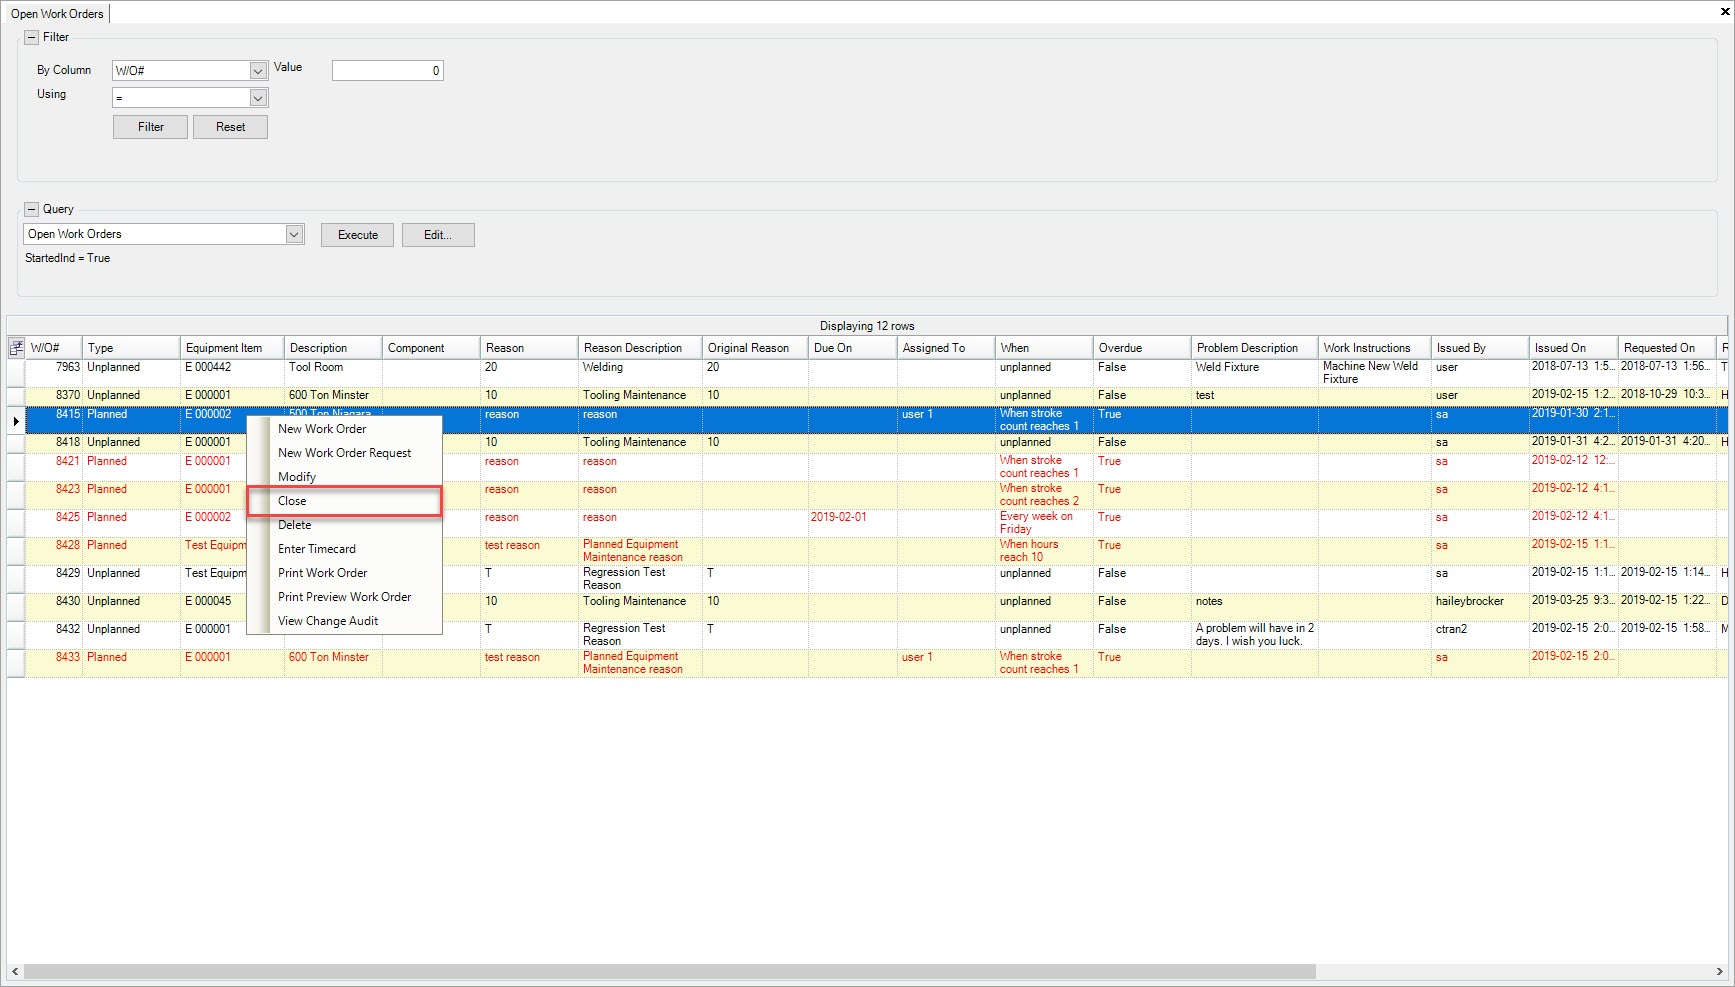
The second way is to locate the Open Work Order you wish to close and highlight the appropriate row. Right-click and select the Close option.
Both of these options will open the Close Work Order window.
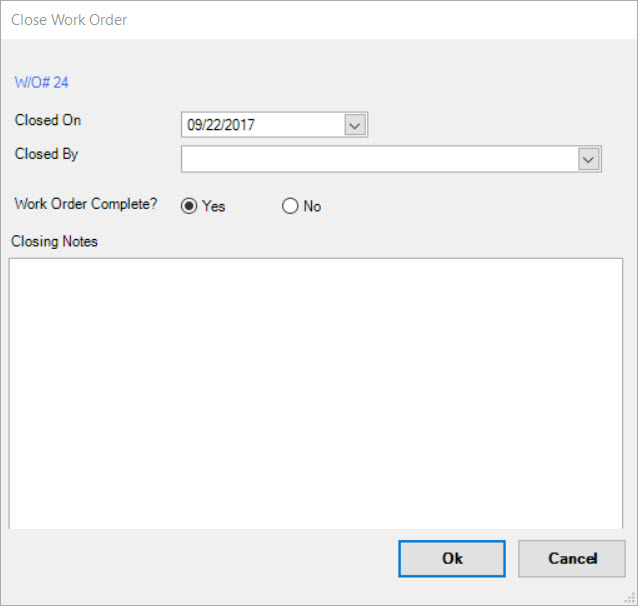
The Closed On date will default to the current date but users can override this by using the available drop-down menu.
A Closed By must be selected using the available drop-down menu, and select whether or not the Work Order was completed. Enter in any Closing Notes using the available textbox.
Once the necessary information has been entered, click on the  button.
The Work Order will be closed and removed from the open Work Orders screen.
Note
Users can also close a Work Order, Planned or Unplanned from an Equipment Item. For more information, please see Equipment > Equipment Items > Planned Maintenance Tab OR Unplanned Maintenance Tab.
Deleting an Open Work Order
To delete an Open Work Order, navigate to the  tab and click on the
 ![]() icon. The Open Work Orders
lookup screen will be displayed.
icon. The Open Work Orders
lookup screen will be displayed.

Locate the Open Work Order you wish to delete and highlight the appropriate row. Right-click and select the Delete option.
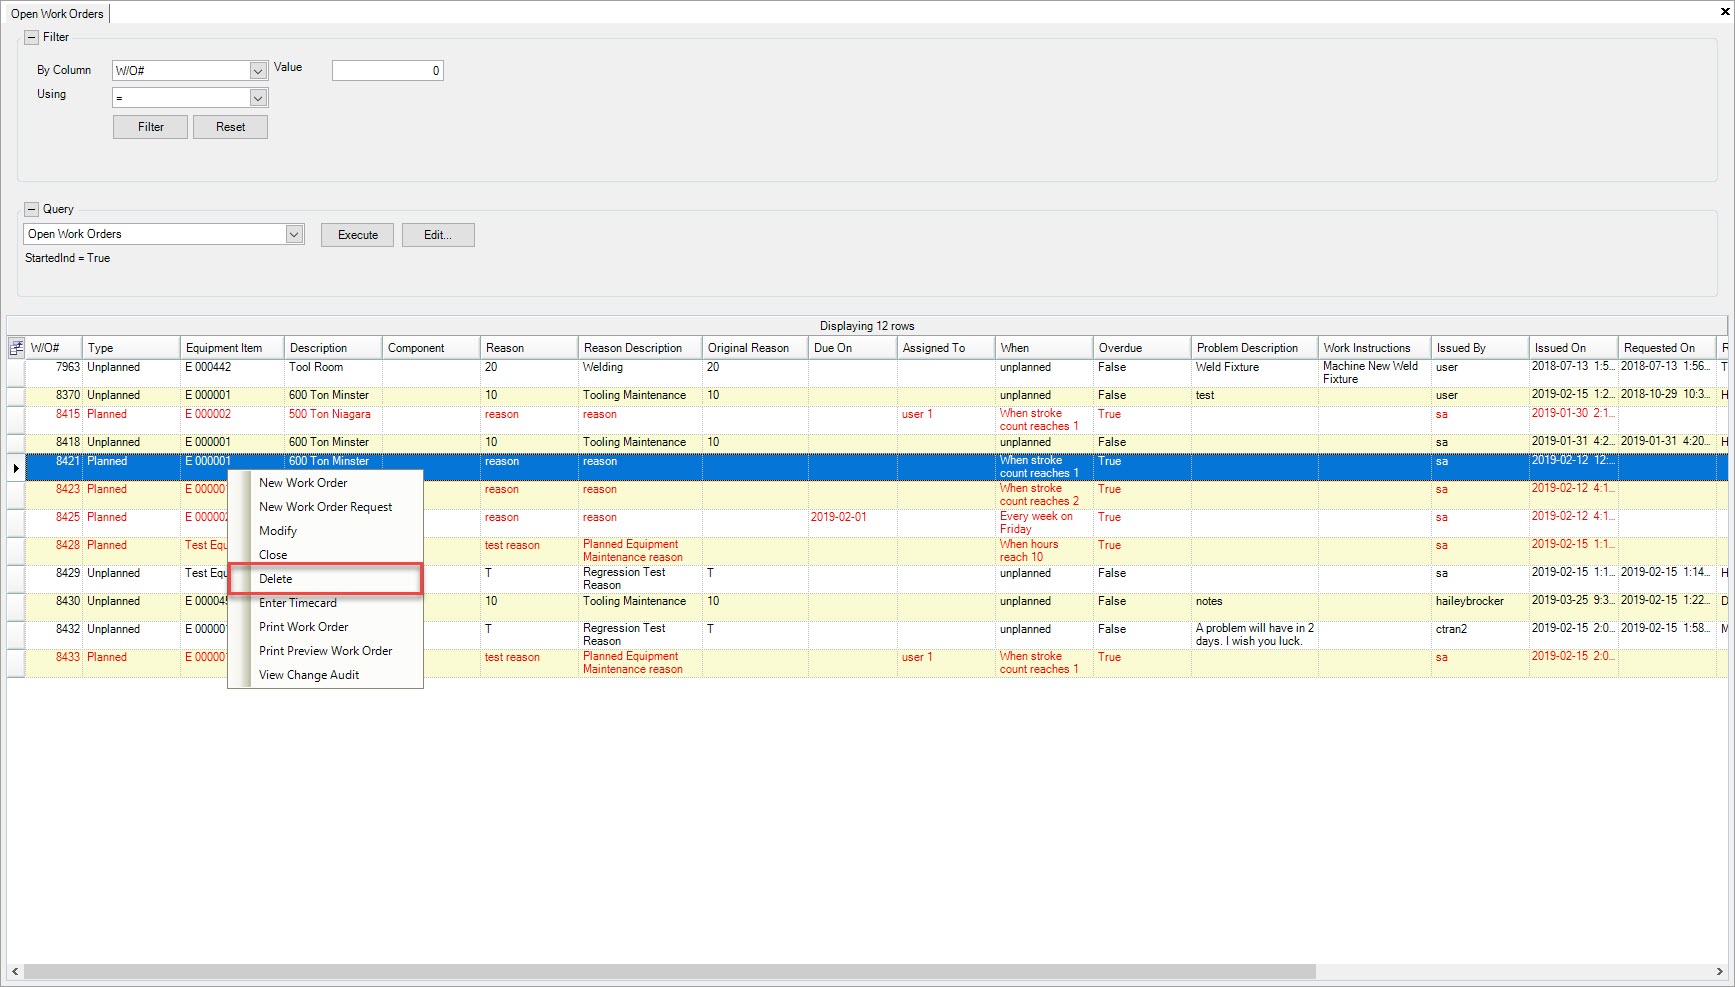
The Confirm Delete window will appear, confirming users that the selected Work Order will be deleted. Click on the  button to confirm.
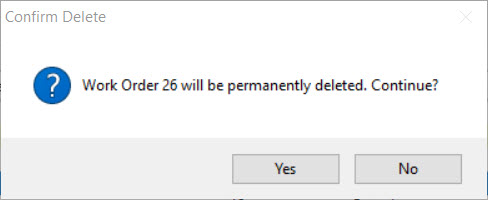
The selected Work order will be deleted from the Open Work Orders screen.
Note
Users can also delete a Work Order, Planned or Unplanned from an Equipment Item. For more information, please see Equipment > Equipment Items > Planned Maintenance Tab OR Unplanned Maintenance Tab.
Entering a Timecard for an Open Work Order
To enter a Timecard for an Open Work Order, navigate to the  tab and click on the
 ![]() icon. The Open Work Orders
lookup screen will be displayed.
icon. The Open Work Orders
lookup screen will be displayed.

Locate the Open Work Order you wish to enter a Timecard for and highlight the appropriate row. Right-click and select the Enter Timecard option.
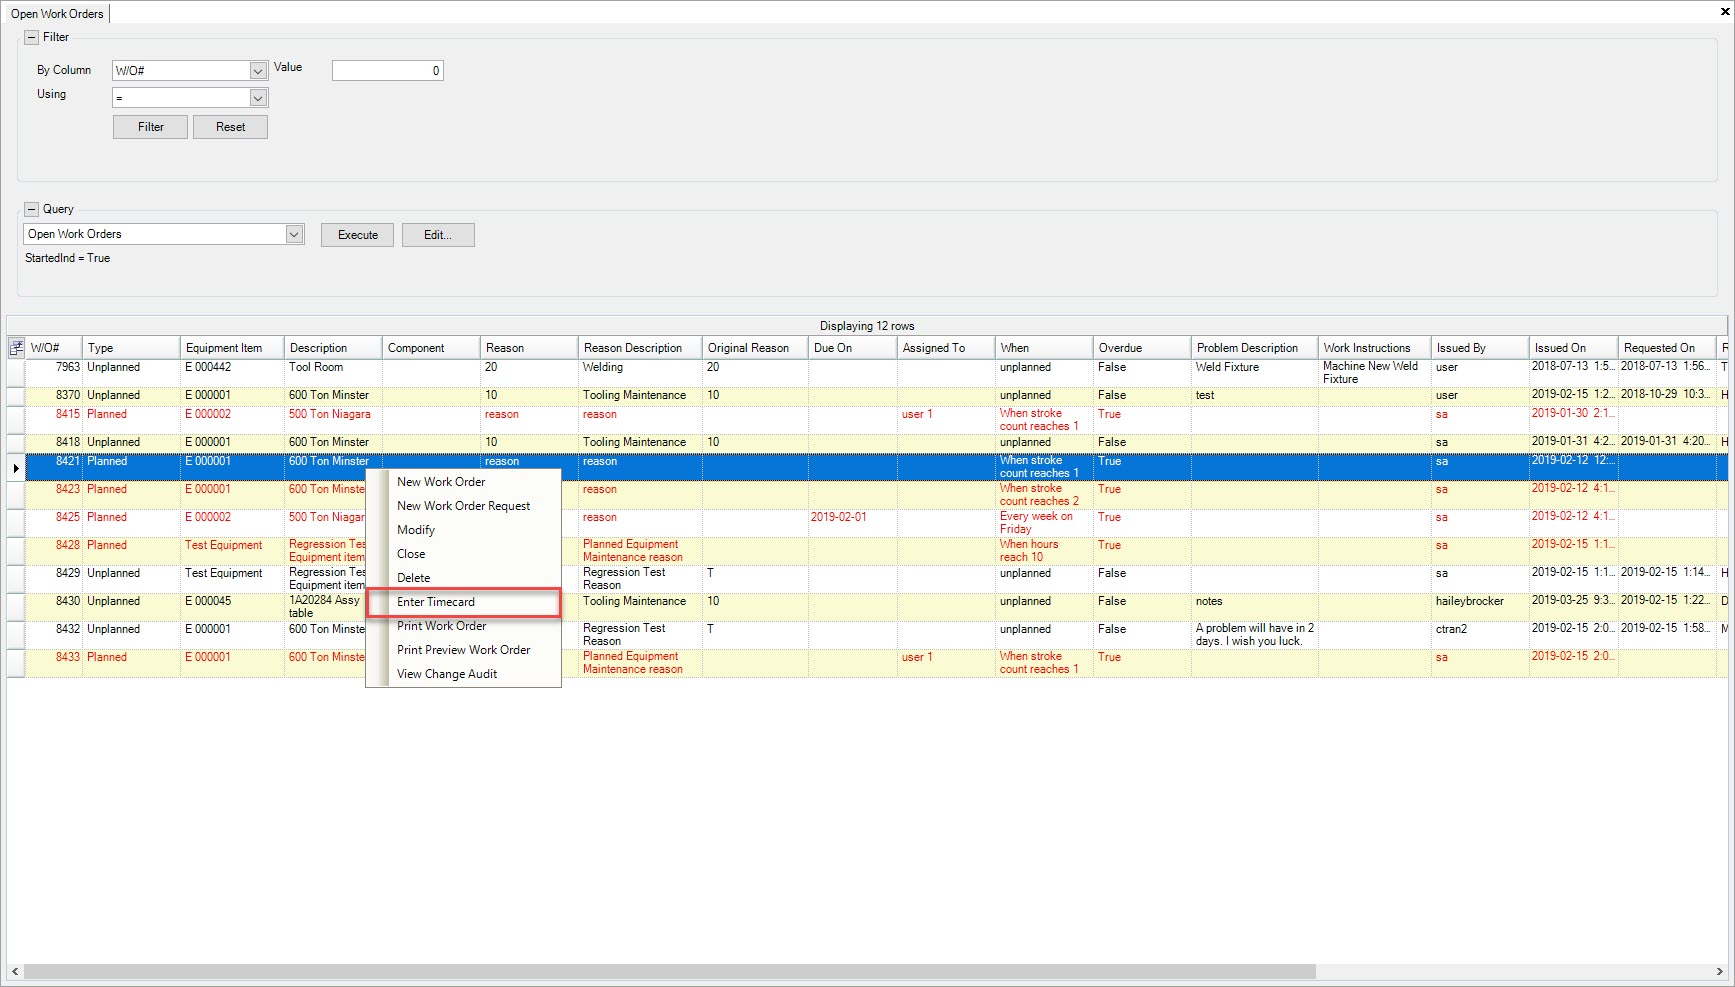
A new Equipment Time Reporting screen will appear.
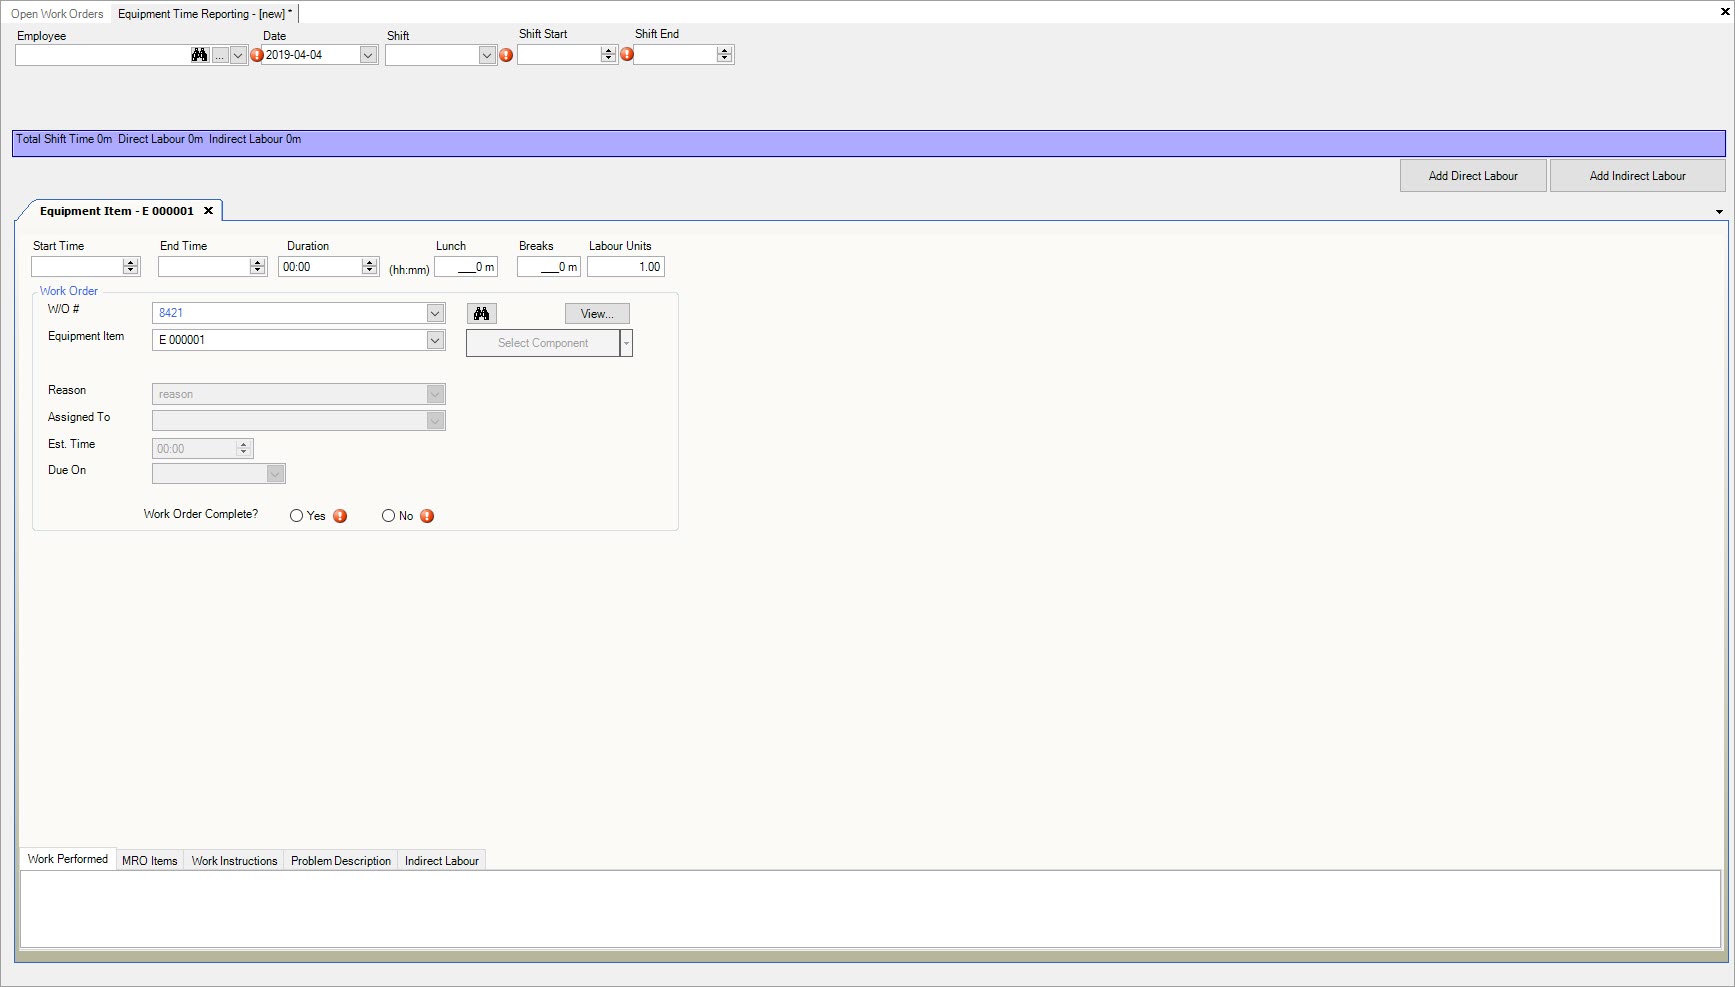
Users must enter in all of the necessary fields for the Timecard.
Make sure to save your changes before exiting the screen. The Timecard will then be saved to the Timecard Listing screen.
Note
For more information on creating a new Timecard, please see Equipment > Timecard Entry > Creating a New Timecard.
Printing a Work Order
To print an Open Work Order, navigate to the  tab and click on the
 ![]() icon. The Open Work Orders
lookup screen will be displayed.
icon. The Open Work Orders
lookup screen will be displayed.

Locate the Open Work Order you wish to print and highlight the appropriate row. Right-click and select the Print Work Order option.
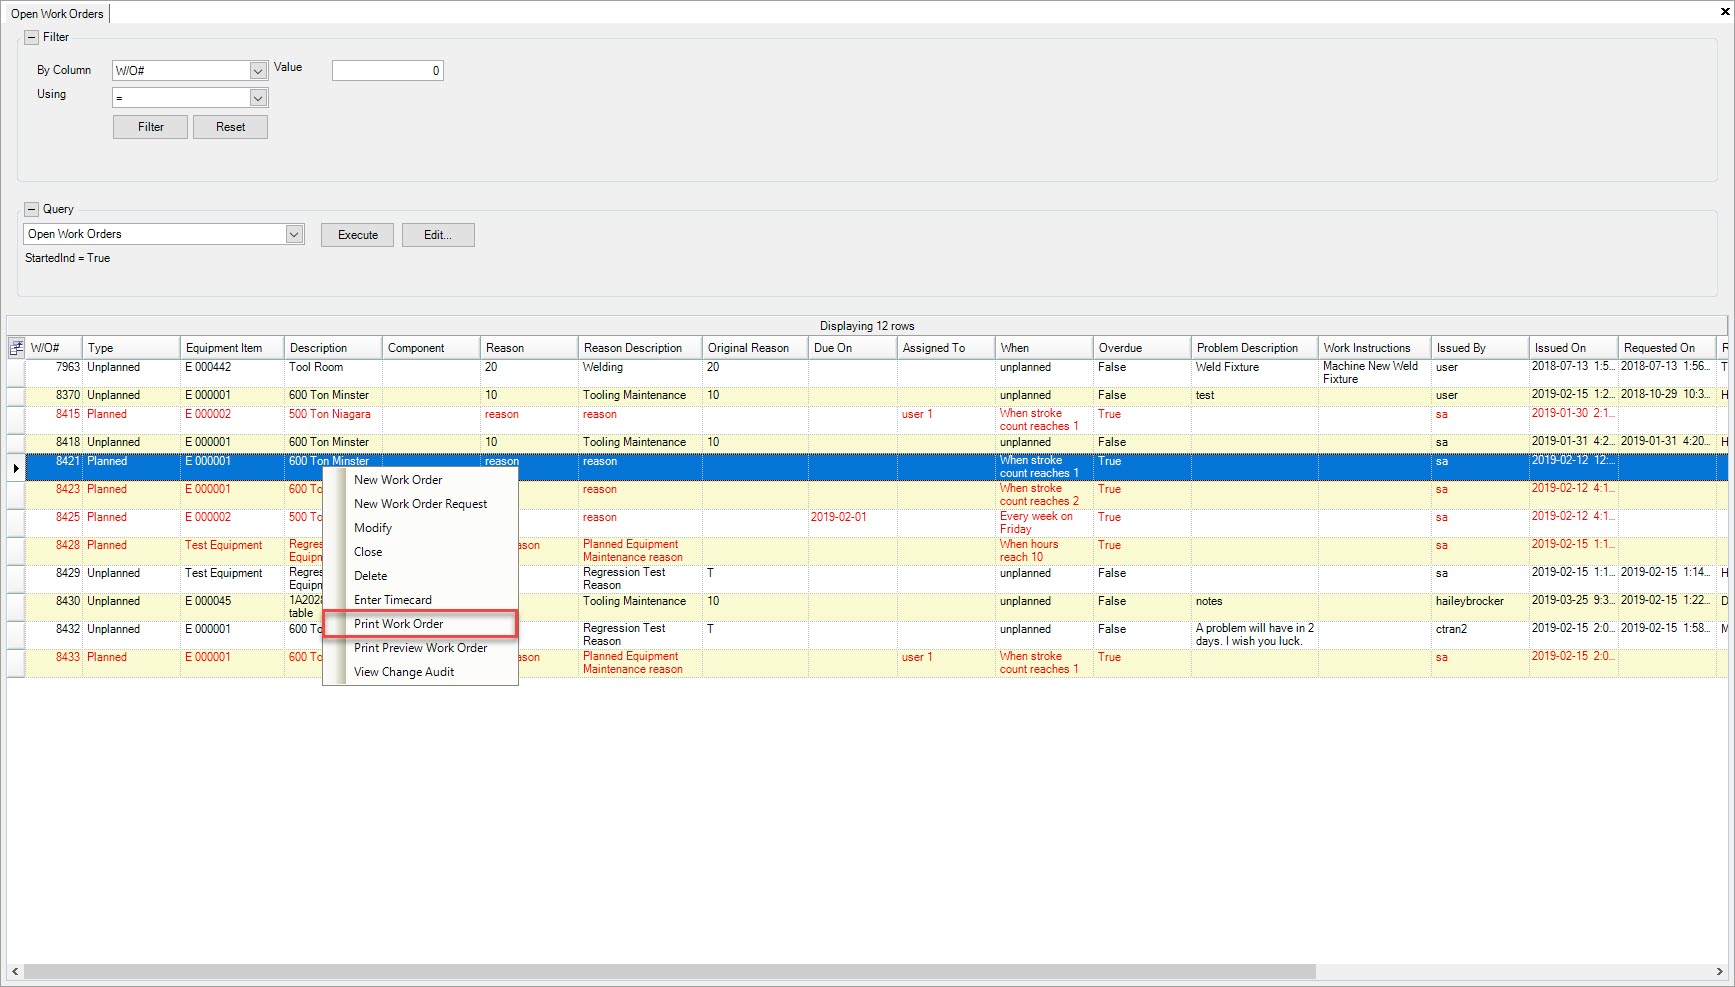
The Print window will appear where users can select the appropriate Printed and Printer Settings. Then, click on the  button.
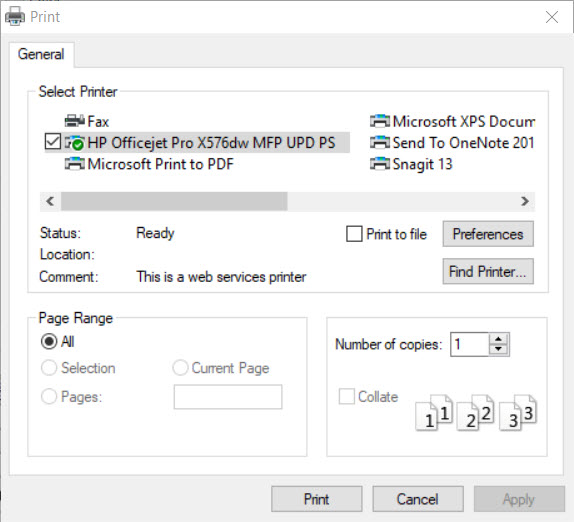
The selected Work Order will be printed.
Viewing a Work Order Print Preview
To view print preview for an Open Work Order, navigate to the  tab and click on the
 ![]() icon. The Open Work Orders
lookup screen will be displayed.
icon. The Open Work Orders
lookup screen will be displayed.

Locate the Open Work Order you wish to view print preview for and highlight the appropriate row. Right-click and select the Print Preview Work Order option.
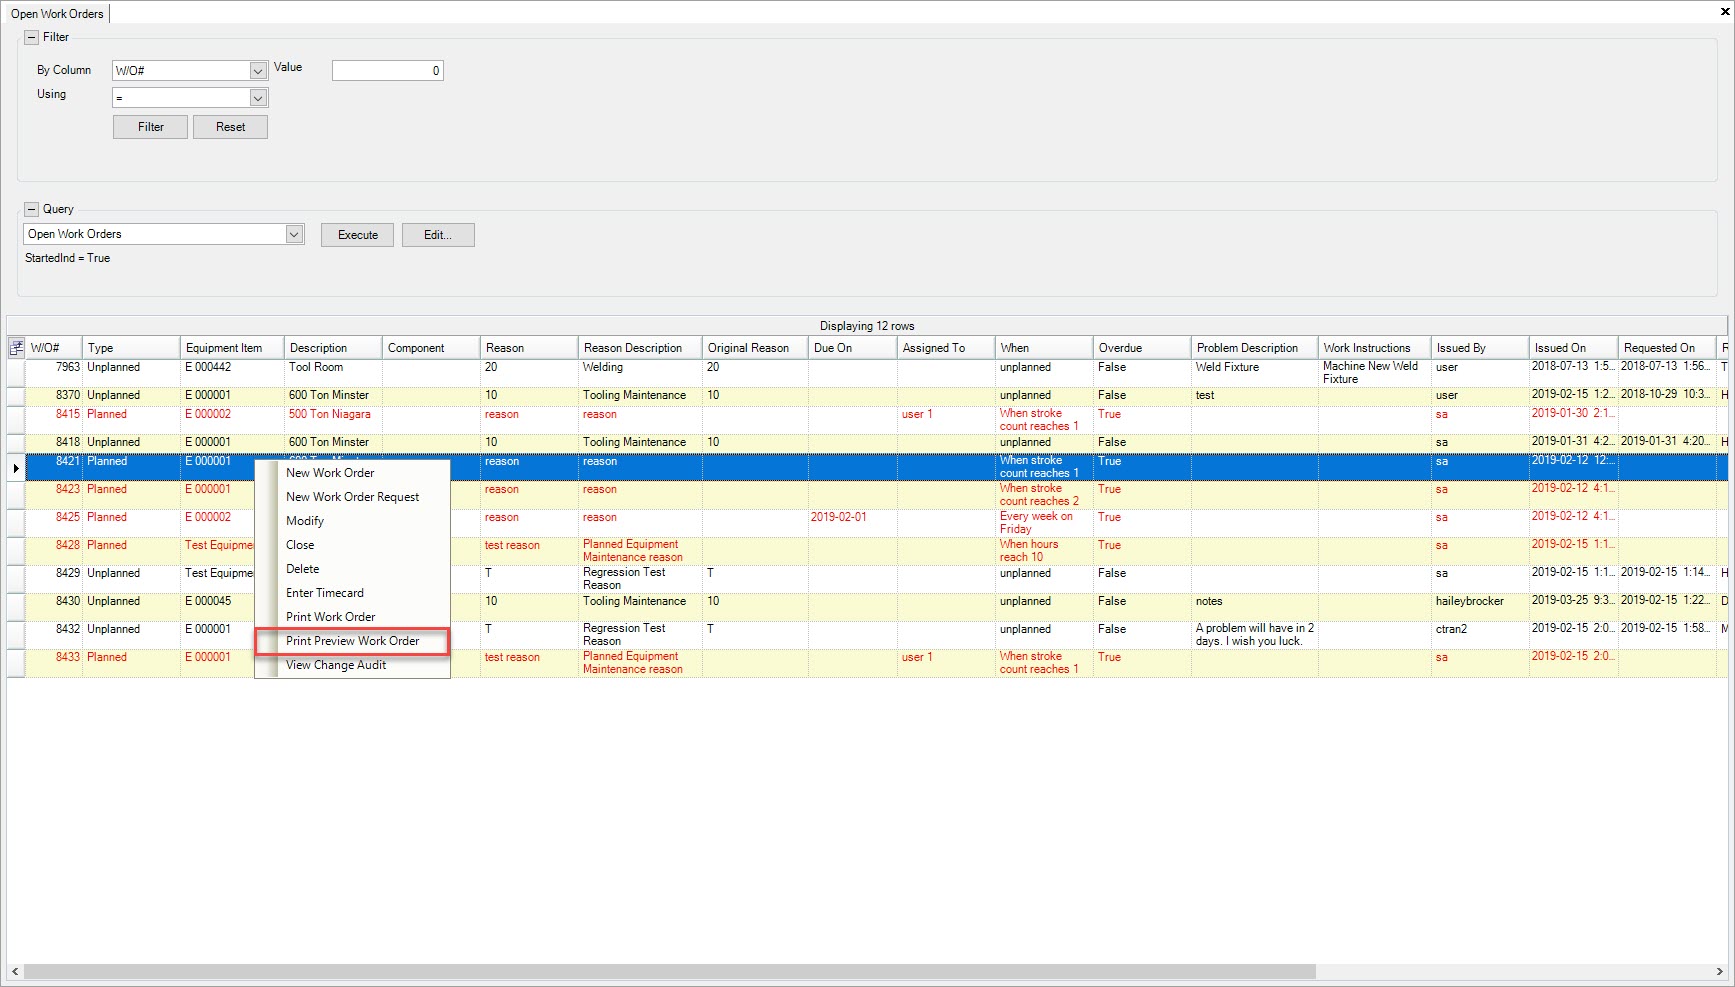
The Preview screen will appear where users are able to preview the selected Open Work Order.
Viewing Change Audit for an Open Work Order
To view the Change Audit for an Open Work Order, navigate to the  tab and click on the
 ![]() icon. The Open Work Orders
lookup screen will be displayed.
icon. The Open Work Orders
lookup screen will be displayed.

Locate the Open Work Order you wish to view the Change Audit for and highlight the appropriate row. Right-click and select the View Change Audit option.
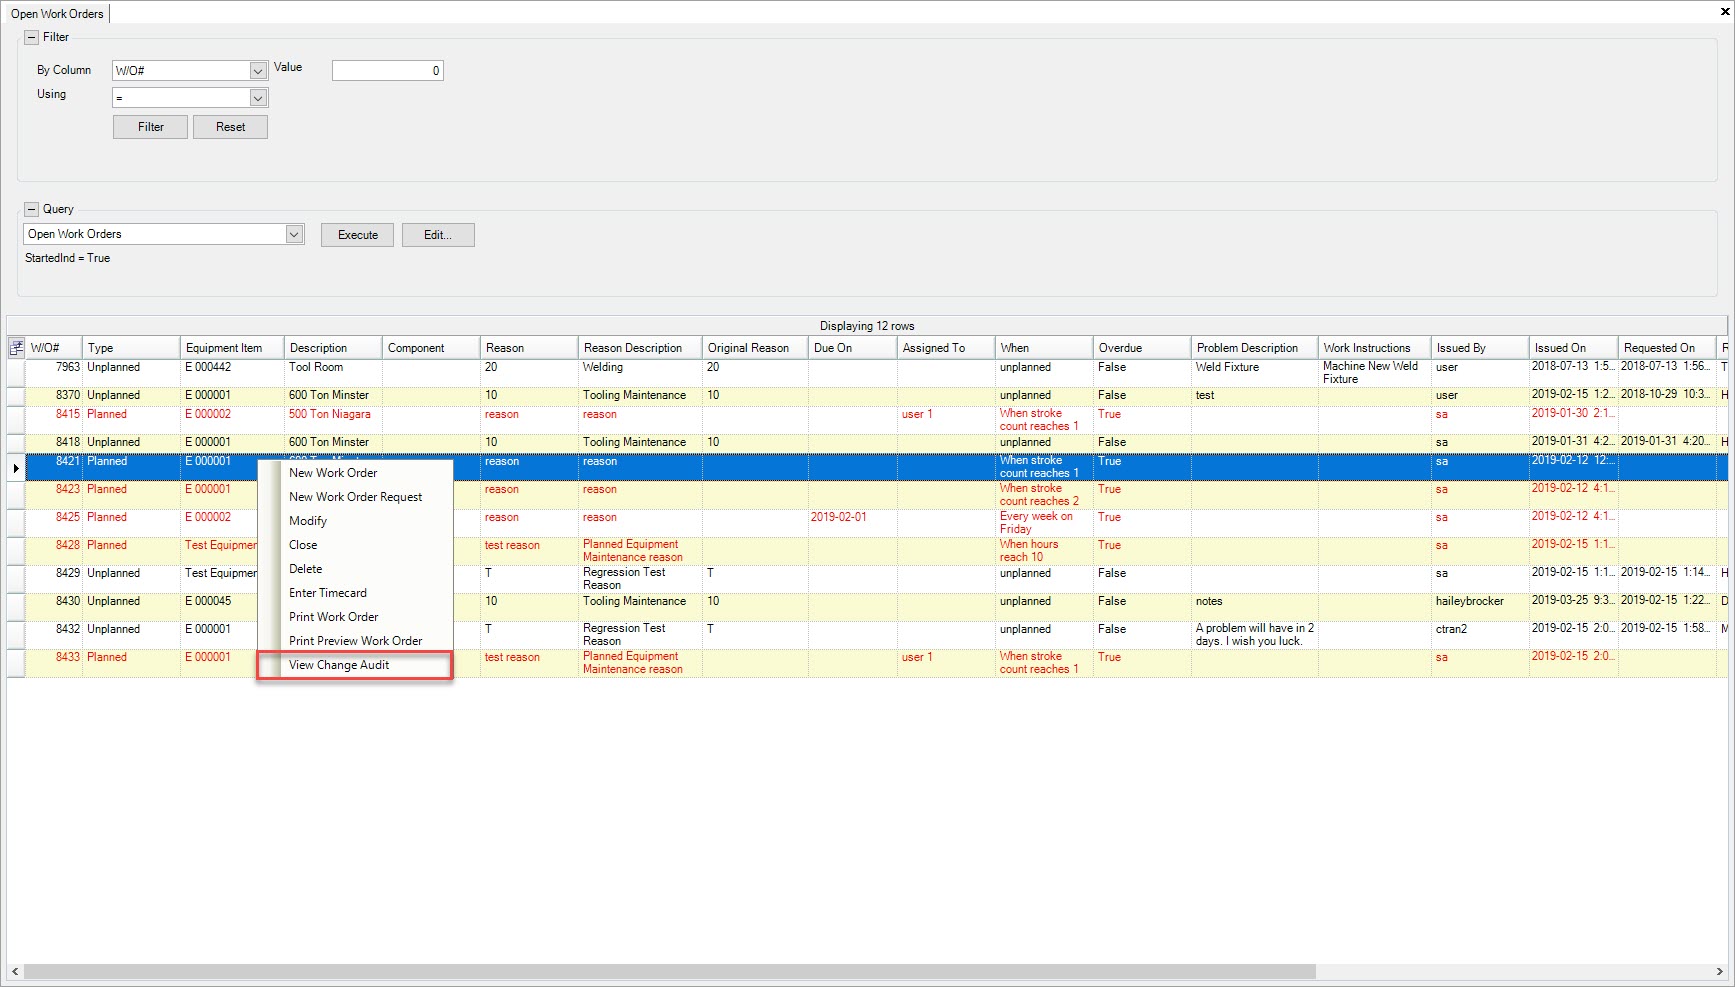
The Change Audit window will appear.
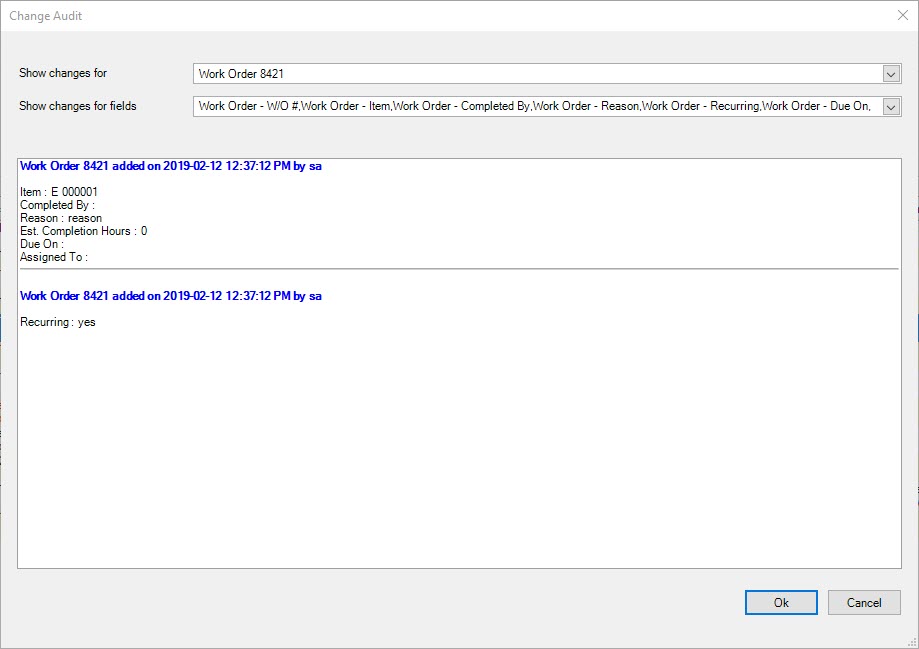
Users are able to view all changes made to the selected Work Order.