Master Production Schedule
The Master Production Schedule is available to users in order to view, edit, and delete jobs in the system.
To view the Master Production Schedule, navigate to the  tab and click on the
 ![]() icon. This will open the Master Production Schedule.
icon. This will open the Master Production Schedule.
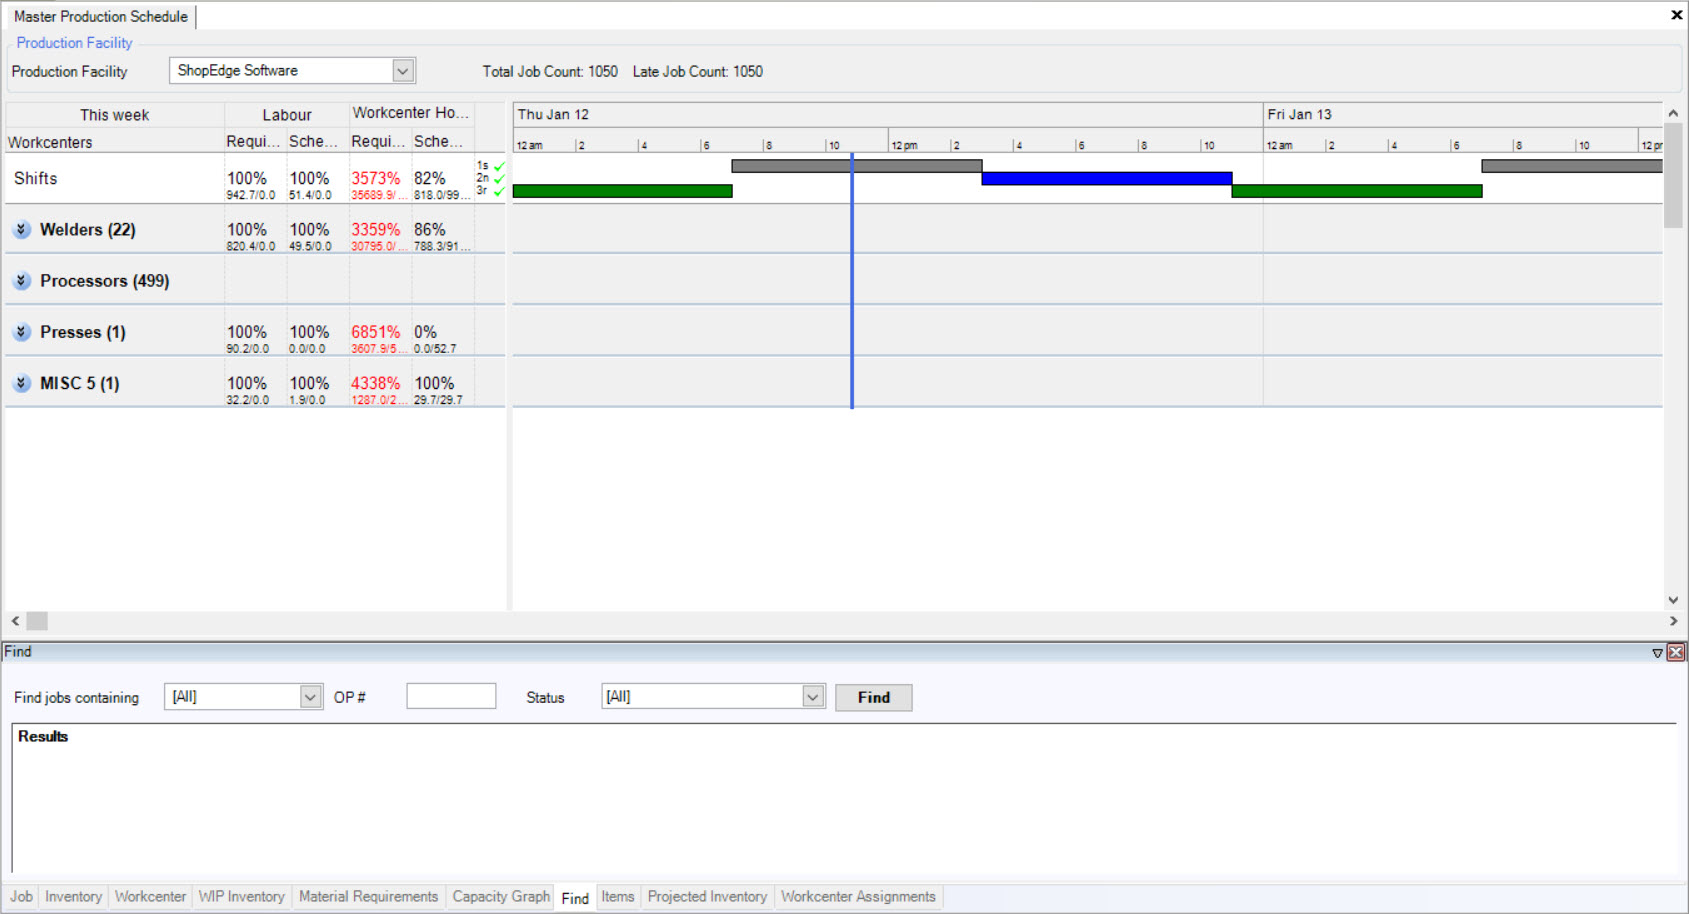
Users will be able to view all of the available Workcenters by selecting the appropriate Production Facility using the drop-down menu.
Click on the drop-down arrows to view the Schedules.
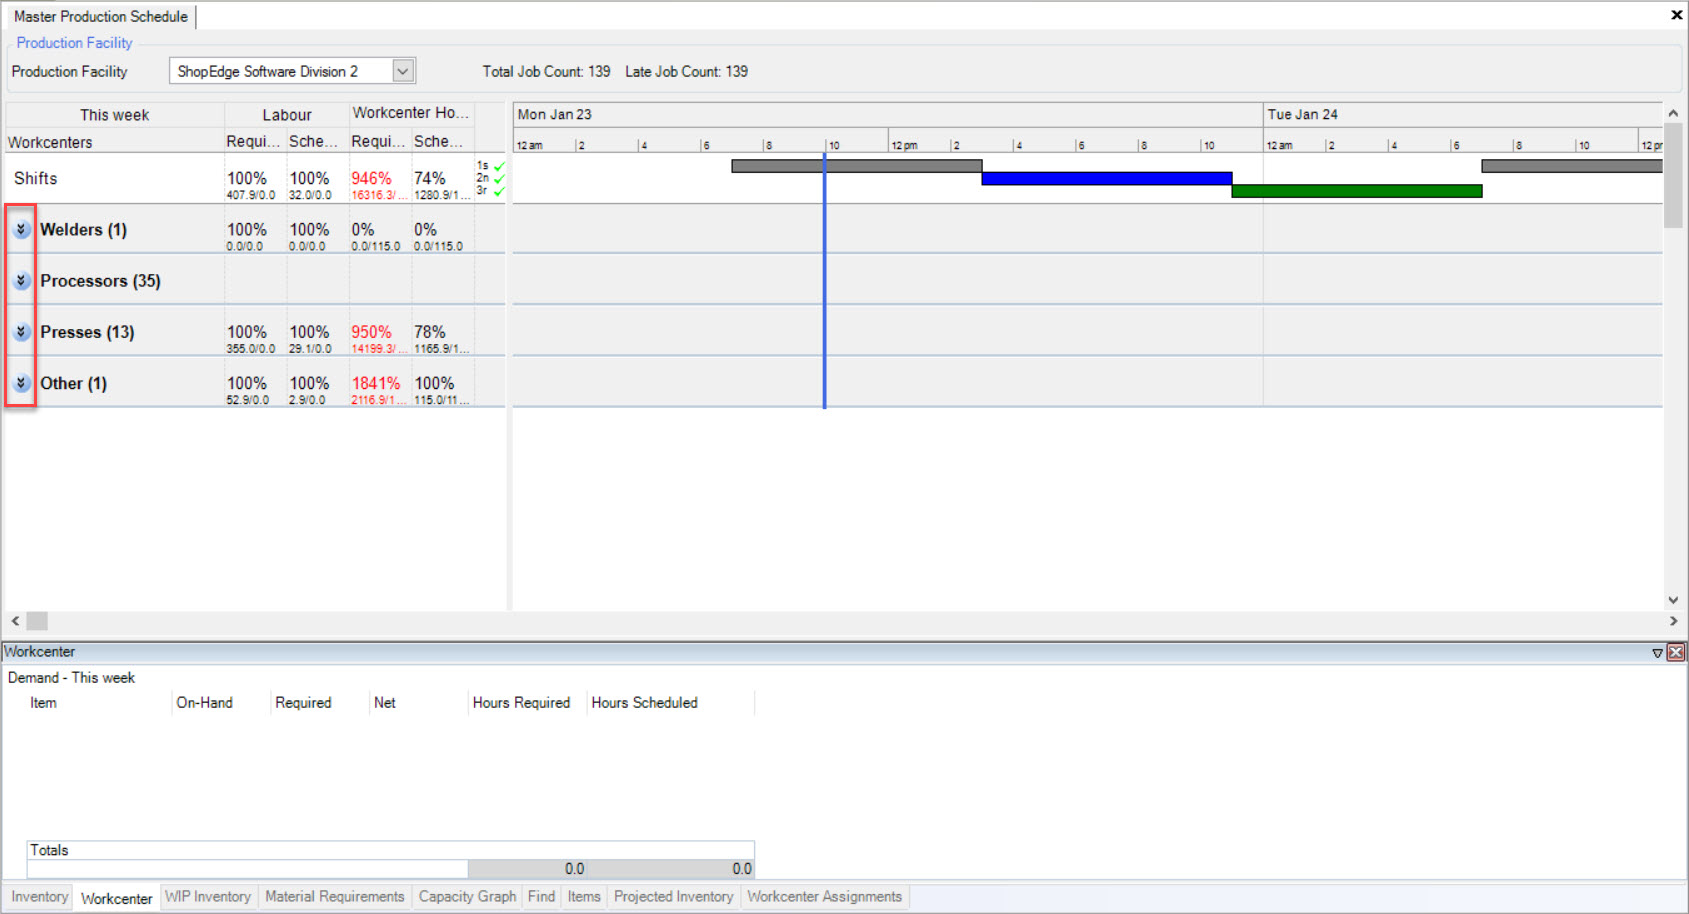
Double-click on the Workcenter row that you wish to view to the left of the screen. This will open the Workcenter Schedule screen.
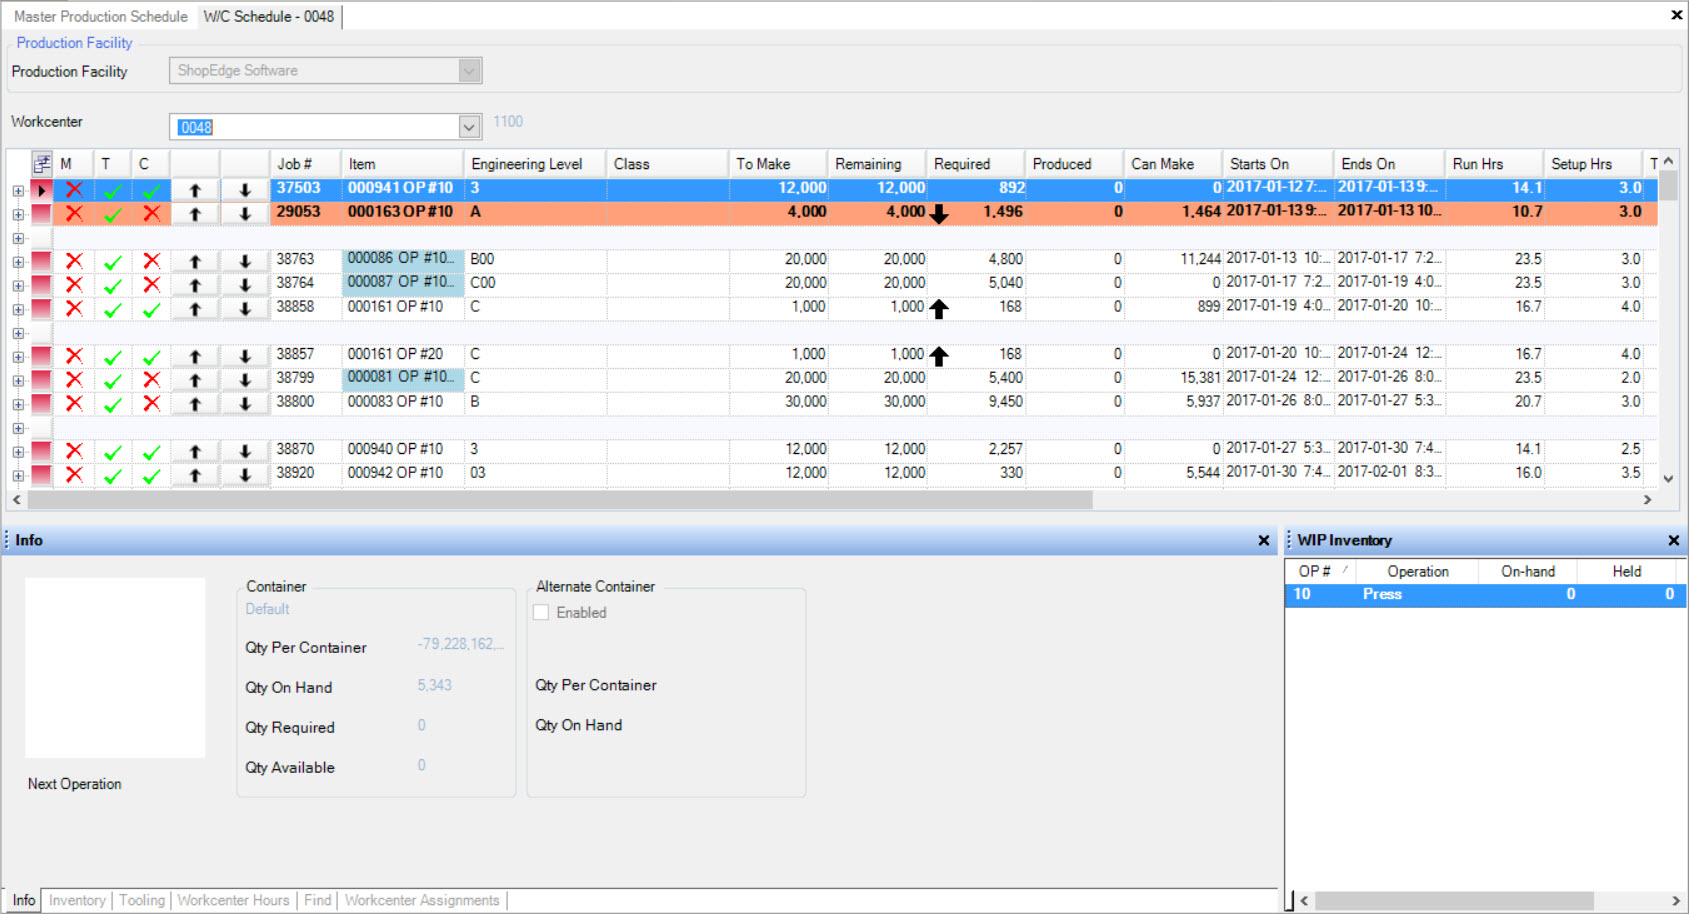
Here, the planner sets the schedule of jobs for the Workcenter operator. The sequence of jobs and information on the screen is reflected on the Workcenter operator’s screen. Any changes made here can be saved and will be reflected on the operator’s screen.
Master Production Schedule Tab Information
When the Master Production Schedule screen is displayed, there are number of tabs located at the bottom of the screen. These tabs are available to view a quick view of a Workcenters details instead of proceeding to fully open the Workcenter. Instead of double-clicking on a Workcenter, users can select the appropriate Workcenter and then click on the necessary tabs to view information.
Inventory Tab
The Inventory tab can be viewed by selecting the  tab located at the bottom of the screen.
Once a Workcenter has been selected, users must highlight a Job in order for the system to populate the Inventory information.
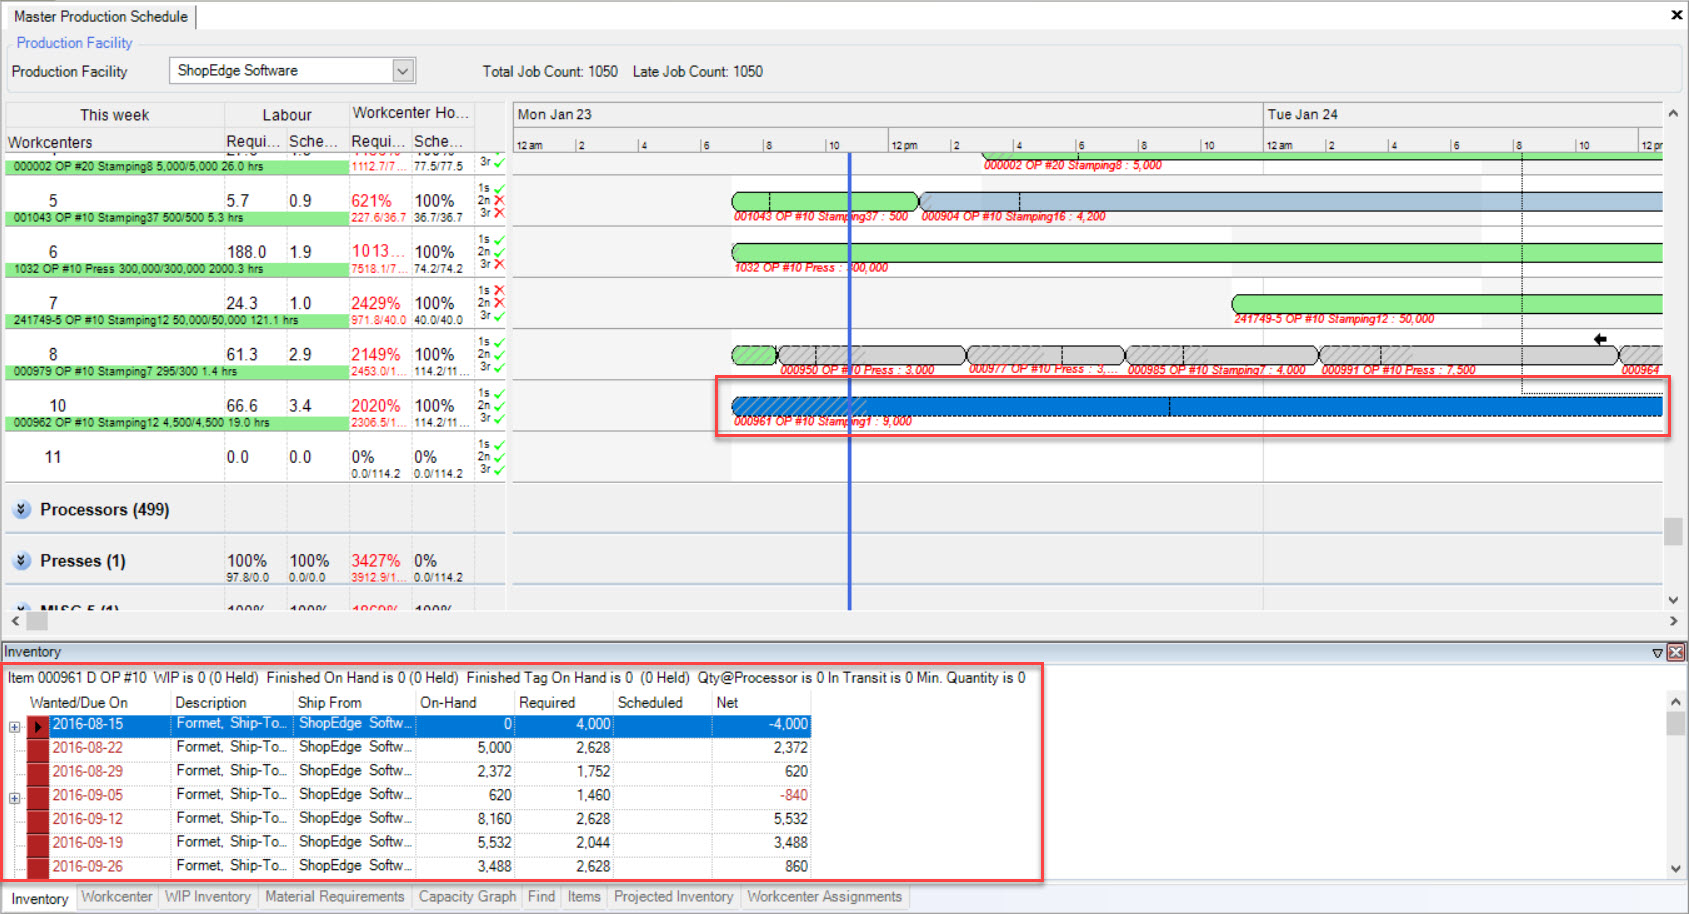
Users will be able to view Inventory details for the particular Job selected such as the Wanted/Due on dates, Description, Ship From, On-Hand, Required, Scheduled, and Net. In order to view further details, click on the plus sign located beside the Wanted/Due On date (where available).

Workcenter Tab
The Workcenter tab can be viewed by selecting the  tab located at the bottom of the screen.
Users will be able to view the Demand for the current week for each Item listed under the selected Workcenter. Fields such as the Item, On-Hand, Required, Net, Hours Required, and Hours Scheduled will be displayed.

Users can also click on the plus sign located beside the Item to view further details.

WIP Inventory Tab
The WIP Inventory tab can be viewed by selecting the  tab located at the bottom of the screen.
Users will be able to view the OP #, Operation, On-Hand, Held, and At Processor details for the selected Workcenter as well as the Totals.

Material Requirements Tab
The Material Requirements tab can be viewed by selecting the  tab located at the bottom of the screen.
Users will be able to view the Item(s), and details regarding On-Hand, Held, Required, and Net.

To expand the Item, click on the plus sign.

Capacity Graph Tab
The Capacity Graph tab can be viewed by selecting the  tab located at the bottom of the screen.
A graph will be displayed with the option to change what shows on the X-Axis and Y-Axis.

Find Tab
The Find tab can be viewed by selecting the  tab located at the bottom of the screen.
Here, users can select the Item, enter in the OP #, and select the Status. Then, click on the  button for the system to populate the Jobs containing the
selected Item.

Items Tab
The Items tab can be viewed by selecting the  tab located at the bottom of the screen.
Here, users will be able to view the Item, amount On-Hand, Required, Scheduled, and Net for the current and following weeks.

Users can expand Items in order to view further details by clicking on the plus sign located before the Item row. Once expanded, Item information such as the Wanted/Due On dates, Description, On-Hand, Required, Scheduled, and Net can be edited.

To edit an Item, simply use the textboxes, and drop-down menus to make the necessary changes.
To delete an Item, simply highlight the appropriate row. Use your Delete key and when the system prompts you, select Yes.
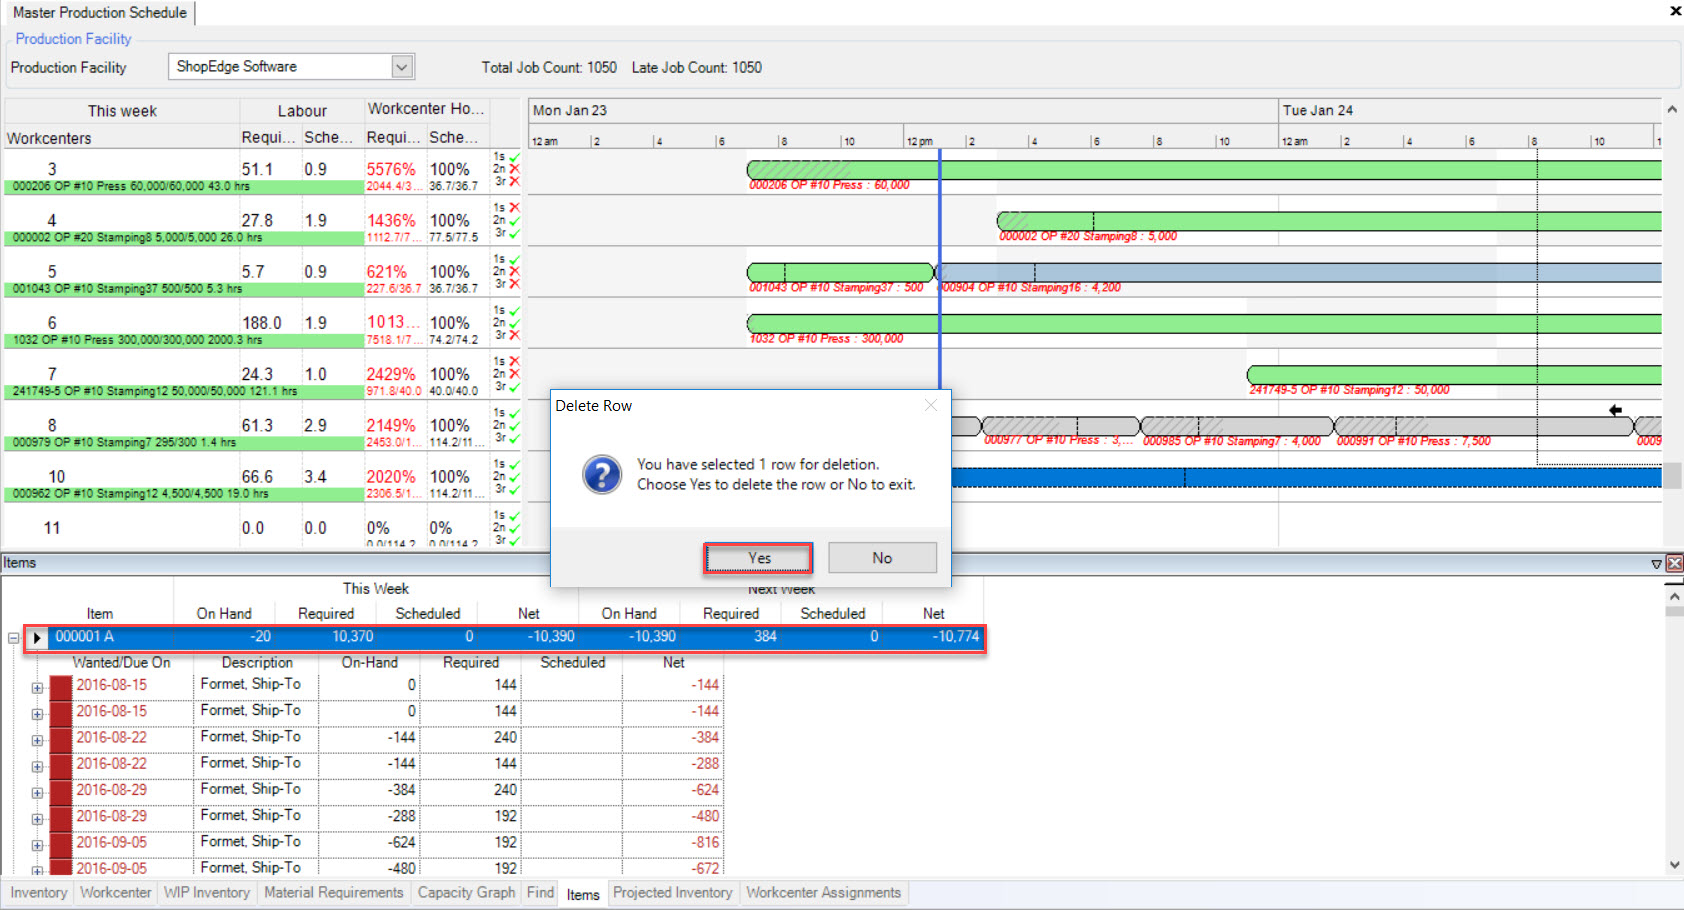
The selected Item will be deleted.
Projected Inventory Tab
The Projected Inventory tab can be viewed by selecting the  tab located at the bottom of the screen.
Here, users will be able to view the Projected Inventory for each available Item. Users are able to select the type of Display (Plan, Schedule, or All) using the drop-down menu provided. The
Total Weeks to Display and Show Days for the First _____ Weeks can have a value entered into them for the system to populate. Once the proper information has been selected and entered, click on the
 button.

Users can expand each Item by clicking on the plus sign located beside each Item row. It can then be expanded again in order to view further details. Depends on the row that is selected, it will be displayed on the right bottom side of the screen.

Workcenter Assignments Tab
The Workcenter Assignments can be viewed by selecting the  tab located at the bottom of the screen.
Users will be able to view the Workcenter, Priority, Batch Size, Strokes Per Minute, Run Rate, Active, Setup (Hrs), and Round to Nearest for each Workcenter Assignment.

Workcenter Tab Information
There are a series of tabs located at the bottom of the Workcenter Schedule screen that provide users with additional information. To view the Workcenter Schedule screen for editing purposes,
navigate to the  tab and click on the
 ![]() icon.
This will open the Workcenter Schedule screen.
icon.
This will open the Workcenter Schedule screen.

Click on the drop-down arrows to view the Schedules.

Double-click on the Workcenter row that you wish to view to the left of the screen. This will open the Workcenter Schedule screen.

By default, the Info and WIP Inventory tabs will be visible when the Workcenter Schedule screen is first opened.
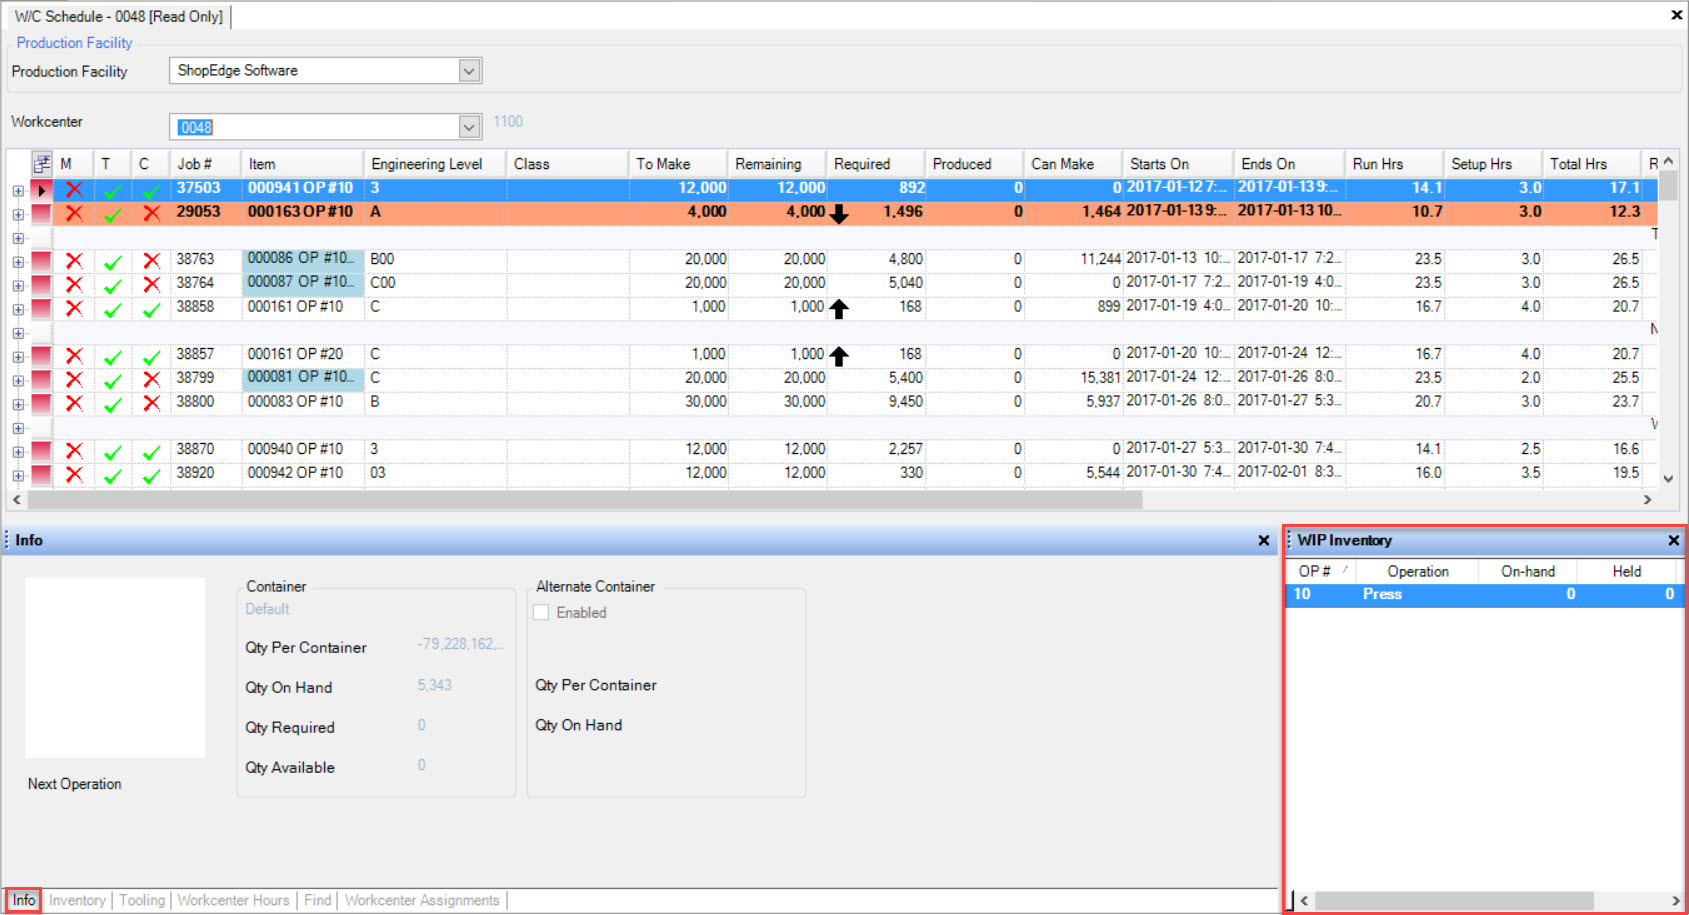
Note
If you are not able to view any tabs on the Workcenter Schedule screen, navigate to View > Show in the menu at the top of the screen and select the tabs you wish to view.
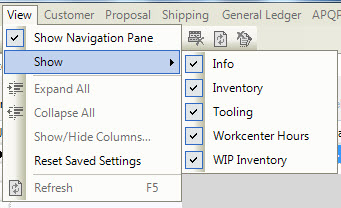
Info Tab
The Info tab on the Workcenter Schedule screen can be viewed by selecting the  tab located at the bottom of the screen.
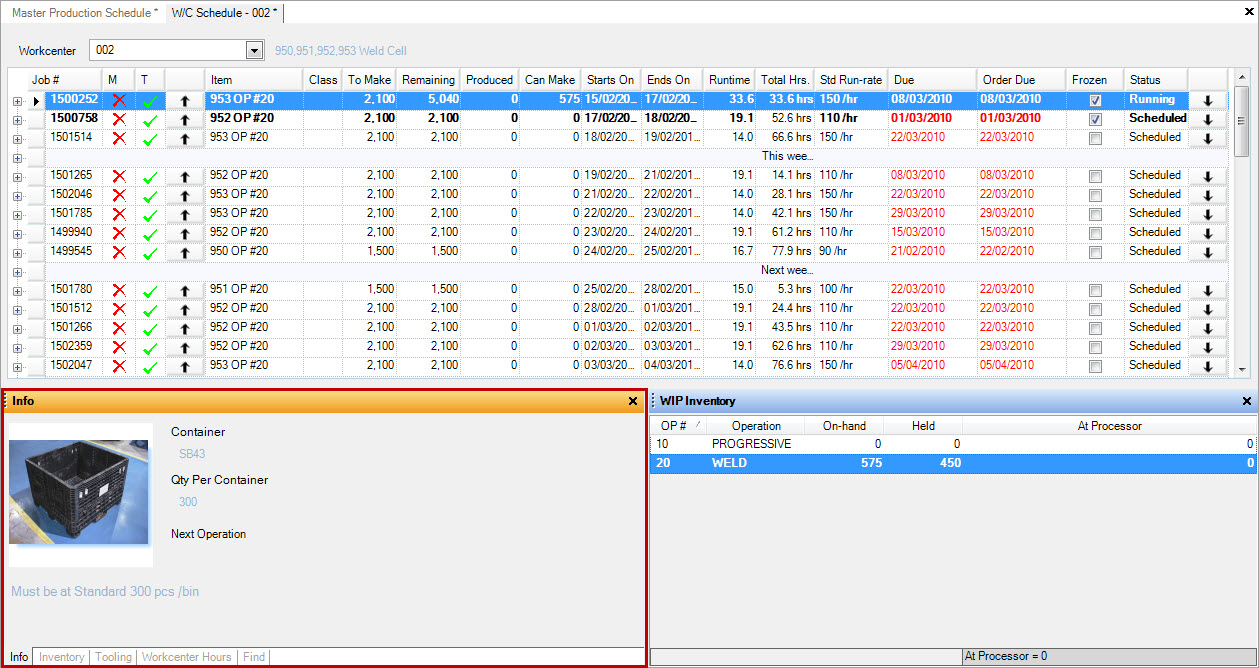
This screen is helpful in showing Container details. You can also view any upcoming Operations for a job.
Inventory Tab
The Inventory tab on the Workcenter Schedule screen can be viewed by selecting the  tab located at the bottom of the screen.
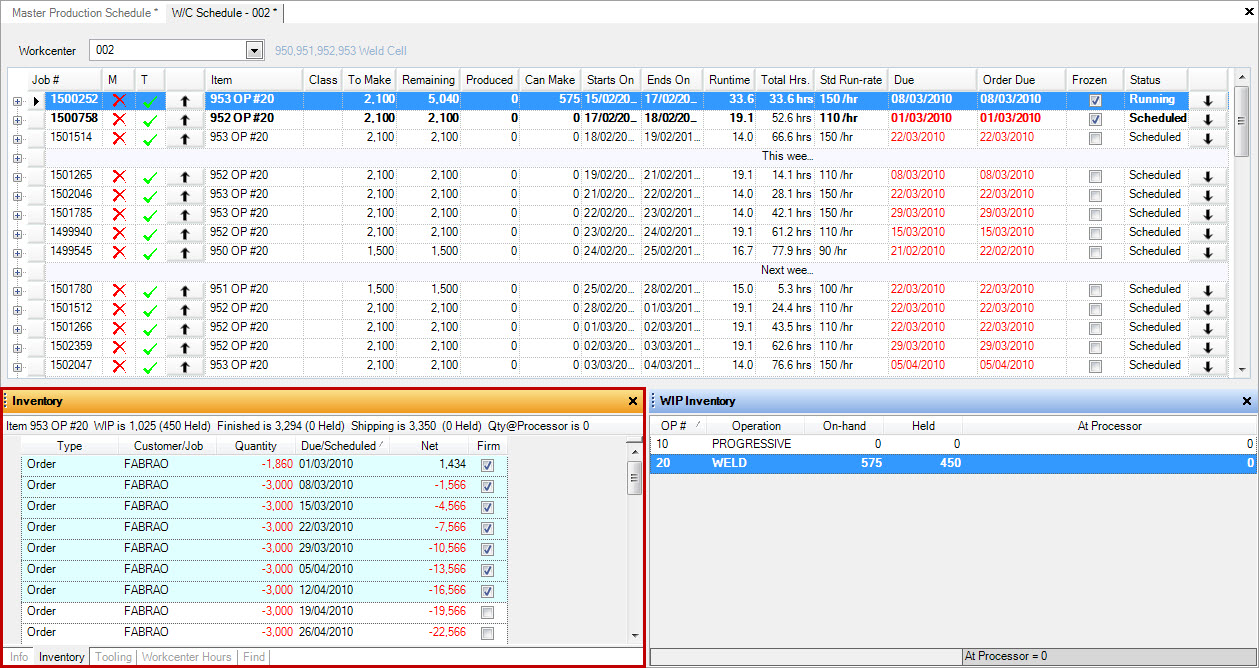
This screen is helpful in showing all current Orders for a particular Item. For each available date, users are able to click on the plus sign in order to expand the details.
Tooling Tab
The Tooling tab on the Workcenter Schedule screen can be viewed by selecting the  tab located at the bottom of the screen.
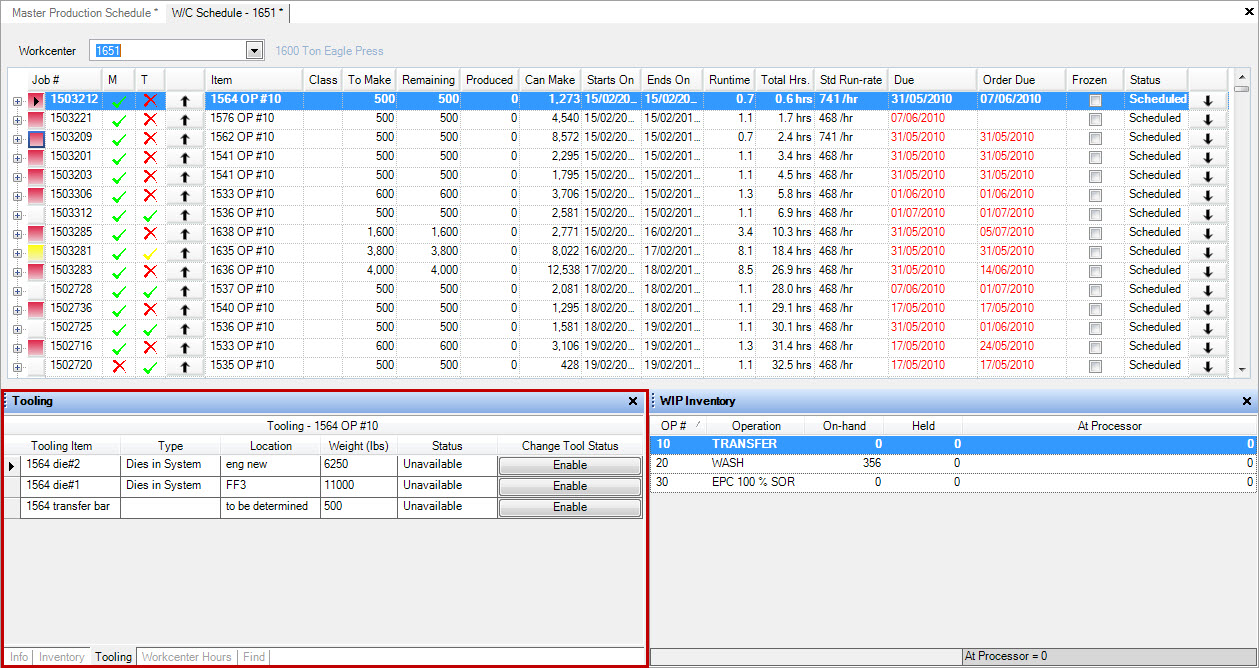
This screen is helpful in showing Tooling Item details such as where a Tool is located and stored and if a Tool is available. Users also have the ability to change a Tooling Item’s status
from Unavailable to Available. To do so, click on the  button.
Workcenter Hours Tab
The Workcenter Hours tab on the Workcenter Schedule screen can be viewed by selecting the  tab located at the bottom of the screen.
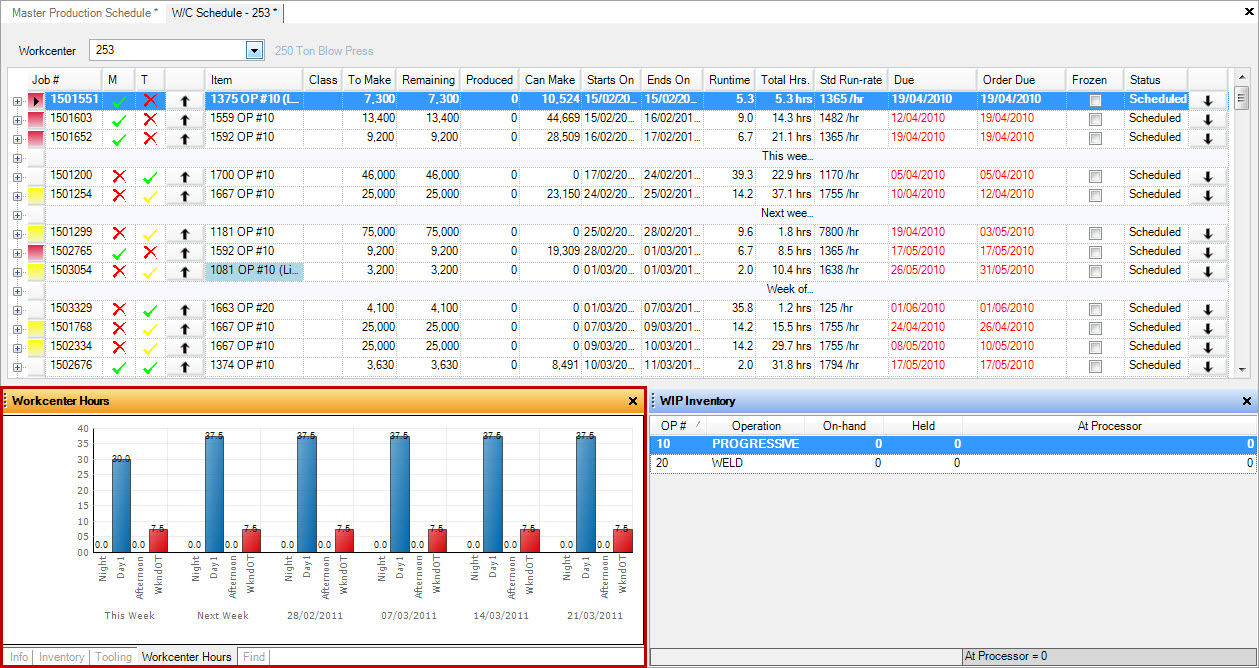
This screen is helpful by displaying the number of hours per shift scheduled on a particular Workcenter by graph.
Find Tab
The Find tab on the Workcenter Schedule screen can be viewed by selecting the  tab located at the bottom of the screen.
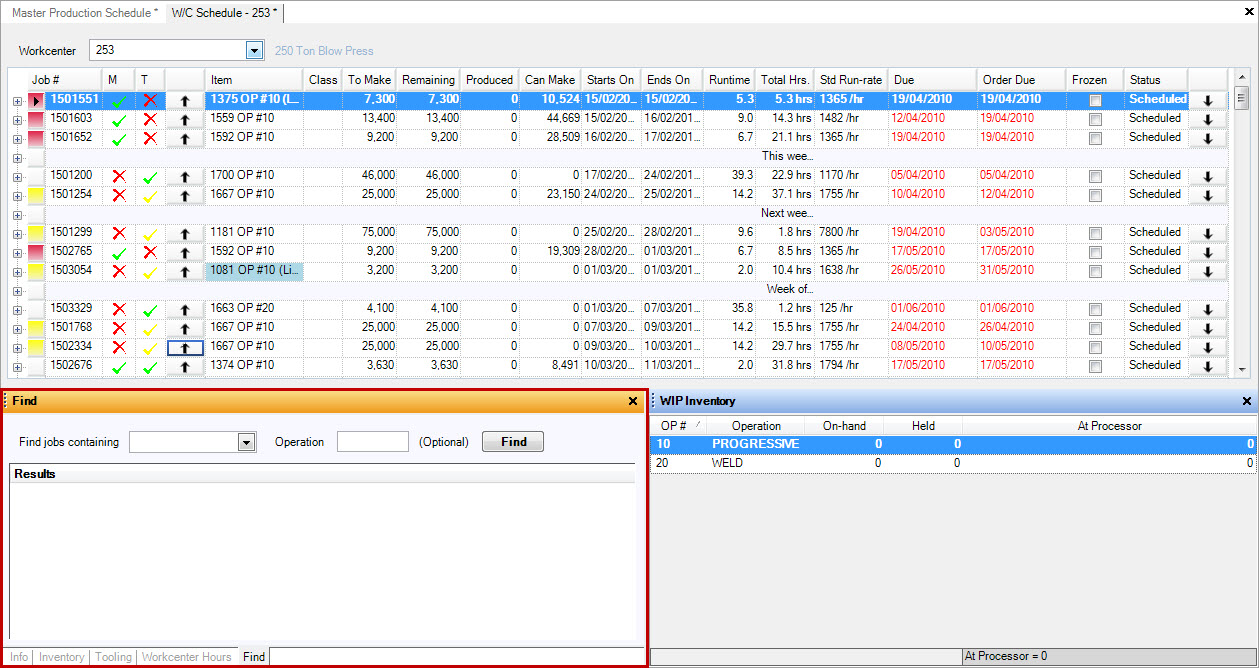
This tab allows users to search for an Item or Job quickly. To do so, select the Item Number from the Find Jobs Containing drop-down menu and enter in the Operation # (optional). You can also
select the Status by using the drop-down menu located beside Status. Then, click on the  button. The results will appear in the space
below Results.
Workcenter Assignments Tab
The Workcenter Assignments tab on the Workcenter Schedule screen can be viewed by selecting the  tab located at the bottom of
the screen.
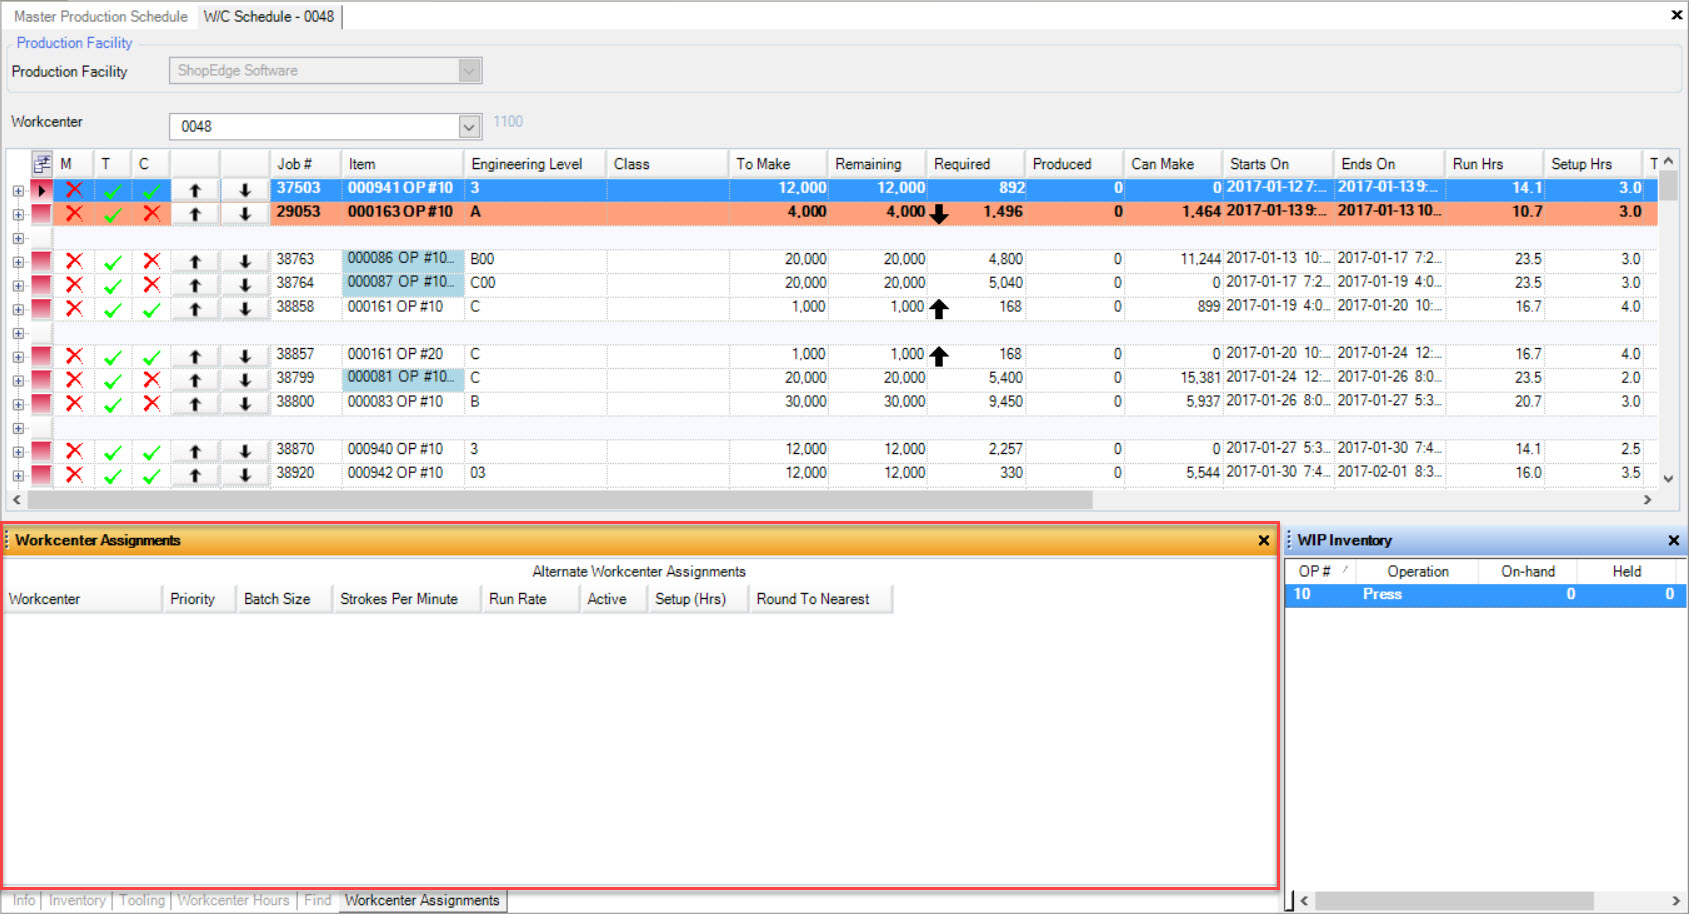
This tab allows users to view all of the Workcenter Assignments. The details include the Workcenter, Priority, Batch Size, Strokes Per Minute, Run Rate, Active, Setup (Hrs.), and Round to Nearest.
WIP Inventory Tab
The WIP Inventory tab on the Workcenter Schedule screen can be viewed to the bottom right corner of the screen.
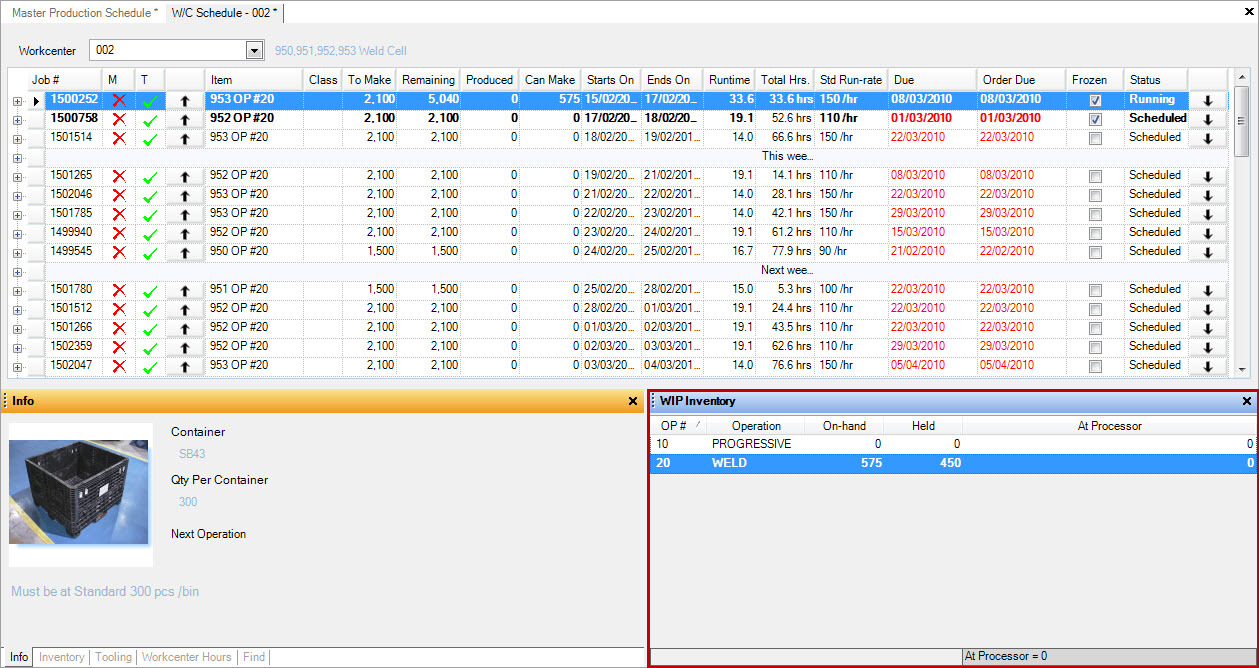
Here, users can view all of the WIP Inventory levels by Operation for an Item.
Material and Tooling Availability
The Workcenter schedule displays current Material (M), Tooling (T) and Container (C) availability on the left side of the screen. If there is Material, Tooling, or Container
issues, you will notice a  in the column. If there is enough Material, Tooling, and Container available, you will notice a
 in the column.
To view Material details (if there is an issue or not), simply expand the appropriate Job by clicking on the plus sign beside the Job number. You can further expand the Material details to view On-Hand Tags and Quantities by clicking the plus sign once more.
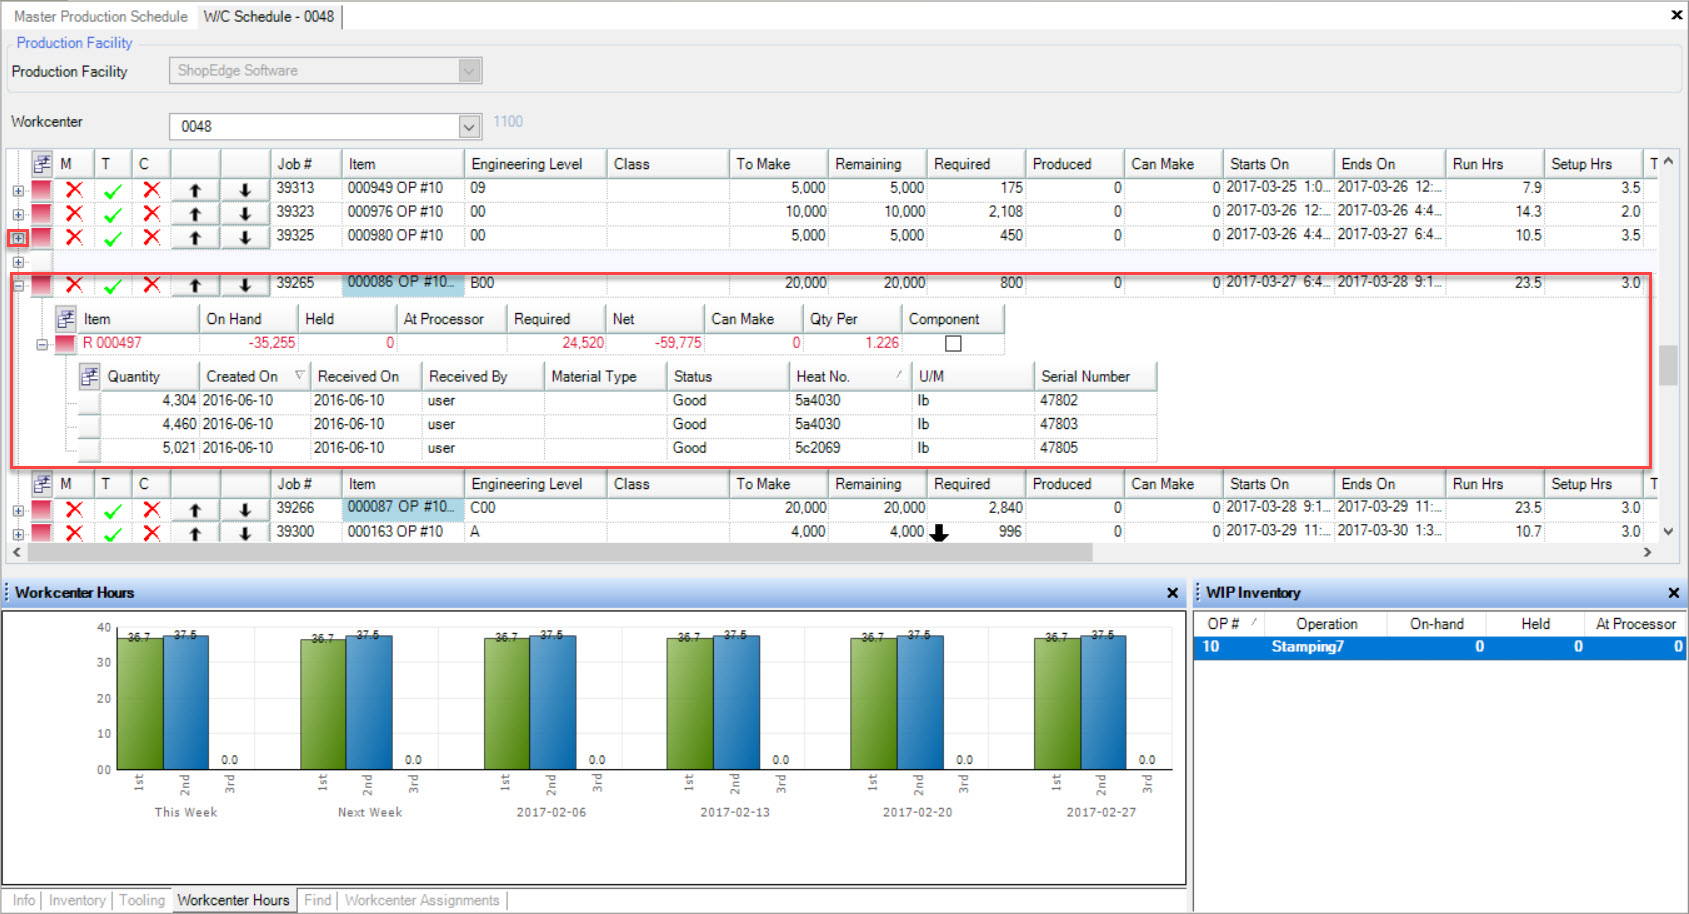
If a Tooling checkmark is yellow:  , then there is one or more overdue preventative maintenance checks that are scheduled for that particular
Tooling Item.
Job Detail Screen
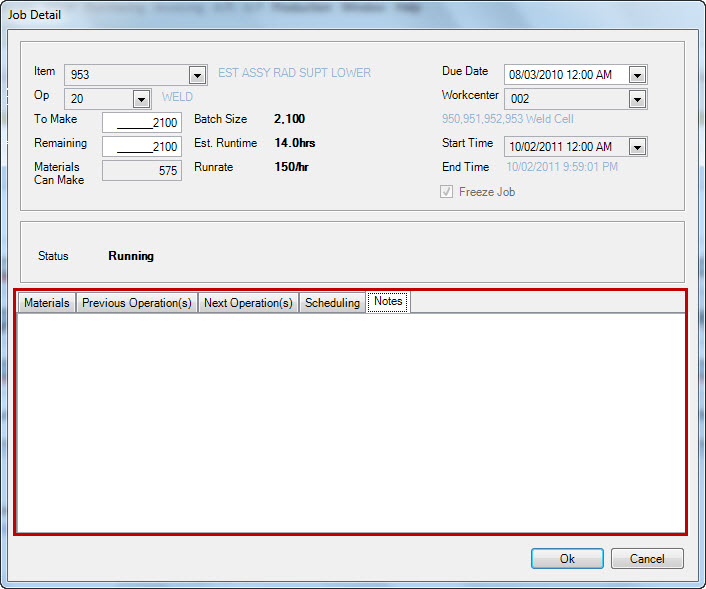
Double-clicking on a Job in the Workcenter schedule screen will open the Job Detail window.
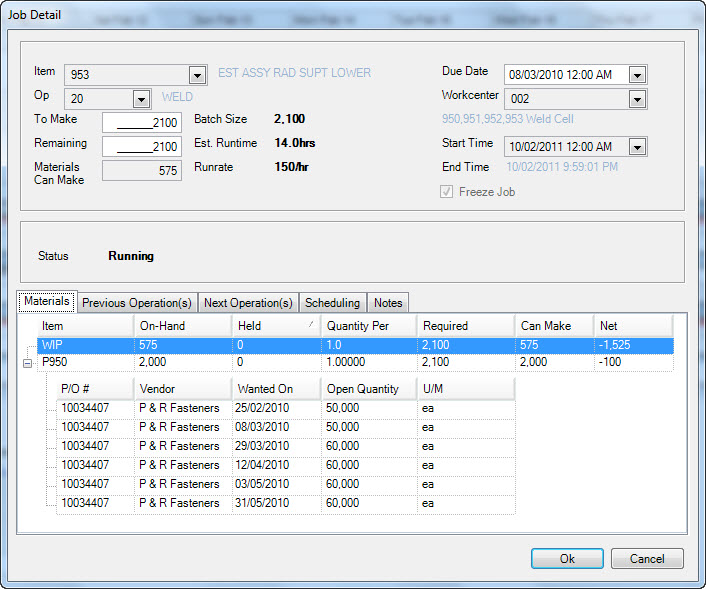
The Job Detail window will provide users will detailed information regarding the selected Job. Located in this window, there are different tabs that users can select such as Materials, Previous Operation(s), Next Operation(s), Scheduling, Notes, and Workcenter Assignments.
Materials Tab
The Material details for a job can be viewed by clicking on the  tab.
tab.
Here, users can view the Materials used for the Job, including any Raw Materials, Components, or WIP Materials. You can also click on the plus sign to expand each Material to see their P/O #, Vendor, Wanted On date, Open Quantity, and Unit of Measure (U/M). To open a P/O, double-click on the appropriate row.
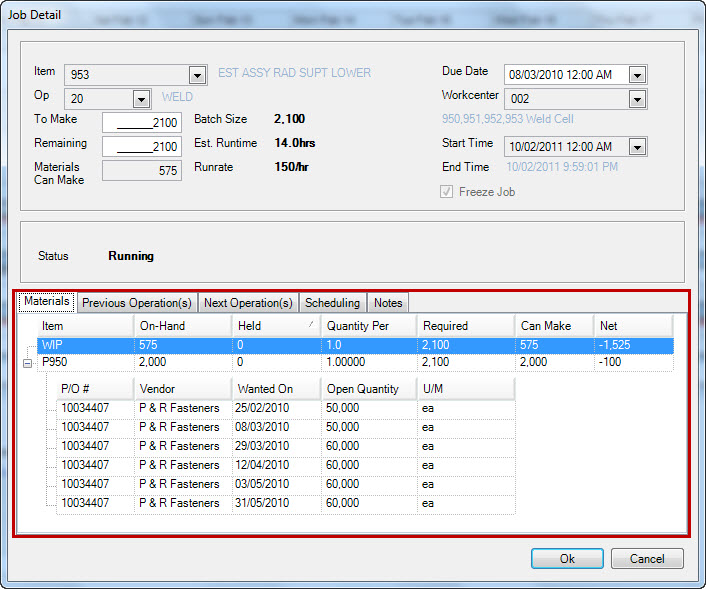
This screen is helpful in determining how much Materials you have On-Hand, as well as, how much you will use in Production (i.e. you may wish to run out a coil or bin of parts).
Previous Operation(s) Tab
The Previous Operation(s) details for a job can be viewed by clicking on the  tab.
tab.
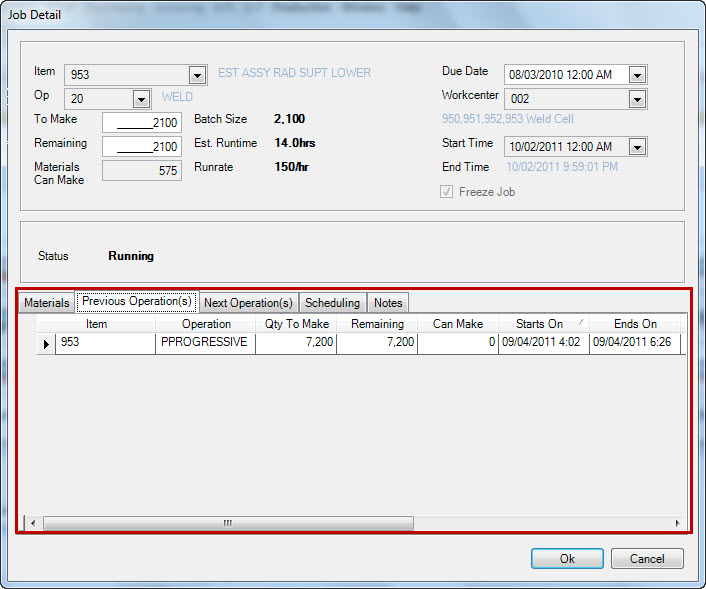
Here, you can view any Previous Operation(s) for a Job.
Next Operation(s) Tab
The Next Operation(s) details for a Job can be viewed by clicking on the  tab.
tab.
Here, you can view any upcoming Operation(s) for a Job.
Scheduling Tab
The Scheduling details for a Job can be viewed by clicking on the  tab.
tab.
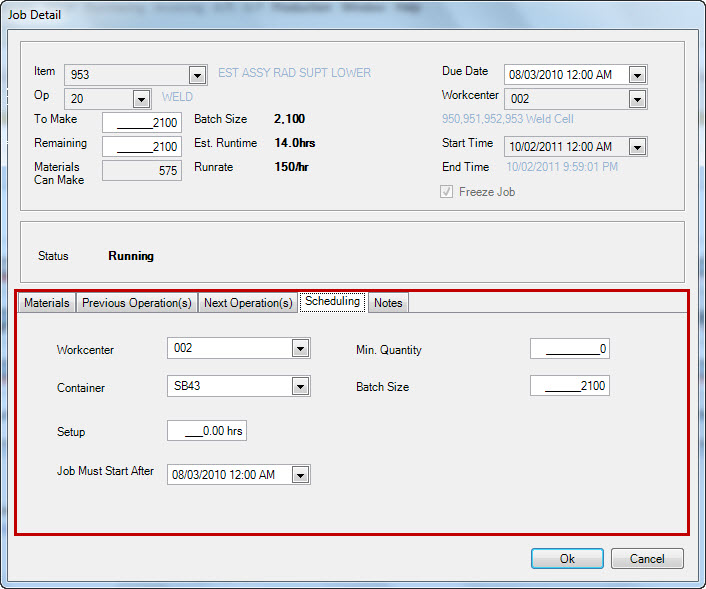
Here, you can change a Workcenter or Container, enter in a Minimum Quantity or Batch Size, adjust Setup hours, and enter a date that the Job must start after.
Notes Tab
The Notes for a Job can be viewed by clicking on the  tab.
tab.
Here, you can view any Notes for a Job as well as add, edit, or remove them by using the textbox provided.
Workcenter Assignments Tab
The Workcenter Assignments for a Job can be viewed by clicking on the  tab.
tab.
Here, users are able to view the Workcenter, Priority, Batch Size, Strokes Per Minute, Run Rate, Active, Setup (Hrs), and Round to Nearest for all available Workcenter Assignments for the selected Job.
If any changes have been made, click on the  button.
Make sure to save your changes before exiting the screen.
Resequencing Jobs
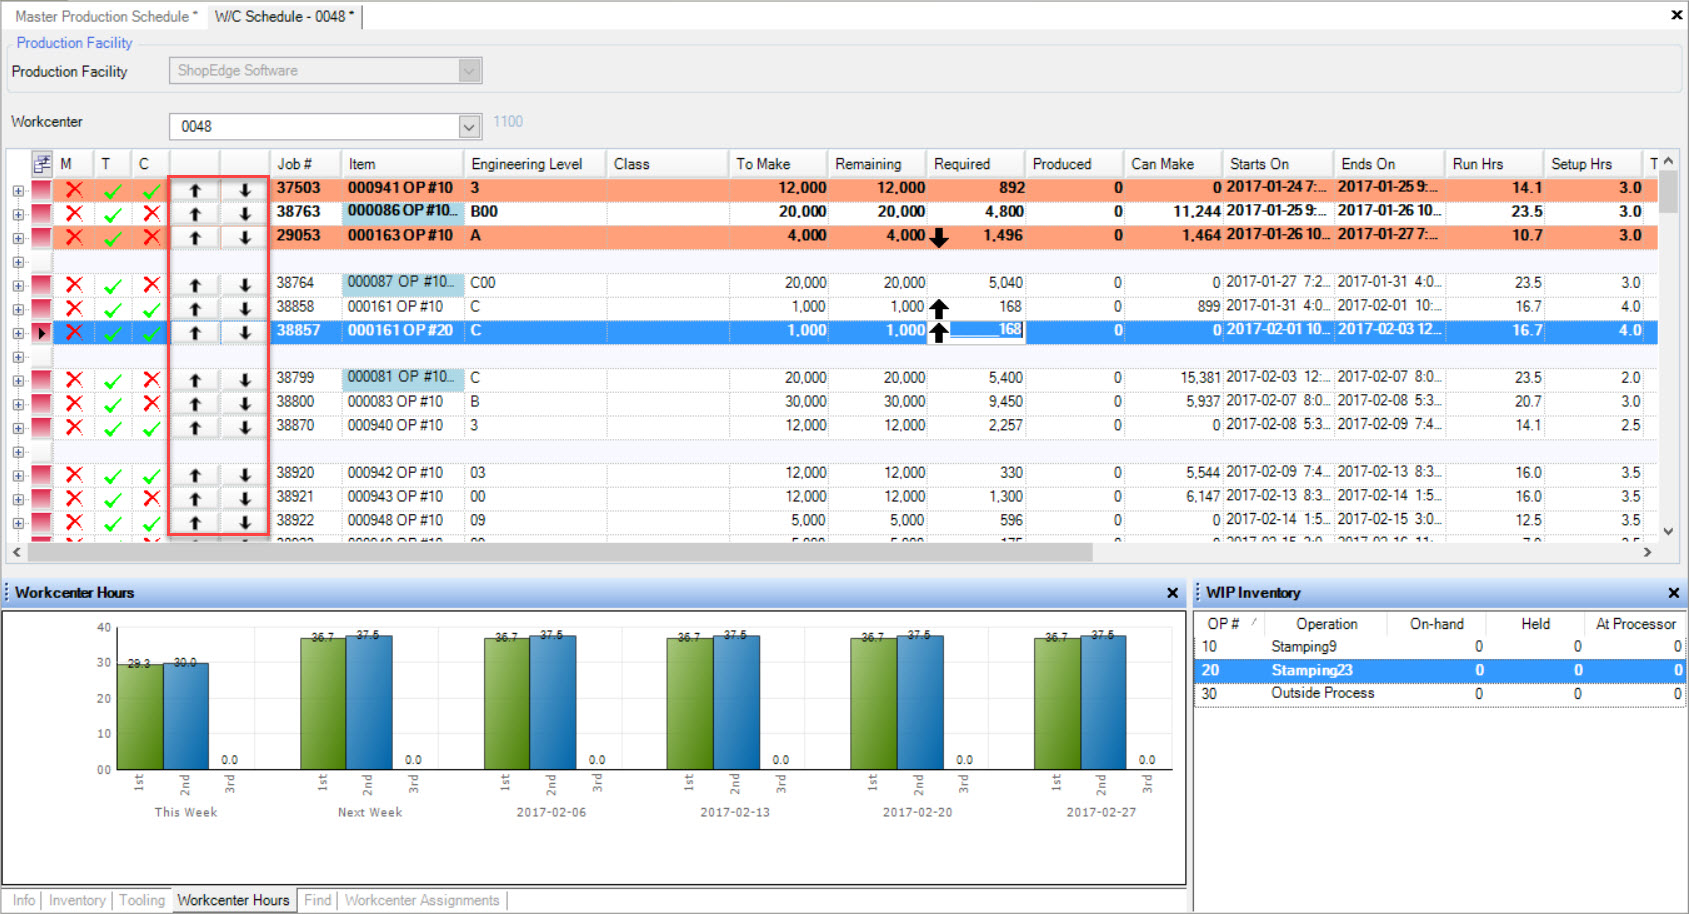
To resequence Jobs on the Workcenter Schedule screen, simply use the  arrow or the
  arrow
until the Jobs are in the sequence you wish.
Note
Jobs that are frozen can be moved, but will have their Frozen status removed and will need to be Refrozen if desired.
Adjusting Job Quantities
To adjust the Job Quantity, click in the To Make column in the appropriate row of the Job you wish to adjust. Enter a new Job Quantity.
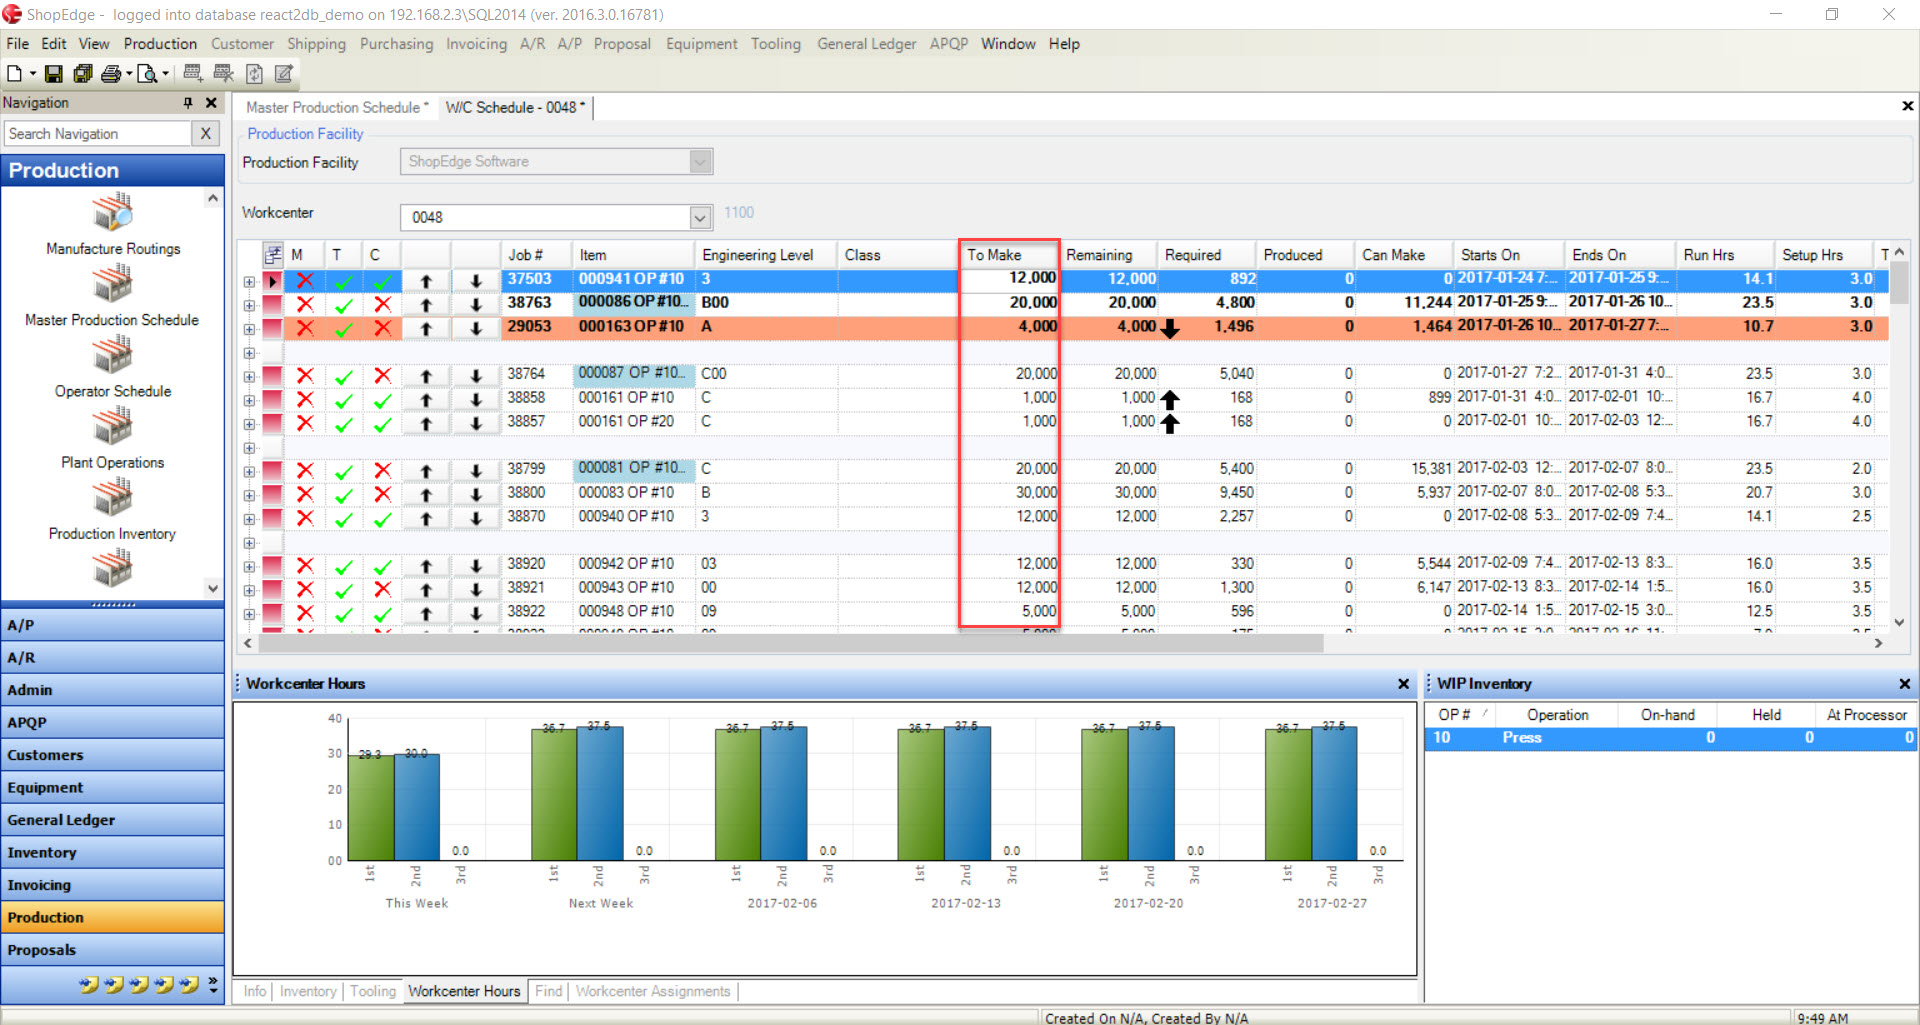
Make sure to save your changes before exiting the screen.
Changing Job Start Time
To adjust the Start Time of a Job, use the drop-down Calendar in the Start Time column in the row of the Job you wish to modify. Users can also type in the new date.
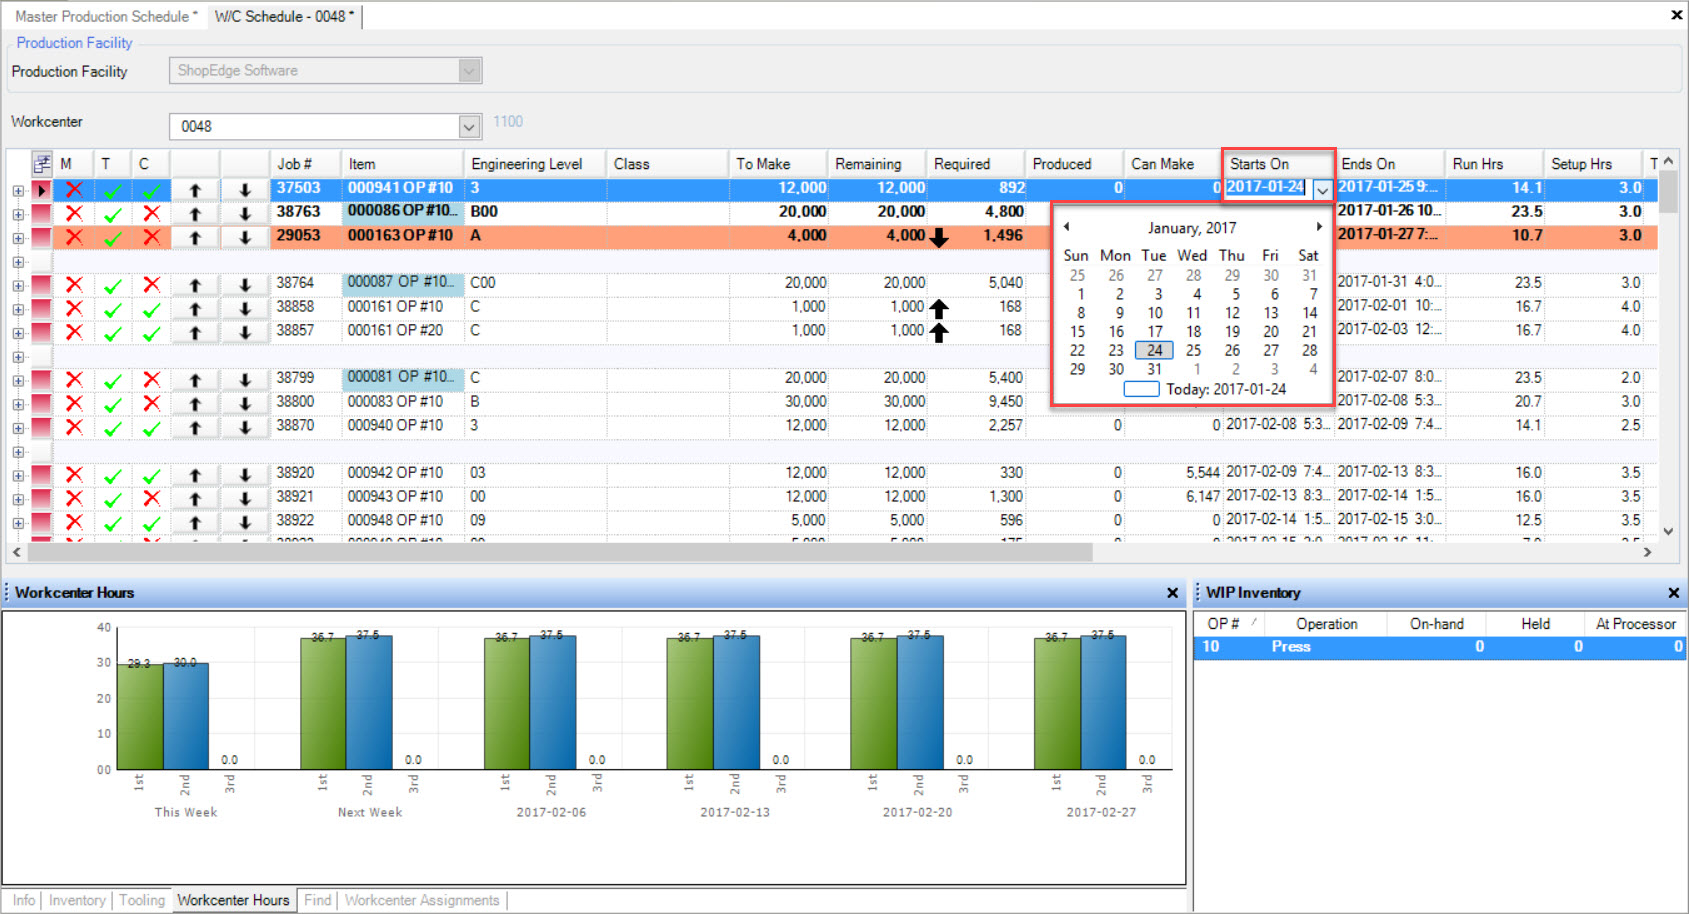
Make sure to save your changes before exiting the screen.
Freezing/Unfreezing a Job
To Freeze/Unfreeze a Job, click on the checkbox under the Frozen column in the row of the Job you wish to Freeze or Unfreeze.
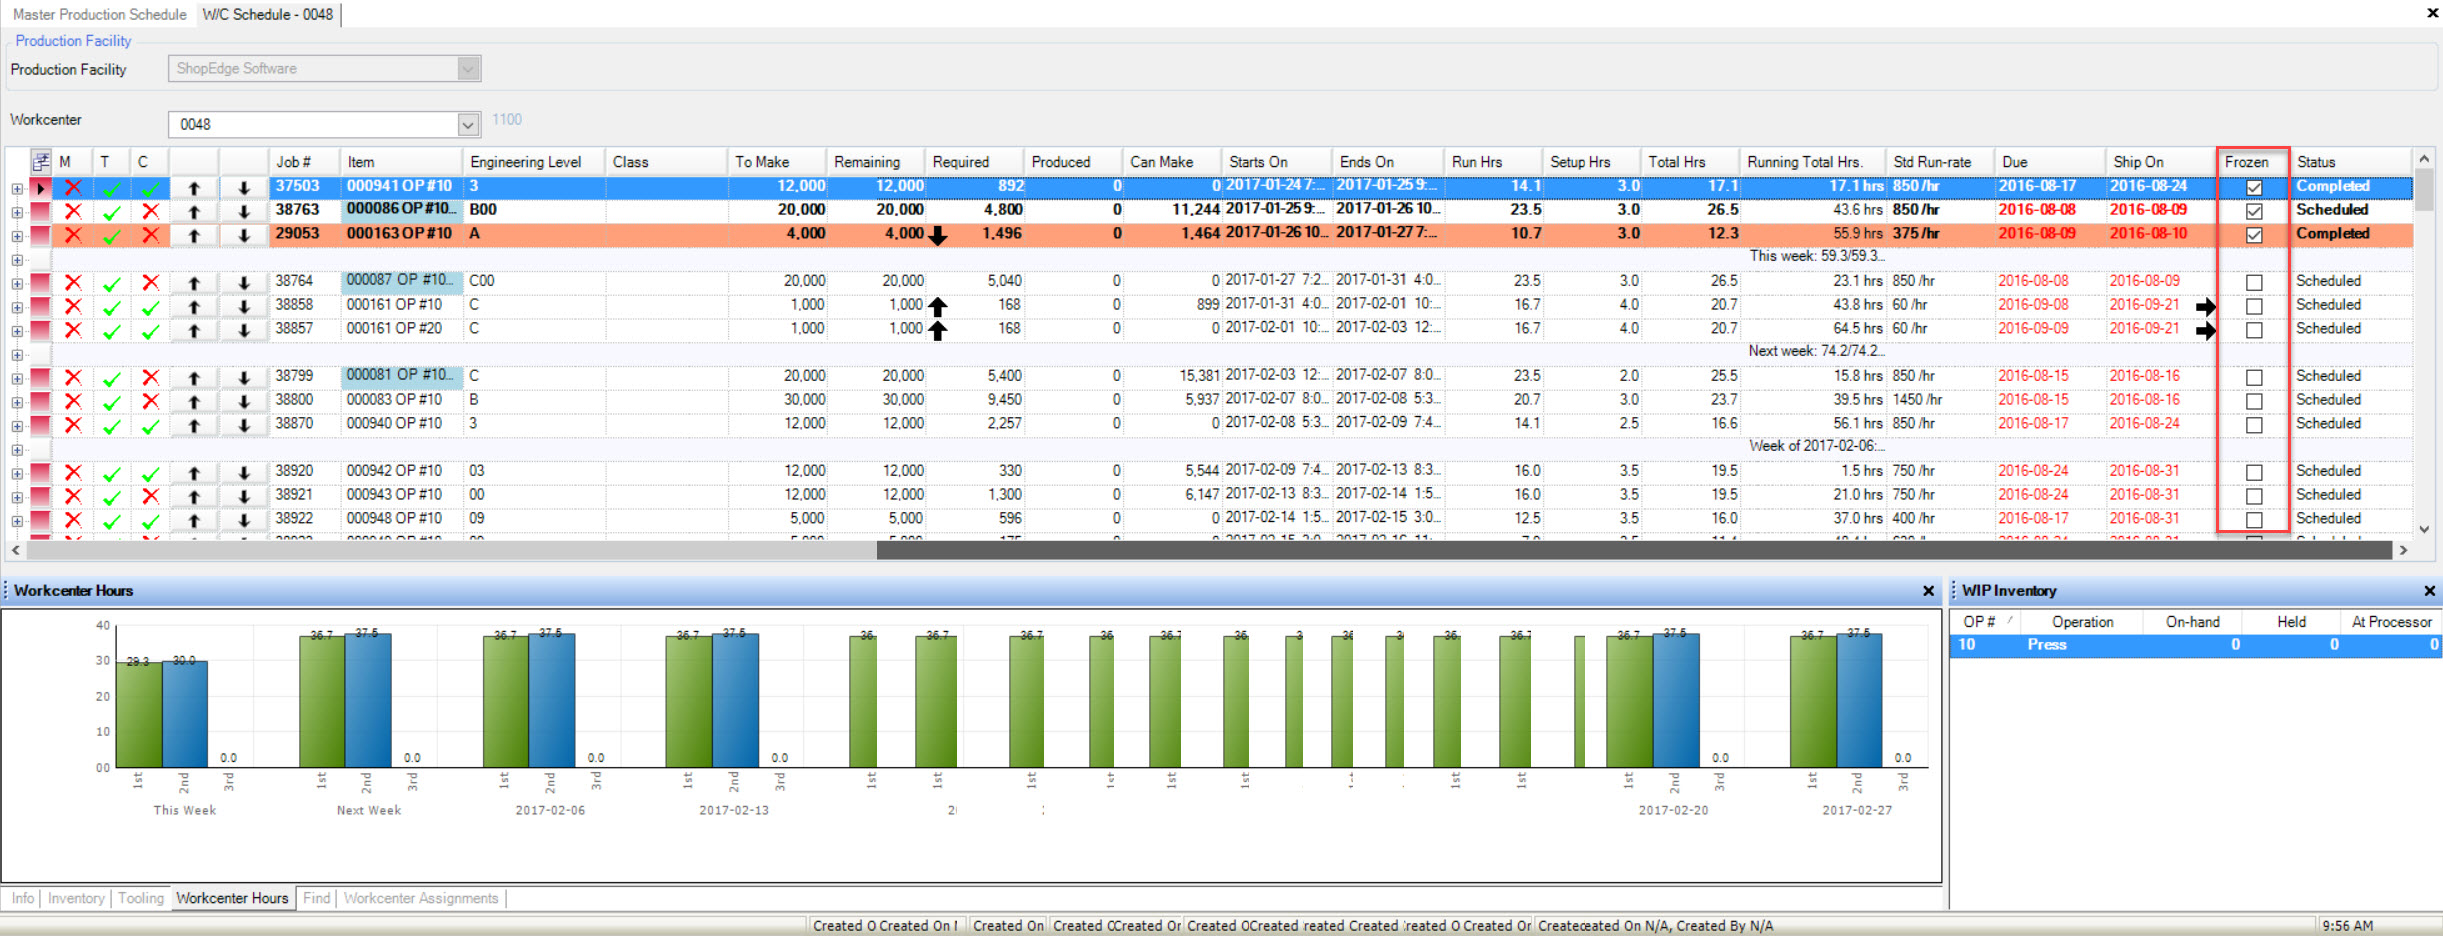
Make sure to save your changes before exiting the screen.
Deleting a Job
To delete a Job, highlight the appropriate row of the Job you wish to delete. Use your Delete key and when the system prompts you, click on the  button.
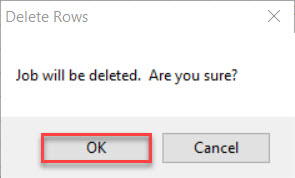
The selected Job(s) will be deleted. Make sure to save your changes before exiting the screen.