Packing Slips
Packing Slips are located under the Shipping module in the system. To view all Open Packing Slips, navigate to the  tab and click on the
 ![]() icon.
This will open the Open Packing Slips screen.
icon.
This will open the Open Packing Slips screen.
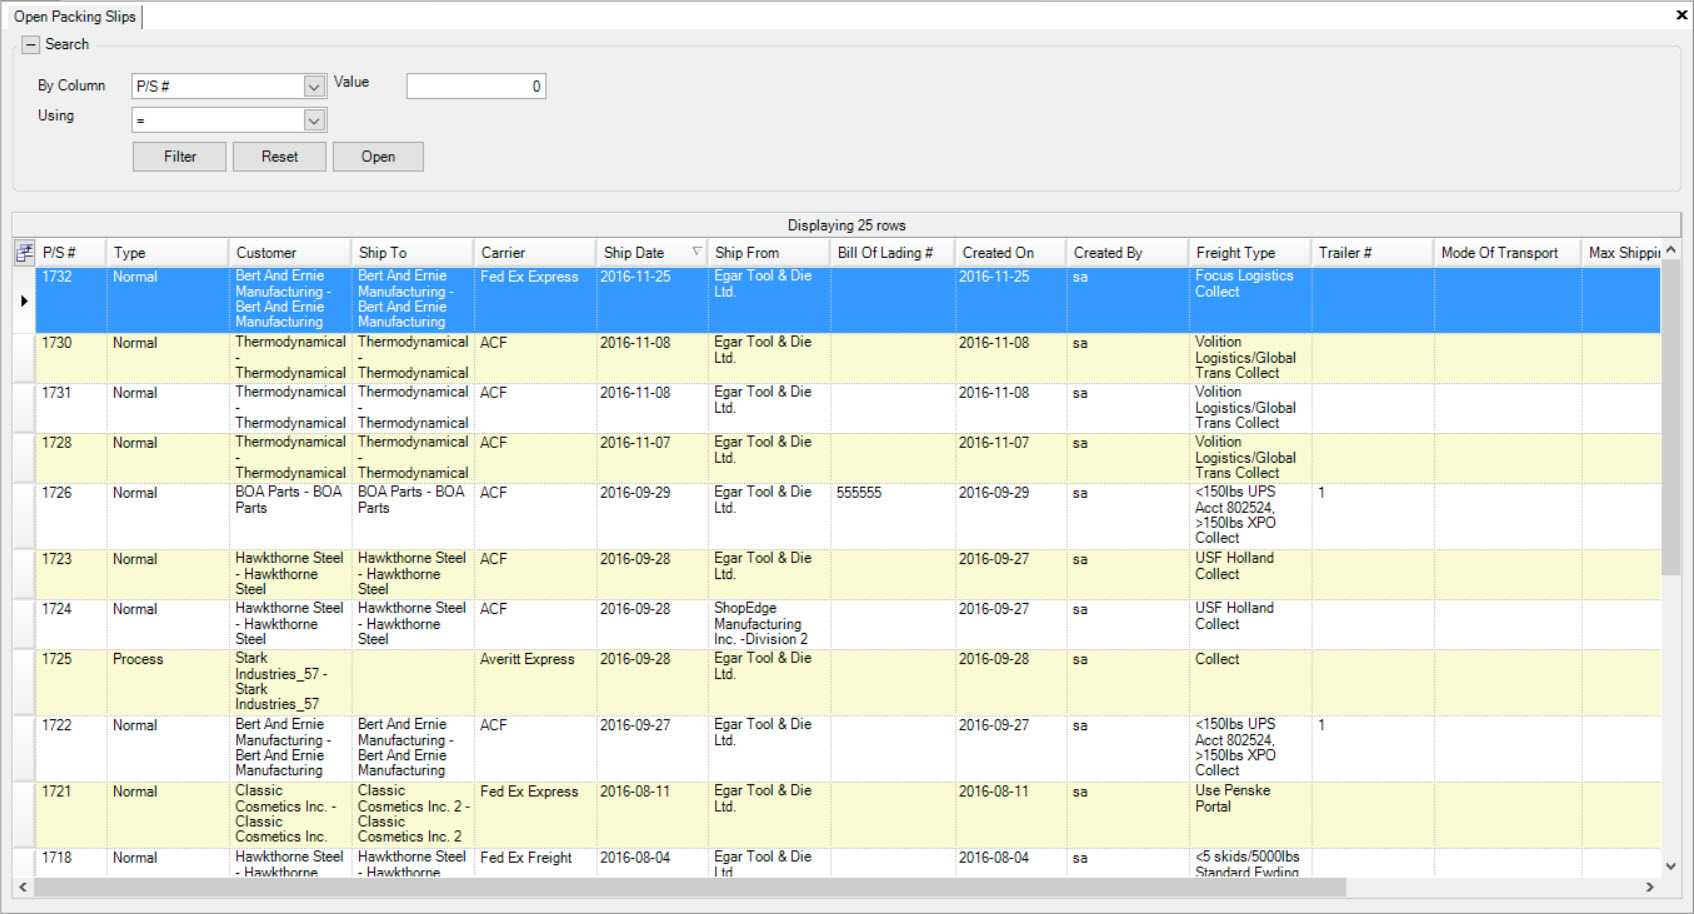
To open an existing Packing Slip, double-click on the appropriate row.
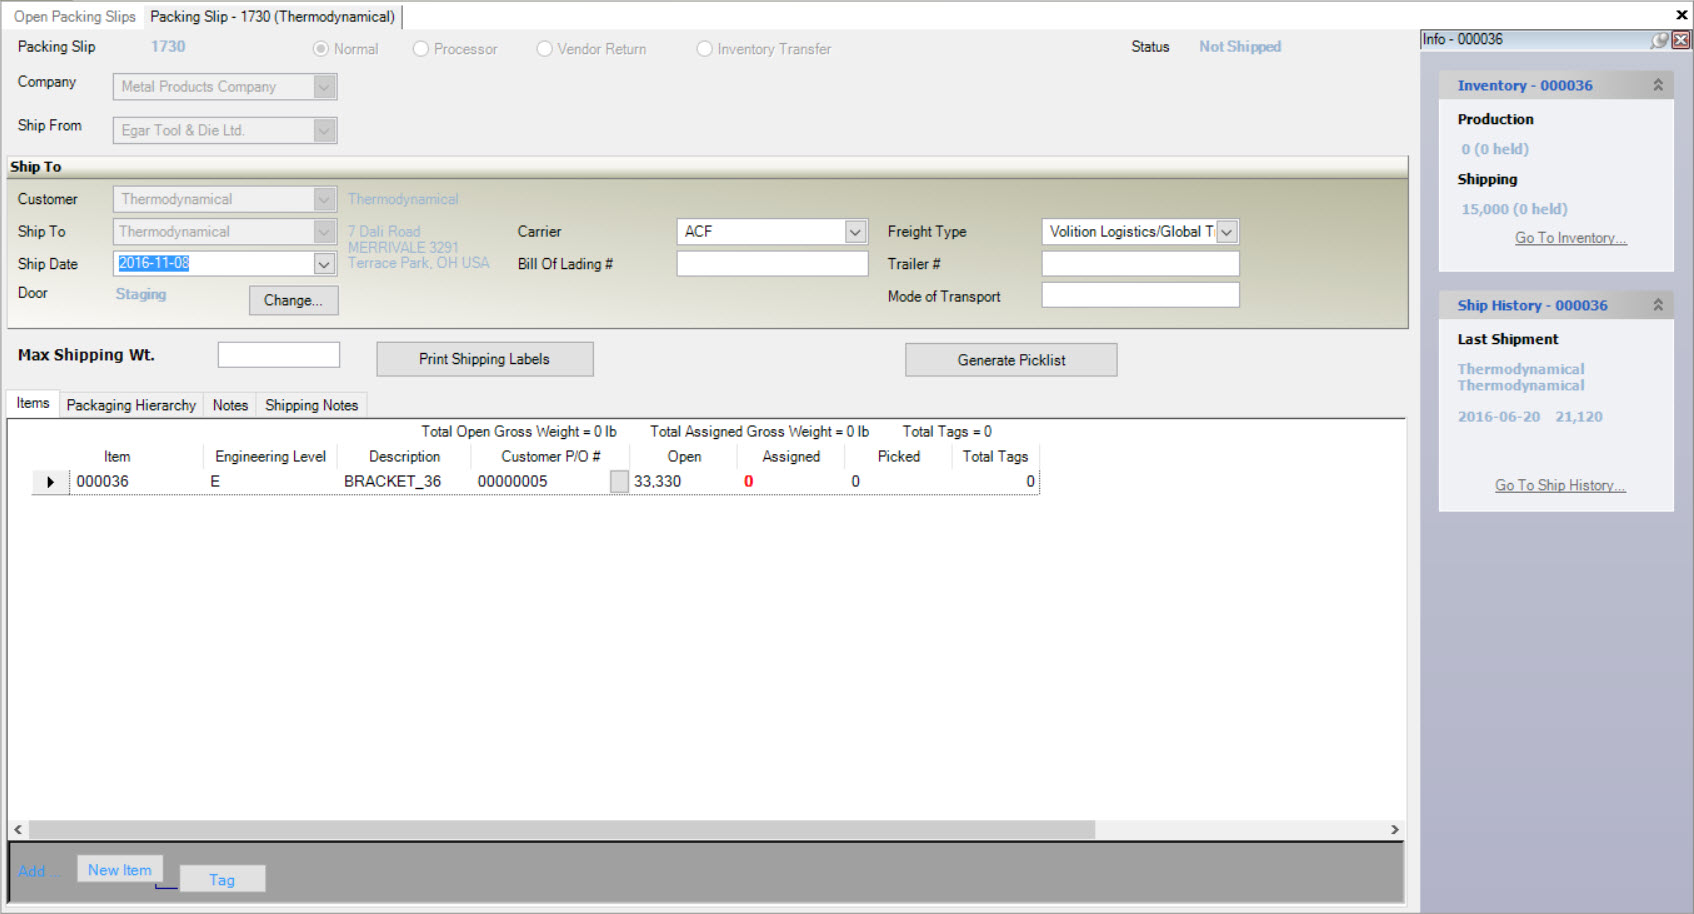
Once it is open, users can edit, add Items and Tags, Print Shipping Labels, Generate Picklists, etc. before shipping it in the system.
Creating a New Packing Slip
There are three different ways to create a new Packing Slip in the system. The first way is to press the Ctrl + Shift + P keys. The second way is to navigate to File > New > Packing Slip.
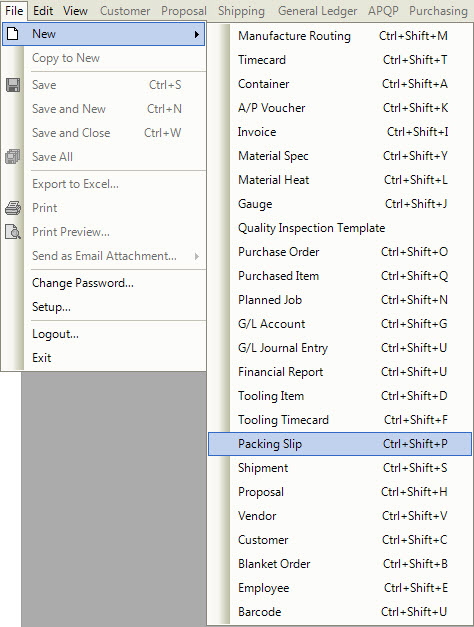
The last way is the click on the  button, and then on the Packing Slip option.
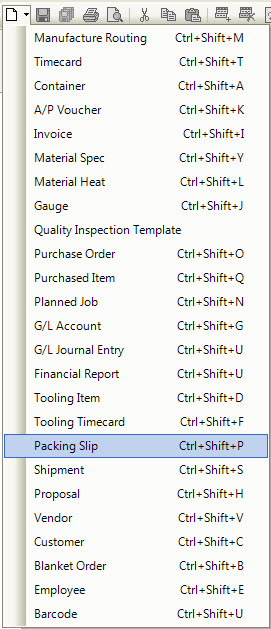
Each of these options will open a new Packing Slip screen.
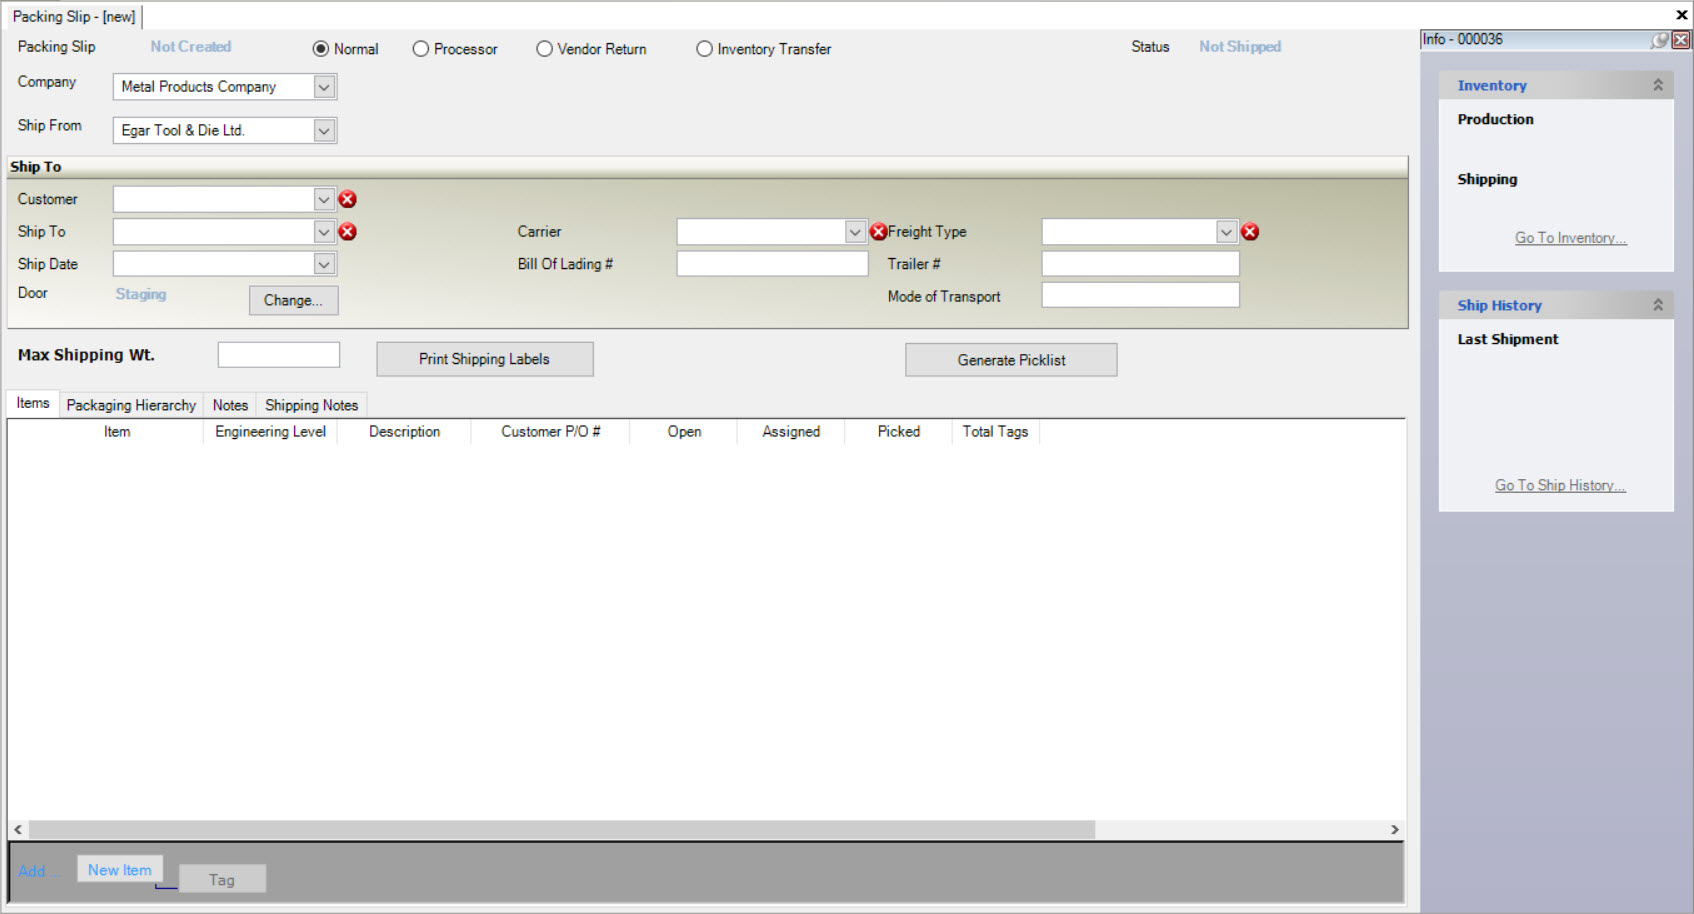
Users will need to decide if they are creating a Normal Packing Slip (shipment to a Customer), or a Processor Packing Slip (shipment to a Vendor).
Normal Packing Slip
To create a new Normal Packing Slip, click on the  button, and then on the Packing Slip option.
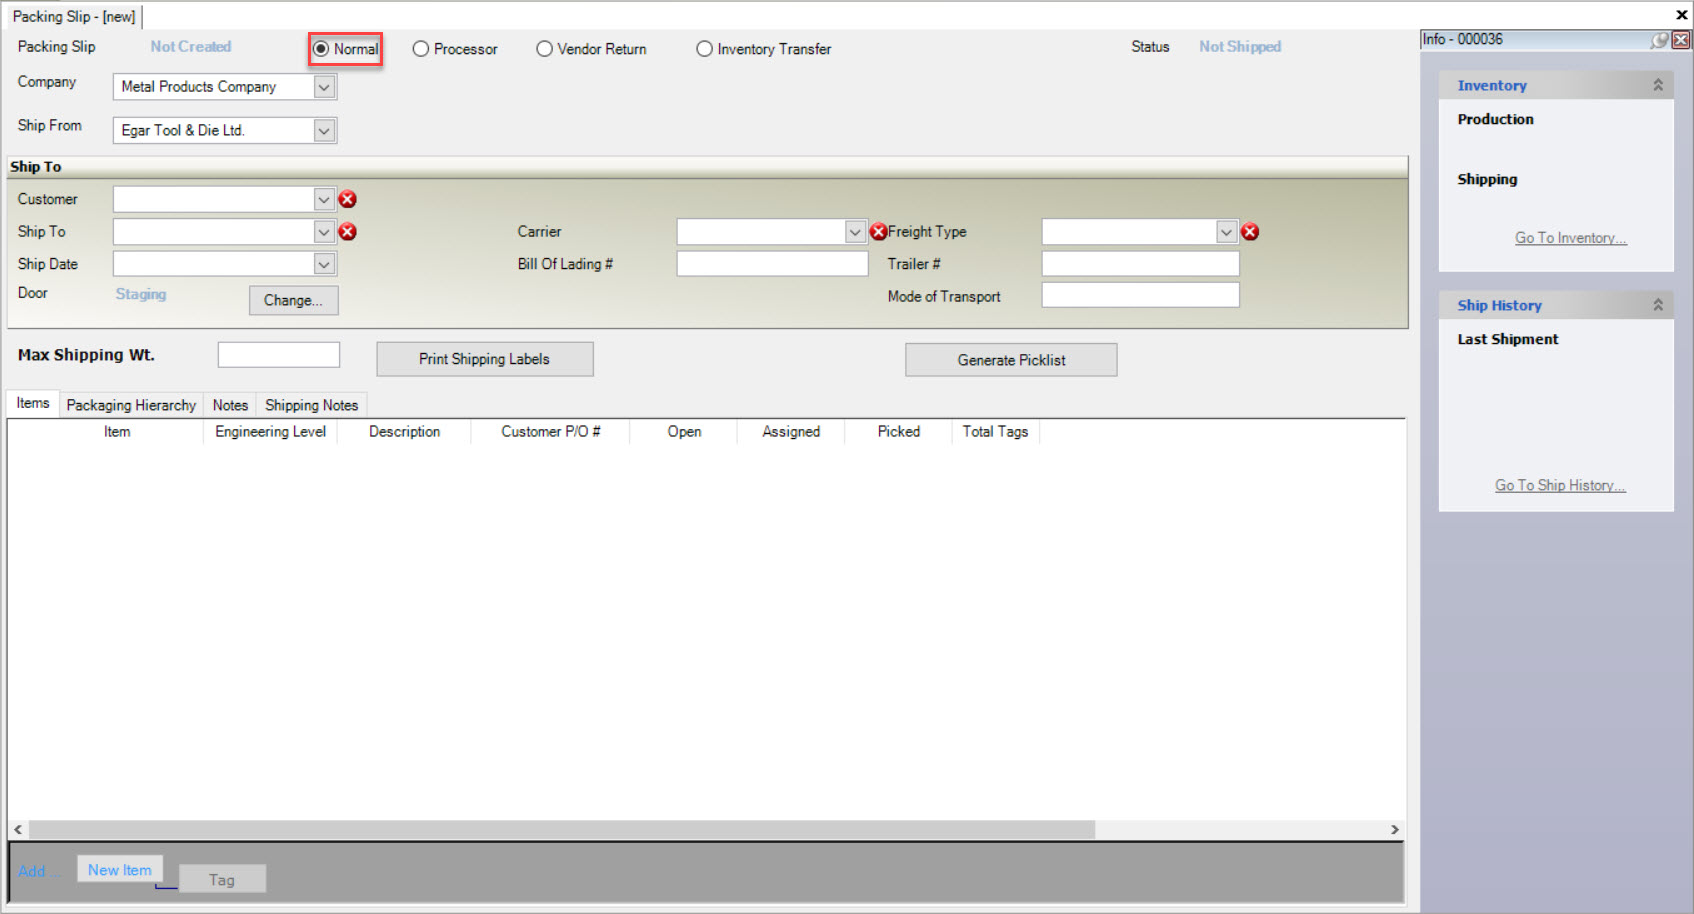
This will open a new Packing Slip screen. Make sure that the Normal option is selected.
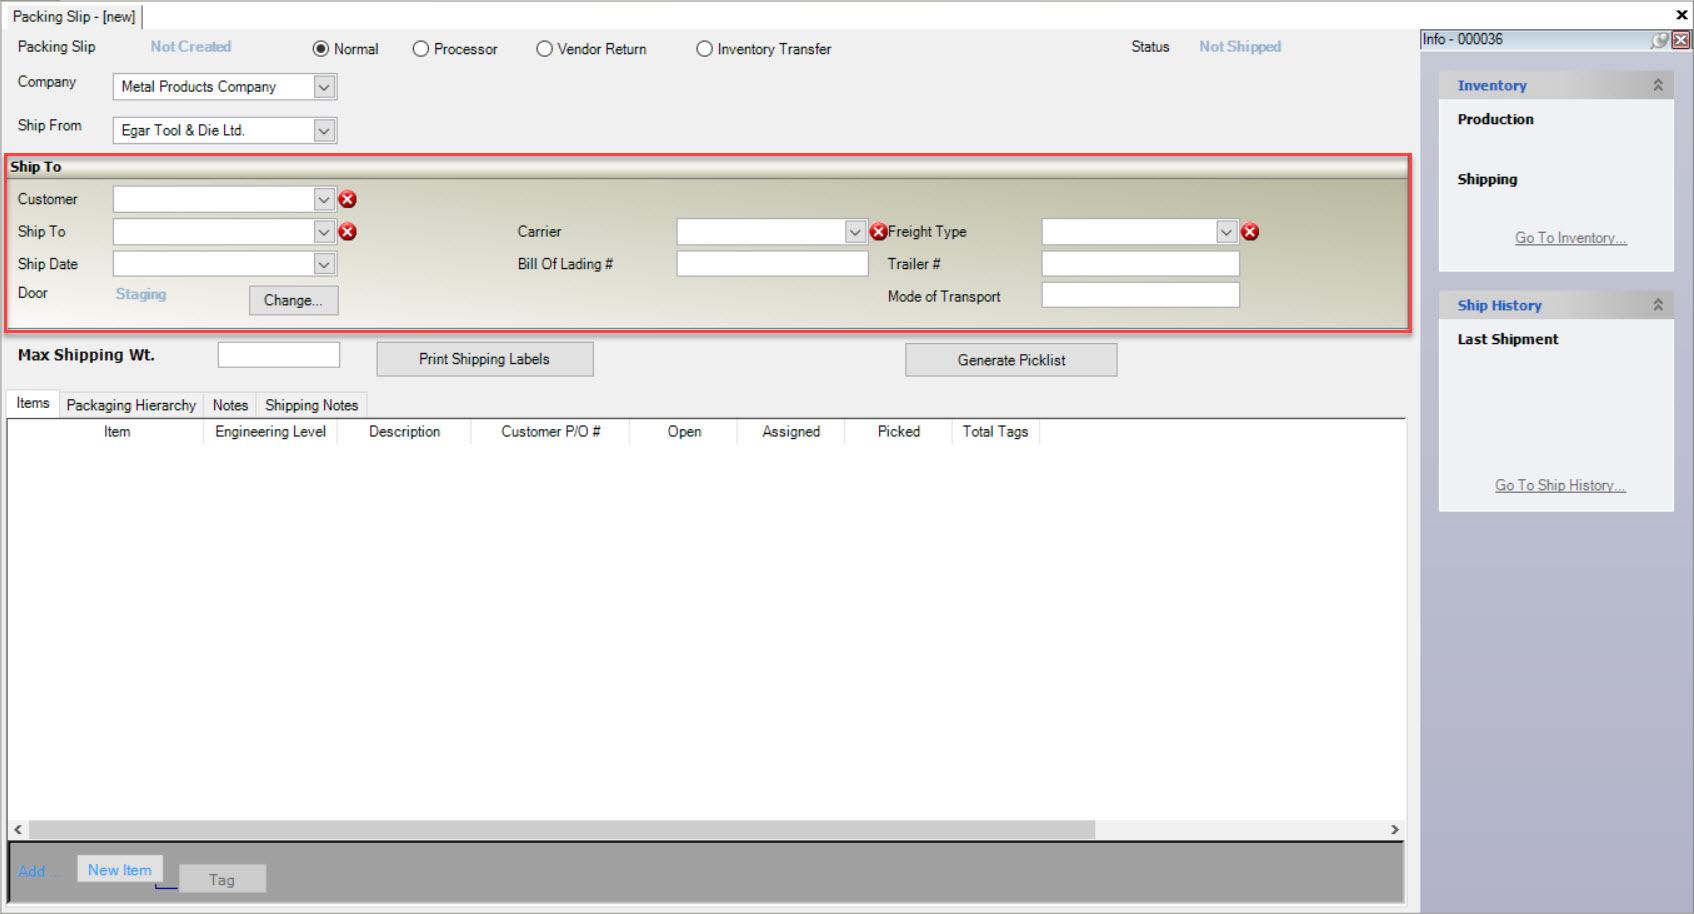
Users must fill in the header information such as selecting the Customer, Ship To, Ship Date, Carrier, and Freight Type. This can be done by using the appropriate drop-down menus.
Note
By selecting the Customer, the Ship To and Freight Type will automatically be populated. Users still have the option to change them if necessary.
The system will automatically generate a Shipping Door as well, based on the Default selected in the system, but it can be changed by clicking
on the  button.
Note
Items cannot be added to the Packing Slip until the Customer is established. If Items are on the Packing Slip, then the header information cannot be modified.
Note
When creating a new normal Packing Slip, users have the ability to add Notes and Shipping Notes using the tabs located below the header information.
Adding Items to a Normal Packing Slip
Once the header information is completed, users have the ability to add Items to the Packing Slip.
To start, click on the  button located at the bottom of the screen.
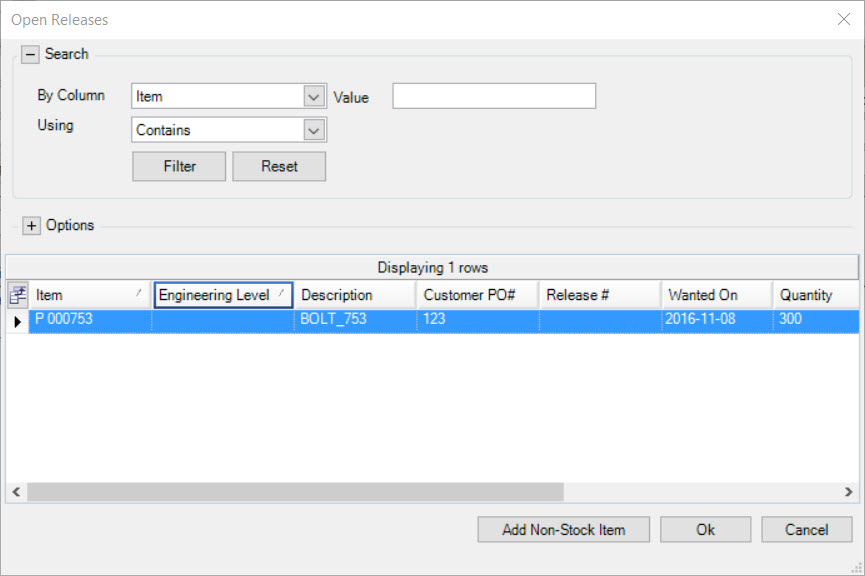
This will open the Open Releases window where users can view all Open Releases for the Customer and Plant in the system.
Note
Expand Options to select how far out you wish to view Releases for.
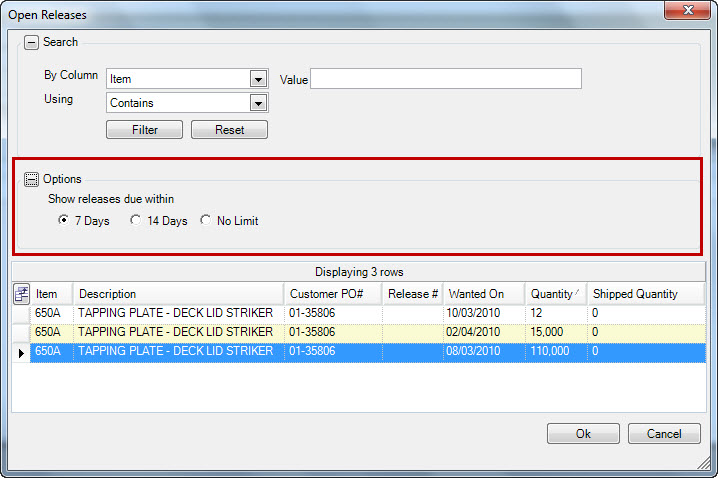
Select the Items you wish to add to the Packing Slip and click the  button. If there are 0 Items visible, you may select the Add Non-Stock Item
and a new row will appear on the Packing Slip. The
 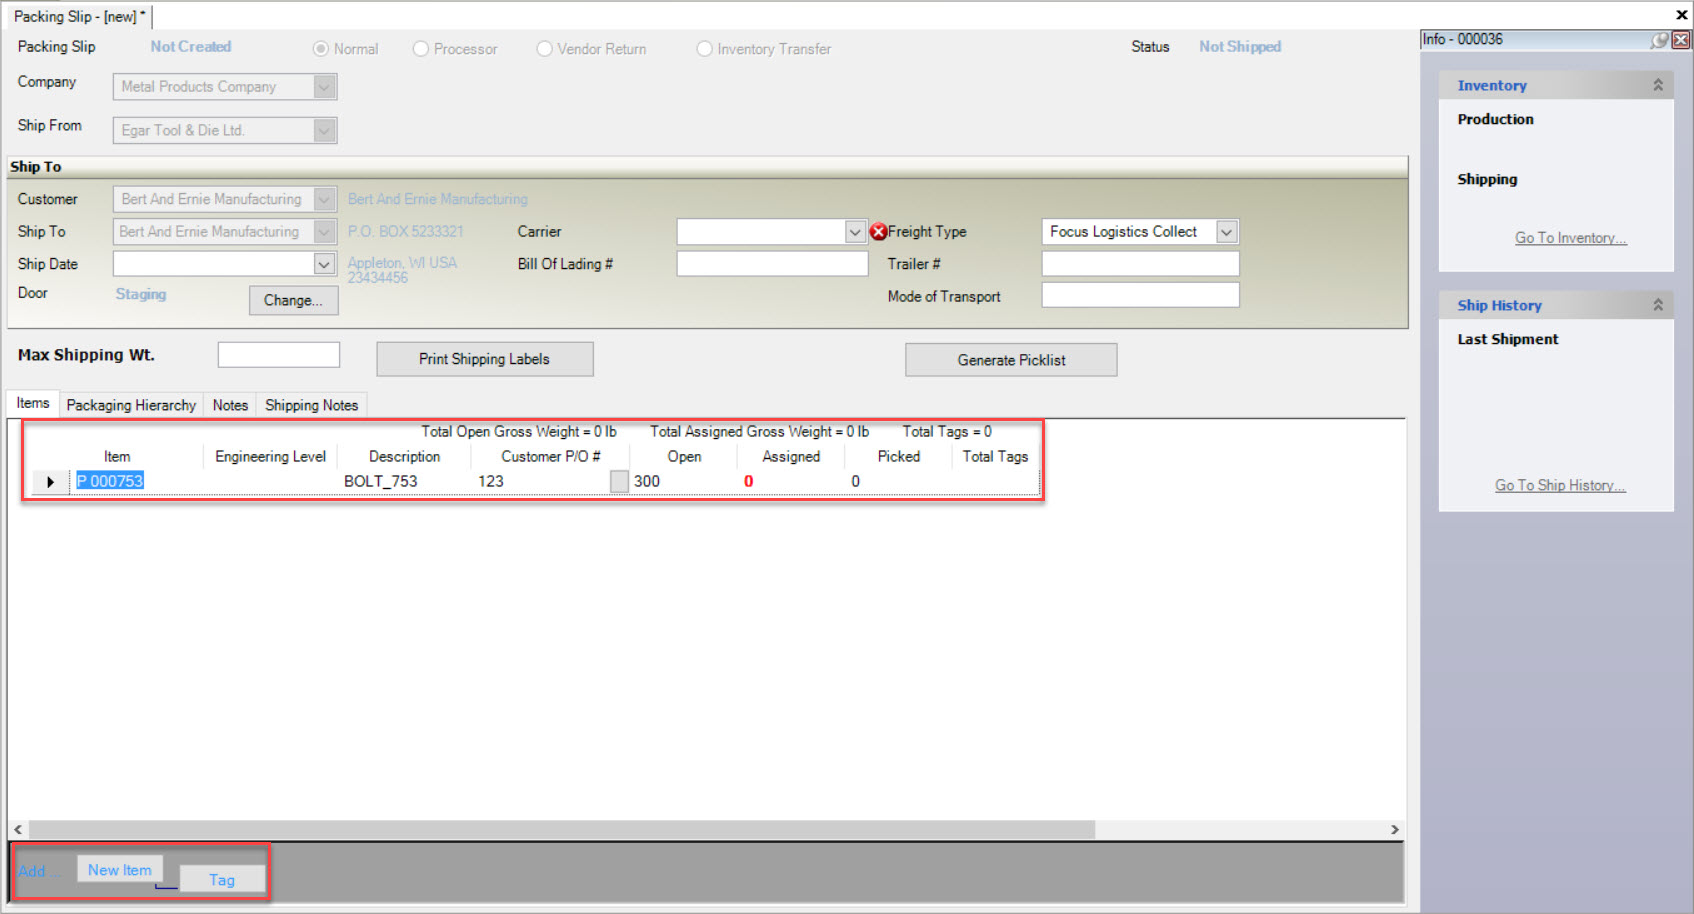 button will now become functional.
These Items are now ready to have a Tag(s) assigned to them. Items cannot be shipped until a Tag is assigned to them.
All Tags are unique and are never duplicated therefore, each Item will have a unique Tag assigned to it.
Note
The Open column has a number assigned (300). When adding Tag(s), the user should select Releases that do not over ship or under ship Items.
Adding Tags to Items on a Normal Packing Slip
To add a Tag(s) to Items on a normal Packing Slip, highlight the appropriate row of the Item you wish to add a Tag to.
The click on the  button located at the bottom of the screen.
A new row will appear located below the Item row. Tags are created here or selected from the available F/G Tags for that Item. Users must finish filling in the Tag row. If you save the screen, the Tags will be added to F/G Tags.
If you click on the button in the Serial # column, the Tag Lookup window will open.
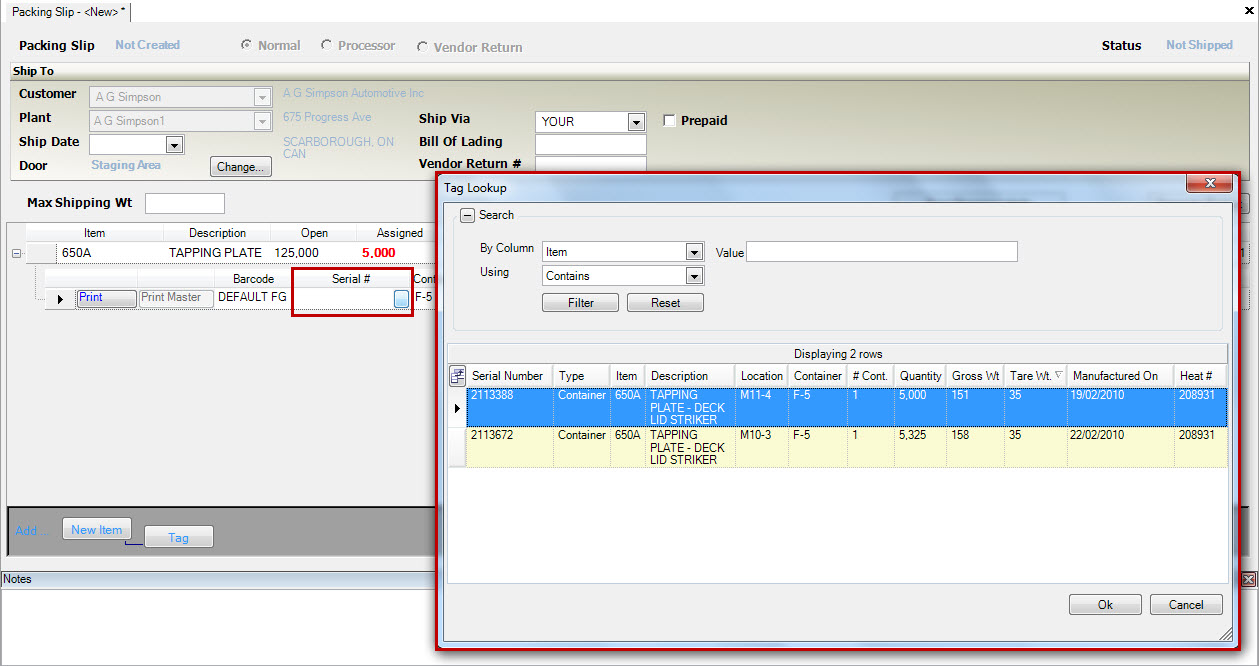
Tags should be selected that best match the Open quantity required. Once you have selected the Tags you wish to add to the Item, you will notice that the Assigned number will be updated to include the Tag totals. When the Assigned quantity matches the Open release quantity your shipment for that Item will be complete.
Generating a Picklist on a Normal Packing Slip
To generate a picklist on a normal Packing Slip, click on the  button. This will automatically generate Tags to fulfill open
release quantities (or as close to the open quantity as possible) for each Item on your Packing Slip, starting with Tags that were produced first, otherwise known as FIFO, or
First In First Out.
Saving a Normal Packing Slip
Users have the option to save a normal Packing Slip in the system. Users can then locate it, to add additional Items or Tags.
Simply perform a save at any time while working on it.
Shipping a Normal Packing Slip
Once you have Items and Tags added to a normal Packing Slip, users have the ability to now ship it.
To locate an Open Packing Slip, navigate to the  tab and click on the
 ![]() icon.
icon.
This will open the Open Packing Slips screen where you can locate all Packing Slips that have not yet been shipped in the system. To open and complete a Packing Slip, double-click on the appropriate Packing Slip row.

Select the Shipping menu located at the top of the screen and click on the Ship this P/S... option.
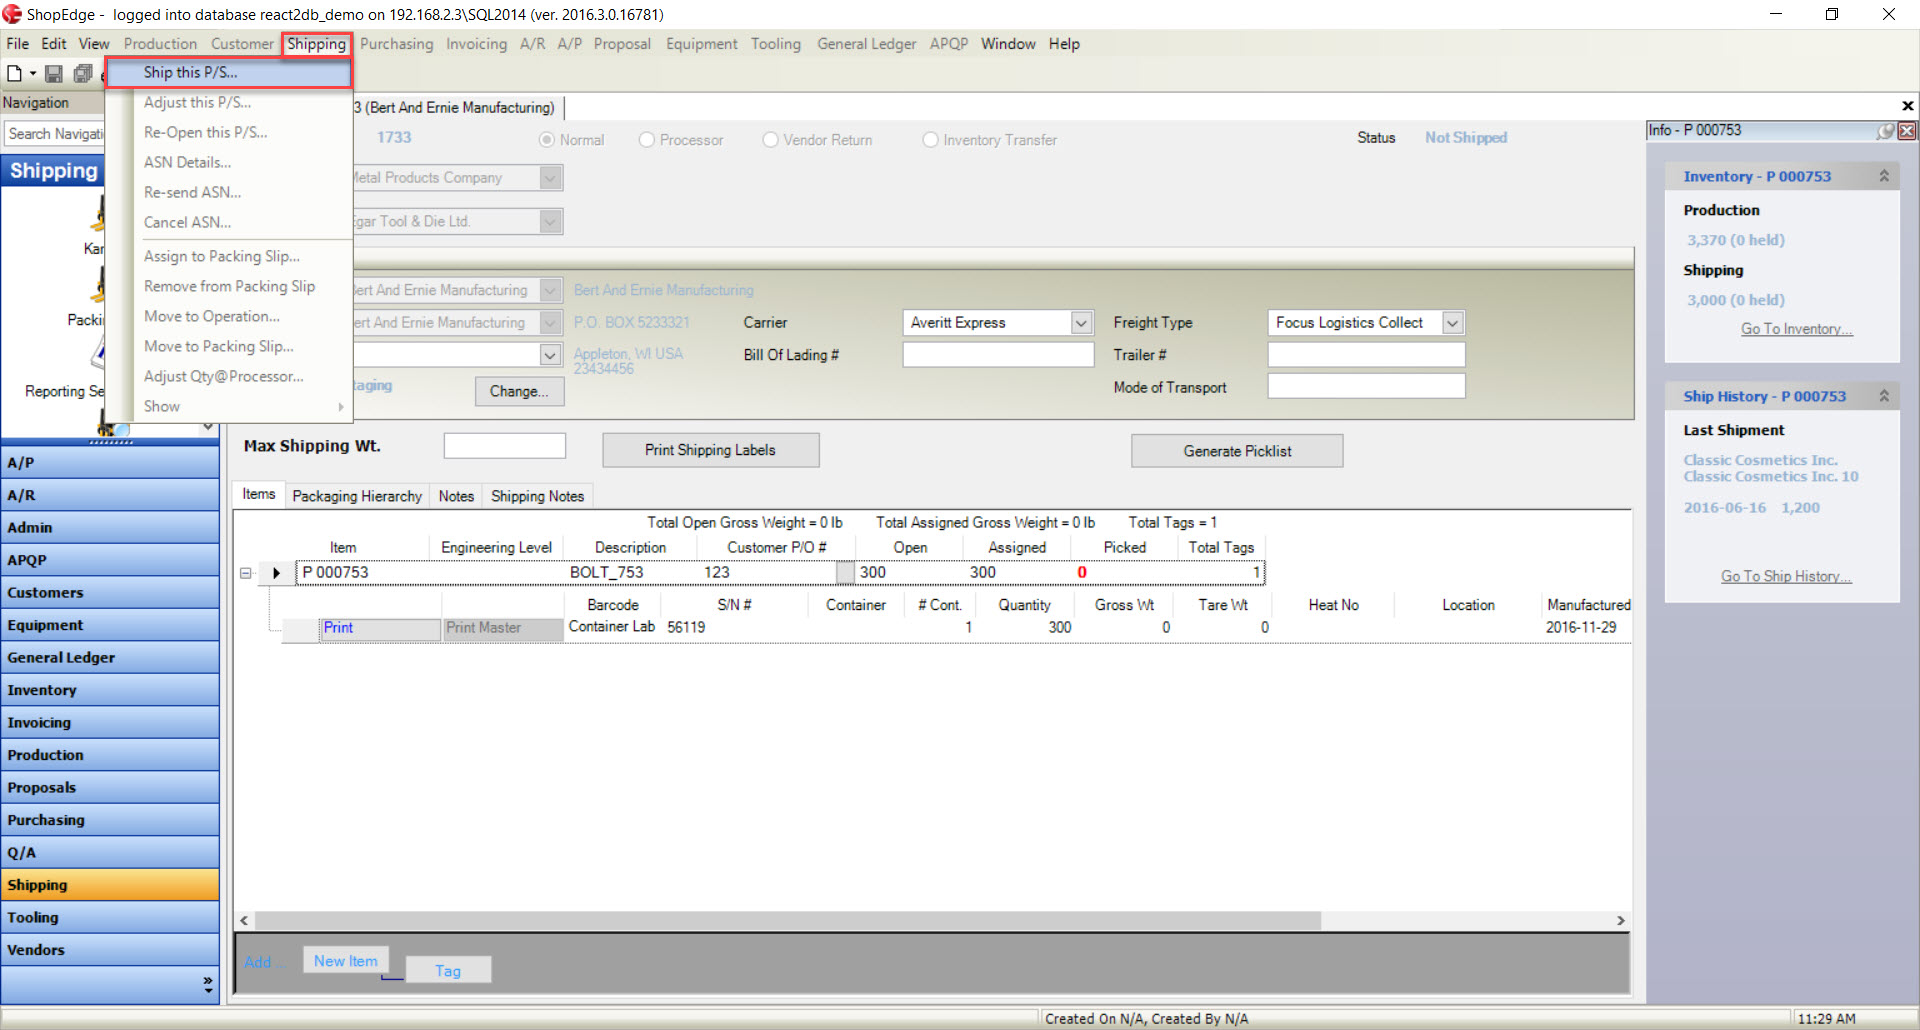
The Ship Packing Slip window will appear. The system will confirm the Ship Date (it will default to the current date), and you can indicate if you wish the Shipping Paperwork to be printed at the same time.
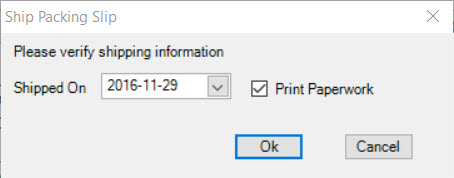
Once you have verified the Shipped On date, click on the  button to ship the normal Packing Slip.
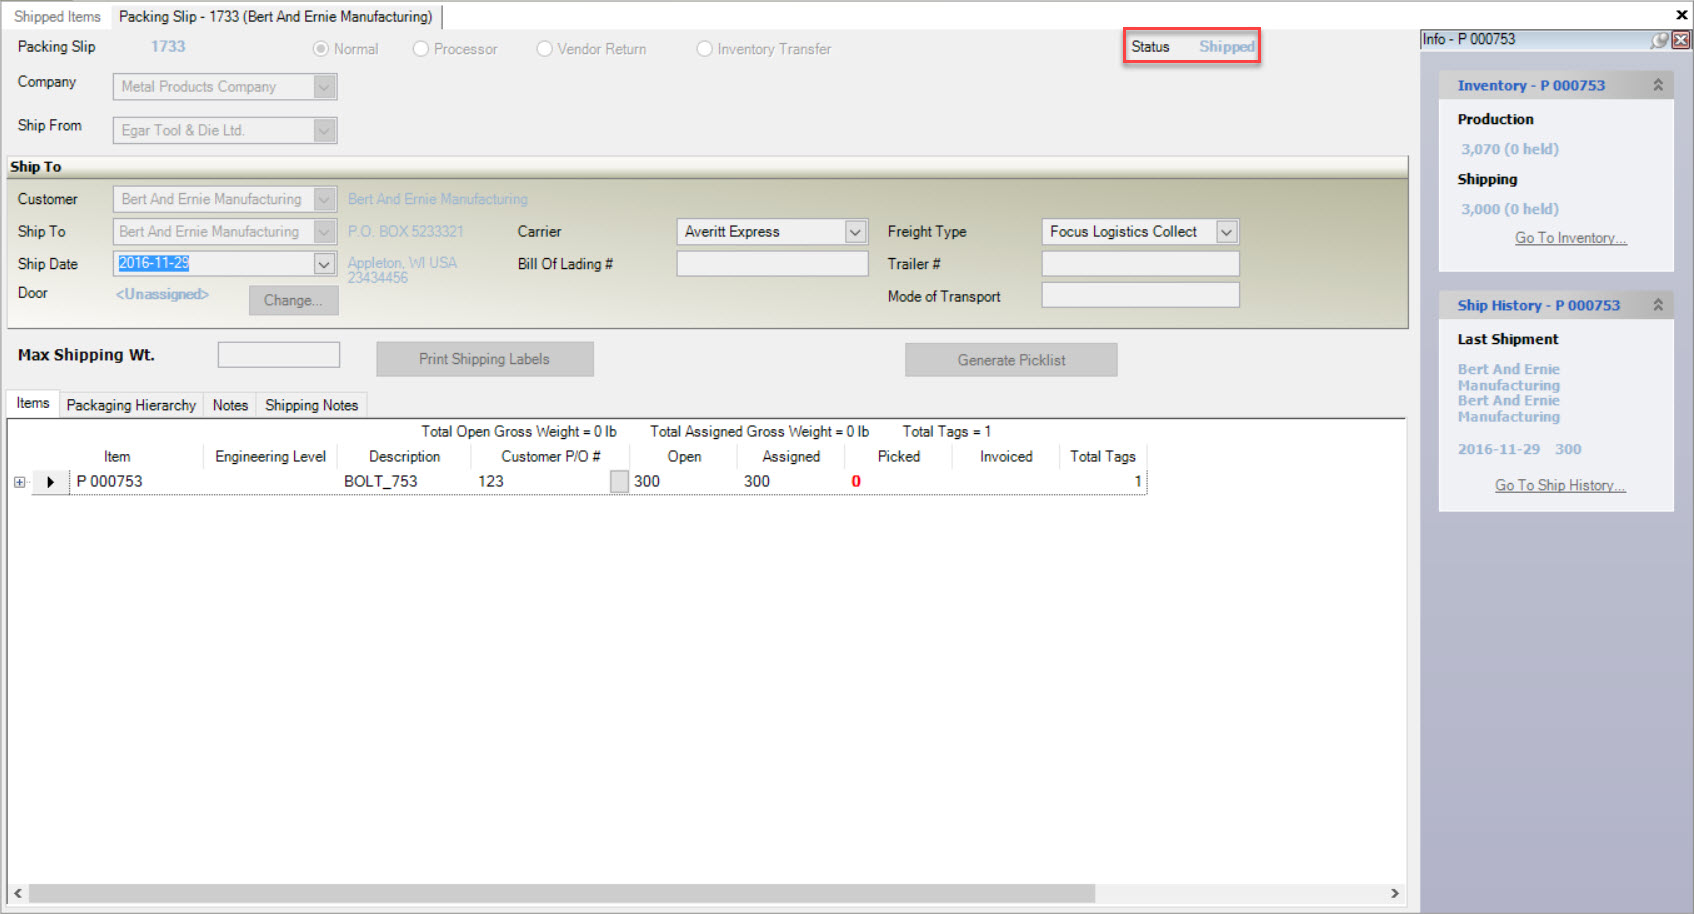
The Packing Slip status will be changed to Shipped in the system. When a Packing Slip is shipped, it is automatically entered into the Non-Invoiced Packing Slips function in the Invoicing module. Therefore, you are now ready to create an Invoice for this normal Packing Slip.
Note
The Packing Slip can now be located by navigating to the  tab and clicking on the
 ![]() icon.
To view the Shipped Packing Slip double-click on the appropriate row. Notice the status is now changed to Shipped.
icon.
To view the Shipped Packing Slip double-click on the appropriate row. Notice the status is now changed to Shipped.
Make sure to save your changes before exiting the screen.
Processor Packing Slip
A Processor Packing Slip is used to track Items that go to an outside Processor to complete an operation. It is very similar to a normal Packing Slip.
To create a new Processor Packing Slip, click on the  button, and then on the Packing Slip option.
This will open a new Packing Slip screen. Make sure that the Processor option is selected.
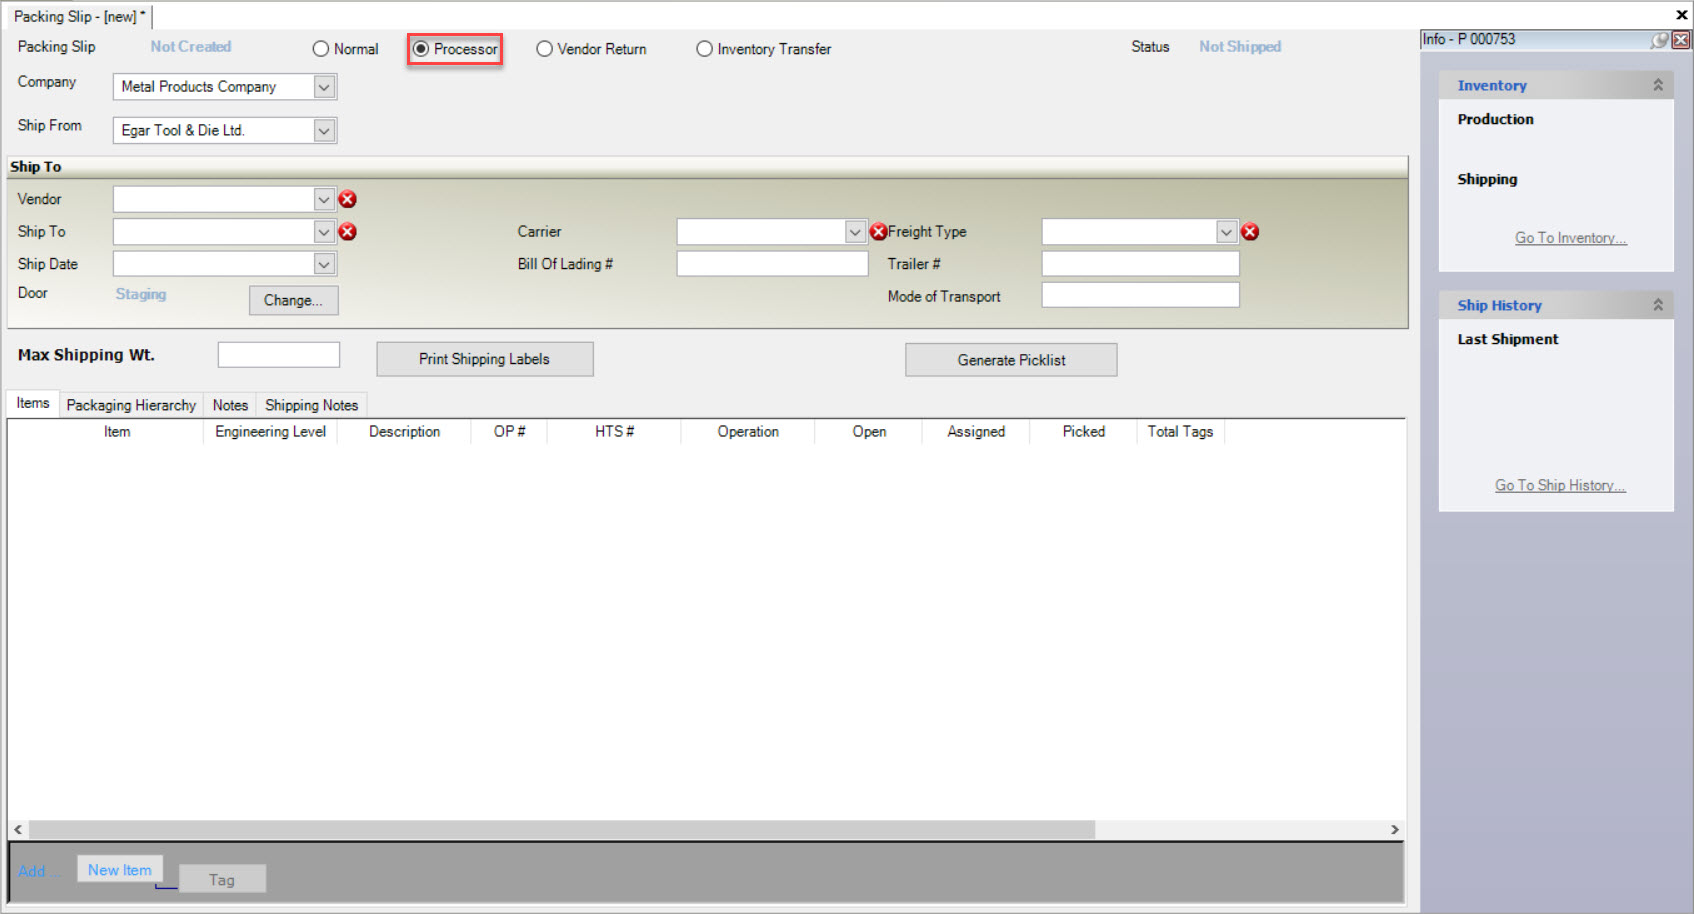
You will notice that the Customer field will be replaced with Vendor in the header. The Item information will also be different. Fill out the header information required including Vendor, Ship To, Carrier, and Freight Type. Once the header information is complete, you can start to add your Items.
Note
When creating a new Processor Packing Slip, users have the ability to add Notes and Shipping Notes using the tabs located below the header information.
Adding Items to a Processor Packing Slip
To add an Item, click on the  button located at the bottom of the screen. This will open the Purchase Orders window where
users can select the Items from an existing P/O for the particular Vendor. Users can select as many Items by using your Shift and Ctrl keys. Once you have
selected all the Items you wish to add fron the P/O, click on the
  button to add them to the Processor Packing Slip.
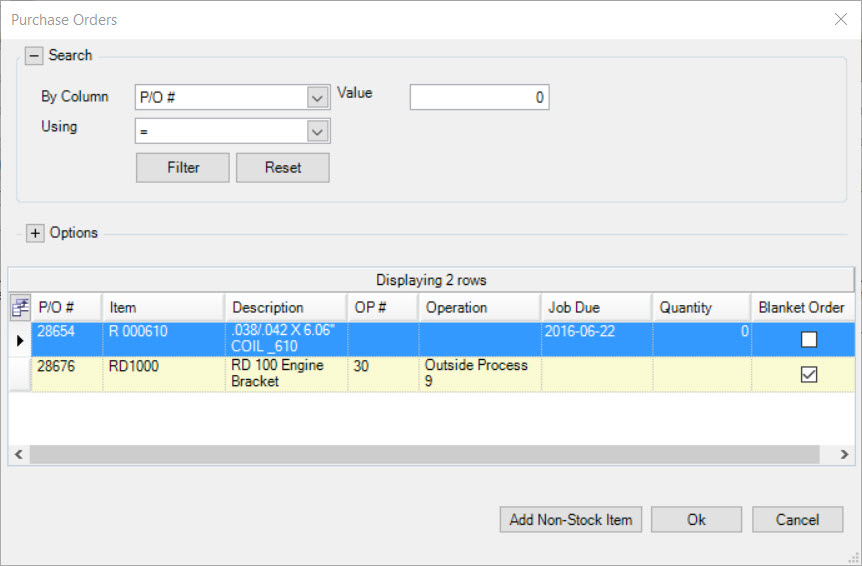
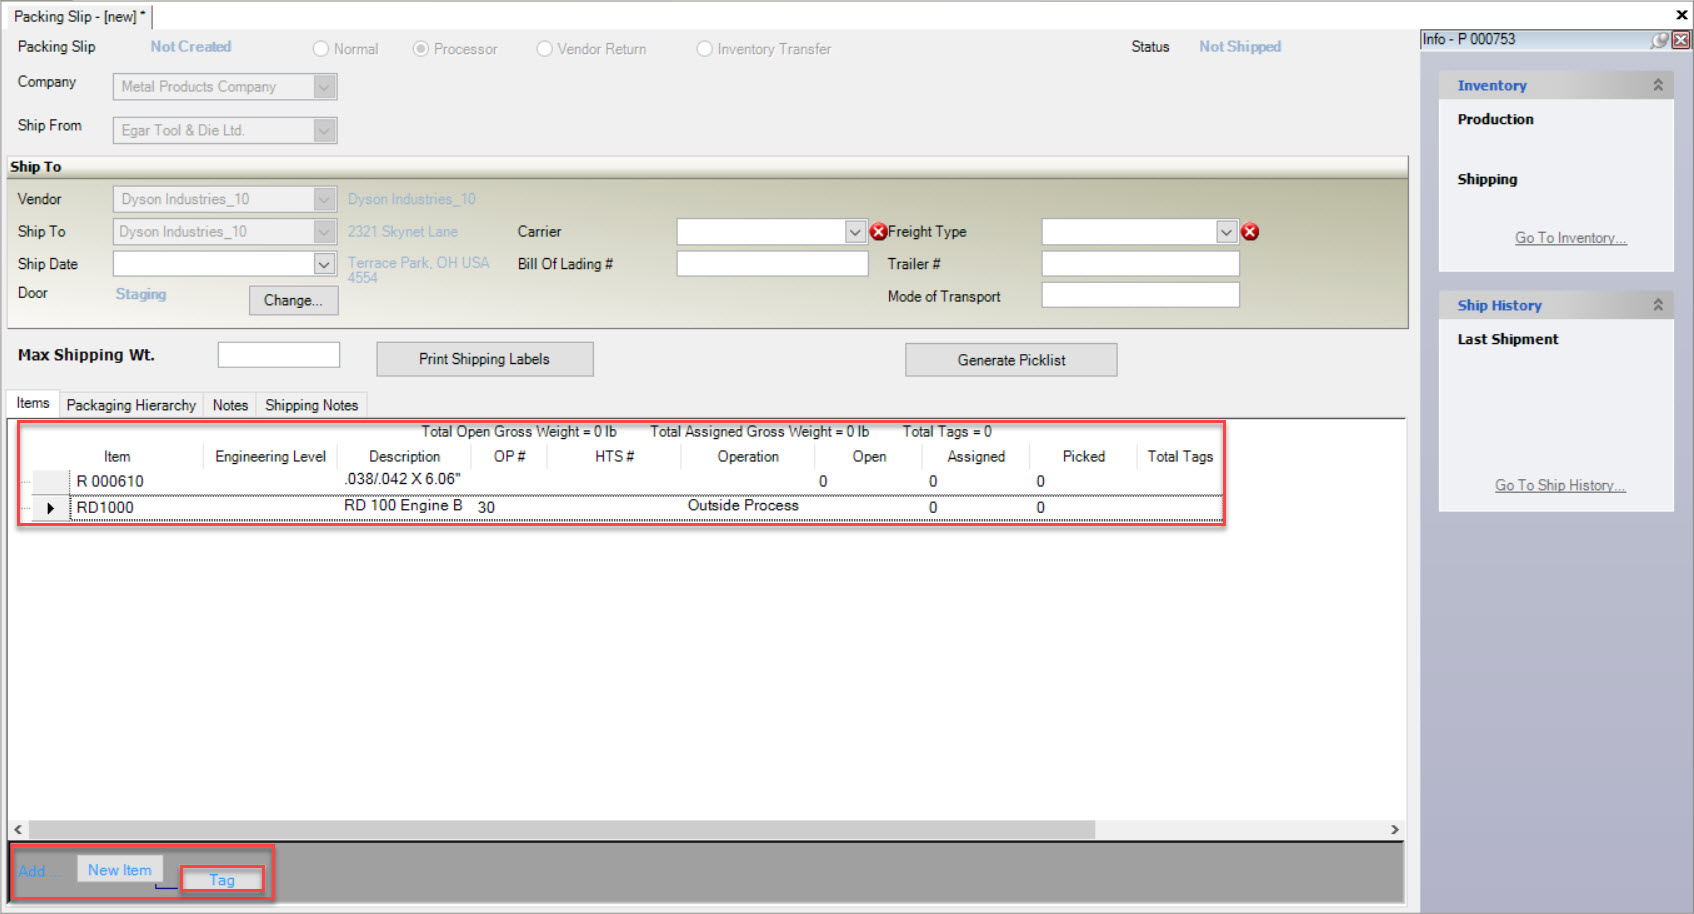
The Item(s) will be added to the Processor Packing Slip and the  button will be available to use.
Adding Tags to Items to a Processor Packing Slip
To add Tags to Items on a Processor Packing Slip, highlight the appropriate Item row(s).
The click on the  button located at the bottom of the screen.
A new row will appear below the Item row. If you click on the button in the Serial # column, the Tag Lookup window will open.
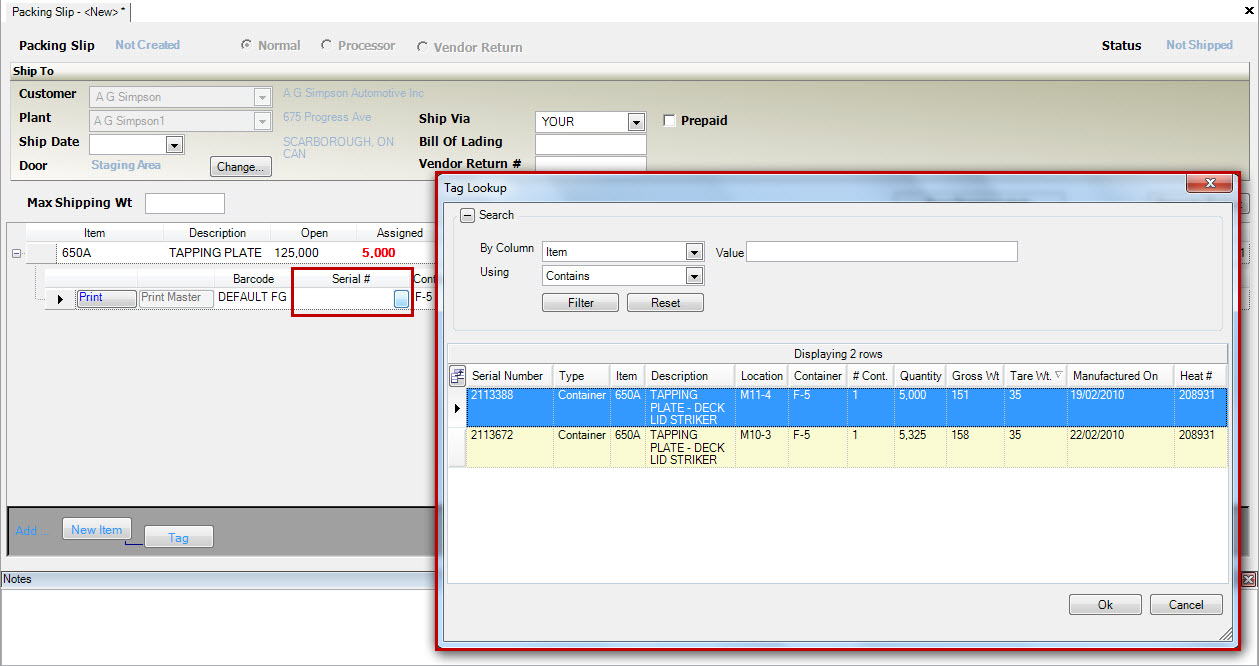
Tags should be selected that best match the Open quantity required. Once you have selected the Tags you wish to add to the Item, you will notice that the Assigned number will be updated to include the Tag totals. When the Assigned quantity matches the Open release quantity your shipment for that Item will be complete.
Generating a Picklist for a Processor Packing Slip
To generate a picklist for a Processor Packing Slip, click on the  button.
This will automatically generate Tags to fulfill open release quantities (or as close to the open quantity as possible), for each Item on your Processor Packing Slip, starting with Tags that were produced first.
Saving a Processor Packing Slip
Users have the option to save a Processor Packing Slip in the system. Users can then locate it, to add additional Items or Tags.
Simply perform a save at any time while working on it.
Shipping a Processor Packing Slip
Once you have Items and Tags added to a Processor Packing Slip, users have the ability to ship it.
To locate an Open Packing Slip, navigate to the  tab and click on the
 ![]() icon.
icon.
This will open the Open Packing Slips screen where you can locate all Packing Slips that have not yet been shipped in the system. To open and complete a Packing Slip, double-click on the appropriate Packing Slip row.

Select the Shipping menu located at the top of the screen and click on the Ship this P/S... option.
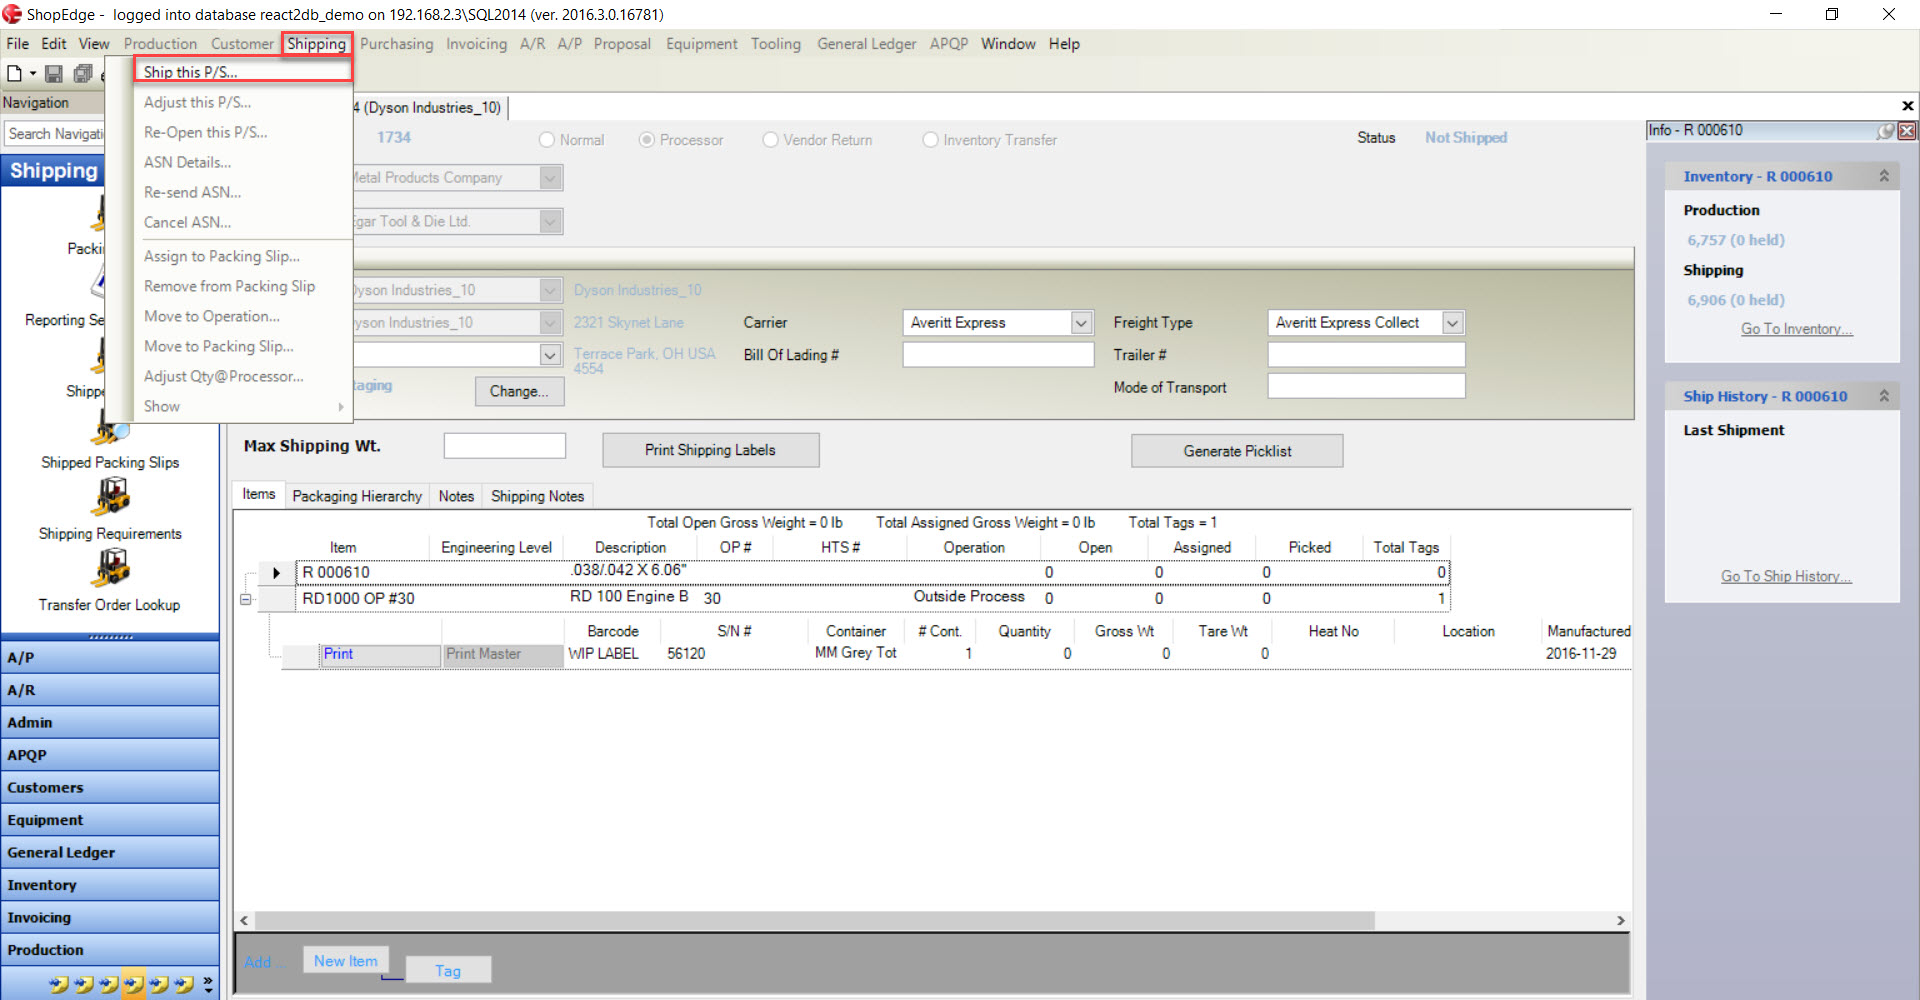
The system will confirm the Shipped On date (it will default to the current date), and users can indicate if they wish to have the Shipping Paperwork printed at the same time.
Once the Shipped On date is verified, click on the  button to ship the Processor Packing Slip.
The packing slip status will be Shipped in the system. When a Processor Packing Slip is shipped it is automatically entered into the Non-Invoiced Packing Slips function in the Invoicing module. Therefore, users are now ready to create an Invoice for this Processor Packing Slip.
Note
The Processor Packing Slip can now be located by navigating to the  tab and click on the
 ![]() icon.
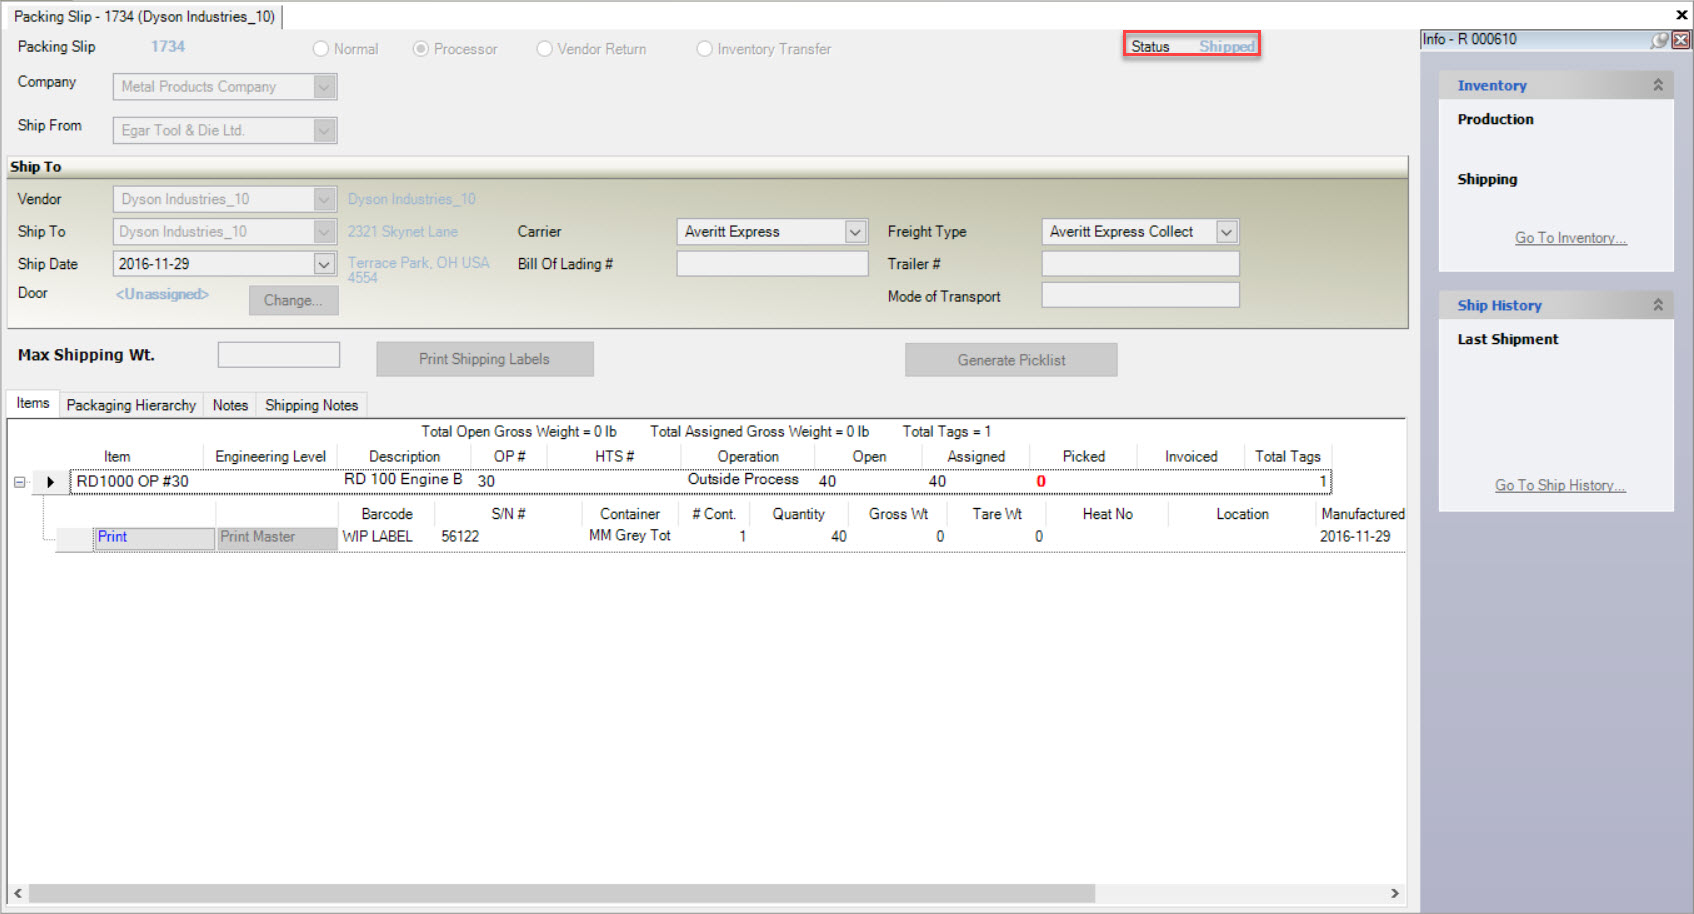
To view the Shipped Processor Packing Slip, double-click on the appropriate row. Notice the status is changed to Shipped.
icon.
To view the Shipped Processor Packing Slip, double-click on the appropriate row. Notice the status is changed to Shipped.
Make sure to save your changes before exiting the screen.