Vendors
The ShopEdge system can process incoming ASN files through EDI that are sent by your vendors. This process can streamline the entire receiving process, since the receiver can simply scan serial numbers directly against the ASN data, once the ASN data is converted to a receipt. ShopEdge can also import ASN information from a spreadsheet, where your vendor is not EDI capable.
The ShopEdge system can send Requirements through EDI or Email to your vendors. The Requirements can be sent at the Vendor/Vendor Location or Purchase Order level.
Preliminaries
Before ShopEdge can start sending or receiving EDI data from your Vendor or Vendor Locations, you must establish a trading partnership with your Vendor through your EDI VAN. This normally requires that you exchange with your Vendor your Sender ID Qualifier, Sender ID (or mailbox ID) and your EDI VAN. You need to get the same values from your Vendor. Once you have that information, you need to establish the trading partnership.
Vendor Setup
The first step in configuring ShopEdge to send or receive EDI is to enter the correct EDI Parameters against the Vendor and Vendor Location. This will allow ShopEdge to recognize the EDI as belonging to that specific Vendor or Vendor Location.
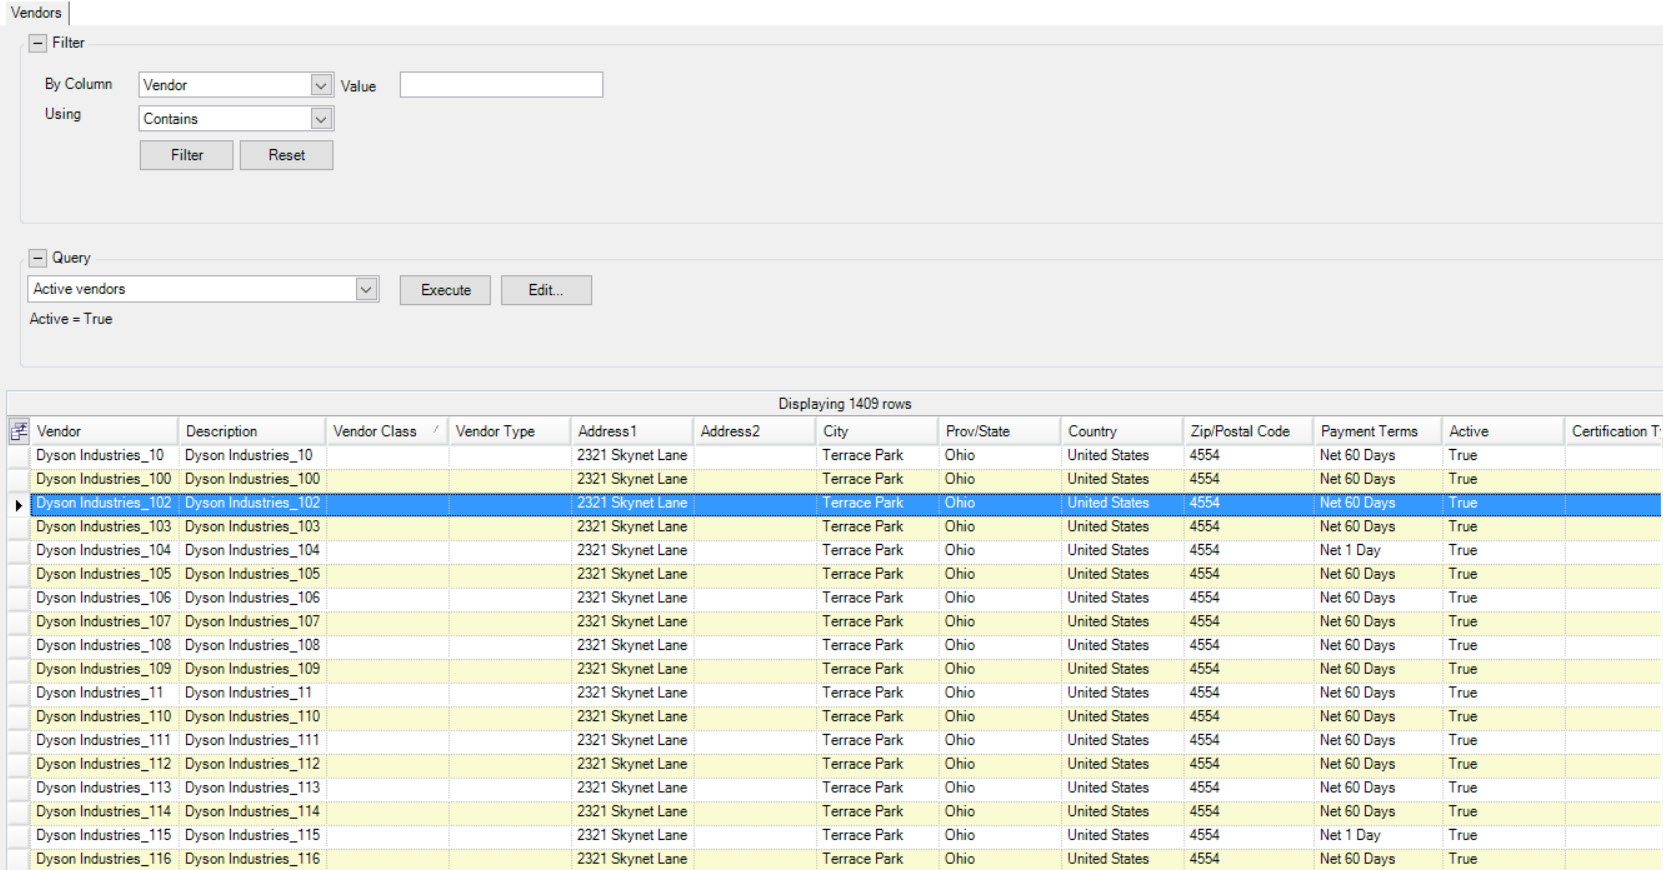
To update the Vendor and Vendor Location EDI and Email, navigate to the  tab, clicking on the
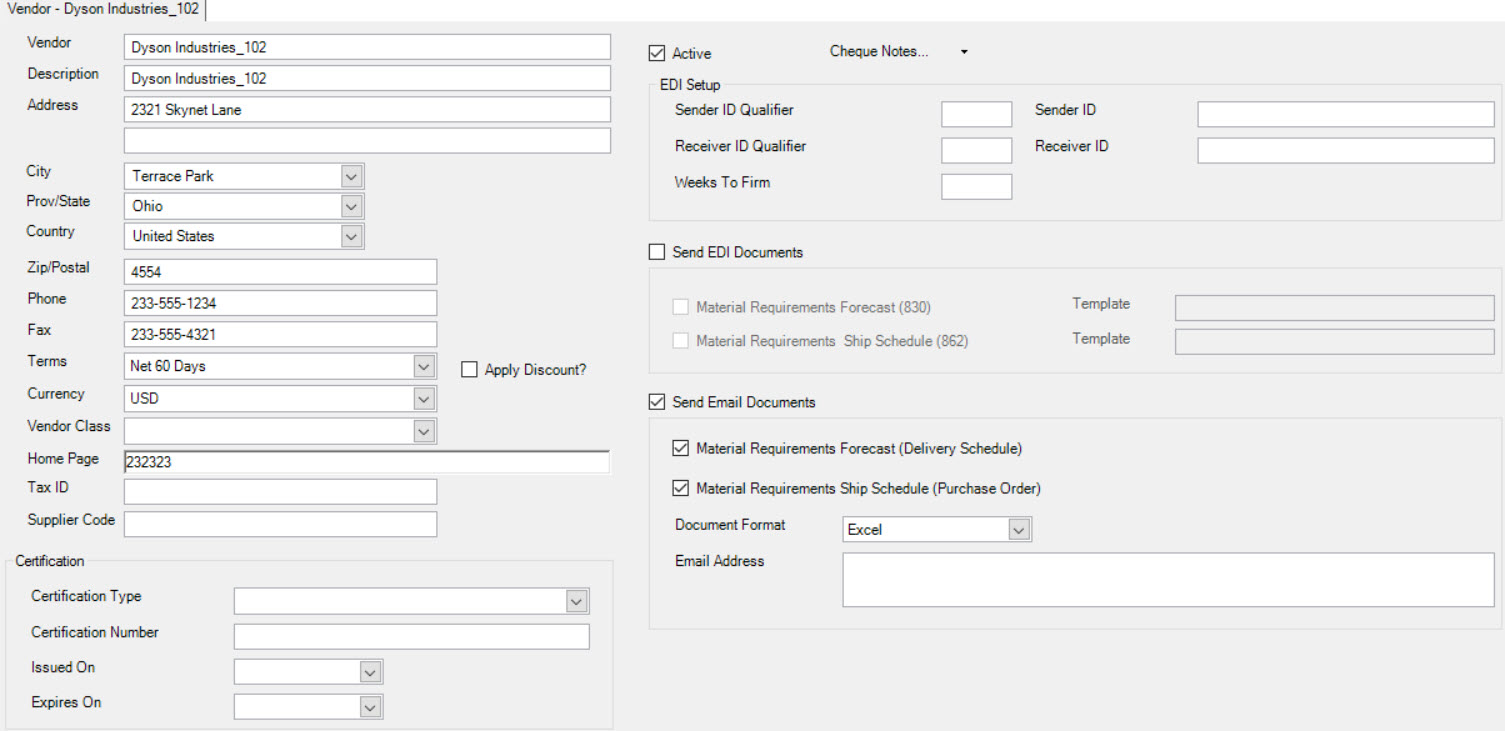
  and using the Vendor Lookup to find the Vendor. Double-click on the Vendor row to bring up the Vendor Detail
screen.
Setup for Receiving ASN’s
The Sender ID Qualifier and Sender ID information will be provided by your Vendor.
Enter the Vendor EDI information:
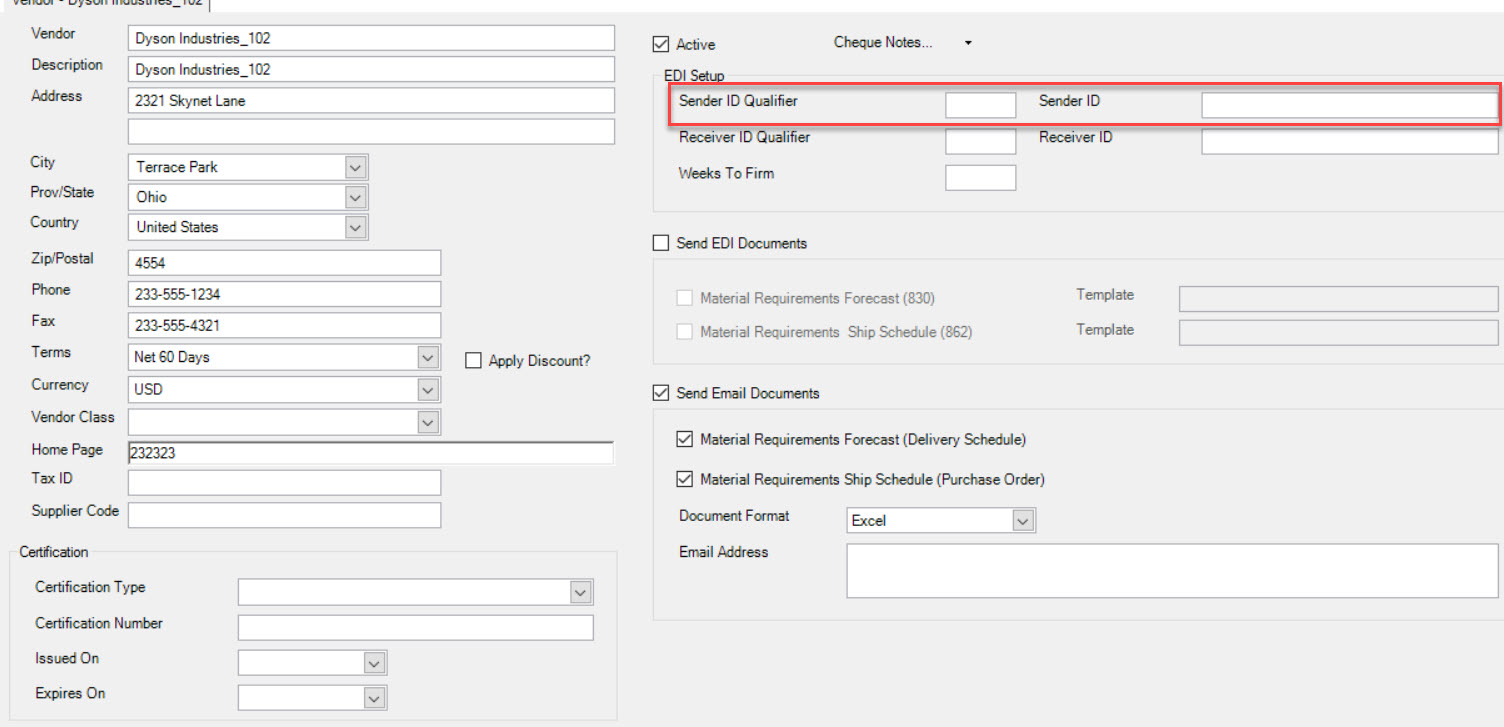
- Sender ID Qualifier - the sender ID qualifier of the Vendor for incoming transmissions.
- Sender ID - the sender ID of the Vendor for incoming transmissions.
Enter the Vendor Location EDI information:
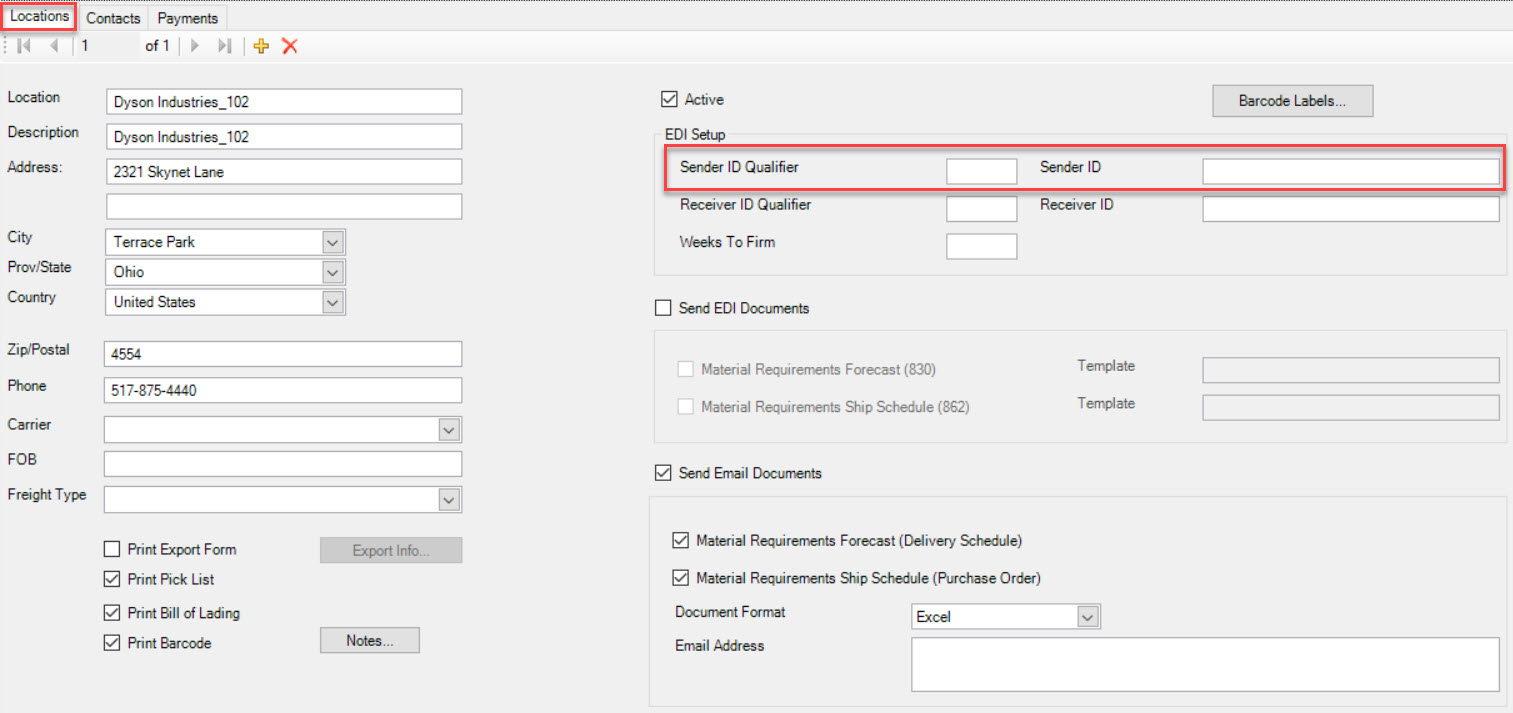
- Sender ID Qualifier - the sender ID qualifier of the Vendor Location for incoming transmissions
- Sender ID - the sender ID of the Vendor Location for incoming transmissions
Click the  icon to save.
Setup for Sending Requirements
Planning Schedules(830) and Shipping Schedules(862) can be sent to the vendor or vendor location either by EDI or email. The Receiver ID Qualifier and Receiver ID information will be provided by your Vendor and only needs to be entered if you are going to transmit EDI to the Vendor.
Enter the Vendor EDI and Email information.
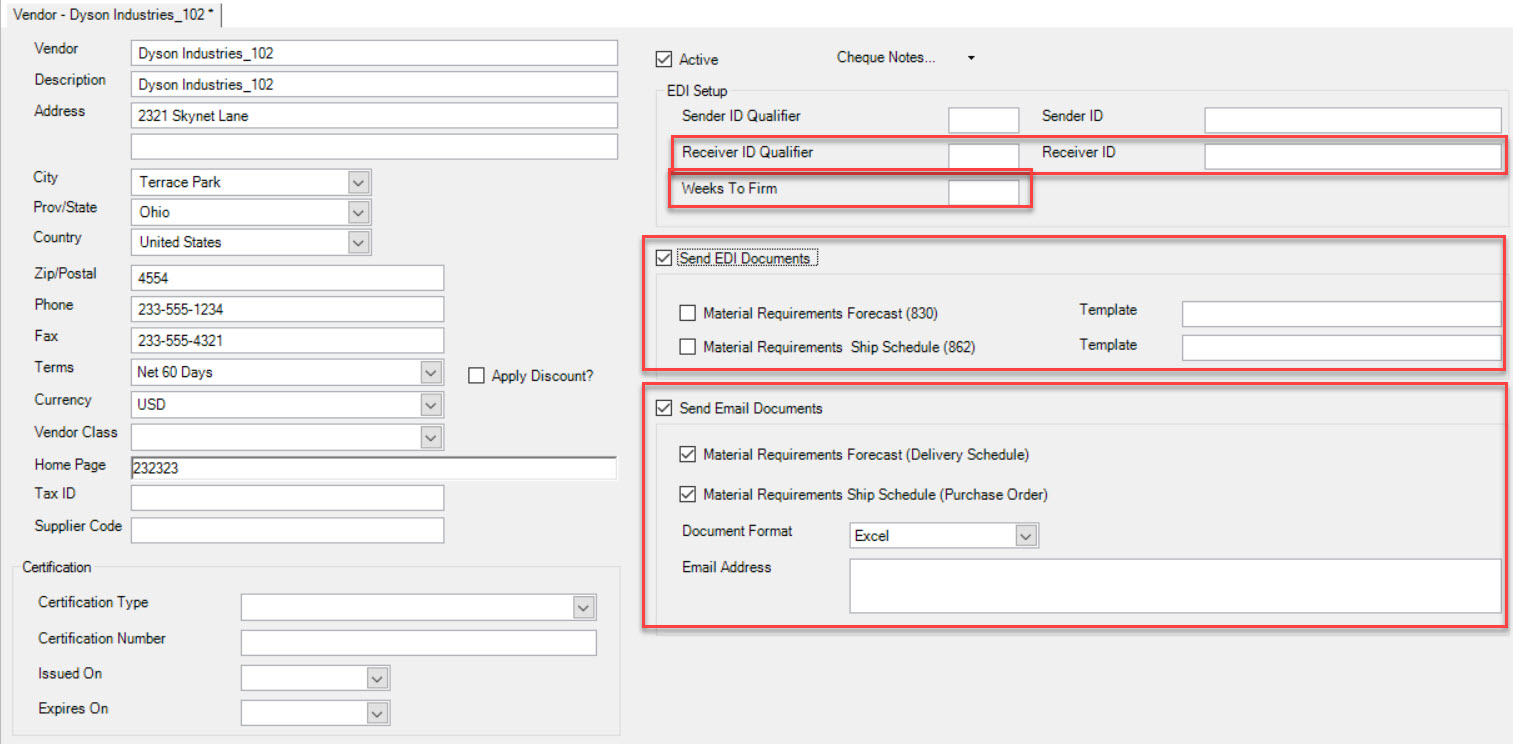
- Receiver ID Qualifier - the receiver ID qualifier of the Vendor for outgoing EDI transmissions.
- Receiver ID - the receiver ID of the Vendor for outgoing EDI transmissions.
- Weeks To Firm - the number of weeks to firm the Releases for the Vendor Location.
- Check the Send EDI Documents box if the vendor will be receiving EDI
- Check the Material Requirements Forecast(830) and enter a template (ie: EDI830.xml) if the Vendor will be receiving this document type.
- Check the Material Requirements Ship Schedule(862) and enter a template (ie: EDI862.xml) if the Vendor will be receiving this document type.
- Check the Send EMail Documents box if the vendor will be receiving email
- Check the Material Requirements Forecast(Delivery Schedule) if the Vendor will be receiving this document type.
- Check the Material Requirements Ship Schedule(Purchase Order) if the Vendor will be receiving this document type.
- Select the Document Format from the drop-down.
- Enter the Email Address of the person who will be receiving the Email documents.
Click the  icon to save.
Email Notifications for Incoming Vendor EDI
You can configure ShopEdge to send you an Email whenever new Vendor EDI arrives. To configure Email notifications, access the system setup from the File > Setup menu option (you must have proper security access).
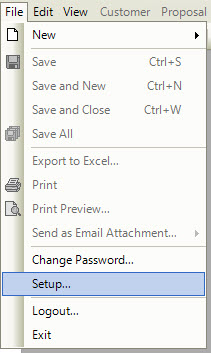
Navigate to the EDI tab.
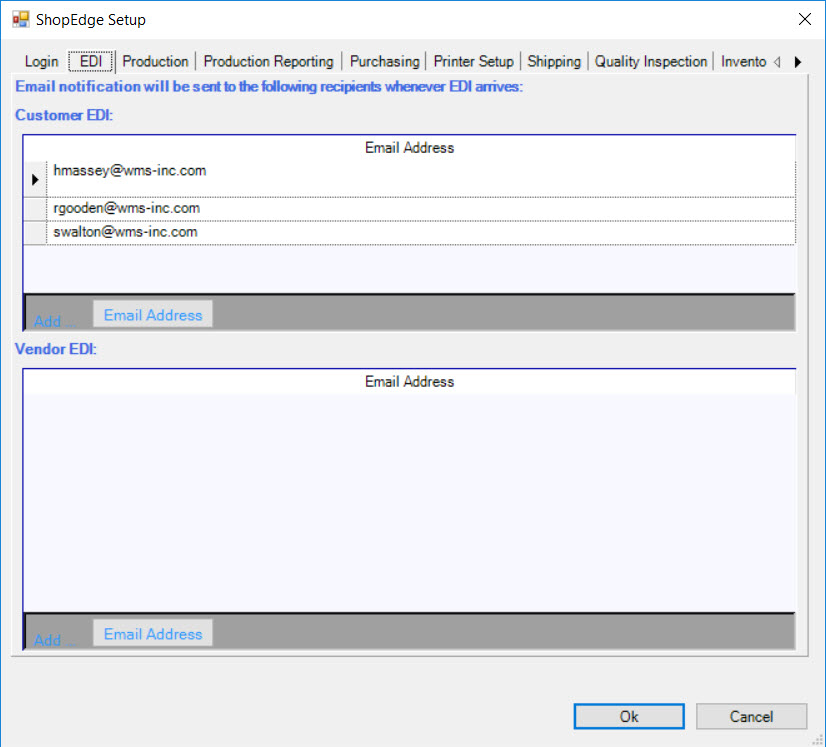
Click the  button under Vendor EDI to add a new Email Address.
Click Ok to save the changes.
EDI Receipts
Once the trading partnership has been established with your EDI VAN, ShopEdge will start processing any incoming Vendor EDI. Incoming Vendor EDI will appear on the EDI Receipts screen under the Open or Archived - Received tabs. All Releases sent by either EDI or Email will appear on the EDI Receipts screen under the Archived - Sent tab.
Incoming Vendor EDI can be accessed by navigating to the  tab,
and clicking on the
 ![]() icon.
The EDI Receipts screen will be displayed.
icon.
The EDI Receipts screen will be displayed.
Open
This screen will list all Incoming EDI that has not yet been processed. For each Incoming EDI Transmission the details are displayed.
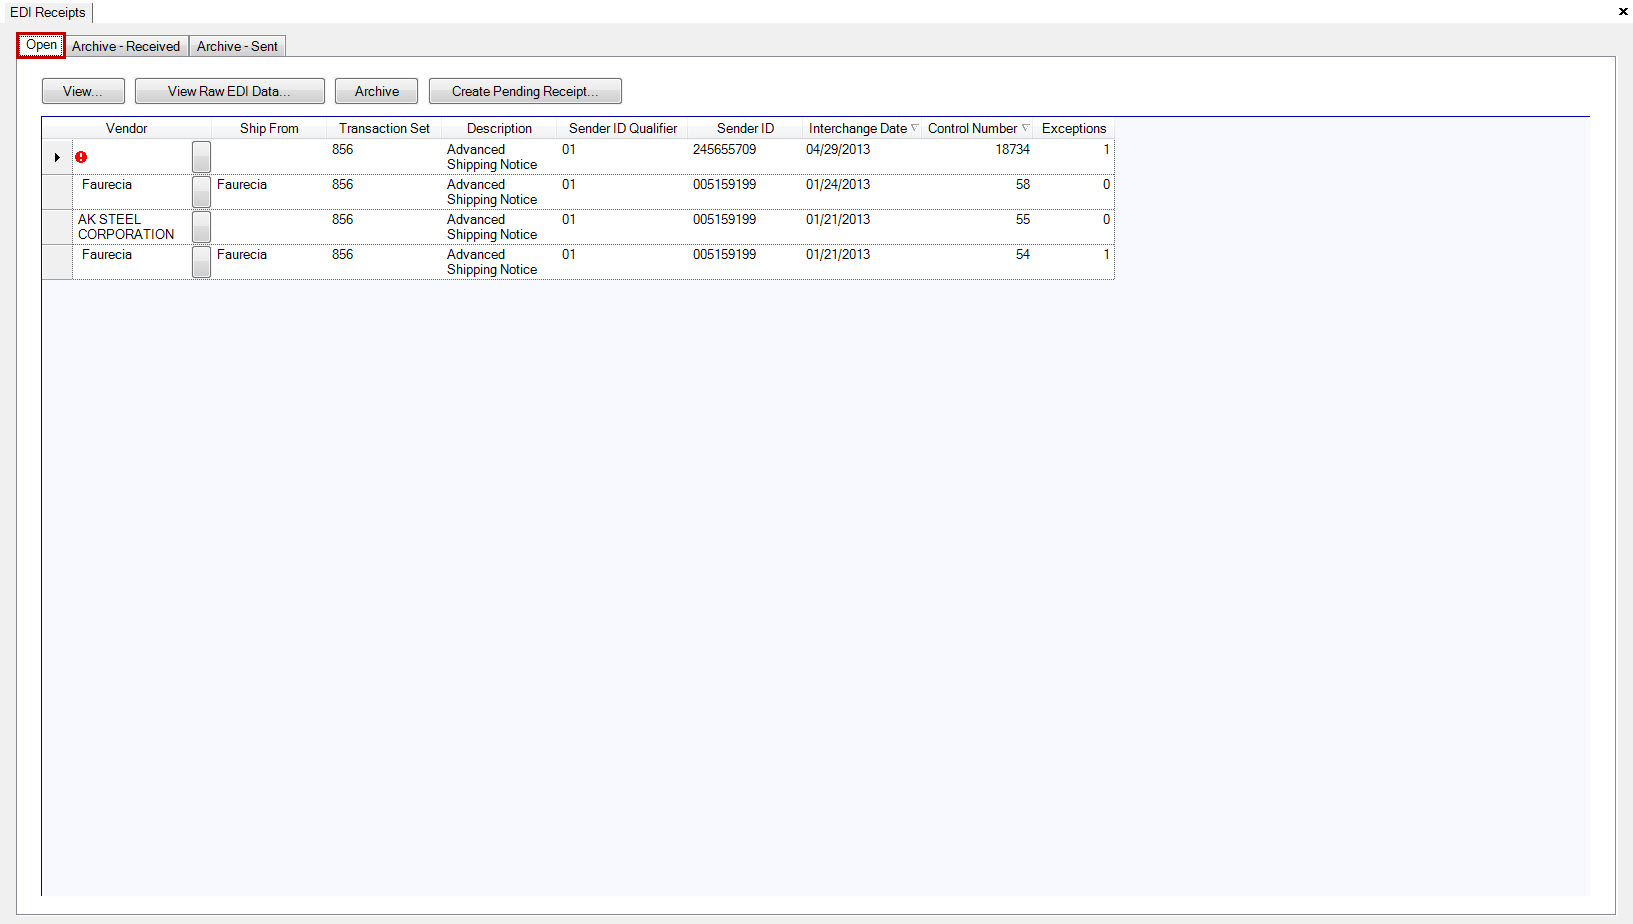
- Vendor - the Vendor that sent the EDI. If the Vendor is blank, the Vendor can be mapped. (see Mapping a Vendor)
- Ship From - the Ship From of the Vendor.
- Transaction Set - Identifier for the type of EDI document sent, in this case 856 which represents an ASN.
- Description - description of the EDI document.
- Sender ID Qualifier - the sender ID qualifier of the Vendor contained in the EDI document.
- Sender ID - the sender ID of the Vendor contained in the EDI document.
- Interchange Date - the date the file was sent.
- Control Number - unique number that identifies the EDI document.
- Exceptions - the number of exceptions in the EDI document. This number represents the number of items in the document that cannot be processed because a Vendor, Purchase Order, or Item cannot be found in the system that match with the information in the EDI.
The EDI Open tab has buttons that perform different functions.

View
To view the contents of the EDI document for a Vendor, highlight the row and click the  button.
A report will be displayed with the document contents.
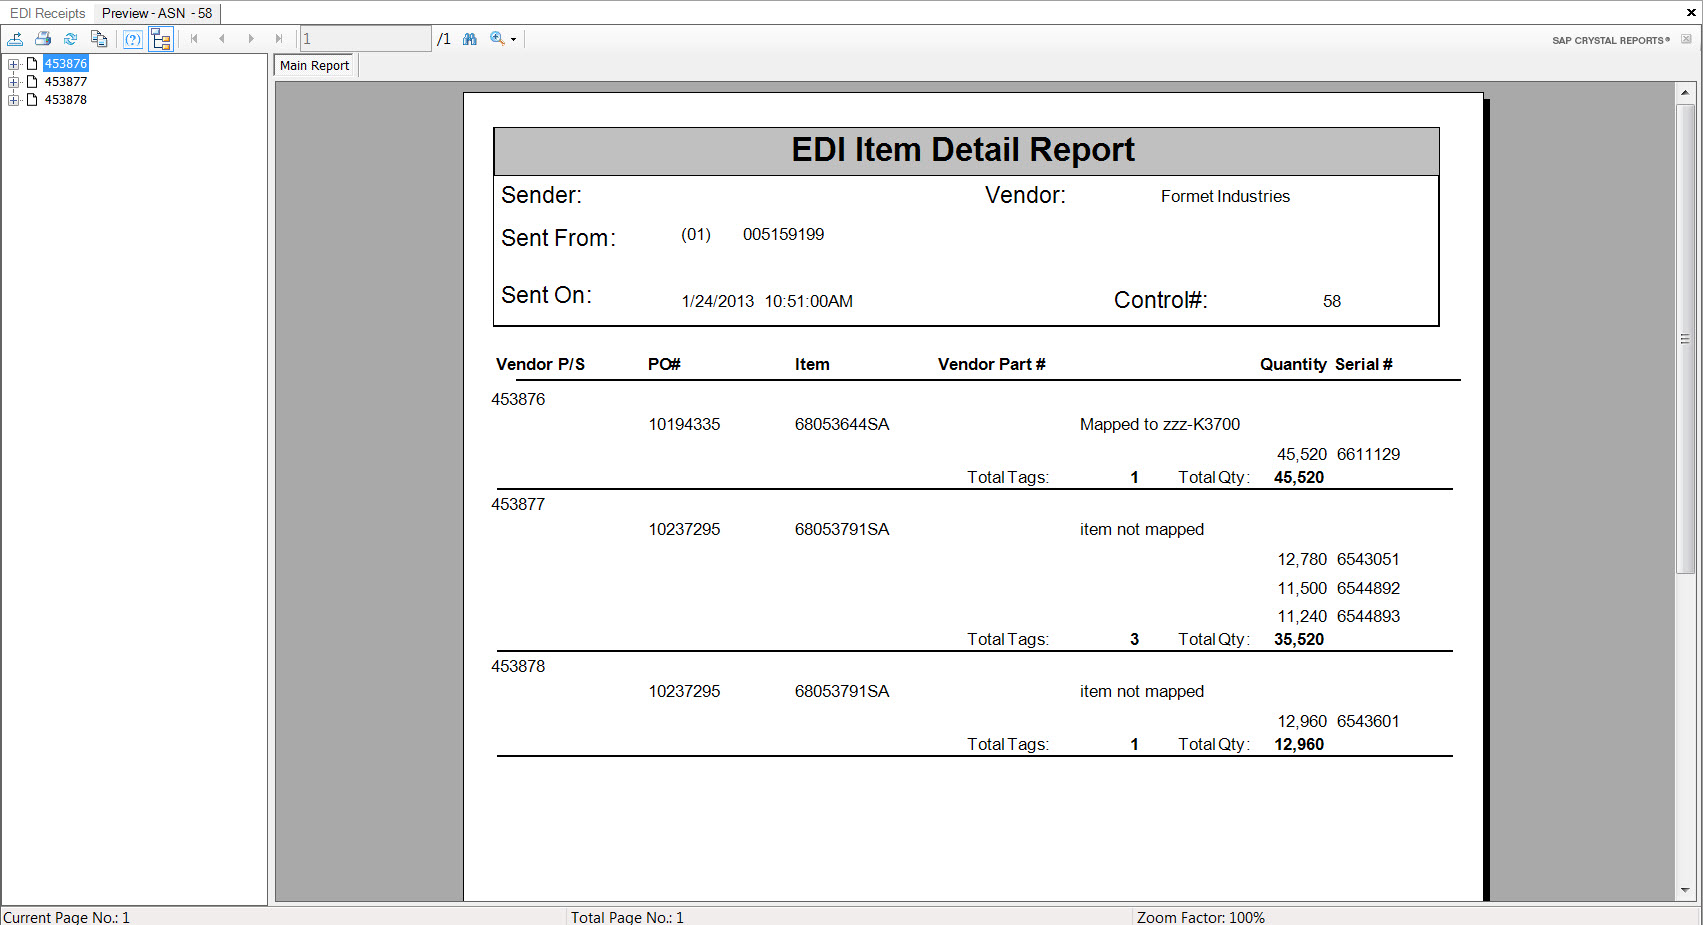
The reports will also highlight any exceptions so they can be corrected.
View Raw EDI Data
To view the Raw EDI Transmission Data for a Vendor, highlight the row and click the  button.
The EDI Transmission Details window will be displayed.
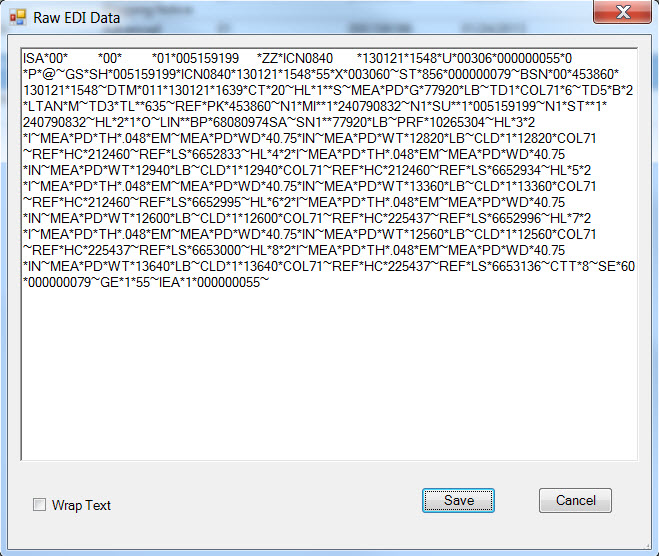
You can save the Raw EDI Data as a .txt file by clicking the  button or
click the
  button to return to Open display.
Archive
You can archive EDI that you do not wish to import. This will remove the EDI from the Open tab and add it to the Archive - Received tab.
To archive the EDI, highlight the row and click the  button.
Creating a Pending Receipt
To create a Pending Receipt for Receiving, highlight the row and click the  button.
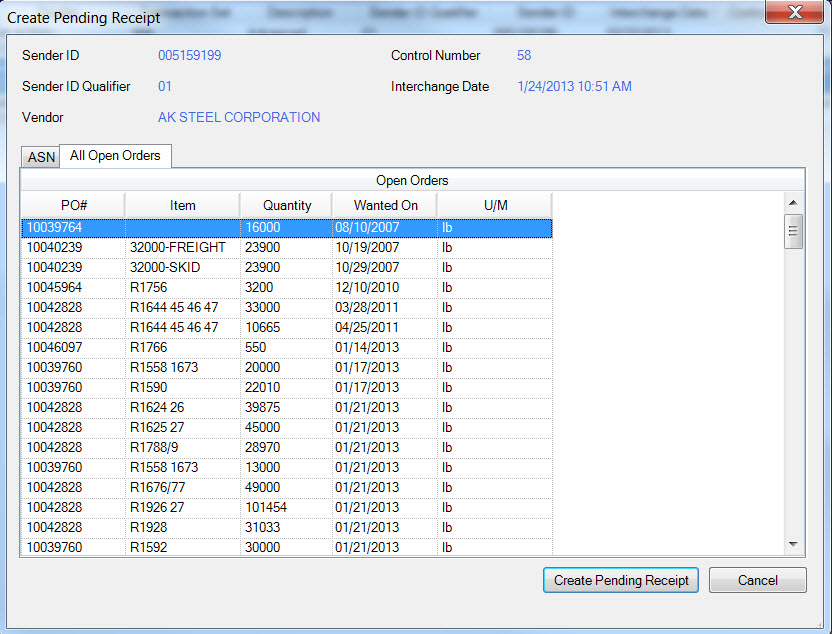
A new window will appear displaying the ASN information along with the Open Purchase Orders for the Mapped Vendor.
If the ASN P/O # and Item have previously been mapped to a P/O # and P/O Item the line will be displayed with no errors.
Note
The ASN P/O # and Item can be mapped to a different P/O # and P/O Item each time if required.
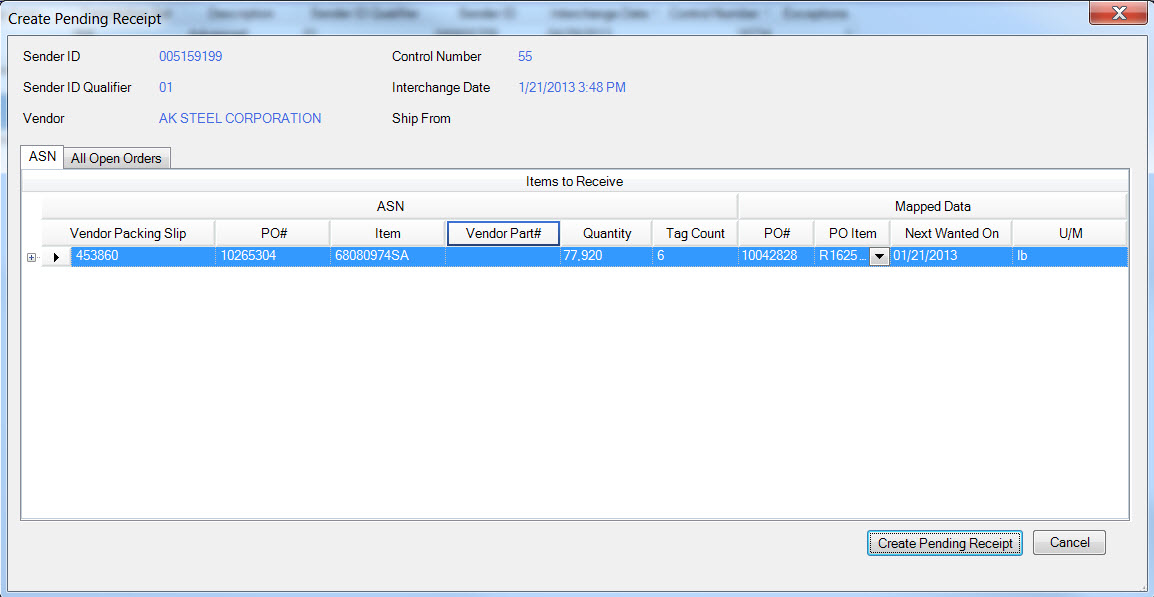
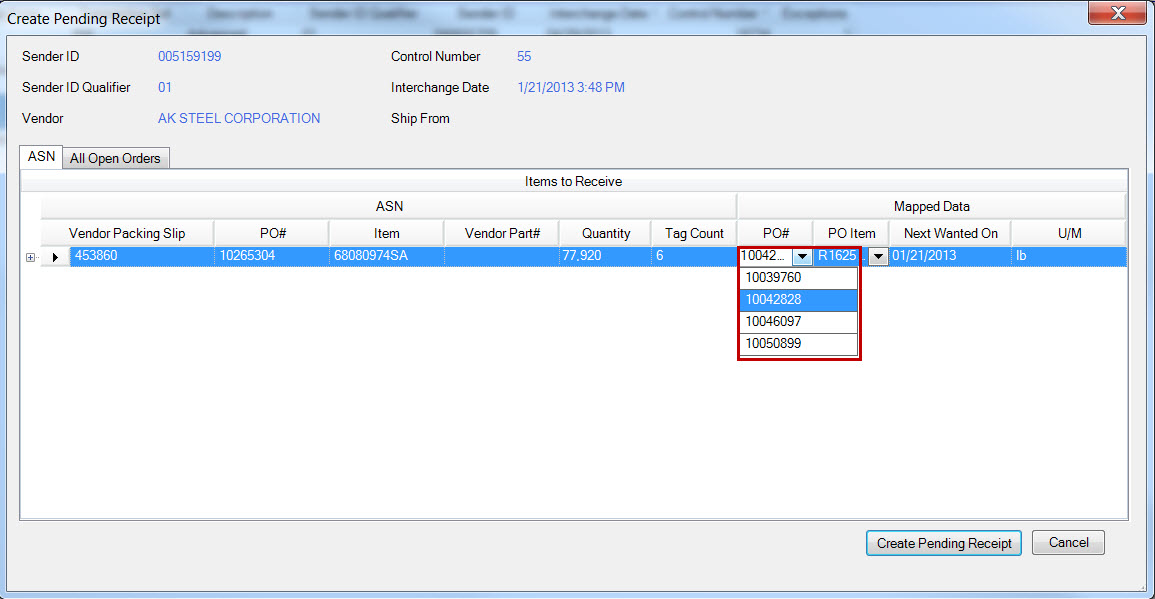
Use the  button to select the P/O #.
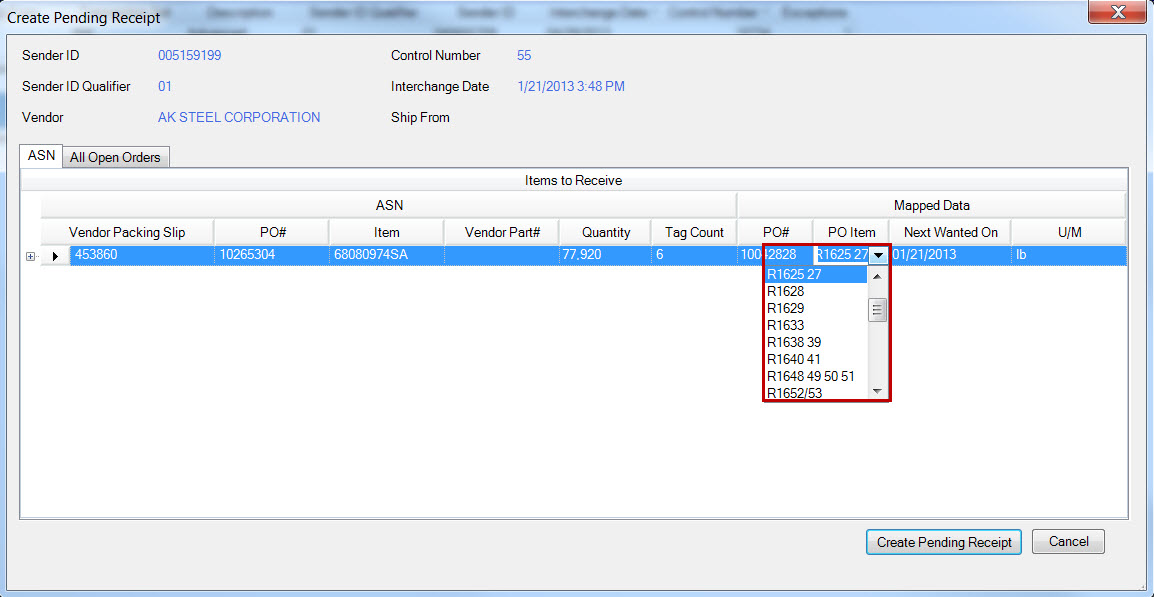
Use the  button to select the P/O Item.
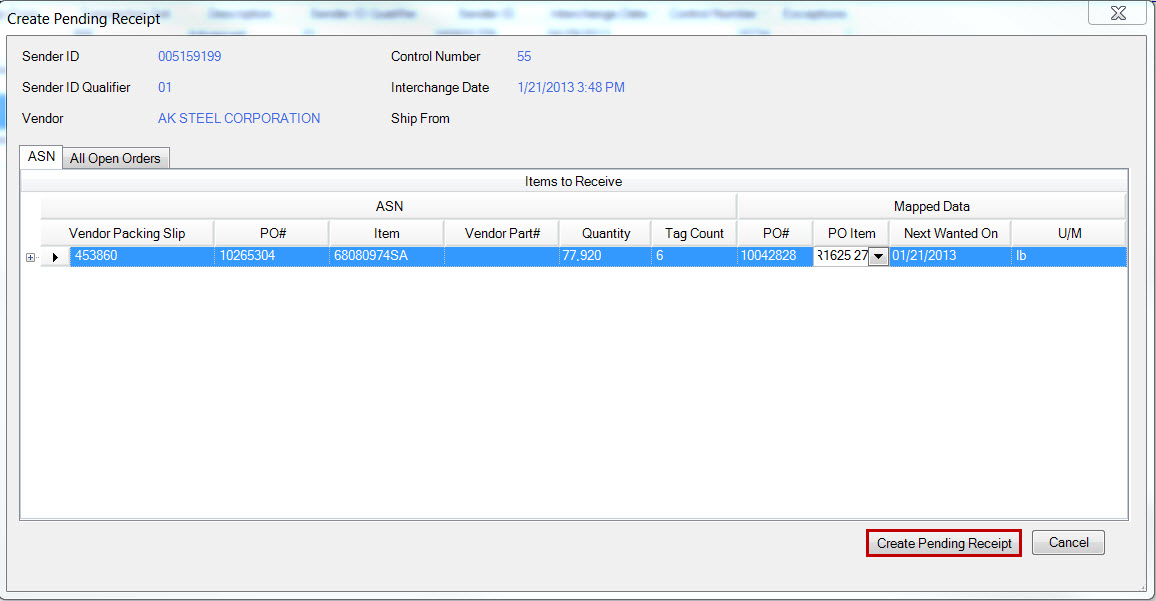
Once you have verified and mapped the data. Click on the  button to create the Pending Receipt and to start the Receiving process.
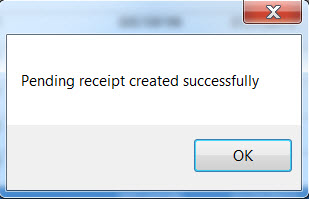
A confirmation window will be displayed ‘Pending receipt created successfully’, click the
  button.
To display all of the Open Orders for the Vendor, select the All Open Orders tab.
Mapping a Vendor
To map the EDI Receipt to a Vendor, highlight the row and click the  button.

Highlight the Vendor and click the  button.
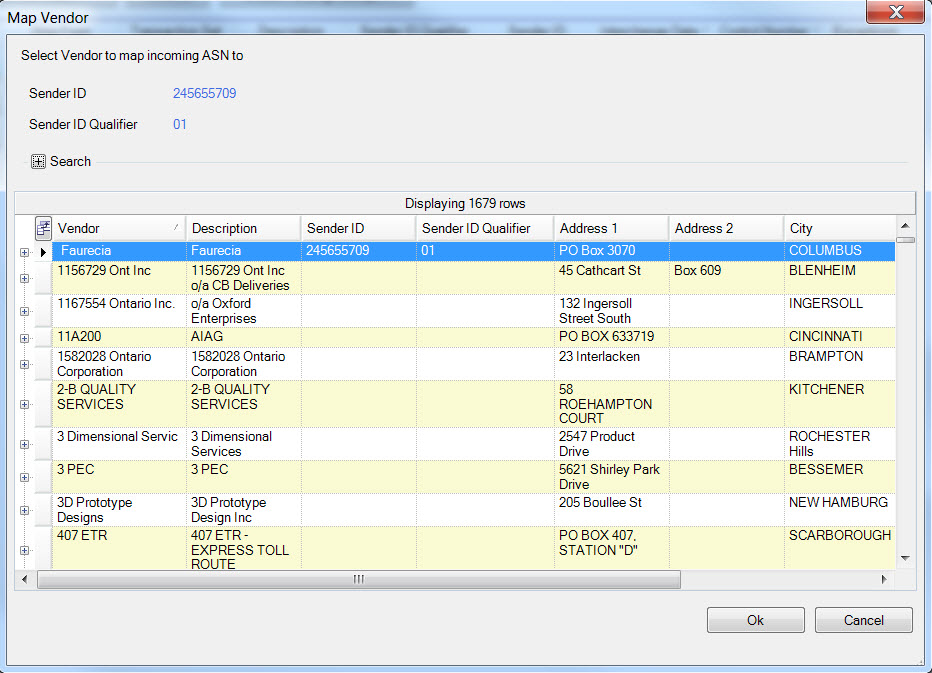
The Open display will be re-displayed with the Mapped Vendor.

Archive - Received
This screen will display all the Received EDI that has been archived.
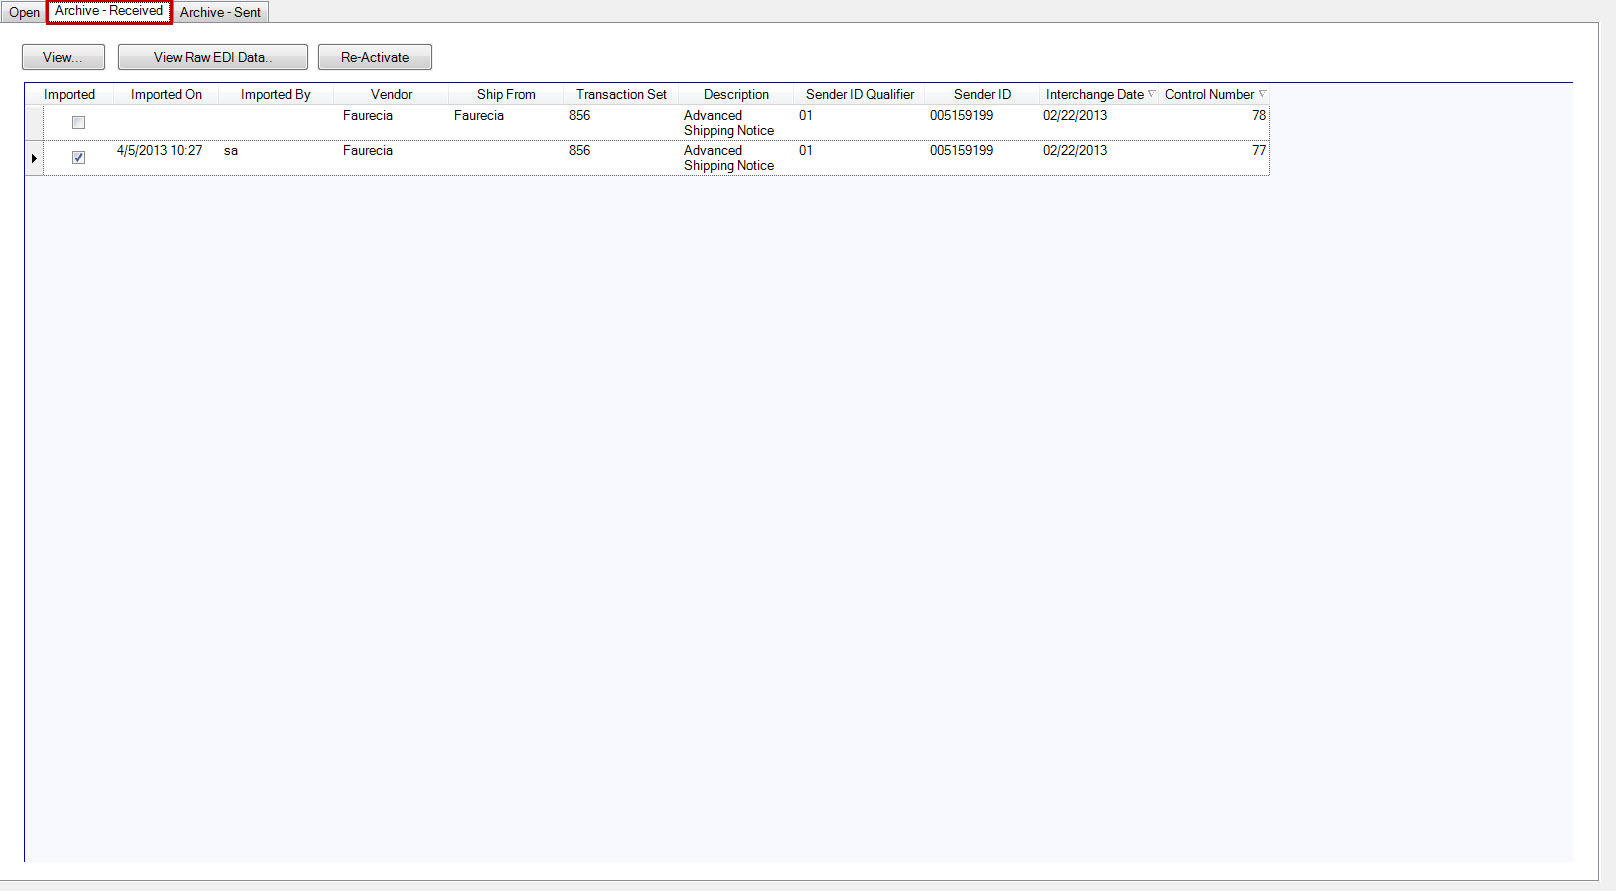
- Imported - if the ‘Imported box’ is not checked, it means that the EDI document was not imported and was Archived using the Archive button, if the box is checked, the EDI document was imported into the system when Creating the Pending Receipt.
- Imported On - the date the document was imported.
- Imported By - the user that imported the document.
- Vendor - the Vendor that sent the EDI.
- Ship From - the Ship From of the Vendor.
- Transaction Set - Identifier for the type of EDI document sent, in this case 856 which represents an ASN.
- Description - description of the EDI document.
- Sender ID Qualifier - the sender ID qualifier of the Vendor contained in the EDI document.
- Sender ID - the sender ID of the Vendor contained in the EDI document.
- Interchange Date - the date the file was sent.
- Control Number - unique number that identifies the EDI document.
The EDI Archive - Received tab has buttons that perform different functions.

View
To view the contents of the Archived EDI document for a Vendor, highlight the row and click the  button.
A report will be displayed with the document contents.

View Raw EDI Data
To view the Raw EDI Transmission Data for a Vendor, highlight the row and click the  button.
The EDI Transmission Details window will be displayed.

You can save the Raw EDI Data as a .txt file by clicking the  button or by
clicking on the
  button to return to Archive - Received display.
Reactivate
You can reactivate an Archived EDI document that you wish to process again.
To reactivate the Archived EDI document, highlight the row and click the  button.
The reactivate confirmation screen will be displayed.
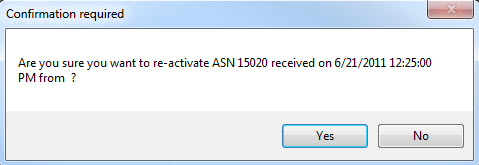
Click the  button, this will remove the EDI document from the Archive - Received tab and add it to the Open tab.
Archive - Sent
This screen will display the details of all the Sent Requirements for EDI and Emails that have been archived.
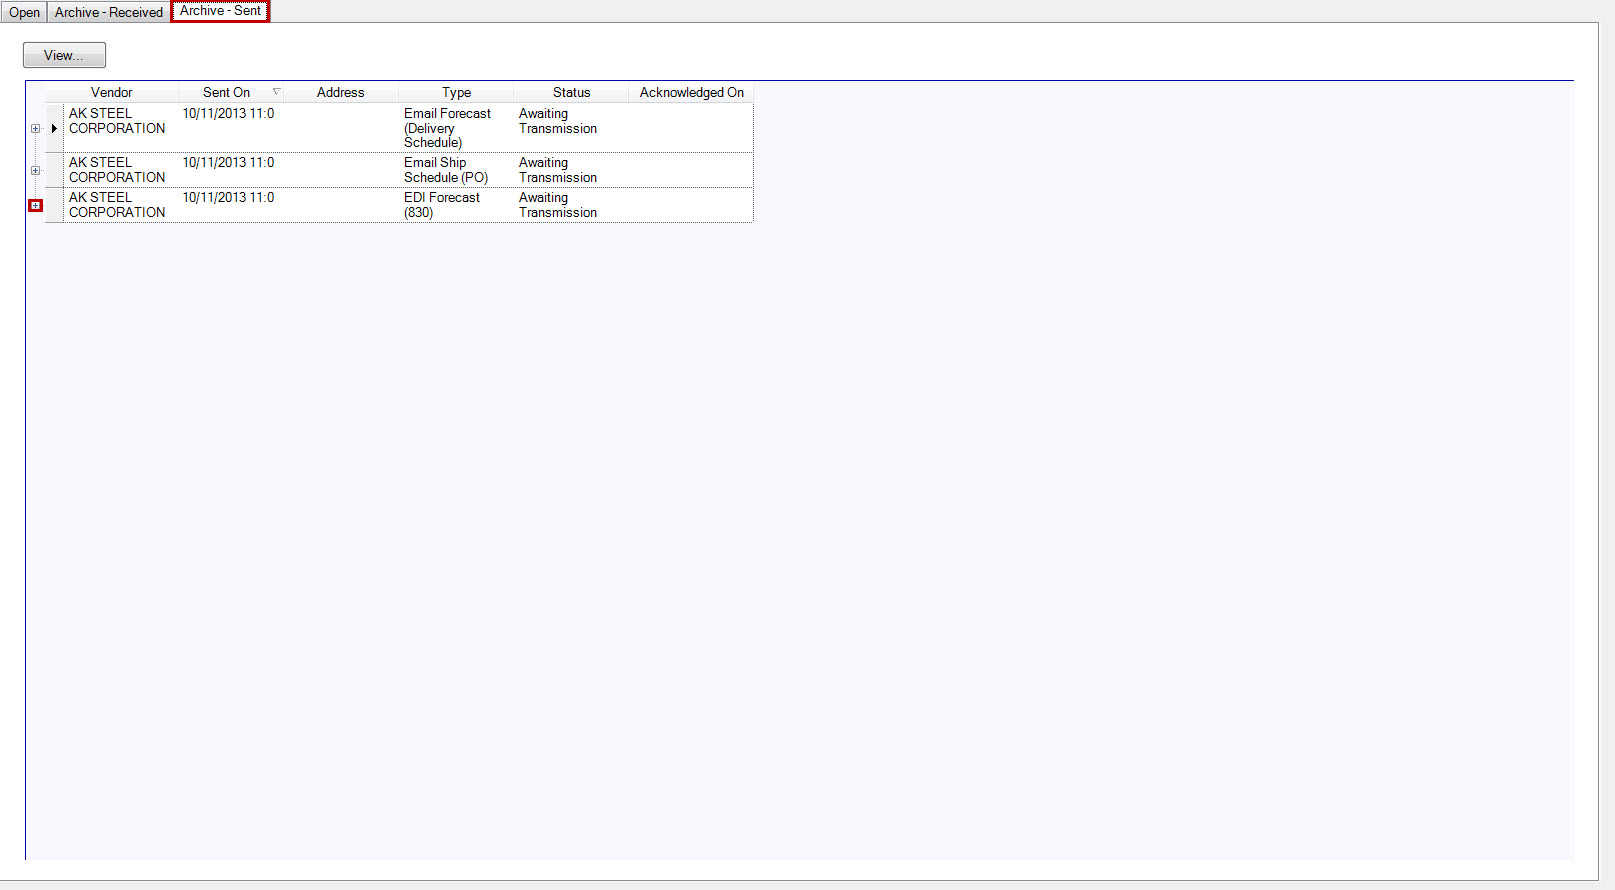
- Vendor - the Vendor that the EDI or Email document was sent to.
- Sent On - the date the document was sent.
- Address - for EDI the Receiver ID Qualifier/Receiver ID will be displayed and for Email, the Email address will be displayed.
- Type - description of the type of EDI or Email document ie: EDI Forecast(830) or Email Forecast(Delivery Schedule).
- Status - the status of the document ie: Awaiting Transmission or Transmitted.
- Acknowledged On - the date the Vendor acknowledged receiving the EDI document.
Clicking the  button next to the row will display more information of what was transmitted in the document.
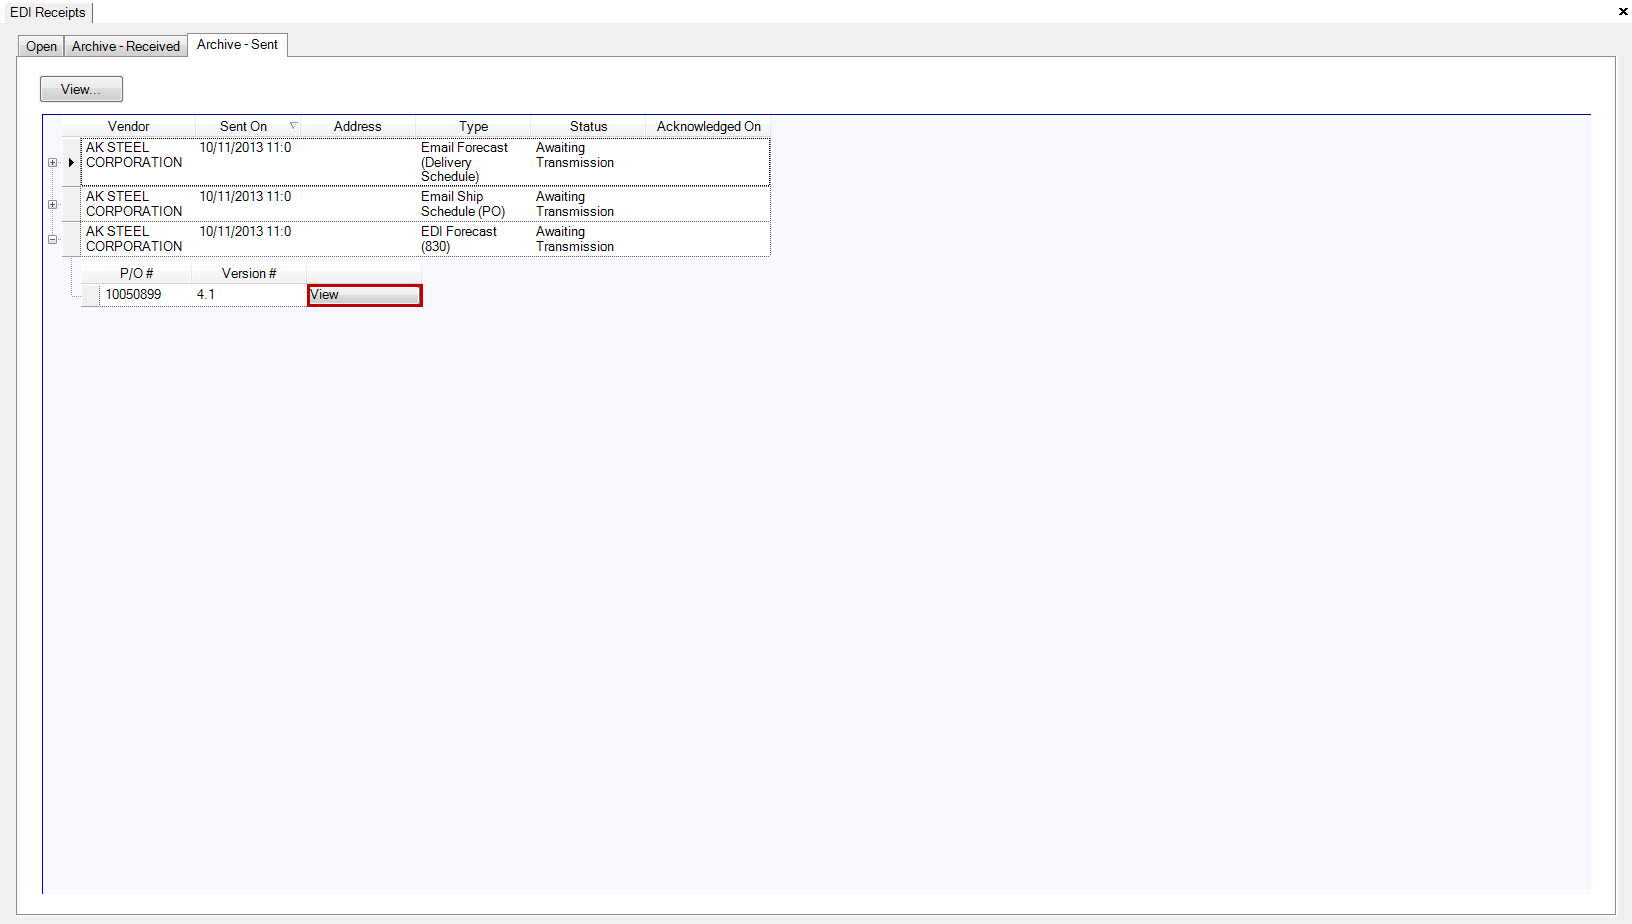
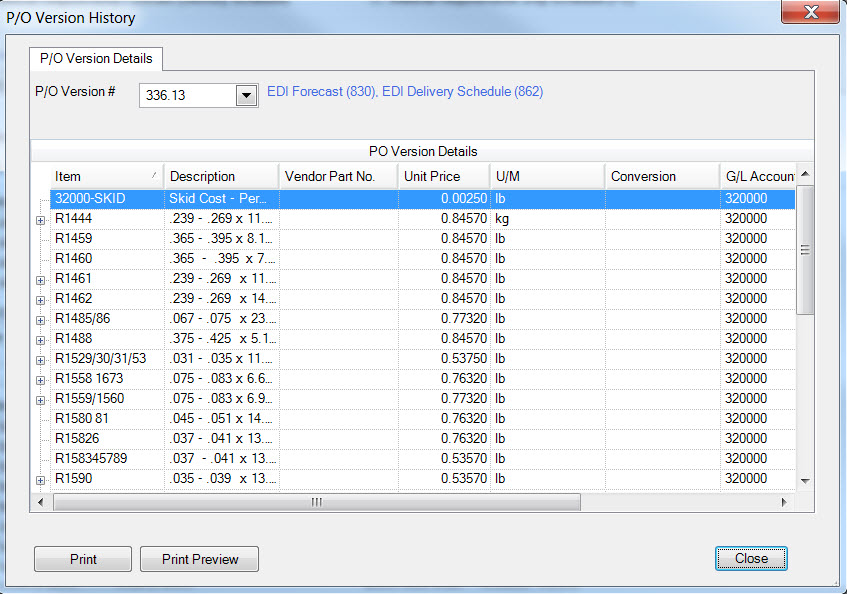
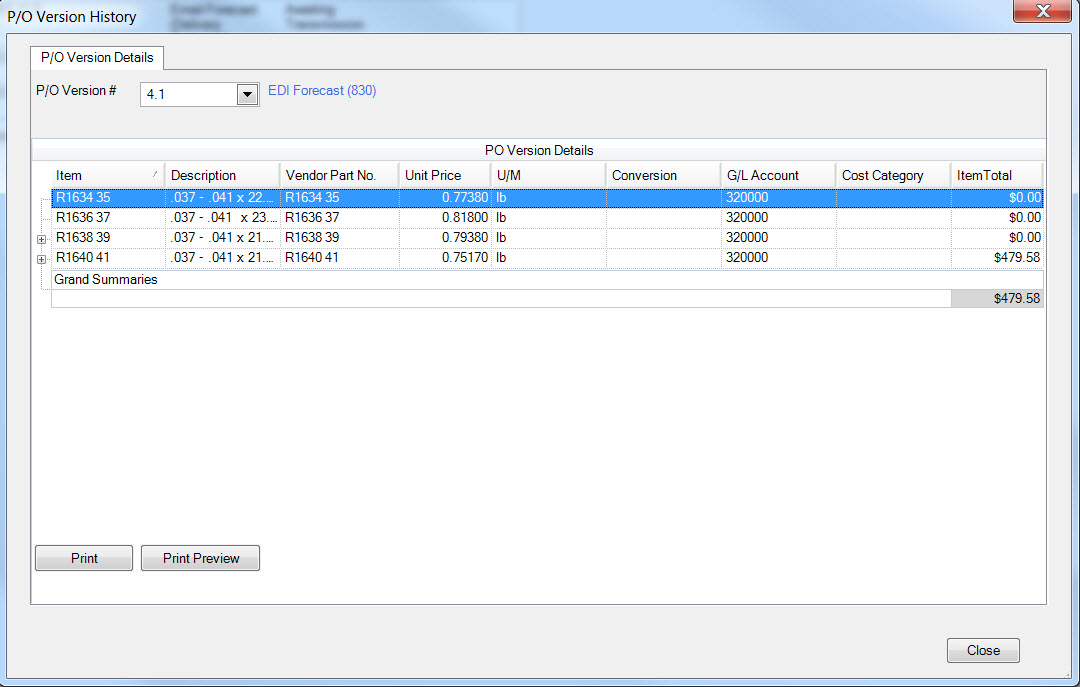
Click the  button to display the P/O Version History screen with the
P/O detail of what was either transmitted by EDI or by Email to the Vendor. The P/O can be printed or previewed.
The EDI Archive - Sent tab has buttons that perform different functions.

View
To view the contents of the Archived EDI and Email documents sent to the Vendor, highlight the row and click the  button.
Send Requirements
Requirements can be sent to Vendors either by EDI or Email at the Vendor or Purchase Order level. Once the trading partnership has been established with your EDI VAN, you can start sending Requirements to your Vendors using EDI.
Note
The Receiver Id/Receiver Id Qualifier for EDI and the Email address for Email must be setup for the Vendor. An error will be displayed if the Vendor has not been setup.
Requirements can be sent from the Purchase Order screen or the Material Requirements screen.
Purchase Order
To send Requirements for a Purchase Order to a Vendor navigate to the  tab,
and click on the
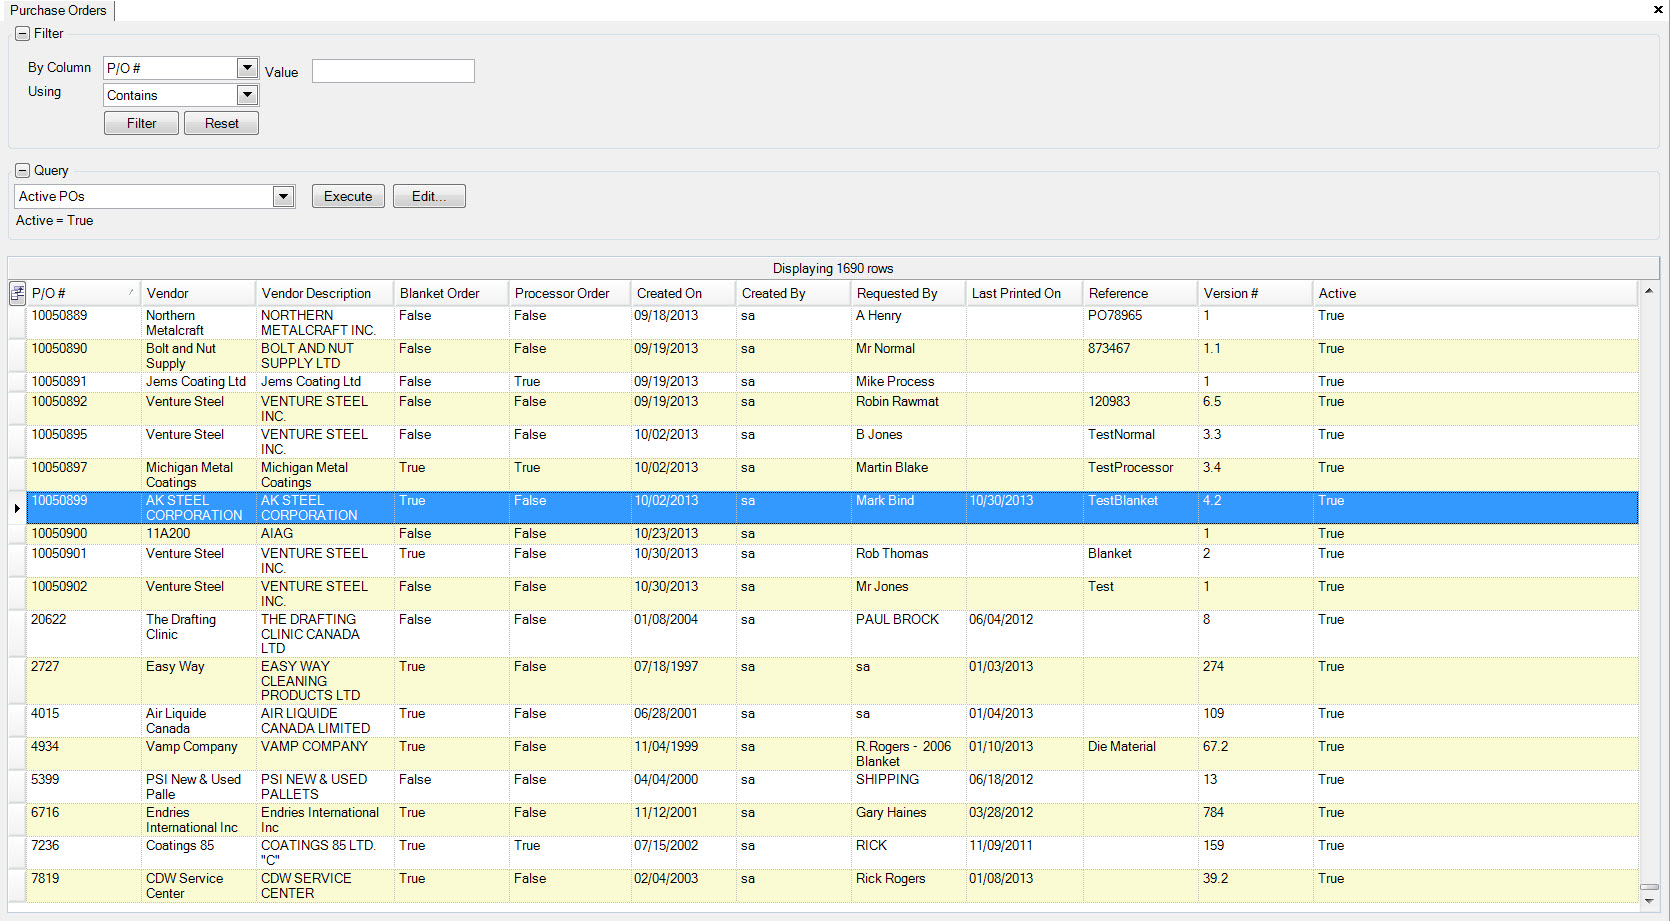
  icon. This will bring up the Purchase Orders Lookup Screen.
Once you find the Purchase Order you are looking for, double-click on the highlighted row or highlight the row and press the ‘Enter’ key.
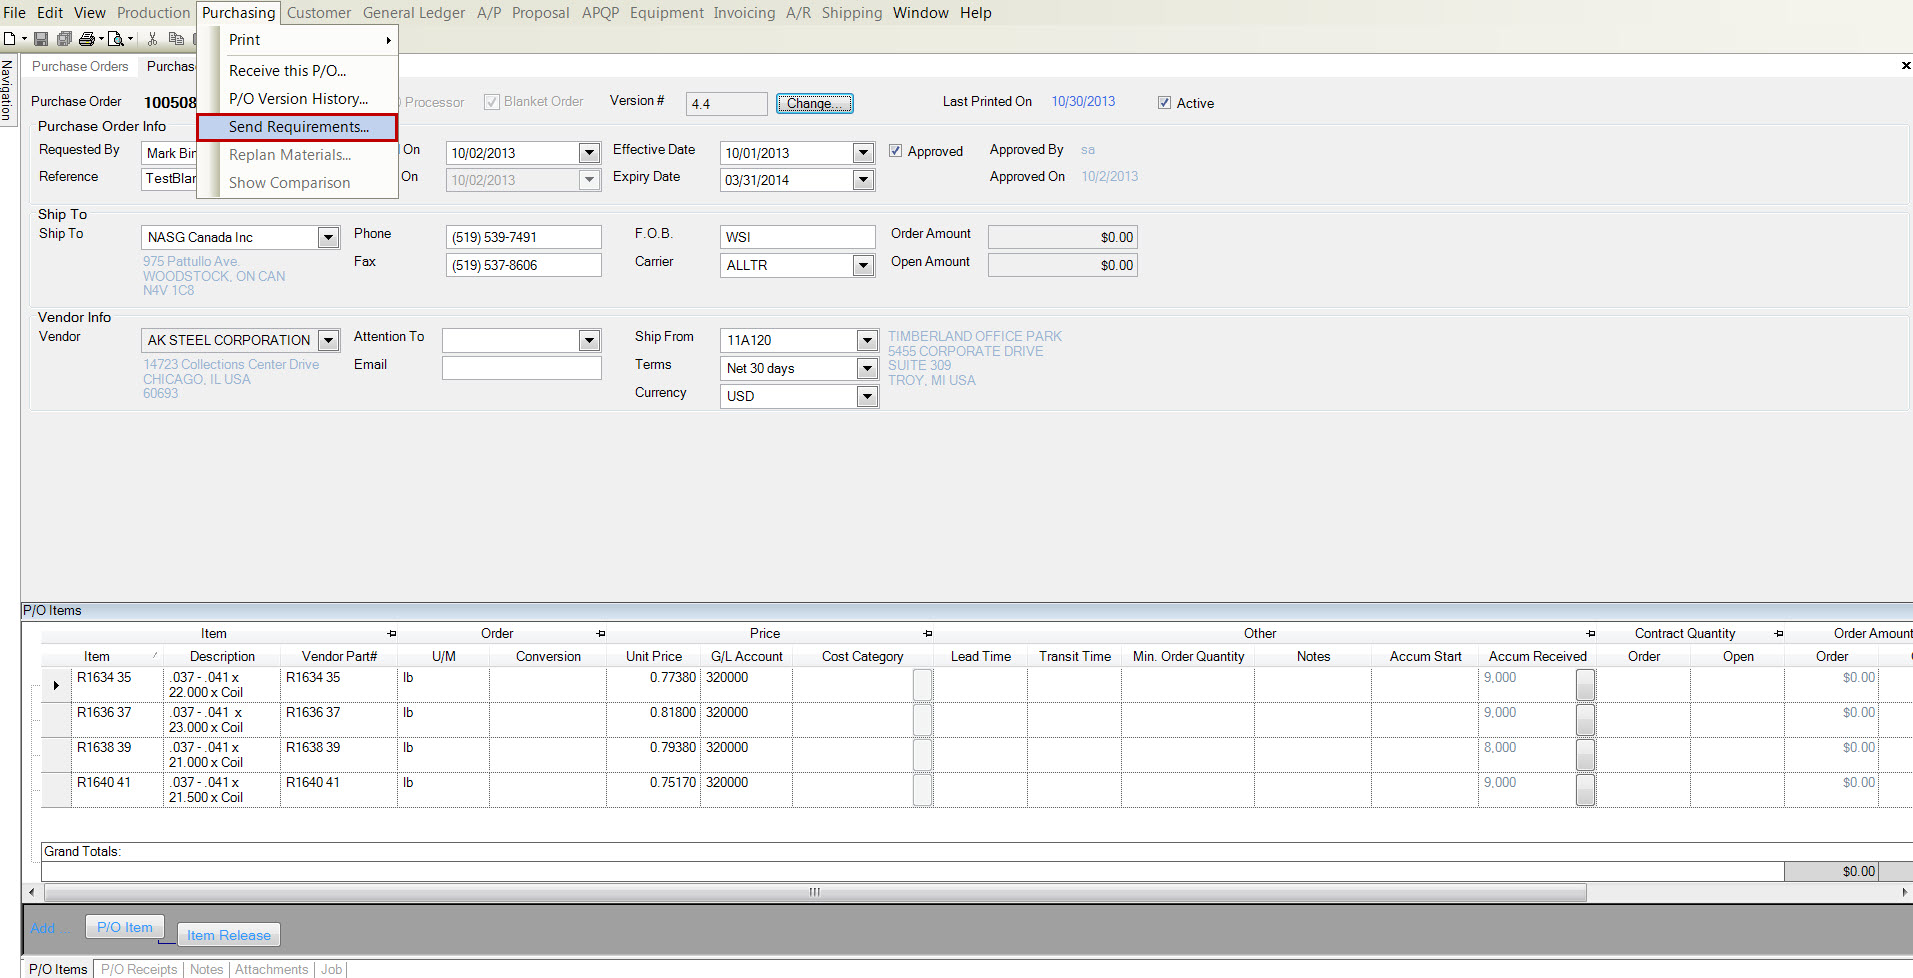
The Purchase Order screen will be displayed, select the Send Requirements from the the Purchasing menu at the top of the screen. The Send Requirements will be greyed out if Send EDI Documents and Send Email Documents is not checked for the Vendor.
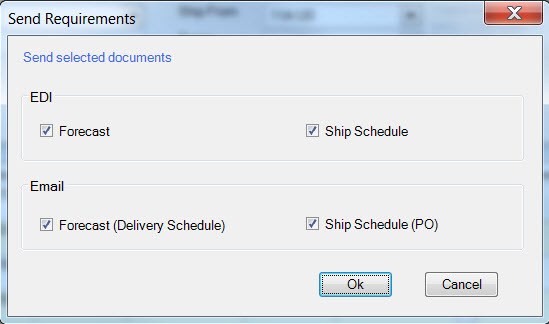
The Send Requirements screen will be displayed.
The EDI Forecast and Ship Schedule will be checked if the Vendor Send EDI Documents is checked. The Email Forecast(Delivery Schedule) and Ship Schedule (P/O) will be checked if the Vendor Send Email Documents is checked.
Uncheck the documents that you do not wish to send and click the  button.
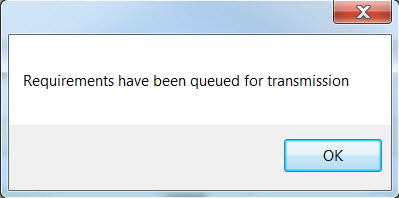
A confirmation message will be displayed that the EDI Forecast has been queued, click the  button.
Material Requirements
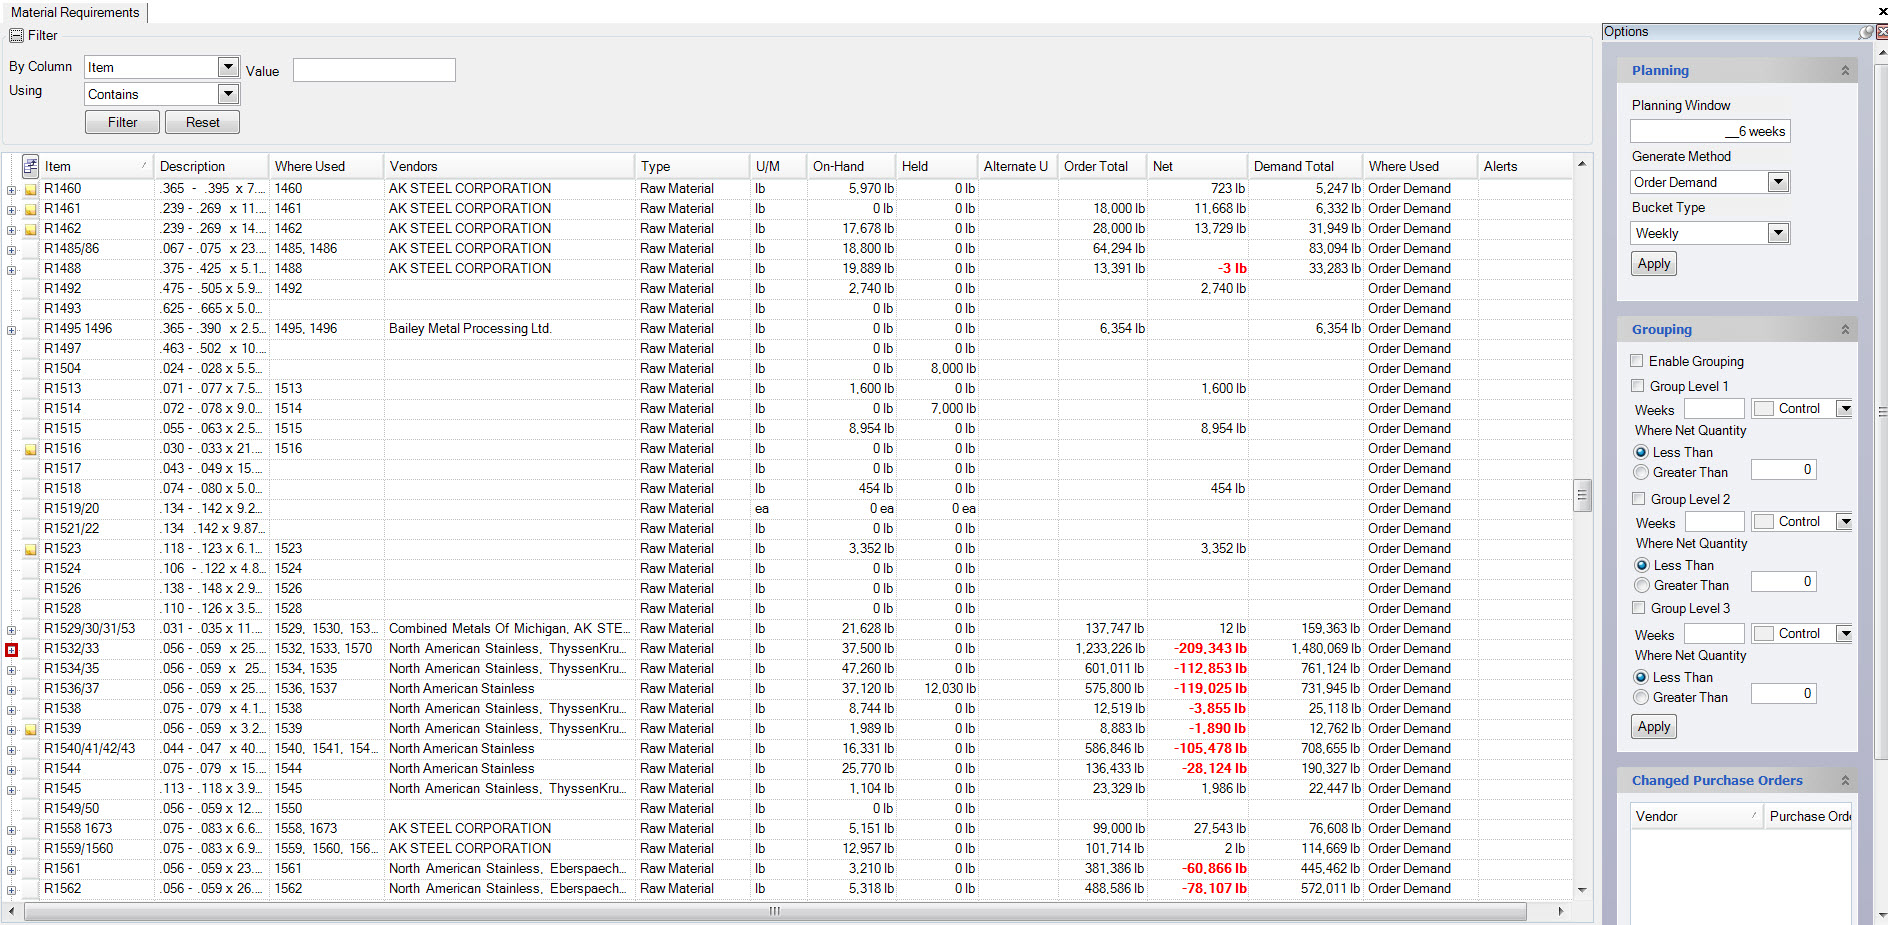
To send Requirements to a Vendor or Vendors, navigate to the  tab,
and click on the
  icon. This will bring up the Material Requirements Screen.
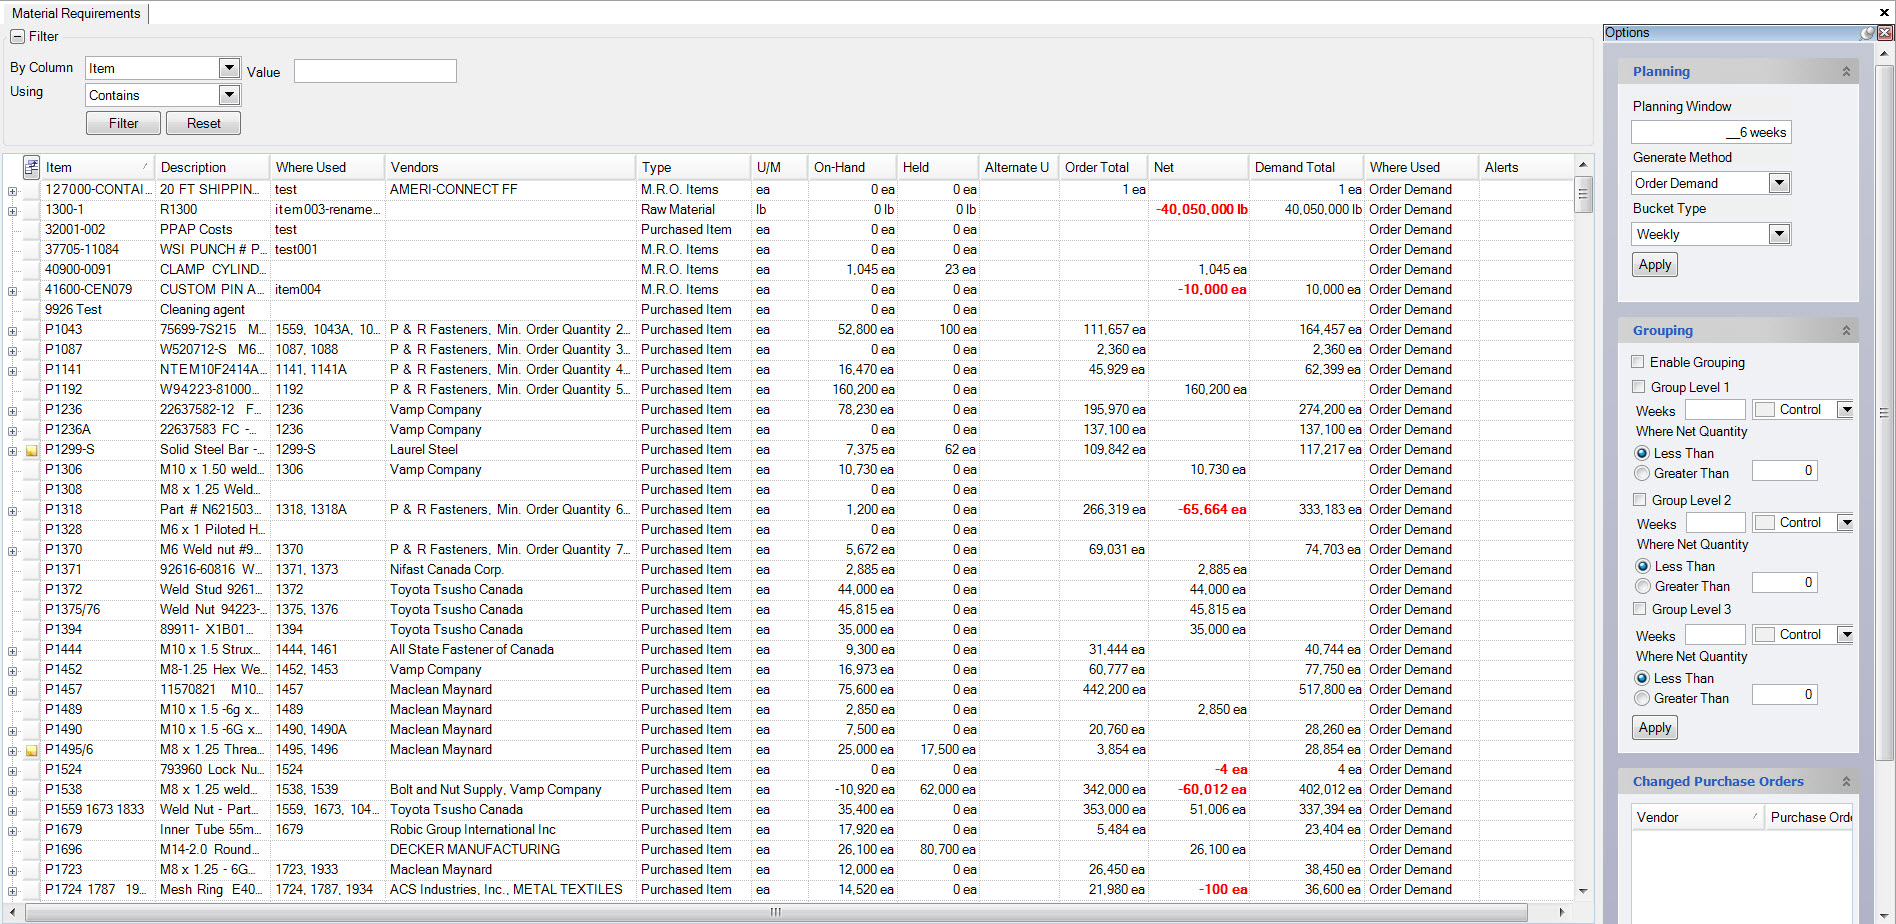
Send Requirements to Single or Multiple Vendors
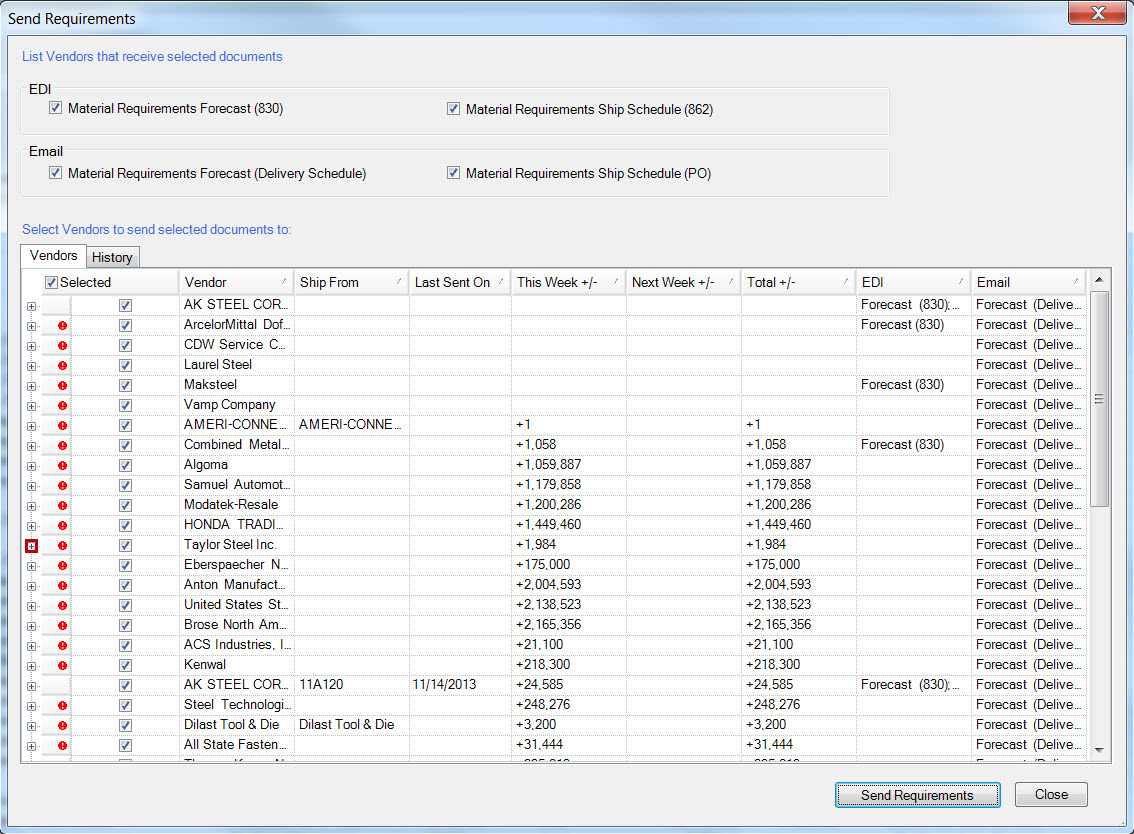
Select Send Requirements from the the Purchasing menu at the top of the screen.

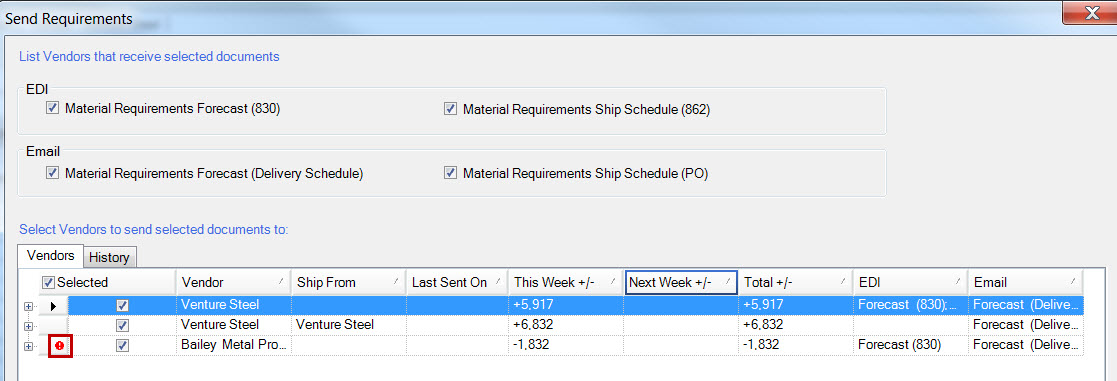
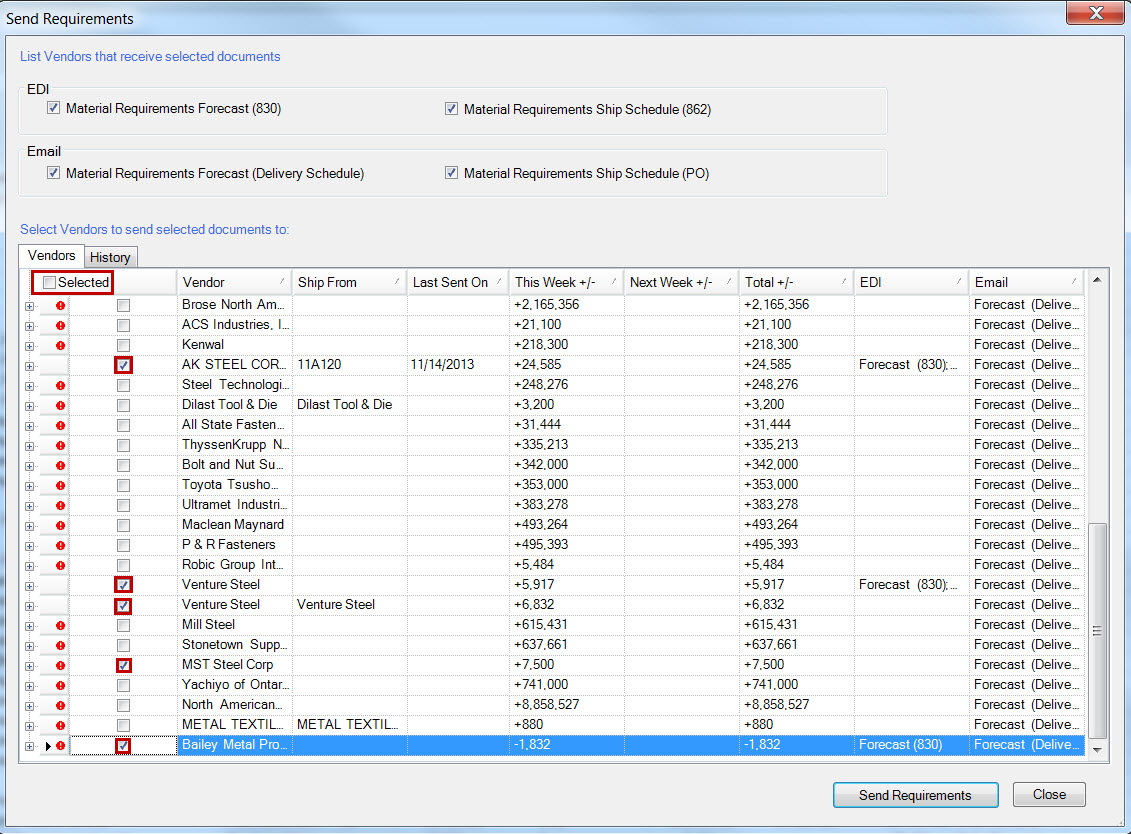
The Send Requirements Vendor selection will be displayed. The EDI Forecast and Ship Schedule will be checked for EDI and the
Email Forecast (Delivery Schedule) and Ship Schedule (P/O) will be checked for Email. All of the Vendors are selected by default.
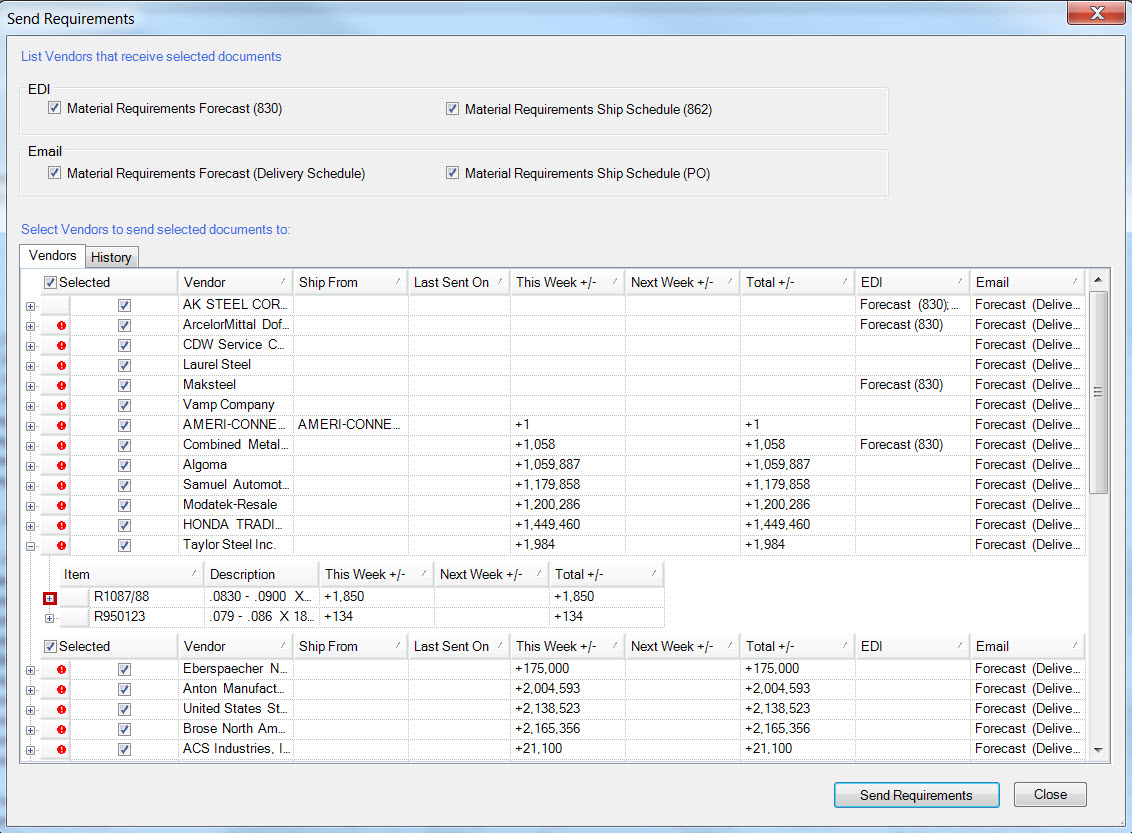
Click the  button next to the Vendor row and the Item Requirements
will be displayed.
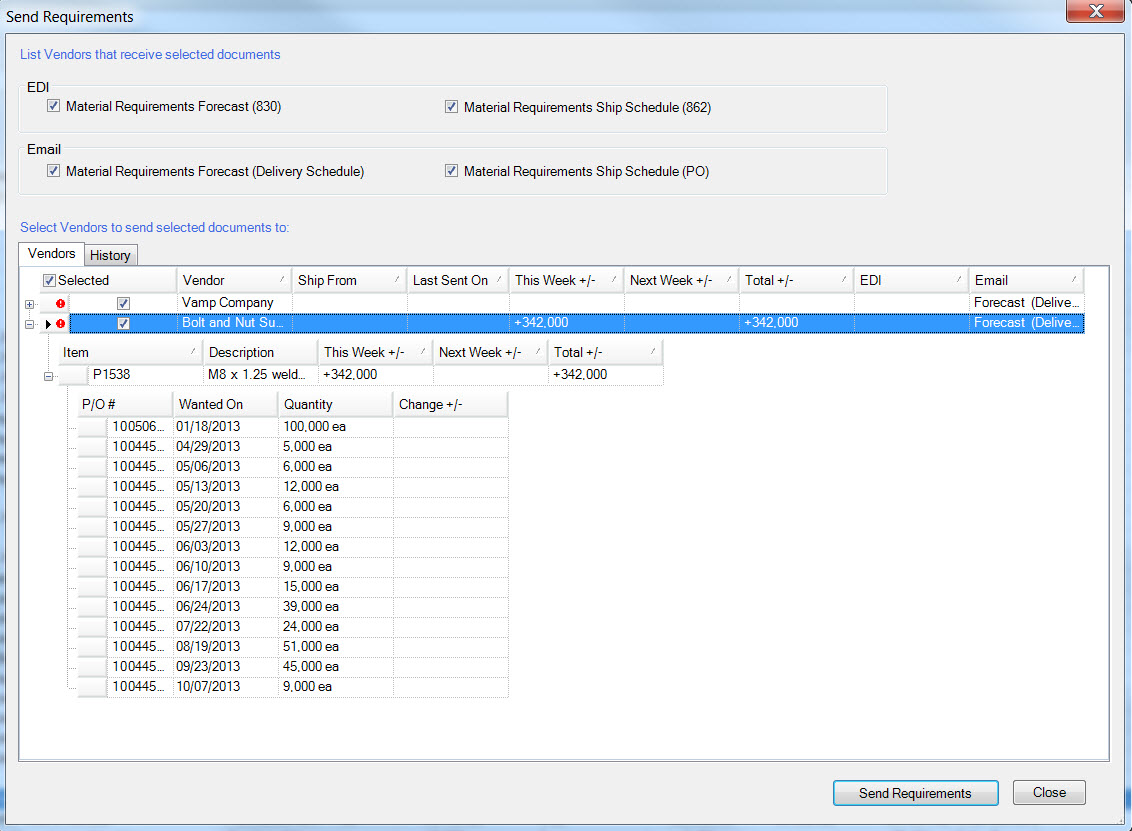
Click the  button next to the Item row and the P/O #, Wanted On and Quantity
will be displayed.
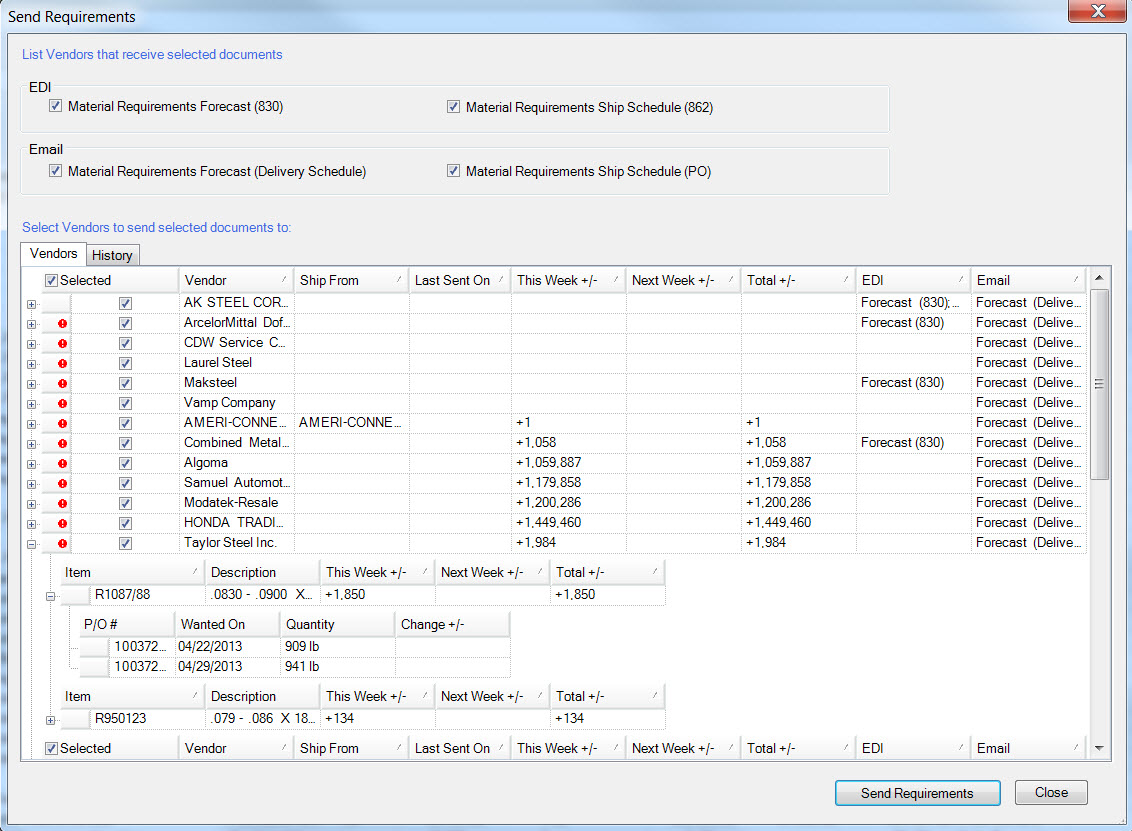
To send Requirements to selected Vendors, uncheck the box that is selected and then select the Vendors, otherwise to send to all Vendors leave the selected box checked.
Click the  button.
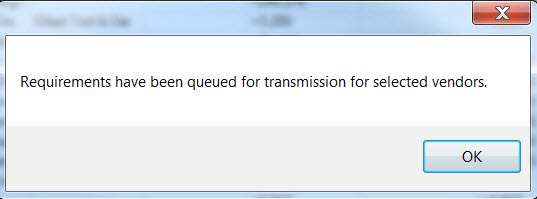
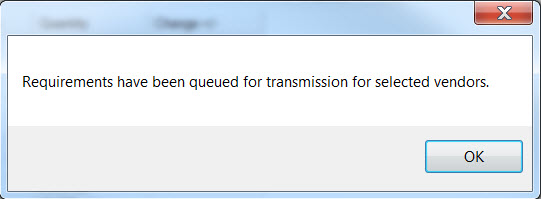
A confirmation message will be displayed that the Requirements have been queued, click the  button.
Send Requirements to Vendor
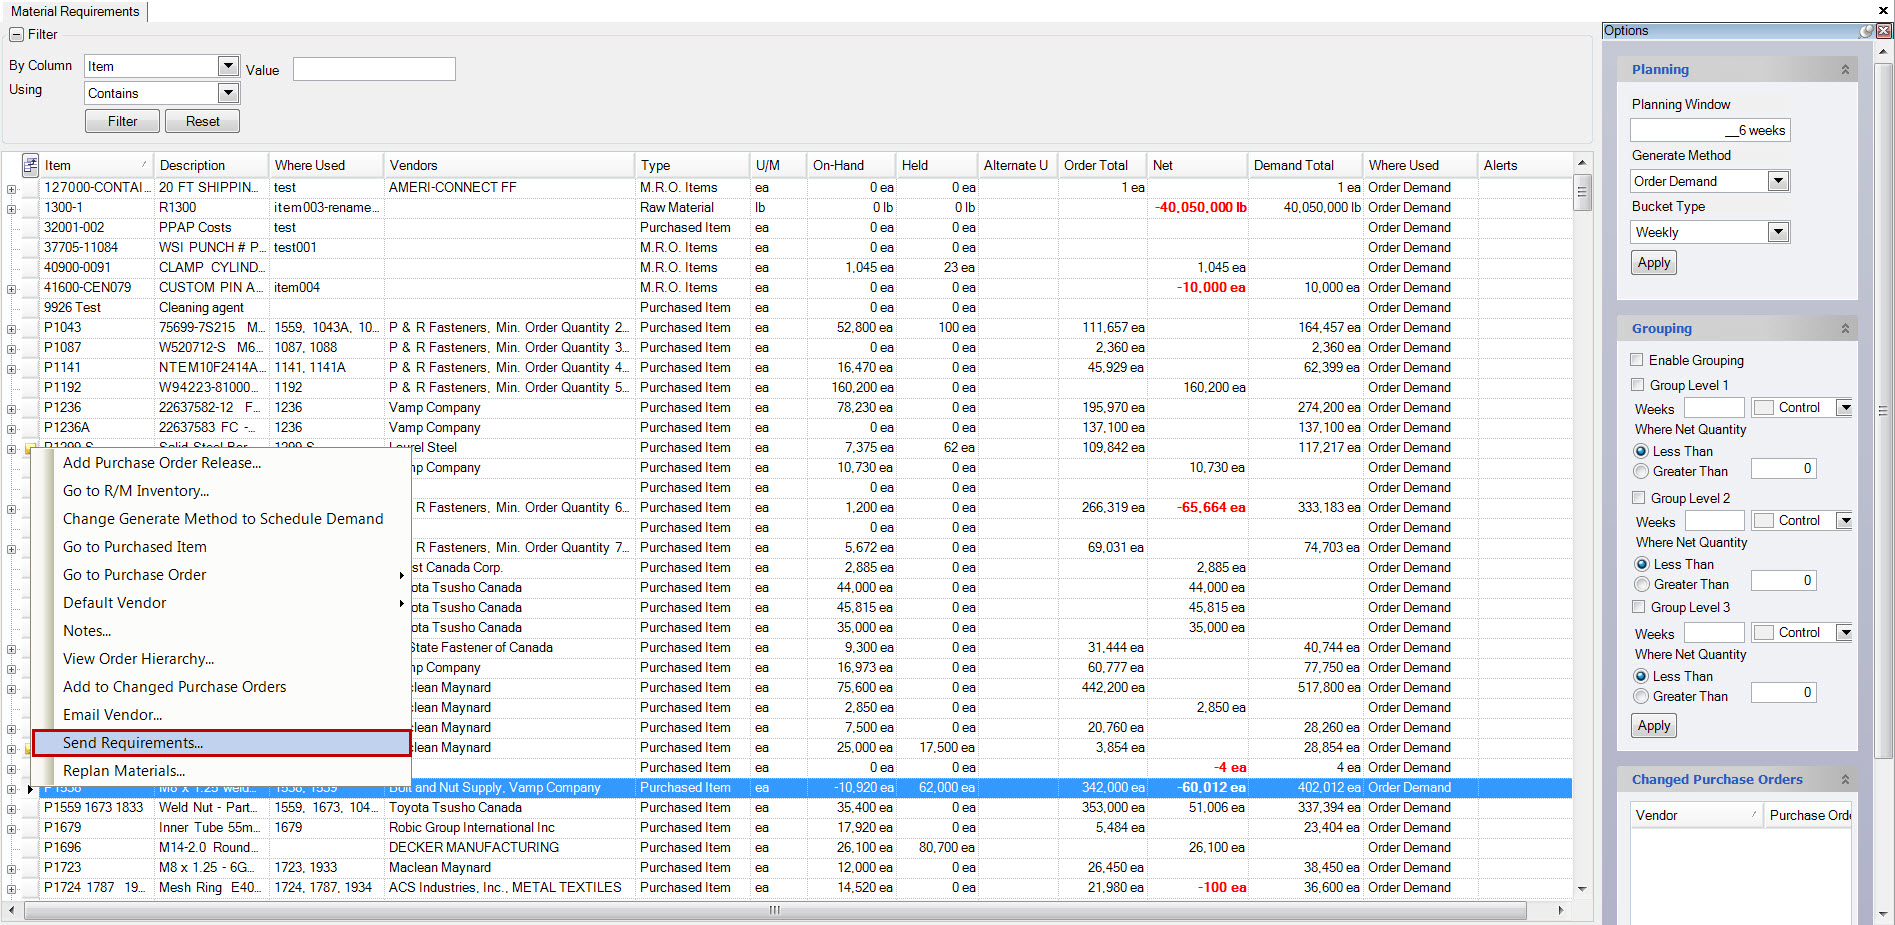
To send Requirements to a Vendor, highlight and right-click on the Item row and select the Send Requirements from the the drop-down menu.
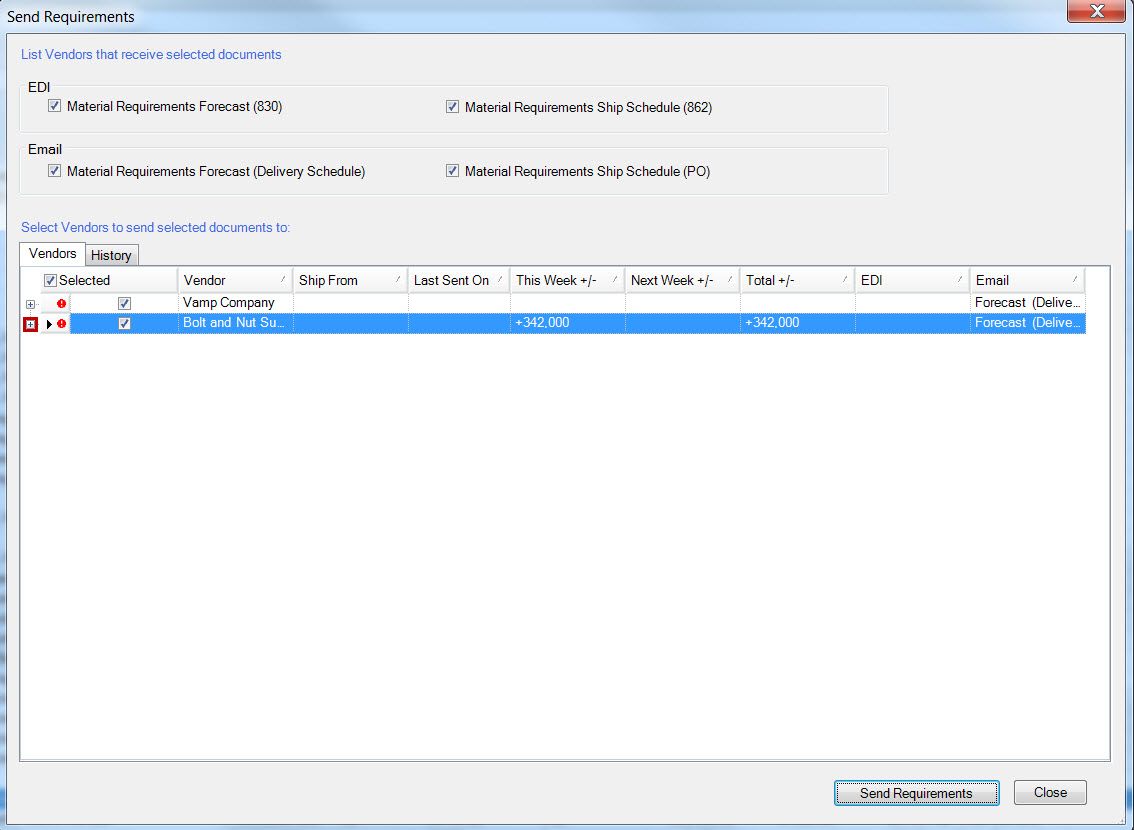
The Send Requirements Vendor selection will be displayed. The EDI Forecast and Ship Schedule will be checked for EDI and the
Email Forecast (Delivery Schedule) and Ship Schedule (P/O) will be checked for Email. If multiple Vendors supply the Item they will be displayed in
the selection. Click the  button next to the Vendor row and the Item Requirements
will be displayed.
Click the  button next to the Item row and the P/O #, Wanted On and Quantity
will be displayed.
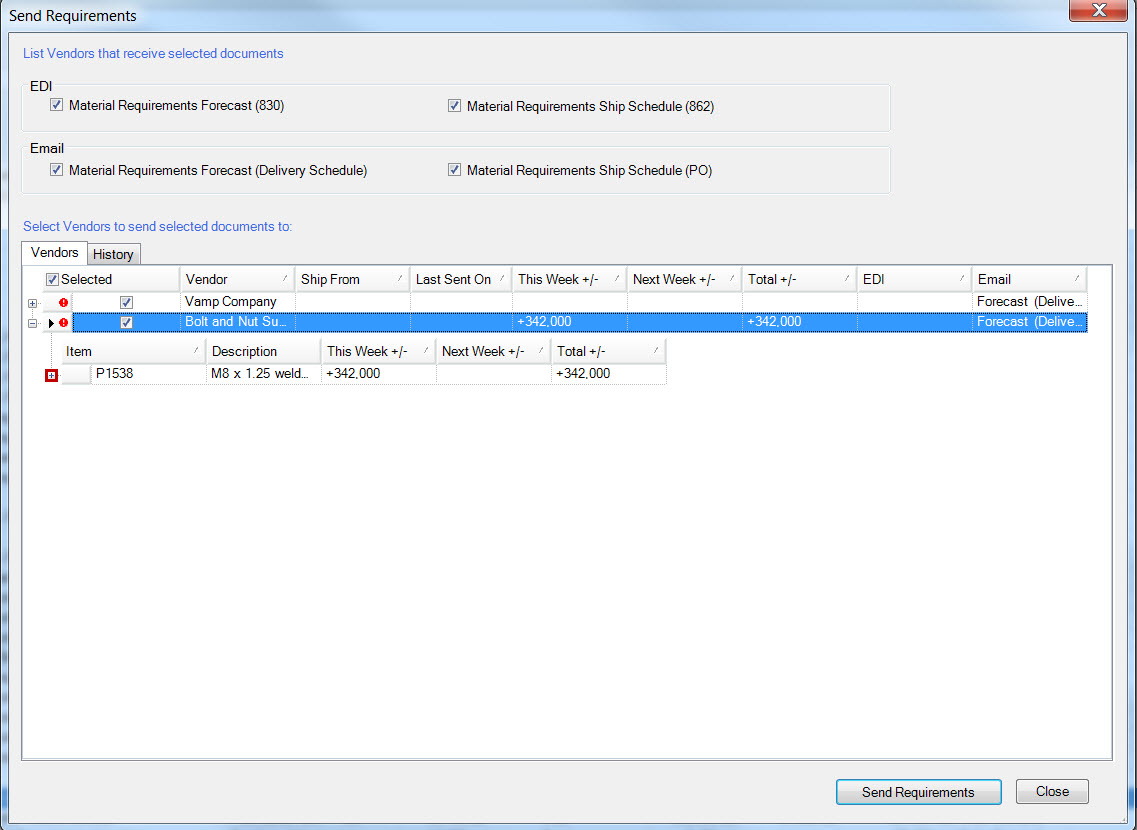
To send Requirements to selected Vendors uncheck the box that is selected and then select the Vendors, otherwise to send to all Vendors leave the selected box checked.
Click the  button.
A confirmation message will be displayed that the Requirements have been queued, click the  button.
Send P/O Requirements
To send P/O Requirements to a Vendor, click the  next to the Item to display more detail.
Vendor
To send Requirements to the Vendor for a P/O, highlight and right-click on the P/O row and select the Send Requirements for this Vendor from the the drop-down menu.
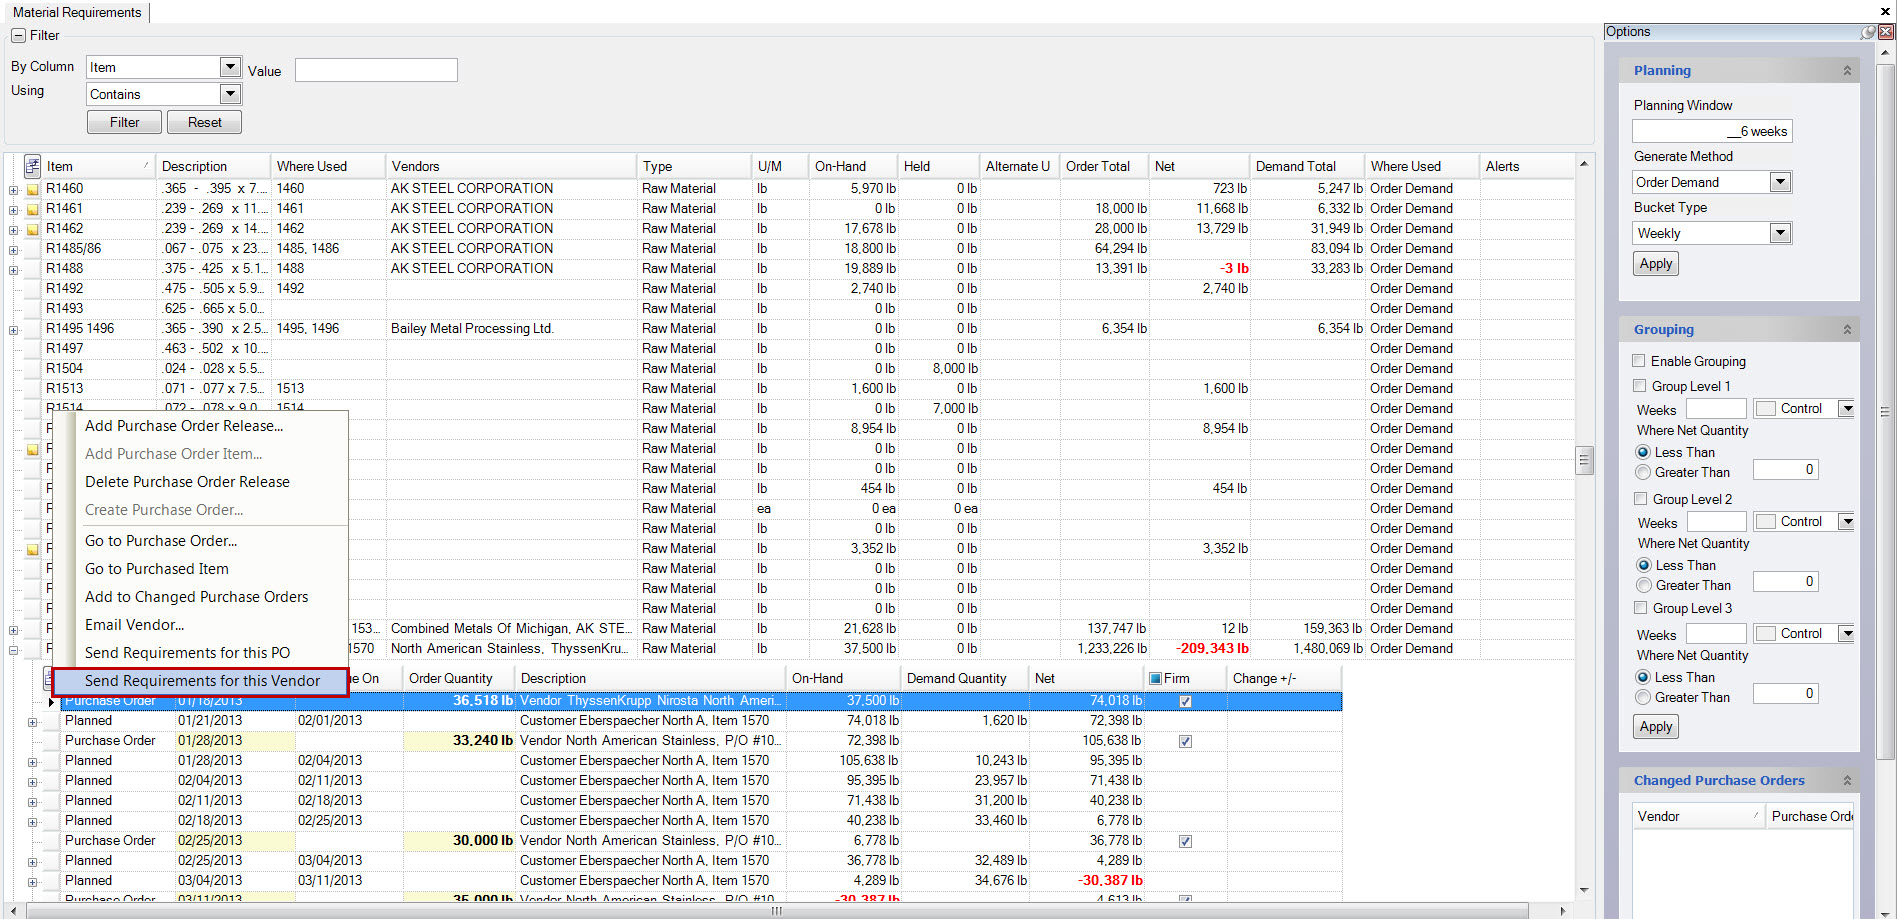
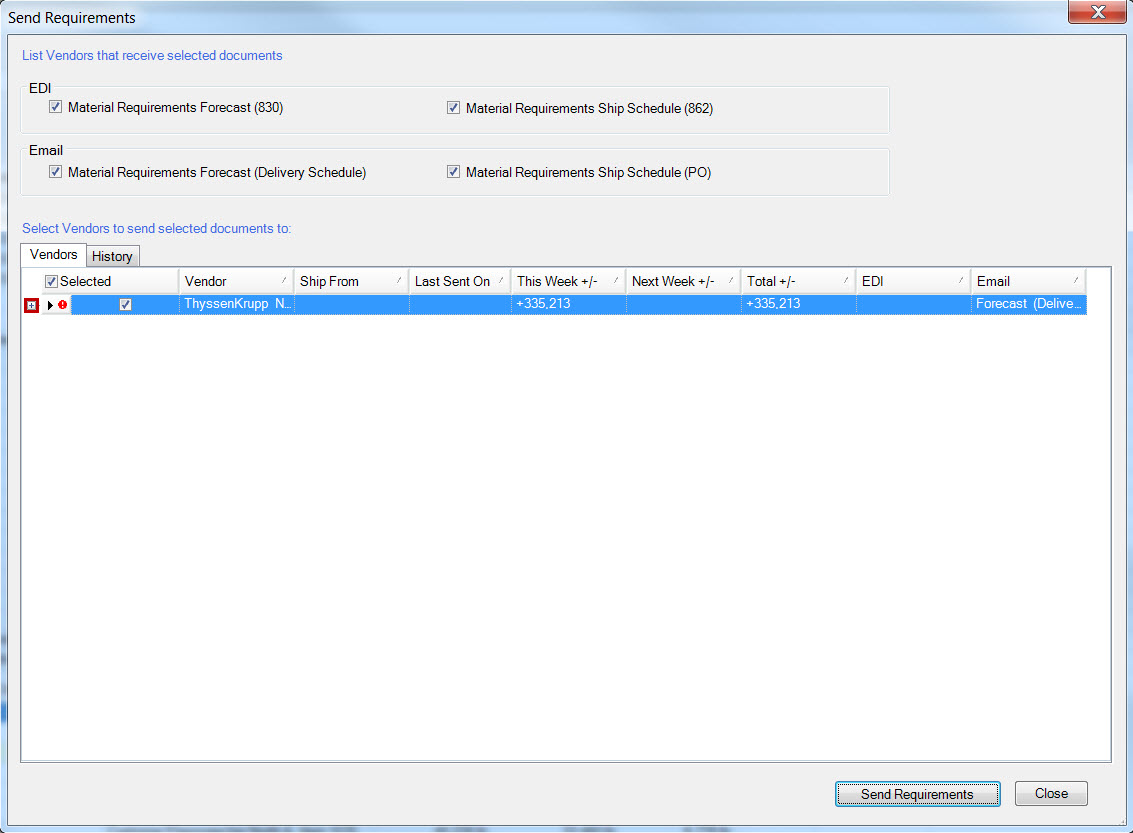
The Send Requirements selection will be displayed. The EDI Forecast and Ship Schedule will be checked for EDI and the
Email Forecast (Delivery Schedule) and Ship Schedule (P/O) will be checked for Email.
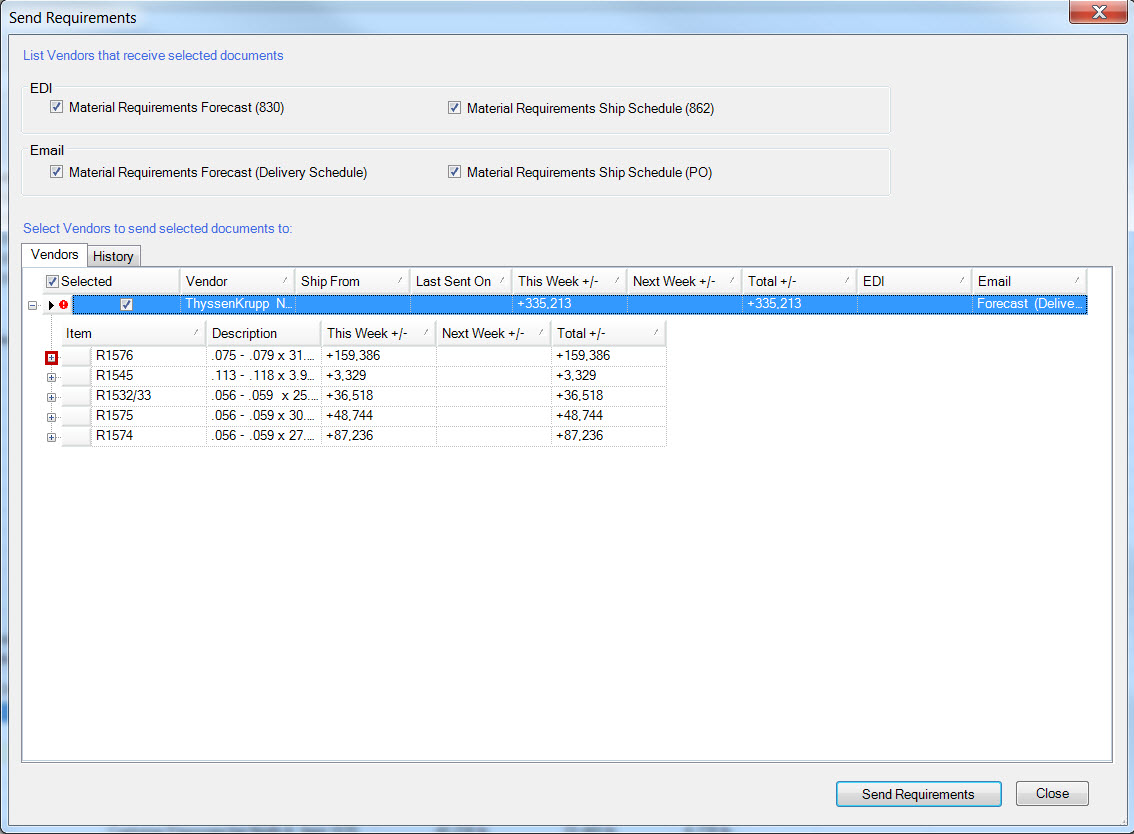
Click the  button next to the Vendor row and the Item Requirements
will be displayed.
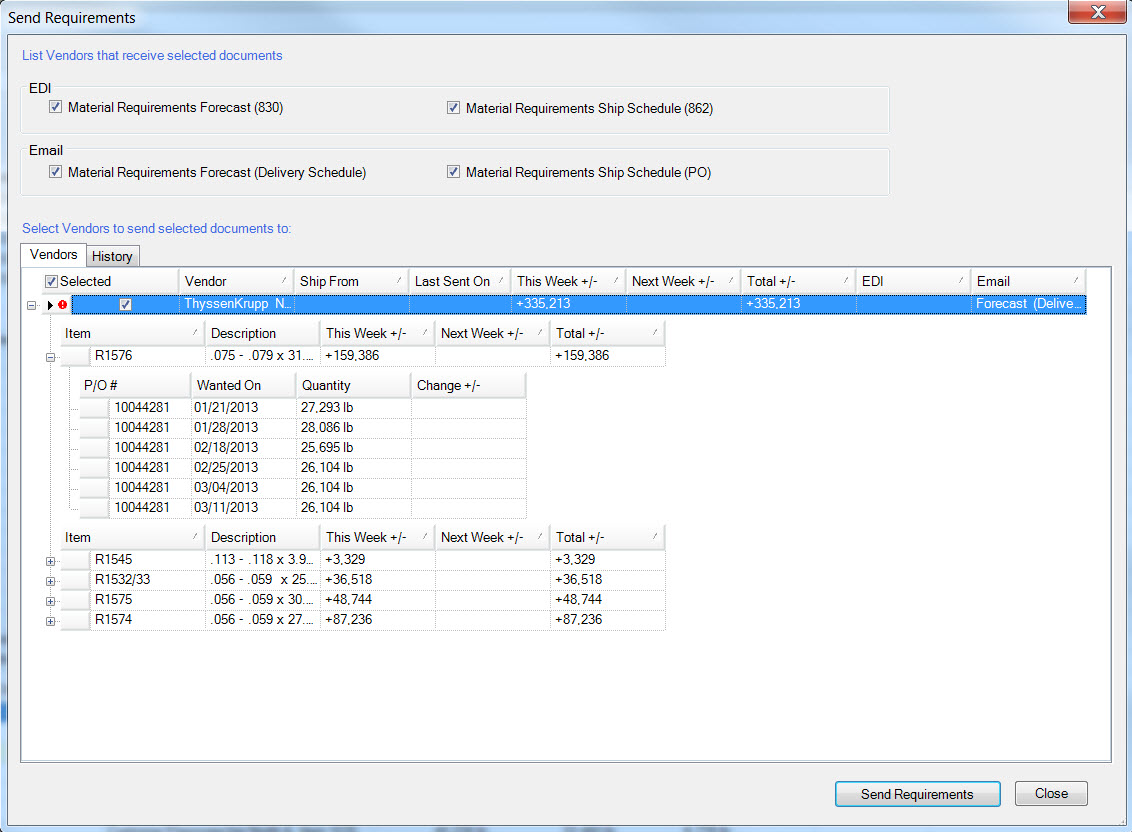
Click the  button next to the Item row and the P/O #, Wanted On and Quantity
will be displayed.
To send the Requirements click the  button.
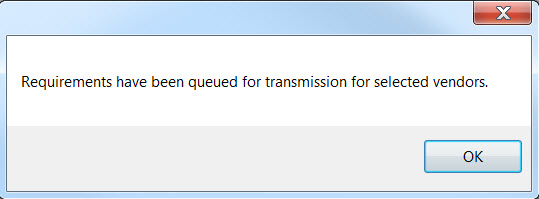
A confirmation message will be displayed that the Requirements have been queued, click the  button.
P/O
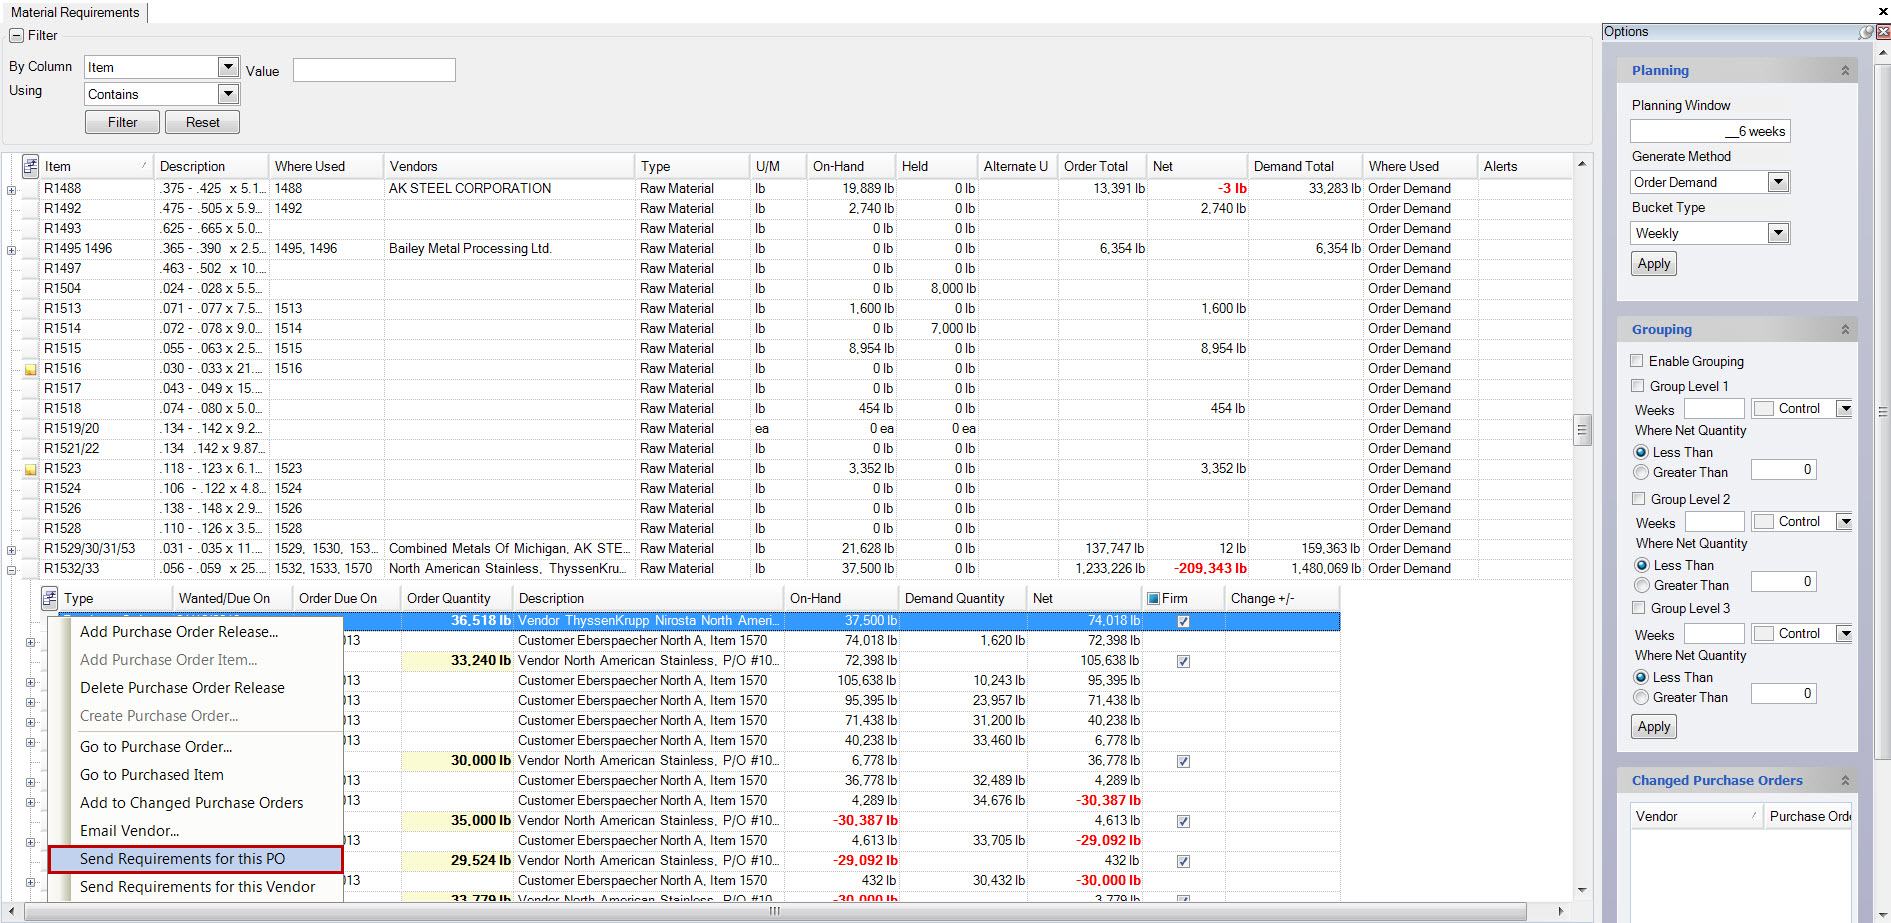
To send Requirements to the Vendor for a P/O, highlight and right-click on the P/O row and select the Send Requirements for this PO from the the drop-down menu.
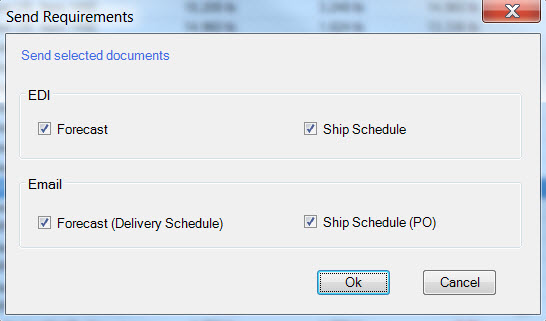
The Send Requirements will be displayed. The EDI Forecast and Ship Schedule will be checked for EDI and the
Email Forecast (Delivery Schedule) and Ship Schedule (P/O) will be checked for Email depending on the Vendor settings.
Click the  button to send the requirements.
View Sent Requirements History
To view the Sent Requirements History, navigate to the  tab,
and click on the
  icon. This will bring up the Material Requirements screen.

Select the Send Requirements from the the Purchasing menu at the top of the screen.

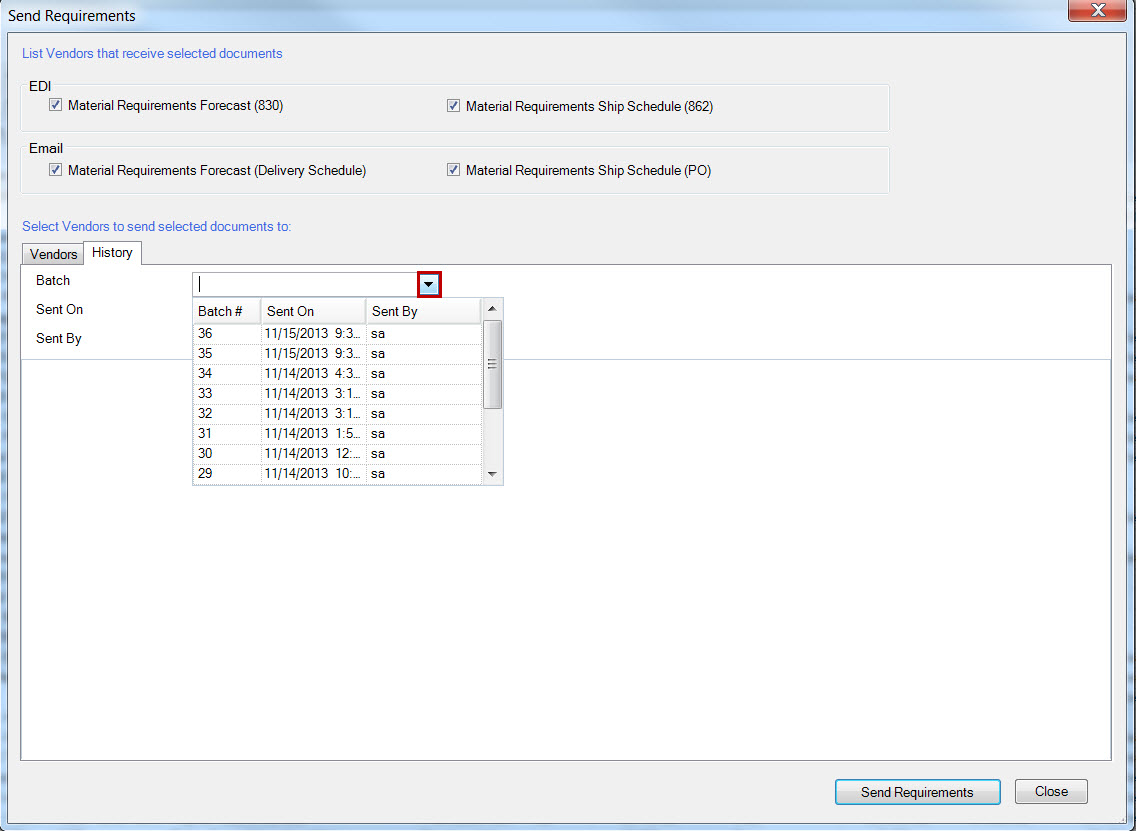
The Send Requirements Vendor selection will be displayed, click the  tab.
tab.
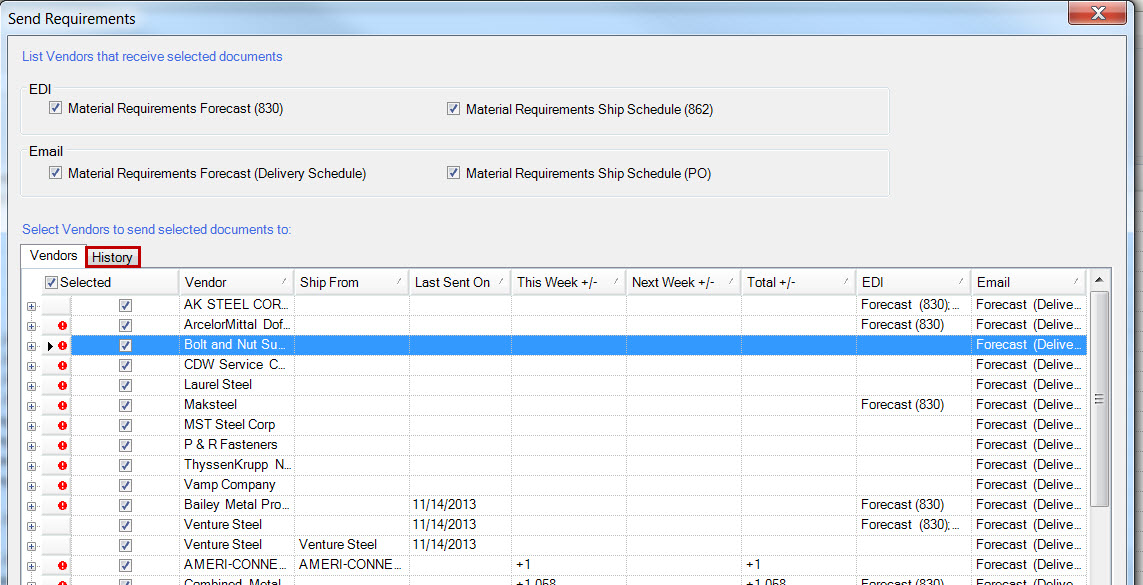
Use the drop-down box to select a batch.
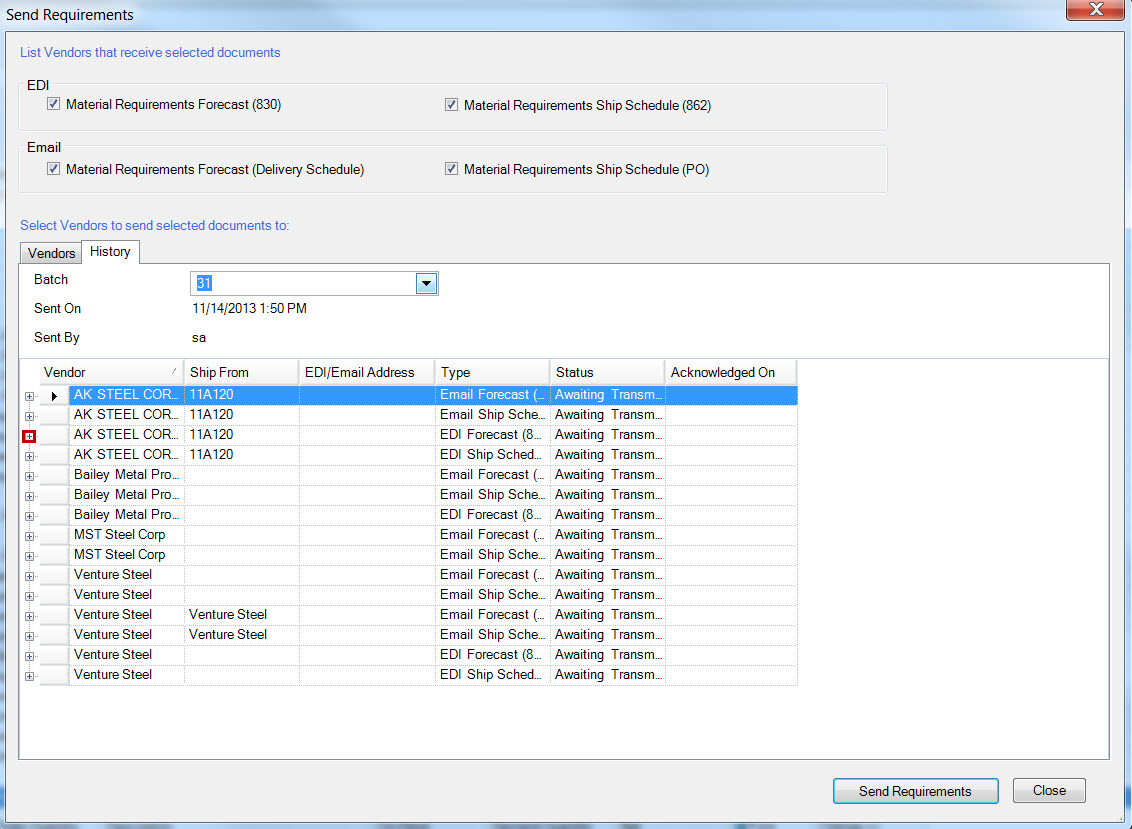
Click the  button next to the Vendor row and the P/O #
will be displayed.
Click the  button next to P/O to view the P/O Version detail.
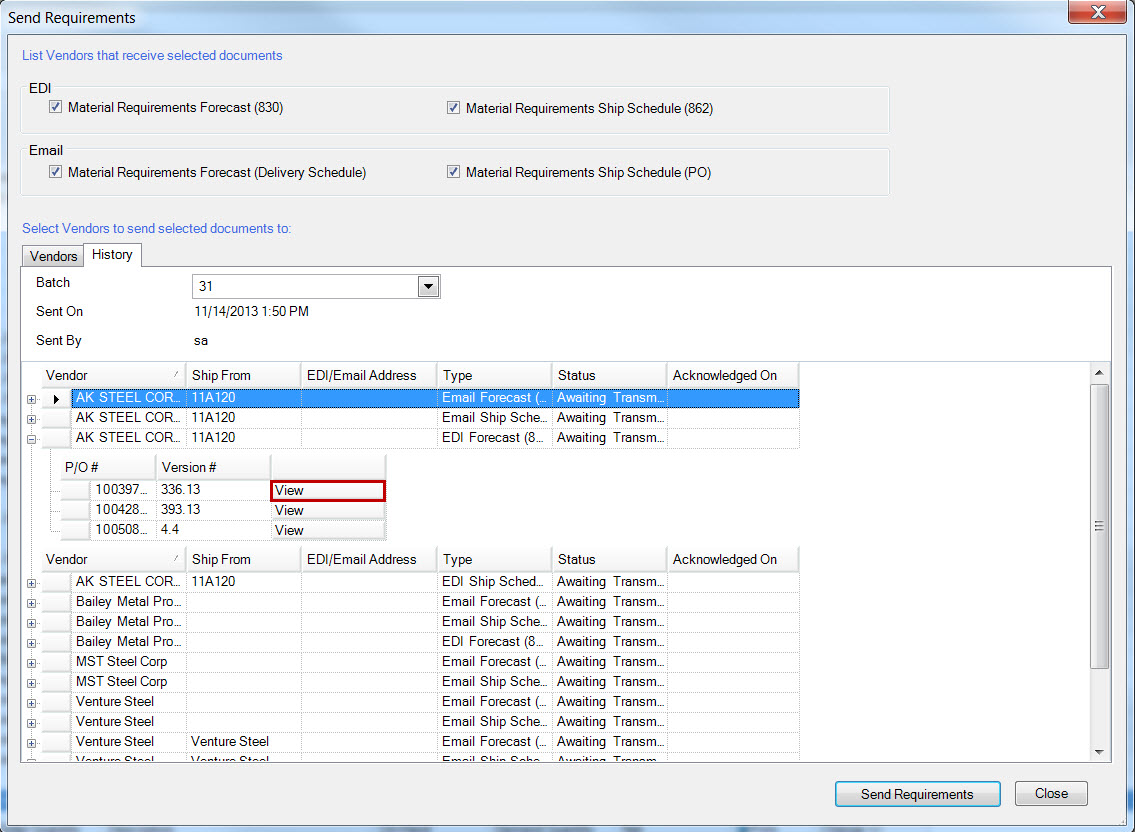
The P/O can be printed or print previewed. Click the  button to close the display.
