Customers
Preliminaries
Before ShopEdge can start sending or receiving EDI data from your customers, you must establish a trading partnership with your customer through your EDI VAN. This normally requires that you exchange with your customer, your Sender/Receiver ID Qualifier, your Sender/Receiver ID (or mailbox ID) and your EDI VAN.
You need to get the same values from your customer. Once you have that information, you need to establish the trading partnership.
Customer Setup
To update the Customer EDI, navigate to the  tab, clicking on the
 ![]() . Use the Customer Lookup screen to find the customer you are looking for. Double-click on the customer row to bring up the Customer Detail
screen.
. Use the Customer Lookup screen to find the customer you are looking for. Double-click on the customer row to bring up the Customer Detail
screen.
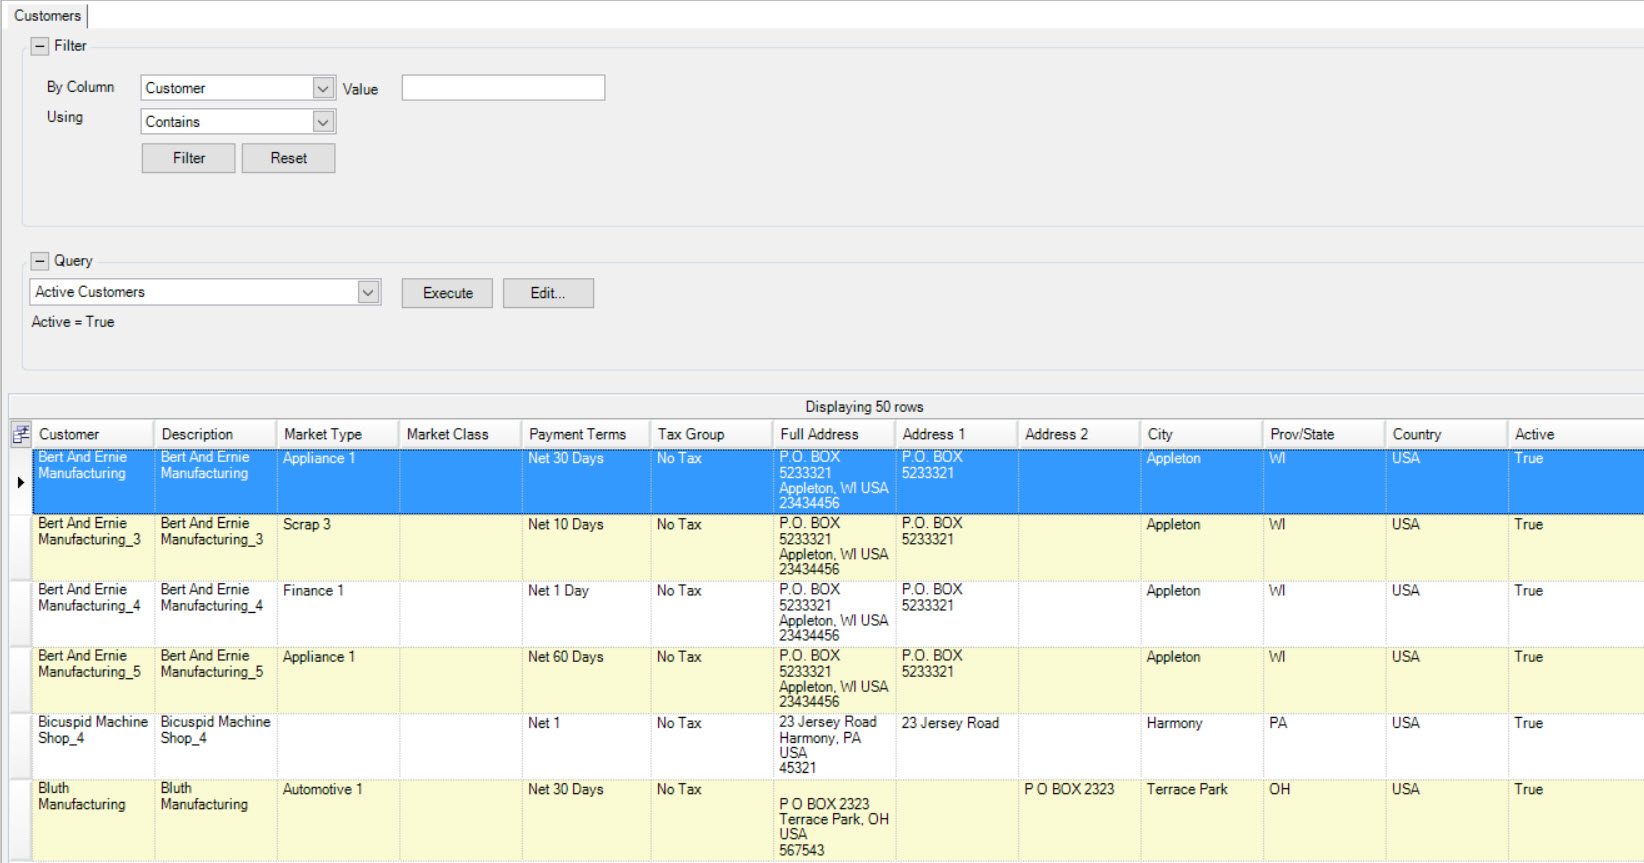
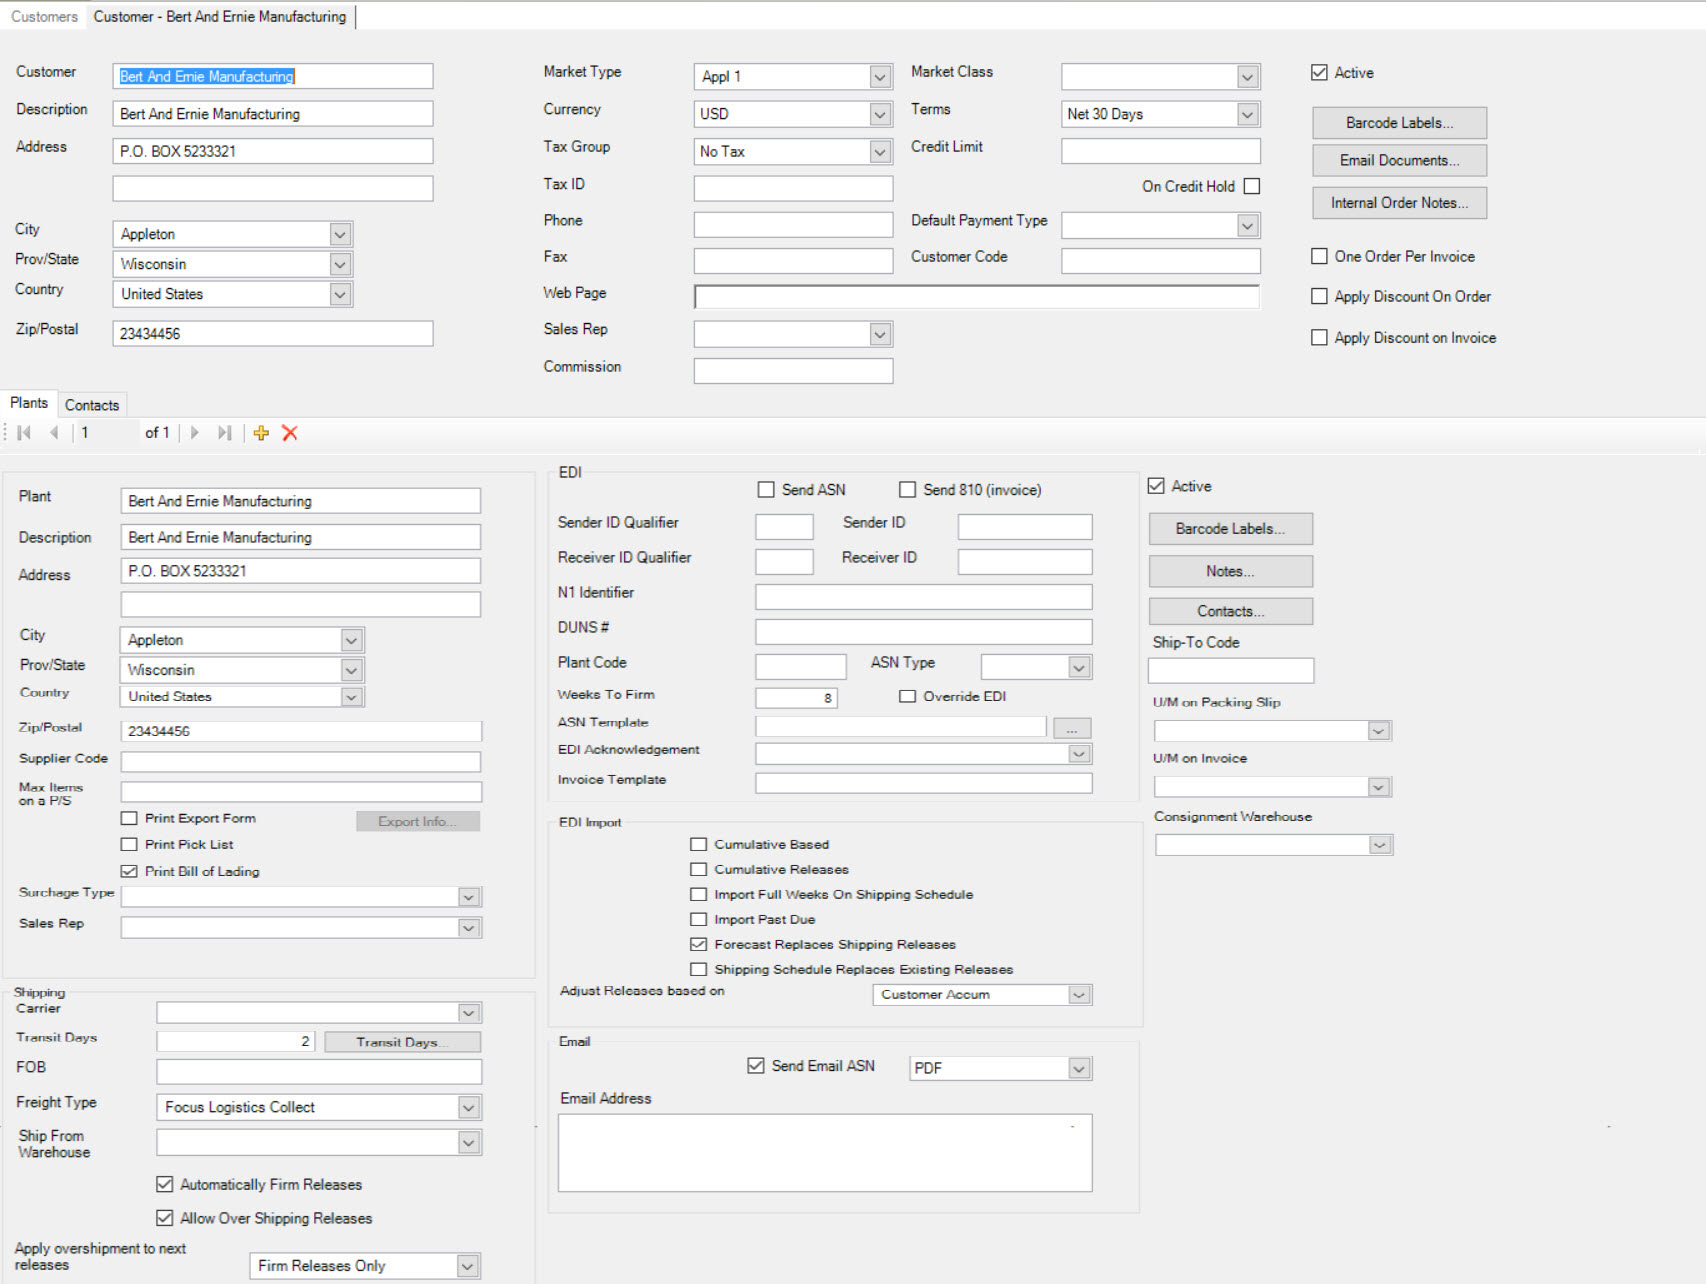
Enter the Customer EDI information:
- Send ASN - send an ASN to the customer.
- Send 810 (invoice) - send an invoice to the customer.
- Sender ID Qualifier - the sender ID qualifier of the customer for incoming transmissions (ie: 830-Production Planning).
- Sender ID - the sender ID of the customer for incoming transmissions (ie: 830-Production Planning).
- Receiver ID Qualifier - the receiver ID of the customer for outgoing transmissions (ie: 856-ASN).
- Receiver ID - the receiver ID of the customer for outgoing transmissions (ie: 856-ASN).
- N1 Identifier - is used to identify the Customer and Plant for incoming transmissions. The N1 Identifier can be retrieved from the Raw EDI Data by searching for the entity identifier codes of ‘ST’ or ‘MI’ in the N1 segments. For example if ‘N1*ST**01*253999999’ or ‘N1*MI**01*253999999’ were found, the N1 Identifier would be updated as ST,1,253999999 or MI,1,253999999.
- DUNS # - Customer Plant Duns #.
- Plant Code - Plant Code which is sometimes required in the N1 segment for the entity identifier code ‘ST - Ship To’
- ASN Type - type of ASN format:
- 856 - X12 format
- DESADV - EDIFACT format
- Weeks To Firm - the number of weeks to firm the releases for when the Override EDI is flagged.
- Override EDI - Override the Forecast Qualifier and Forecast Timing Qualifier when the EDI is received.
- ASN Template - the ASN template is used to format the customers ASN (ie: ASN856_EMCONDEXTER.xml).
- EDI Acknowledgement - type of Acknowledgement that is required by the customer when EDI is received:
- None - not required.
- Shipment Level - acknowledgement required for each shipment in the 830/862 document.
- File Level - acknowledgement required for the 830/862 document.
- Invoice Template - the Invoice Template is used to format the Customers Invoice (ie: INV810_EMCONDEXTER.xml).
EDI Import - the type of processing that must be performed when EDI is imported for a Customer:
- Cumulative Based Release - the open quantities in the EDI file are the cumulative required quantities (e.g. Accum: 190 000; Monday: 200 000, Tuesday: 220 000 is imported as Monday:10 000, Tuesday: 20 000).
- Cumulative Releases - the open quantities in the EDI file are cumulative open quantities (e.g. Monday: 200 000 is imported as Monday: 200 000, Tuesday: 20 000).
- Import Full Weeks on Shipping Schedule - when importing shipping schedule, default to date range excluding partial weeks included in the EDI file.
- Import Past Due - add past due quantities to the open releases.
- Forecast Replaces Shipping Releases - when importing planning numbers (830 or DELFOR), firm releases are replaced with the planning numbers.
- Shipping Schedule Replaces Existing Releases - when importing shipping schedule (862 or DELJIT) all releases are replaced; this does not have an effect if the Purpose Code in the EDI file is ‘5’ (replace), in which case all releases are replaced
- Shipping Schedule Replaces Forecast - when importing shipping schedule (862 or DELJIT) planned numbers are replaced; this does not have an effect if the Purpose Code in the EDI file is ‘5’ (replace), in which case all releases are replaced
Adjust Releases based on - the type of processing that must be used to Adjust Releases when EDI is imported for a customer:
- None - releases imported as is.
- Customer Accum. - the in-transit quantity is calculated as the difference between the customer’s accum in the edi file and the shipped accum in ShopEdge, and is applied to the imported releases - either zeroing out releases if there is a positive in-transit, or adding open releases if there is a negative in-transit
- Last Shipped - the in-transit is calculated using the last shipped date/quantity in the EDI while considering the transit days; the last shipped packing slip is found based on the last shipped date which is the customer’s received on date, and add up the shipped quantities that were shipped after
- Last Shipped, Ignore Transit Days - the last ship date in the EDI file is the actual ShopEdge ship date
- Last Received Accum. - the in-transit quantity is calculated using the Last Received Accum field in the EDI file
Click the  icon to save.
Email Notifications for Incoming Customer EDI
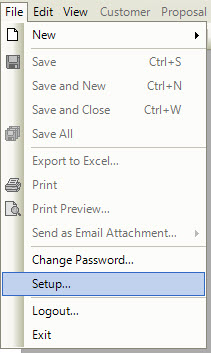
You can configure ShopEdge to send you an email whenever new Customer EDI arrives. To configure email notifications, access the system setup from the File > Setup menu option (you must have proper security access).
Navigate to the EDI tab.
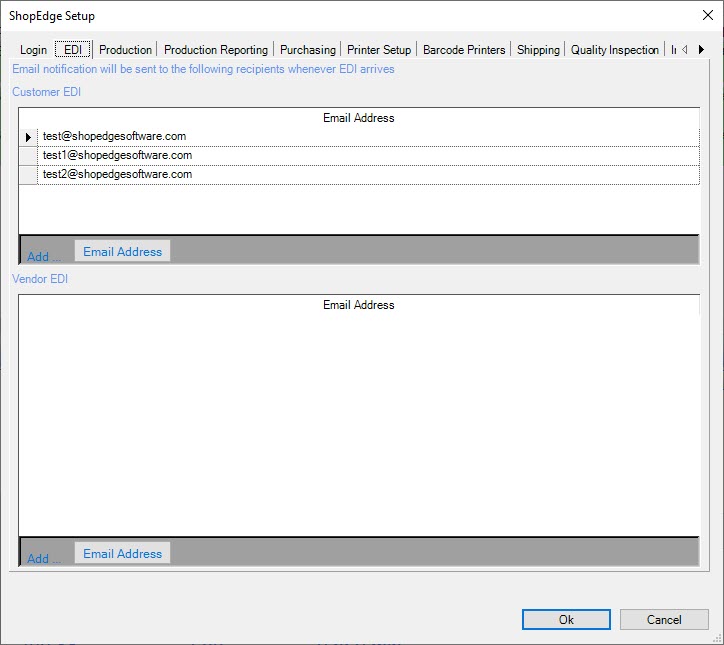
Click the  button under Customer EDI to add a new email address.
Click Ok to save the changes.
EDI Receipts
Once the trading partnership has been established with your EDI VAN, ShopEdge will start processing any incoming Customer EDI. Incoming Customer EDI will appear on the EDI Receipts screen under the Customers module.
Incoming Customer EDI can be accessed by navigating to the  tab,
and clicking on the
 ![]() icon.
The EDI Receipts screen will be displayed.
icon.
The EDI Receipts screen will be displayed.
Open
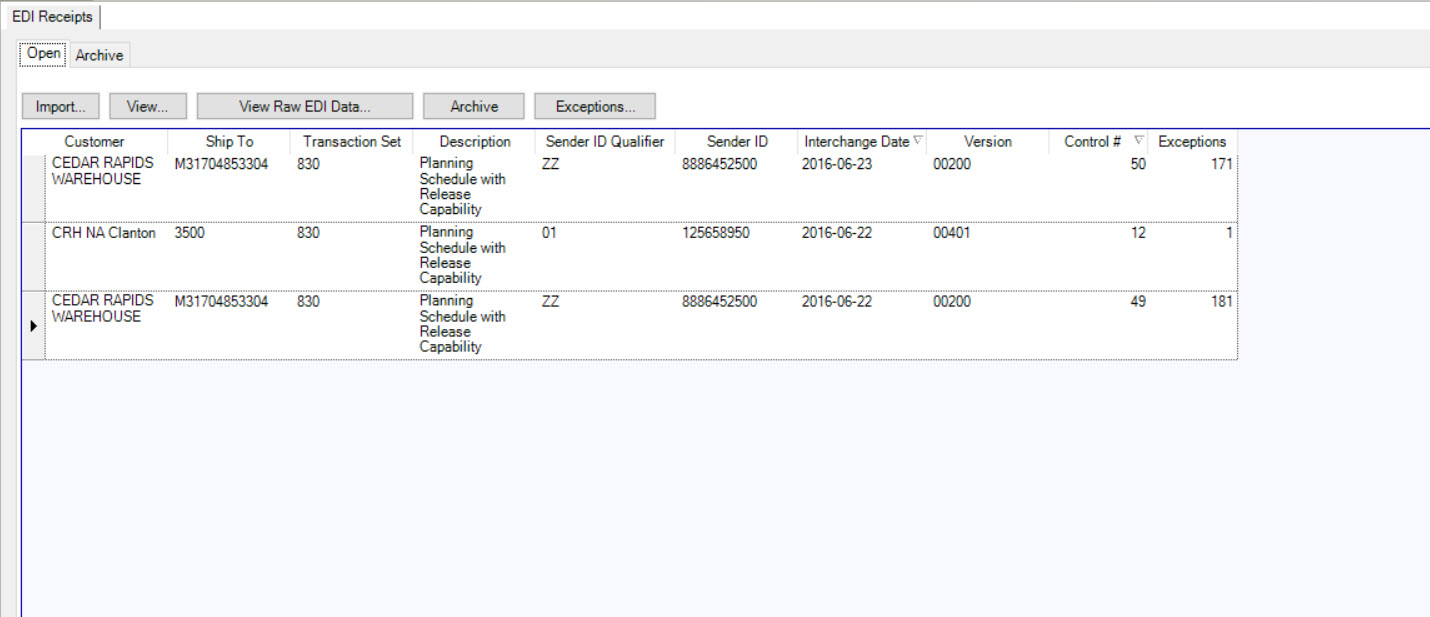
This screen will list all Incoming EDI that has not yet been processed. For each Incoming EDI Transmission, the following details are displayed:
- Customer - the Customer that sent the EDI.
- Ship To - the EDI ID of the Customer Plant.
- Transaction Set - Identifier for the type of EDI document sent (ie:830/861/824).
- Description - description of the EDI document.
- Sender ID Qualifier - the sender ID qualifier of the Customer contained in the EDI document.
- Sender ID - the sender ID of the Customer contained in the EDI document.
- Interchange Date - the date the file was sent.
- Version - message type Version/Release Number (ie:00306-3060/00401-4010).
- Control Number - unique number that identifies the EDI document.
- Exceptions - the number of exceptions in the EDI document. This number represents the number of items in the document that cannot be processed because a Customer, Purchase Order, or Item cannot be found in the system that match with the information in the EDI.
The EDI Open tab has buttons that perform differen functions.

Import
To import the releases for a Customer, highlight the row and click the  button.
The Import EDI window will be displayed.
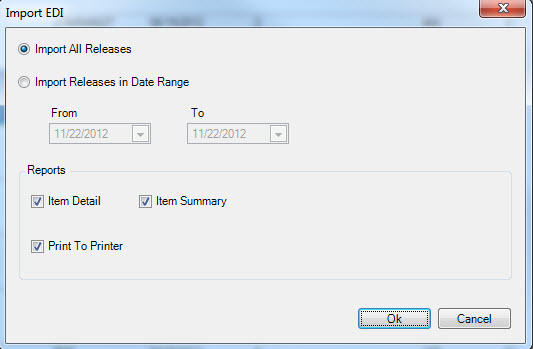
Check the options as required and click the  button.
- Import All Releases - all releases in the document will be imported.
- Import Releases in Date Range - only releases in the document within the date range will be imported.
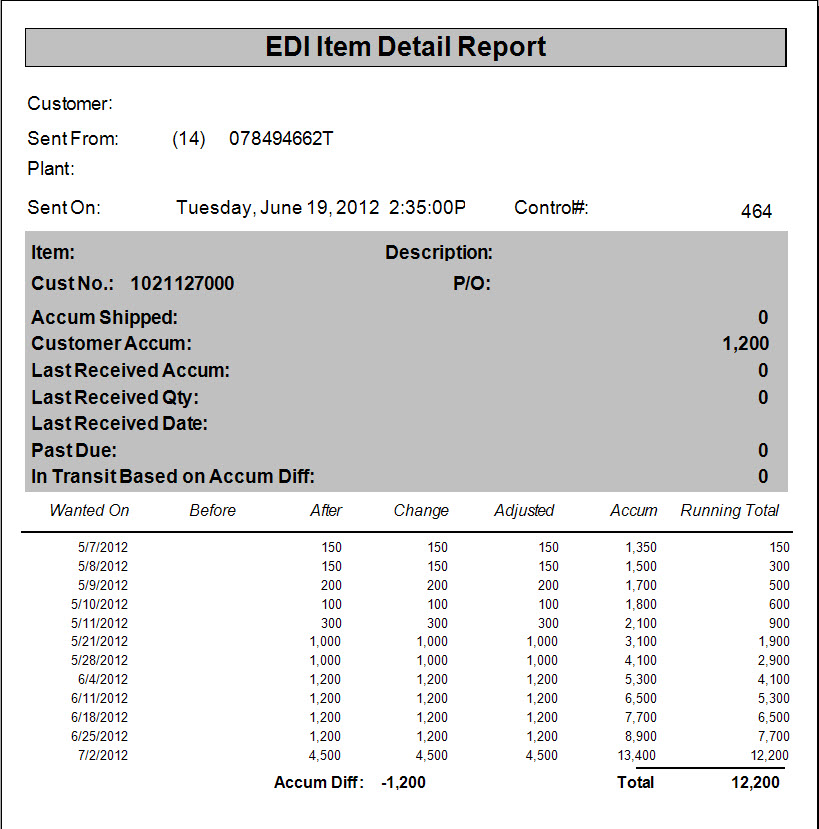
- Item Detail - item detail report will be printed.
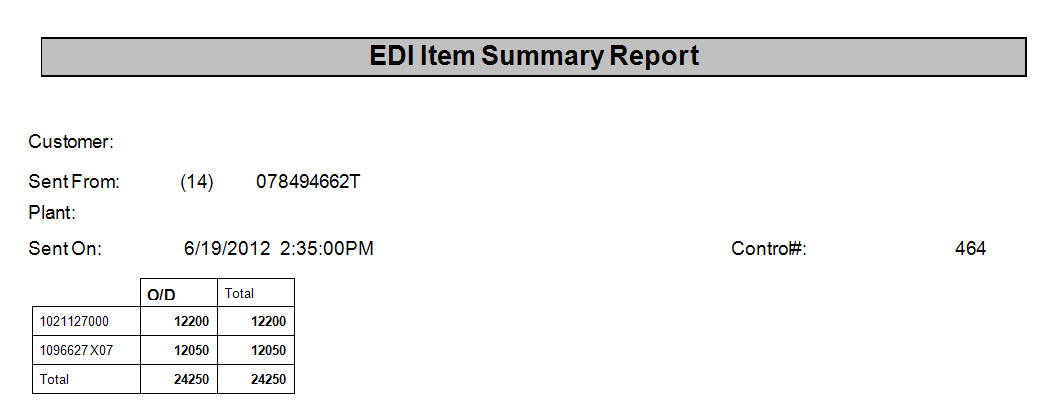
- Item Summary - item summary report will be printed.
- Print To Printer - the reports will be printed to the printer in place of the print preview.
When the EDI has been imported and processed it will be removed from the Open tab and will be shown in the Archive tab. The Customer Releases will be updated and adjusted based on the imported EDI.
View Raw EDI Data
To view the raw EDI transmission data for a Customer, highlight the row and click the  button.
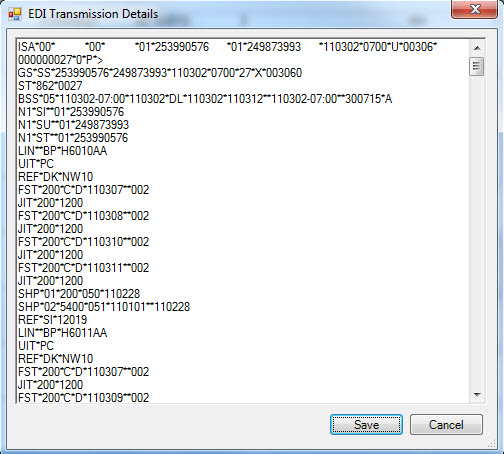
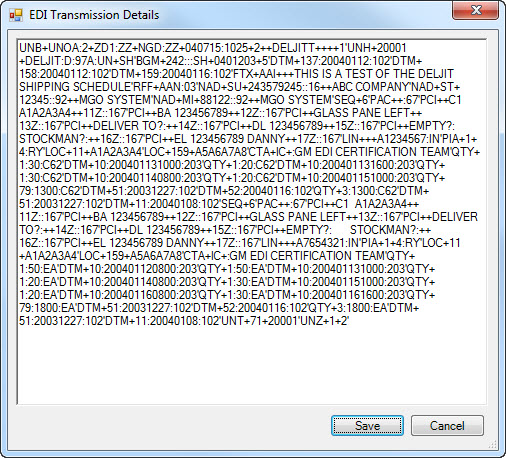
The EDI Transmission Details window will be displayed.
X12:
EDIFACT:
Click the  button if you wish to save the EDI Data to a location on your PC, otherwsie click
the
  button to return to Open display.
View
To view the contents of the EDI document for a Customer, highlight the row and click the  button.
A report will be displayed with the document contents.
830 - Planning Schedule with Release Capability
862 - Shipping Schedule
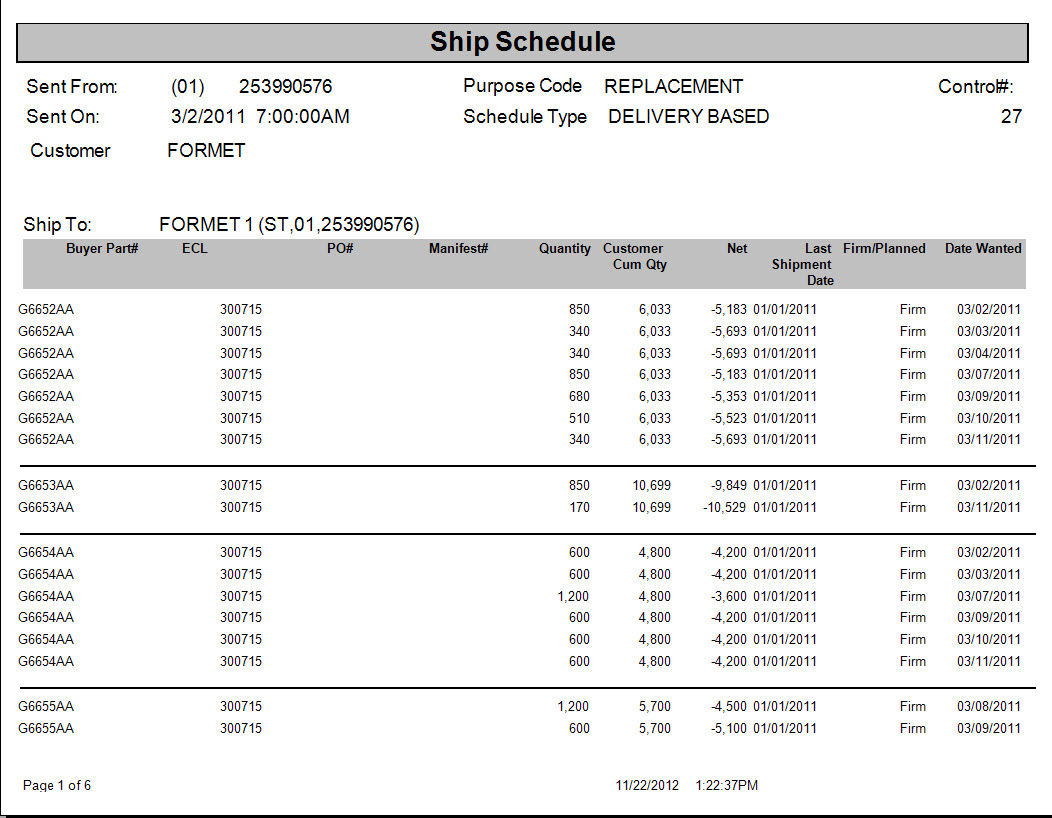
The reports will also highlight any exceptions so they can be corrected before importing.
Archive
You can archive EDI that you do not wish to import. This will remove the EDI from the Open tab and add it to the Archive tab.
To archive the EDI, highlight the row and click the  button.
Exceptions
If the EDI document for a Customer has exceptions, highlight the row and click the  button.
A report will be displayed with the document contents.
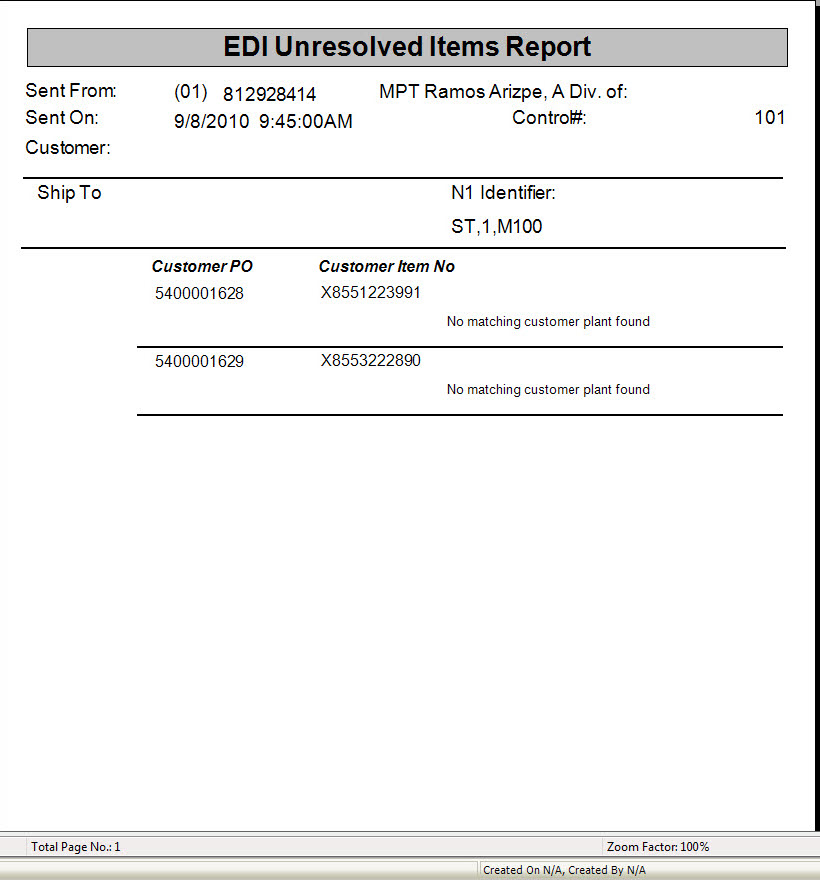
Example of ‘No matching customer plant found’:
Example of ‘No matching active P/O found’:
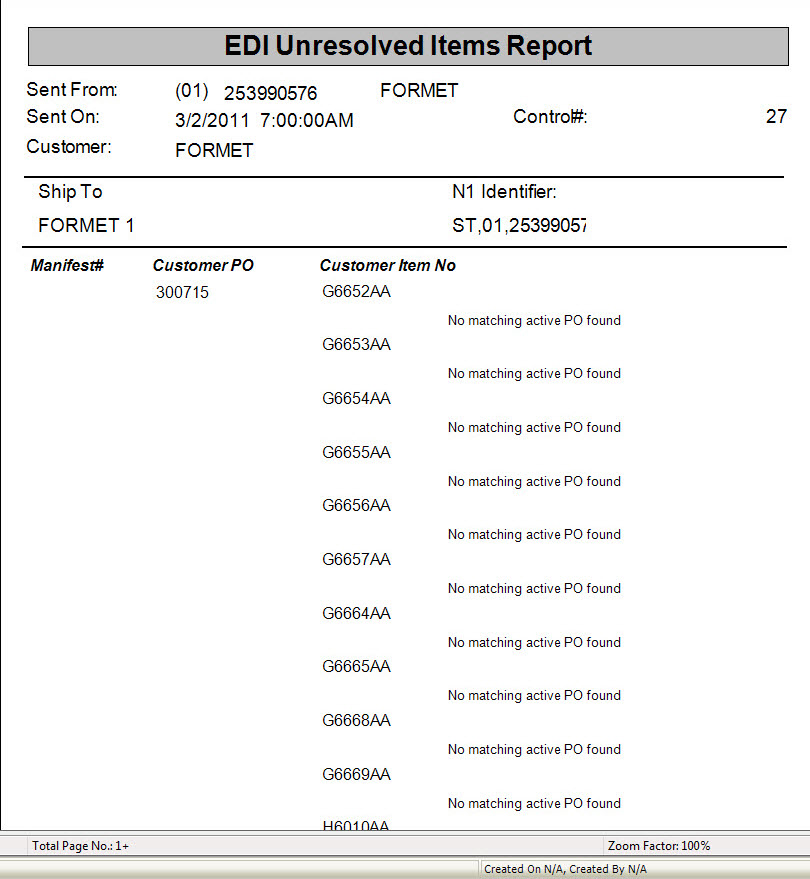
List of EDI errors:
- No matching customer plant found:
- Reason: The N1 Identifier for the Customer Plant could not be found
- Solution: Update the N1 Identifier for the Customer Plant
- No matching active P/O found:
- Reason: The P/O sent for the Customer Item does not exist in Shopedge
- Solution: Add the P/O for the Customer Item
- No matching active customer item pricing found:
- Reason: Item Pricing does not exist for the Customer Item
- Solution: Add the pricing for the Customer Item
- No matching active delivery schedule found:
- Reason:
- Solution:
Archive
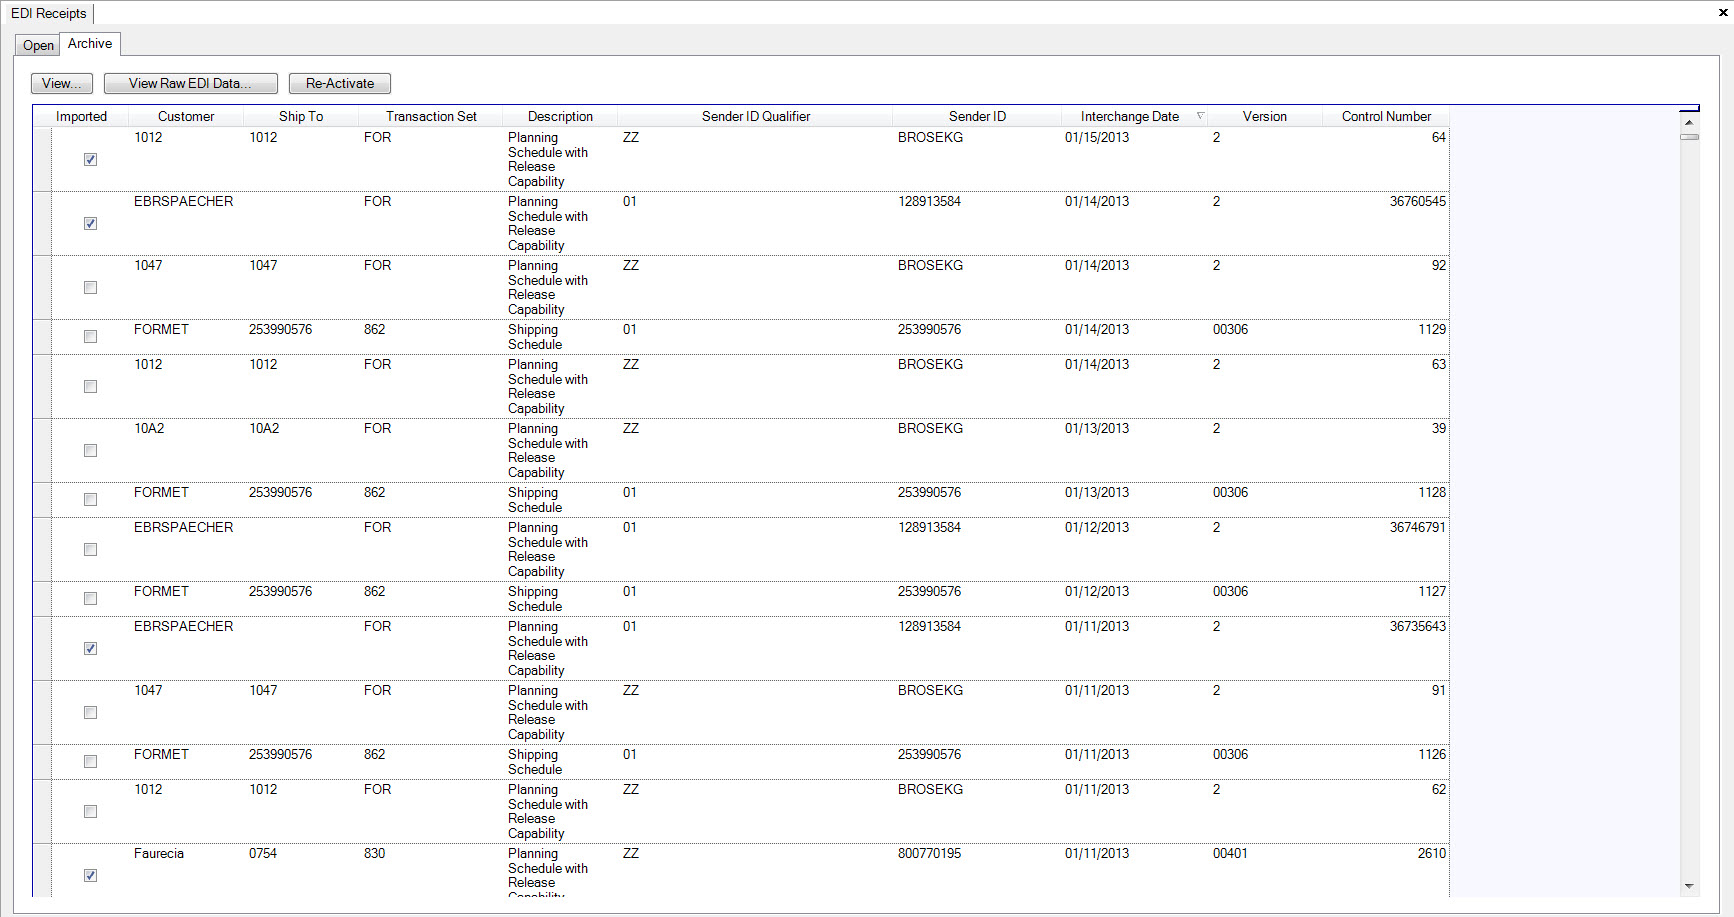
This screen will display all the EDI that has been archived with the following details:
- Imported - if the ‘Imported box’ is not checked, it means that the EDI document was not imported and was Archived using the Archive button. If the ‘Imported box’ is checked, the EDI document was imported into the system.
- Customer - the Customer that sent the EDI.
- Ship To - the EDI ID of the Customer Plant.
- Transaction Set - identifier for the type of EDI document sent (ie:830/861/824).
- Description - description of the EDI document.
- Sender ID Qualifier - the sender ID qualifier of the Customer contained in the EDI document.
- Sender ID - the sender ID of the Customer contained in the EDI document.
- Interchange Date - the date the file was sent.
- Version - message type Version/Release Number (ie:00306-3060/00401-4010).
- Control Number - unique number that identifies the EDI document.
The EDI Archive tab has buttons that perform different functions.

View
To view the contents of the archived EDI document for a Customer, highlight the row and click the  button.
A report will be displayed with the document contents.
830 - Planning Schedule with Release Capability


862 - Shipping Schedule

View Raw EDI Data
To view the Raw EDI Transmission Data* for a Customer, highlight the row and click the  button.
The EDI Transmission Details window will be displayed.
X12:

EDIFACT:

Click the  button if you wish to save the EDI Data to a location on your PC, otherwise click
the
  button to return to Open display.
Reactivate
You can reactivate an archived EDI document that you wish to re-import.
To reactivate the EDI document, highlight the row and click the  button.
The Reactivate Confirmation screen will be displayed.
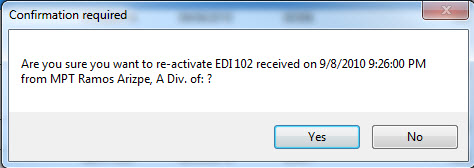
Click the  button, this will remove the EDI document from the Archive tab and add it to the Open tab.