Windows Mobile Application
Fork-lift Terminal
Note
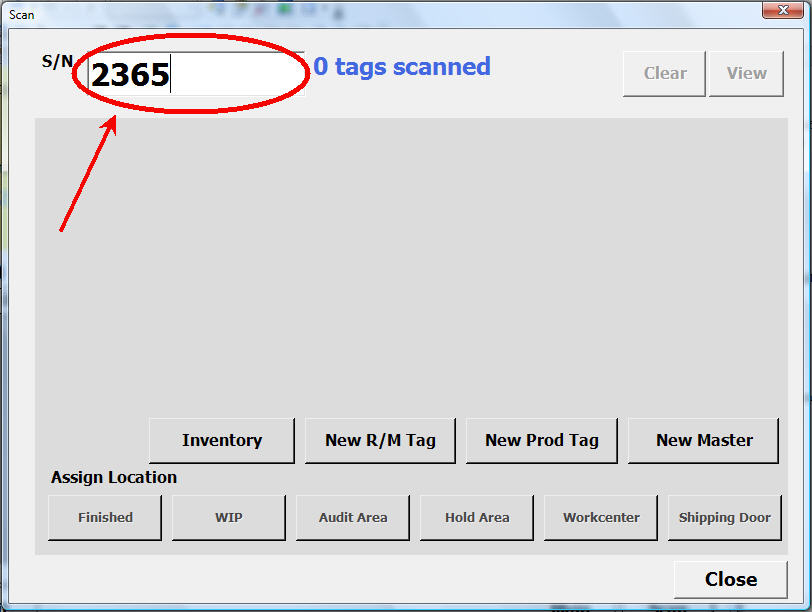
Anywhere in the forklift application tht you can scan a barcode, you can also manually type the serial #
Starting the Shop Edge Application
Double-click the ShopEdge icon ![]() on your desktop, or click your “Start”
menu->ShopEdge. The main menu screen will display.
on your desktop, or click your “Start”
menu->ShopEdge. The main menu screen will display.
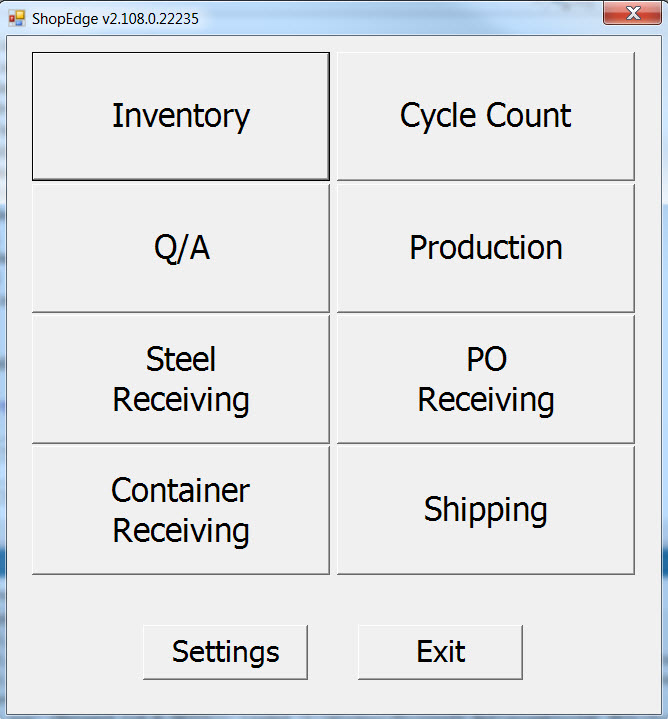
You have 6 options from the main menu:
- Shipping
- Production
- Inventory
- Steel Receiving
- Settings
- Exit
If you select  , you will be taken to the shipping area(s) of your building
To return to the main menu, select the  button.
Production
The main function of the production module, is to control and track inventory related to the production process. Both production (WIP and finished goods) and raw materials are scanned when they are picked up, and located when they are moved. The production screens help coordinate inventory movement. Shop floor activity and detail about running jobs and inventory can be viewed. The production screens are helpful to know which workcenter(s) need attention (like picking up inventory), and to locate raw materials for running jobs.
Viewing Shop Floor Activity
To navigate to the production screen, click the  button on the main menu. The screen below will appear.
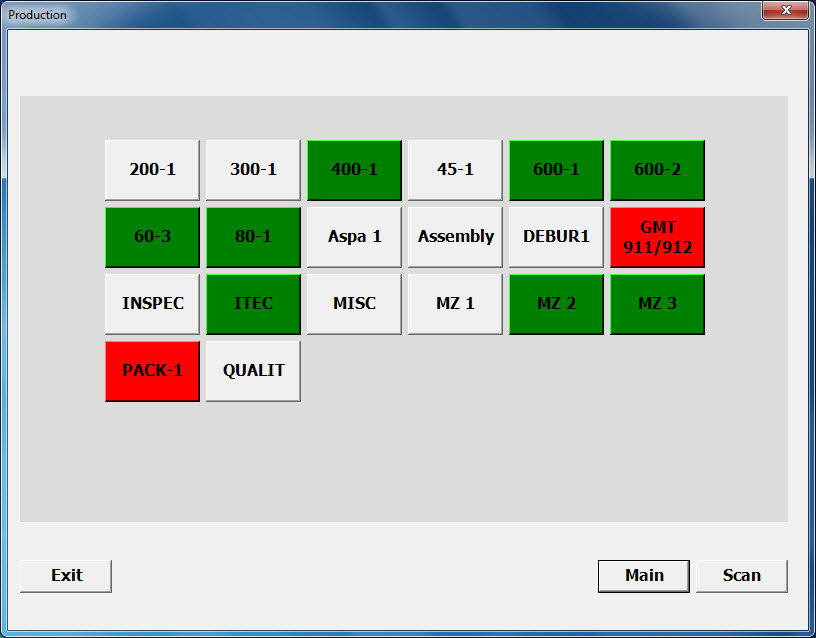
The production screen displays a real-time view of shop floor activity. Workcenters are colour-coded green for workcenters that are running, red for workcenters that have material to be picked up, and grey, if they are not running.
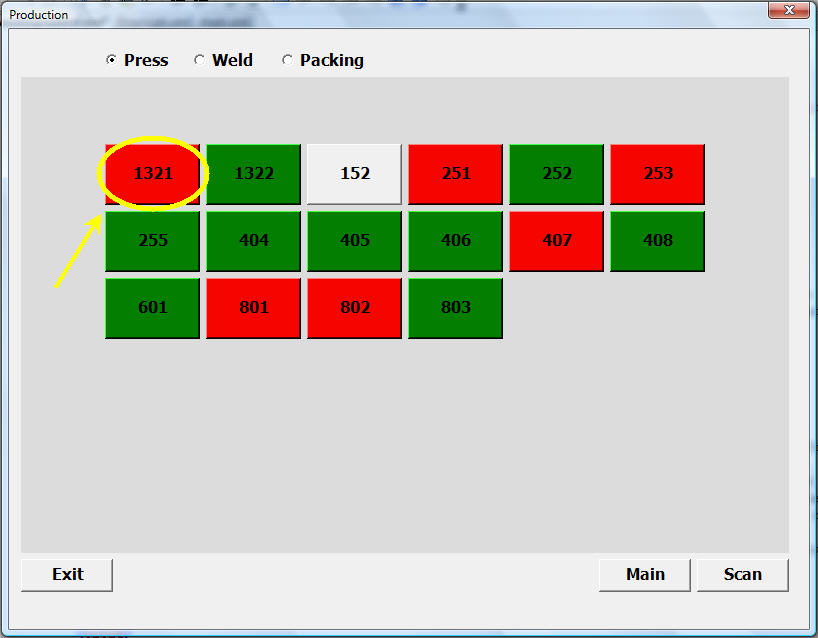
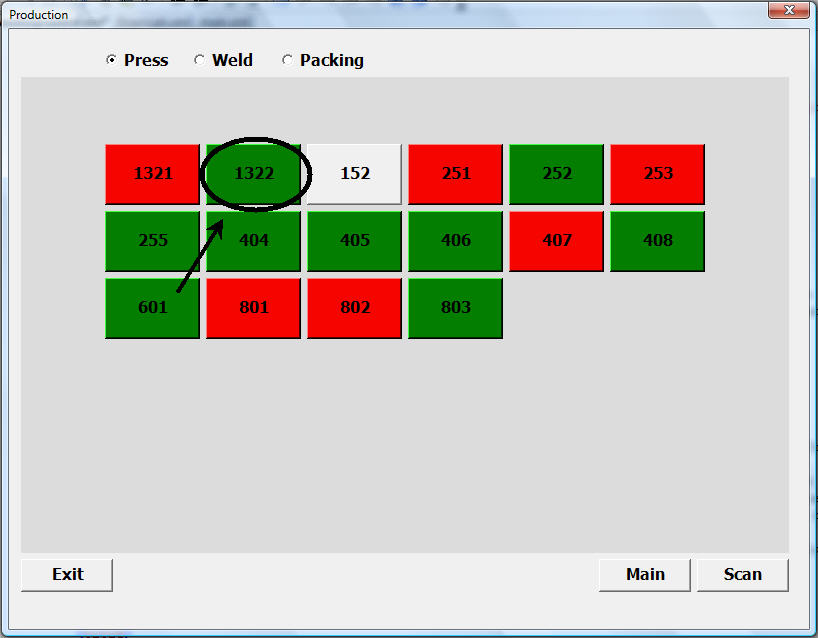
Workcenters are grouped by their type. The screen below is showing all Press workcenters. The Weld and Packing workcenters are displayed by clicking on the type. (Workcenter types are specific to your particular system configuration).
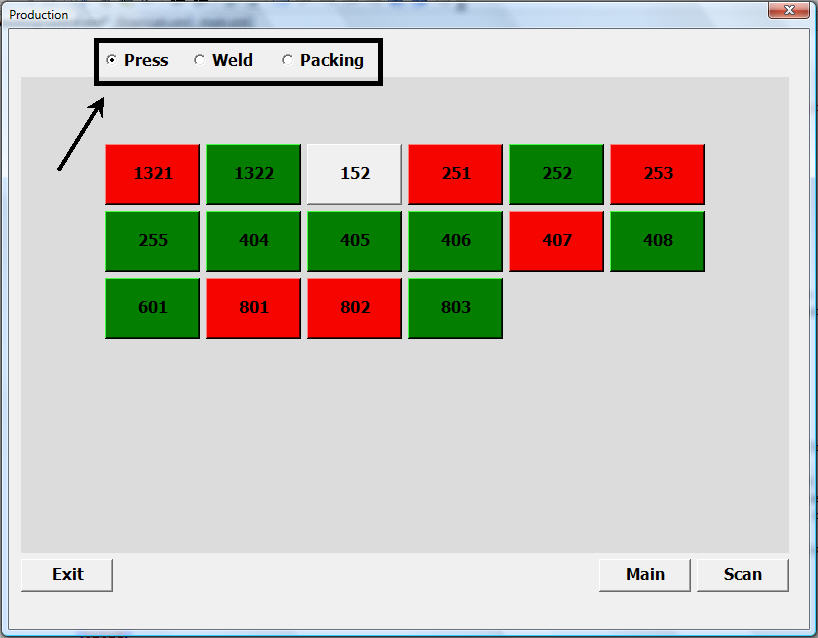
Changes on this screen are updated immediately, and occur in response to the workcenter operator activity. A workcenter will turn green as soon as a job is started. A workcenter will turn red as soon as a barcode label is printed. The workcenter will turn green once a barcode is scanned from that workcenter. A workcenter will turn grey once the job is stopped.
To return to the production screen, click on the  button. To return to the main menu, click on the
 button.
Viewing Work Center Information
To view detailed information about a particular workcenter, click the button corresponding to the workcenter. The screen below will appear:
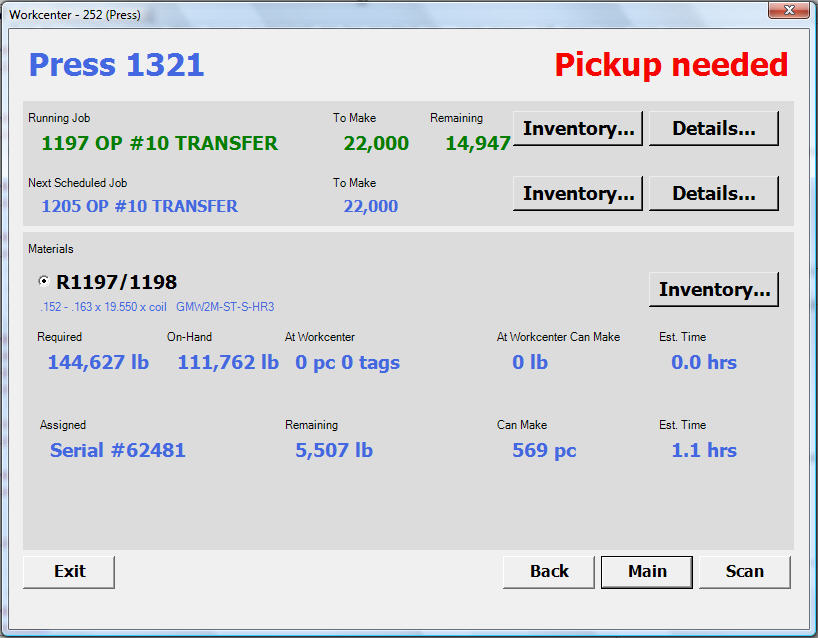
The workcenter detail screen displays information about the currently running job (if it is running), and the job scheduled next. The bill of material for the running job is displayed at the bottom of the screen. Each item from the bill of material can be viewed by clicking on the item.
Viewing Job Details
To view details for the running job, or next scheduled job, click the corresponding  button.
A window will appear that displays a picture of the job part, and the container, along with any comments.
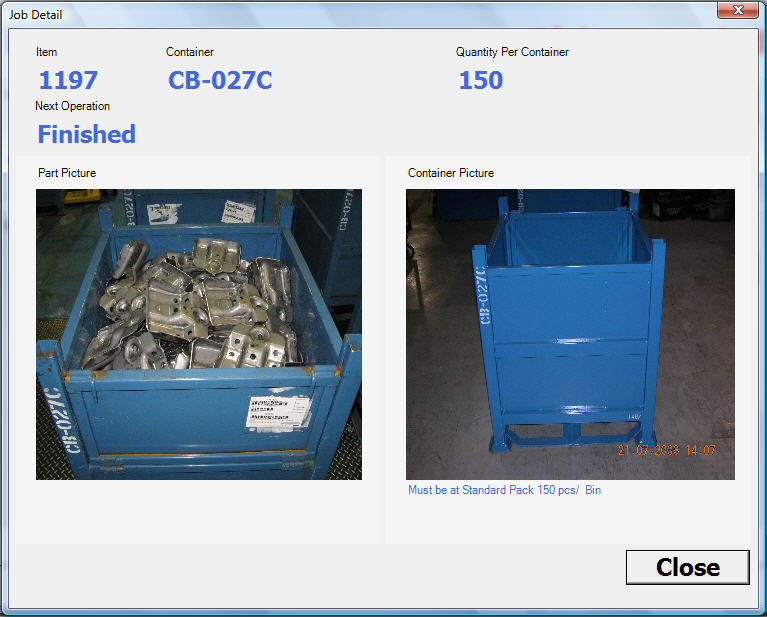
The job detail screen shows the item or job that you are running, as well as a picture of the part on the screen below.
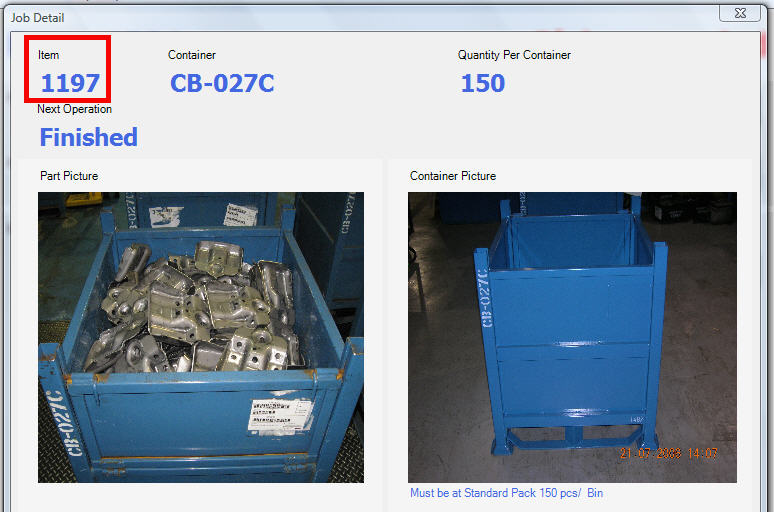
The container name or identifier as well as a picture of the container can be found on the job detail screen.
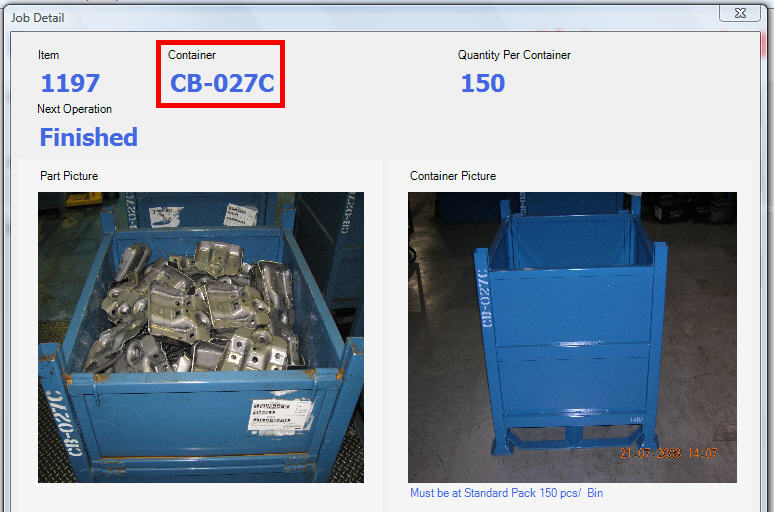
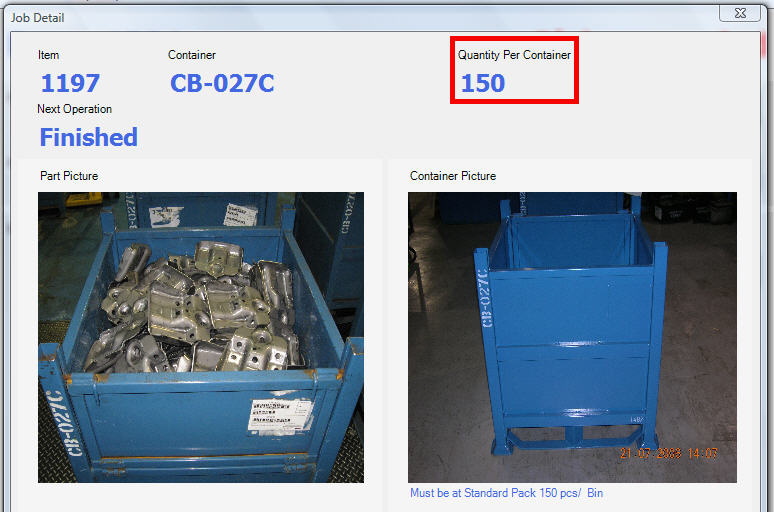
The job detail screen also outlines the quantity of parts per container allowed.
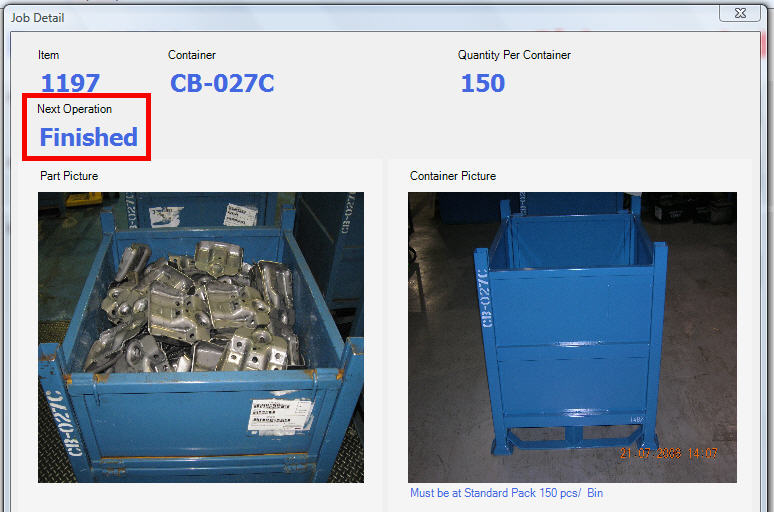
The next operation for the running job is listed on the job detail screen. In the picture below, the next operation is “Finished”.
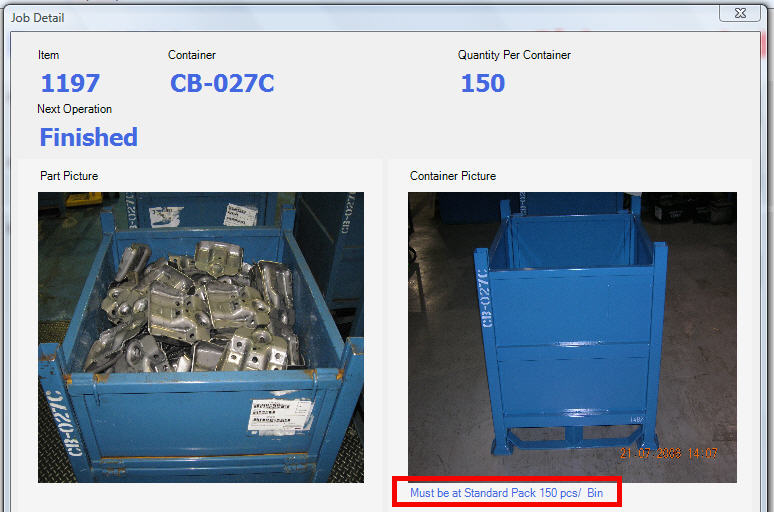
Any notes that are attached to a container are also visible on the job detail screen.
To close the window and return to the workcenter detail screen, click the  button.
Note
You have the ability to view a “Job Detail Screen” for either the running job or the “Next Scheduled Job”, depending on the  button that you click on.

Viewing Job Inventory
To view inventory for the running job, or next scheduled job, click on the corresponding  button.
A window will appear that displays the inventory for the item.
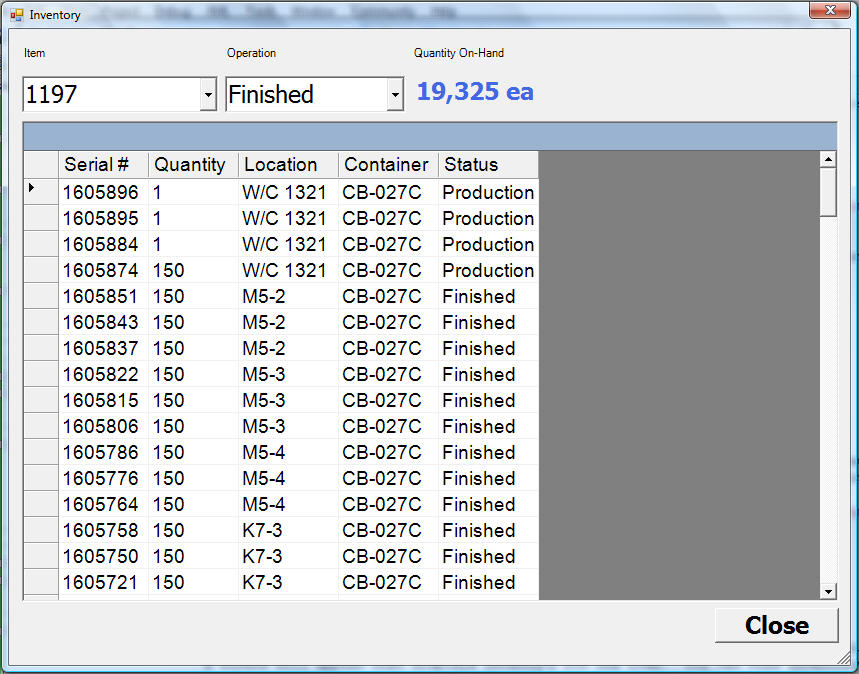
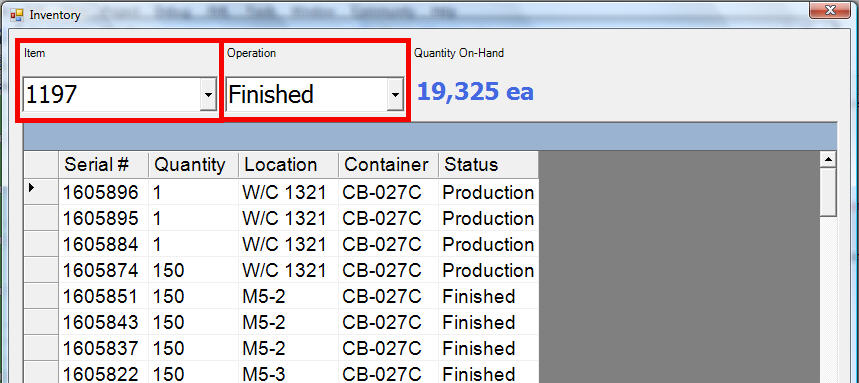
You can view inventory for other items by selecting from the item and operation drop down lists.
To close the window and return to the workcenter detail screen, click the  button.
Viewing Inventory for Bill of Material Items
To view inventory for an item on the running job bill of material, select the desired item, and click the  button.
A window will appear that displays inventory for the item.
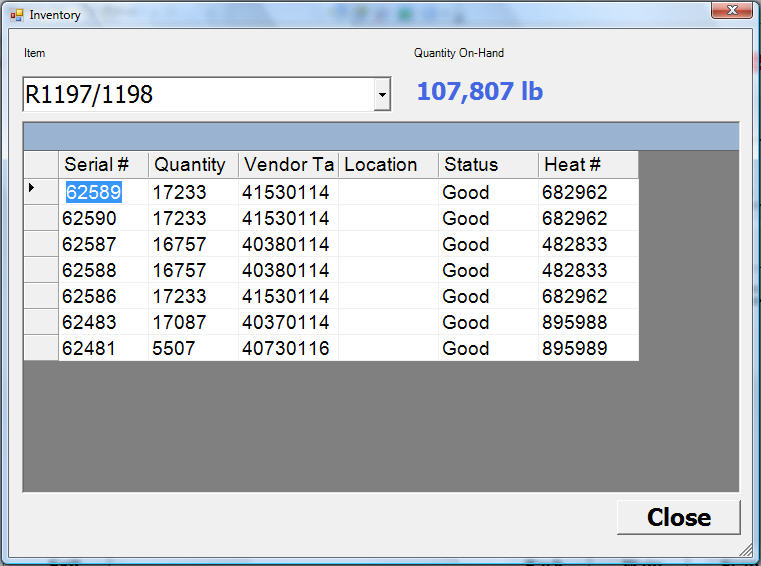
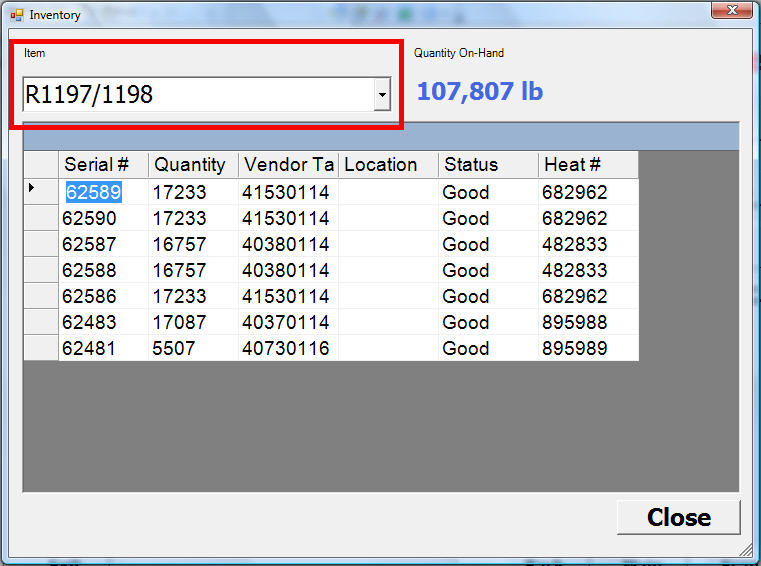
You can view inventory for other items by selecting the item from the drop down list.
To close the window and return to the workcenter detail screen, click the  button.
Moving Production Inventory
Barcode labels for parts produced at a workcenter must be scanned as they are moved. To pick up a container of completed WIP for Finished Good parts, scan the serial number on the barcode attached to the container (the location of the serial number field will be different depending on the type of barcode printed). For master tags, scan the master tag barcode (scanning a tote serial number will not move the master tag). Once the barcode is scanned, the scan window will appear.
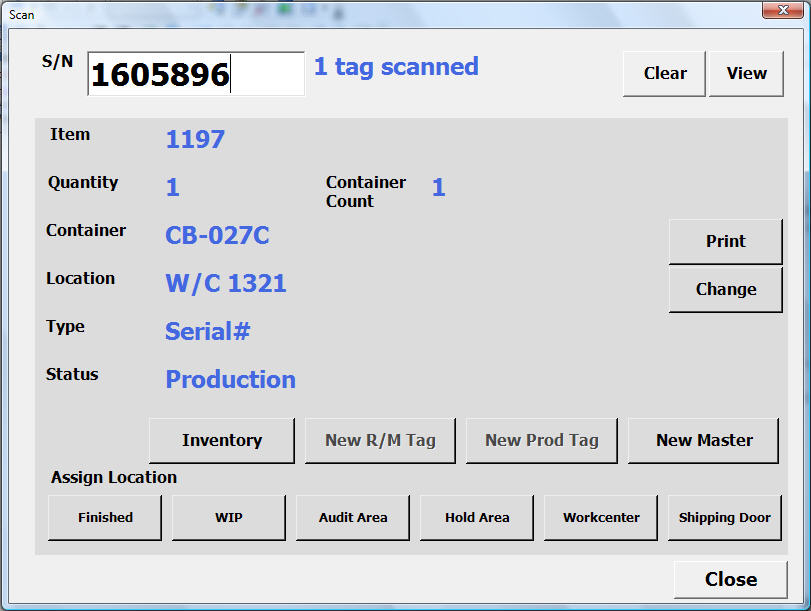
The scan window displays detailed information about the current serial number. To pick up multiple containers at the same time, scan each serial number once. The system will keep track of the number of serial numbers scanned (count on screen). Scanning a serial number a second time will remove it from the list or it can be removed manually by clicking the clear button, or view and clicking remove.
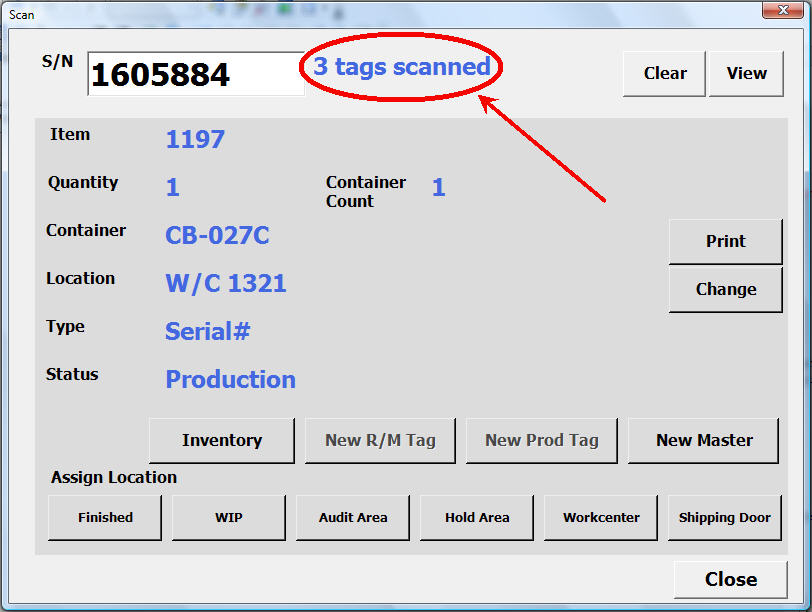
To move the scanned inventory to a location, either scan the barcode for the location, or manually select the location by clicking one of the location buttons on the scan window.
To move inventory to a WIP location, click the  button and select the WIP location you wish to move the inventory to.
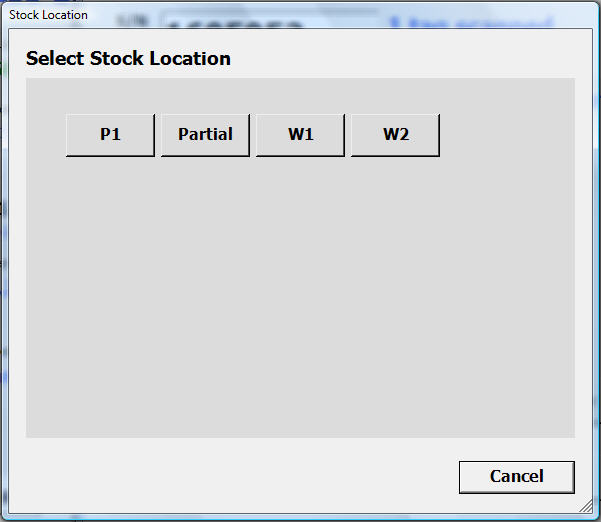
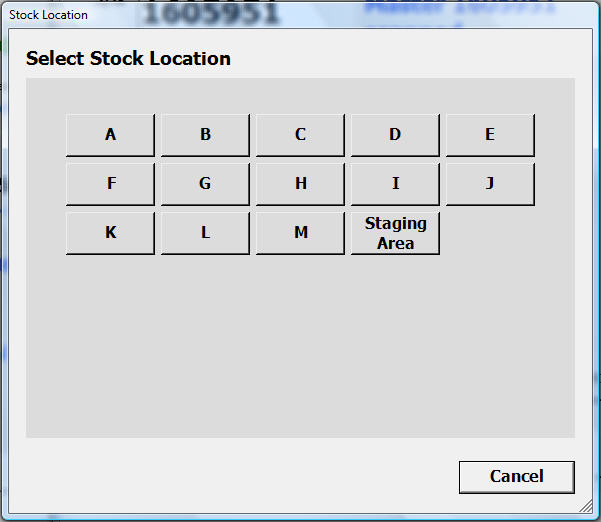
To move inventory to a Finished location, click the  button and select the location from the ‘Select Stock Location’ screen.
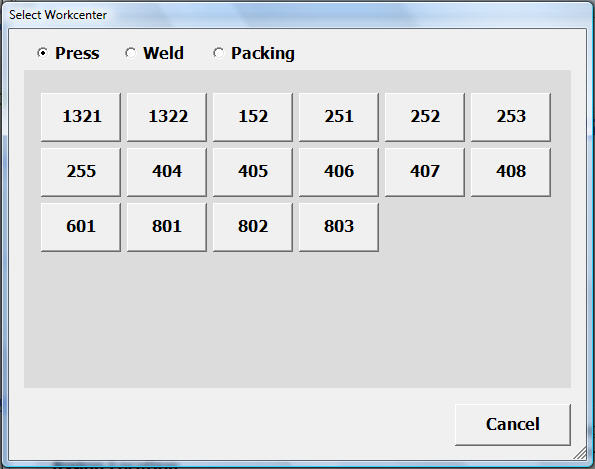
To move inventory to a Workcenter, click the  button. The ‘Select Workcenter’ screen will appear so you can select the appropriate workcenter.
To move inventory to an Audit Area, click the  button and select the location.
The system will display a message that the inventory has been moved to the ‘Audit Area’.
To move inventory to a Hold Area, click the  button and select the location.
The system will display a message that the inventory has been moved to the ‘Hold Area’.
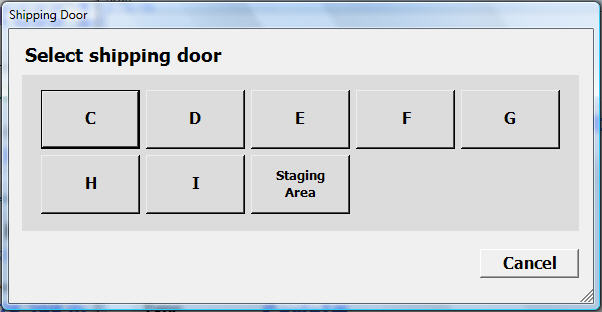
To move inventory to a ‘Shipping Door’, click the  button. The ‘Shipping Door Location’ screen will appear so you can select the location you wish to move the scanned inventory to.
Moving Raw Material Inventory
Barcode labels for raw materials must be scanned as they are moved. To pick up raw material, scan the serial number on the barcode attached to the raw material. Once the barcode is scanned, the scan window will appear. The scan window displays detailed information about the current serial number. To move the scanned inventory to a location, either scan the barcode label for the location, or manually select the location by clicking one of the location buttons on the scan window, as described above.
Shipping
The shipping module coordinates inventory movements related to the shipping process. Shipping screens display real-time pick list information making it easy to locate shipping inventory. Status is tracked as it happens to ensure shipping accuracy. The shipping module also allows combining product into shipping masters (for mixed loads), and printing customer-specific barcode labels.
Viewing Pick Lists
To view the current open pick lists, click on the  button on the main menu.
The screen below appears:
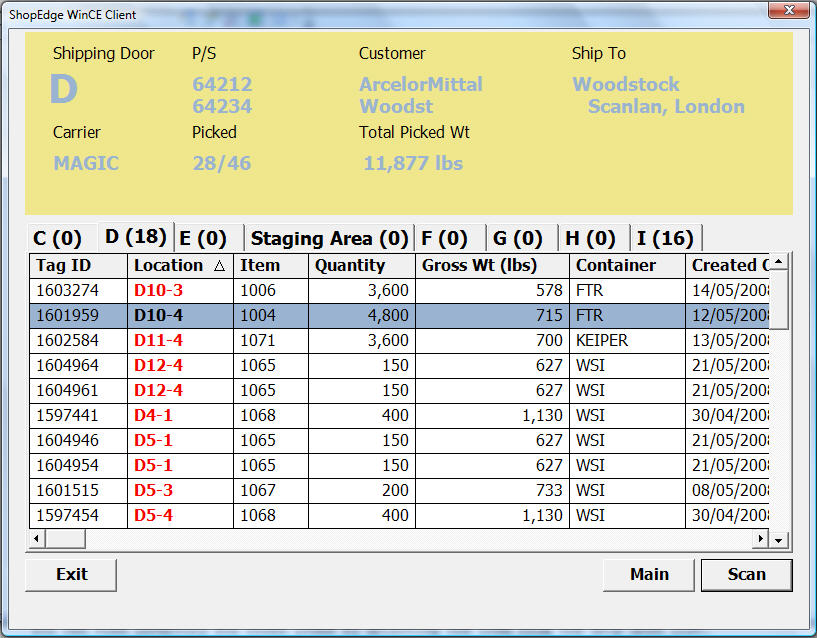
The shipping screen displays a real-time view of all current open packing slips, organized by shipping door location. Each tab corresponds to a shipping door location, with the number on the tab corresponding to the number of remaining serial numbers to pick. To view the pick list associated with a particular shipping door, select the appropriate tab.
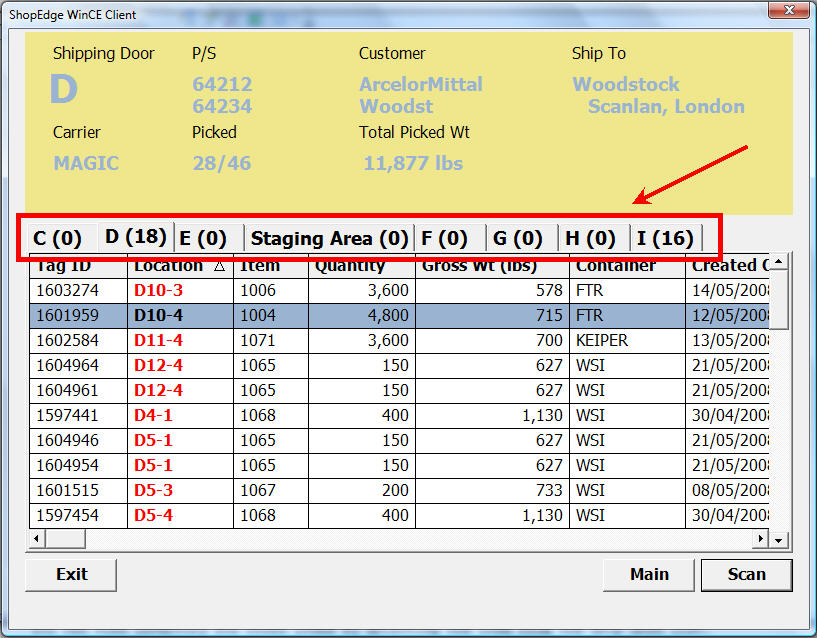
The top part of the screen displays detailed information about the packing slip, such as customer/ship-to, total shipping weight picked, and a count of remaining vs. total serial numbers to pick. As serial numbers are scanned and moved to the shipping door location, they are removed from the list. A packing slip cannot be shipped until all tags are picked, or tags are removed from the pick list using the packing slip function in the main ShopEdge ERP application
Picking Inventory
To pick inventory, serial numbers must be scanned and moved to the destination shipping location.
Picking Assigned Serial Numbers
To pick a serial number listed on the pick list, first scan the serial number barcode on the label. The scan window will appear. You can scan multiple serial numbers by scanning each serial number barcode.
Note
Scanning the same serial number again will result in the serial number being removed from the list.
To complete picking the serial number(s), either scan the shipping door location, type the shipping door location into the s/n box, or manually select the shipping door by clicking the  button,
and selecting the appropriate shipping door.

Note
If you select the wrong shipping door, or scan a serial number that is not on the pick list, an error message will display indicating that one ore more serial numbers do not belong at that destination. You cannot pick serial numbers to a shipping door when a packing slip does not exist for that item.
Picking Un-assigned Serial Numbers Directly to the Packing Slip
Serial numbers that are not assigned to a pick list can be assigned by scanning directly to the destination shipping door. This feature works well when inventory is moving directly from production to shipping, or when picking specific serial numbers is difficult. To pick a serial number not assigned to the pick list, first scan the serial number barcode on the label. The scan window will appear.

You can scan multiple serial numbers by scanning each serial number barcode. To complete picking the serial number(s), either scan the shipping door location, or manually enter/select it using the procedure outlined above. A window will appear showing packing slip details for the part number scanned:
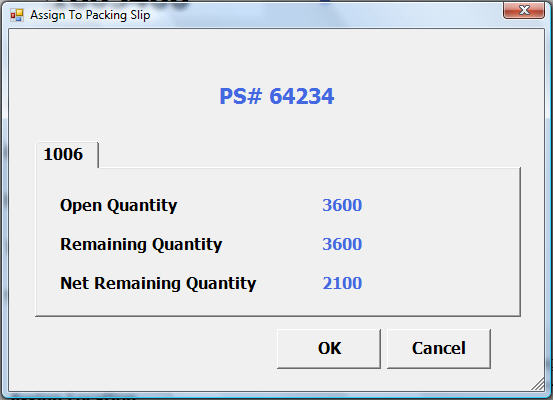
The window displays the part number for the serial number scanned, and the current open/picked quantities. This display should be used as a guide so that picked quantities do not exceed open quantities. When the
picked quantity exceeds the open quantity, the picked quantity will be highlighted in red. To pick the serial number, click  . To cancel the operation, click the
  button.
Picking Serial Numbers From a Master Tag
In cases where shipping requirements call for quantities that are less than a master, it is possible to pick individual containers from the master tag.
Note
The full master tag quantity will always show on a pick list, even if the entire master quantity is not required.
To pick a one or more containers from a master tag, scan the serial number barcode on the label. The scan window will appear if it isn**t already displayed. The forklift display will keep a count of the serial numbers scanned, and display details for the last serial number scanned.

To complete picking the serial number(s), either scan the shipping door location, or manually select/enter it. A window will appear showing packing slip details for the part number scanned:

The window displays the part number for the serial number scanned, and the current open/picked quantities. This display should be used as a guide so that picked quantities do not exceed open quantities. When the picked quantity exceeds the open quantity, the picked quantity will be highlighted in red. To pick the serial number, click OK. To cancel the operation, click the cancel button. Once the serial numbers are picked, a confirmation message will display. Once the tags are picked, the number of containers, and the total piece quantity is removed from the master, and each serial number picked will appear as a separate serial number in inventory.
Note
Picking individual container serial numbers does not result in the master tag being removed from the pick list. The system will not allow shipping the packing slip until the master is manually removed from the packing slip.
Creating Master Tags
Creating master tags is necessary when you need to generate customer-specific mixed/master load labels, or when you want to simplify processing of multiple smaller containers by grouping them into a single load.
This will allow you to scan the serial number barcode on the master label to move all containers at once, eliminating the need to scan each individual container serial number.
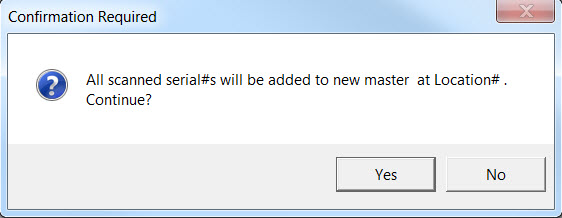
To create a master tag, click the  button. If you already have serial numbers scanned, the system will warn you that the serial numbers will be added to the new master.
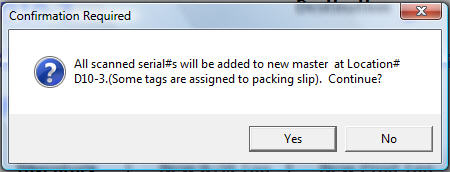
Finally, the print window will display. Confirm the barcode printer and label that will print, and click  . The barcode label will print to the specified printer.
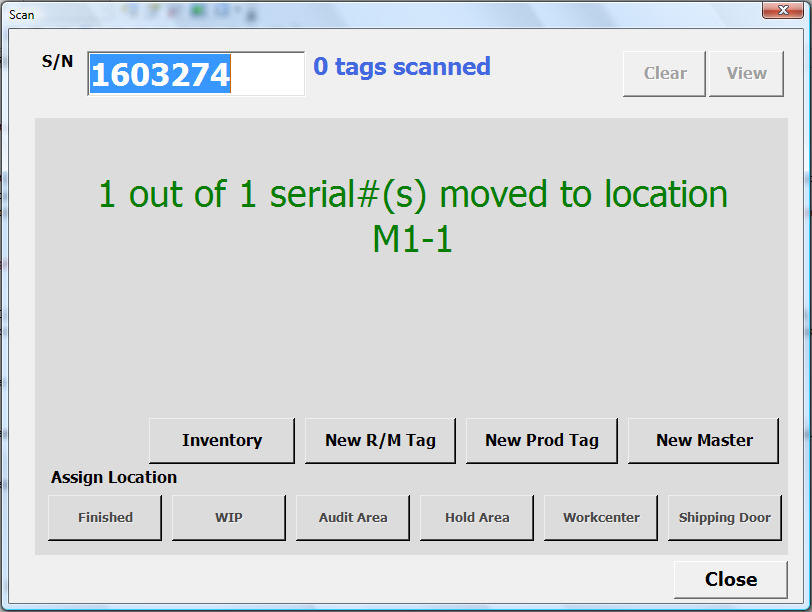
To move serial numbers to the master, scan one or more serial numbers to move, and then scan the serial number barcode on the master label (or manually enter the master serial number). A confirmation message will display.
Click
  and the serial numbers will be moved to the master.
Note
**The same process can be used for moving containers to a new master or an existing master tag.**
To remove one or more serial numbers from the master, scan the serial number barcode label for each container, then scan (or manually enter) the location (stock, w/c, or shipping door). The serial numbers will be removed from the master tag and a confirmation message will be displayed.
Printing Barcode Labels
In cases where the same part ships to multiple customers or the contents of mixed loads are not known until shipping time, you may need to print barcode labels when the order is picked. The system is capable of printing customer-specific barcode labels for containers and mixed loads, and also capable of re-printing barcode labels in cases where barcode labels get damaged, or lost.
Printing Container Labels
To print a container barcode label, first scan the serial number barcode on the label. The scan window will appear with the serial number details. To print a barcode label, click the  button. The print
window will display.
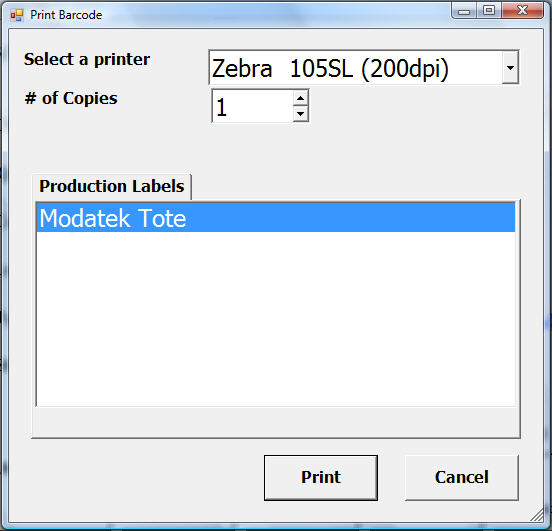
Select the appropriate barcode printer and the number of copies, and then select the barcode label to print. Several different barcode labels may be available depending on the type of serial number scanned (WIP, finished good, etc), and the customers that buy the item. For WIP items, only labels that print at production time will be available.
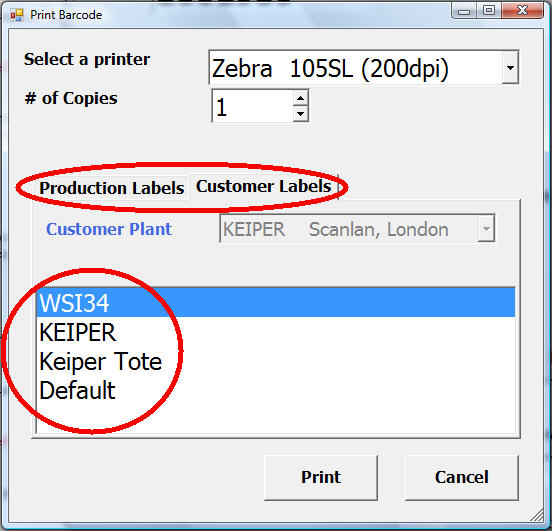
For finished good items, both labels that print at production time and customer-specific labels (if they exist) will be available.
Select the barcode label to print by clicking on the entry in the list. Click  . The barcode label will print to the selected printer, and the print window will close.
Printing Master Labels
To print a master barcode label, first scan the serial number barcode on the master label. The scan window will appear with the master tag details. To print a barcode label, click the  button.
The print window will display.
Note
You can also print a master barcode label by scanning a serial number for a container on the master. A button will appear in this case Print Master that will print a label for the container**s associated master.
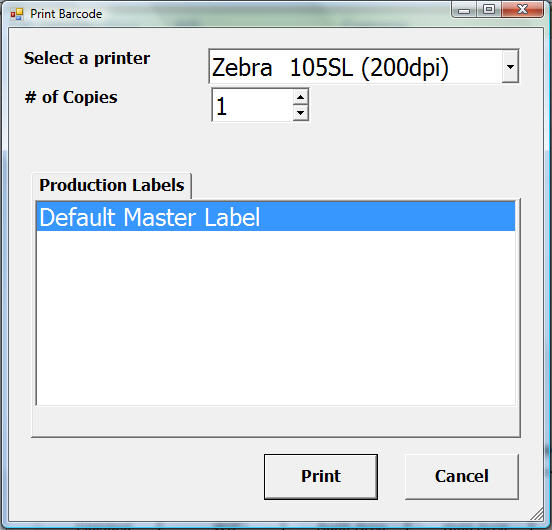
Select the appropriate barcode printer and the number of copies, and then select the barcode label to print. Several different barcode labels may be available depending if the master is assigned to a packing slip or not.
If the master is not assigned to a packing slip, only the default master barcode label will be available.
If the master is assigned to a packing slip, then all customer-specific master labels and the default master barcode label will be available.
Select the barcode label to print by clicking on the entry in the list. Click  . The barcode label will print to the selected printer, and the print window will close.
Steel Receiving
The steel receiving module simplifies the steel receiving process by allowing steel coil information on vendor barcode labels to be scanned into the system.
Starting a Steel Receipt
Before vendor tags can be scanned, a receipt must be started in the main application.
To start a steel receipt, navigate to  and click on
 ![]() . The steel receiving window will appear.
. The steel receiving window will appear.
Begin by entering the purchase order number you will be receiving against. Once you enter the correct purchase order number, a list of open items will appear.
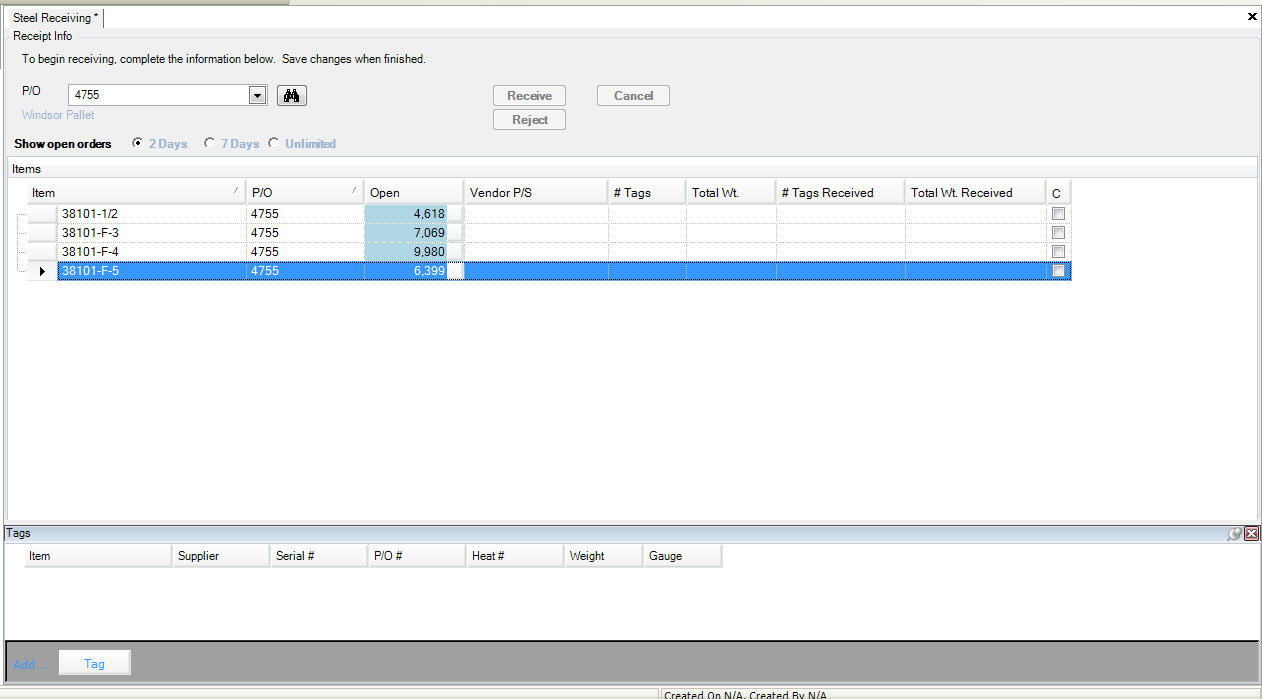
By default, only items open within the next 2 days will appear. You can change this by clicking on either 7 days, or unlimited. Check off the items to be received by clicking on the checkbox beside each item. Enter the vendor p/s information, and the number of tags and total quantity to receive.
Note
You can only enter this information if the row is checked off.
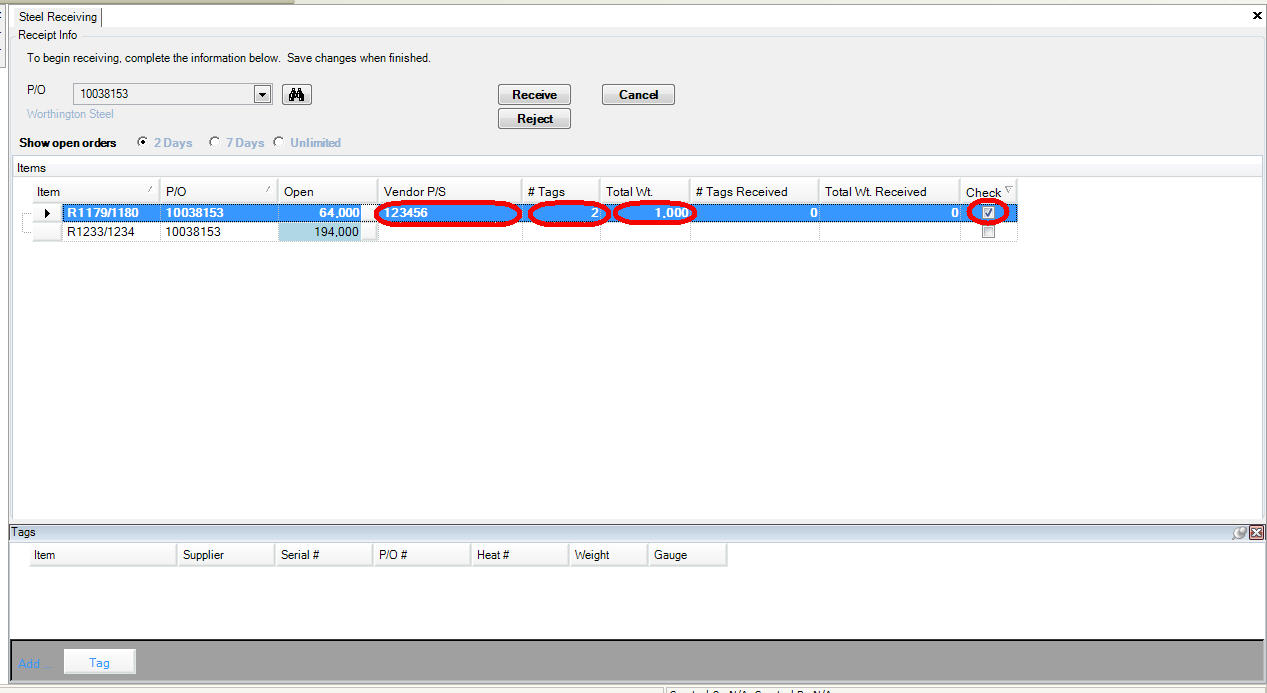
When finished, click  . You are now ready to scan vendor tag information to complete the receipt.
Scanning Steel Tags
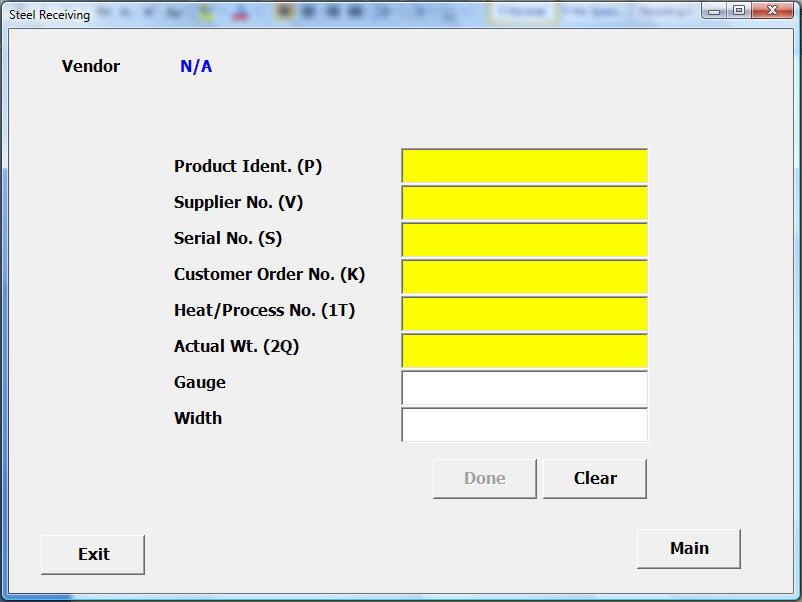
To start scanning vendor tag information, click on the  option from the main menu on the forklift application. The steel receiving window will appear.

At the top of the screen, you will see the vendor, and purchase order information for this receipt. Verify that the information is correct. Next, scan the information on the vendor barcode label. The scanned information will be automatically populated into the correct spot on the screen.
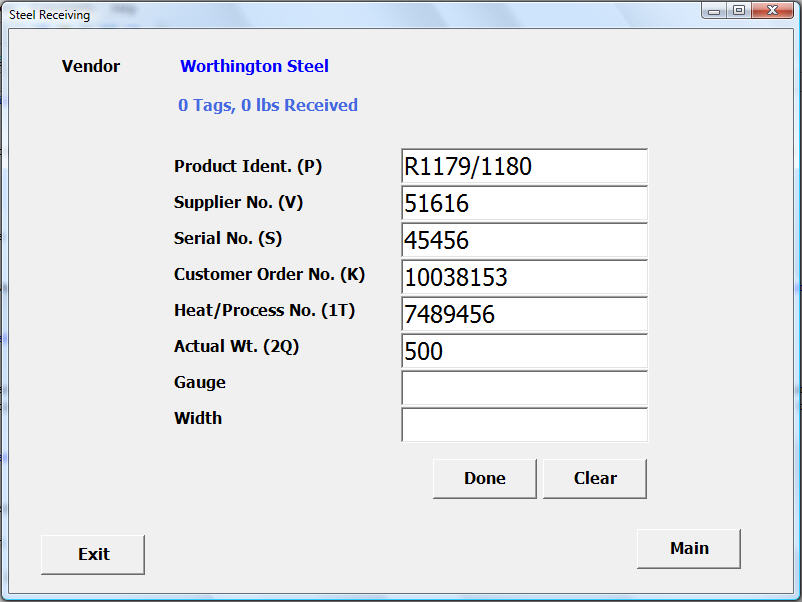
Note
**In cases where barcode labels cannot be scanned, this information must be typed in.
The gauge and width information must be typed in. When all mandatory fields are filled, click  .
.
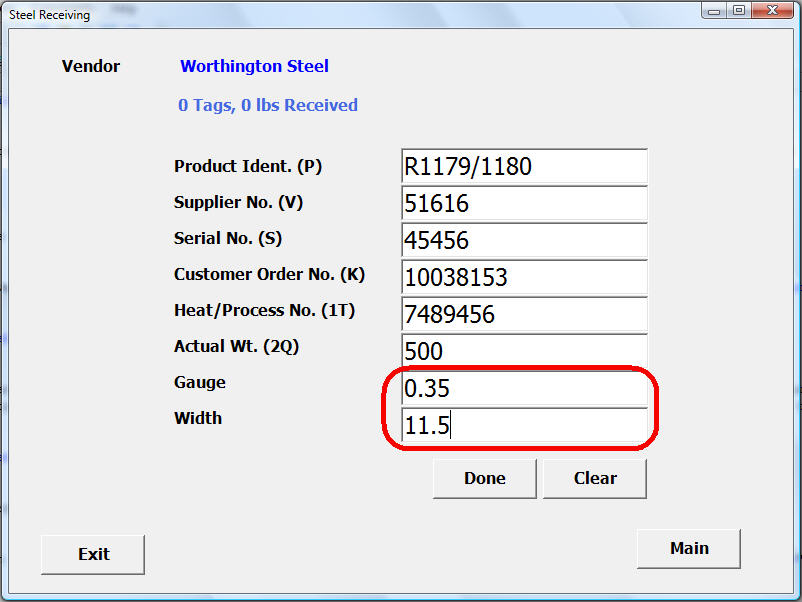
Note
**If a receipt is not started in the main application, the  button will be disabled.
A confirmation message will appear indicating success. Keep scanning vendor tags until all coils are scanned.
Matching Scanned Item Numbers and Vendor Codes
Sometimes, item numbers and vendor codes as they appear on vendor barcode labels do not match with values in the system. This makes it impossible for the system to know which item you are receiving. In cases like this, a window will appear asking you to confirm the correct part number.
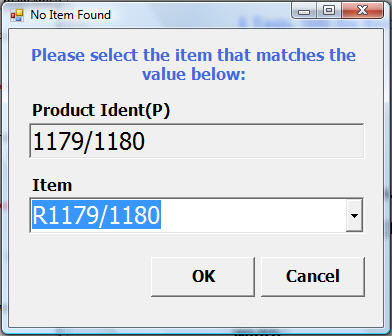
The window displays the value on the vendor barcode label, and a drop down is available for you to match it to the correct item number. Click  when complete.
Note
The system will save your selections so next time you scan the item number, it will know which item it really is.
A similar action happens when scanning a vendor code that the system does not recognize. A window will appear asking you to confirm the correct vendor code.
Verifying Width and Gauge Values
The width and gauge values entered as part of the steel receiving process are verified against tolerances defined in the system. When width and/or gauge values are out of tolerance, a warning message will be displayed indicating that width and/or gauge values are out of tolerance. You have the option to either cancel (which will not receive the tag into the system) or to continue. Continuing will receive the coil, but it will be received automatically as held material.
Note
Width and gauge values can be set on the purchased item screen. .. image:: images/purchaseditemminmax.jpg
Completing a Receipt
Once all tags have been scanned, you can complete the steel receipt.
To complete the receipt, navigate to the ![]() icon under the
icon under the  group. The steel receiving window will appear, and the current in progress receipt will be displayed.
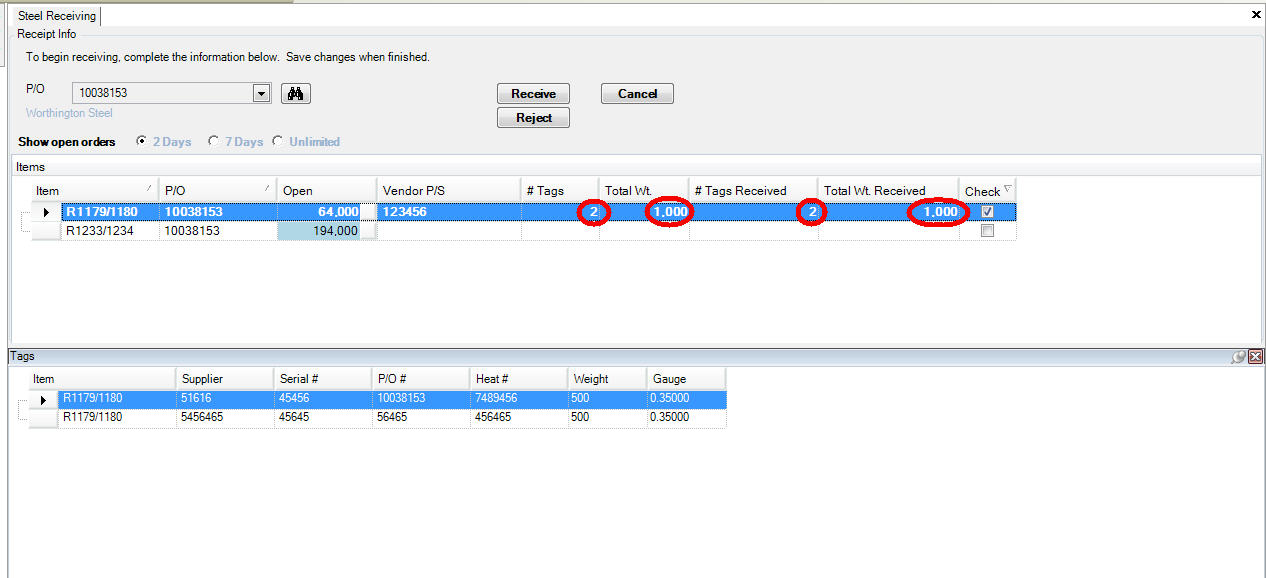
All scanned tags appear at the bottom of the screen. The screen also shows beside each item that was checked off the number of tags received and the total weight. Before completing the receipt, you should verify that the
totals are correct. If the # tags does not match the # tags received or the total wt. does not match the total wt received, you can still proceed with the receipt.
Once you have confirmed the totals, click the  button. If totals do not match, a warning will be displayed. Click
  to continue, and a window will appear where you can
put notes against each item discrepancy
Note
The notes entered will be visible in the A/P module when payment is made against the receipt.
A window will display asking if you want to print tags for the coils.

Click  to print barcode labels, or
  to continue.
Note
Printing barcode labels is not really necessary since the system can process the vendor barcode labels. You may only need to print barcode labels if tags are damaged.
Once the receipt is complete, the screen will clear ready for the next receipt.
Cancelling a Receipt
To cancel a receipt already started, click the  button. A message will be displayed asking you to confirm the action. Click
  to cancel the receipt. All scanned tags
will be removed, and the current receipt will be cleared.
Handheld Scanner
The handheld scanning in the ShopEdge system is similar to the fork truck mounted application, but with a few different options. After opening the application on your desktop, you will see the following screen.
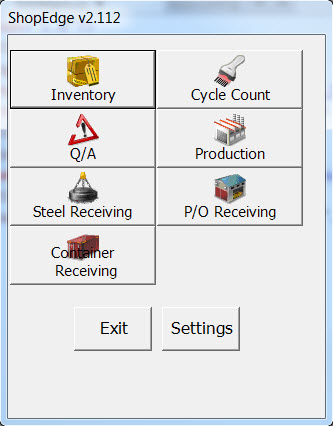
From the main handheld screen, you can choose ‘Steel Receiving’, ‘Inventory’, ‘Q/A’, ‘PO Receiving’, ‘Production’ or ‘Container Receiving’.
To Exit the handheld screen, click on the  button.
To manage settings for the handheld application, such as User ID, Password, Server, and Web Service IP, click on the  button to open the ‘Settings’ screen.
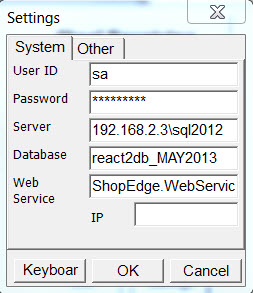
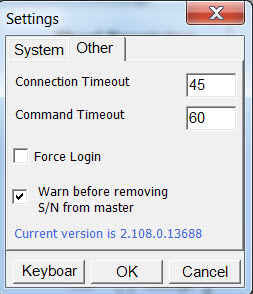
Click on the  tab
to show which version of the handheld application you are running and additional information.
At any time in the handheld application, you can click on  to go to the previous screen, or
  to go to the main handheld screen.
Steel Receiving
To start steel receiving on the handheld application, click on the  button.
This will open the Steel Receiving screen.
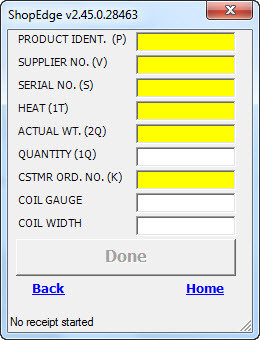
From this screen, you can scan a steel barcode to populate the information, or you can enter in the information manually.
Note
The yellow areas will be populated when a barcode is scanned; the white text boxes need to be filled out manually.
Once you have entered the appropriate information, click on the  button to add the tag to the system.
Inventory
To start inventory on the handheld application, click on the  button.
This will open the Inventory screen.
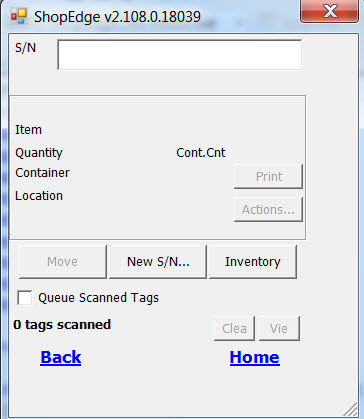
There are a variety of functions performed from the Inventory screen, including entering or scanning new Production, Raw material, and Master tags into the system, transferring tags, and printing or editing tags.
Adding a New Tag
To add a new tag, click on the  button
and select the type of tag required from the Create new S/N screen.
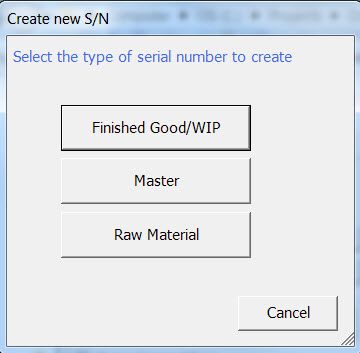
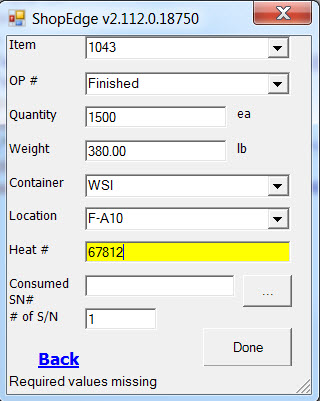
Production Tag
To add a new production tag, click on the  button to open the New Production Tag screen.
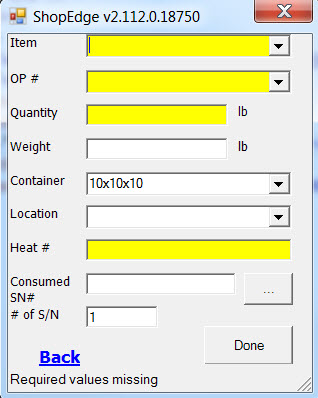
Select the Item, Operation, Container and Location from the drop down boxes and enter in the other information required. You can also scan a barcode if it exists to automatically populate the information. Multiple tags can be created by changing # of S/N.
When you are finished, click on the  button to save the tag in the system.
Raw Material Tag
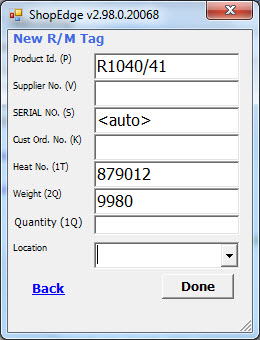
To add a new R/M tag, click on the  button to open the New R/M Tag screen.
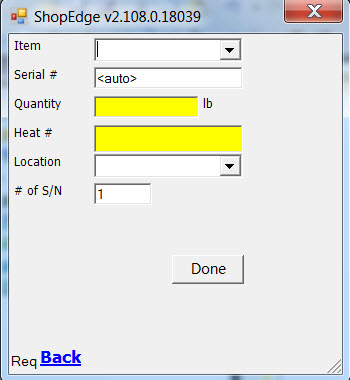
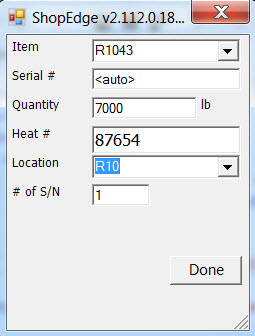
Select the Item and Location from the drop down boxes and enter all the other information required. You can also scan an existing barcode if it exists to automatically populate the information. Multiple tags can be created by changing # of S/N.
When you are finished, click on the  button to save the tag in the system.
Master Tag
To add a new master tag, you first need to scan or enter in the serial number/s of all existing tags you wish to combine on a master. The system will be able to combine all serial numbers from one location on the new master tag.
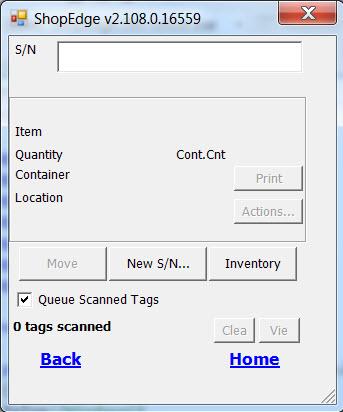
Check the Queue Scanned Tags is checked. When all serial numbers/s have been scanned or entered for the master,
click on the  button.
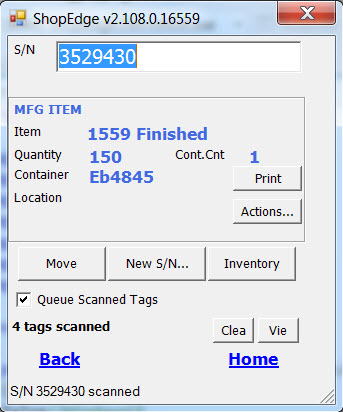
Click on the  button.

The system will prompt with a confirmation to ensure you are creating the new master from the correct location.
Click the  button.
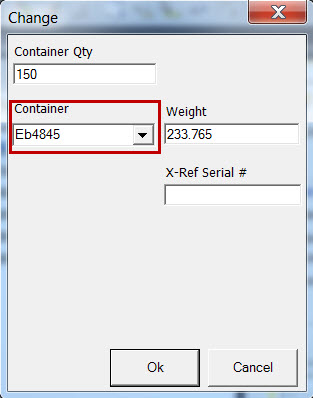
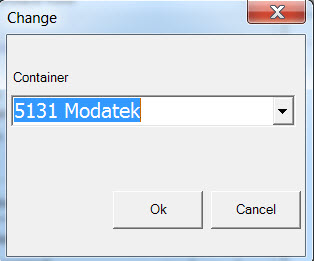
The Change screen will be displayed so that the Container can be changed if required.
The Print Barcode screen will be displayed so that the Printer and Master Label can be selected.
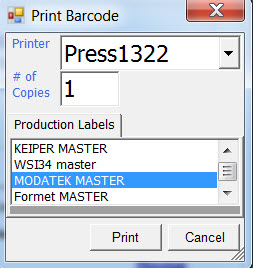
The system will then create a new serial number for the master tag and print the master tag.
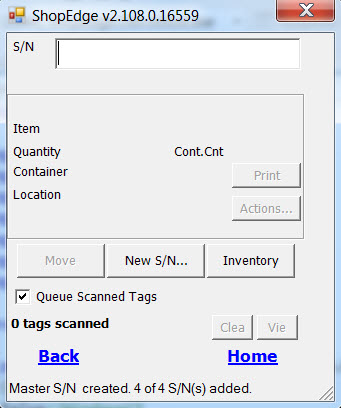
Moving an Inventory Tag
To move an inventory tag in the system, navigate to the ‘Inventory’ section from the main page, and enter in the serial number you wish to move or scan the barcode.

Then select the  button. This will open the ‘Select Location’ screen.
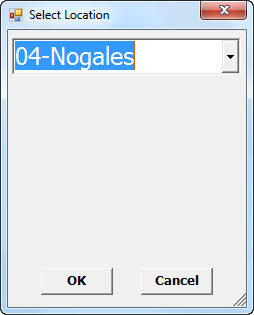
Use the dropdown to enter in the new location and click on the  button to save your new location.
Modifying a Tag
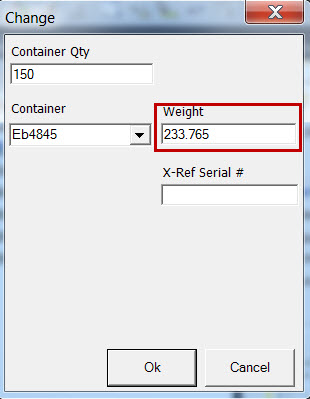
To modify the tag quantity, weight, container or add a cross reference serial number, navigate to the ‘Inventory’ section from the main page and enter in the serial number you wish to modify, or scan the barcode.
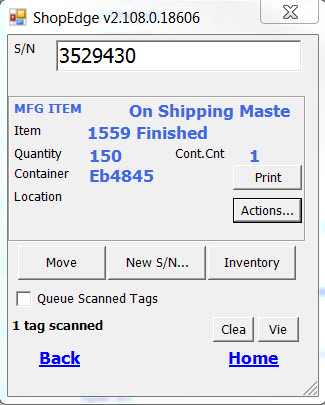
Then select the  button. This will open the ‘Actions’ screen.
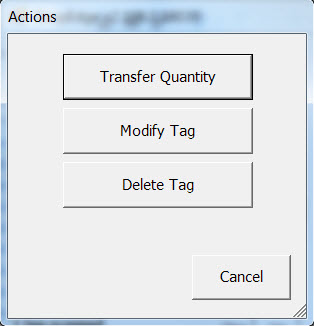
Then select the  button. This will open the ‘Change’ screen.
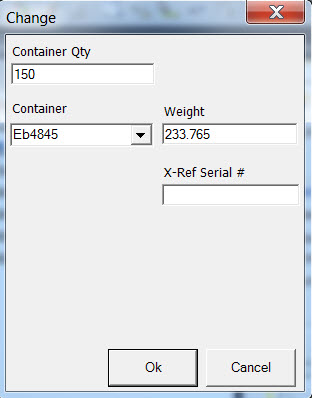
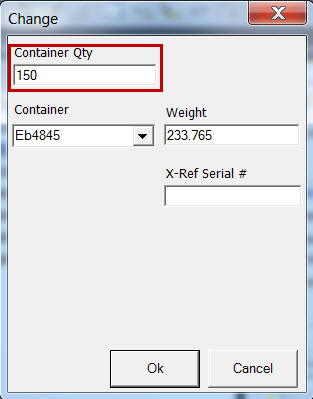
Changing a Tag Quantity
Enter in the new container quantity in the box provided and click on the  button.
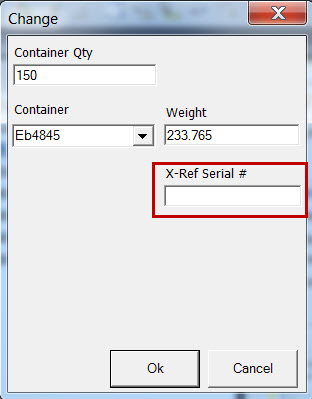
Adding a Cross Reference Serial Number
Enter the new serial number in the text box provided and click on the  button.
Combining Inventory Tags
An option exists on the handheld scanner application for transferring inventory from one tag to another tag. An inventory transaction is created for the inventory transfer so that heat/lot traceability is maintained.
From the main screen, open the Inventory screen by clicking on the  button.
Then enter in the serial number or scan the barcode of the tag you wish to transfer from.

Then select the  button. This will open the ‘Actions’ screen.

Then select the  button. This will open the ‘Transfer Tag’ screen.
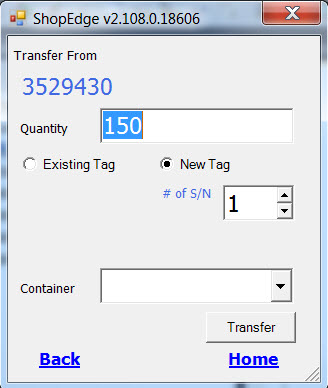
Verify the quantity you want to transfer (the system will default to the tag quantity, assuming you will transfer the entire tag).
To transfer to an existing inventory tag, select Existing Tag. Then either scan or type in the serial number in the box. If you type the serial number, be sure to press enter to register the serial number as found.
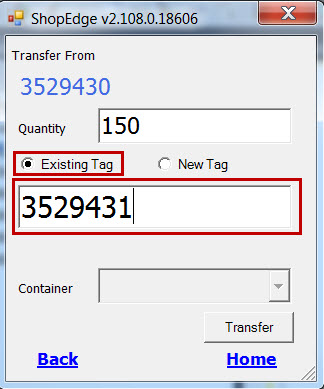
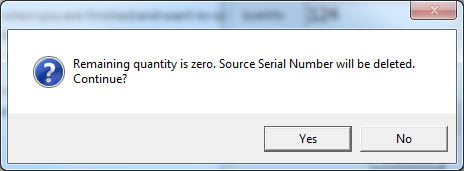
Click the  button when you are finished and want to complete the transfer. If you transfer the full amount from the source tag, the serial number will be removed from inventory. You will be prompted to confirm the serial number will be deleted.
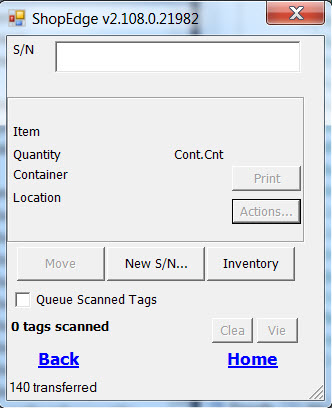
Once successful, the inventory screen will display, with a message in the bottom indicating success.
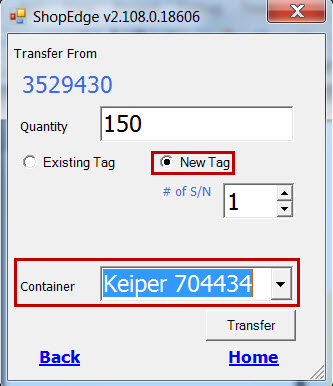
To transfer to a new tag, click New Tag. Leave the serial number blank. Click Transfer when you are ready to complete the transfer. You will be prompted to print a tag for the new serial number.
Deleting an Inventory Tag
To delete an inventory tag in the system, navigate to the ‘Inventory’ section from the main page, and enter in the serial number you wish to delete or scan the barcode.

The details about the tag to be deleted will be displayed. Then select the  button.
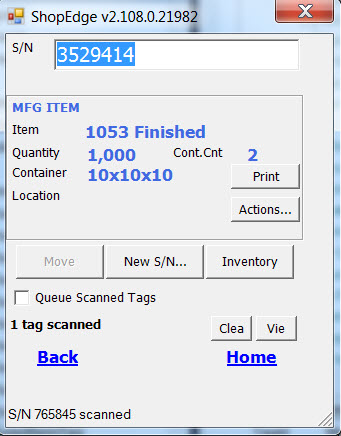
This will open the ‘Actions’ screen.

Then select the  button.
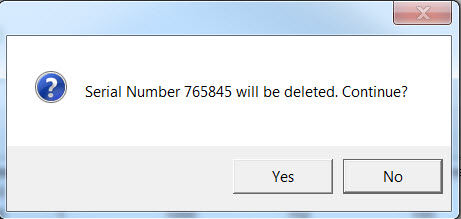
The system will prompt with a confirmation to ensure you are deleting the correct tag.
Click the  button.
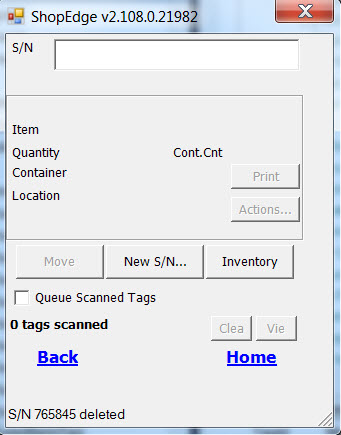
The screen will be displayed showing that the tag has been deleted.
Q/A
To start a Q/A procedure on the handheld application, click on the  button.
This will open the Q/A screen.
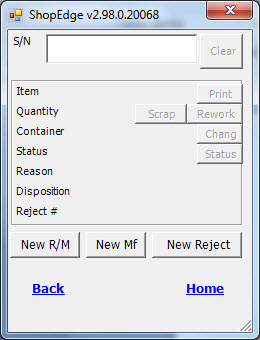
Adding a Tag
You can add a new Raw Material tag by clicking on the  button or a
new Manufacturing tag by clicking on the
  button.
Raw Material Tag
Raw Material tags can be created with the following status:-
- Normal - no reason is required
- Held - reason required
- Rejected - reason required
This will open the status window where you select the status and reason and disposition for the tag if required and
click the  button.
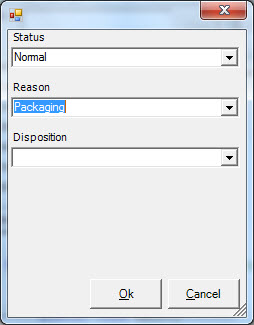
Then you can scan the barcode of the container or enter in the new tag information manually to complete the new Raw Material tag entry.
Click the  button.
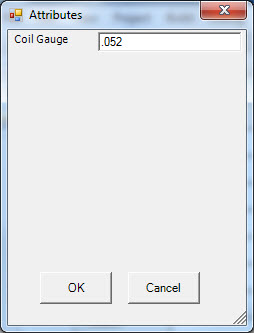
The Attributes window will be displayed if the Coil Gauge or any other attributes are required, enter the information and
click the  button.
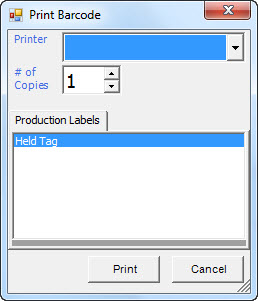
The print Barcode window will be displayed. To print the label select the printer, number of copies, to print the label
click on the  button.
Manufacturing Tag
Manufacturing tags can be created with the following status:-
- Normal - no reason is required
- Held - reason required
This will open the status window where you select the status and the reason, disposition, reject number and estimated processing time for the tag if required and
click the  button.
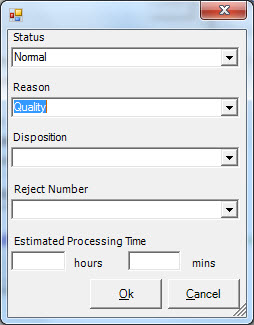
Then you can scan the barcode of the container or enter in the new tag information manually to complete the new Manuacturing tag entry.
Click the  button.
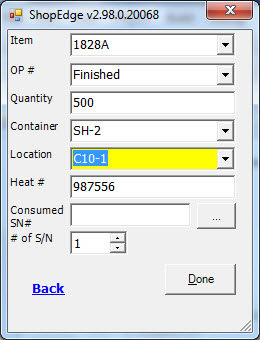
The print Barcode window will be displayed. To print the label select the printer, number of copies, to print the label
click on the  button.

Adding a Reject Number
You can add a new Reject Number by clicking on the  button.
This will open the Reject Number window where you can use the next default reject number
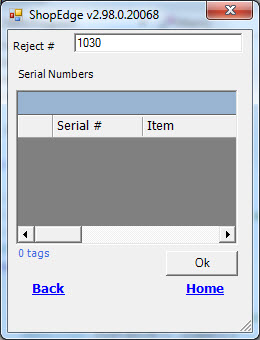
or enter a reject number.
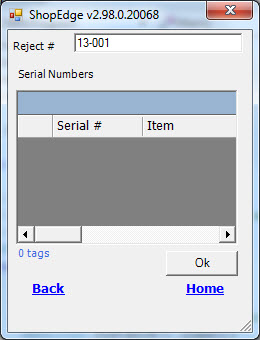
Click the  button.
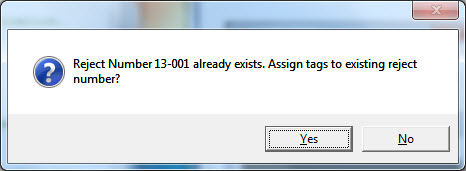
The message ‘Reject Number xxxxx already exists. Assign tags to existing reject number?’ will be displayed if an existing reject number is entered.
Click on the  button to continue.
Maintaining Tags
To modify a tag such as updating tag status (rework, release, scrap), print or change a tag, navigate to the Q/A screen from the main page of the application.
Scan a barcode or enter in the tag serial number that you wish to modify. The tag information will be populated once the correct serial number has been entered.

Changing a Tag Quantity
To change a tag quantity, navigate to the ‘Q/A’ section from the main page and enter in the serial number you wish to modify, or scan the barcode. Then select the
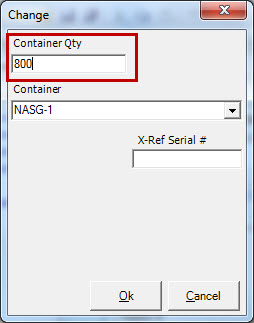
 button. This will open the ‘Q/A Change’ screen.
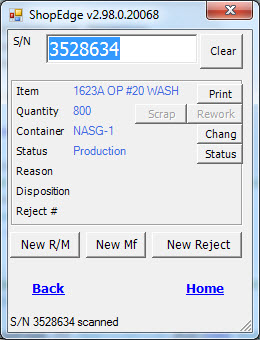
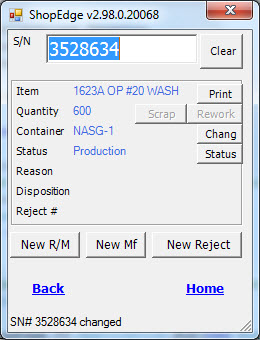
Enter in the new container quantity in the box provided and click on the  button.
The print Barcode window will be displayed. To print the label select the printer, number of copies, and label you wish to print and
click on the  button, else click on the
  button.

Changing a Tag Container
To change a tag container, navigate to the ‘Q/A’ section from the main page and enter in the serial number you wish to modify, or scan the barcode. Then select the
 button. This will open the ‘Q/A Change’ screen.
Select the new container using the dropdown and click on the  button.
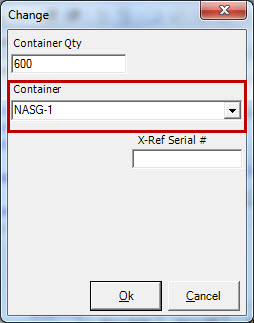
The print Barcode window will be displayed. To print the label select the printer, number of copies, and label you wish to print and
click on the  button, else click on the
  button.

Adding a Cross Reference Serial Number
To add a cross reference serial number, navigate to the ‘Q/A’ section from the main page and enter in the serial number you wish to modify, or scan the barcode. Then select the
 button. This will open the ‘Q/A Change’ screen.

Enter in the new cross reference serial number and click on the  button.
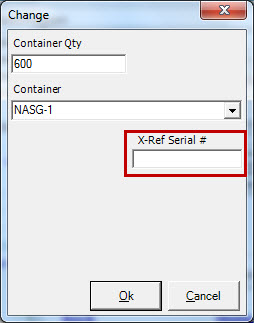
The print Barcode window will be displayed. To print the label select the printer, number of copies, and label you wish to print and
click on the  button, else click on the
  button.

Adding a New Q/A Reason, Disposition, Reject Number and Estimated Processing Time
To add a new Q/A reason, disposition, reject number and estimated processing time, navigate to the ‘Q/A’ section from the main page and enter in the serial number you wish to modify, or scan the barcode. Then select the
 button. This will open the ‘Q/A Change’ screen.
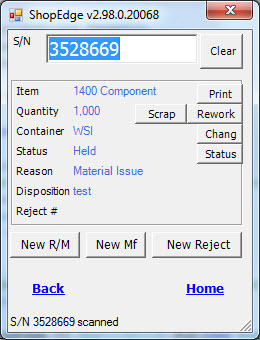
Select the new reason and/or disposition and/or reject number using the dropdown and enter the estimated processing time. Click on the  button.
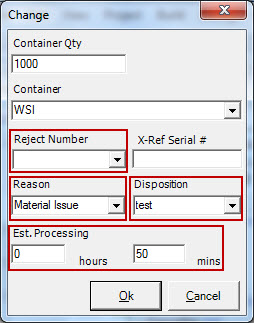
The print Barcode window will be displayed. To print the label select the printer, number of copies, and label you wish to print and
click on the  button, else click on the
  button.

Scrapping a Tag
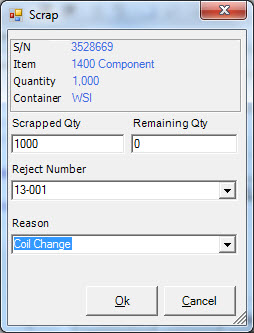
To scrap a tag (or serial number, container of parts), navigate to the ‘Q/A’ section from the main page and enter the serial number you wish to scrap, or scan the barcode. Then select the
 button. This will open the ‘Q/A Scrap’ screen.

Enter in the scrap quantity, the remaining quantity (if any), and the scrap reason. Click on the  button.
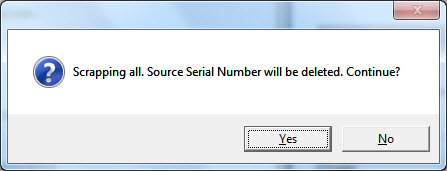
The message ‘Scrapping all. Source Serial Number will be deleted. Continue?’ will be displayed if the remaining quantity is 0. Click on the  button to continue.
Reworking a Tag
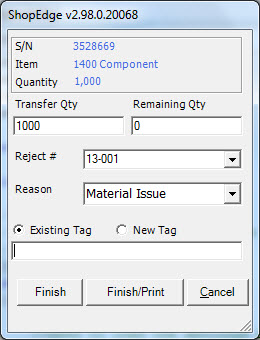
To rework a tag (or serial number, container of parts), navigate to the ‘Q/A’ section from the main page and enter the serial number you wish to rework, or scan the barcode. Then select the
 button. This will open the ‘Q/A Rework’ screen.

Enter in the rework quantity, the remaining quantity (if any), and the reason. Select whether you wish to keep the same tag or serial number, create a new tag.
Click on the  button when you are done.
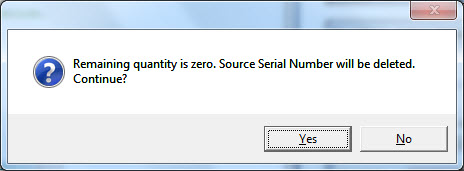
The message ‘Remaining quantity is zero. Source Serial Number will be deleted. Continue?’ will be displayed if the remaining quantity is 0. Click on the  button to continue.
Releasing a Tag
To release a tag (or serial number, container of parts), navigate to the ‘Q/A’ section from the main page and enter the serial number you wish to release, or scan the barcode. Then select the
 button.

Select the status ‘Normal’ using the dropdown.
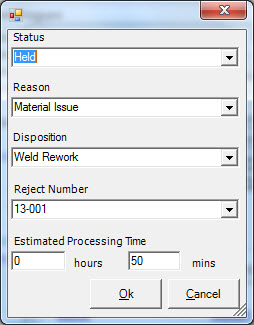
Click on the  button.
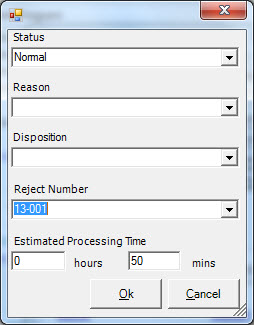
The print Barcode window will be displayed. To print the label select the printer, number of copies, and label you wish to print and
click on the  button, else click on the
  button.

Holding a Tag
To hold a tag (or serial number, container of parts), navigate to the ‘Q/A’ section from the main page and enter the serial number you wish to hold, or scan the barcode. Then select the
 button.

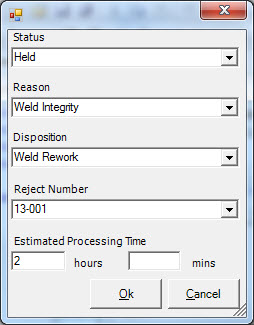
Select the status ‘Held’ using the dropdown.
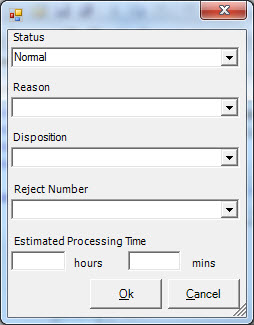
Select the reason, disposition, reject number using the dropdown and enter the estimated processing time.
Click on the  button.
The print Barcode window will be displayed. To print the label select the printer, number of copies, and label you wish to print and
click on the  button, else click on the
  button.

Rejecting Held Material
To reject a tag (or serial number, container of parts), navigate to the ‘Q/A’ section from the main page and enter the serial number you wish to reject, or scan the barcode.
Then select the  button.

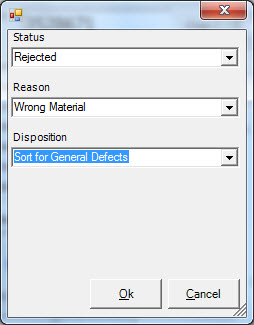
Select the status ‘Rejected’ using the dropdown.
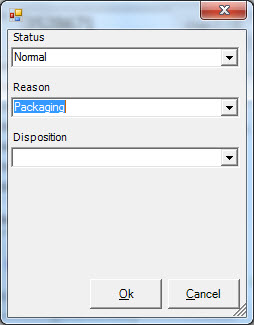
Select the reason and disposition using the dropdown. Click on the  button.
The print Barcode window will be displayed. To print the label select the printer, number of copies, and label you wish to print and
click on the  button, else click on the
  button.

Note
Reject material will show in inventory (in the held total) until it is either deleted from inventory, or returned to the vendor, or scrapped internally.
Printing a Tag
To print a Q/A tag, navigate to the ‘Q/A’ section from the main page and enter the serial number you wish to print, or scan the barcode. Click on the  button.
the ‘Print Barcode’ screen will open.

Select the printer, number of copies, and label you wish to print. Click on the  button to print the barcode.
PO and Processor Receiving using the Handheld
To start PO or Processor receiving on the handheld application, click on the  button.
This will open the PO Receiving Screen.
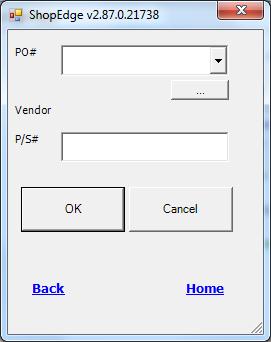
PO Receiving
New Receipts or Maintaining Existing Receipts
You can enter the PO number and Packing Slip number.
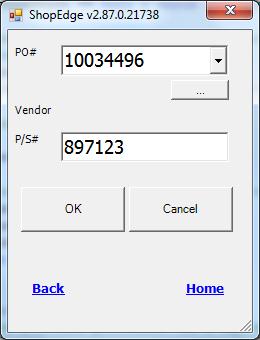
Or you can use the dropdown to select from a list of Receipts already in progress in the system.
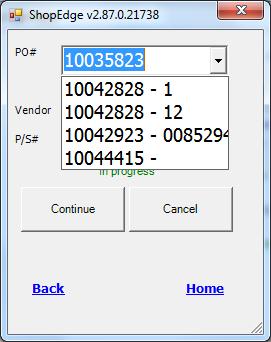
Or you can click on the  button to open the PO search screen where you can enter a vendor name or PO number and find it in the system.
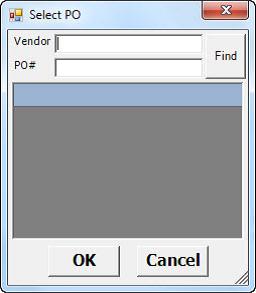
Once you have entered or found the PO you wish to receive, click on the  button.
This will open the PO Receiving screen that allows you to view all PO items, add, edit or remove items, map items, view item details, and start or finish receiving.
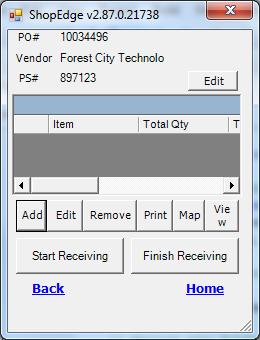
- Add - add the item to be received
- Edit - change the quantity to receive for an item already added by highlighting the item
- Remove - delete an item already added by highlighting the item
- Print - print tags for the item to be received
- Map - map the item to a vendor item by highlighting the item
- View - displays the on order quantity, wanted on date, PO number and vendor by highlighting the item
Receiving Items
To start receiving items, click on the  button.
zero level title or level too high for title Adding Items to Receive and level 7 and len(char) 6
Select the item you wish to receive, by selecting from the dropdown list.
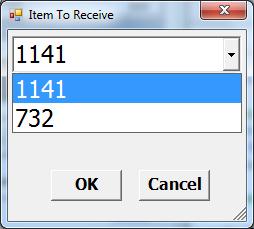
Enter the quantity you wish to receive.
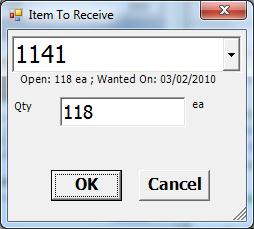
Click on the  button to add the item to the PO Receiving screen. Repeat the process if you have additional items to add to the PO Receiving screen.
Once you**ve added all of the items and quantities to the PO Receiving screen.
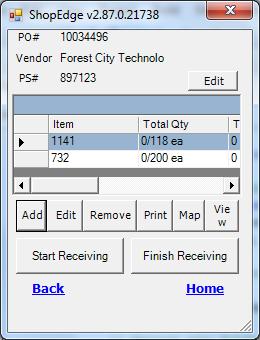
There are two options. You can click on the  button and start to scan the tags (if they meet the tag requirements in ShopEdge),
or you can create and print new tags.
zero level title or level too high for title Print New Tags and level 7 and len(char) 6
To print new tags, highlight the item you wish to create and print tags for, and click on the  button.
This will open a screen for you to create and print a new tag.
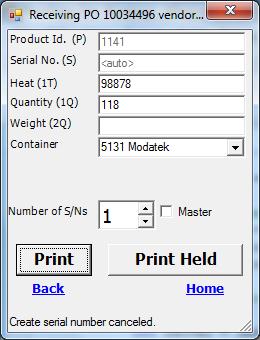
Fill out or scan the information (Heat, Quantity or Weight) and enter the number of serial numbers you wish to print. Then click on the  button to print a tag,
or click on the
  button to print a HELD tag.
Once you have printed all the required tags you can start to receive the items.
zero level title or level too high for title Start Receiving Items and level 7 and len(char) 6
You can then receive the items into Shop Edge. Click on the  button,
and scan the tags to fill out as much of the information as possible.
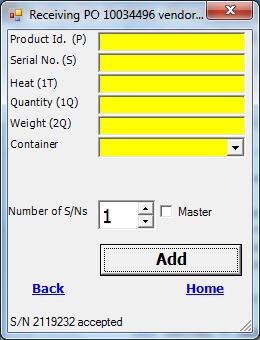
Once all the tag information for the item is complete, click on the  button.
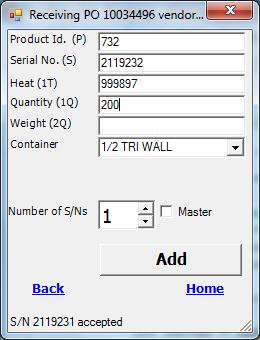
The item information (i.e. quantity and weight) must match the item information on the PO in order for it to be added to the system. Once you have received the items in the system.
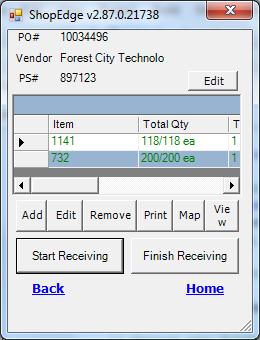
Click on the  button.
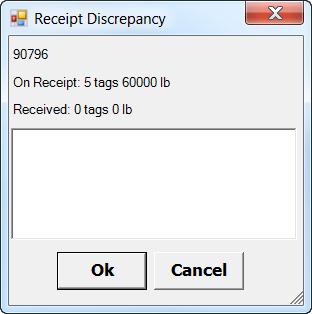
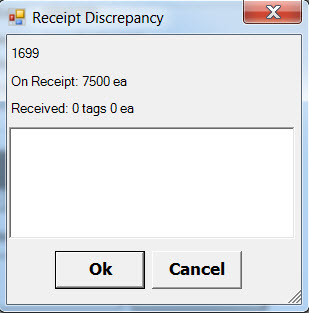
If there are any discrepancies between the PO item amount and the received amount, the system will prompt you to enter a comment in the Receipt Discrepancy screen.
Cancelling an Existing Receipt
Select the receipt from the dropdown list of Receipts already in progress in the system.
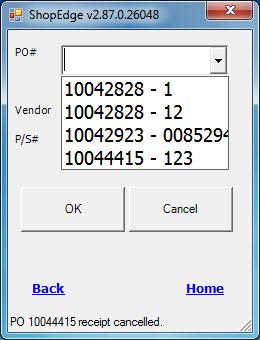
Click on the  button.
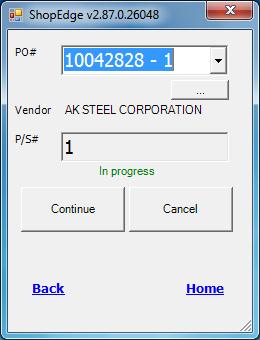
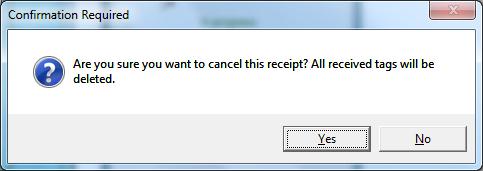
This will display a Confirmation Required screen with the message ‘Are you sure you want to cancel this receipt? All received tags will be deleted’.
Click on the  button.
Processor Receiving
When parts return from the processor and the shipper/receiver receives the parts back into the system using the ORIGINAL serial numbers traceabilty is maintained in the system, however if new tags are printed or the processors own tags are used the traceability will be lost.
Processor Receiving
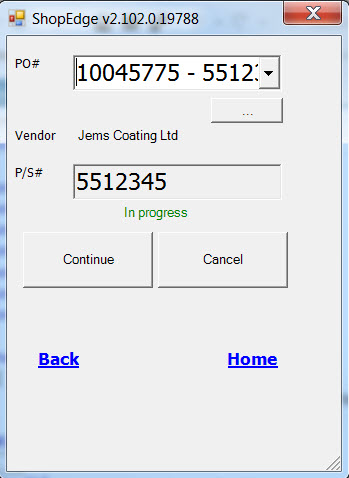
You can enter the processor PO number and Packing Slip number.
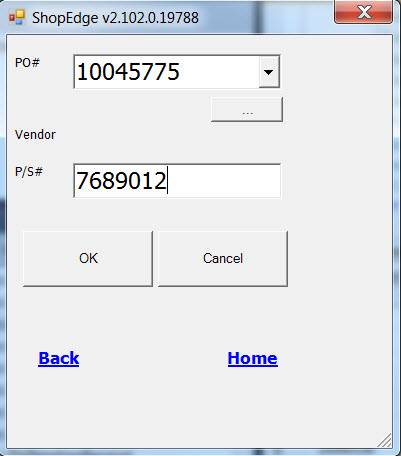
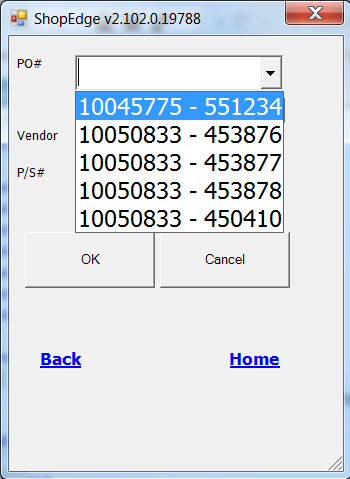
Or you can use the dropdown to select from a list of processor Receipts already in progress in the system.
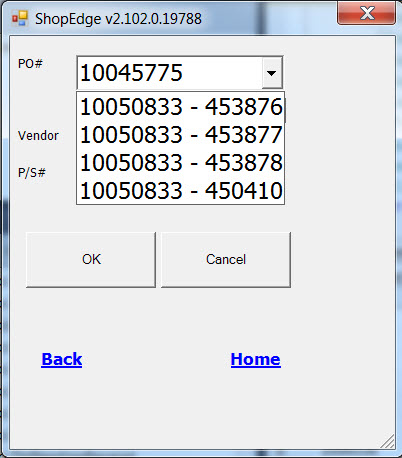
Or you can click on the  button to open the PO search screen where you can enter a vendor name or PO number and find it in the system.
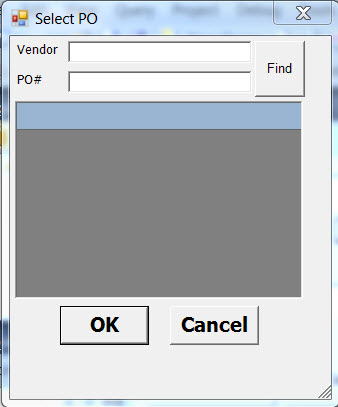
Once you have entered or found the processor PO you wish to receive, click on the  button.
This will open the PO Receiving screen that allows you to view all the PO items, add, edit or remove items, map items, view item details, and start or finish receiving
for the processor.
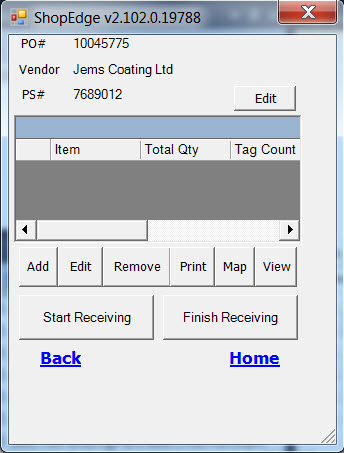
- Add - add the item to be received
- Edit - change the quantity to receive for an item already added by highlighting the item
- Remove - delete an item already added by highlighting the item
- Print - print tags for the item to be received
- Map - map the item to a vendor item by highlighting the item
- View - displays the on order quantity, wanted on date, PO number and vendor by highlighting the item
Receiving Items from the Processor
To start receiving items, click on the  button.
Select the item you wish to receive from the processor, by selecting from the dropdown list.
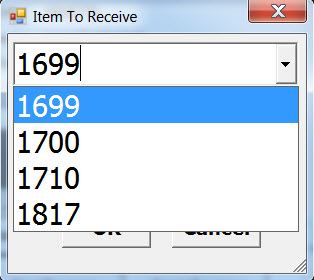
Enter the quantity you wish to receive.
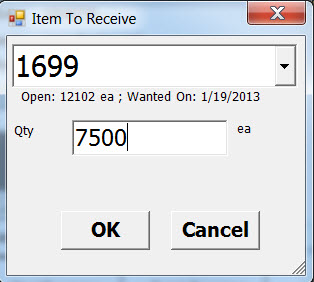
Click on the  button to add the item to the PO Receiving screen. Repeat the process if you have additional items to add to the PO Receiving screen.
Once you**ve added all of the items and quantities for the processor to the PO Receiving screen.
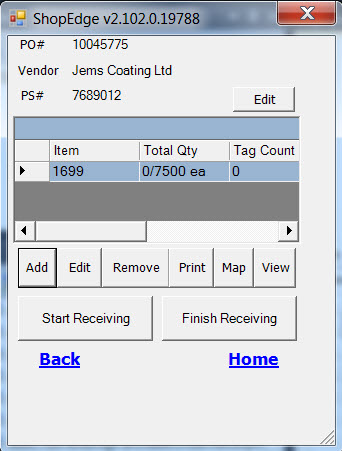
There are two options. You can click on the  button and start to scan or enter the tags (if they meet the tag requirements in ShopEdge),
or you can create and print new tags.
Note
Printing new tags will mean that the traceability will be lost
To print new tags, highlight the item you wish to create and print tags for, and click on the  button.
This will open a screen for you to create and print a new tag.
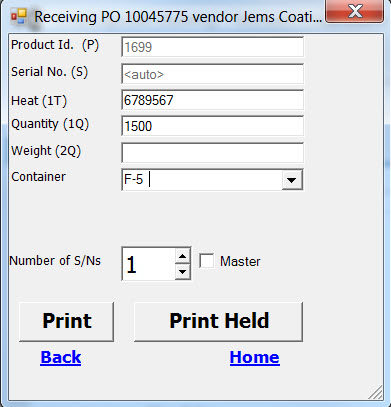
Fill out or scan the information (Heat, Quantity or Weight) and enter the number of serial numbers you wish to print. Then click on the  button to print a tag,
or click on the
  button to print a HELD tag.
Once you have printed all the required tags you can start to receive the items.
You can then receive the items into Shop Edge. Click on the  button.
Scan or enter the Item, Serial No, Heat, Quantity and select the Container. To maintain traceability the Original Serial No must be entered.
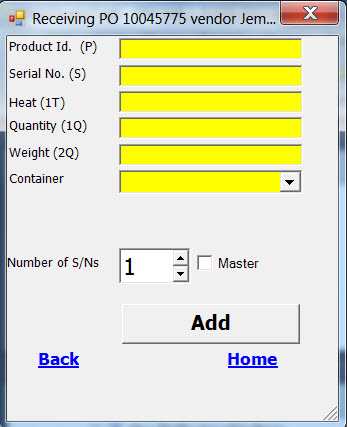
Click on the  button and the Print Barcode screen will be displayed.
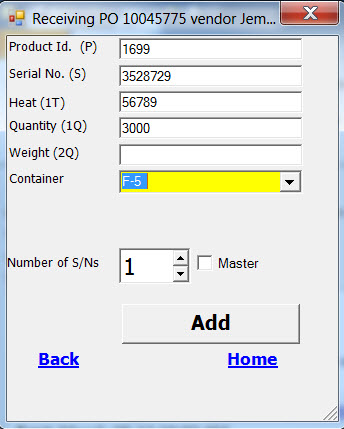
Click on the  button to print the NEW tag.
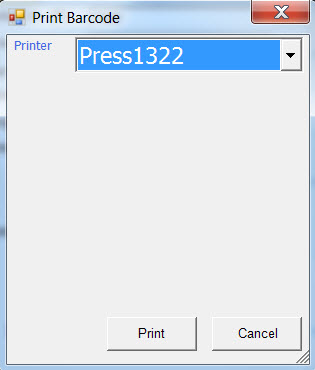
Scan or enter the tag that has just been printed.
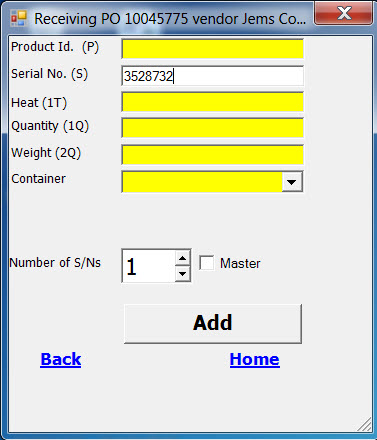
Click on the  button.
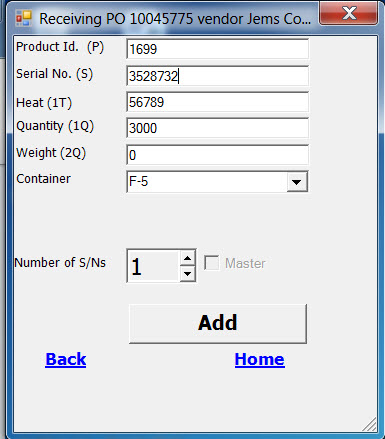
Repeat the process if you have additional tags to receive for the item from the processor.
Once you have received all the tags into the system. Click on the  button.
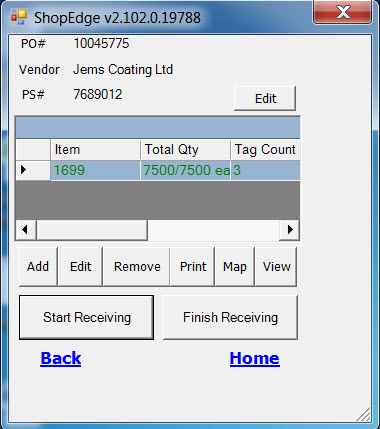
If there are any discrepancies between the PO item amount and the received amount, the system will prompt you to enter a comment in the Receipt Discrepancy screen.
Cancelling an Existing Processor Receipt
Select the receipt from the dropdown list of Receipts already in progress in the system.
Click on the  button.
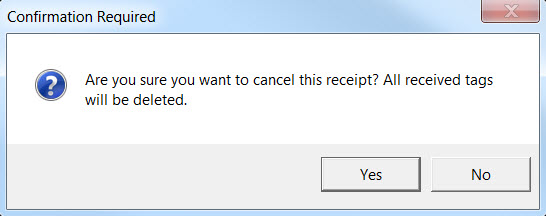
This will display a Confirmation Required screen with the message ‘Are you sure you want to cancel this receipt? All received tags will be deleted’.
Click on the  button.
Production
To start production on the handheld application, click on the  button.
This will open the Production screen.
Container Receiving
To start container receiving on the handheld application, click on the  button.
This will display the Container Receiving screen. To start receiving the containers, click on the  button or scan the container scan code barcode.
Note
See the section on Updating the Container Scan code and creating Barcodes.
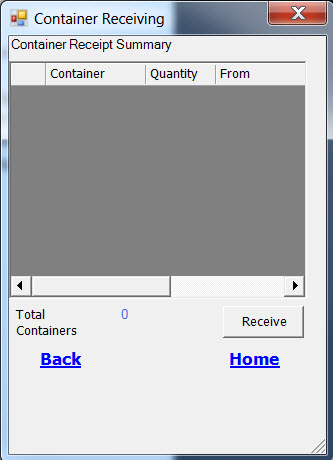
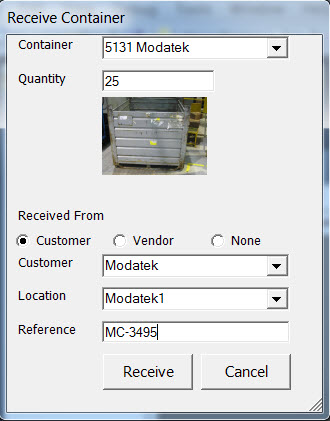
The Receive Container screen will be displayed with the container that was scanned or blank if the  button was clicked.
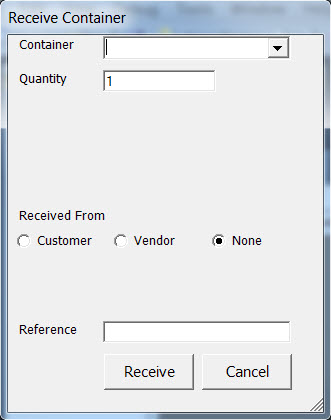
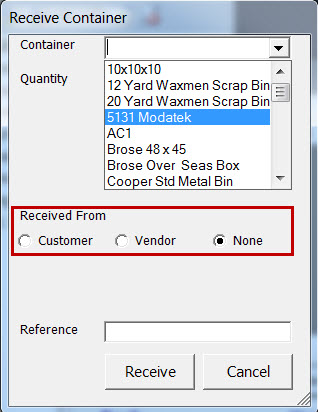
You can enter the container or click the  to select the container from the dropdown box.
Select where the container is being received from Customer, Vendor or None by checking the box.
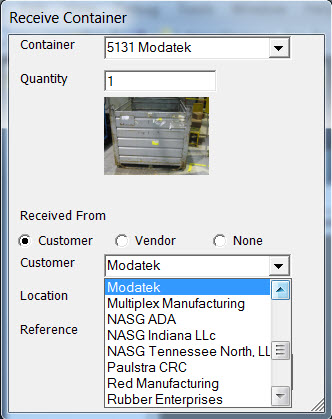
If the Customer is checked you can enter the customer and location or click the  to select the customer and location from the dropdown box.
Only the customer locations that have been set up as a container destination will be displayed in the dropdown box.
If the Vendor is checked you can enter the vendor and location or click the  to select the vendor and location from the dropdown box.
Only the vendor locations that have been setup as a container destination will be displayed in the dropdown box.
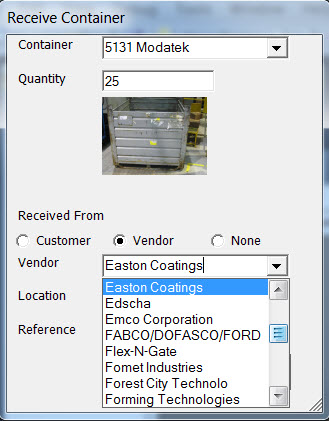
If None is checked the customer/vendor and location will be blank.
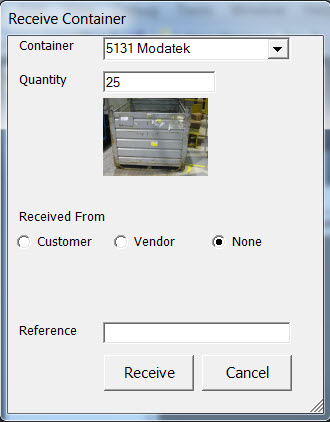
Enter the Quantity or the container scan barcode can be scanned multiple times to increment the Quantity of the container.
You may enter a Reference but it is not mandatory and click on the  button.
When the  button is pressed the container Inventory is updated and the
container transactions are created.
Note
*** See the section on Reviewing the Container Transactions and Inventory.
The Container Receiving screen will be displayed. To continue receiving more containers click on the  button
or scan the container scan code barcode.
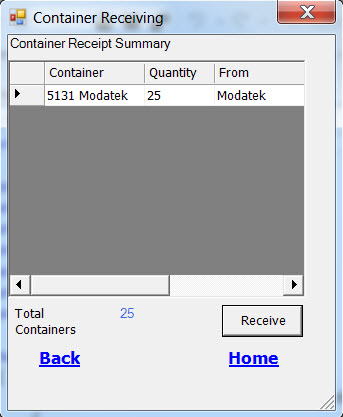
Once all the Container Receiving is complete click on the  or
or  to return to the Handheld menu.
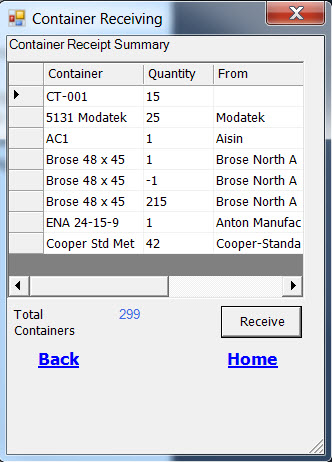
Note
*** To correct an incorrect container quantity enter a negative quantity.
Updating the Container Scan code and creating Barcodes
To update the Container Scan code navigate to the  tab, and clicking on the
 icon.
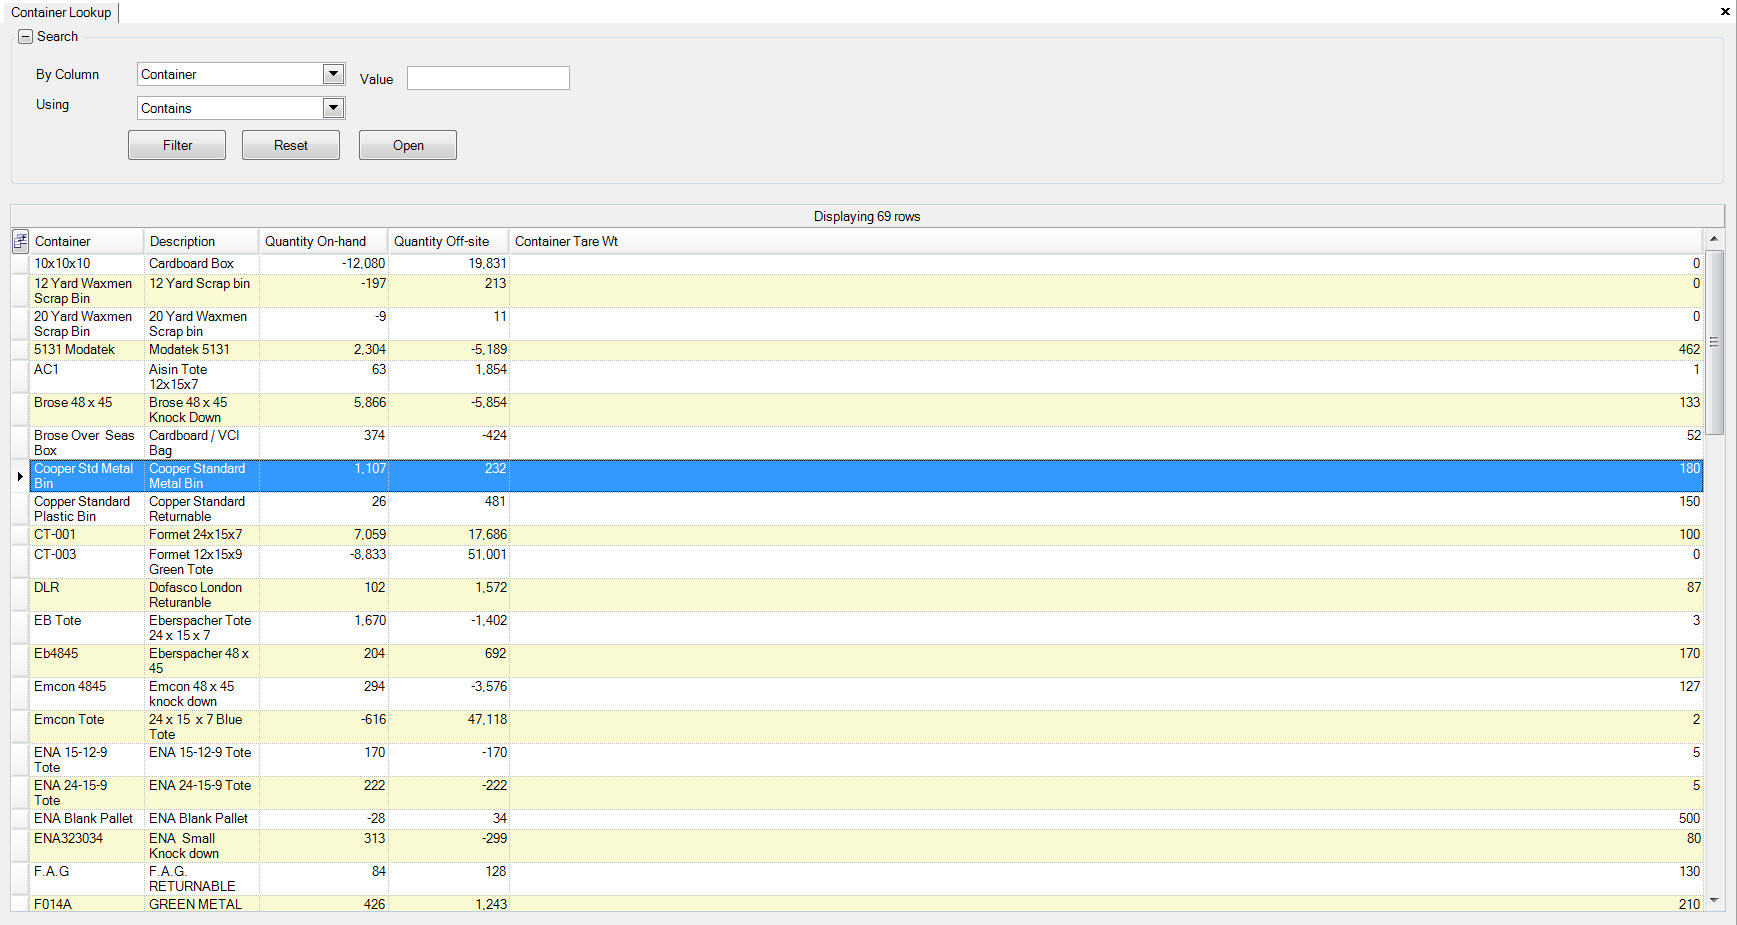
The Container Lookup screen will be displayed, double click on the container that the scan code must be updated on.
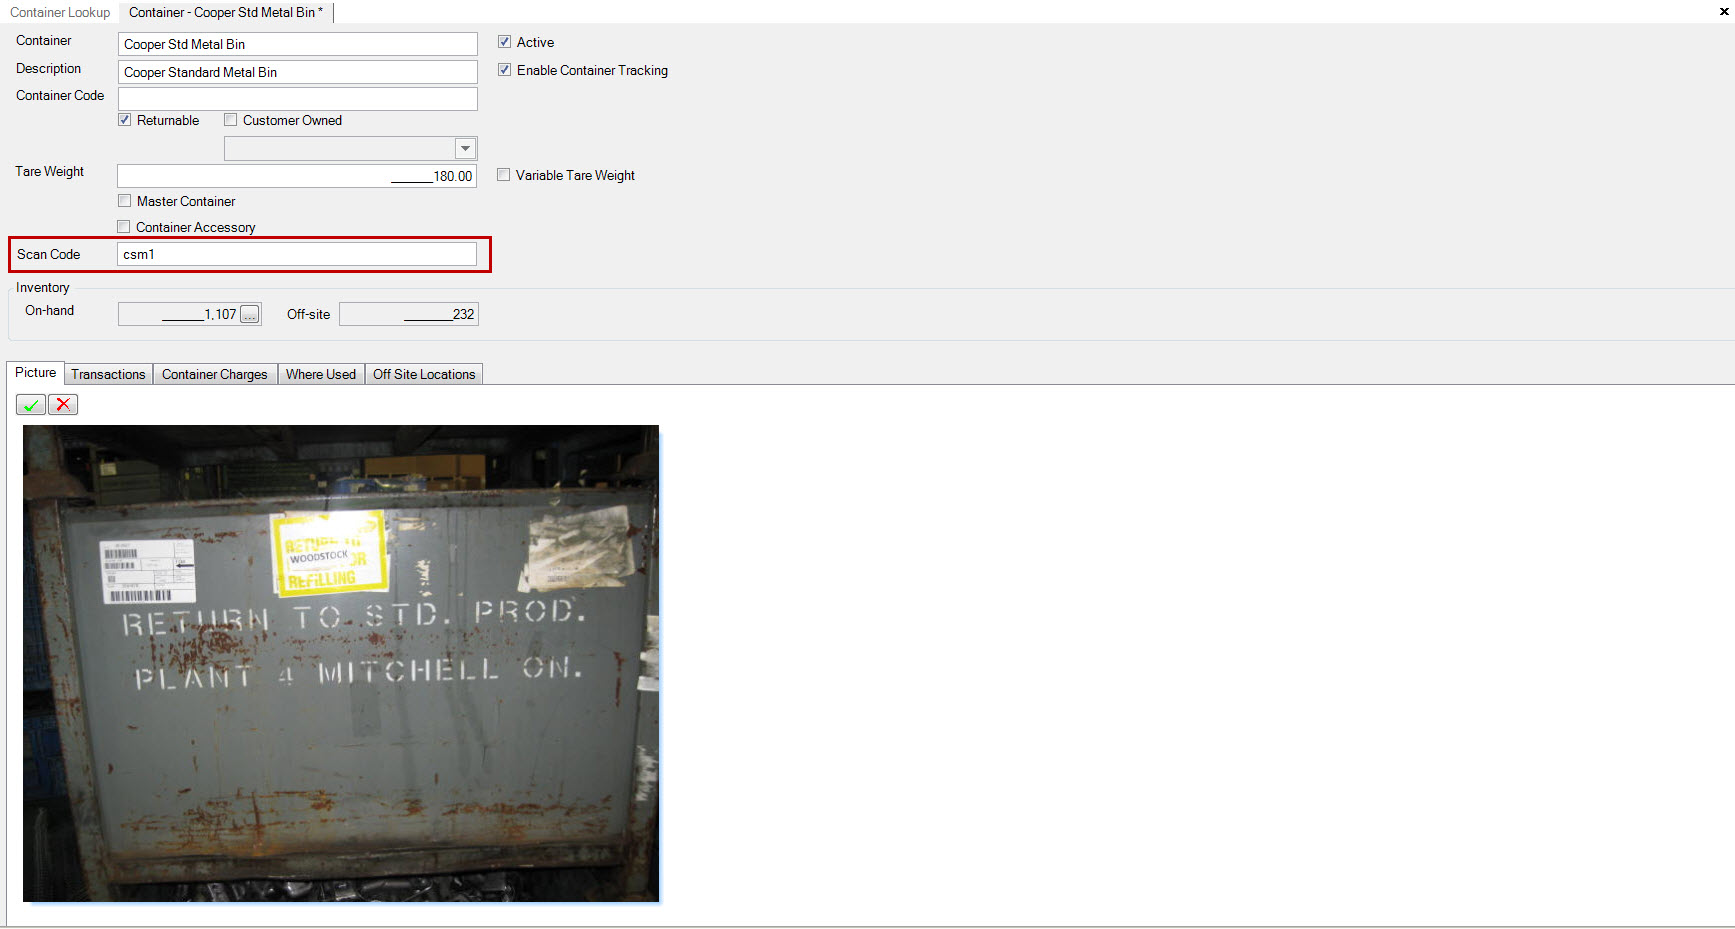
The Container detail screen will be displayed. Update the Scan Code and press the  button to save the change.
There are three different ways to add the new Container Scan Code barcode to the system. The first way is to press the Ctrl + Shift + V keys. The second way is to navigate to File -> New -> Barcode and the last way is New -> Barcode.
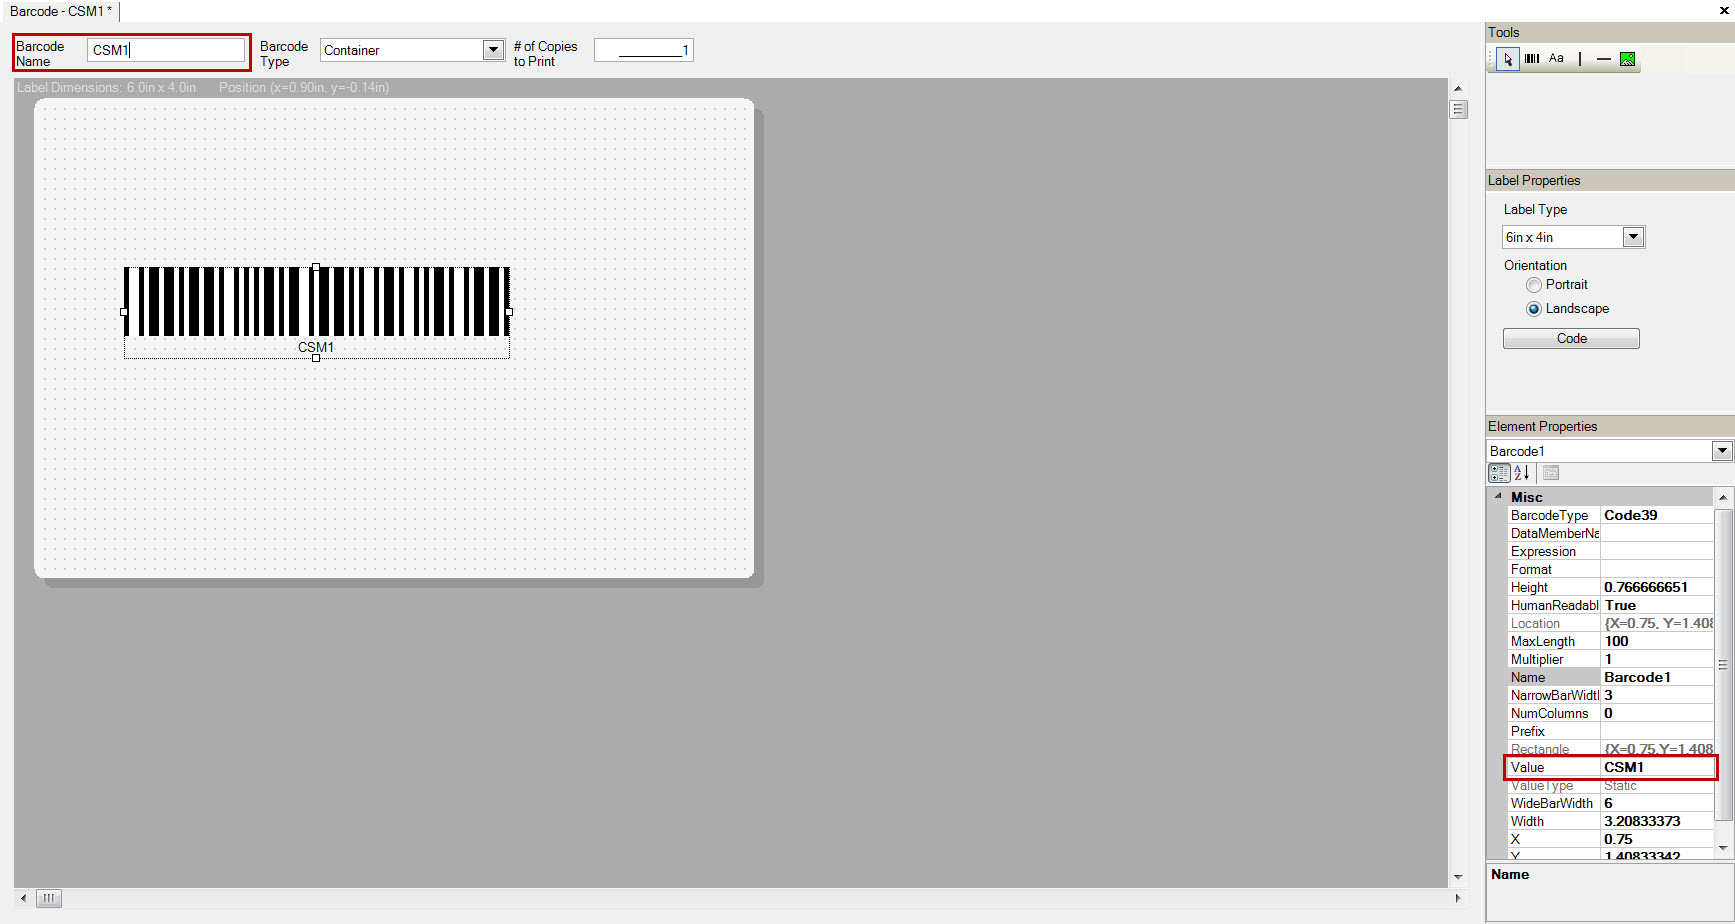
This will display the Barcode designer screen.
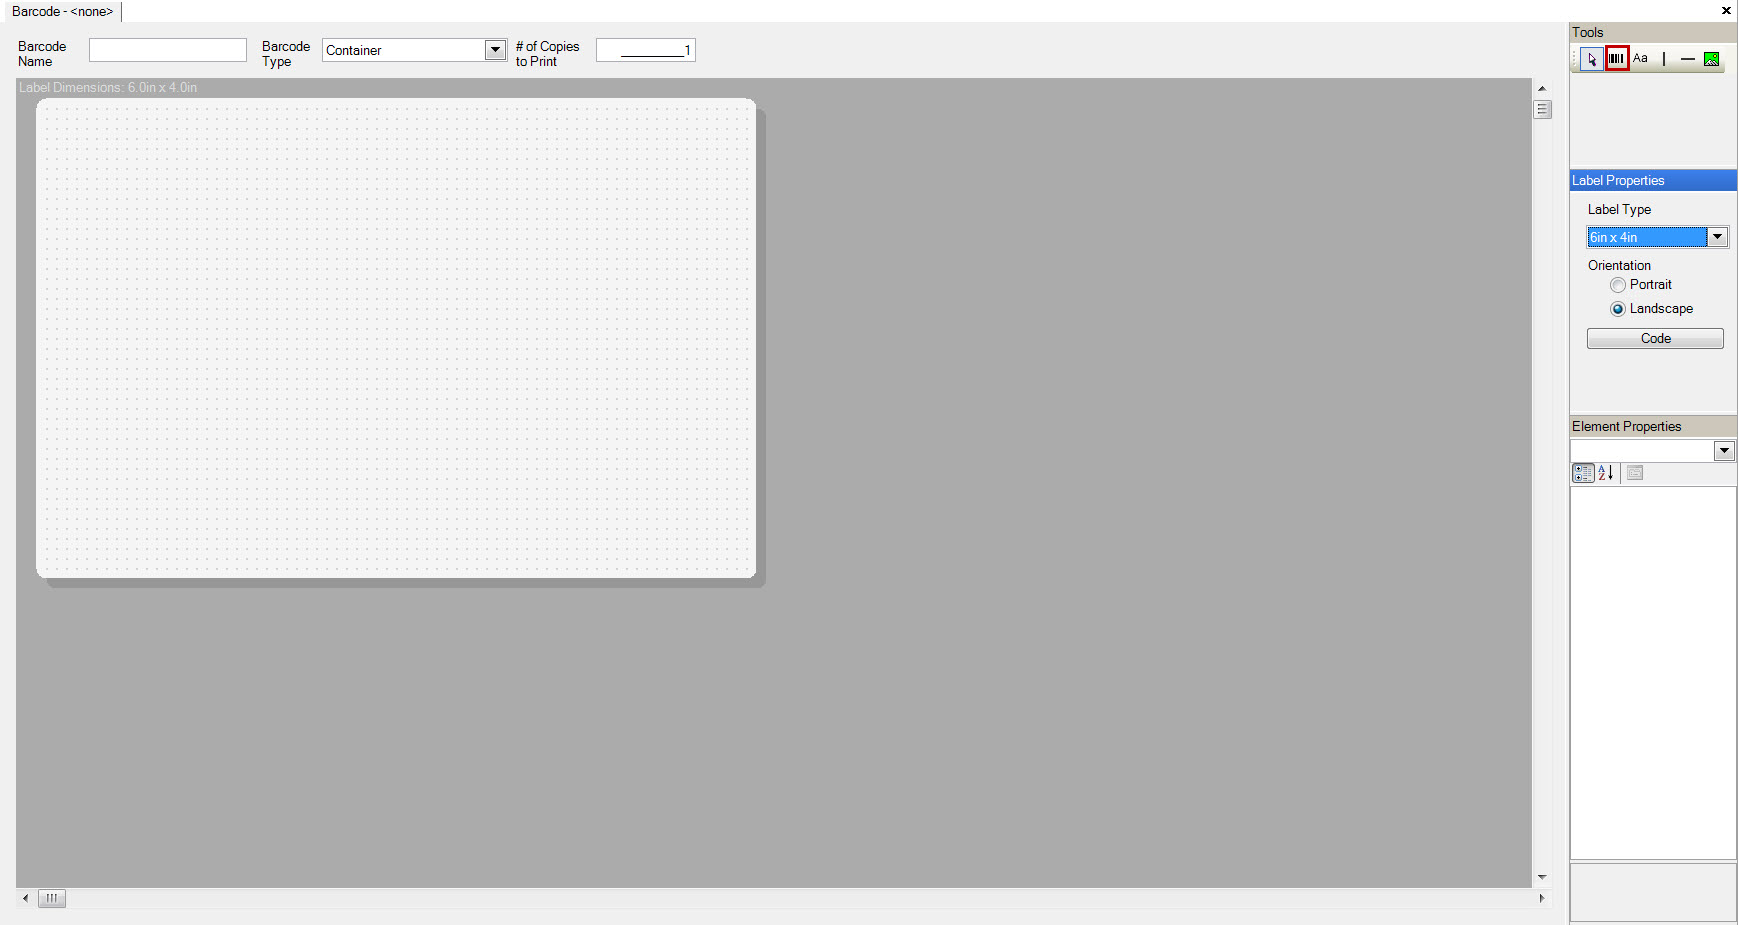
Select the barcode from the Tools option and move it to the label. Update the Value on the Element Properties to the Container Scan Code.
Then enter the Barcode Name and press the  button.
Press the
  button to print the Container Scan Code label.
Reviewing the Container Transactions and Inventory
To review the Container Transactions and Inventory navigate to the  tab, and clicking on the
 icon.
The Container Lookup screen will be displayed, double click on the container that the scan code must be updated on.

The Container detail screen will be displayed. Select the  tab to display the container
transactions or the
  to display the inventory.
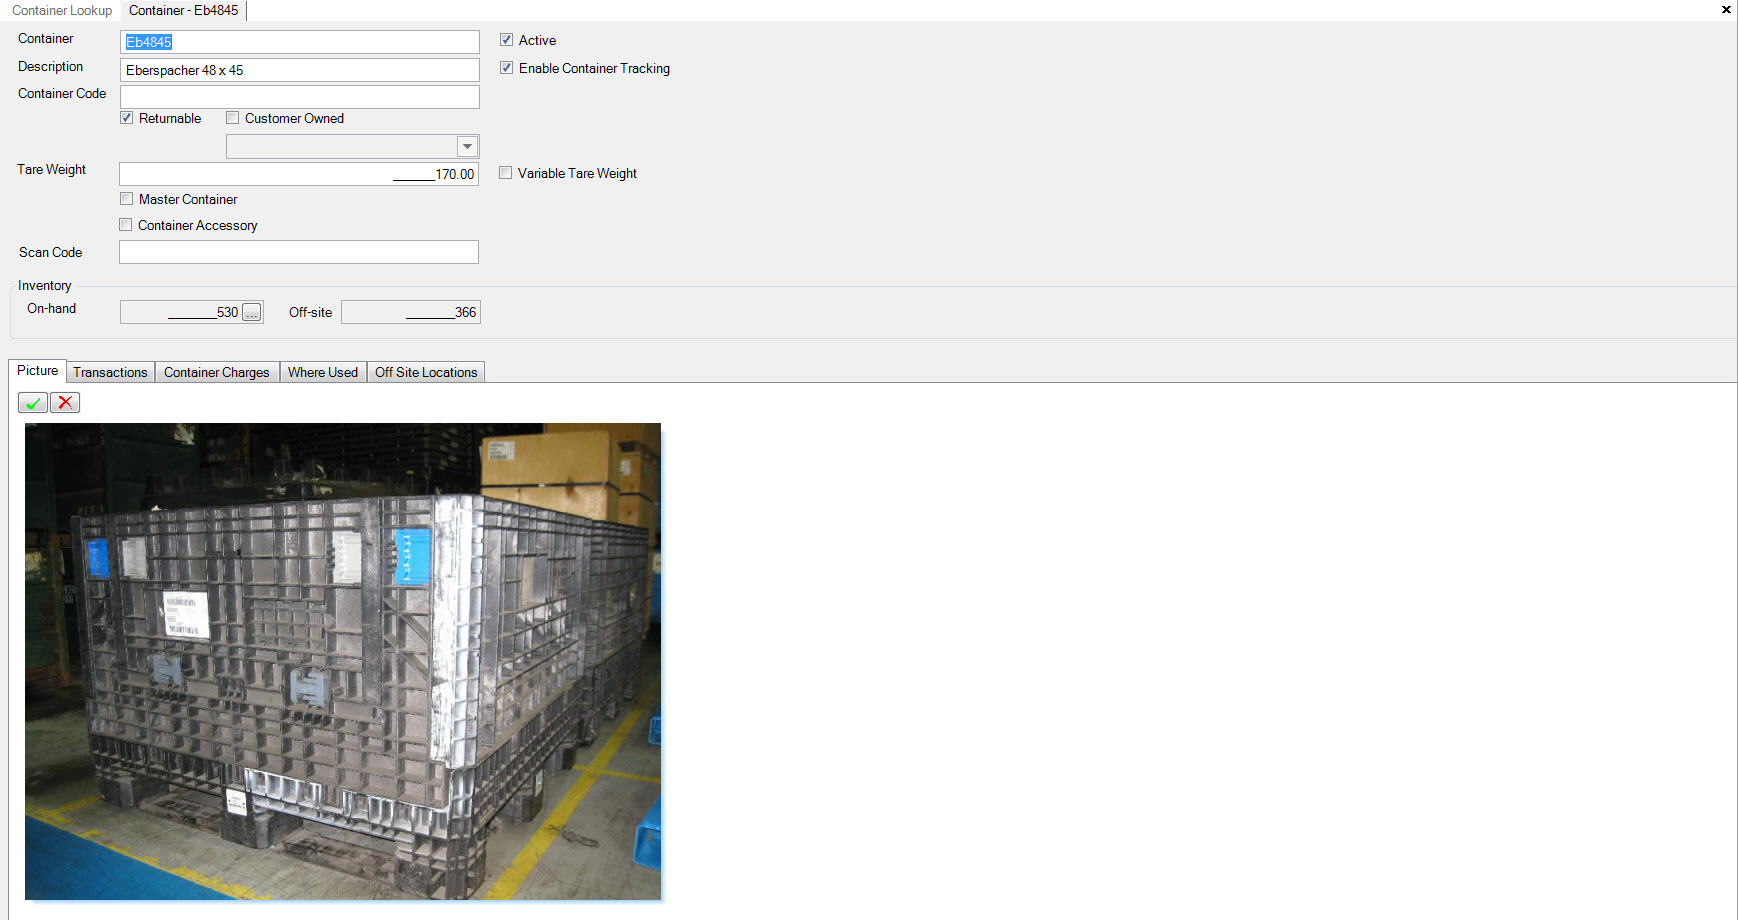
The Container Transactions will be displayed.
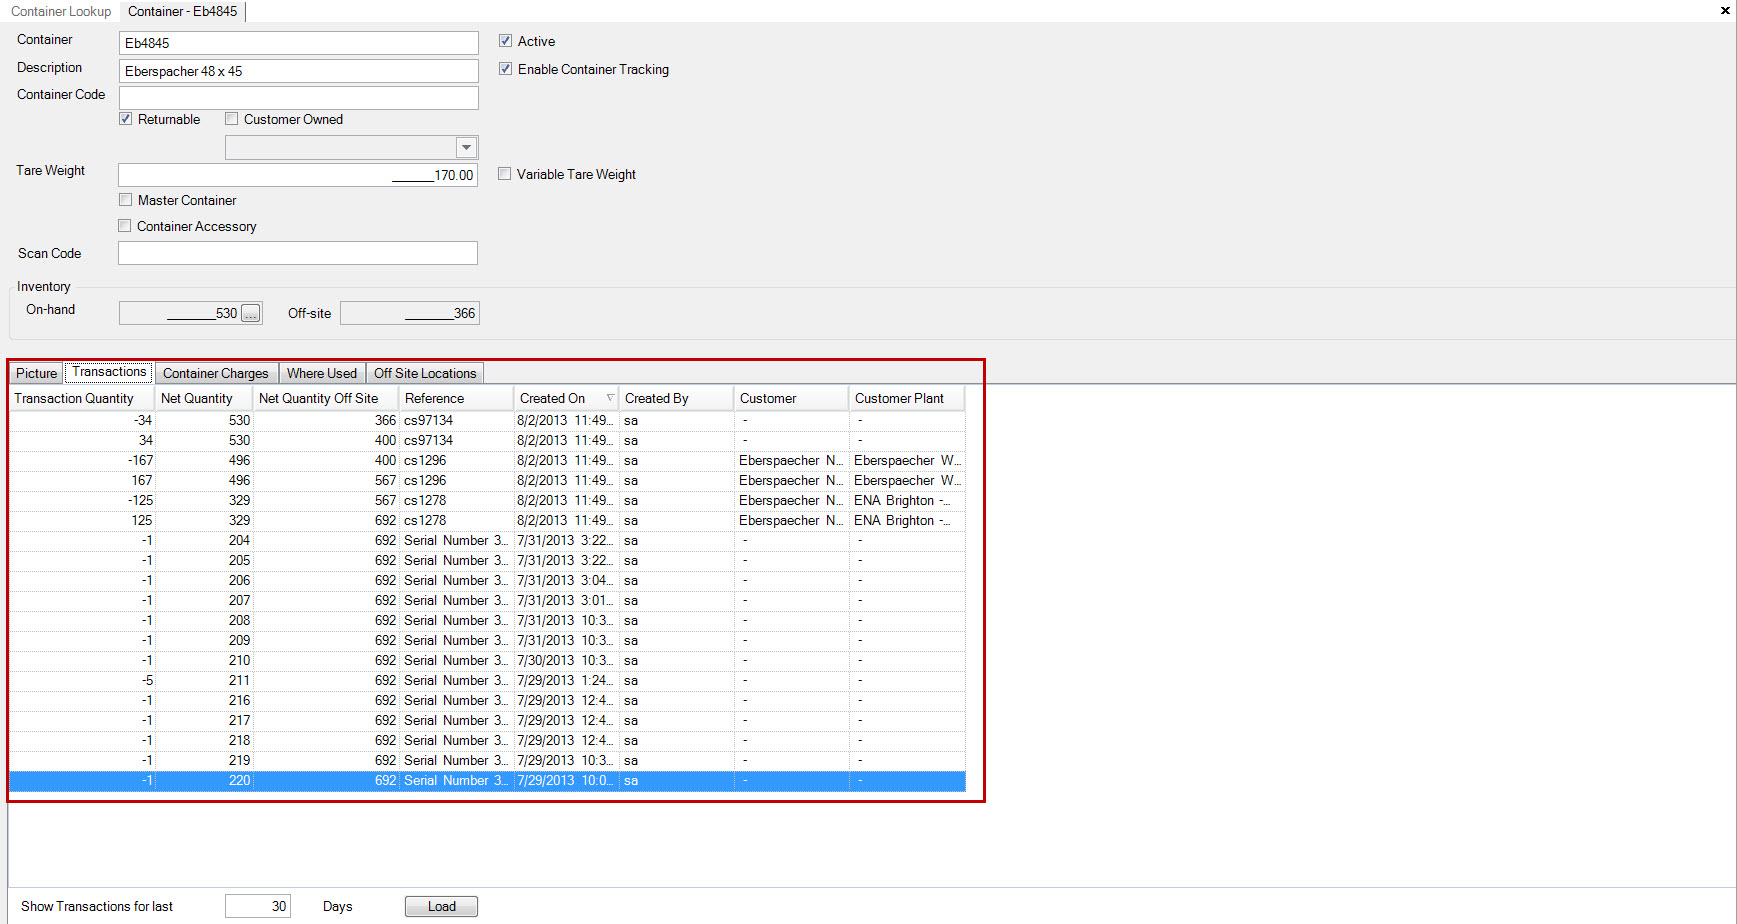
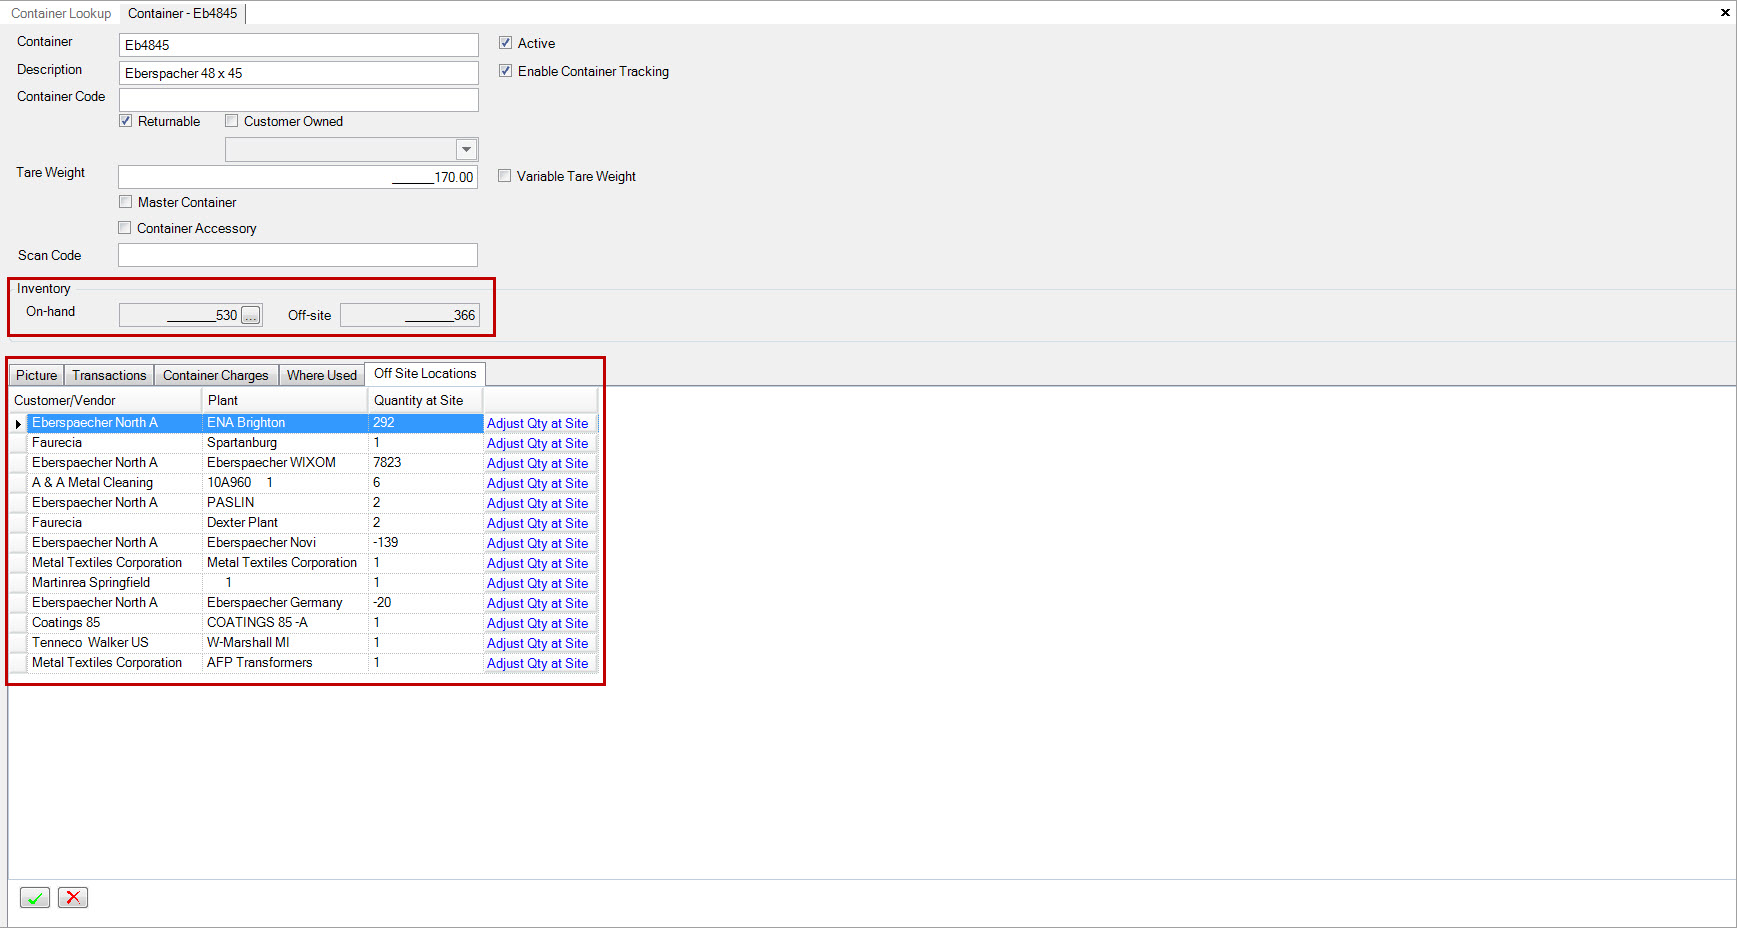
The Container Inventory at the Off Site Locations will be displayed.
