Quality Assurance
Material Specification
Materical Specifications are created and maintained in the Quality Assurance (Q/A) module, and must be entered when defining a new Purchased Item.
Creating a New Material Specification
Each Purchased Item must be defined with a Material Specification and will be measured against these to see if the incoming material is ‘acceptable’. Create a ‘dummy’ (no elements and physicals) specification for purchased materials not requiring this level of measurement.
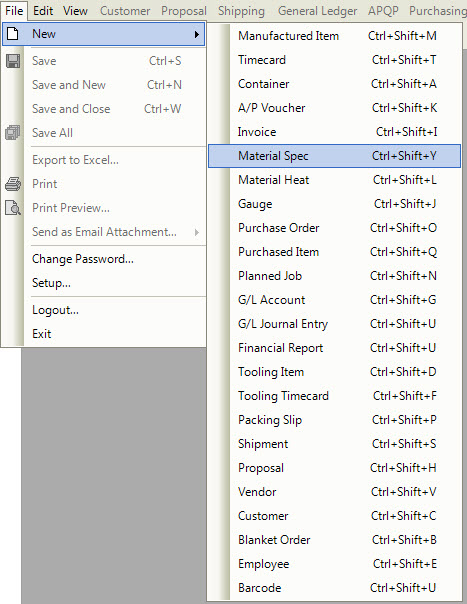
There are three ways in the system to add a new material specification. The first is to navigate to File > New > Material Spec from the menu at the top of the screen.
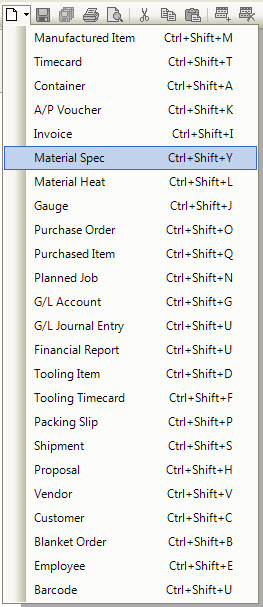
The second way is to navigate to the  button, and select Material Spec.
The third way is to press the Ctrl + Shift and Y keys on your keyboard. All three of these actions will open a new Material Spec screen.
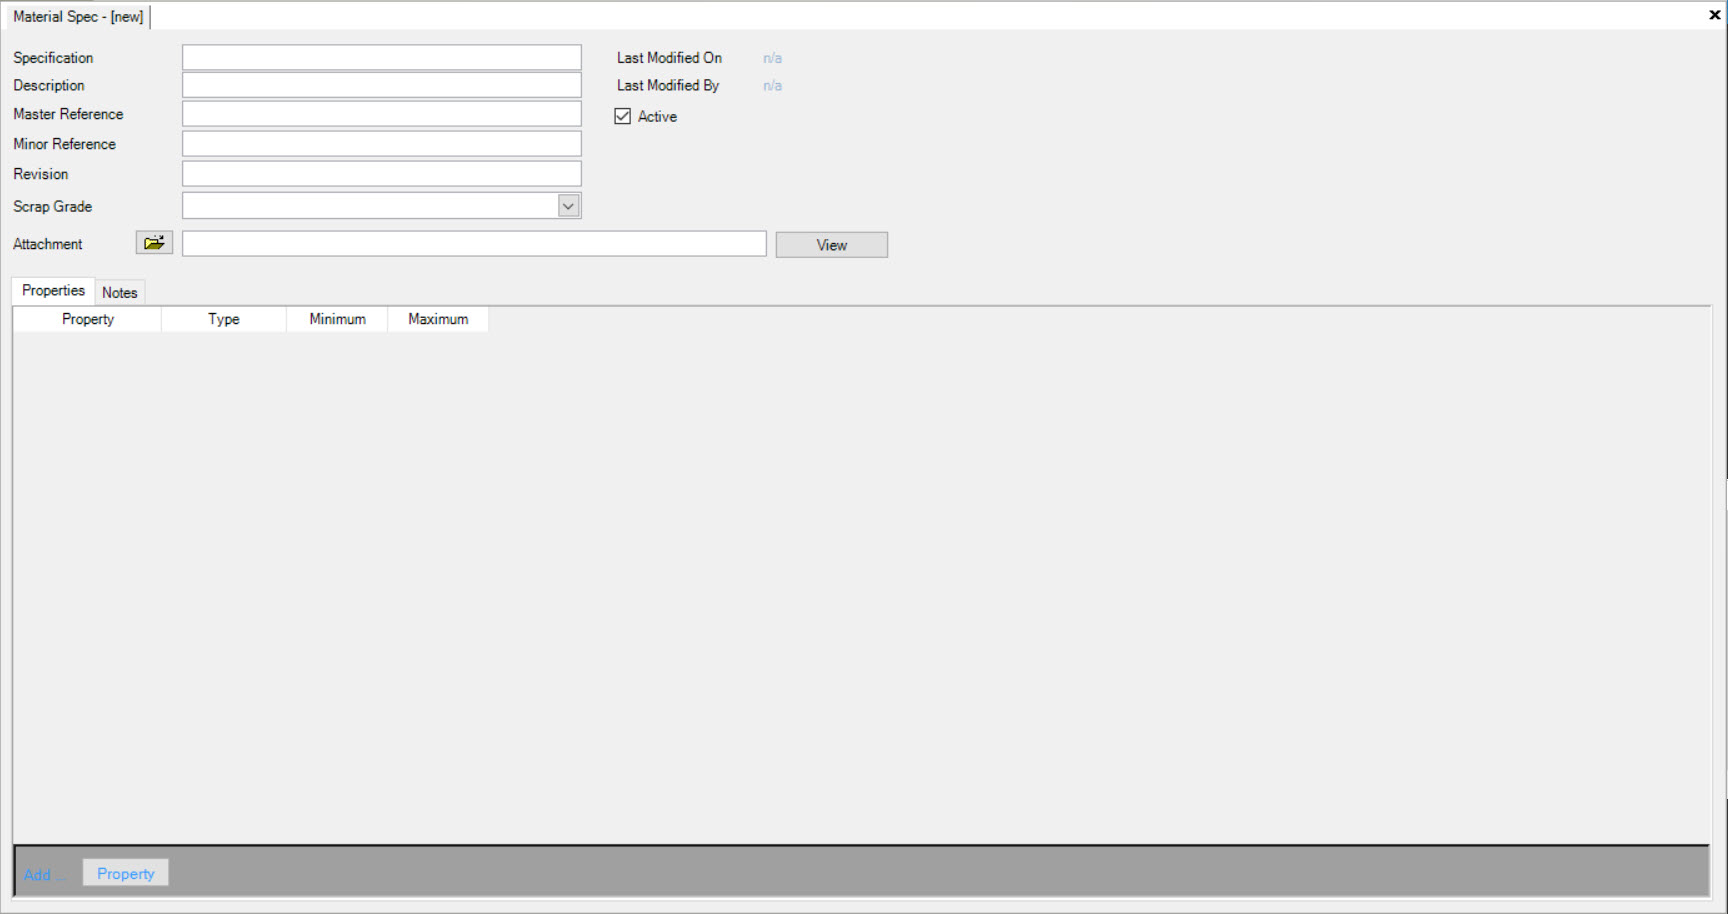
Fill out as much information as you wish to capture on the new Material Spec including Specification, Description, Master and Minor References, and Revision Character. The Material Spec will default as Active unless you click the check box beside Active.
Adding an Attachment to a Material Spec
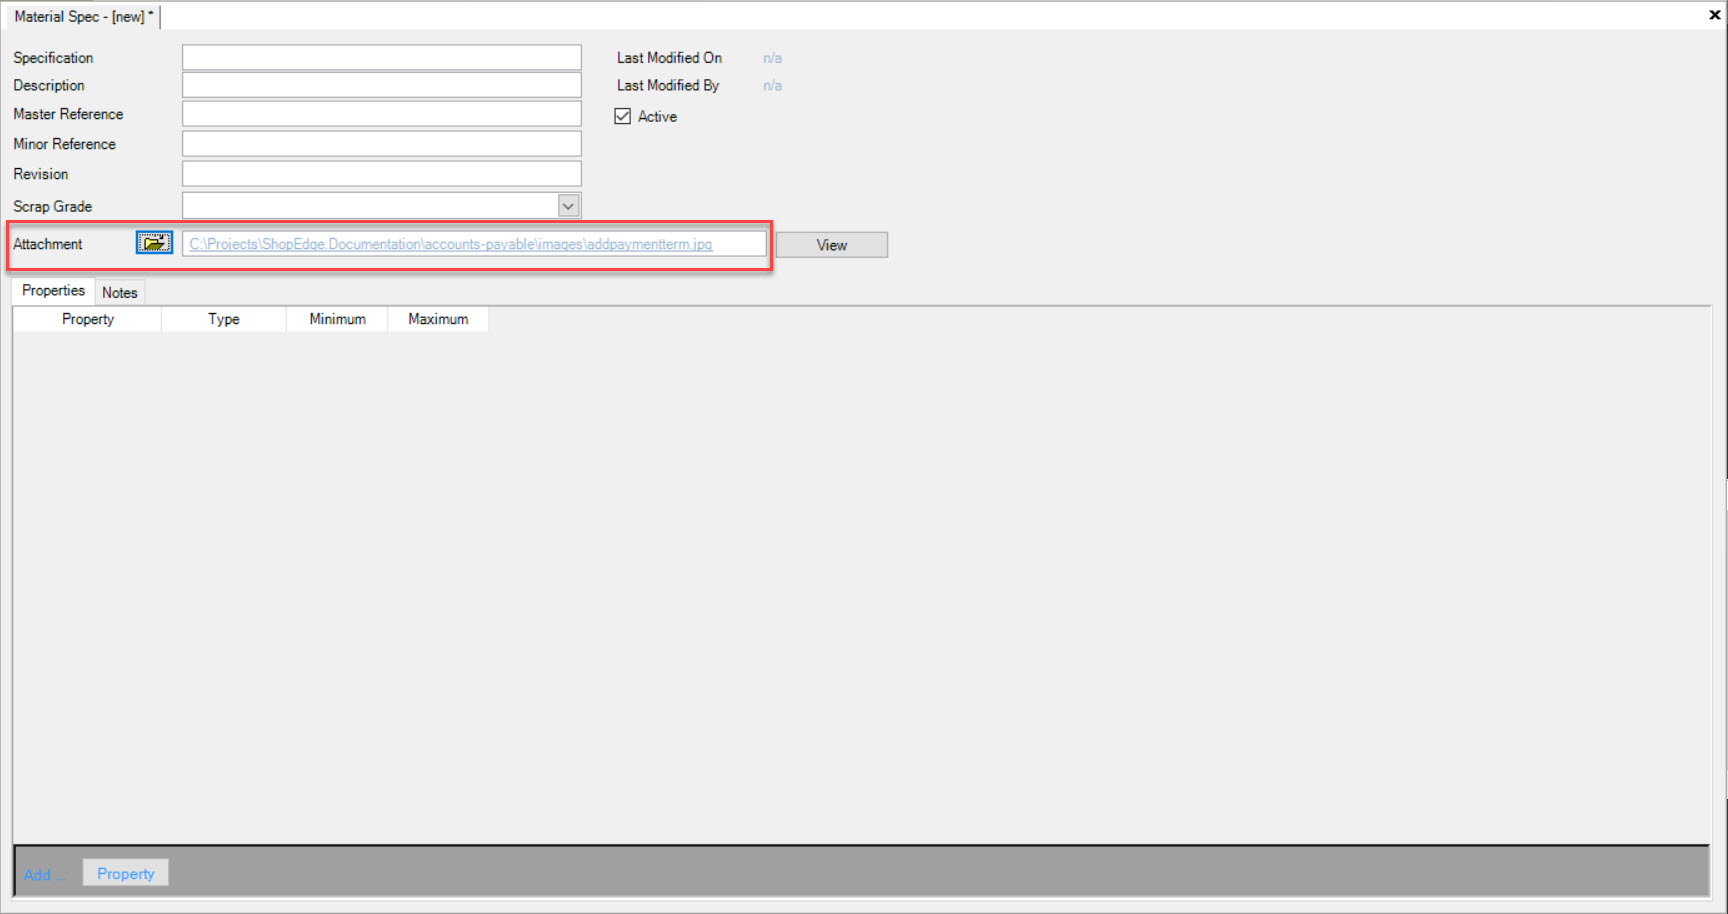
To add an Attachment to a Material Spec, click on the  button, and find the document you wish
to attach, then click on the
  button. You will notice your Attachment in the text box next to Attachment.
Note
ShopEdge supports unlimited file types.
Adding a Property
To add a Property to a Material Spec, click on the  button at the bottom of the screen. This will open the
Find Property screen.
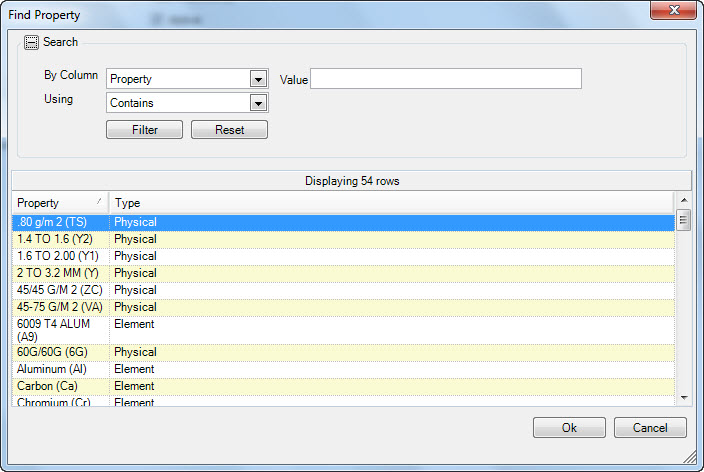
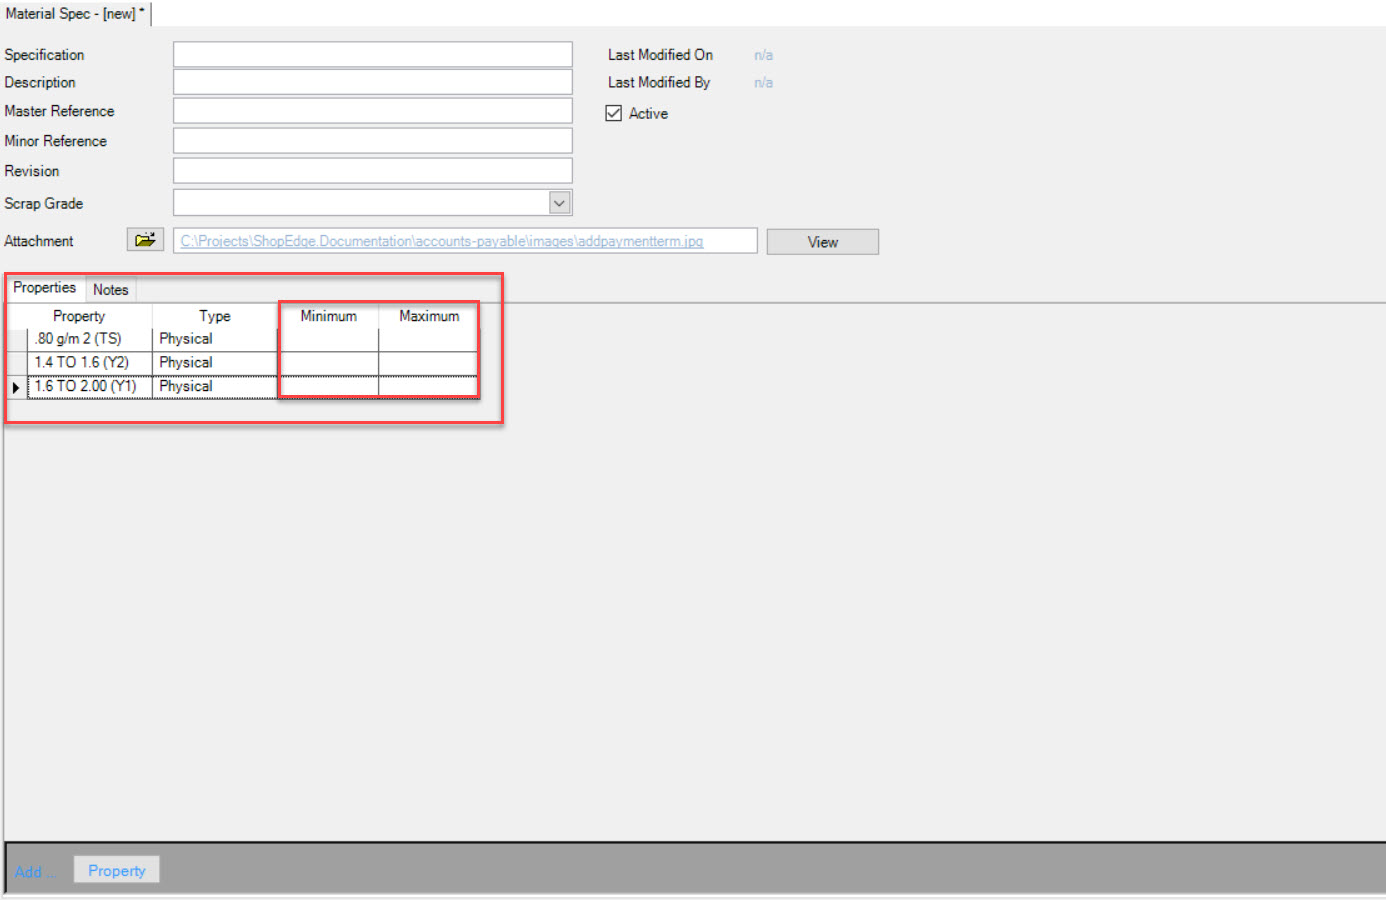
Select the Property or Properties you wish to add to the Material Spec, and click on the  button. This will add the
Property to the Material Spec. You will then have to fill out a Minimum and Maximum value for the Property.
Adding a Note
To add a Note to a Material Spec, click on the  tab. Type the Note into the space provided and save the screen before exiting.
Maintaining a Material Specification
To maintain or make a change to a Material Spec, navigate to the  button, and then select the
  option.
This will open the ‘Material Specification Lookup’ screen.
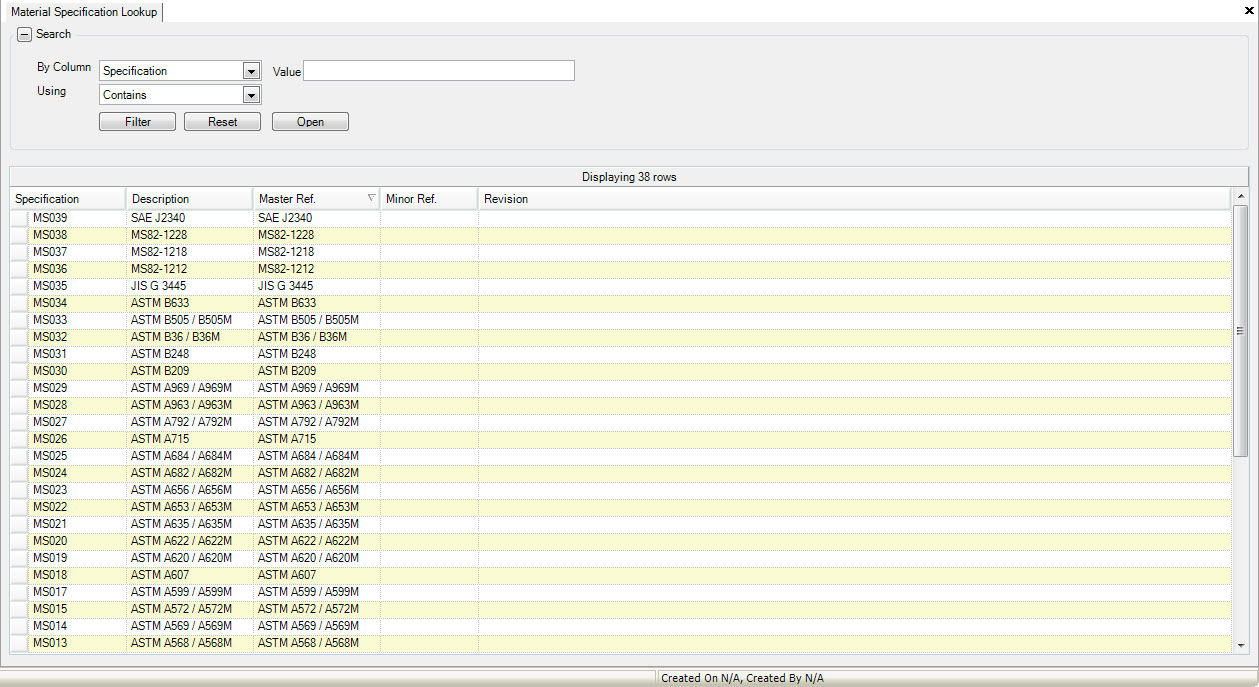
To find the material spec you with to edit, use the ‘Search’ function at the top of the screen, or use the quick sort feature by clicking on the column headings. Highlight the item you wish to open and double click on the row or use the ‘Enter’ key on your keyboard. This will open the ‘Material Spec Detail’ screen.
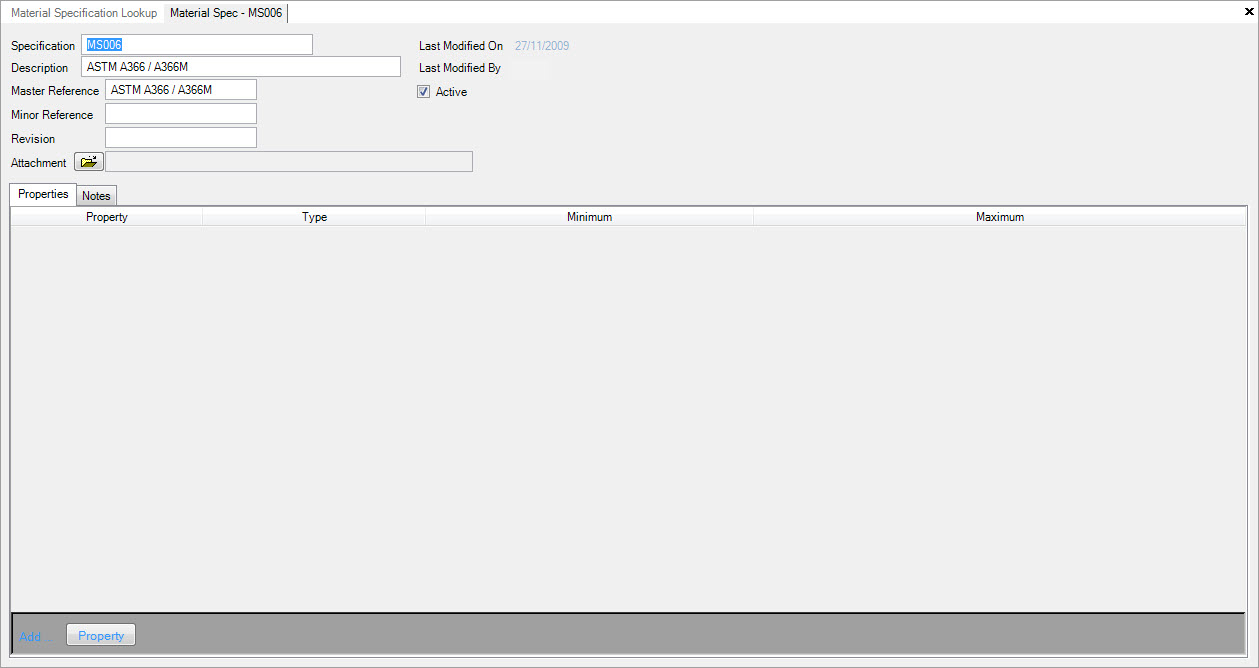
Make your changes to the screen and perform a save before exiting.
Vendor Returns
The vendor return module is used for tracking returns back to a vendor, and for capturing all costs associated with a vendor return. The vendor return module has links to shipping for tracking returned product, and to Accounts Payable for ensuring credits are applied correctly. The vendor return module is also responsible for capturing vendor scrap and returned material quantities for generating vendor quality reports.
Creating a New Vendor Return
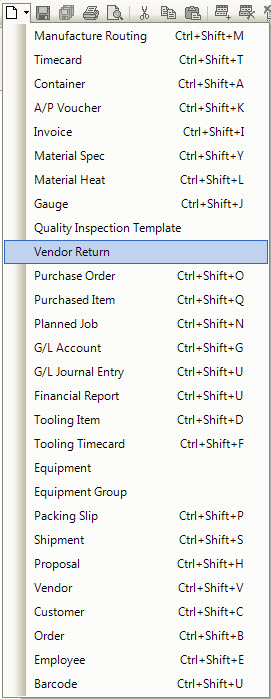
To create a new vendor return, select ‘Vendor Return’ from the new menu option.
This will open a new ‘Vendor Return Screen’.
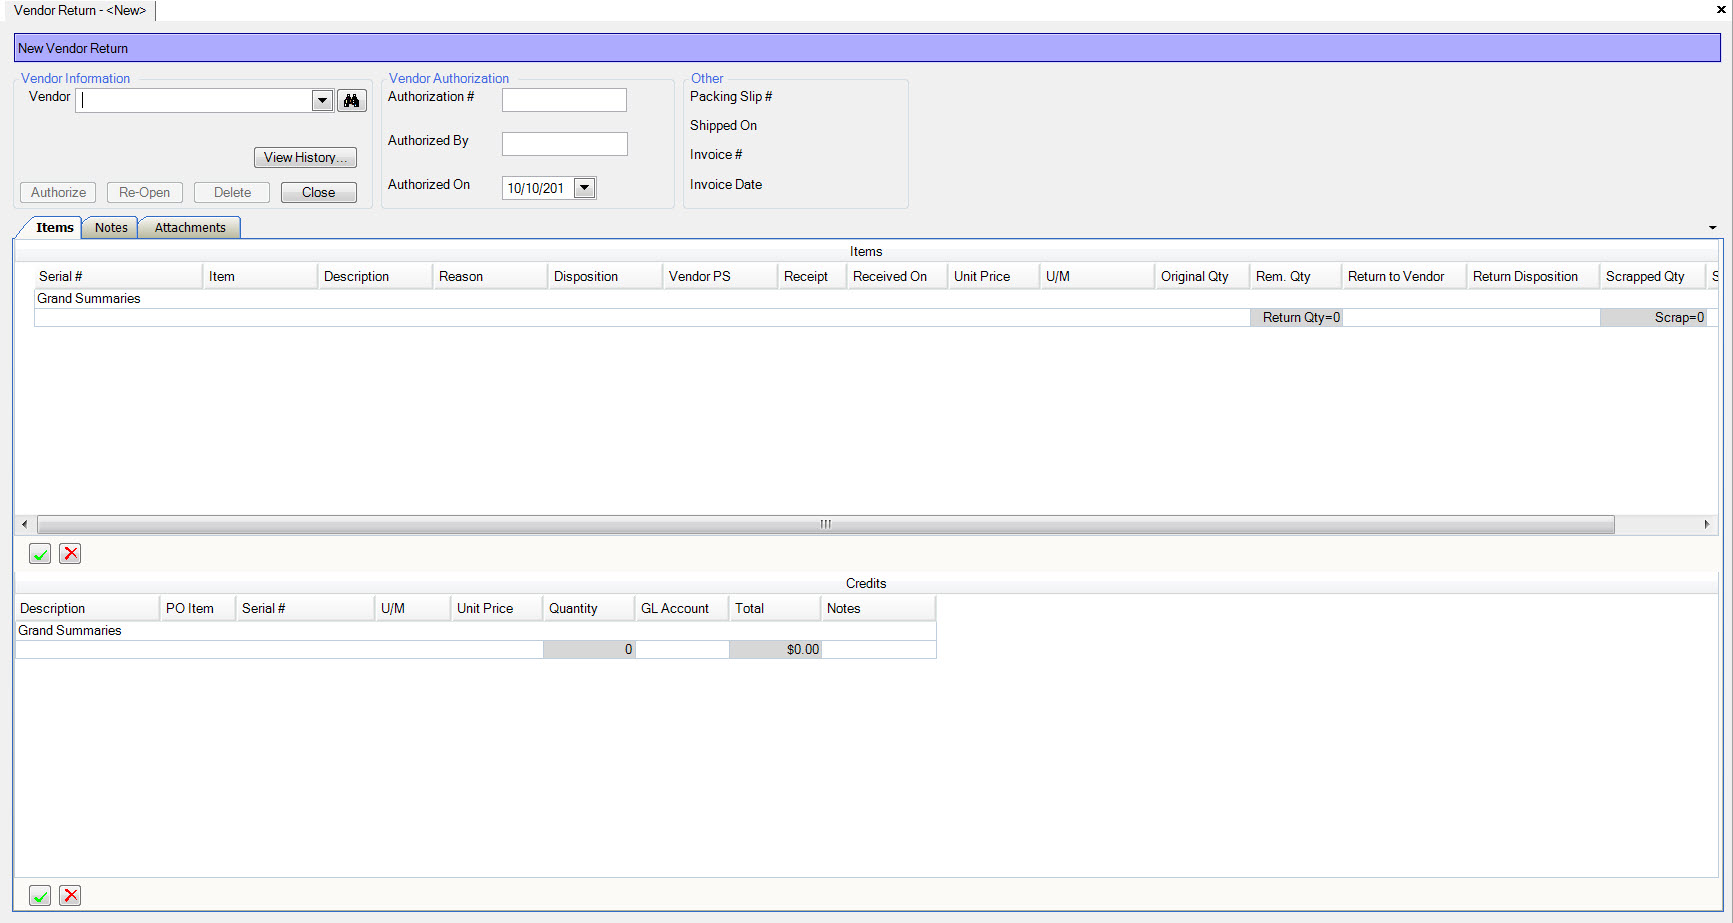
Start by entering the vendor. You can either type the vendor name, select from the drop down list, or use the search function by clicking the  button.
Once the vendor is selected, you can add purchased item tags to the vendor return by clicking the
  button.
A new serial # row will appear. You can either type the serial #, or use the  button to initiate a search.
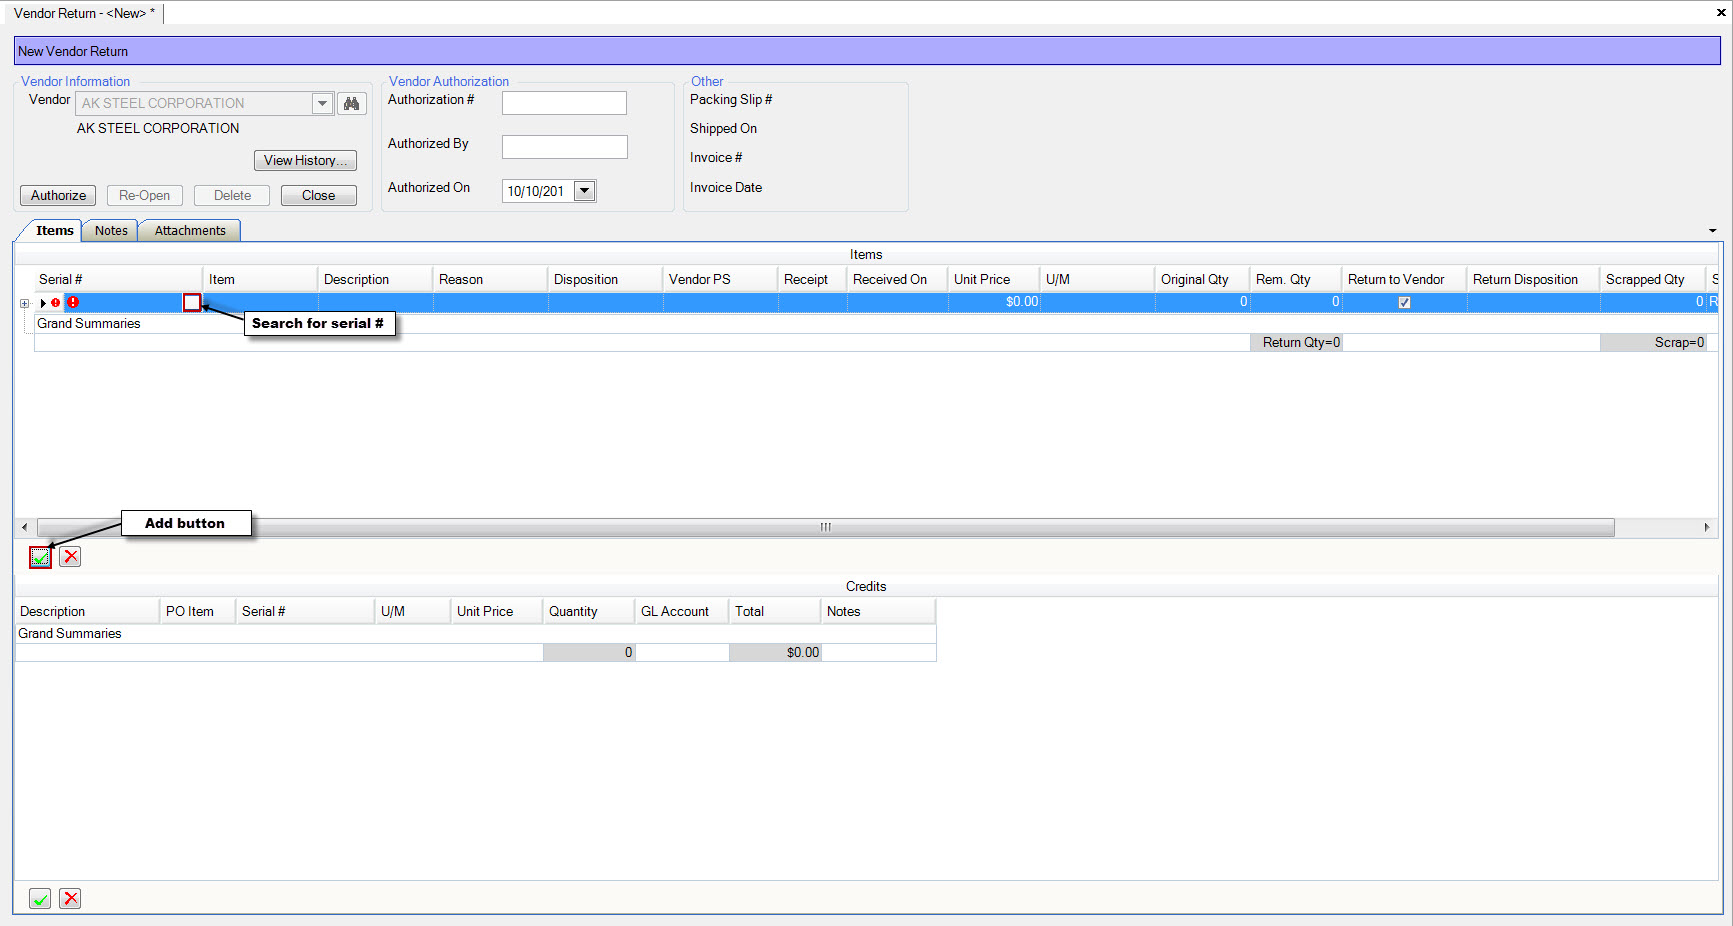
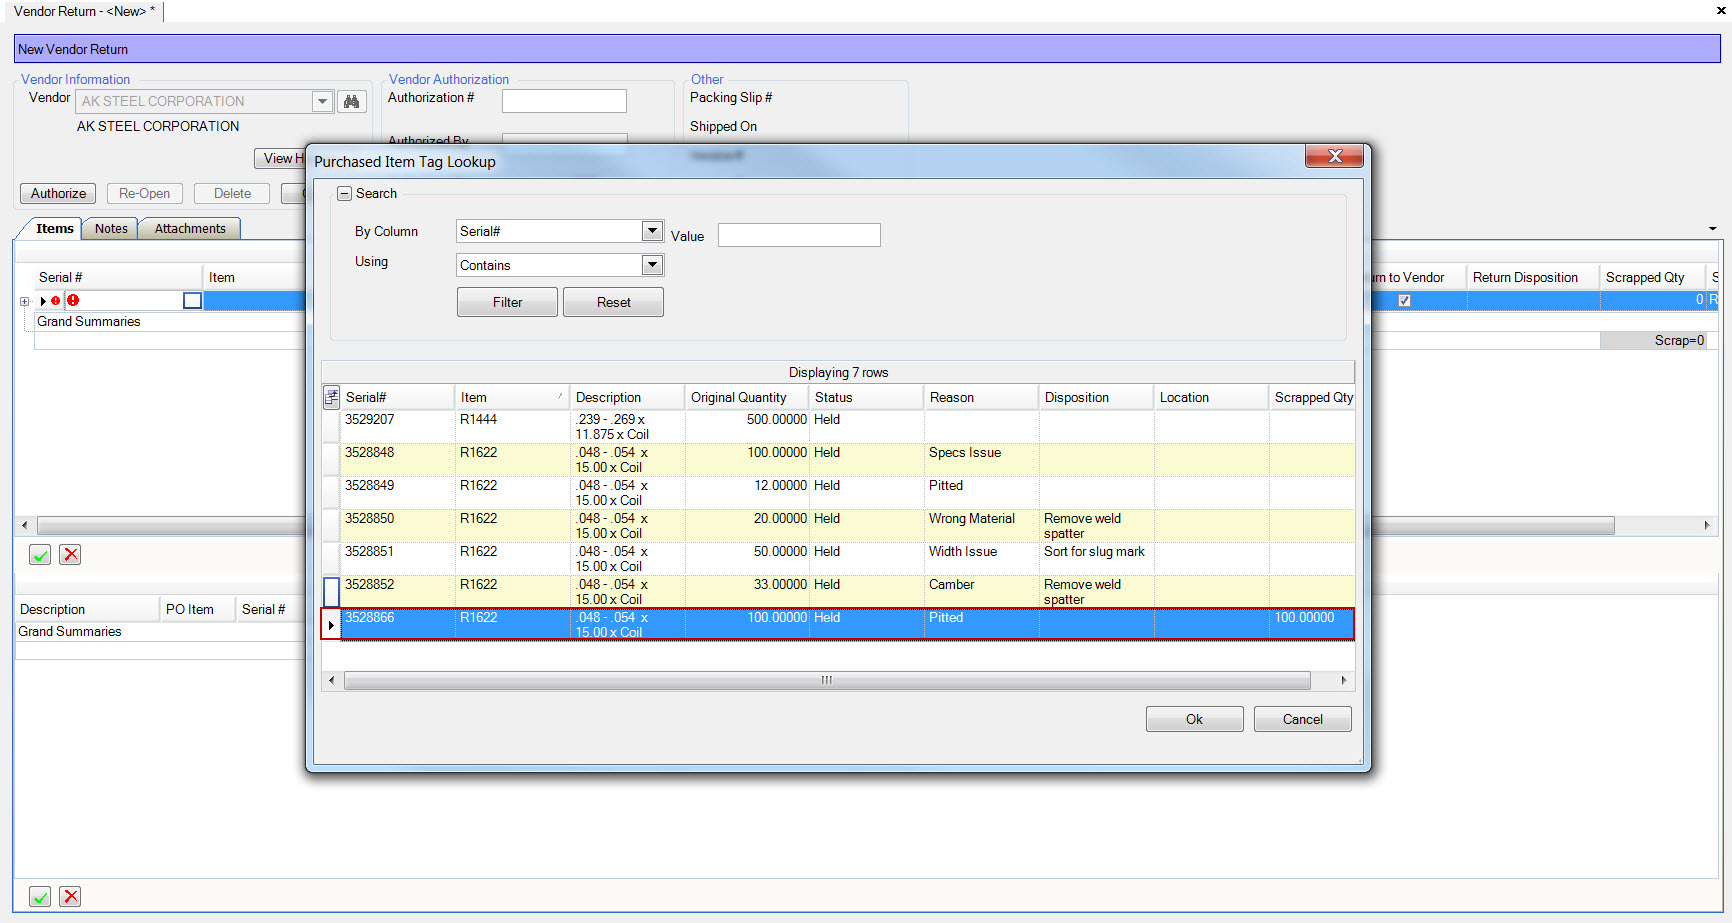
You can only add held or rejected tags to a vendor return. Once you select the serial #, the tag details will appear.
You can return the serial number to the vendor, record internal scrap against the vendor, or both. The quantities recorded as part of the vendor return will be used to generate a vendor quality report that measures the amount of product with quality issues against the vendor.
Returning to a Vendor
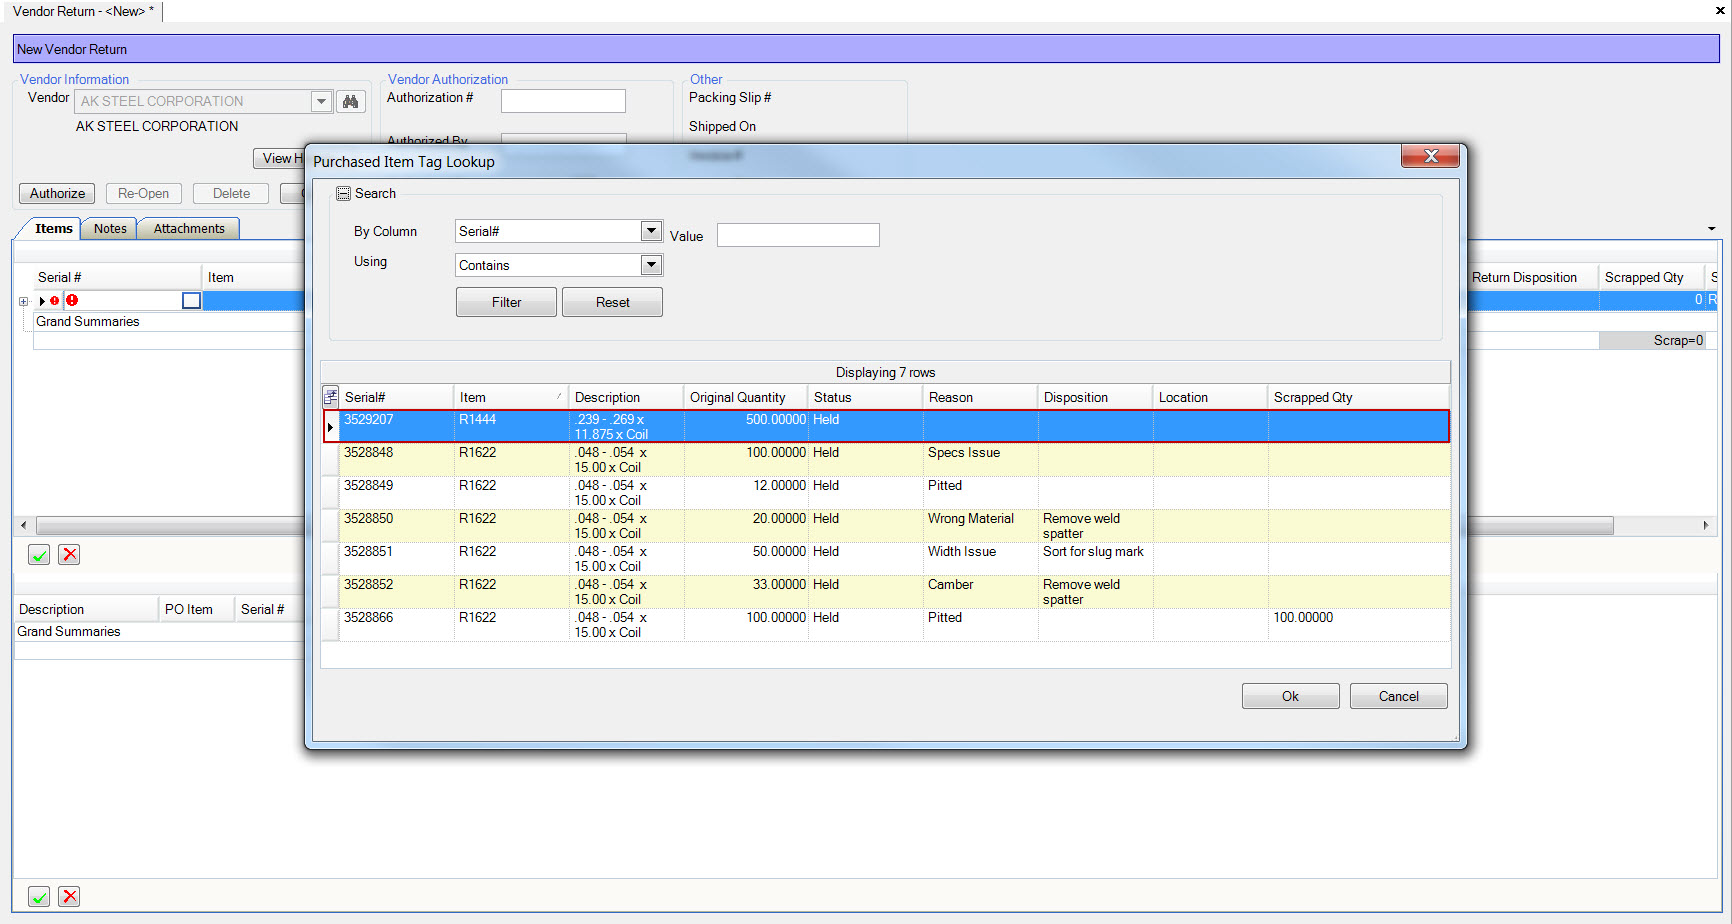
When the  button is used the Purchased Item Tag lookup screen is displayed, select the serial number
to return to the vendor and click the
  button.
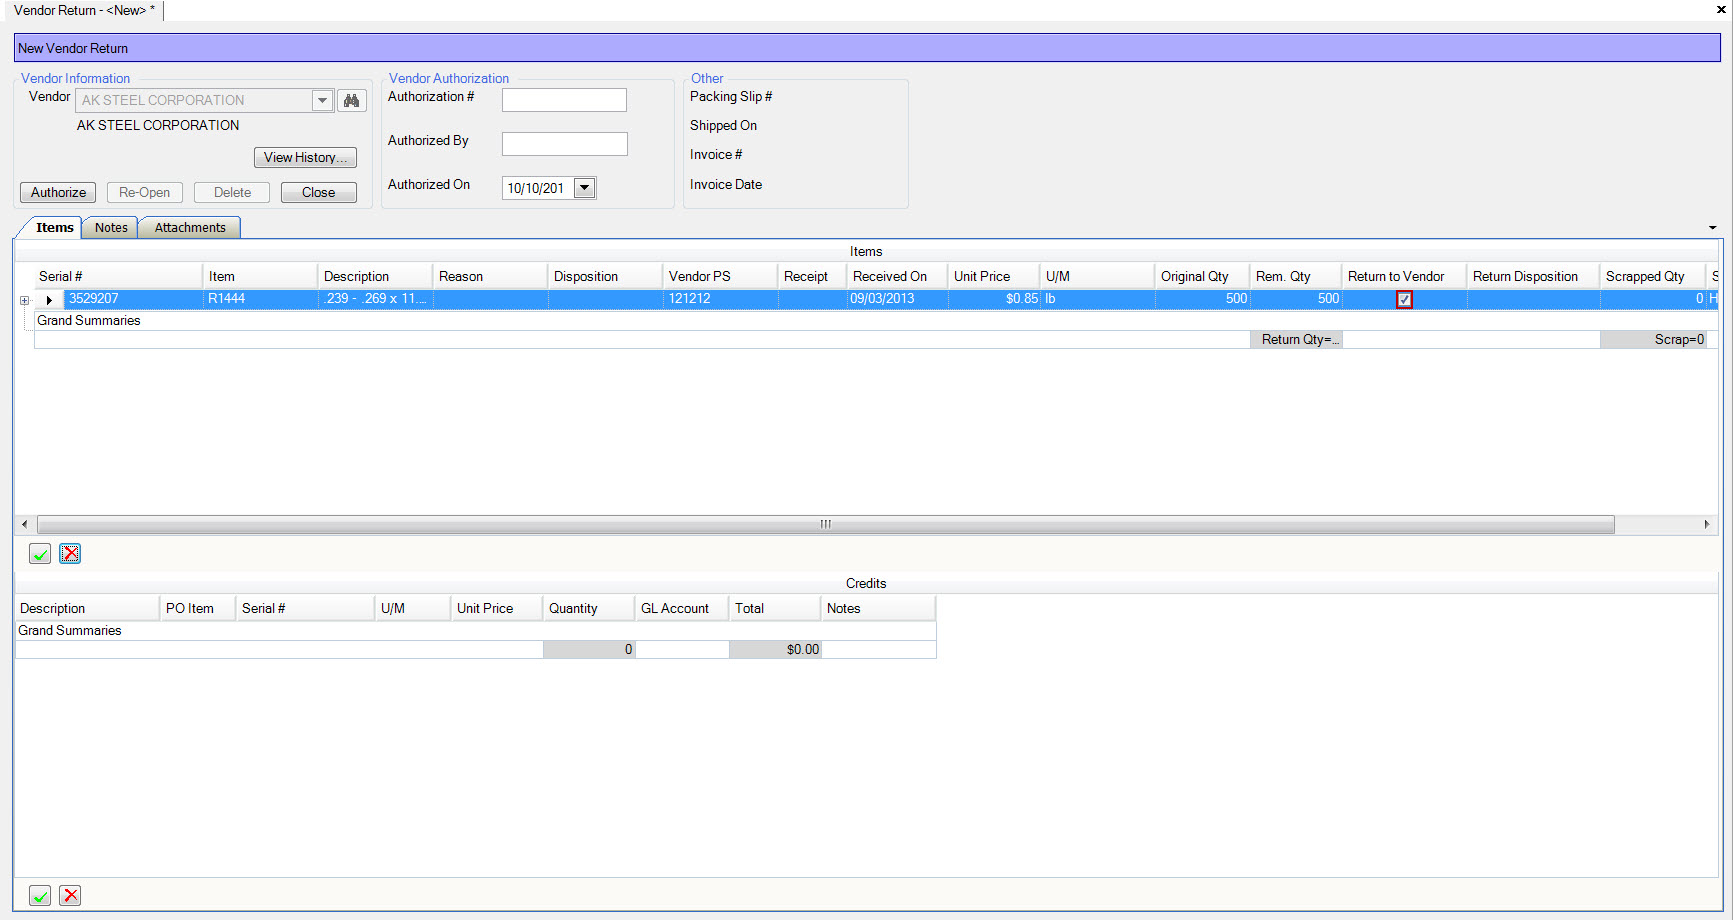
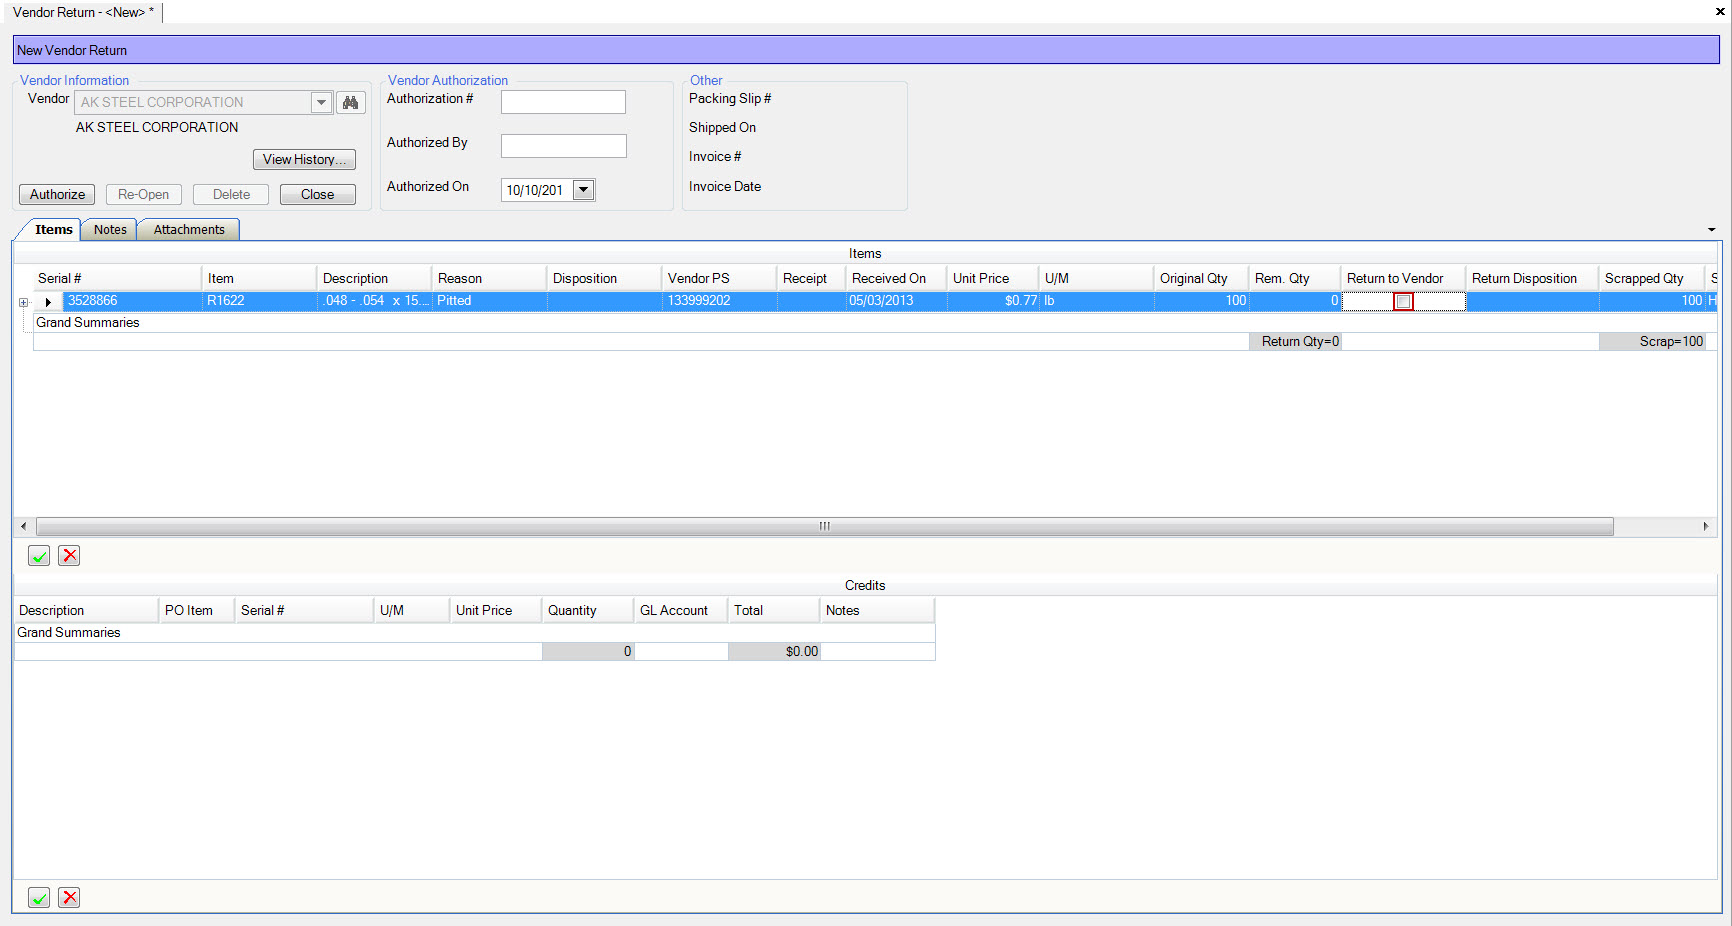
To return a serial number back to the vendor, check the ‘return to vendor’ checkbox. The quantity to return will default to the remaining quantity on the serial number.
Recording Internal Scrap
To record internal scrap against the vendor the transactions must be created beforehand using the Q/A module on the handheld scanner or the held purchased tags function in the Q/A module in ShopEdge.
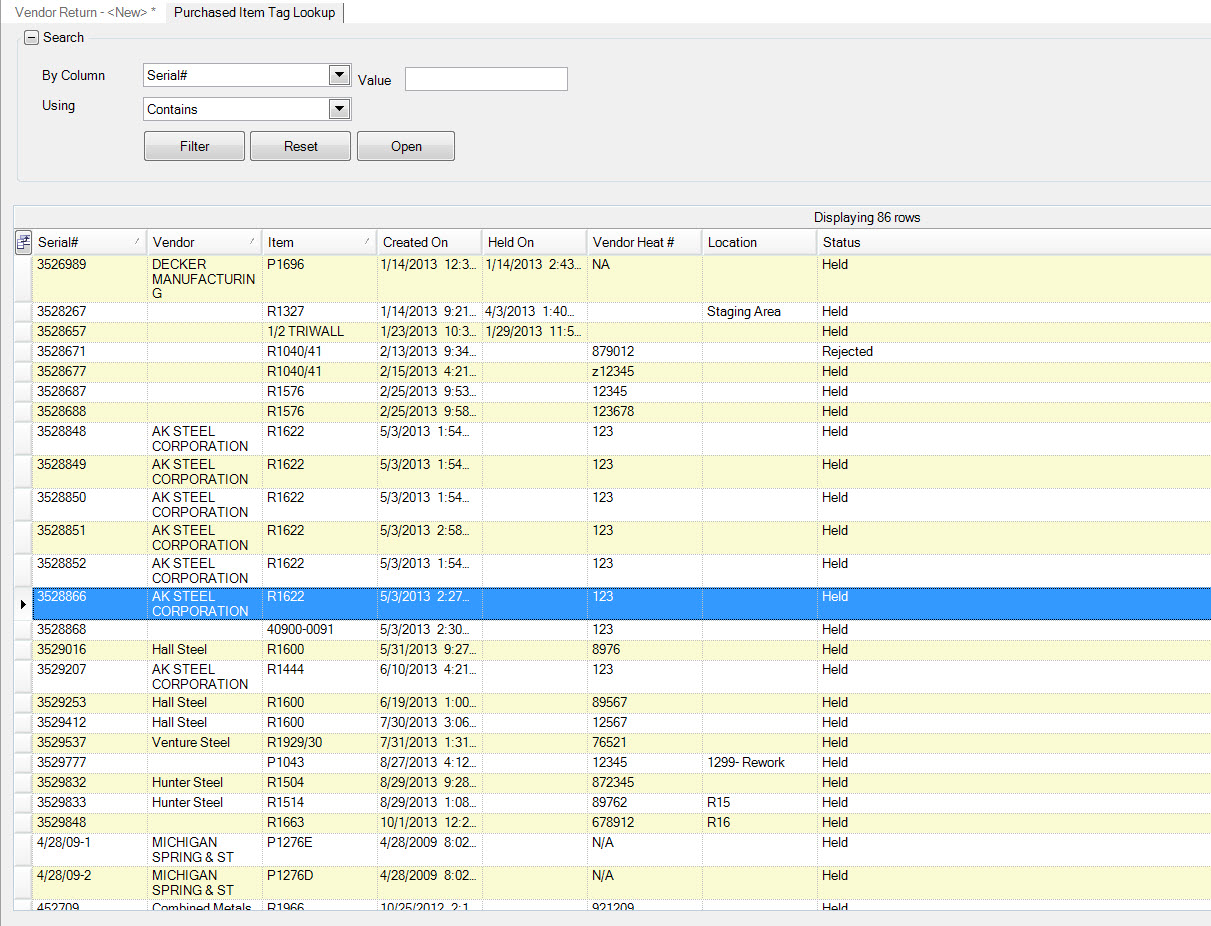
Click the  button to display the Purchased Item Tag lookup screen.
Then select the serial number for the item to scrap by double clicking the row.
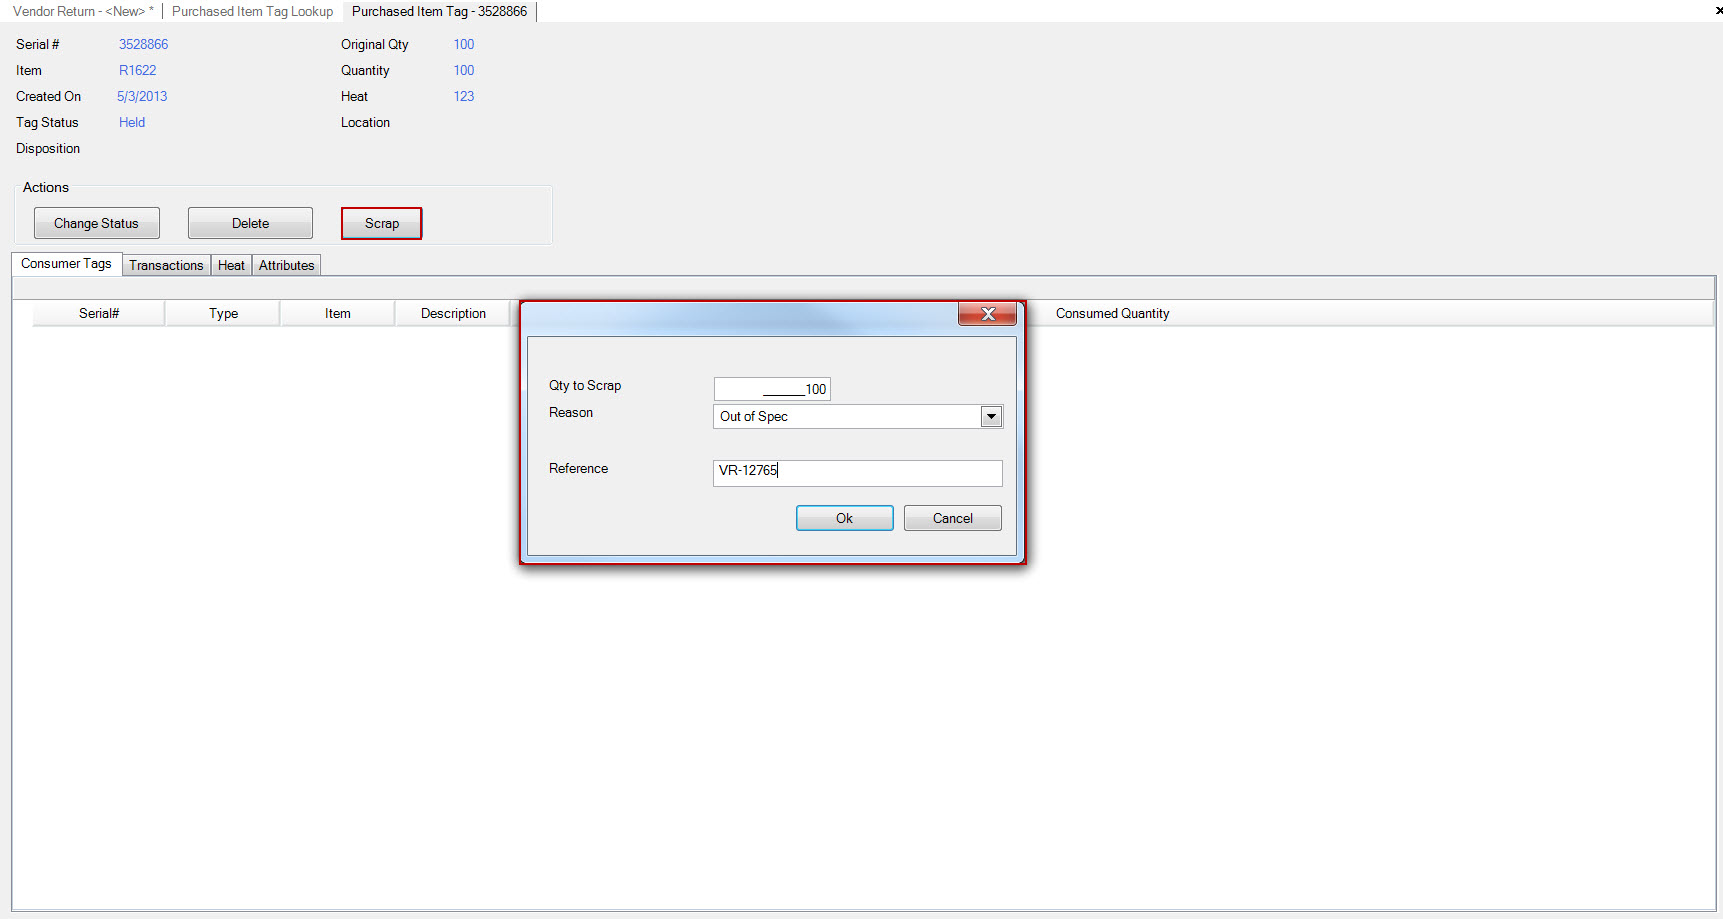
The Purchased Item Tag detail will be displayed. Click on the  button and a screen will be displayed
with the Qty to Scrap, Reason and Reference. The Qty to Scrap will default to the quantity remaining on the tag and this can be changed. Select a Reason and enter a Reference
and click the
  button.
Note
*** Purchased Item Scrap Reasons are located in the Purchasing module under Admin ***
To record the internal scrap against the vendor, click the  button and the Purchased Item Tag lookup screen is displayed.
Select the serial number to scrap and click the
  button.
To record the internal scrap against the vendor, uncheck the ‘Return to Vendor’ checkbox. The scrap quantity will default to the remaining quantity on the serial number.
The scrap transactions against the tag can also be displayed by clicking the plus icon beside the row. Select the appropriate transaction(s) to record against the vendor by clicking the ‘include’ check box.

Adding Credits
You can add credits to the vendor return by adding line items on the ‘credits’ tab.
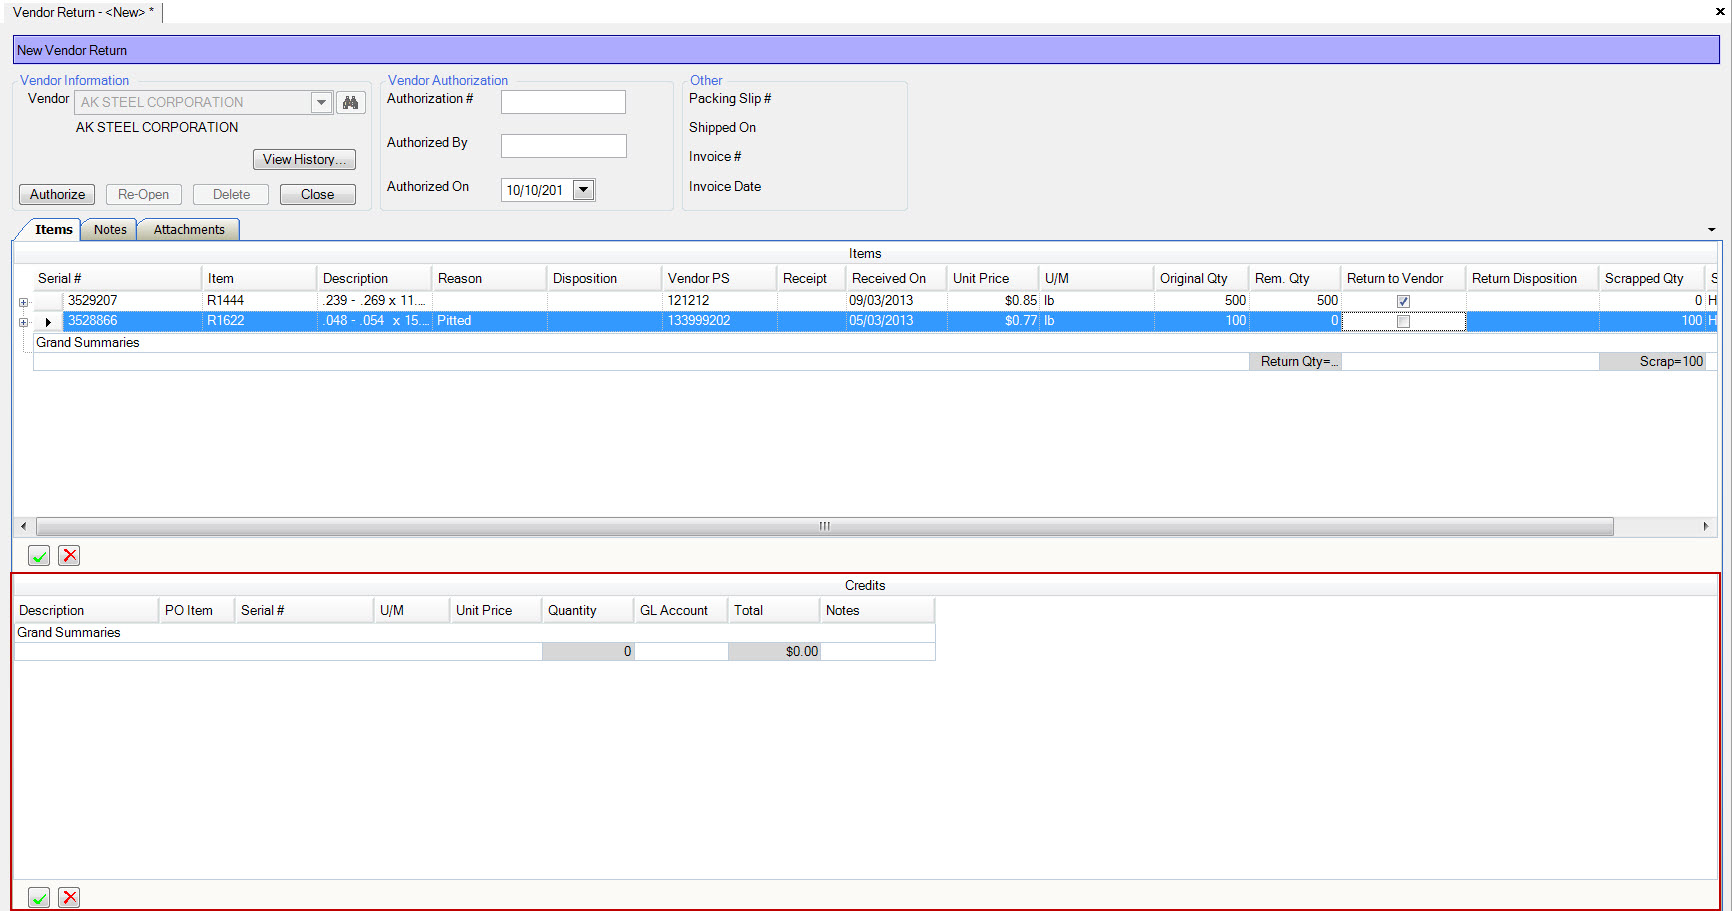
You can add as many credit lines as you want by using the  button at the bottom of the screen
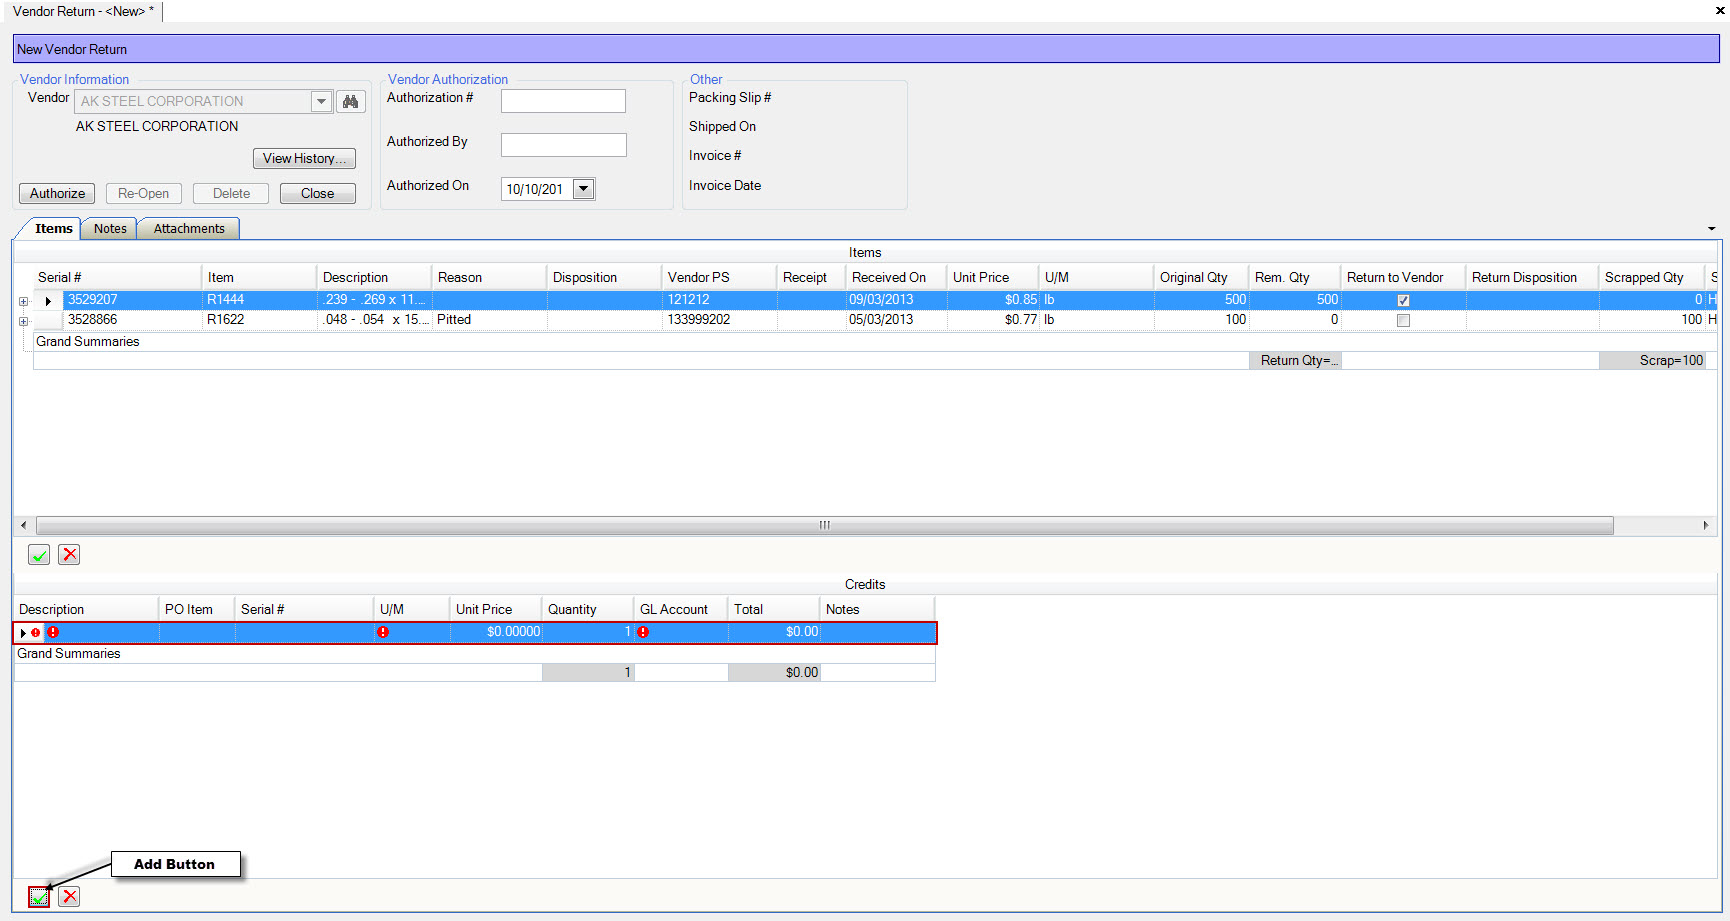
Enter the required credits information.
Note
***** The quantity must be entered as a Negative Quantity in order to flow through correctly to AP *****
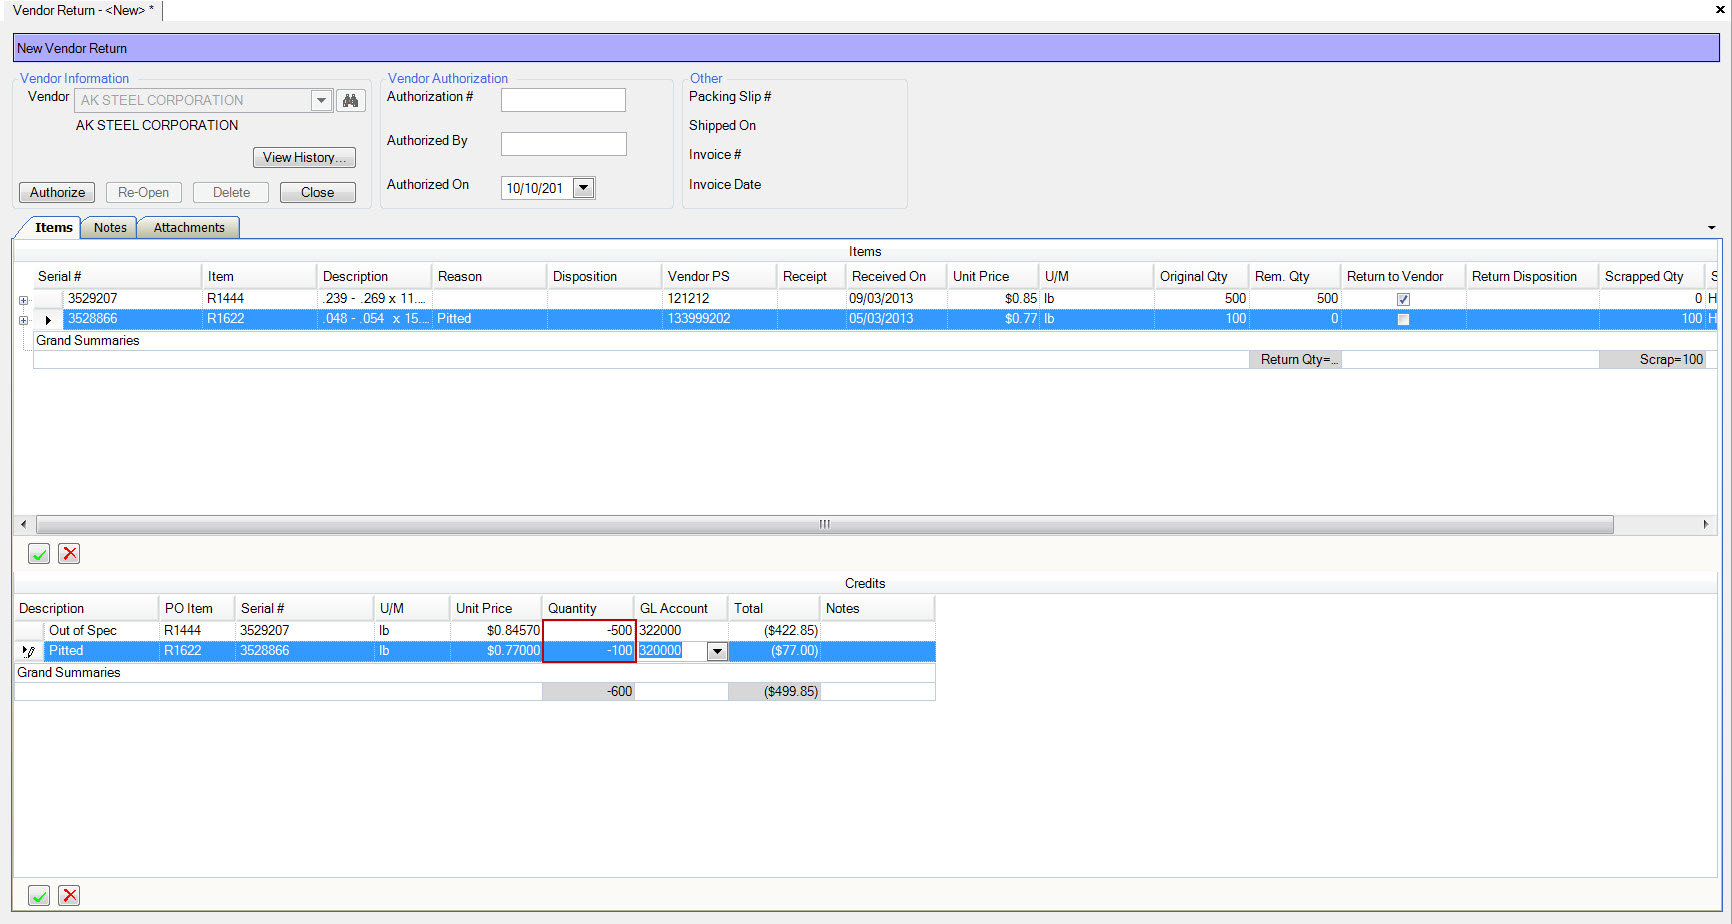
Any credits you add to the vendor return will show as a non-invoiced credit in the accounts payable module.
Authorizing a Vendor Return
Once you’ve completed the vendor return by adding the items and credits, you can authorize the return by completing the vendor authorization information, then click the ‘authorize’ button. Once the return has been authorized, you can no longer make changes, and the credits will be created in the accounts payable module. You can re-open the return any time by clicking ‘re-open’.
Vendor Credit Notes
To create a credit note for the vendor, start by creating a new A/P Voucher. Then click add vendor p/s on the packing slips tab. The vendor return will show as a credit that can be invoiced. The system will keep track of any credits that have not been invoiced by maintaining them in the list until invoiced.
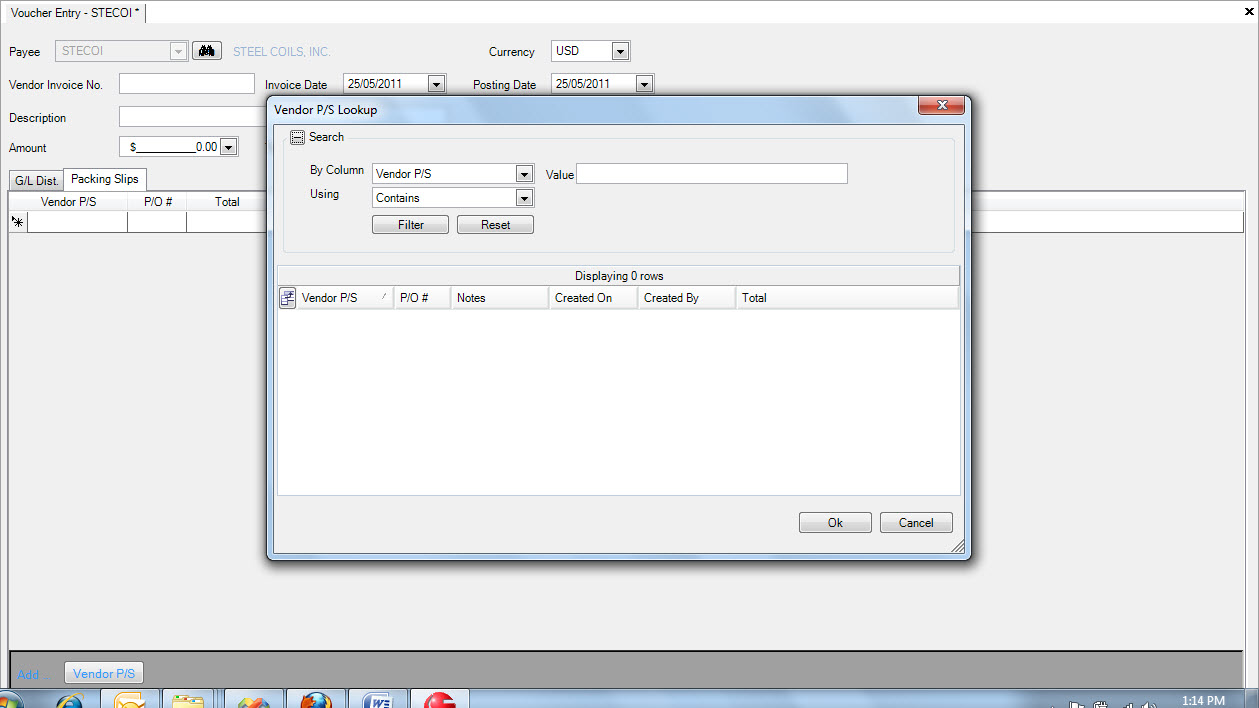
Shipping to a Vendor
To ship back to a vendor against the return, create a new packing slip, and select the ‘vendor return’ type.
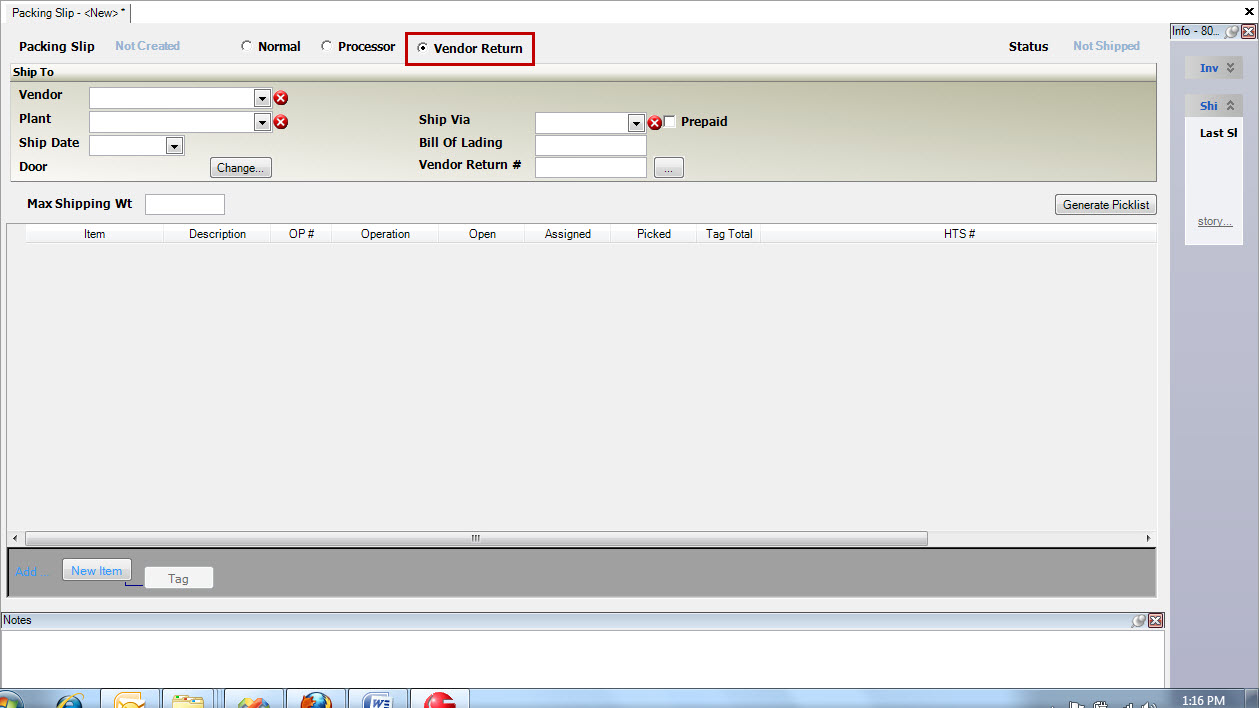
Then select the vendor return # by typing in the number or using the lookup.
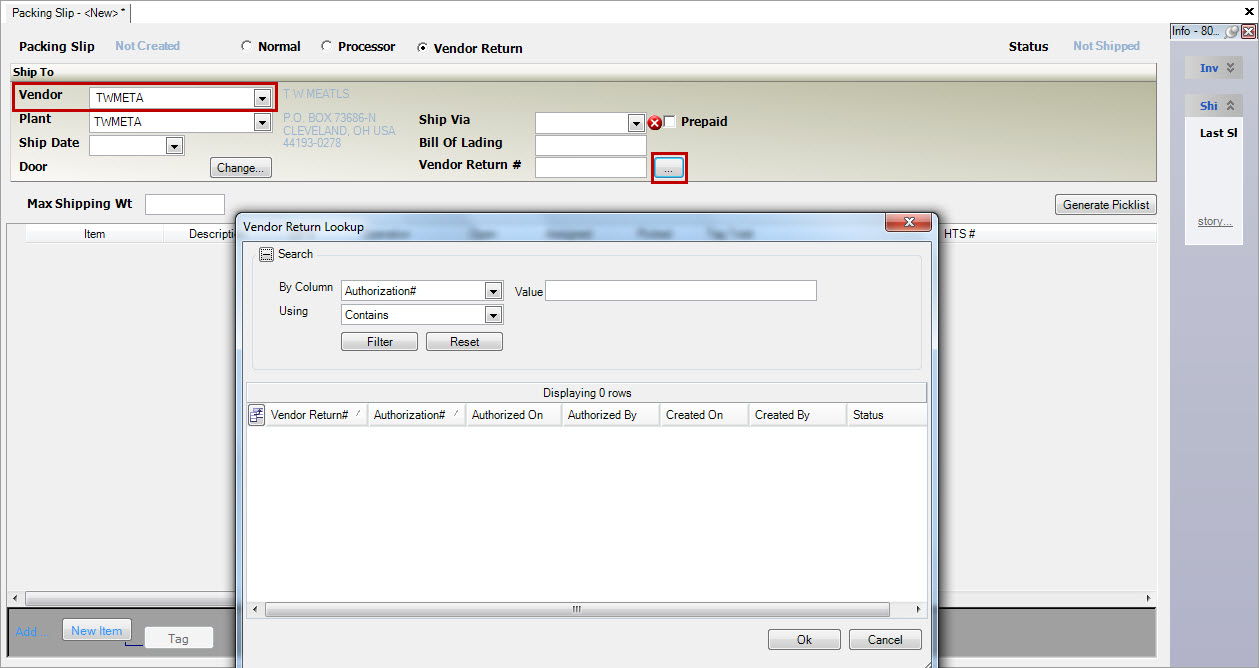
Once you select the return, the tags will be added to the packing slip for shipping.
Held Tags
Tags that are placed on hold in the system can be handled either in the ShopEdge system on your desktop, or on the handheld/forklift application (see Chapter 13; Q/A). When a tag is placed on hold at a workcenter, in quality
control, or throughout the plant, you can review the tag and take further action by navigating to the  button, and then select the
  option.
This will open the ‘Held Tags’ screen.
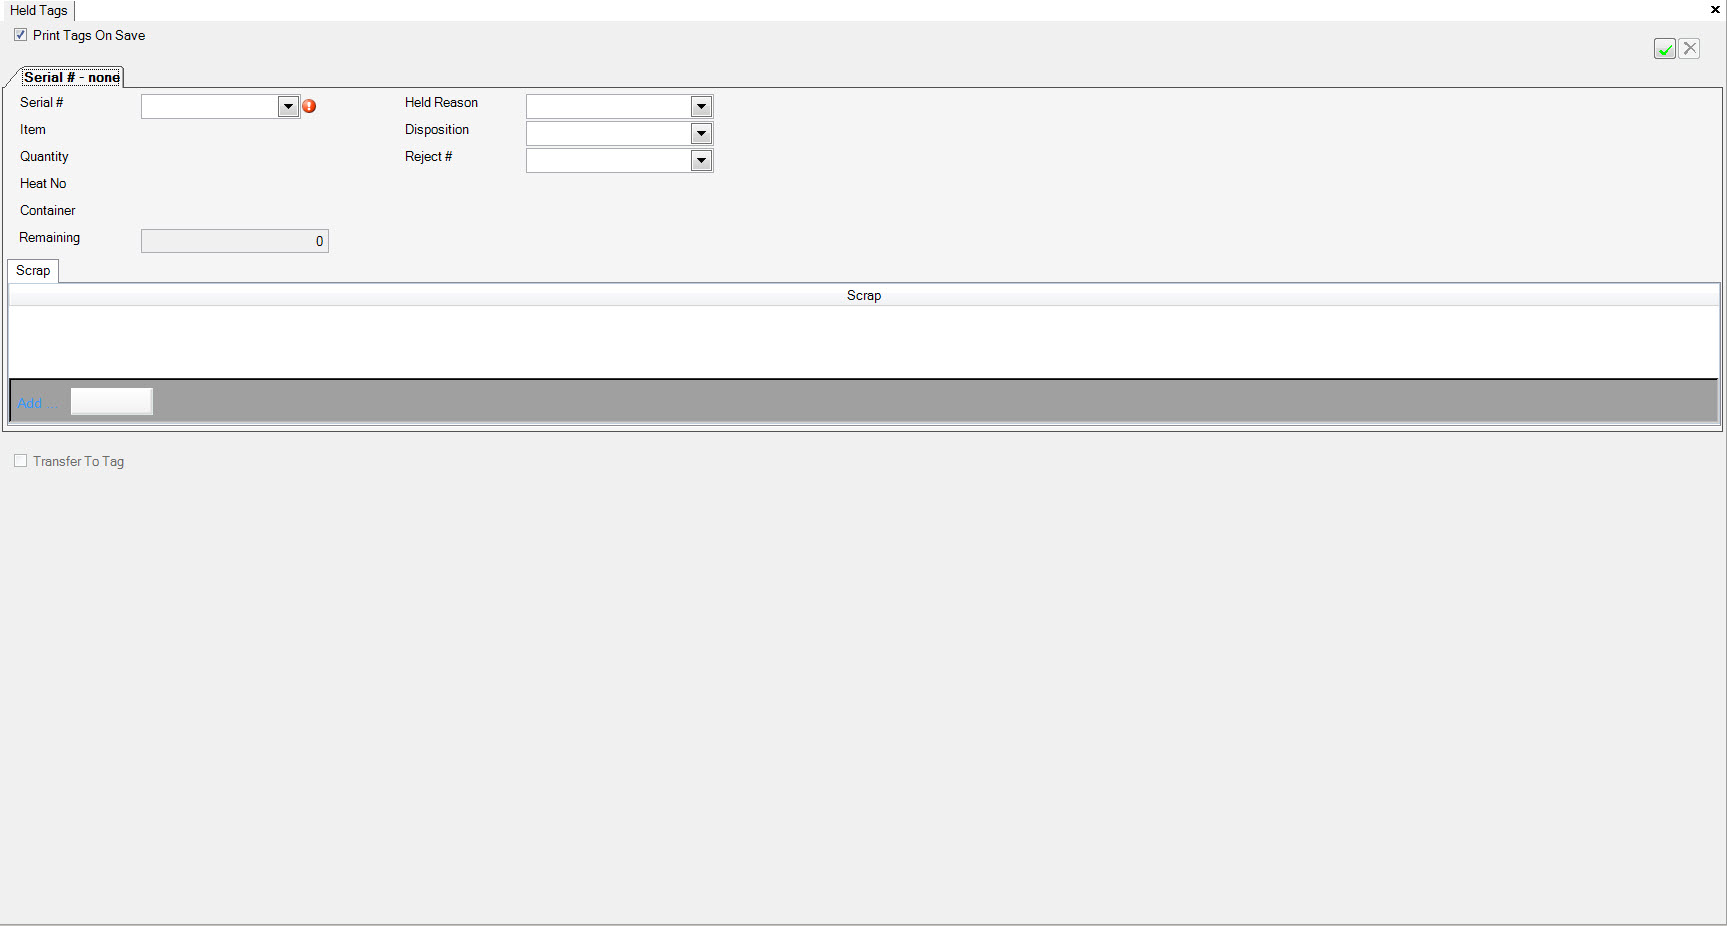
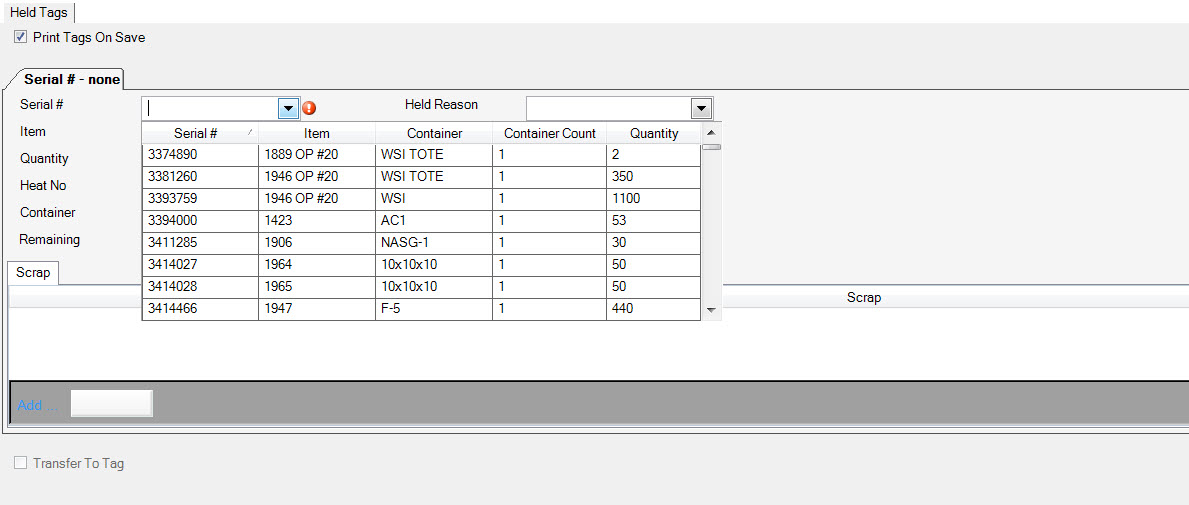
This screen is used to maintain all held tags in the system. Tags are placed on hold at the workcenter, in Q/A, shipping, and various other places in the system. All tags that are placed on hold can be viewed using the dropdown option beside ‘Serial #’.
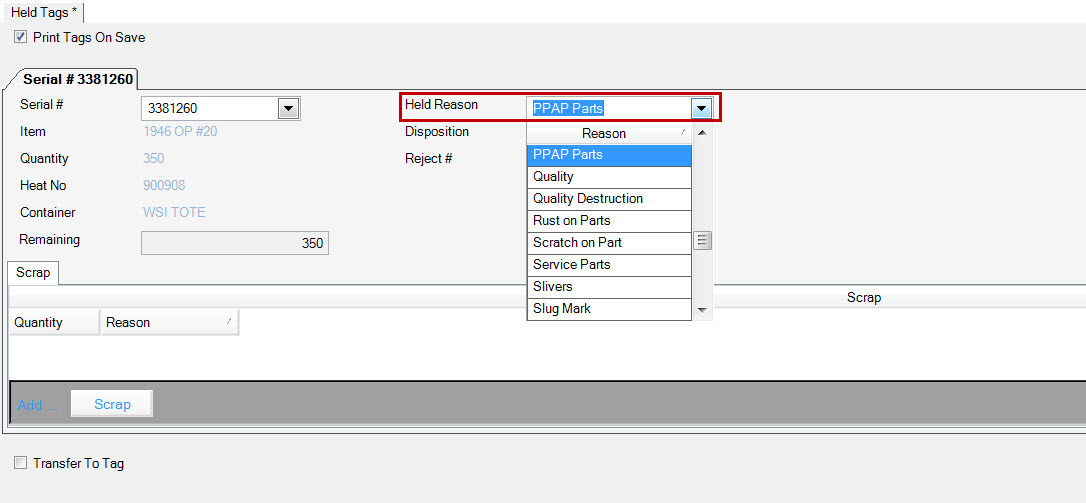
You can change the held status of a tag by selecting the tag, and then using the drop down menu beside ‘Reason’ to select a held reason.
You can change the disposition by using the drop down menu beside ‘Disposition’ to select a disposition.
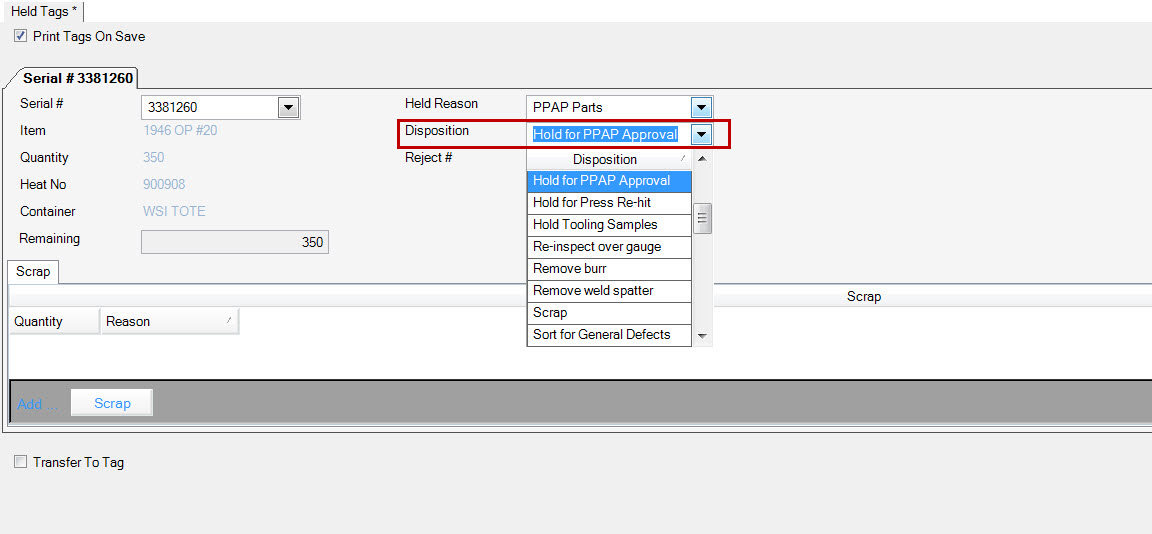
You can change or assign a tag the reject # by using the drop down menu beside ‘Reject #’ to select a reject #.
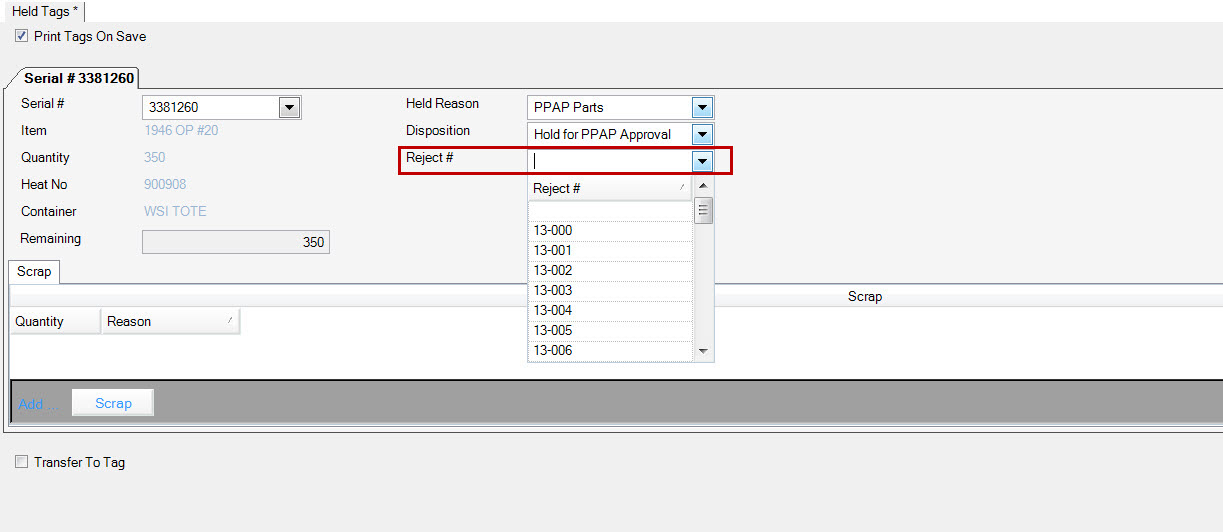
Save your changes.
Changing Tag Status
To change the status of a tag from held to good, find the tag you wish to modify by typing in the serial number, or selecting the number from the drop down menu provided. The system will then populate the item, quantity, heat number and container if applicable.
Complete
Check the  and
the Transfer To Tag information will be displayed.
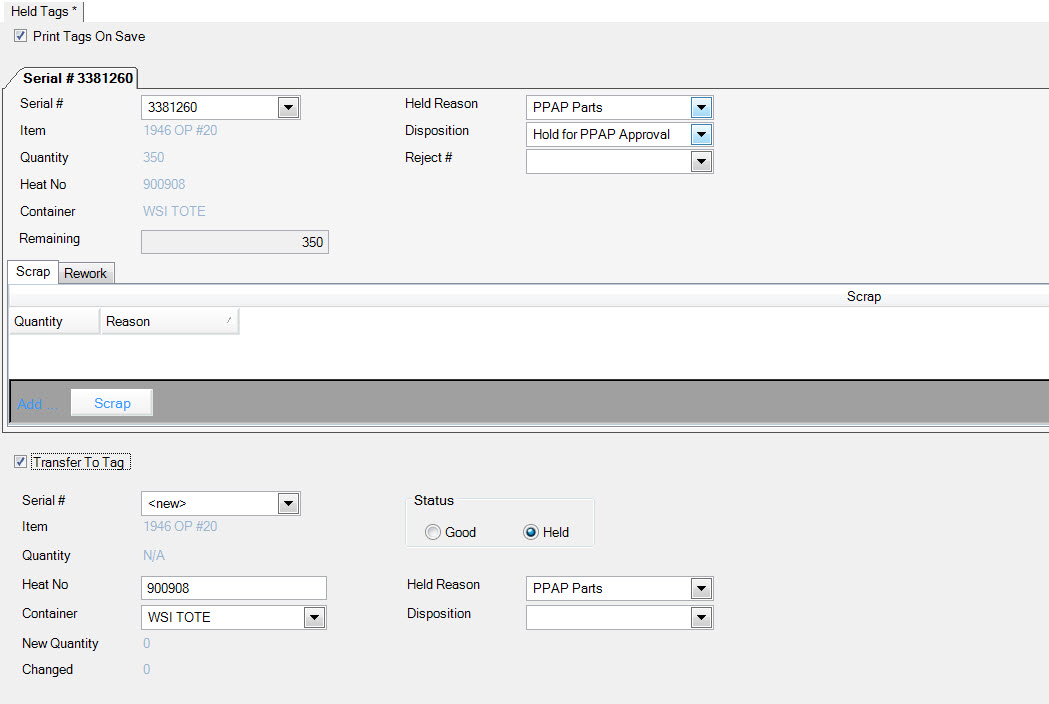
Select the option ‘Good’ under the ‘Status’ section. Click the  tab
and then the
  button.
Enter the rework quantity and select a reason from the drop down menu. The quantity will be populated in the New Quantity and Change field.
Save your changes.
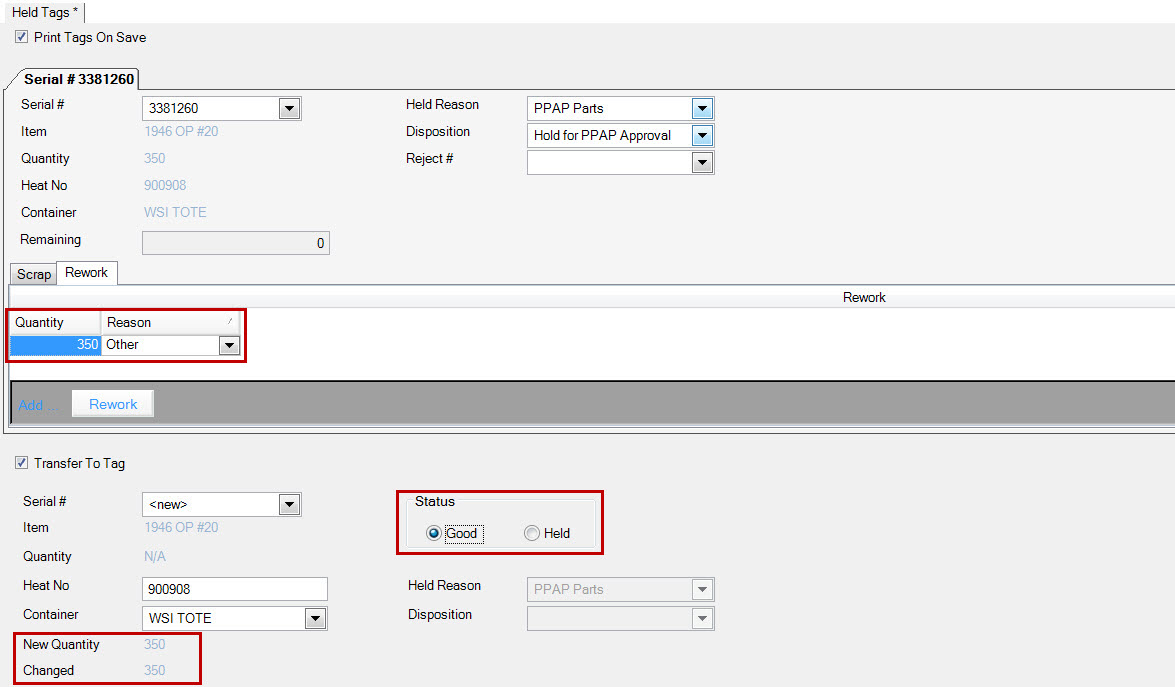
Partial
You can also make a certain number of items ‘Good’, and scrap the other items.
Check the  and the Transfer To Tag information will be displayed.
Click the
  tab and then the
  button.
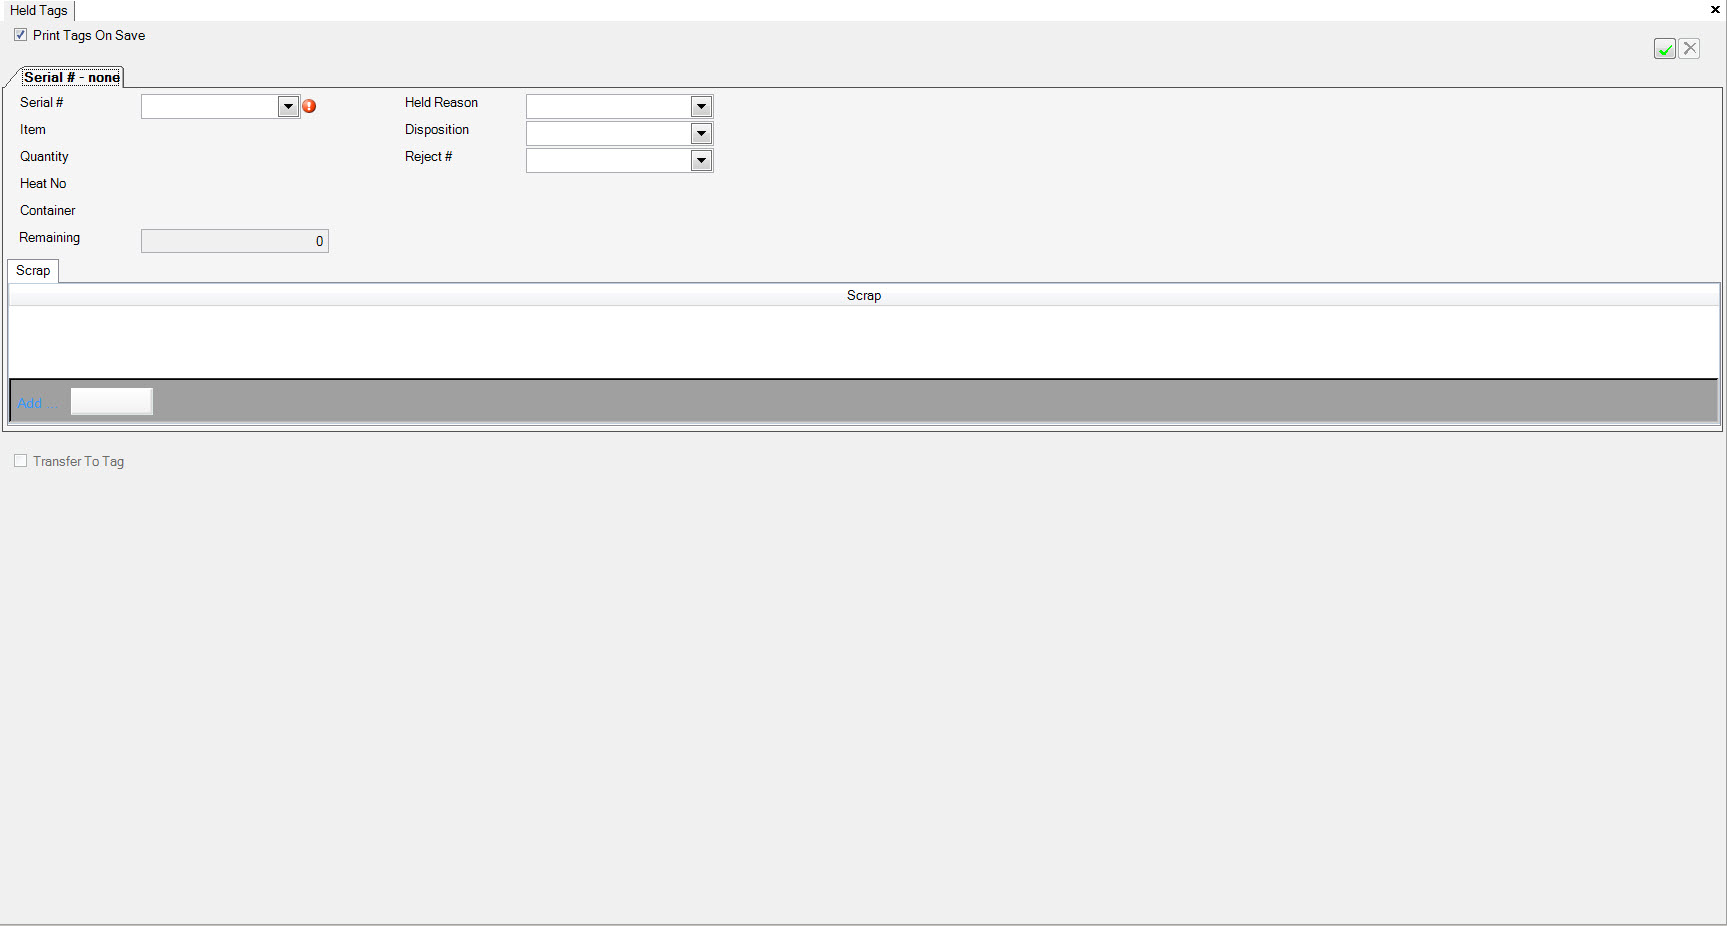
Enter the scrap quantity and select a reason from the drop down menu. The quantity remaining will decrease by the number you input.
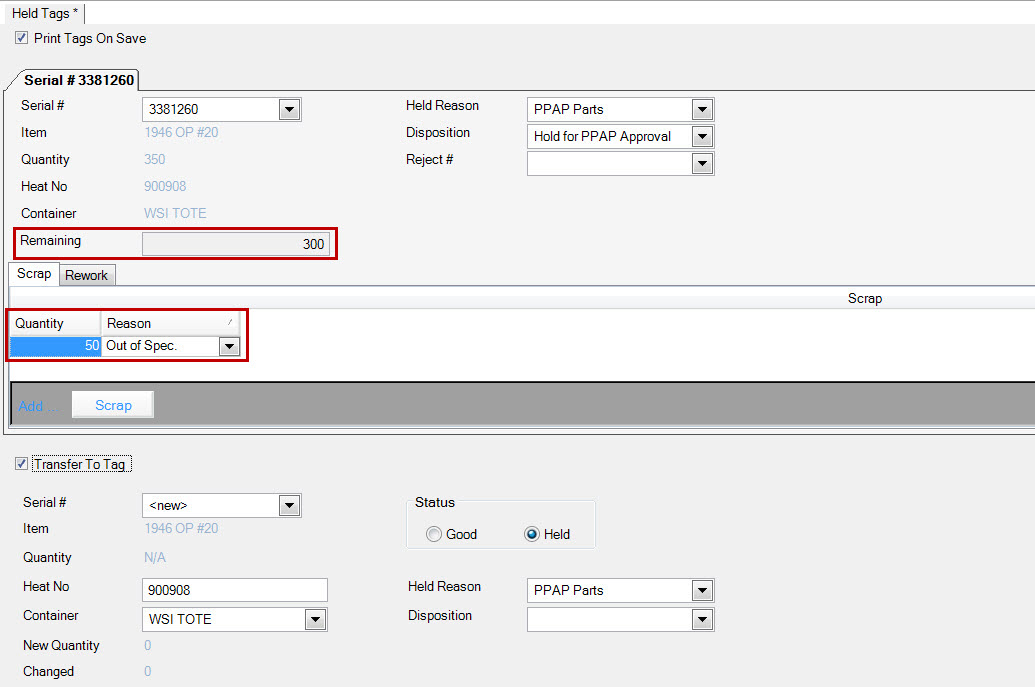
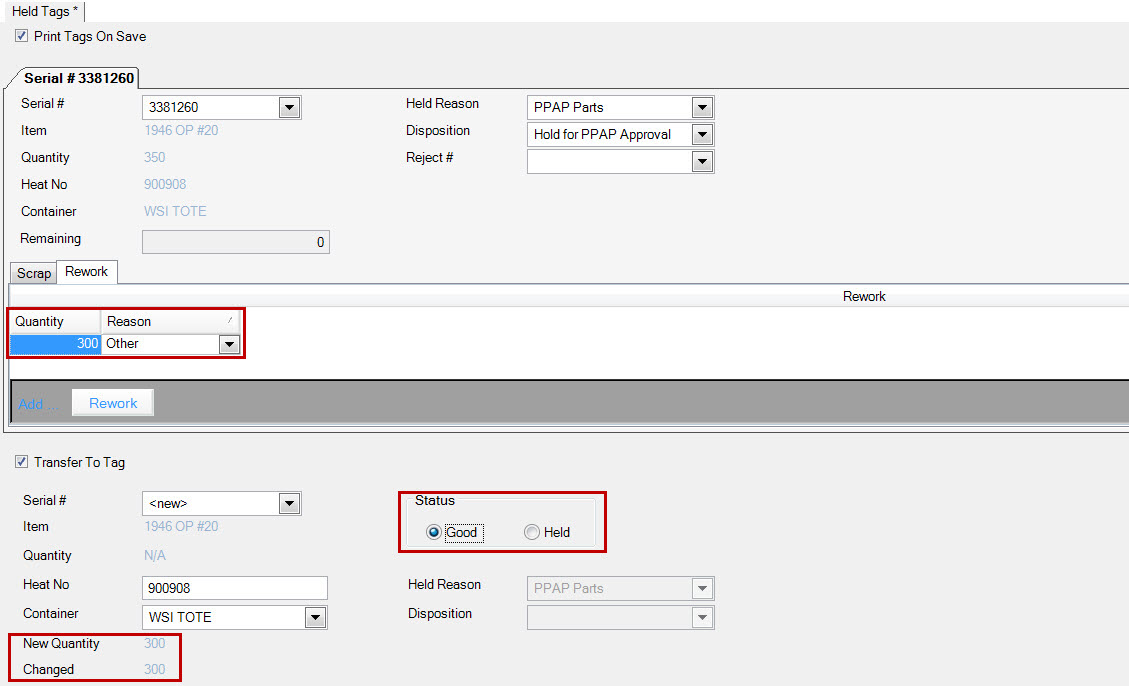
Select the option ‘Good’ under the ‘Status’ section. Click the  tab
and then the
  button.
Enter the quantity remaining in the rework quantity and select a reason from the drop down menu. The quantity will be populated in the New Quantity and Change field.
Save your changes.
Scrapping Items
To scrap items in the held tag screen, select a serial or tag number from the drop down menu provided. The system will populate additional information once a tag is selected. You can either scrap the whole tag quantity, or part of the quantity.
Click the  tab and then the
  button.
Enter the quantity and select a reason from the drop down menu. Save your changes.

Transferring Items to an Existing Tag
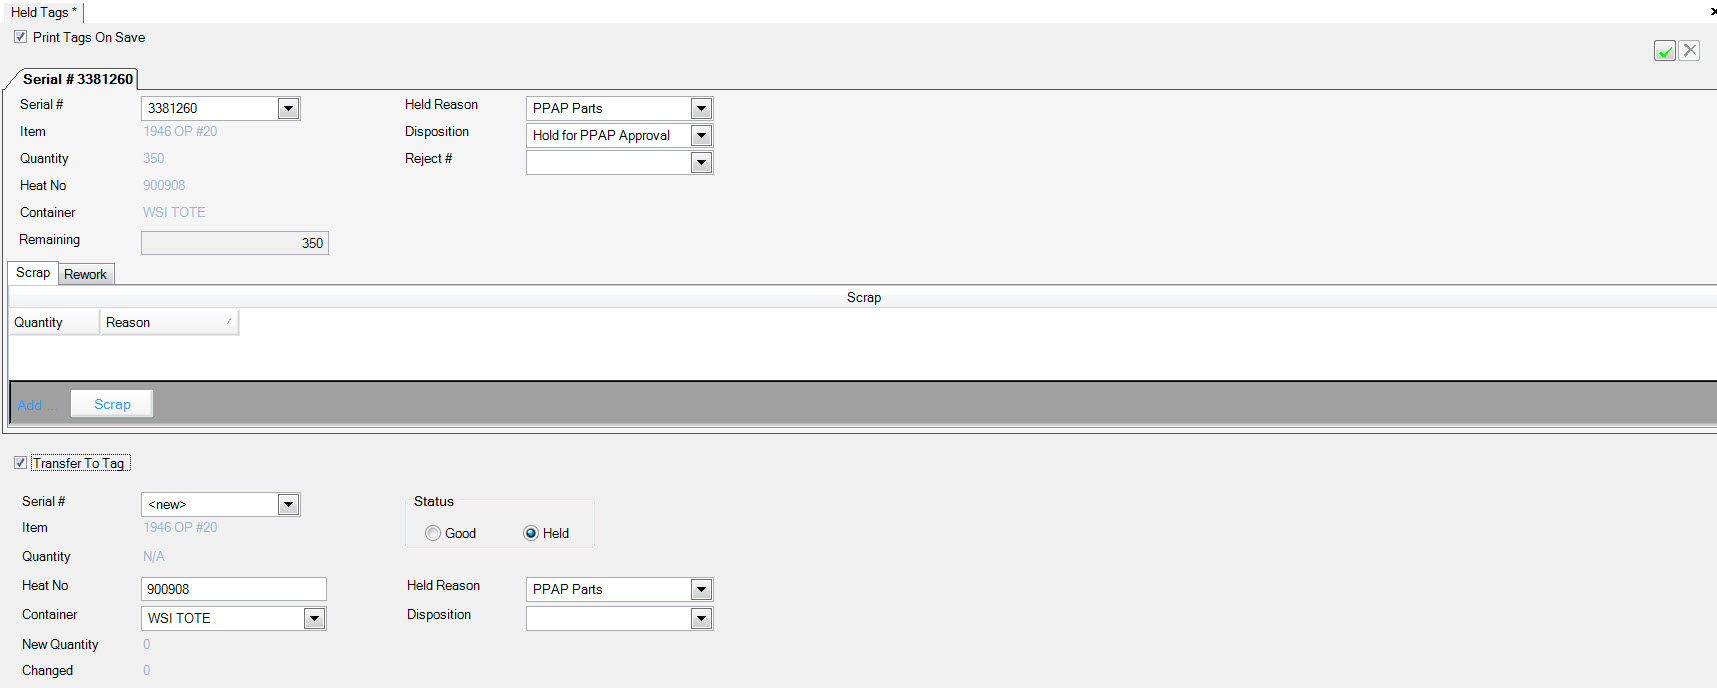
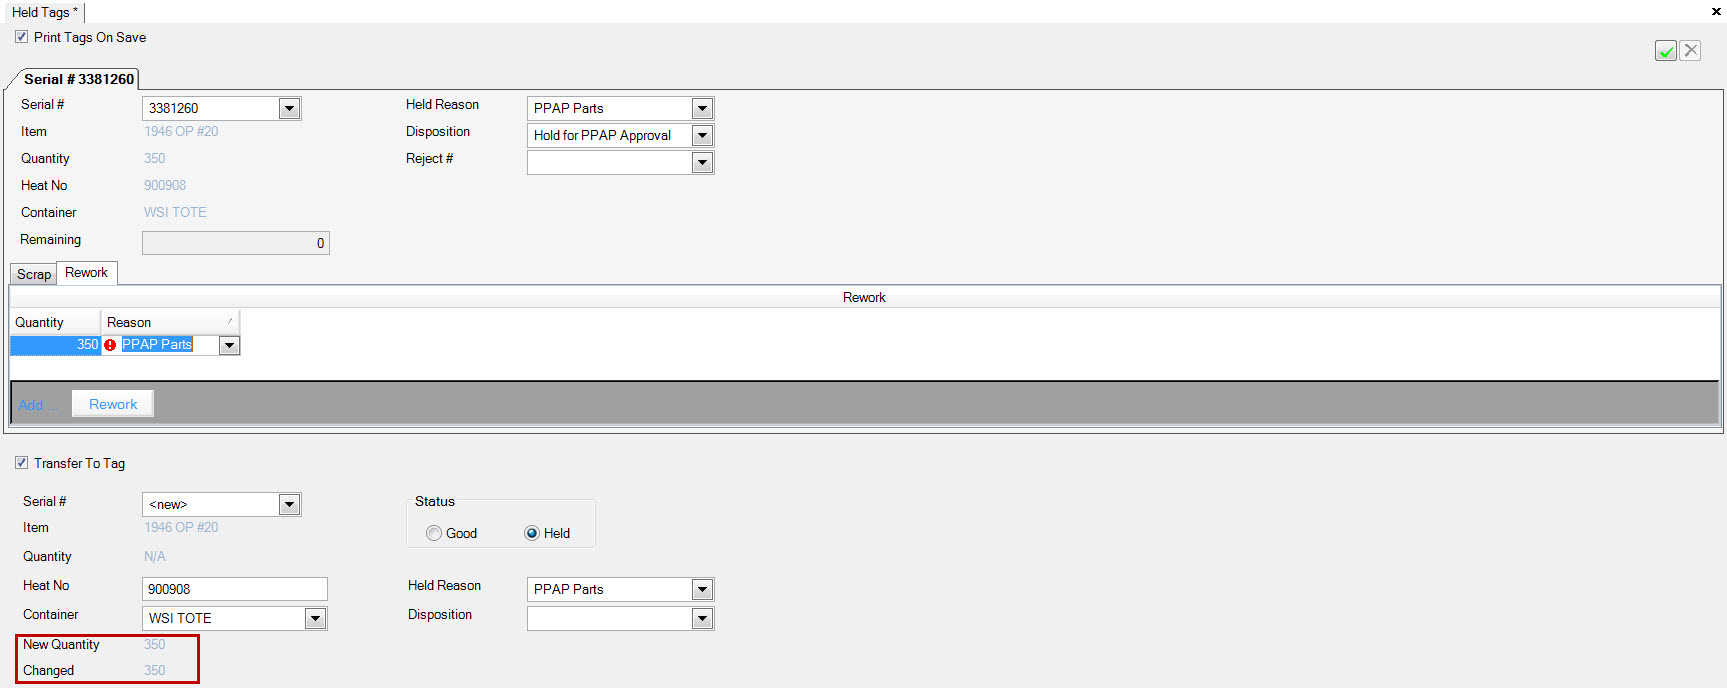
You may want to transfer held tags to an existing tag in the system, or combine held tags for inventory purposes. To do this, first select one of the tags you wish to combine using the drop down menu.

Check the  and the Transfer To Tag information will be displayed.
This will duplicate the screen above.
Click the  tab and then the
  button.
Enter the quantity in the rework quantity and select a reason from the drop down menu.
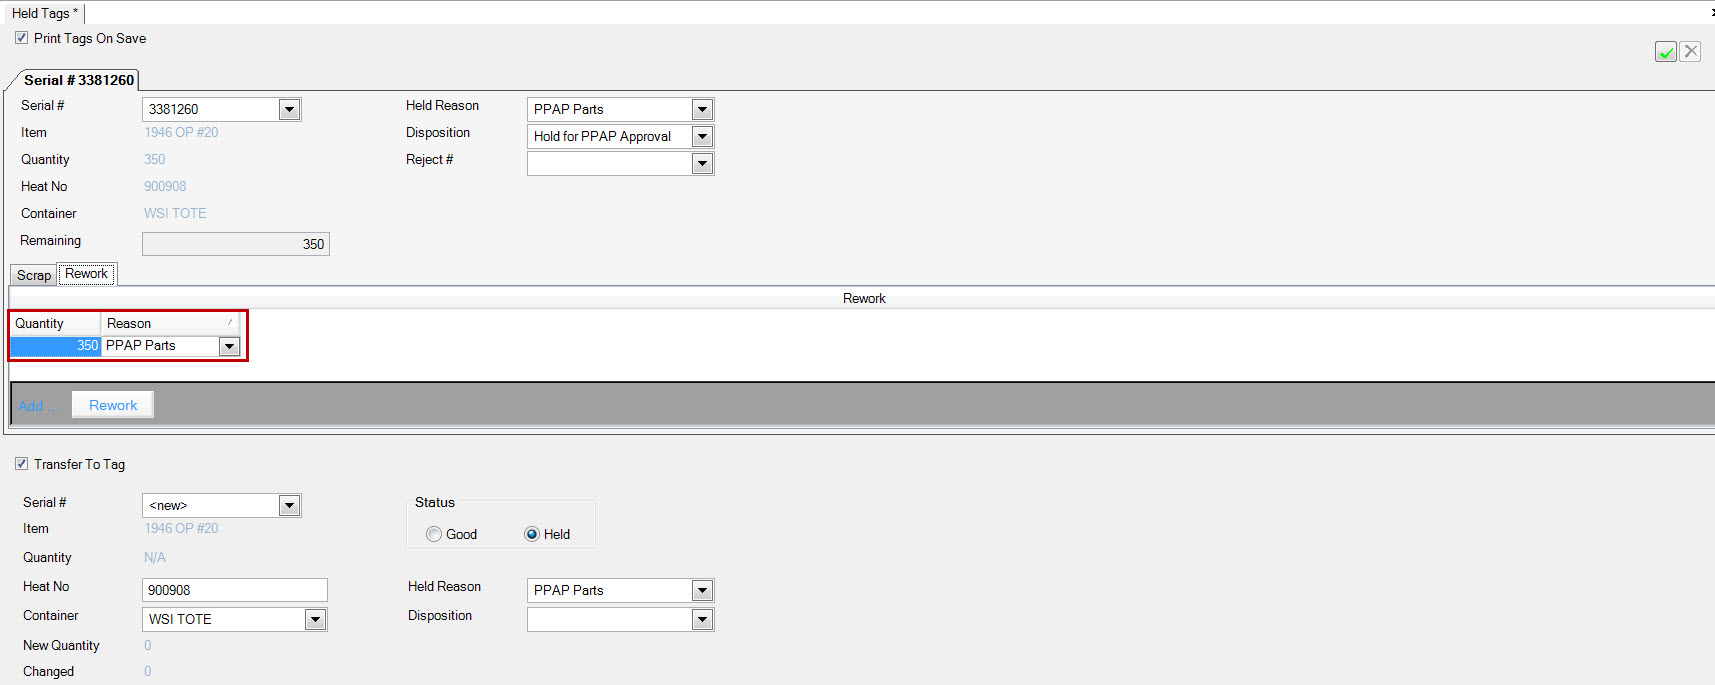
The quantity will be populated in the New Quantity and Change field.
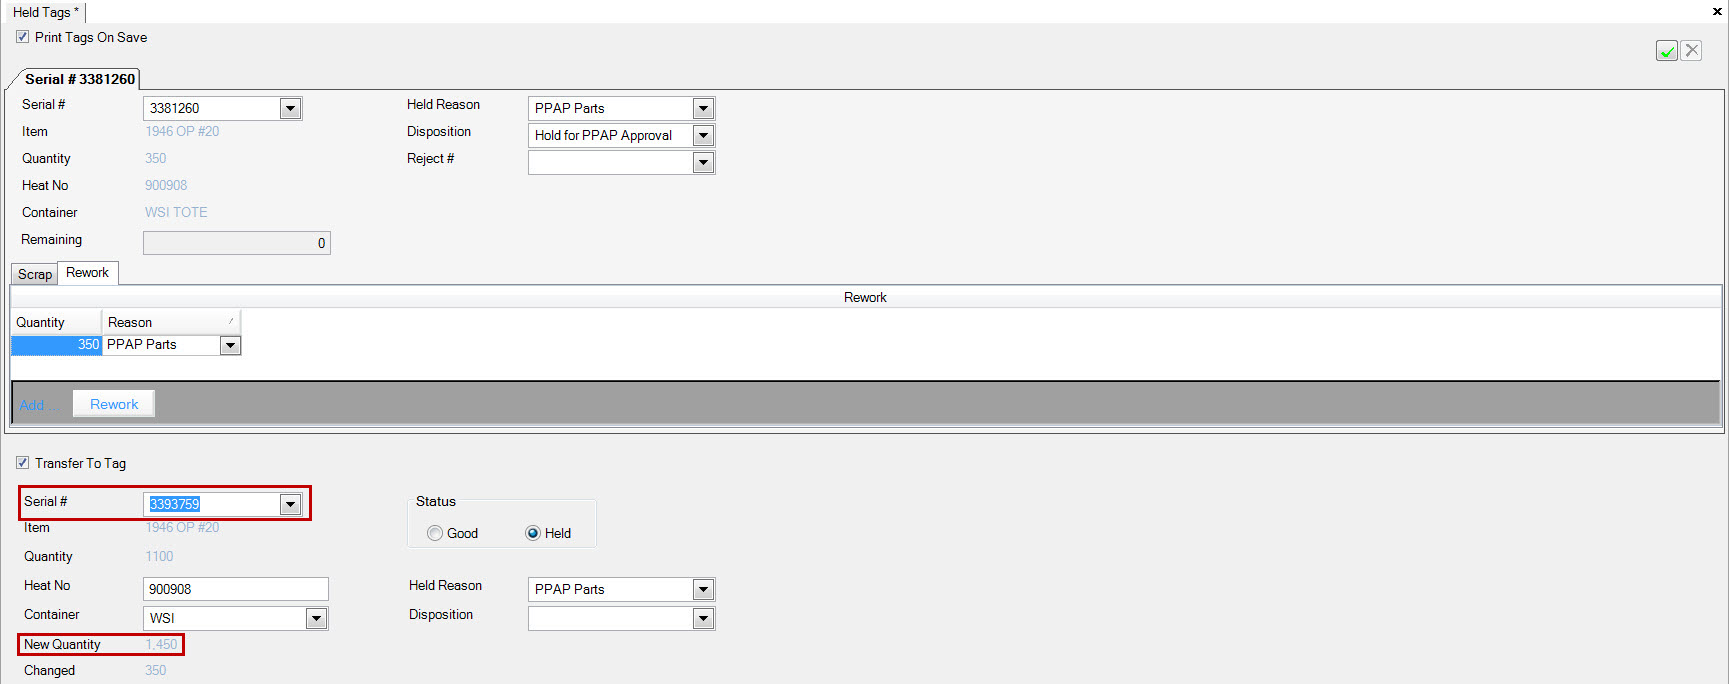
Select the serial # from the drop down menu that you wish to combine with the held tag. The quantity will be added to the New Quantity. Save your changes.
Held Purchased Tags
The Held Purchased tag screen is where you can find all tags that were placed on hold for purchased items. To navigate to this screen, select the  button, and then select the
  option.
This will open the ‘Purchased Item Tag Lookup’ screen.
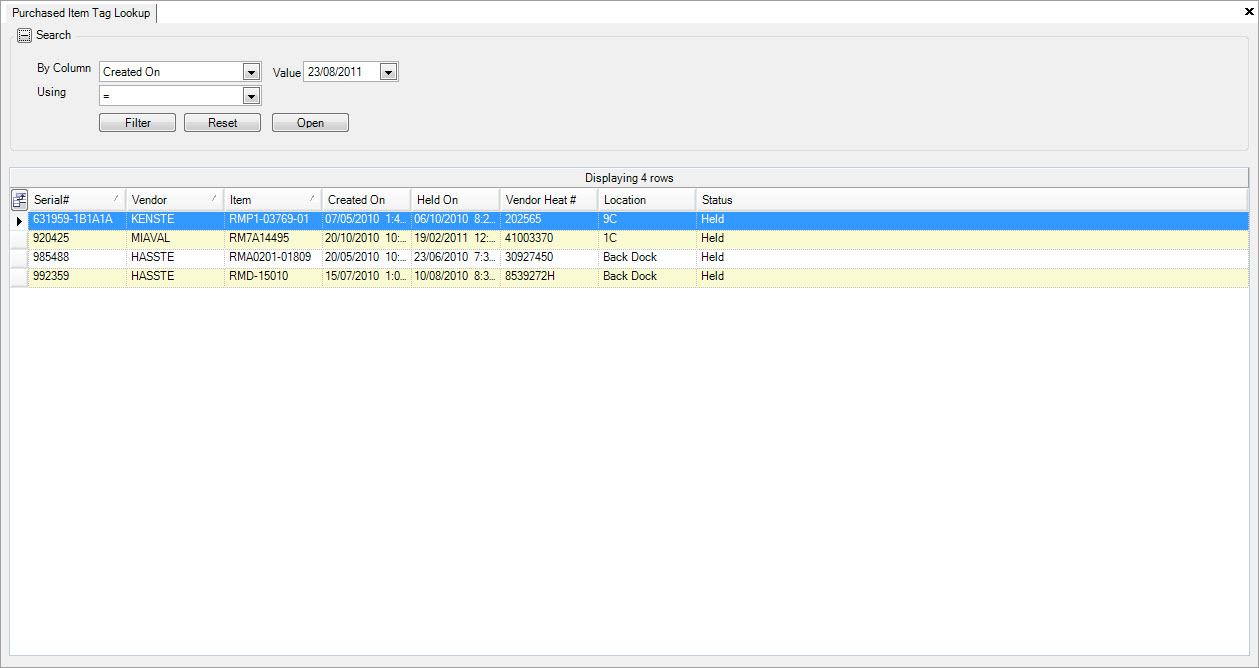
Use the filter function to find the held purchased tag you are looking for. Once you find it, double click on the row or highlight it and press the ‘Enter’ key. This will open the ‘Purchased Item Tag’ screen.
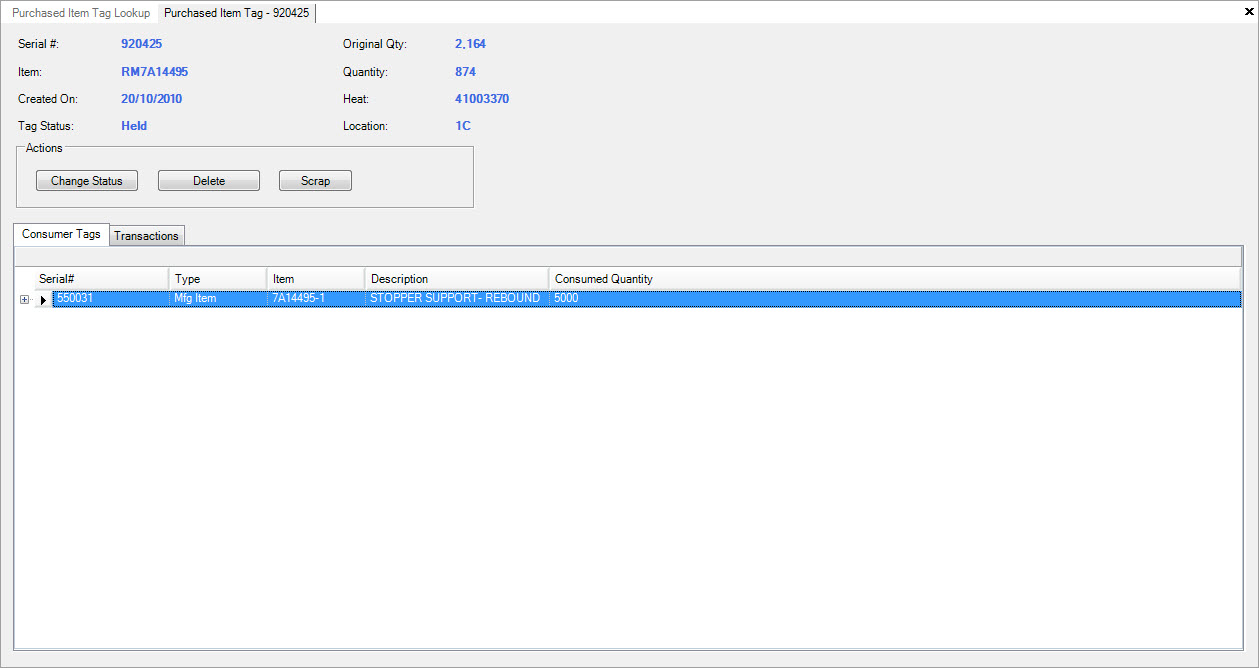
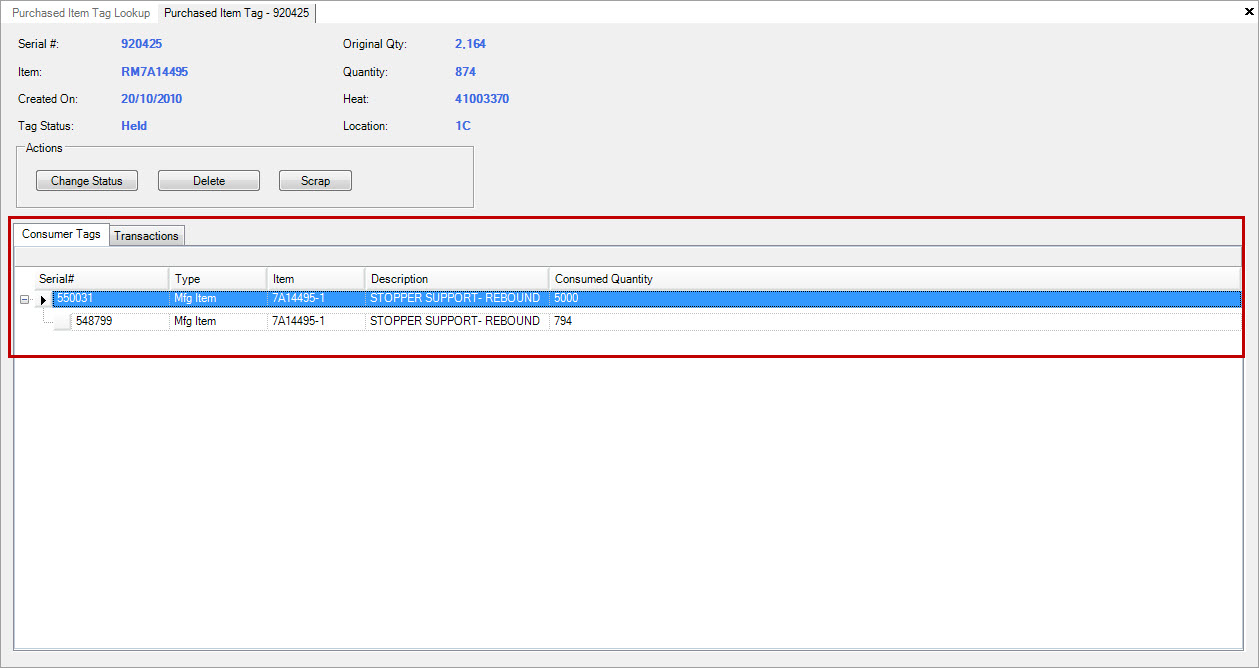
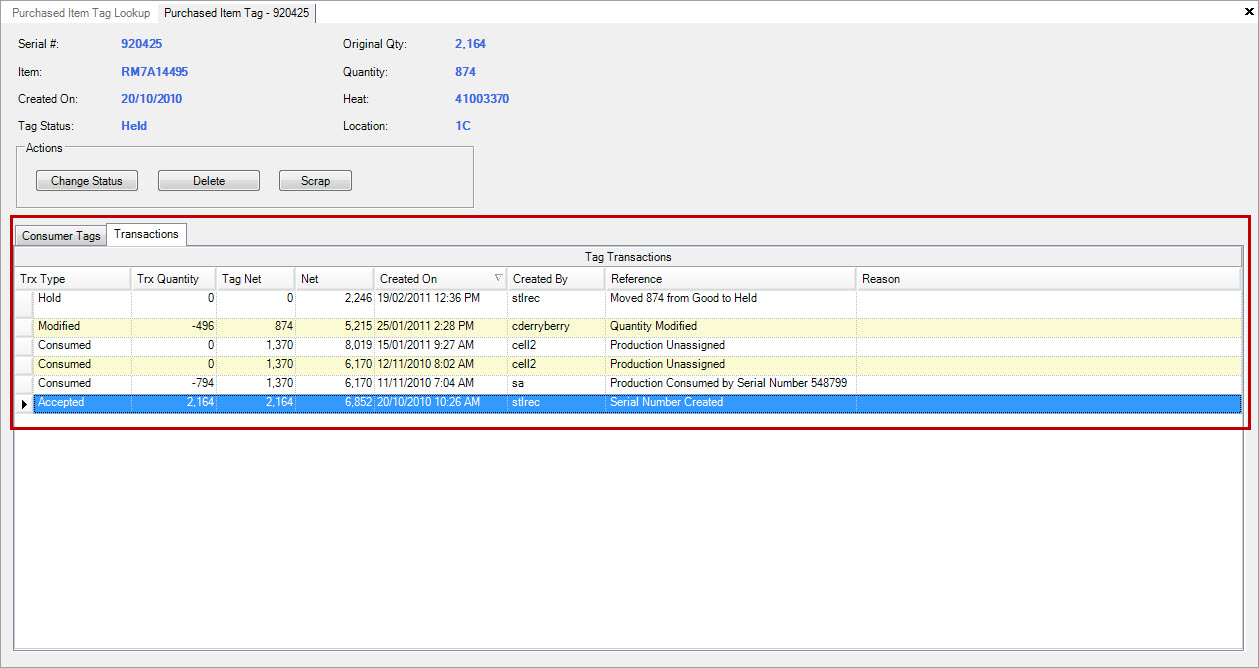
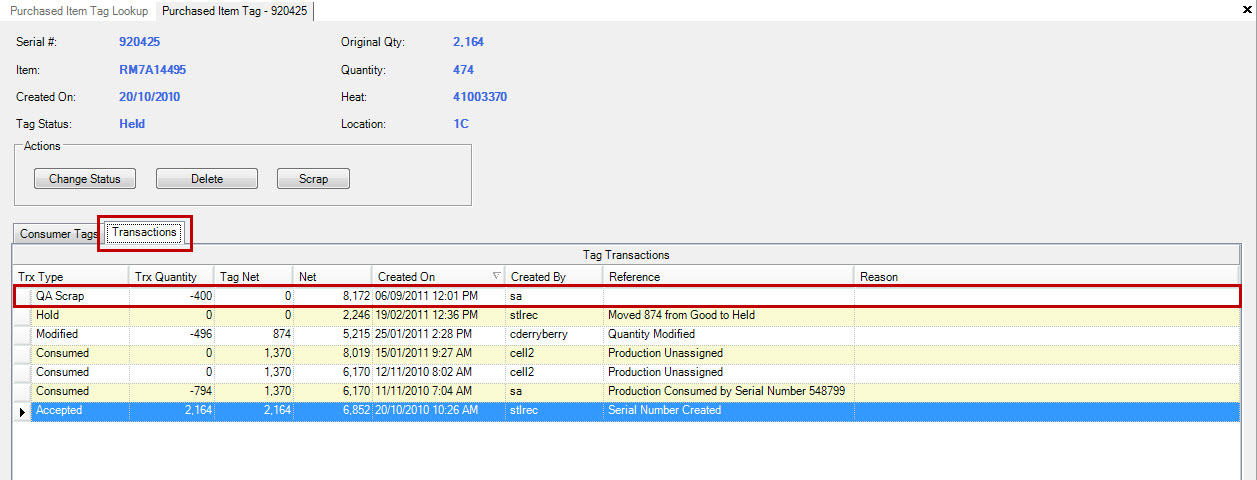
From this screen, you can change the status of the screen, delete or scrap the tag, view all tag transactions, and view consumer tags. To view all consumer tags, make sure the  tab is selected, and
expand the tag info by selecting the + button on the left of the screen.
To view all transactions for a held purchased tag, make sure the  tab is selected.
Changing Tag Status
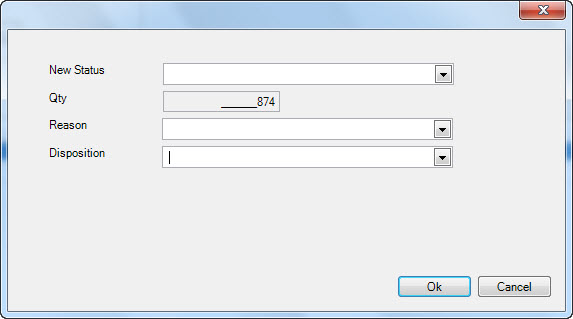
To change a held purchased tag status, open the held purchased tag screen and click on the  button. The system will open the ‘Change Status’ screen, where you must fill out the
‘New Status’, ‘Reason’ and ‘Disposition’ fields before clicking on the
  button.
Note
*The ‘Quantity’ will be automatically generated from the tag quantity and cannot be changed at this time.*
Deleting a Tag
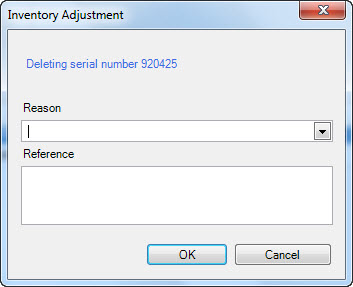
To delete a held purchased tag from the system, click on the  button. The ‘Inventory Adjustment’ window will open. You must select a
‘Reason’, and you can enter in a reference number or information before clicking on the
  button and saving your changes.
Scrapping a Tag
To scrap a quantity of parts from a held purchased tag from the system, click on the  button. The ‘Scrap’ window will open. Enter in a quantity
and select a ‘Reason’ from the drop down provided. You can enter in a reference number or information before clicking on the
  button and saving your changes.

Note
*Purchased Item Scrap Reasons are located in the Admin section in the ‘Purchasing’ module.*
If you only scrap a partial tag quantity the system will maintain the serial number for the held purchased tag and adjust the remaining quantity accordingly. The partial scrap quantity will then be
listed under the  tab.
tab.
Gauge Calibration
Gauge calibration is used for recording
Adding a New Gauge
There are three different ways to add a new gauge to the system. The first is to navigate to File>New>Gauge from the menu at the top of the screen.
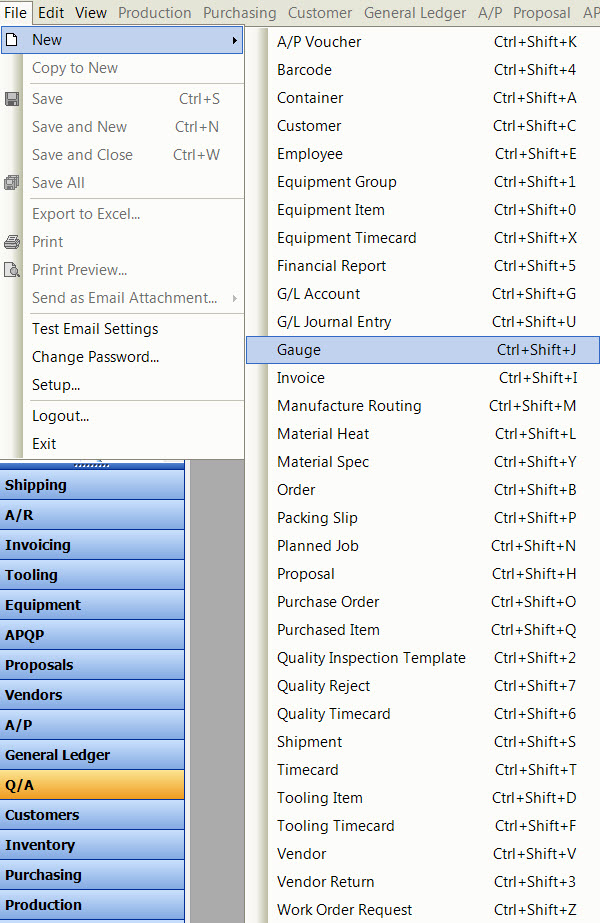
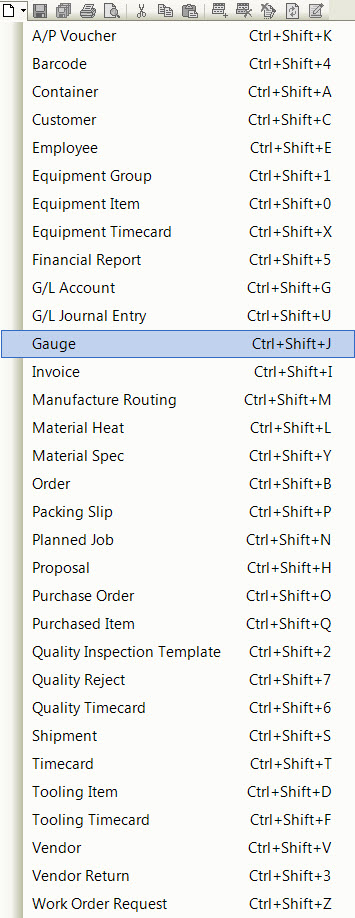
The second way is to navigate to the  button, and select ‘Gauge’.
The third way is to press the ‘Ctrl’ + ‘Shift’ and ‘J’ keys on your keyboard. All three of these actions will open a new ‘Gauge’ screen.
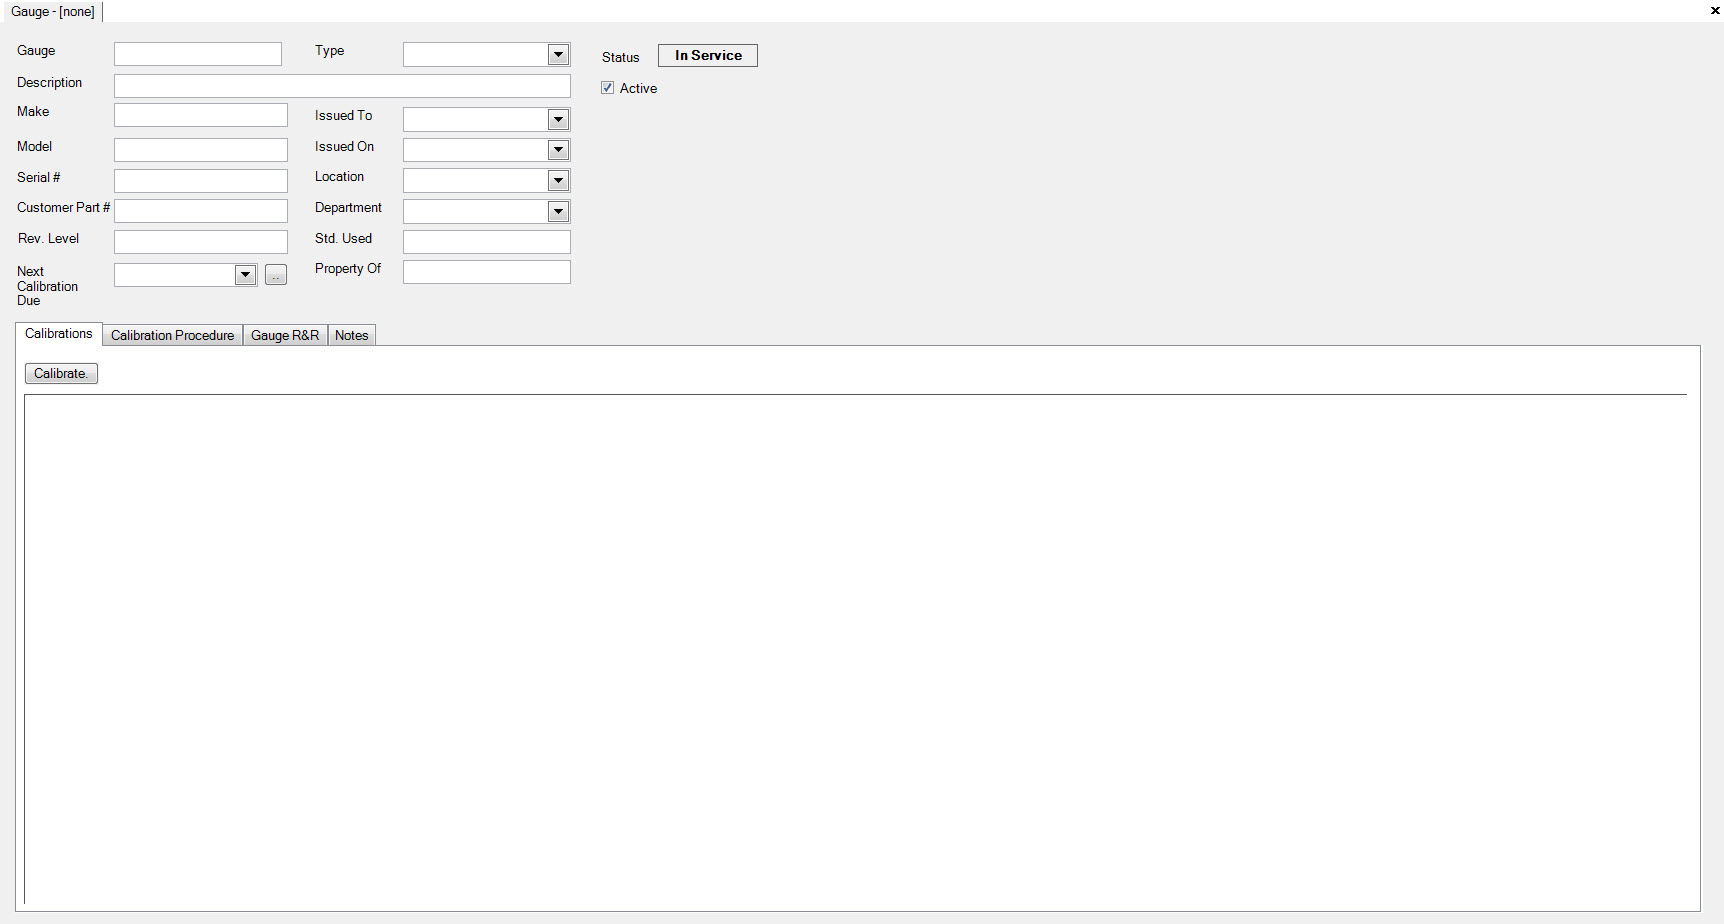
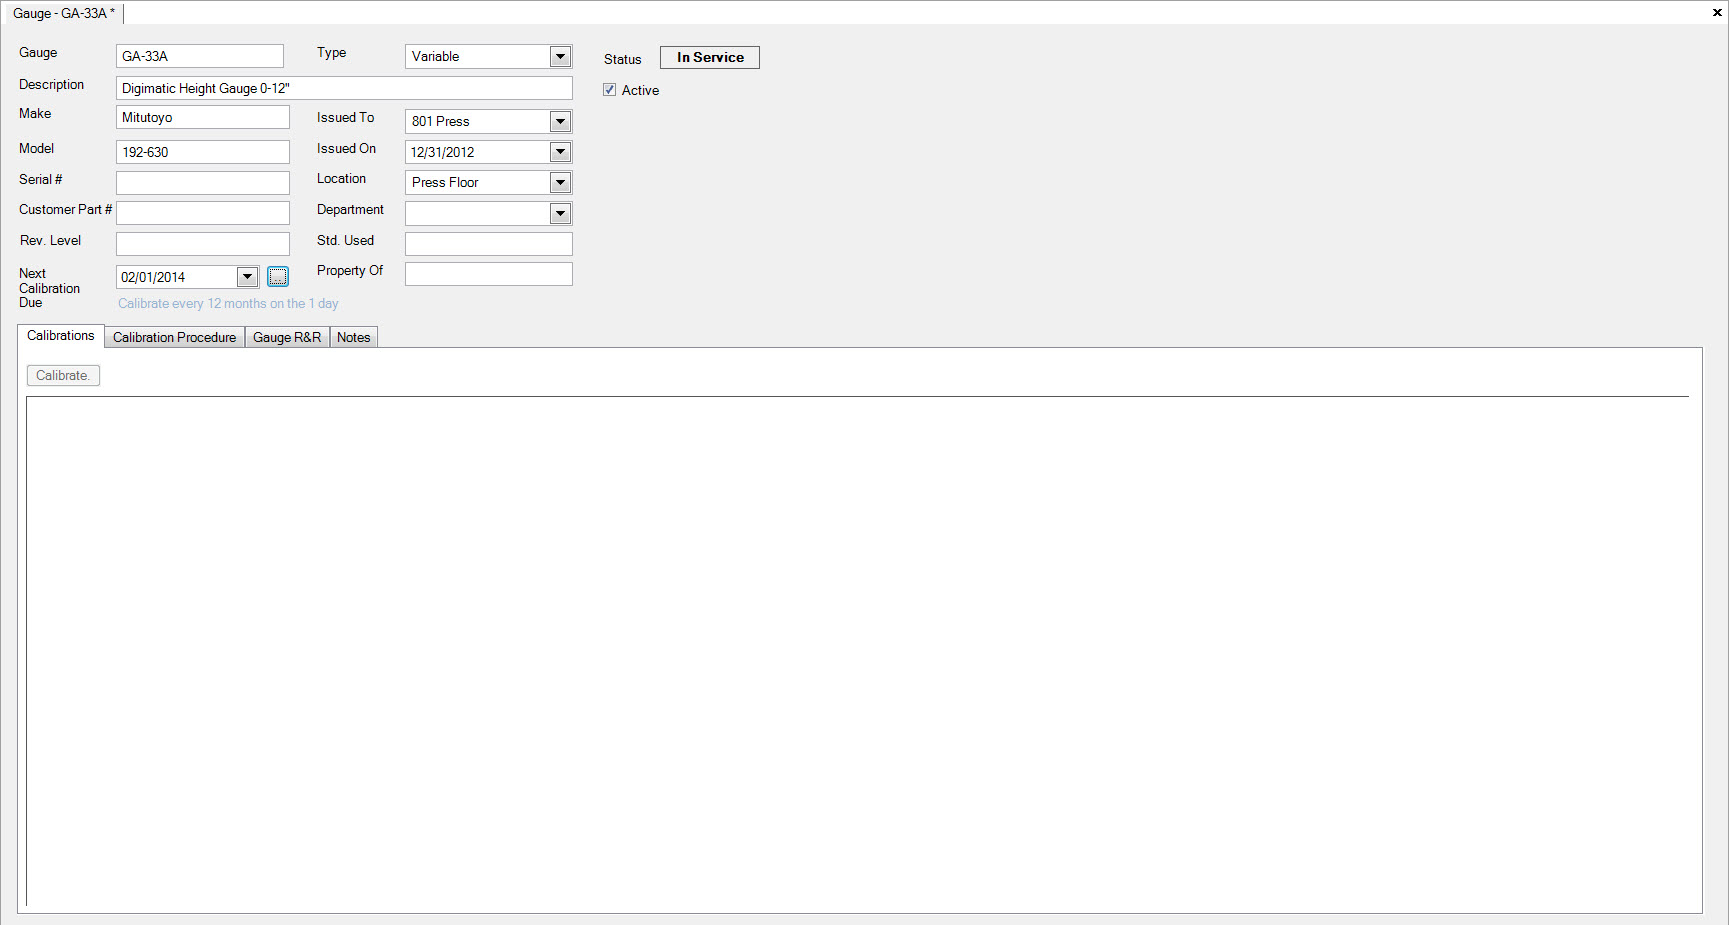
Complete as much information as is available on the new gauge including gauge, description, make, model, serial #, customer #, revision level, type, issued to,
issued on, location, department, std use and property of. The gauge will default as ‘Active’ unless you click the check box beside ‘Active’.
Click the  icon to save.
Opening and Maintaining a Gauge
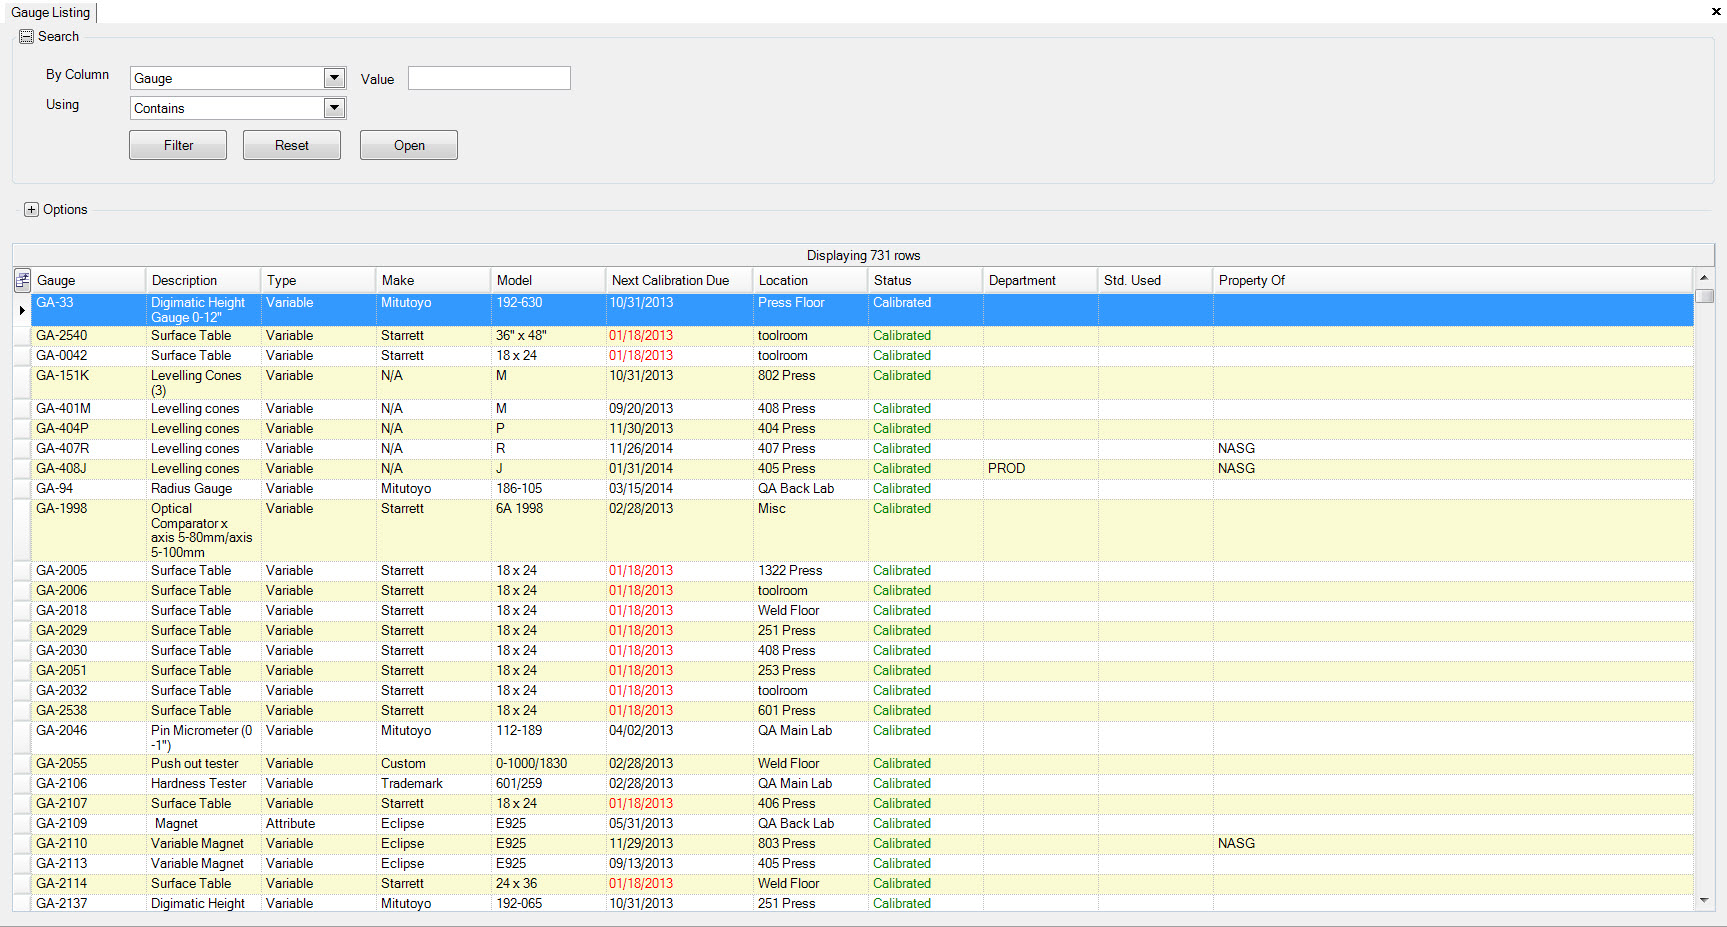
To view or make any changes to an existing Gauge, navigate to the  tab, clicking on the
 ![]() icon.
Double-click on the selected gauge row to bring up the ‘Gauge Detail’ screen.
icon.
Double-click on the selected gauge row to bring up the ‘Gauge Detail’ screen.
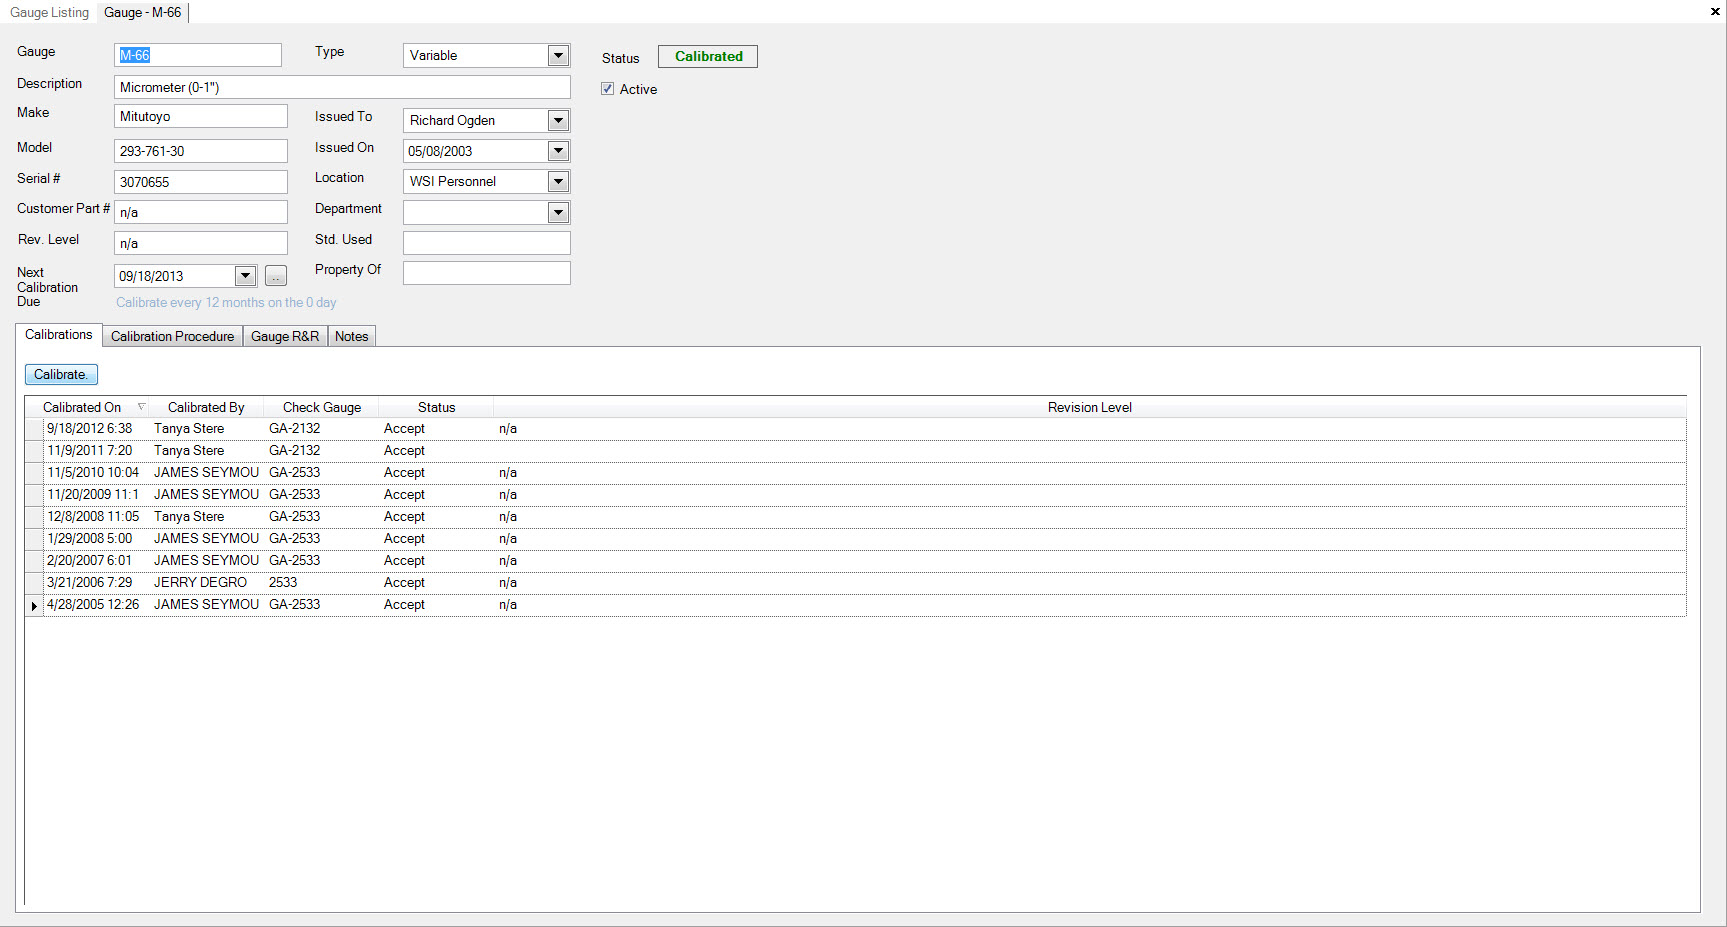
The Next Calibration Due will be displayed in RED if the next calibration date is overdue.
Make the necessary modifications, and click the  icon to save.
Setting a Gauge Calibration Schedule
To setup a Gauge Calibration Schedule for a Gauge, navigate to the  tab, clicking on the
 ![]() icon.
Double-click on the selected gauge row to bring up the ‘Gauge Detail’ screen.
icon.
Double-click on the selected gauge row to bring up the ‘Gauge Detail’ screen.

Click the  icon to display the Schedule Calibration display.
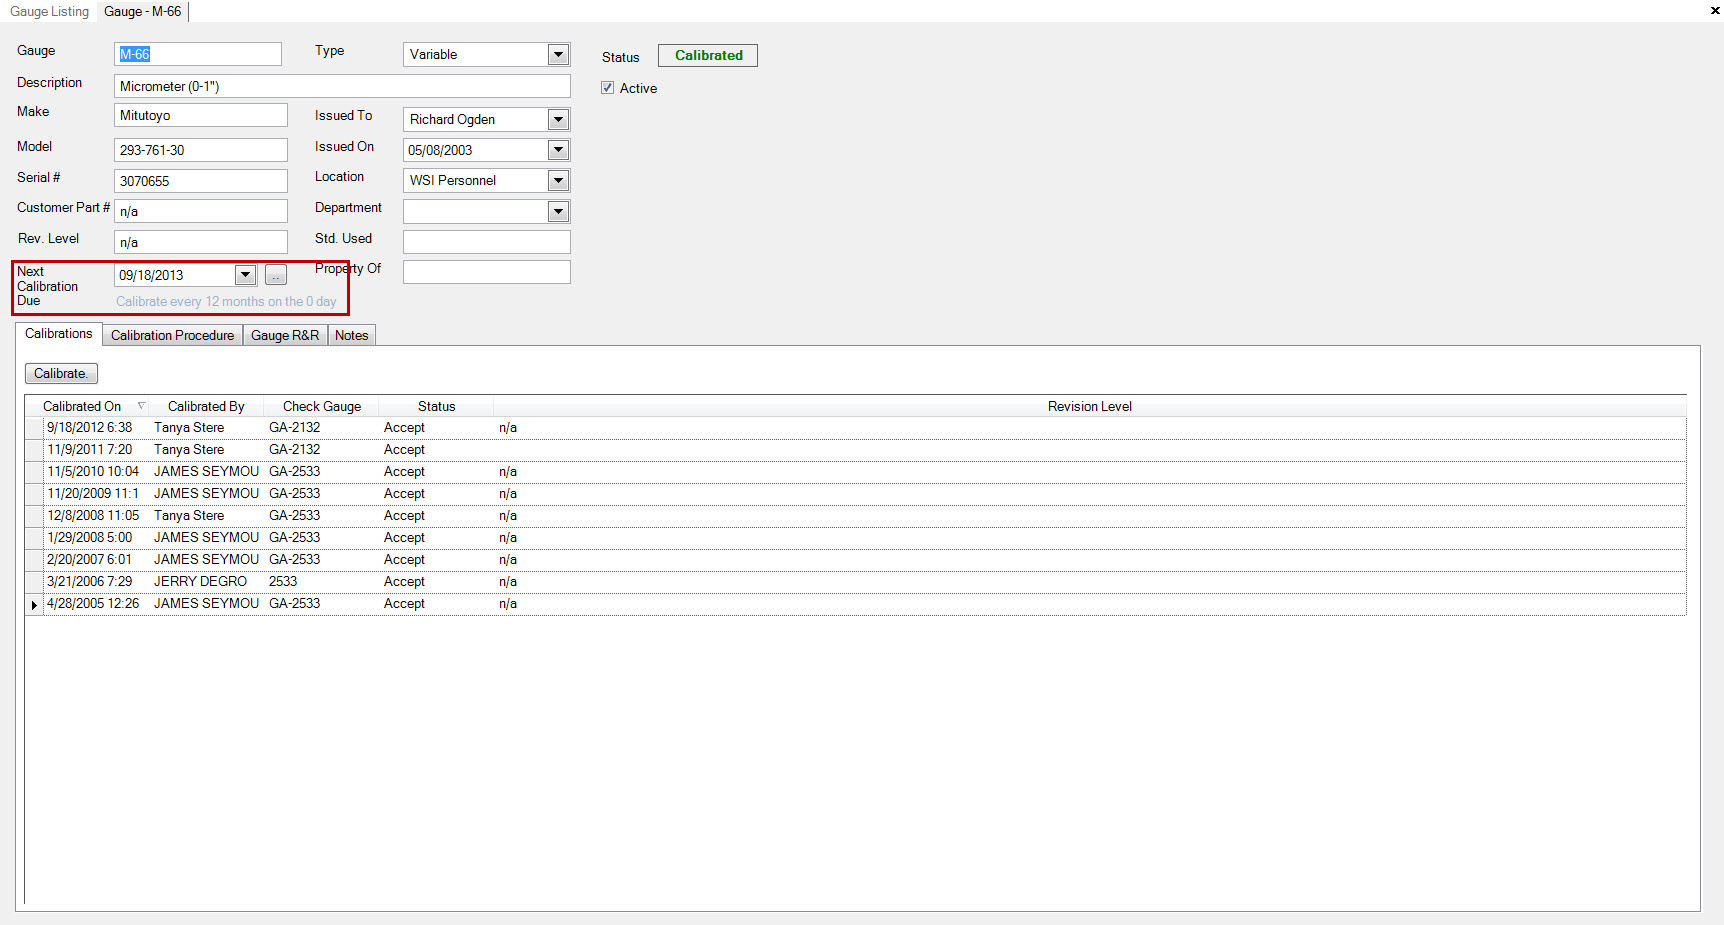
Set the calibration schedule by entering information in the boxes using the keyboard or arrow keys. Click the  button to update.

Adding a Calibration Procedure
To add the Gauge Calibration Procedure for a Gauge, navigate to the  tab, clicking on the
 ![]() icon.
Double-click on the selected gauge row to bring up the ‘Gauge Detail’ screen.
icon.
Double-click on the selected gauge row to bring up the ‘Gauge Detail’ screen.

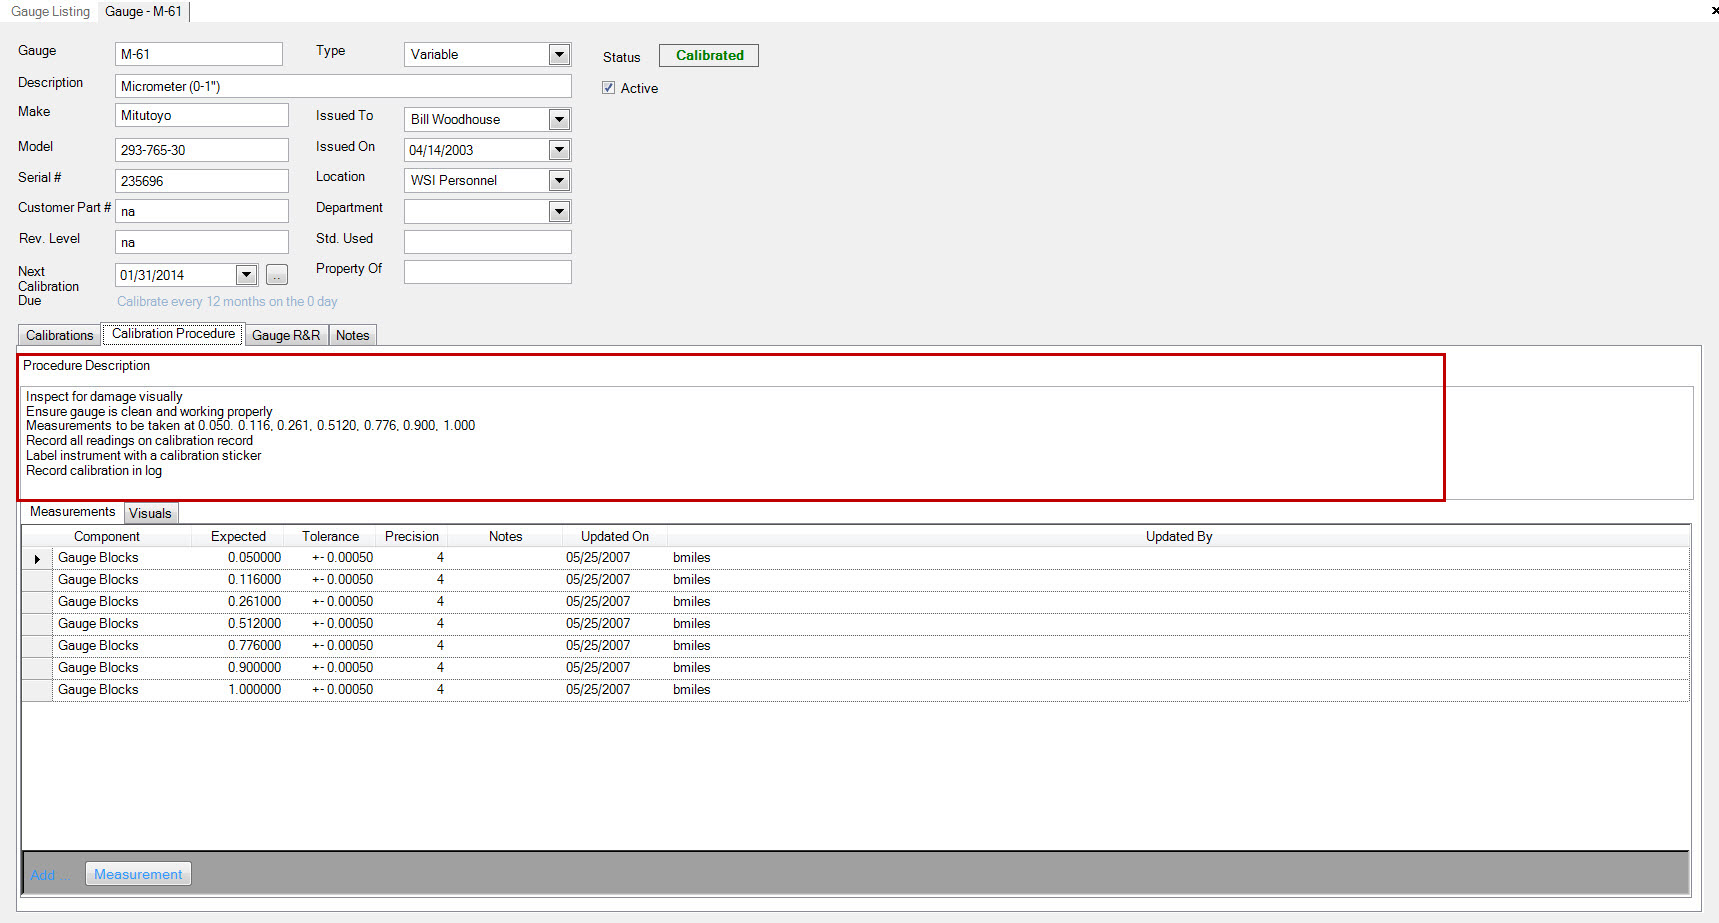
Click the  tab to display the Calibration Procedure.
Enter the Calibration Procedure description.
Adding Measurements
To add the measurements, click the  tab to display the Calibration Measurements.
Click the
  button and a new row will be displayed.
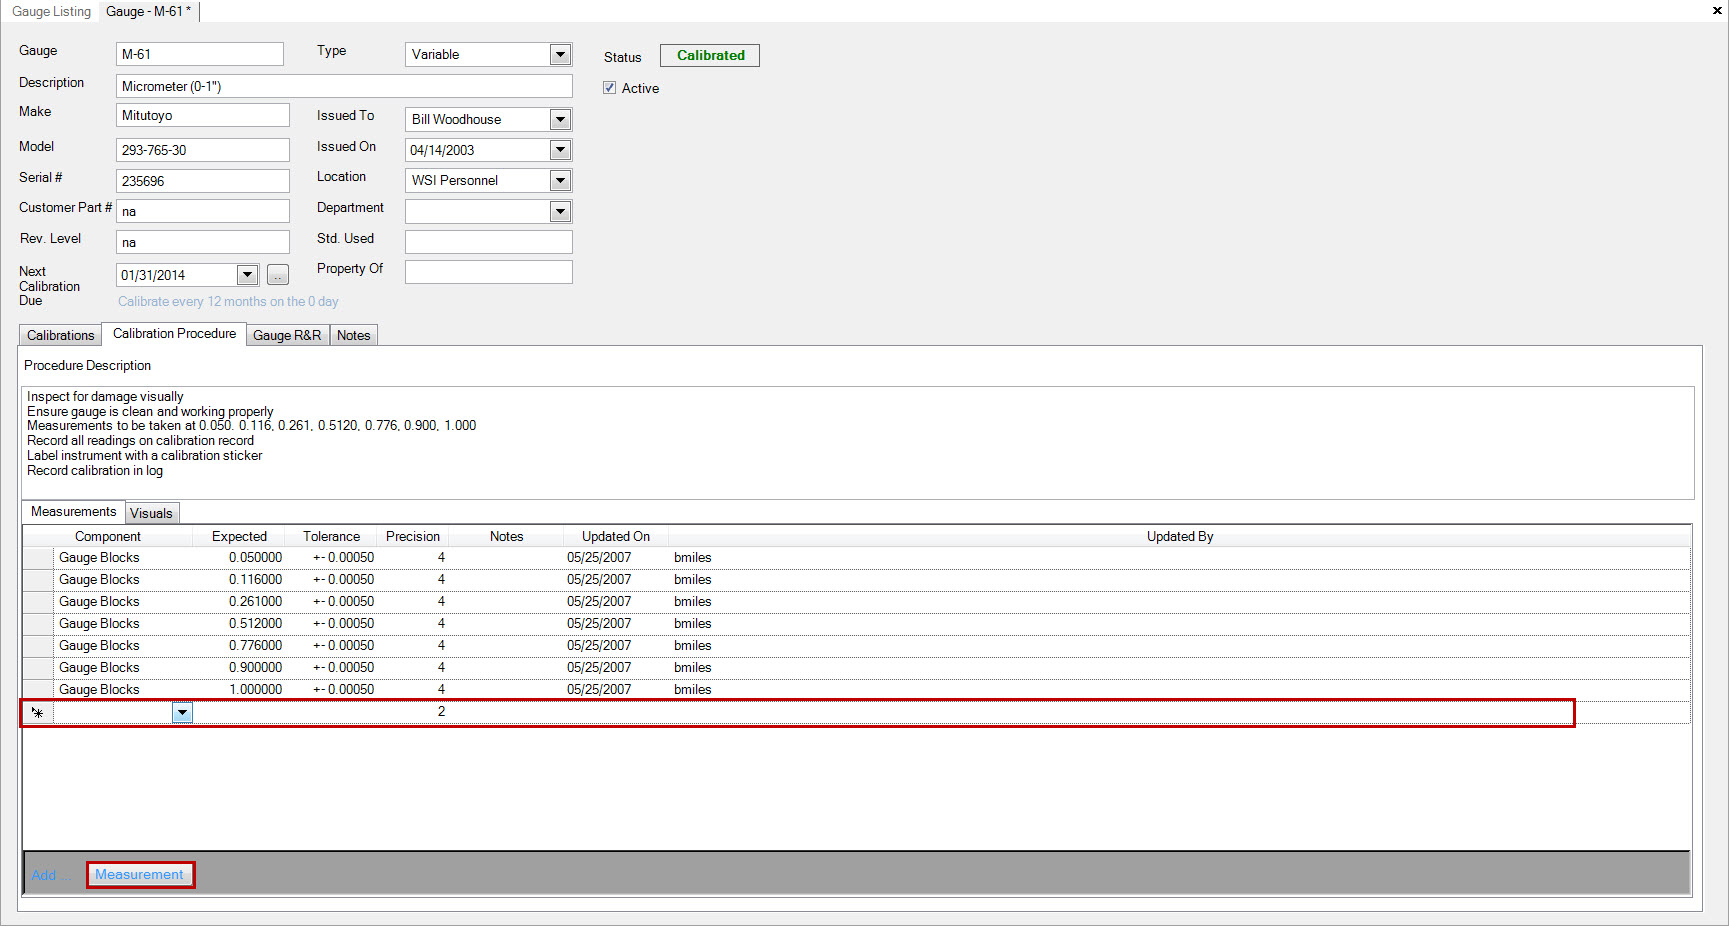
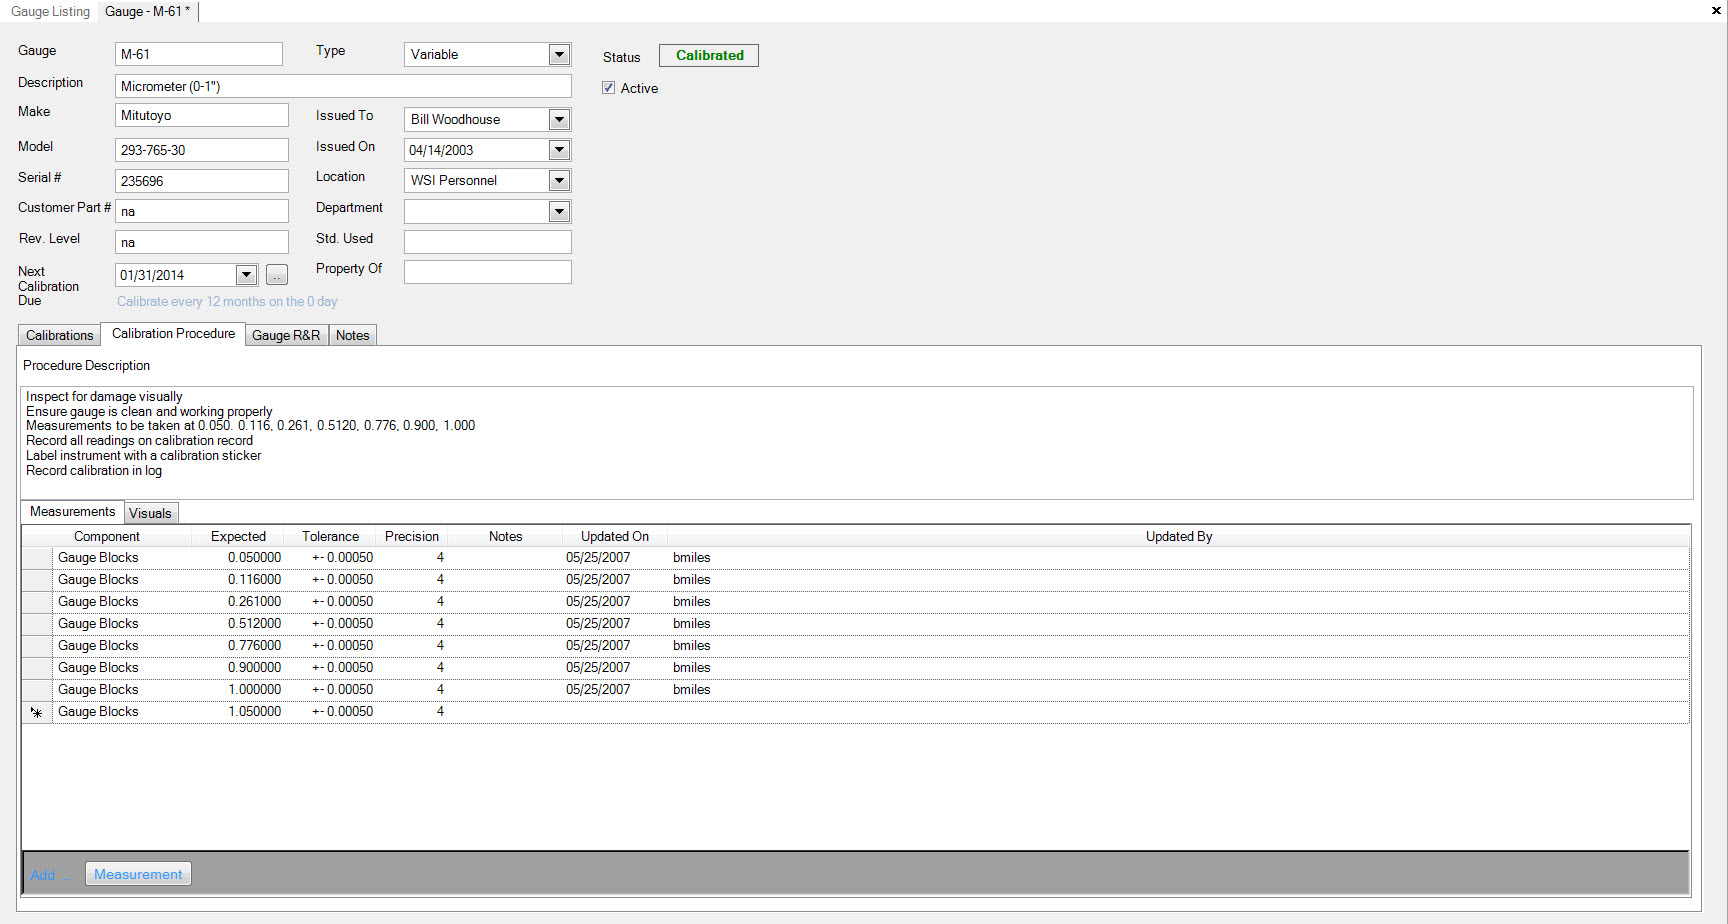
Enter the Measurement information.
Adding Visual Inspections
To add the visual inspections, click the  tab to display the Calibration Visual Inspections.
Click the
  button and a new row will be displayed.
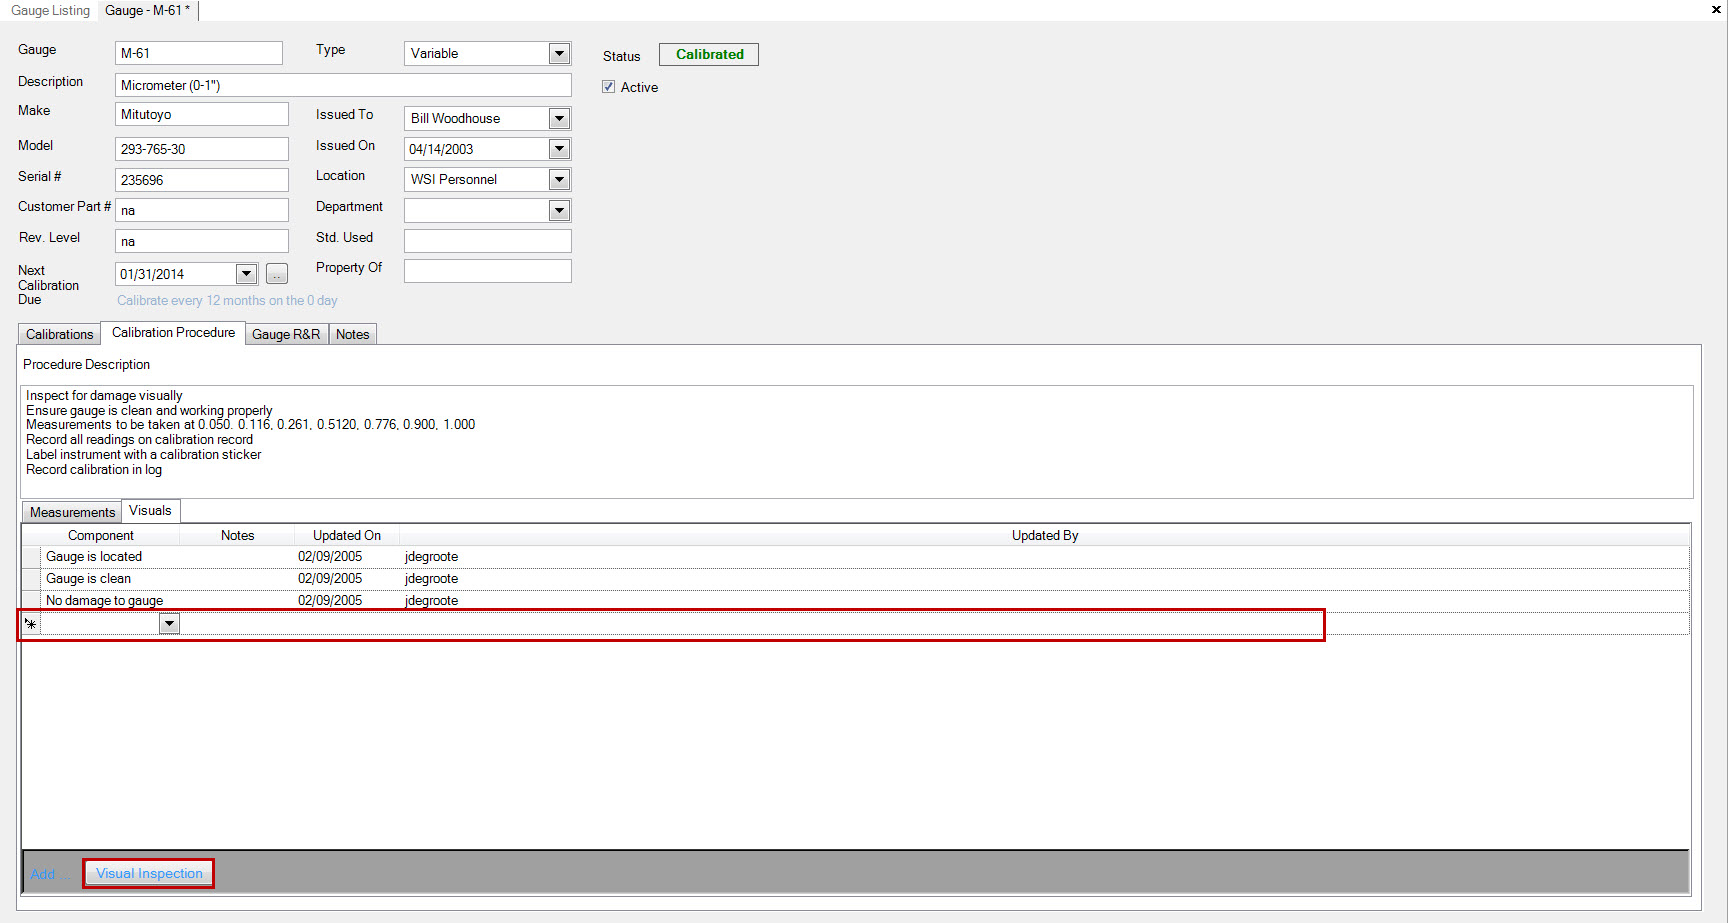
Enter the Visual Inspection information.
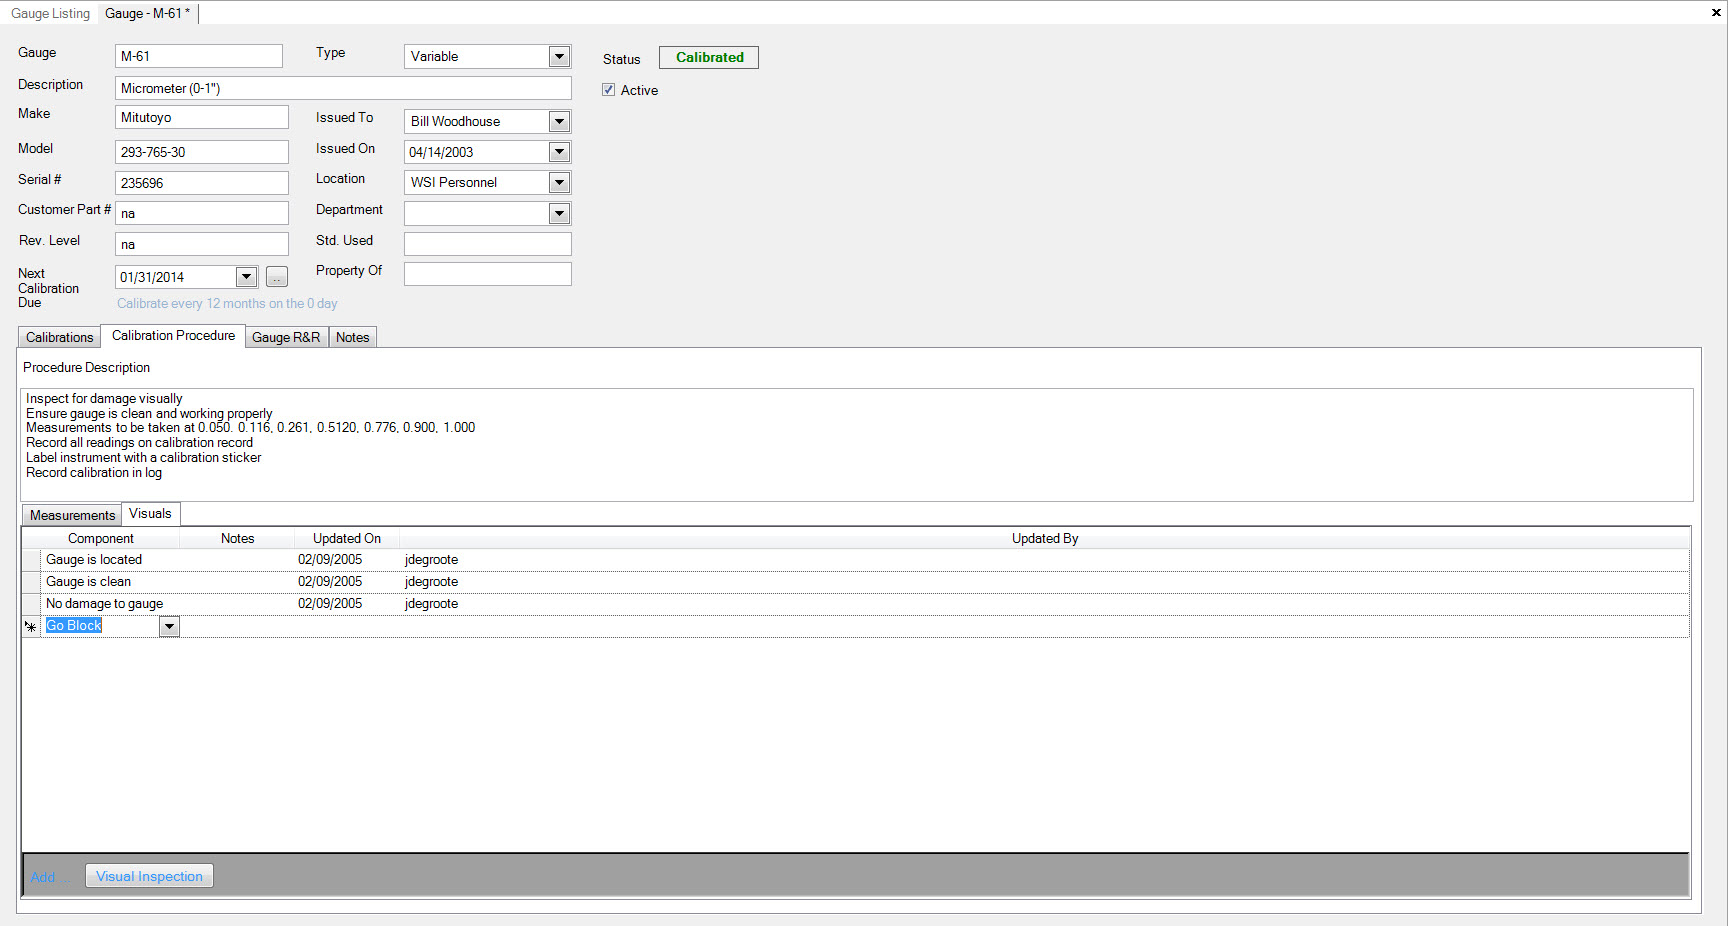
Click the  icon to save all the changes.
Adding Notes to a Gauge
To add Notes to the Gauge, navigate to the  tab, clicking on the
 ![]() icon.
Double-click on the selected gauge row to bring up the ‘Gauge Detail’ screen.
icon.
Double-click on the selected gauge row to bring up the ‘Gauge Detail’ screen.

Click the  tab to display the Notes.
Enter the gauge notes.
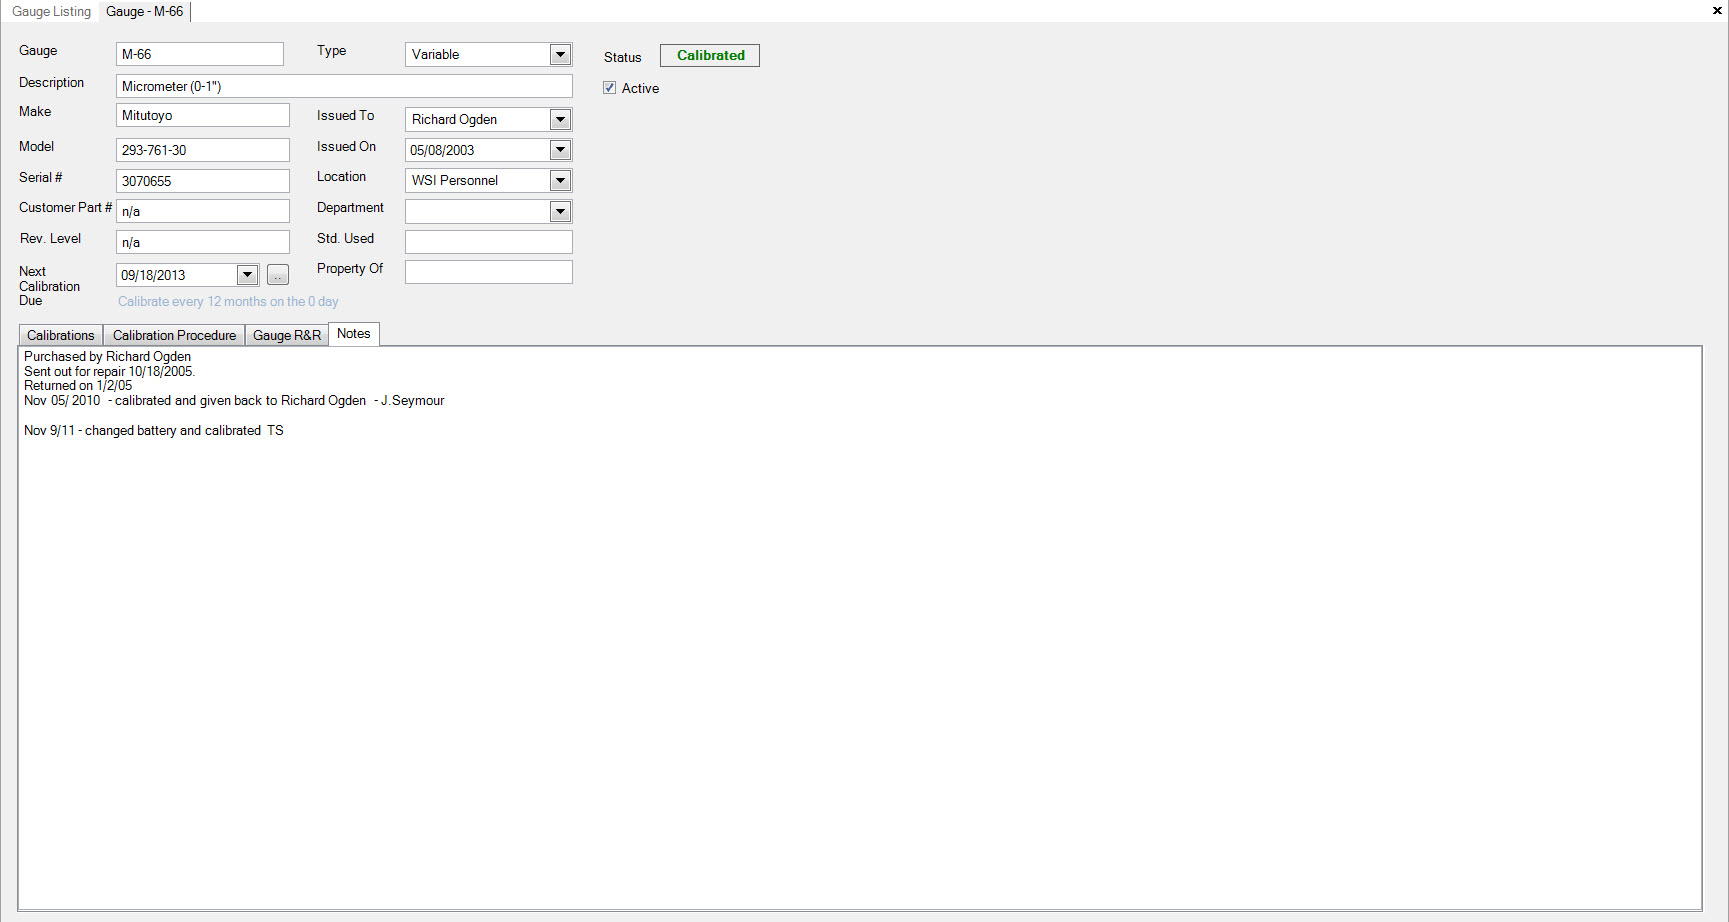
Click the  icon to save all the changes.
Calibrating a Gauge
To Calibrate the Gauge, navigate to the  tab, clicking on the
 ![]() icon.
Double-click on the selected gauge row to bring up the ‘Gauge Detail’ screen.
icon.
Double-click on the selected gauge row to bring up the ‘Gauge Detail’ screen.

Click the  button to display the Gauge Calibration.
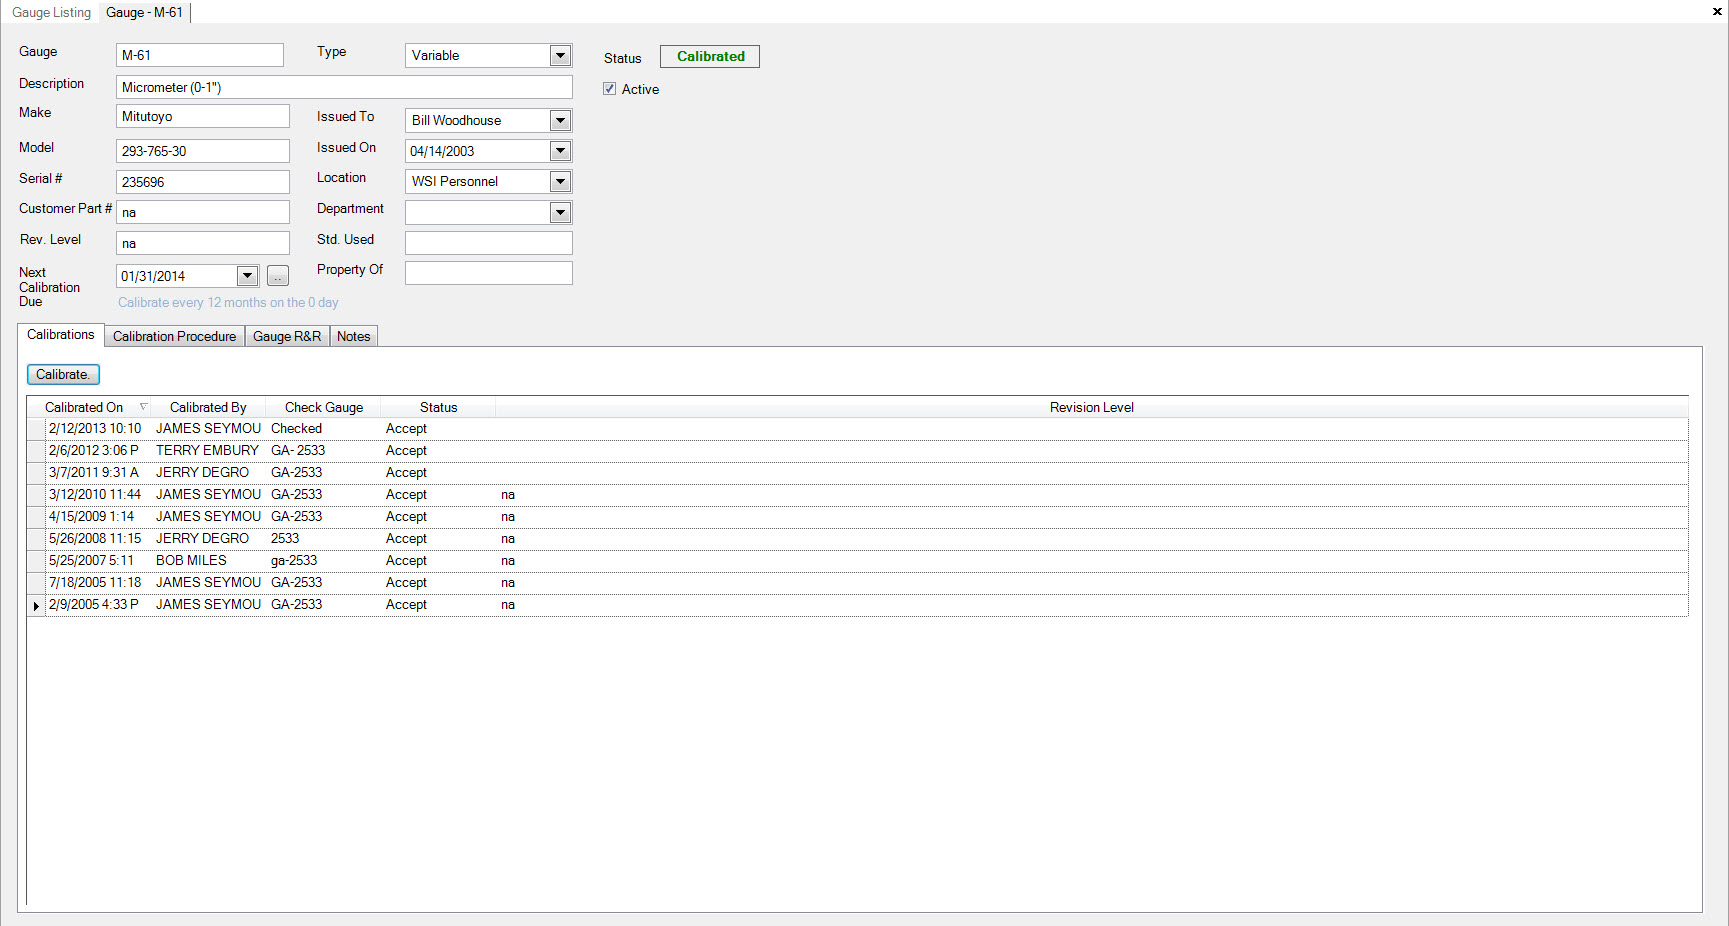
Enter or select from the drop down menu the Calibrated By and the Check Gauge.
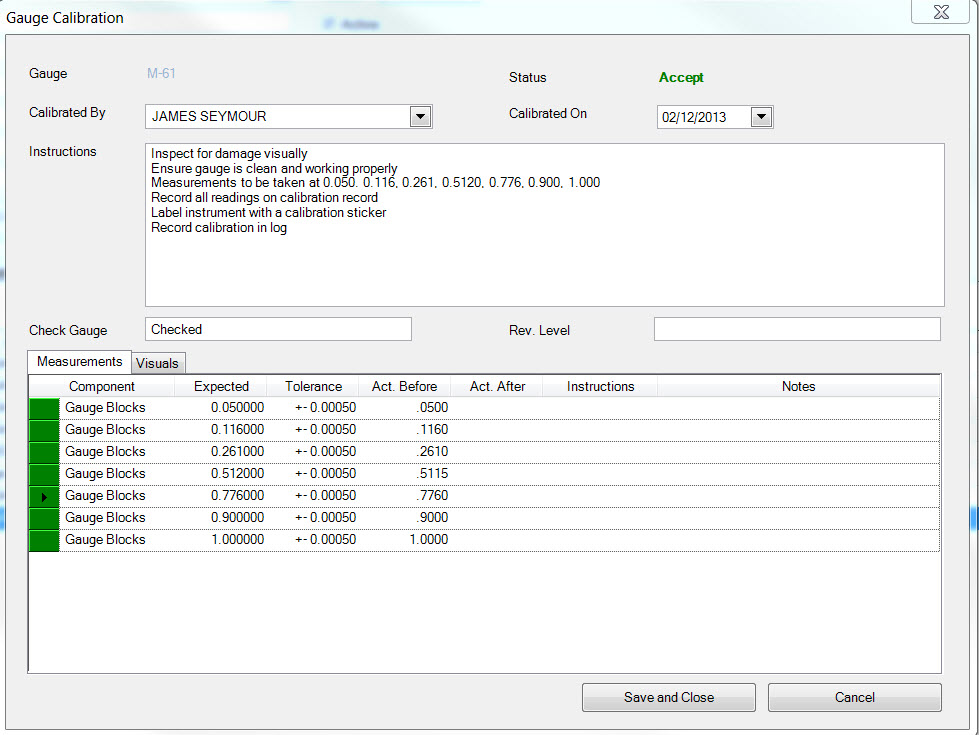
Enter the Measurements
To enter the measurements, click the  tab to display the Measurements.
Enter the measurement information.
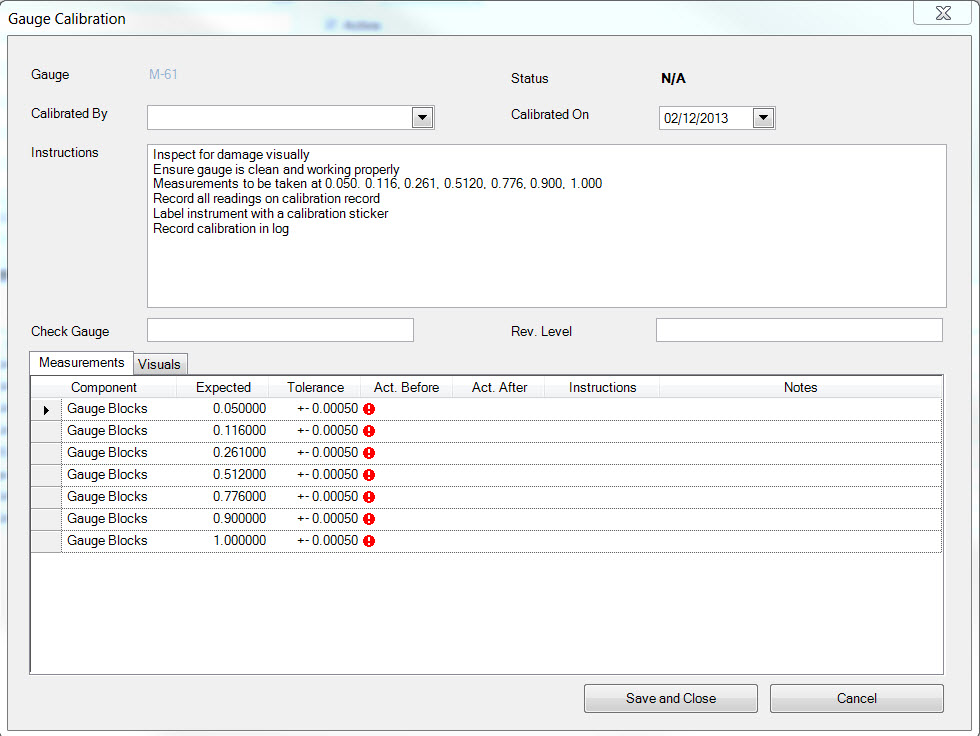
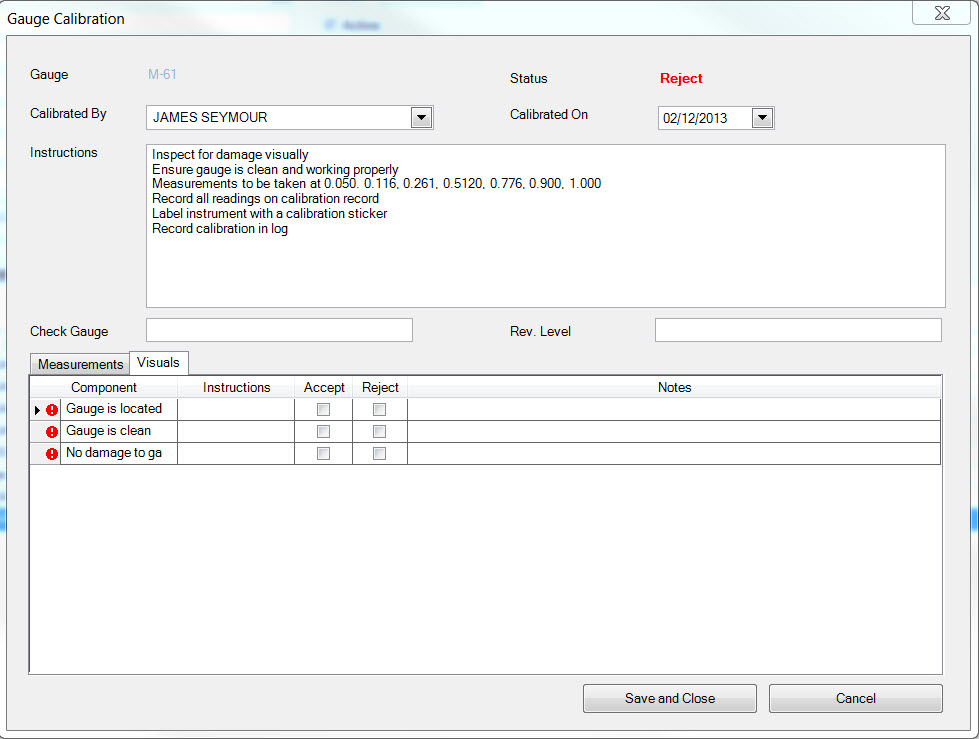
Enter the Visual Inspections
To enter the visual inspections, click the  tab to display the Visual Inspections.
Enter the visual inspection information.
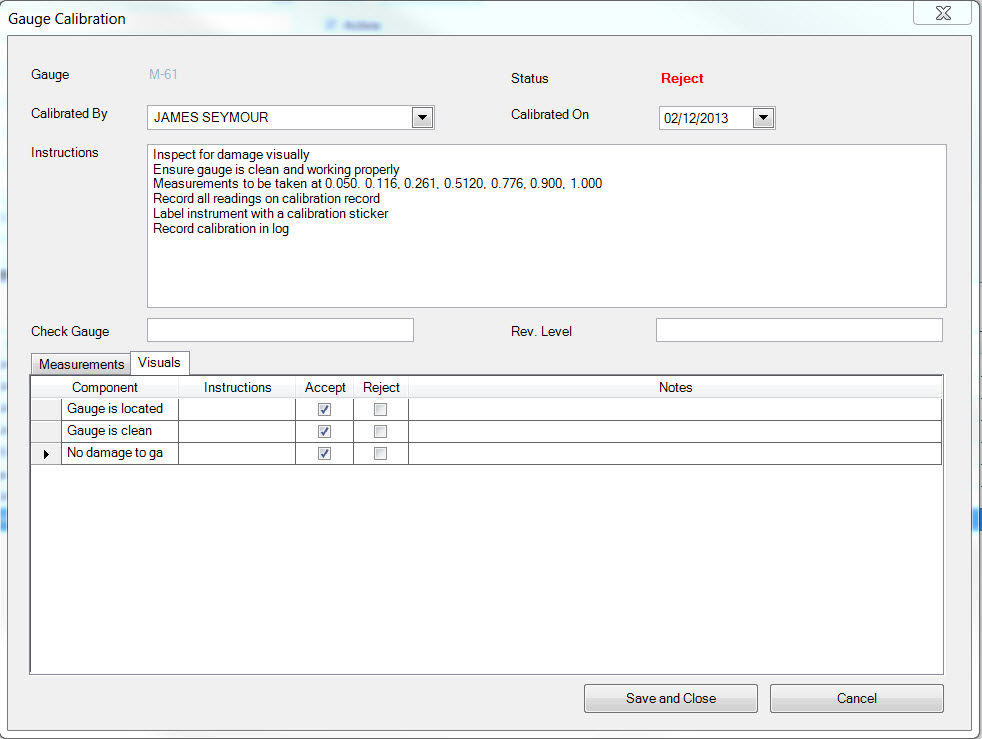
Click the  icon to save all the changes.
Deleting a Measurement or Visual Inspection from a Calibration
To delete a Measurement or Visual Inspection from a calibration, navigate to the  tab, clicking on the
 ![]() icon.
Double-click on the selected gauge row to bring up the ‘Gauge Detail’ screen.
icon.
Double-click on the selected gauge row to bring up the ‘Gauge Detail’ screen.

Click the  tab to display the Calibration Procedure.

Deleting Measurements
To delete the measurements, click the  tab to display the Calibration Measurements.
Click and highlight the measurement you wish to delete, then press the Delete key on the keyboard.
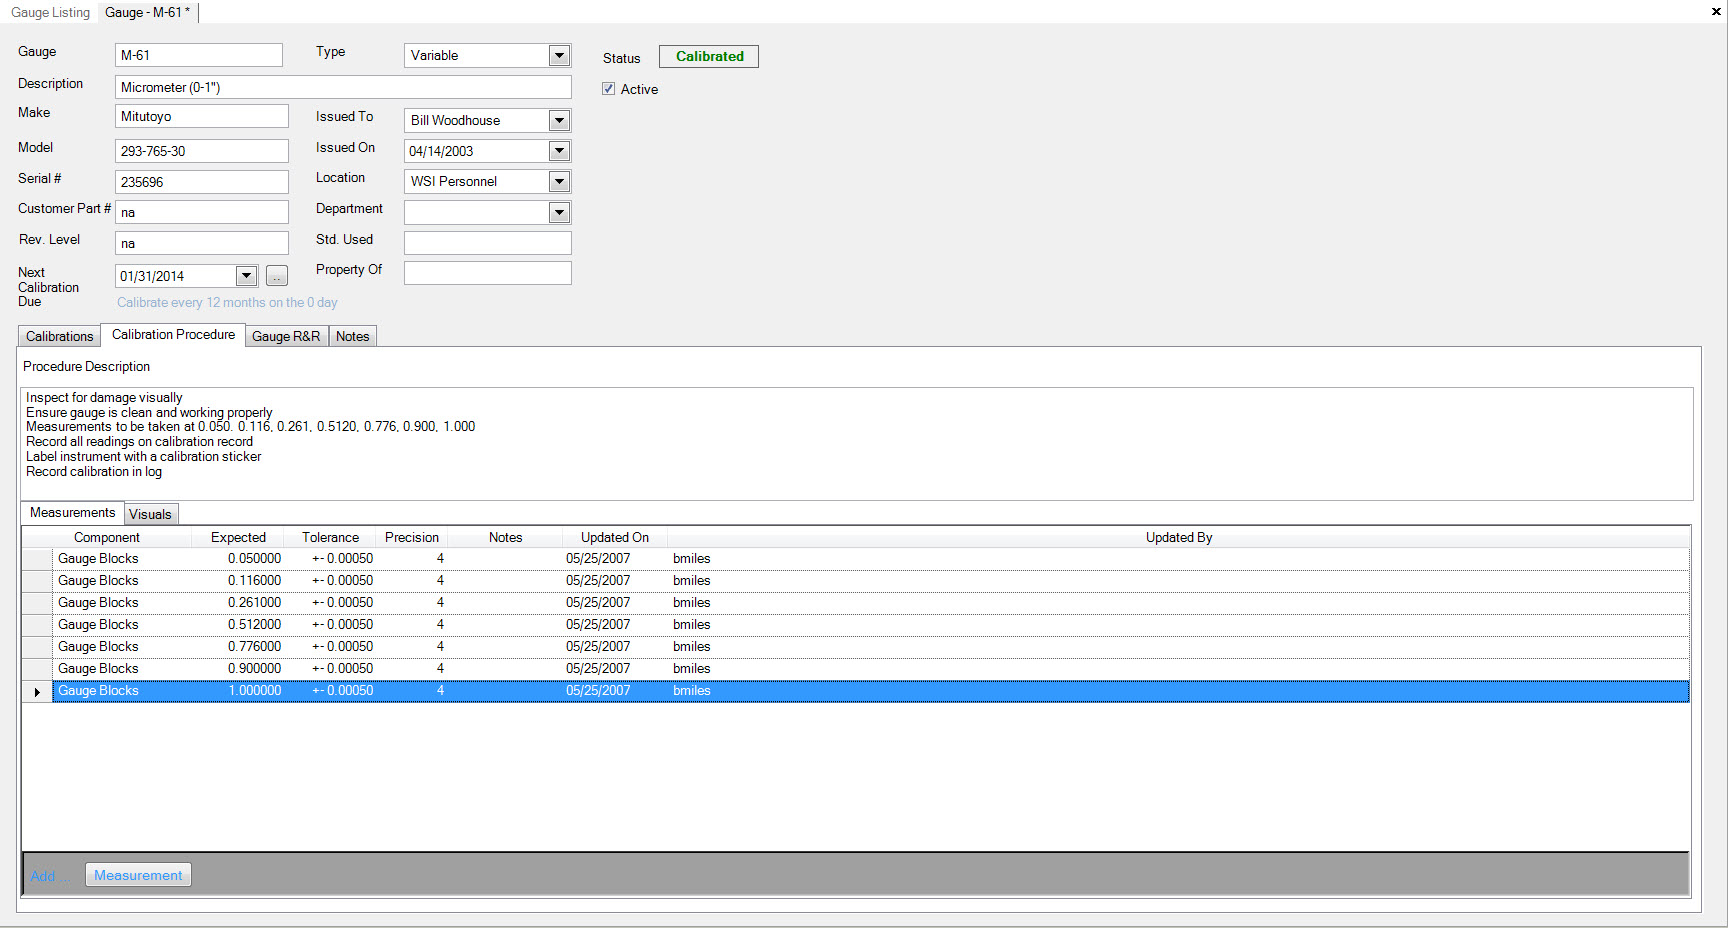
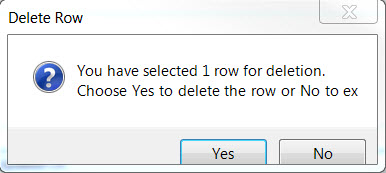
A window with the message ‘You have selected 1 row for deletion. Choose Yes to delete a row or No to exit?’ will appear, click the  button.
The measurement will be removed from the calibration.
Deleting Visual Inspections
To delete the visual inspections, click the  tab to display the Calibration Visual Inspections.
Click and highlight the visual inspection you wish to delete, then press the Delete key on the keyboard.
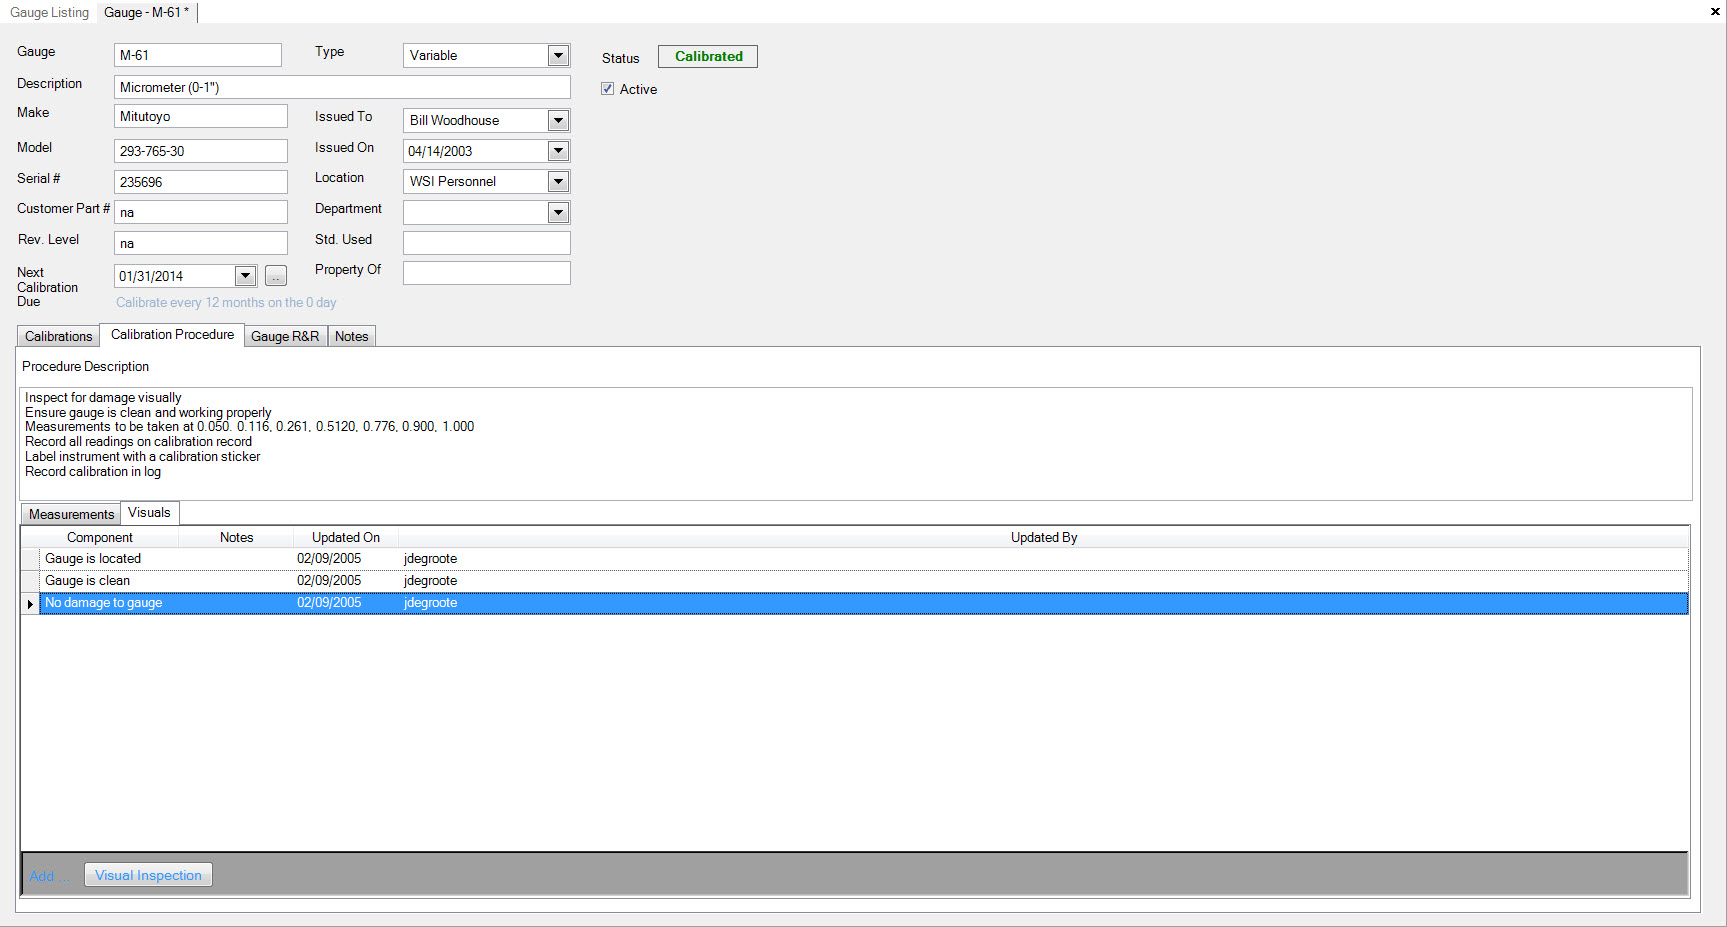
A window with the message ‘You have selected 1 row for deletion. Choose Yes to delete a row or No to exit?’ will appear, click the  button.
The visual inspection will be removed from the calibration.

Completing Gauge Repeatability and Reproducibility Study Study
To add a Repeatability and Reproducibility Study for a Gauge, navigate to the  tab, clicking on the
 ![]() icon.
Double-click on the selected gauge row to bring up the ‘Gauge Detail’ screen.
icon.
Double-click on the selected gauge row to bring up the ‘Gauge Detail’ screen.

Click the  tab to display the Gauge Repeatability and Reproducibility Study.
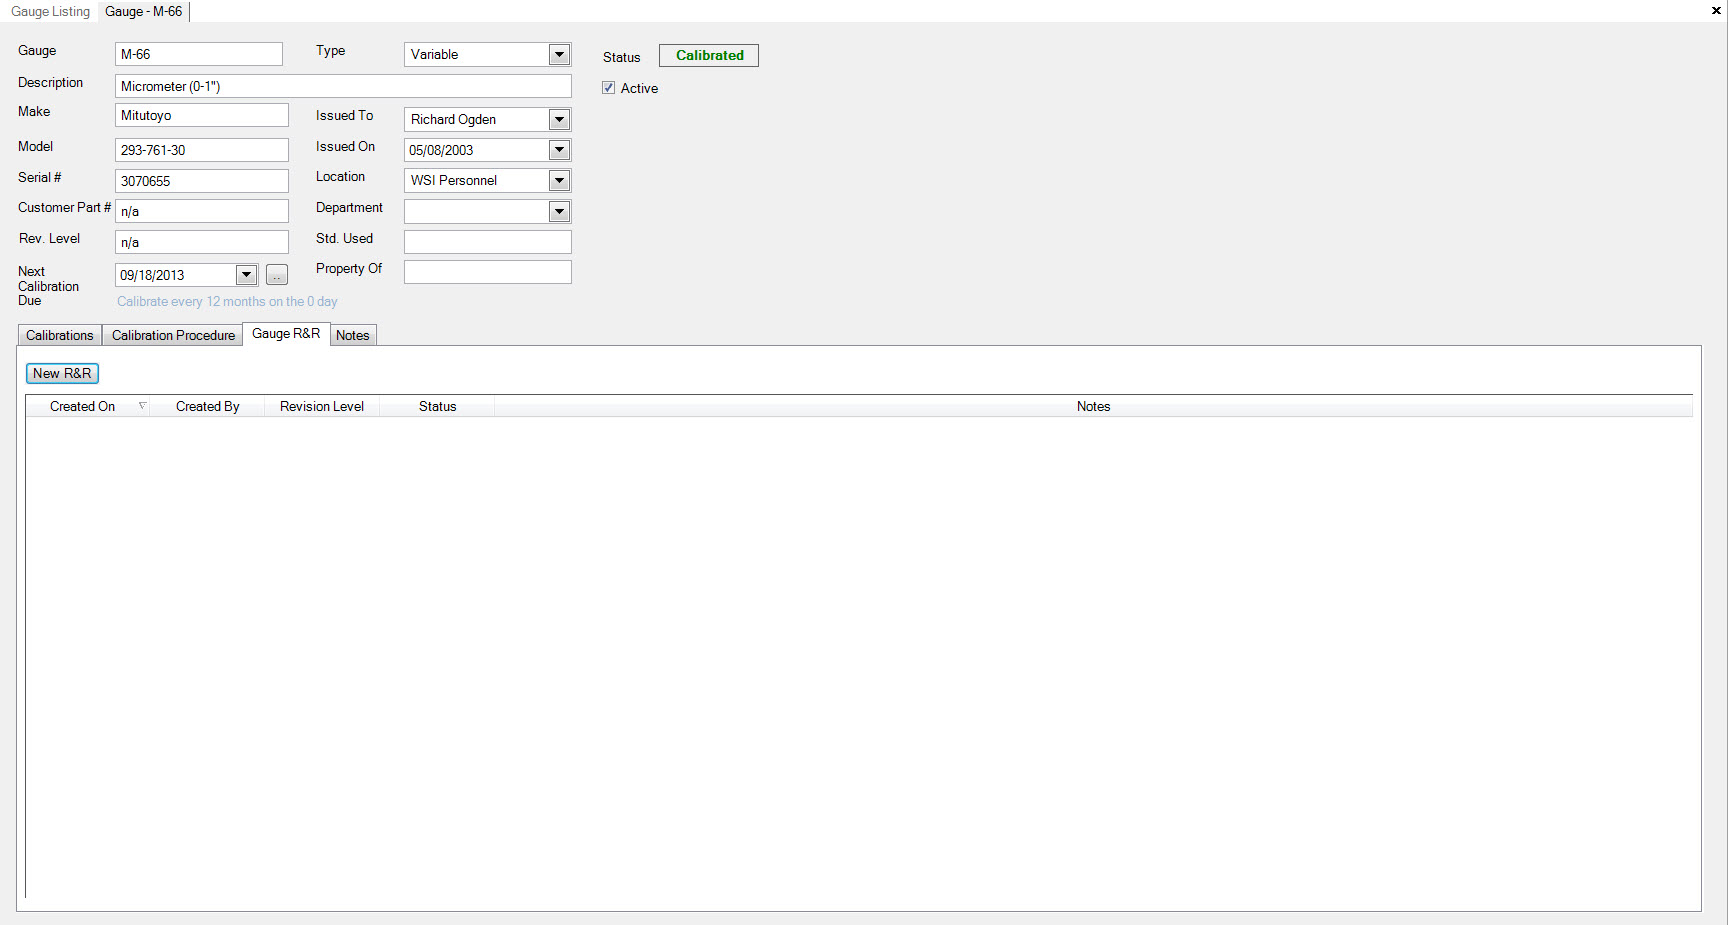
Now click the  button to display the Gauge Repeatability and Reproducibility window.
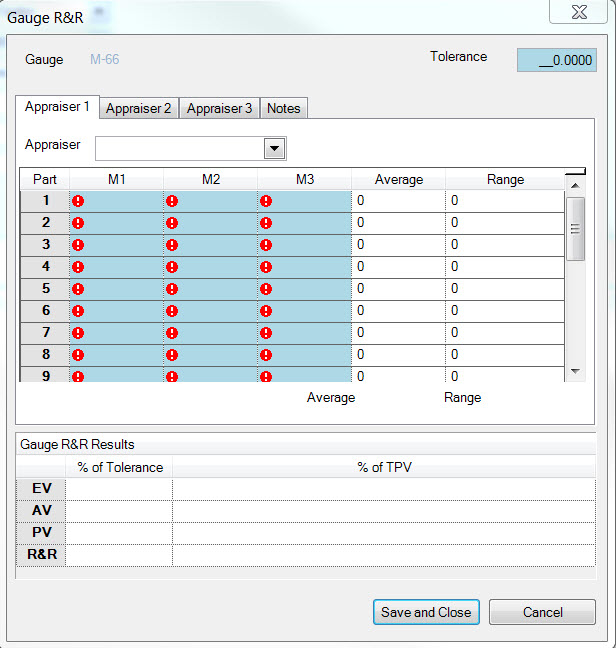
All three Appraiser sections must be completed. The system will prompt if all the fields have not been completed correctly.
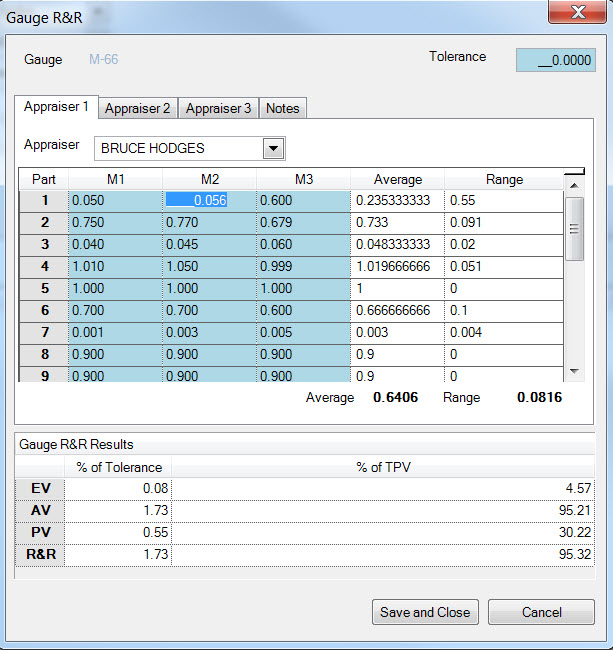
Click the  icon to save all the changes.
Quality Time Tracking
Quality Time Tracking is used in the ShopEdge system to record Q/A labour hours for employees for quality time tracking, scrap and rework. This information provides better reporting by linking quality transactions to reject numbers for scrap, rework and labour hours.
Quality Rejects
Quality Reject numbers are used in the ShopEdge system to provide better reporting by linking quality transactions to reject numbers for scrap, rework and labour hours.
Adding a New Quality Reject Number
There are three different ways to add a new quality reject number to the system. The first way is to press the Ctrl+Shift+7 keys at the same time. The second is to navigate to the File>New>Quality Reject.
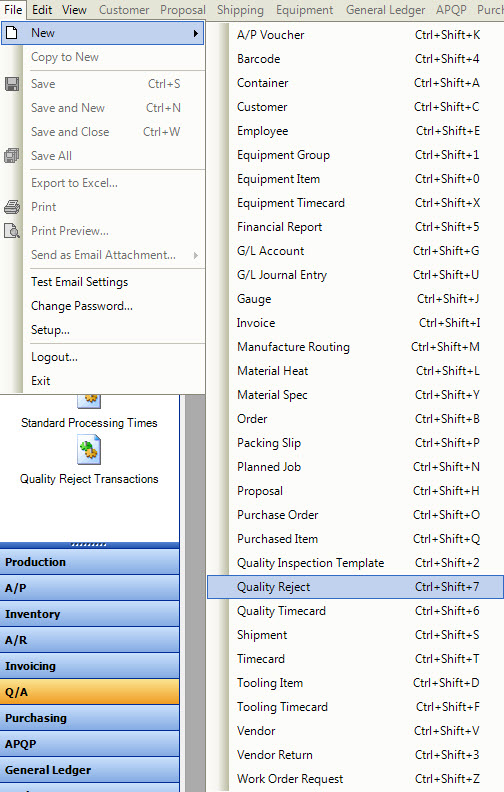
The last way is to click on the  button, and then on the ‘Quality Reject’ option.
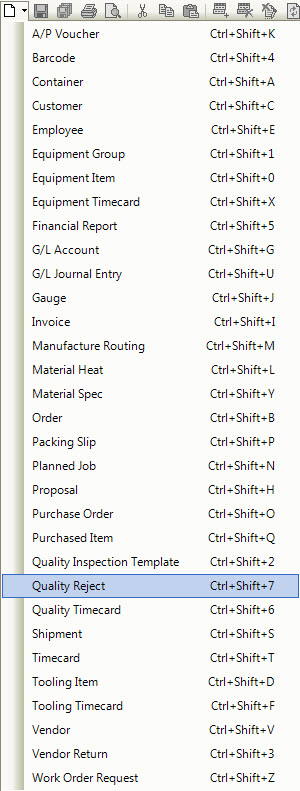
Each of these options will open a new quality reject screen.
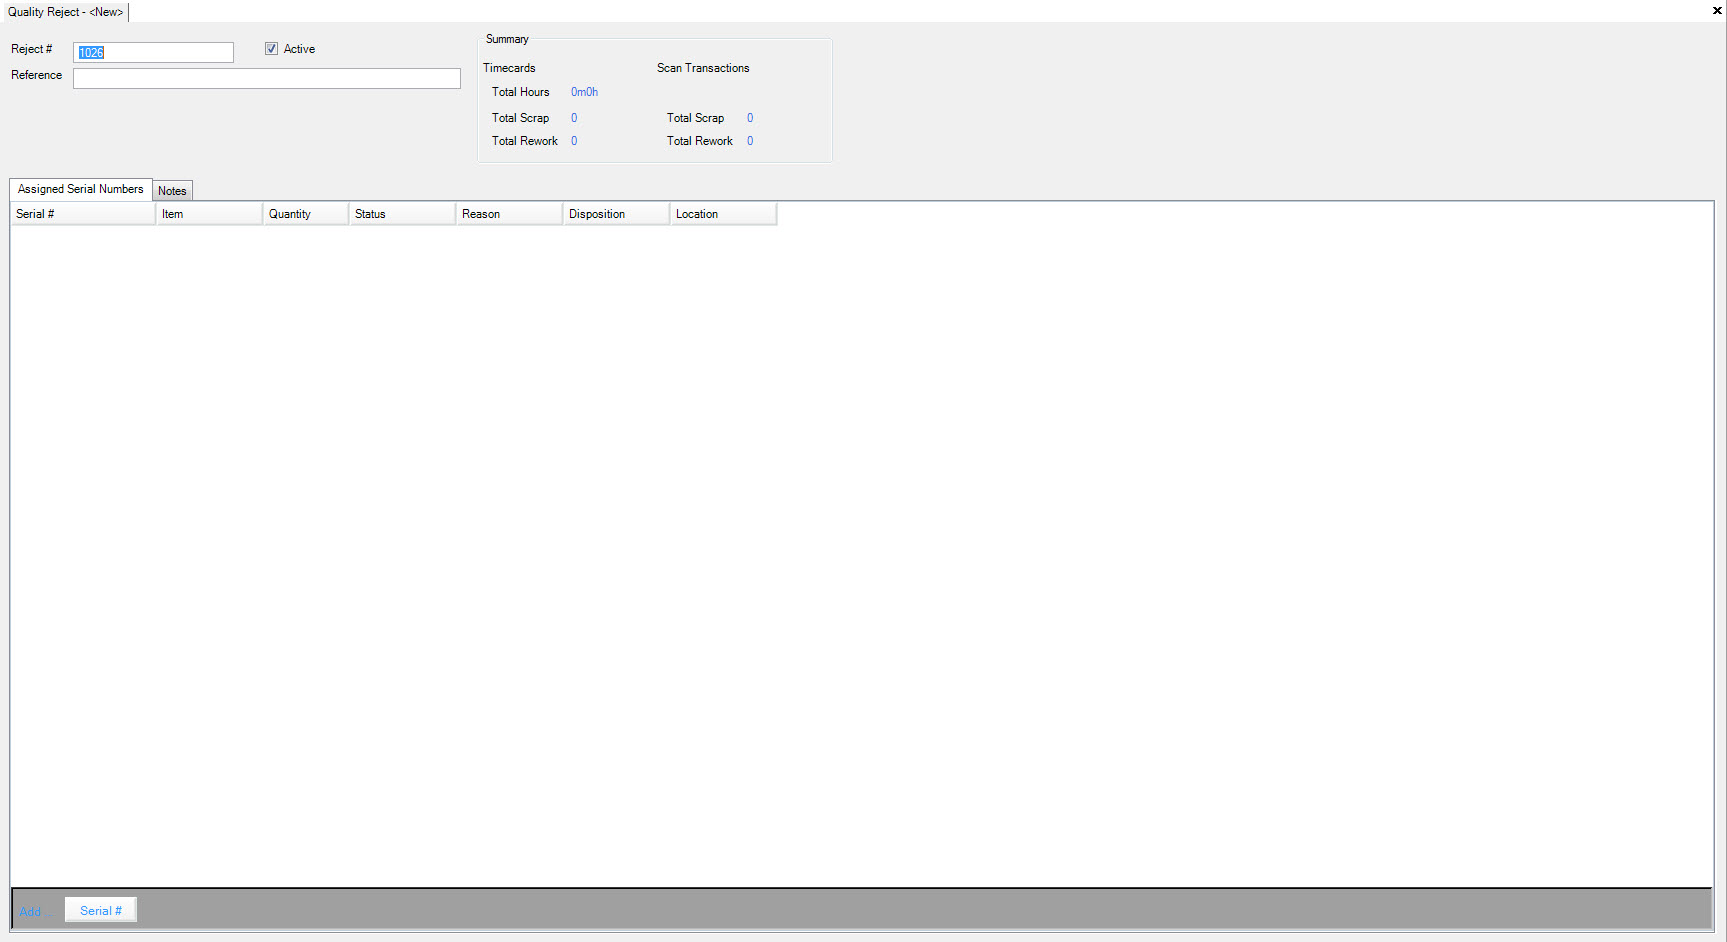
Reject Number Information
The first step to filling out a quality reject is entering the Reference. The system automatically assigns a Reject Number but this can be changed to any numbering sequence required. A message will be displayed if the Reject Number already exists.
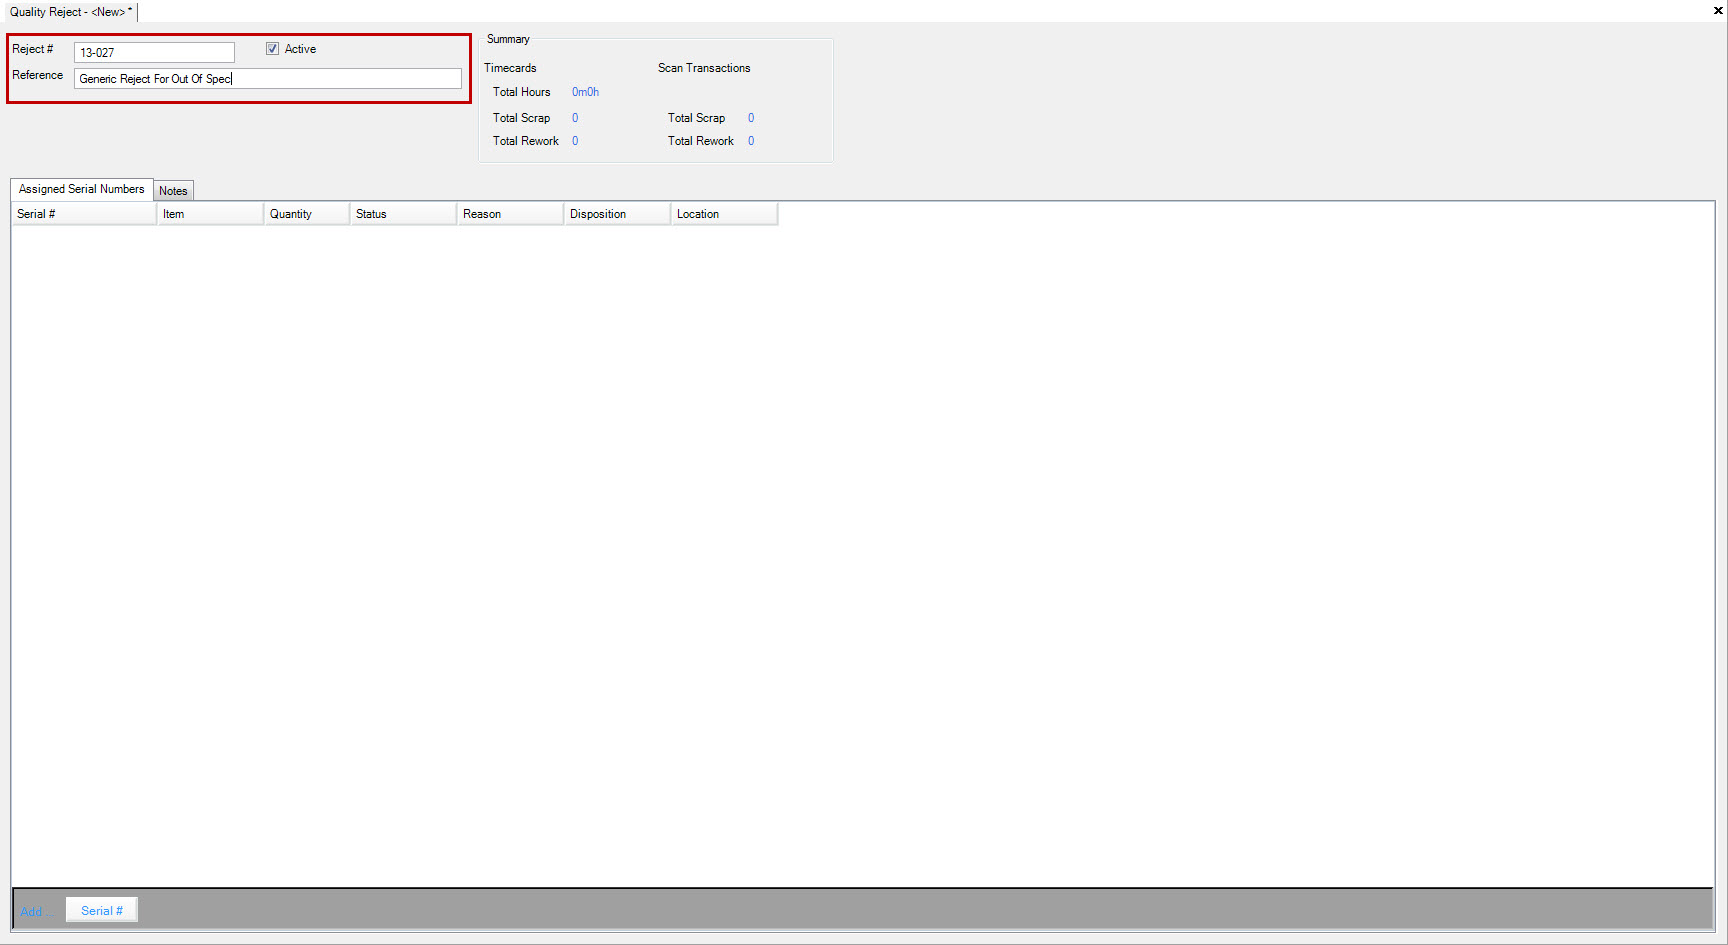
Assigning Serial Numbers to the Reject Number
To assign Serial Numbers to the Reject Number click on the  button,
then click the
  button to open the serial number lookup screen.
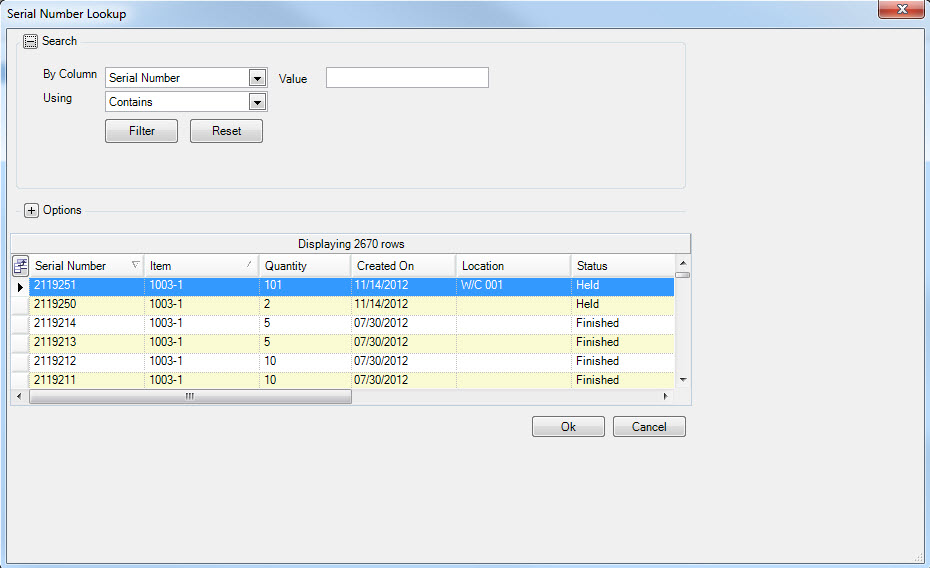
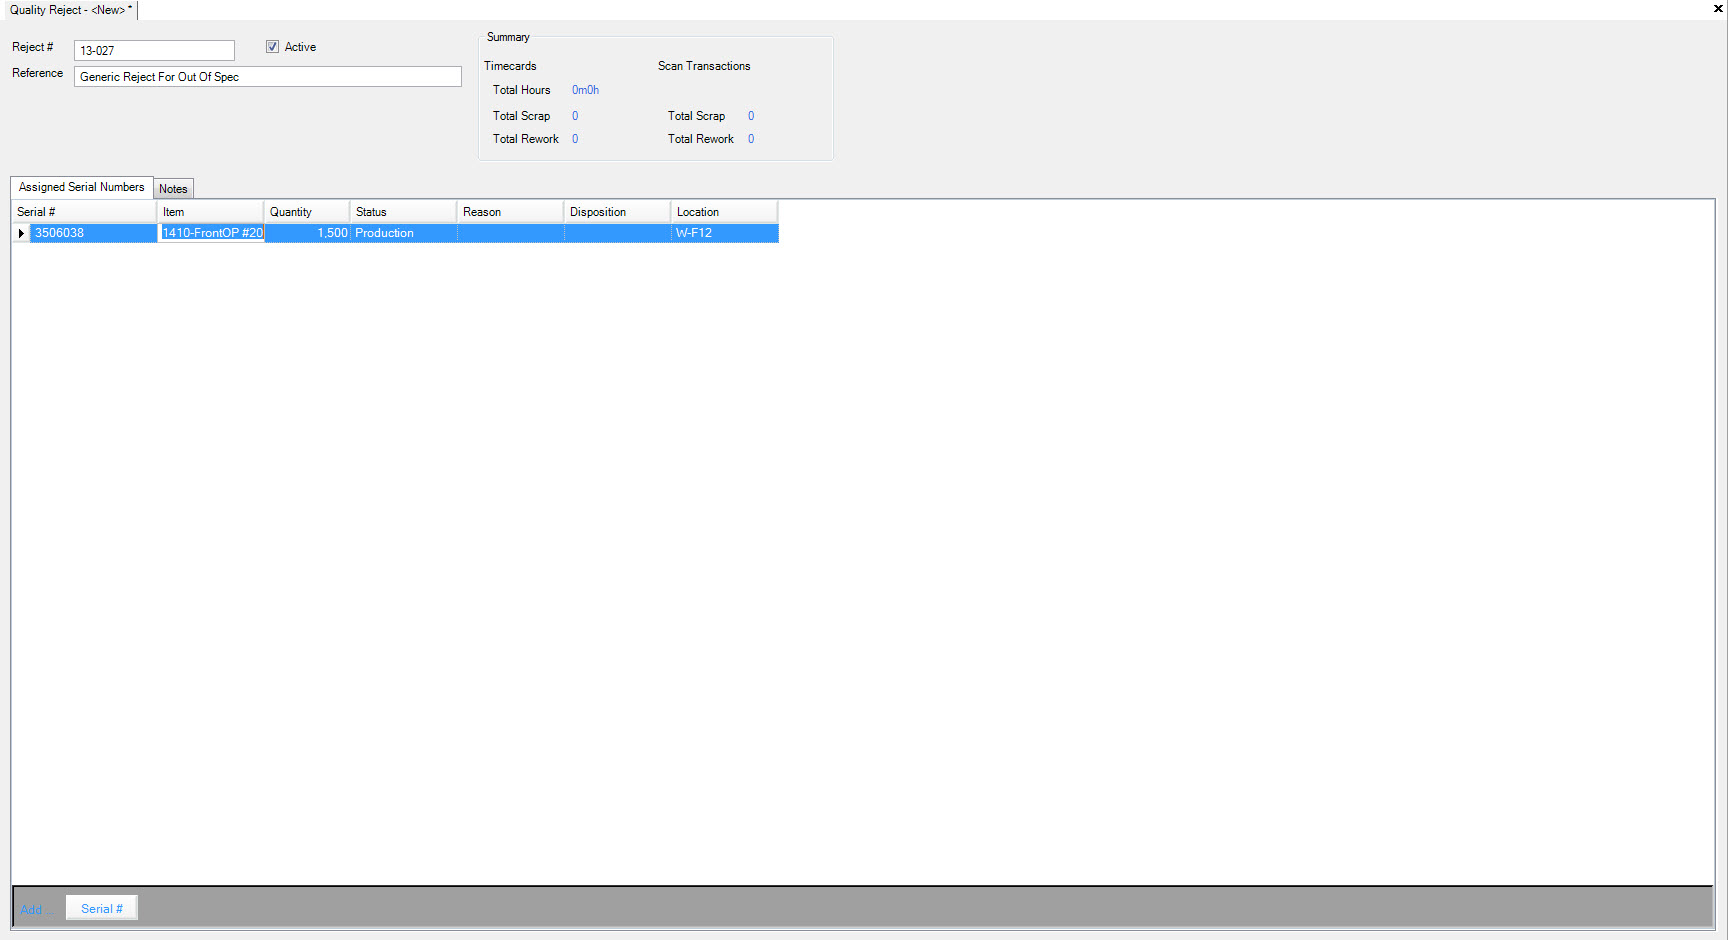
Once the Serial Number has been selected or entered the Item, Quantity, Status and Location will be automatically populated based on the Serial # information.
To assign another Serial Number to the Reject Number click on the  button,
then click the
  button to open the serial number lookup screen.
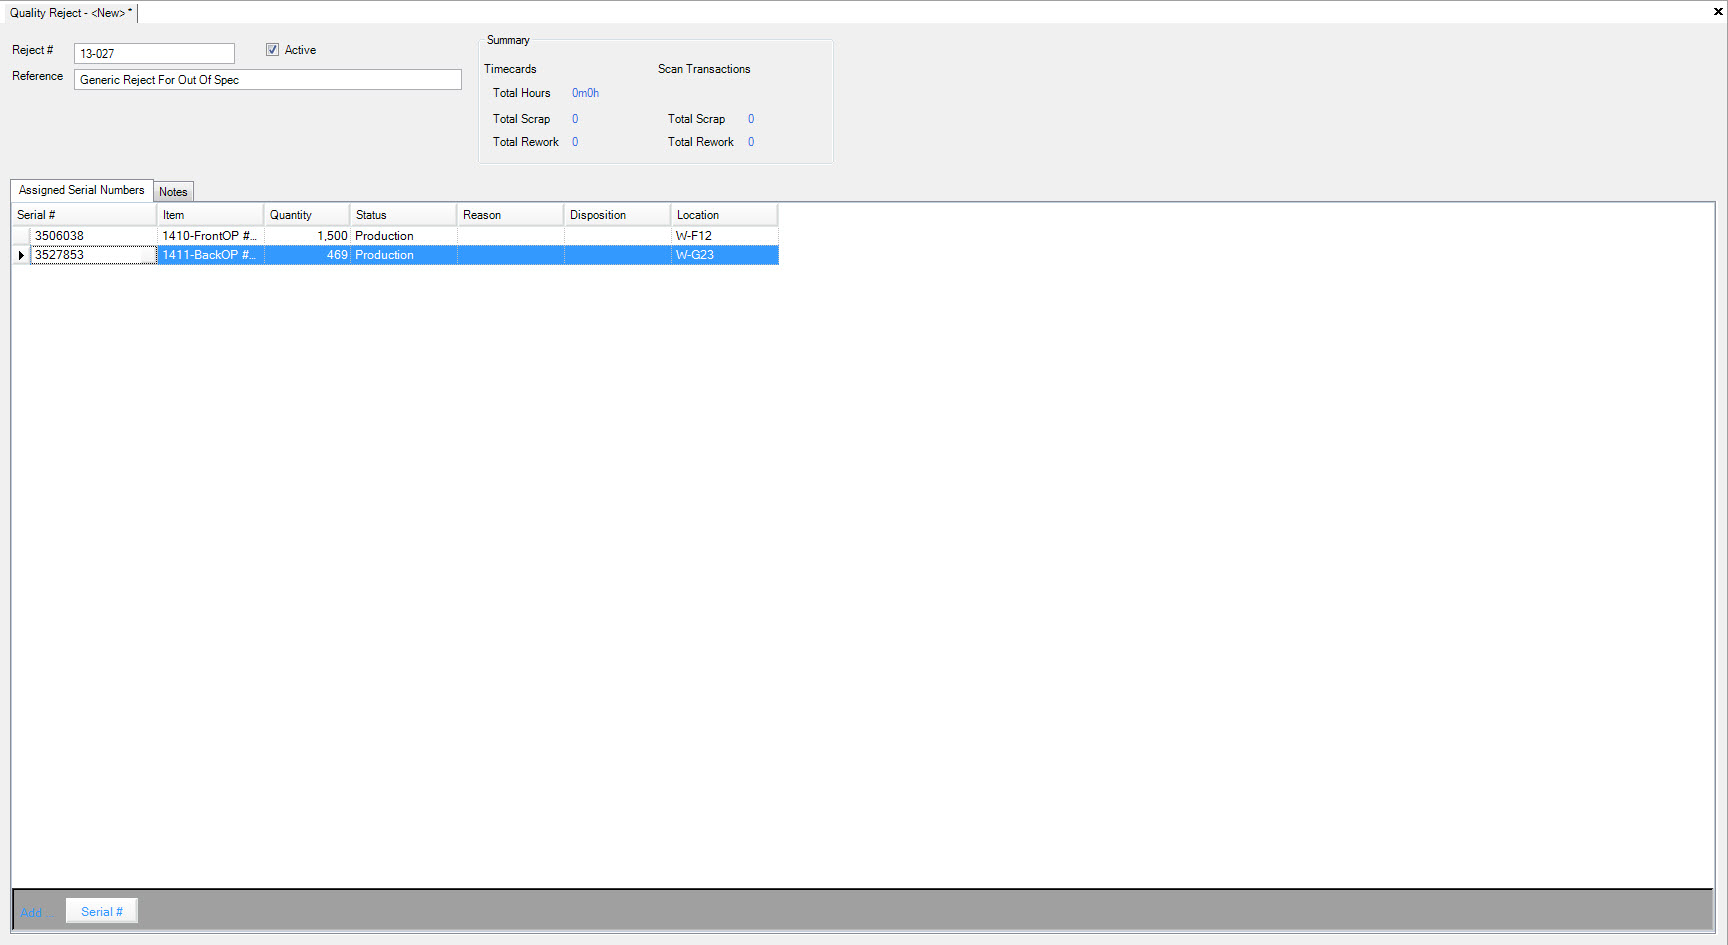
Entering Reject Number Notes
To enter Notes for the Reject Number click on the  tab,
then enter the note information.
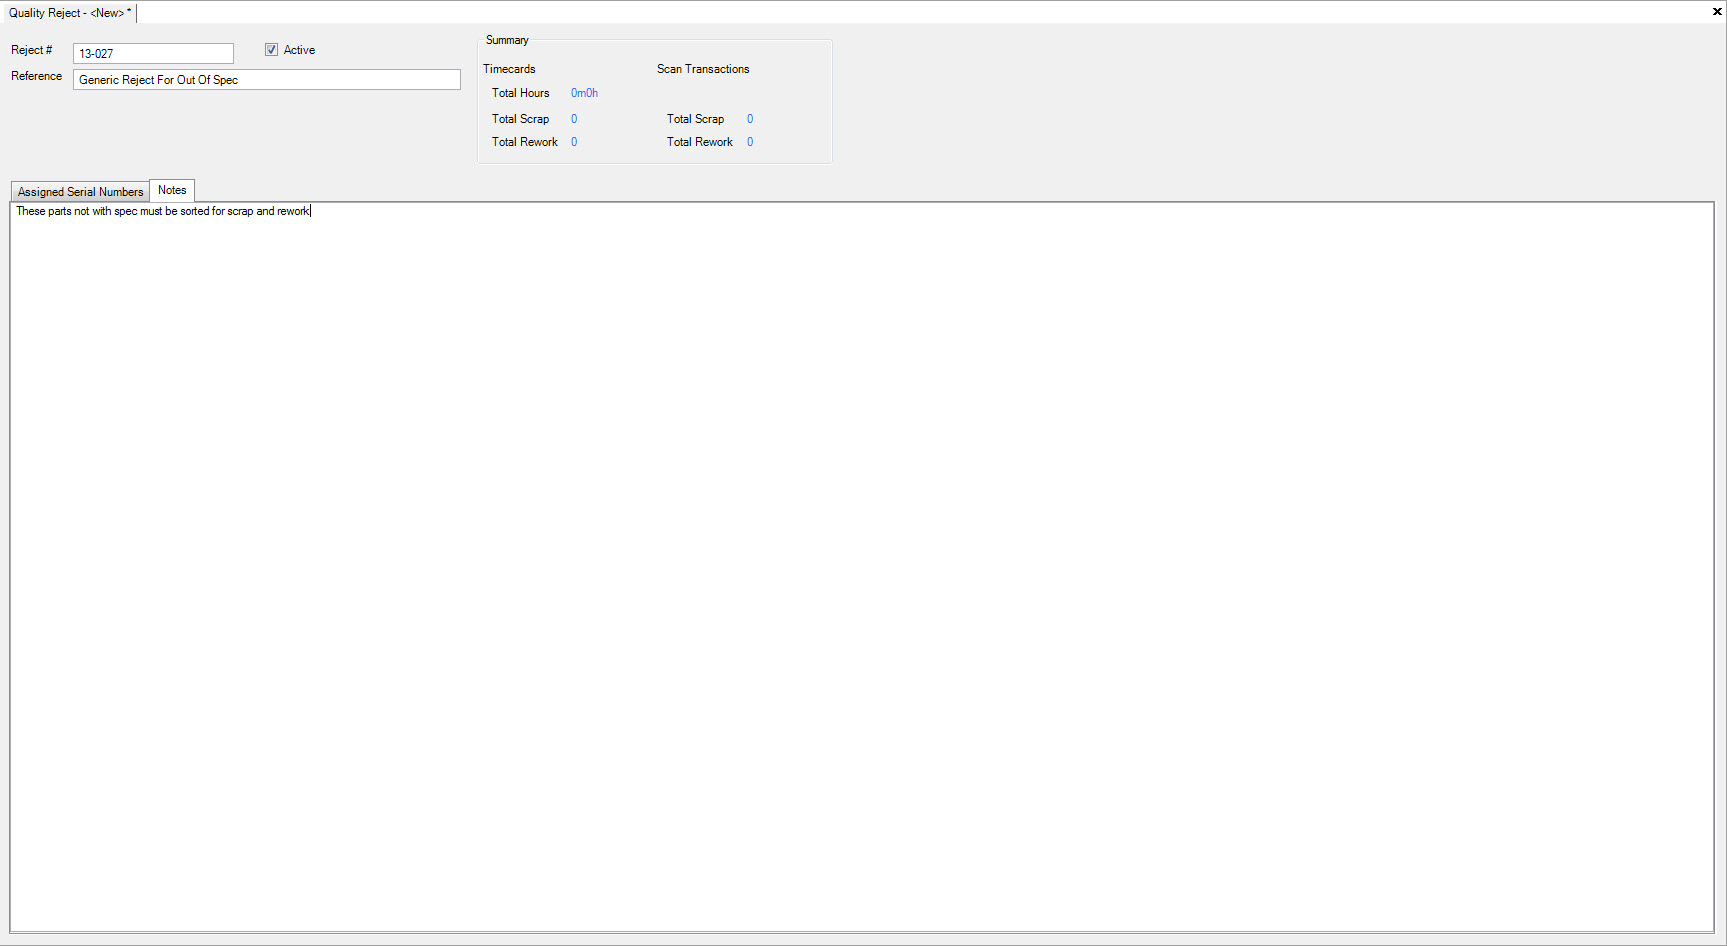
Click the  icon to save.
Maintaining Quality Reject Numbers
To make changes to an existing Quality Reject navigate to the  tab, click on the
 ![]() icon.
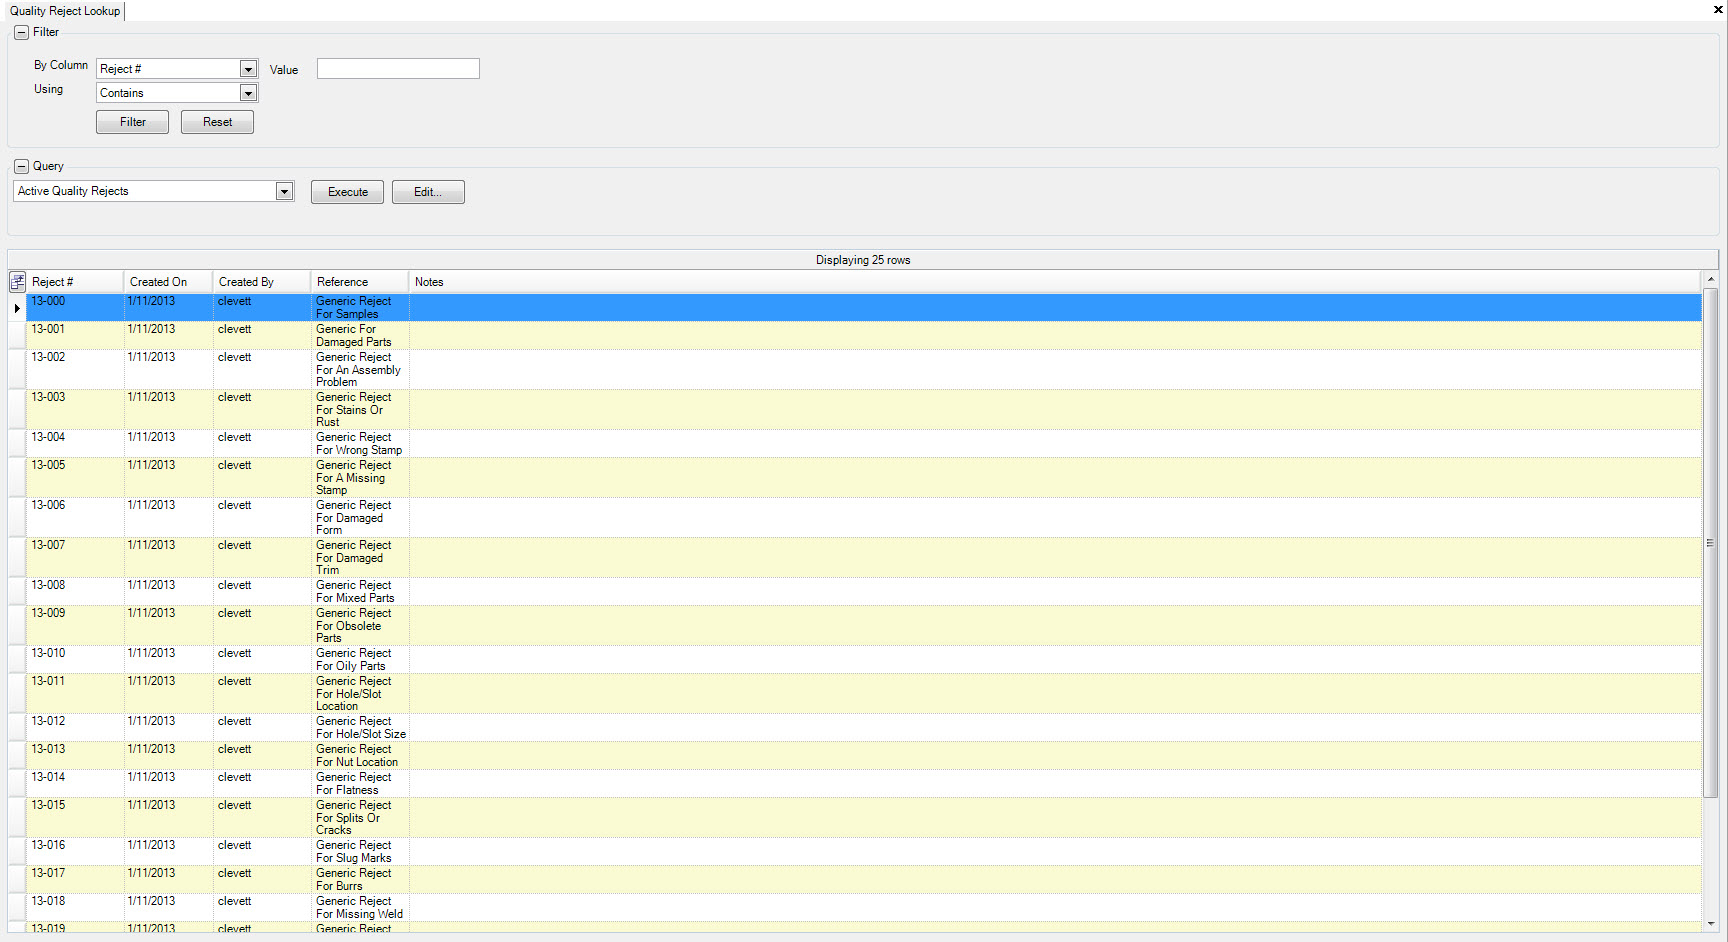
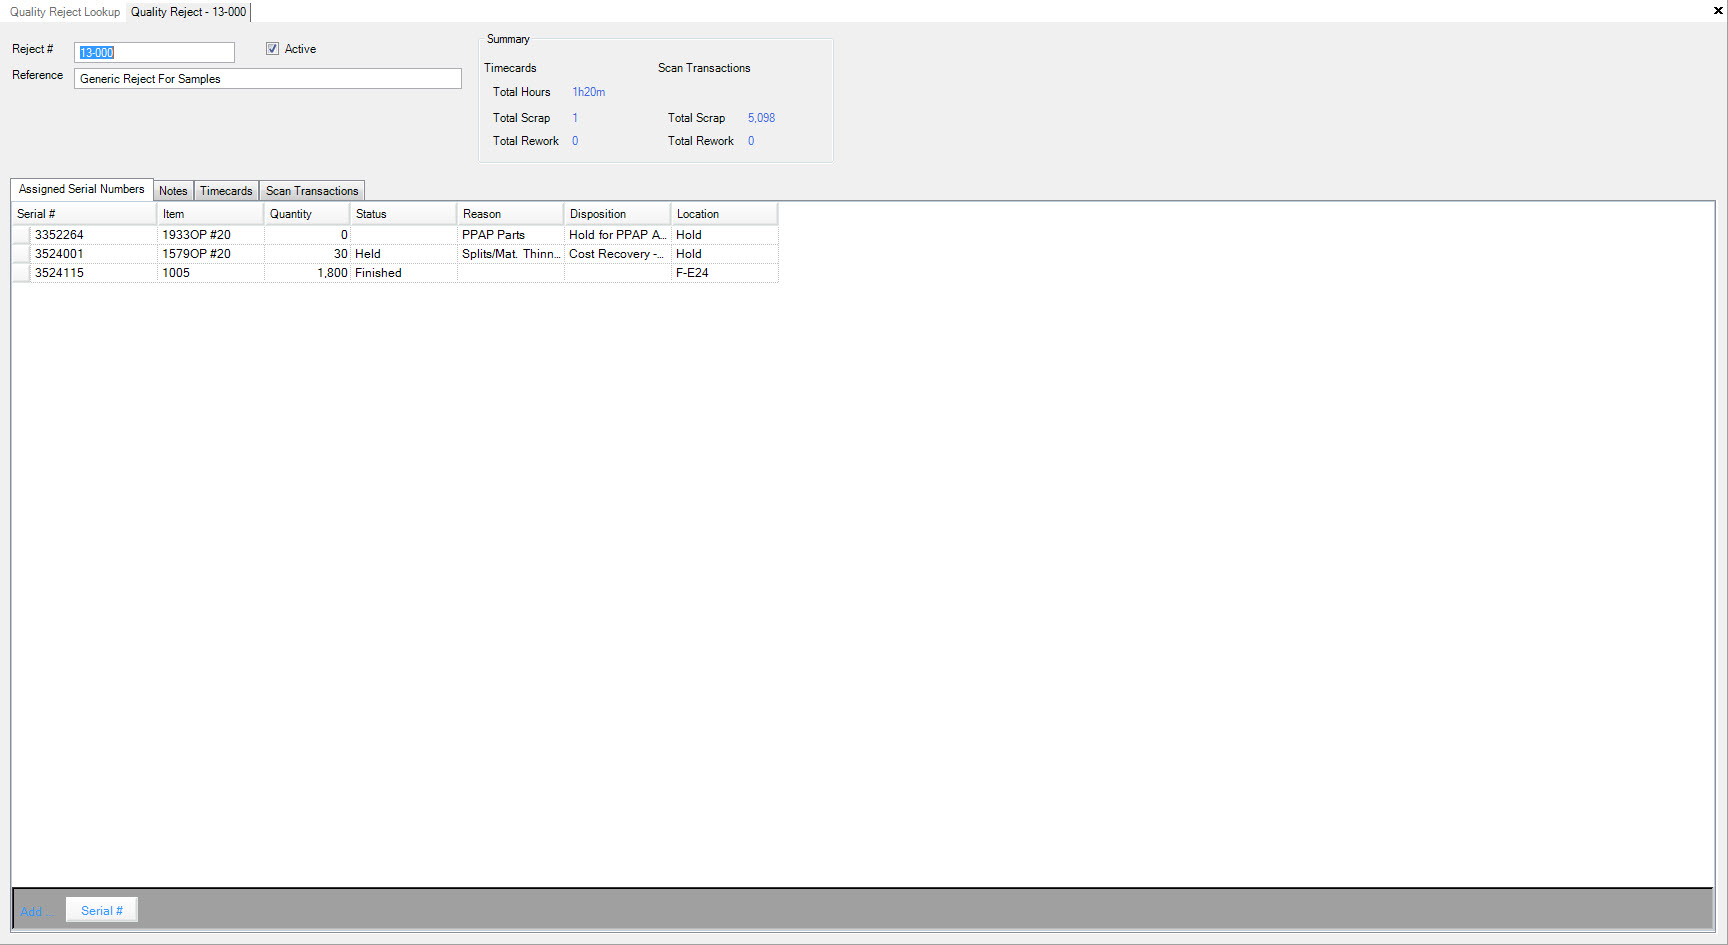
The ‘Quality Rejects Number Lookup’ will be displayed, search for the reject you wish to maintain. Double-click on the reject row to bring up the ‘Quality Reject Number Detail’
screen.
icon.
The ‘Quality Rejects Number Lookup’ will be displayed, search for the reject you wish to maintain. Double-click on the reject row to bring up the ‘Quality Reject Number Detail’
screen.
Assigning a Serial Number to the Reject Number
To assign a Serial Number to the Reject Number click on the  button,
then click the
  button to open the serial number lookup screen.

Once the Serial Number has been selected or entered the Item, Quantity, Status and Location will be automatically populated based on the Serial # information.

Click the  icon to save.
Deleting a Serial Numbers from the Reject Number
To delete the Serial Number from the Reject Number, click and highlight the row of the serial number you wish to delete, then press the Delete key on the keyboard.
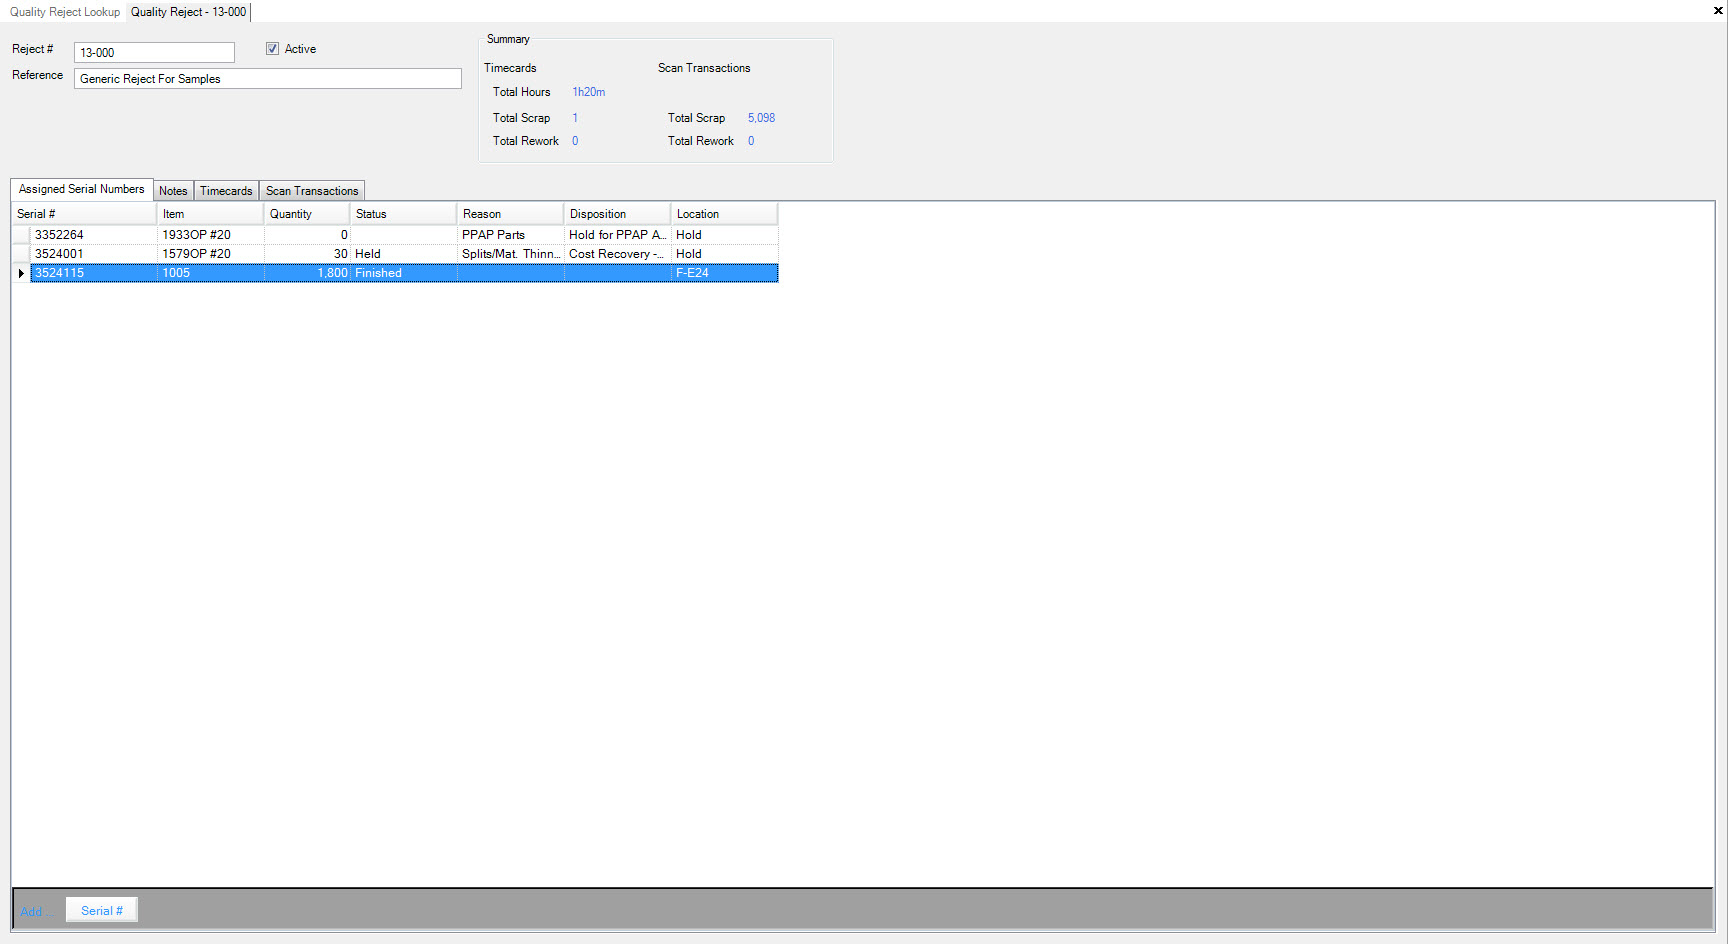
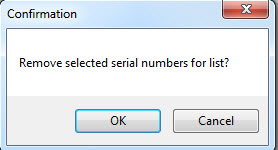
A confirmation window with the message ‘Remove selected serial numbers for list?’ will appear, click the  button. The serial number
will be removed from the assigned serial numbers for the reject number.
Click the  icon to save.
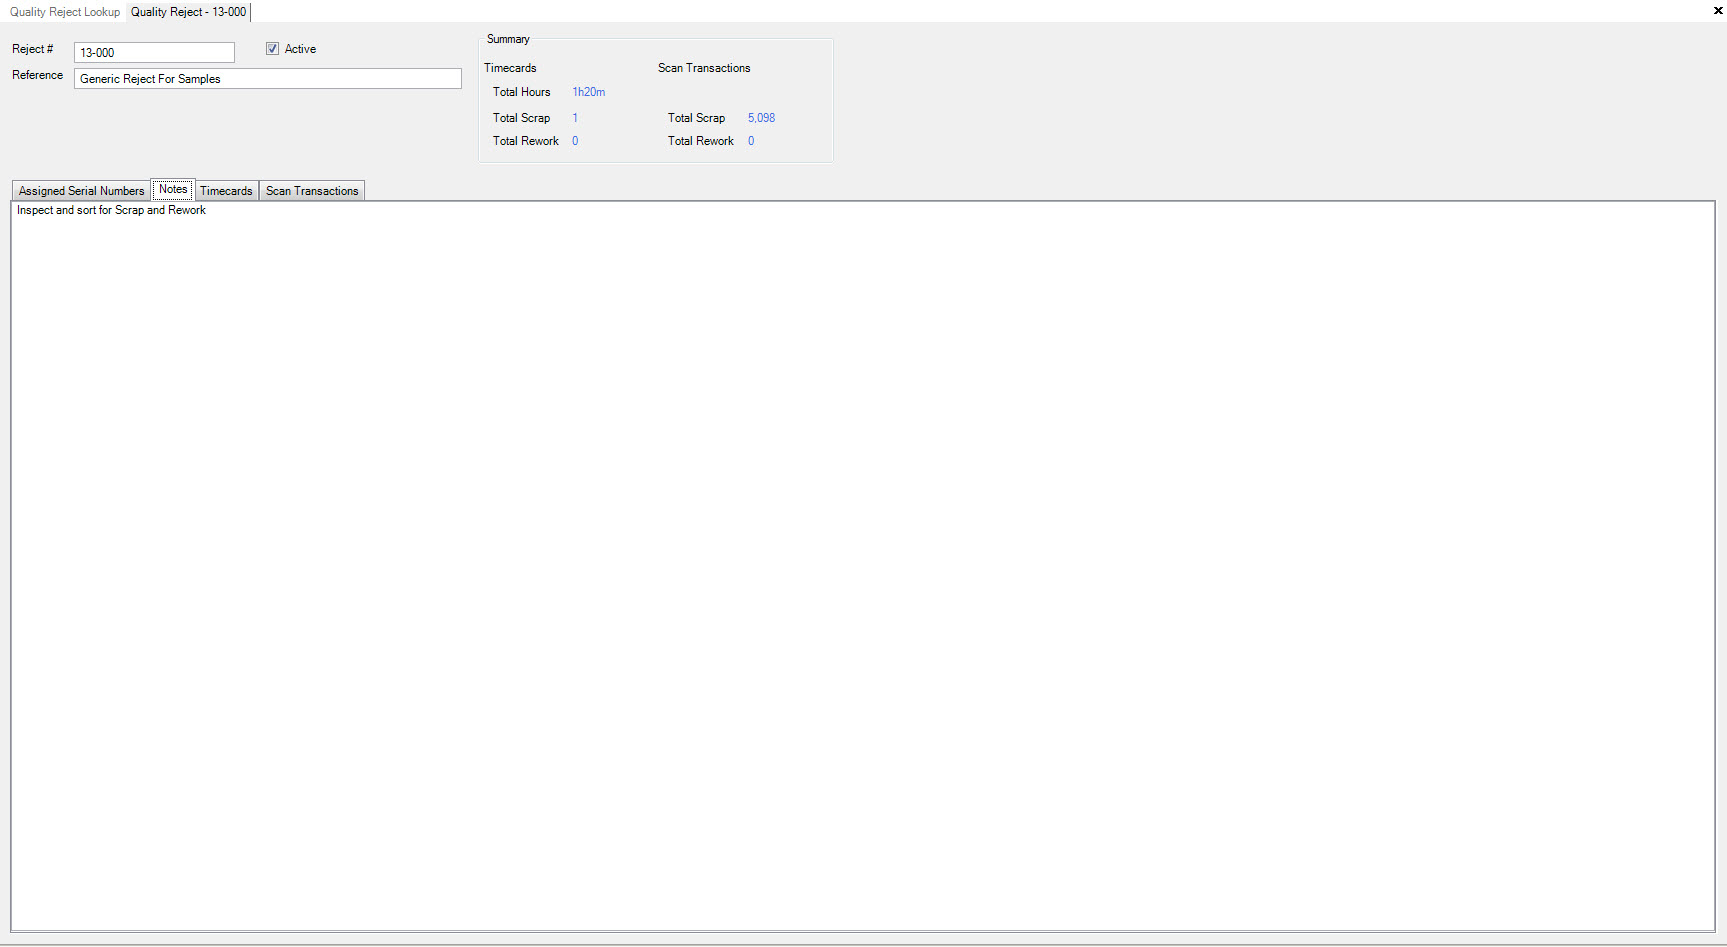
Modifying the Reject Number Notes
To change the Notes for the Reject Number click on the  tab,
then enter the note information.
Click the  icon to save.
Viewing a Quality Reject Number
To view an existing Quality Reject navigate to the  tab, click on the
 ![]() icon.
The ‘Quality Rejects Number Lookup’ will be displayed, search for the reject you wish to maintain. Double-click on the reject row to bring up the ‘Quality Reject Number Detail’
screen.
icon.
The ‘Quality Rejects Number Lookup’ will be displayed, search for the reject you wish to maintain. Double-click on the reject row to bring up the ‘Quality Reject Number Detail’
screen.

The Assigned Serial Number information will be displayed, click the  icon to display the Reject Number Notes.

The Reject Notes information will be displayed, click the  icon to display the Reject Number Timecards.

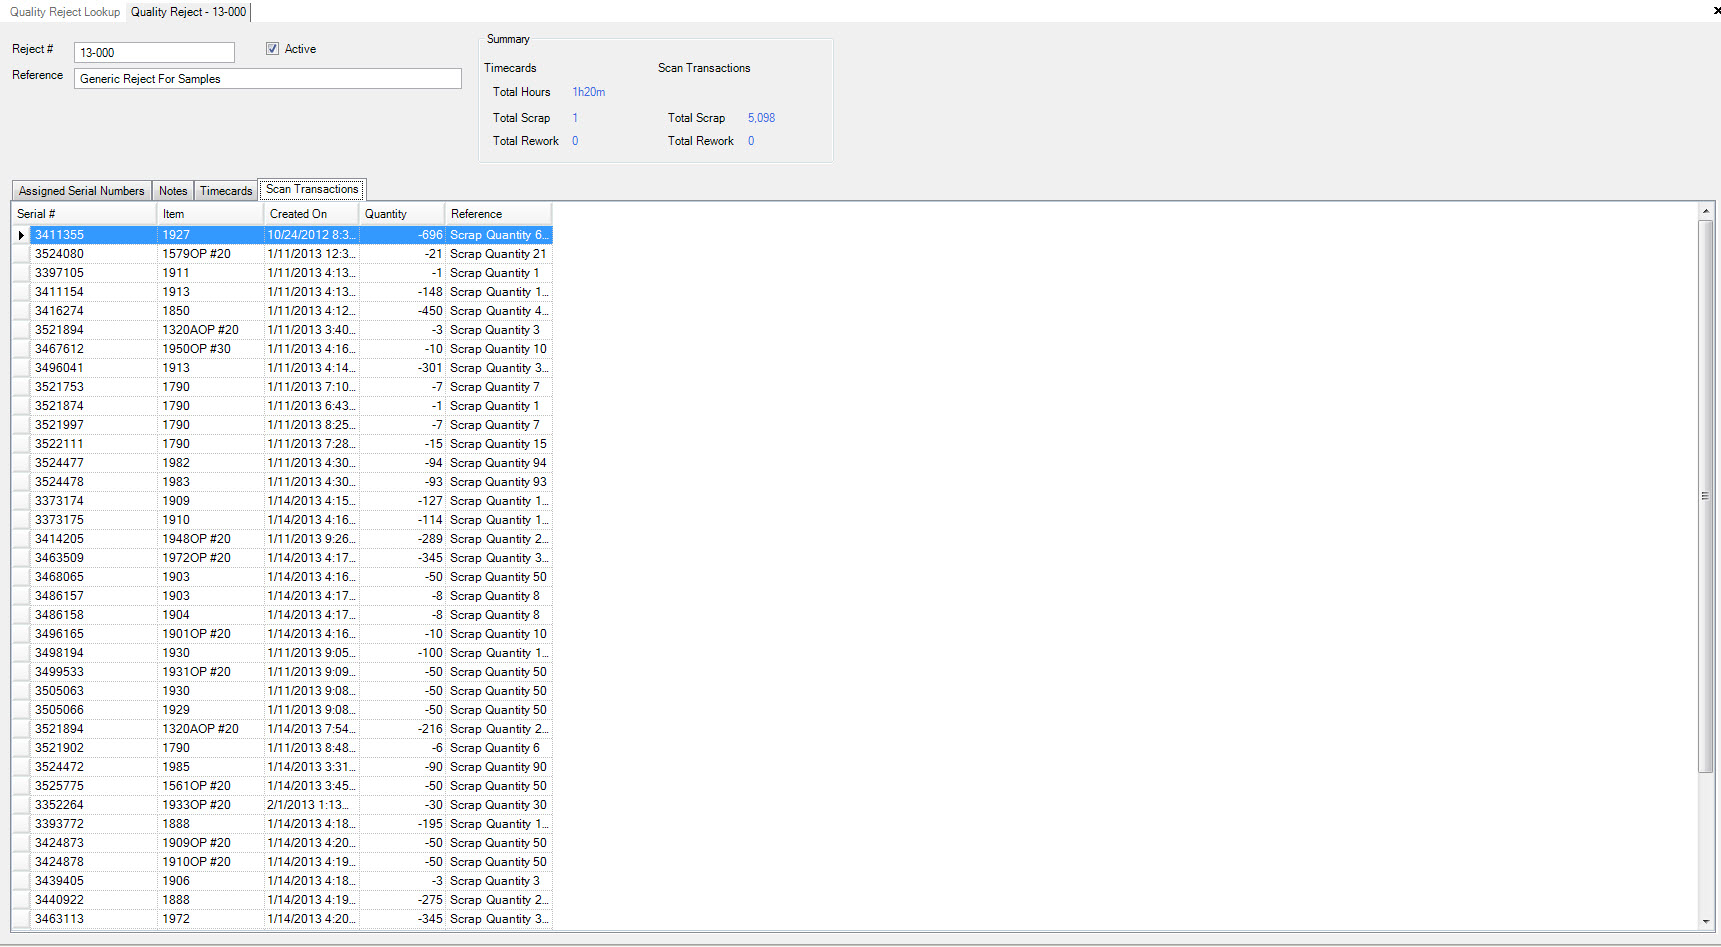
The Reject Timecards information will be displayed, click the  icon to display the Reject Number Scanned Transactions.
The Reject Scanned Transactions information will be displayed.
Quality Timecards
Quality Timecards are used in the ShopEdge system to record Q/A labour hours for employees for quality time tracking, scrap and rework. This information provides better reporting by linking quality transactions to reject numbers for scrap, rework and labour hours. Inventory transactions will be created to record the movement of inventory from held inventory to scrap, and held inventory back to on-hand inventory, eliminating the need for manual inventory adjustments. Existing quality timecards can be modified and deleted and all adjusting transactions will be created accordingly.
Adding a New Quality Timecard
There are three different ways to add a new quality timecard to the system. The first way is to press the Ctrl+Shift+6 keys at the same time. The second is to navigate to the File>New>Quality Timecard.
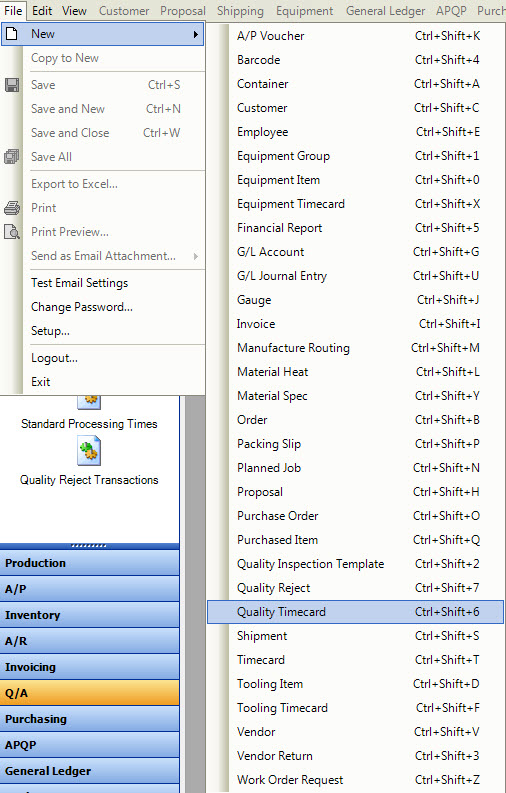
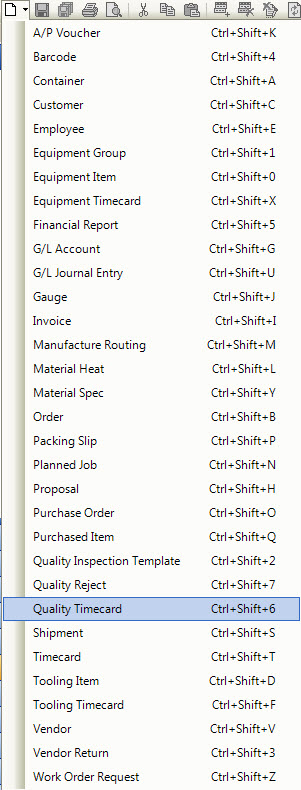
The last way is to click on the  button, and then on the ‘Quality Timecard’ option.
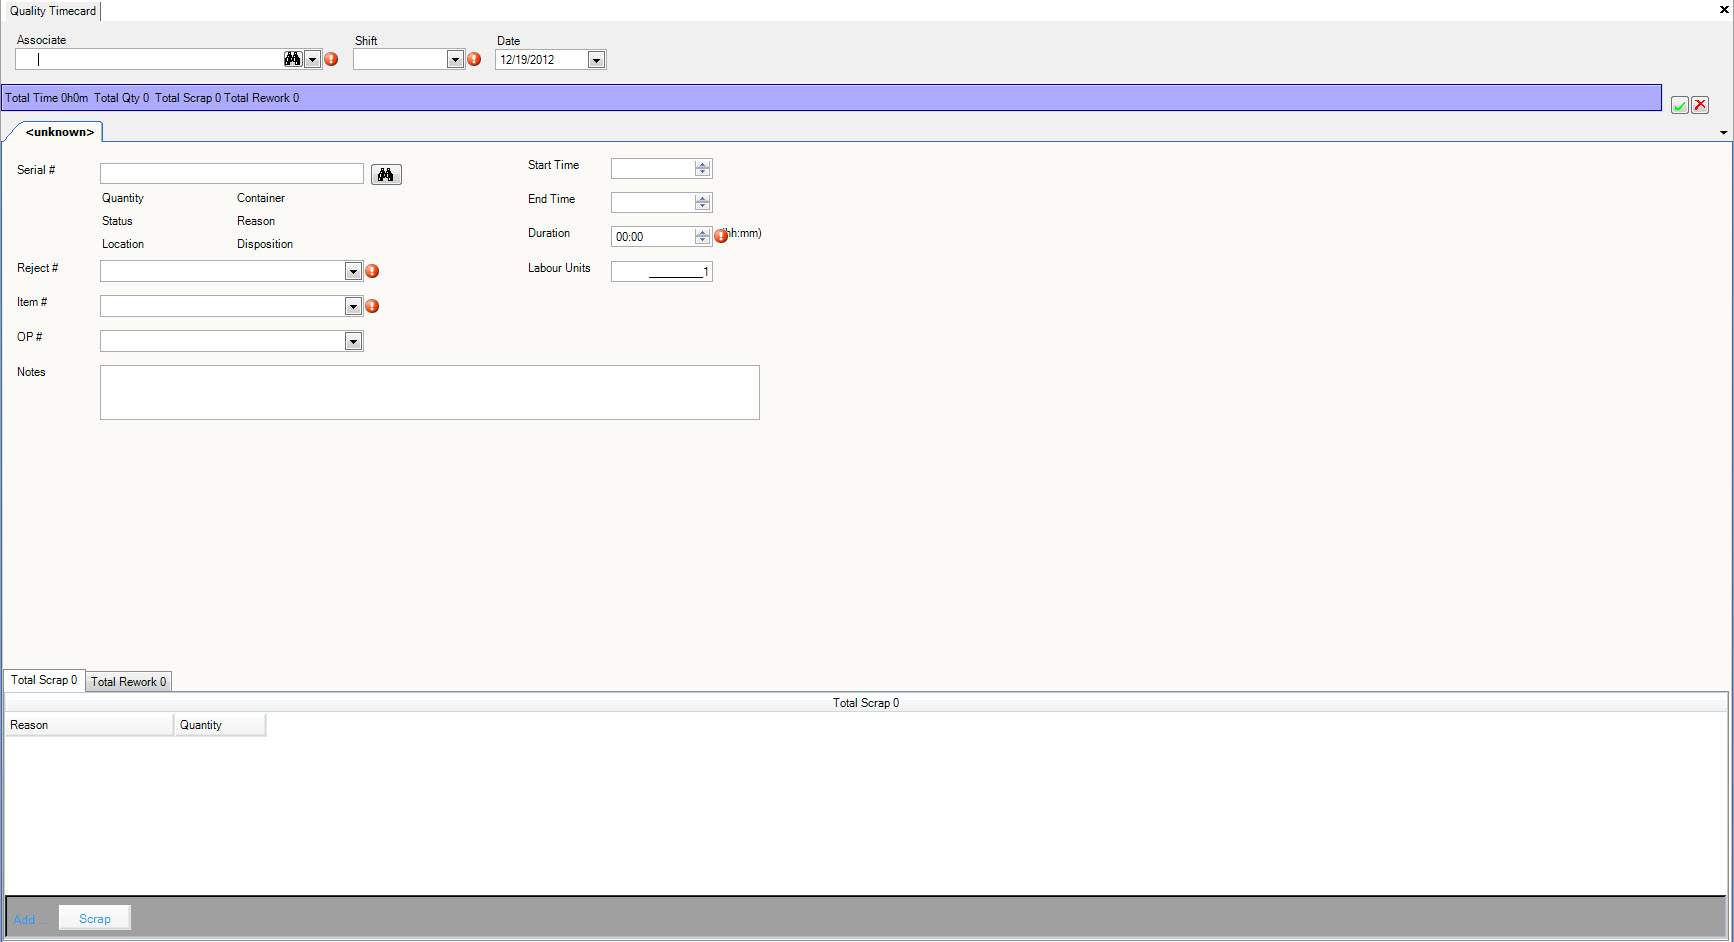
Each of these options will open a new quality timecard screen.
Filling Out a Quality Timecard
Header Information
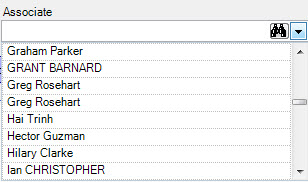
The first step to filling out a quality timecard is selecting the employee you wish to report time for. Typing in the employees name or identifier will
automatically bring up the employee. You can also use the  button to open the
employee lookup screen.
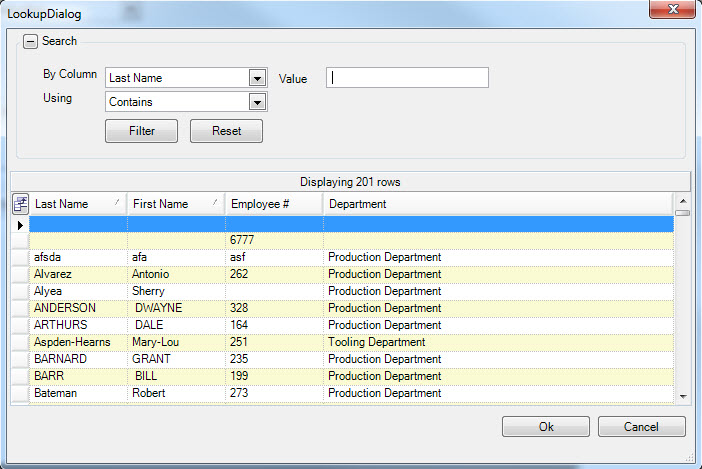
or you can use the  button to display the list of employees.
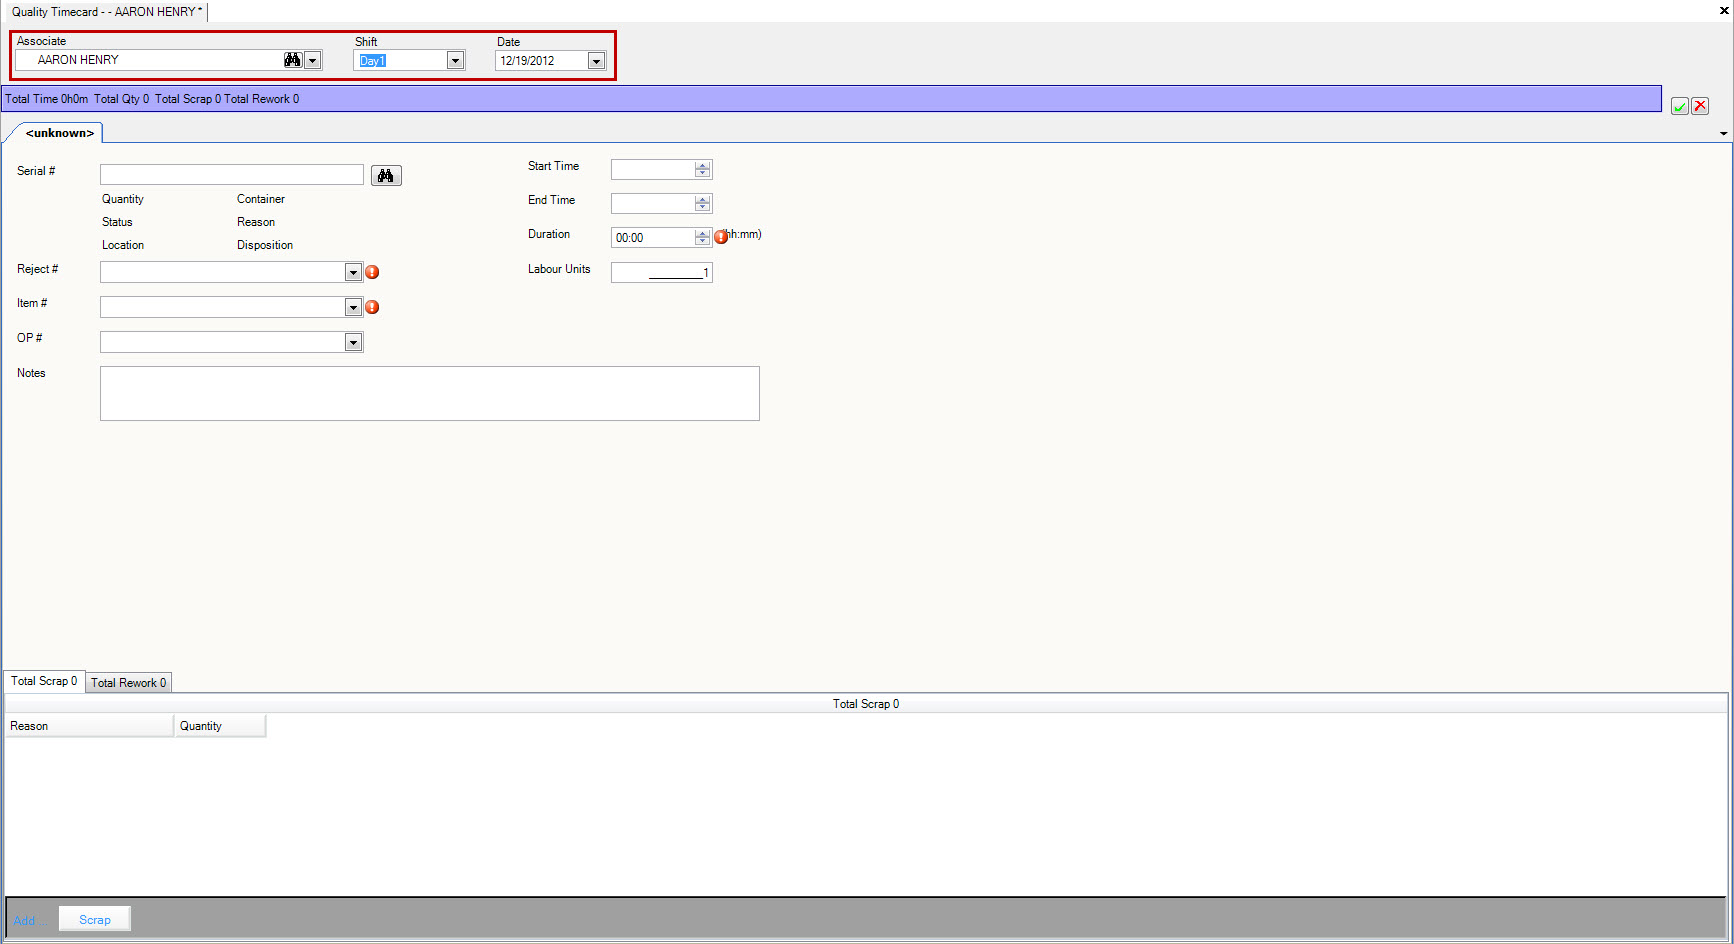
The second step is to enter the shift and the date (the system defaults to the current date) that the employee worked.
Detail Information
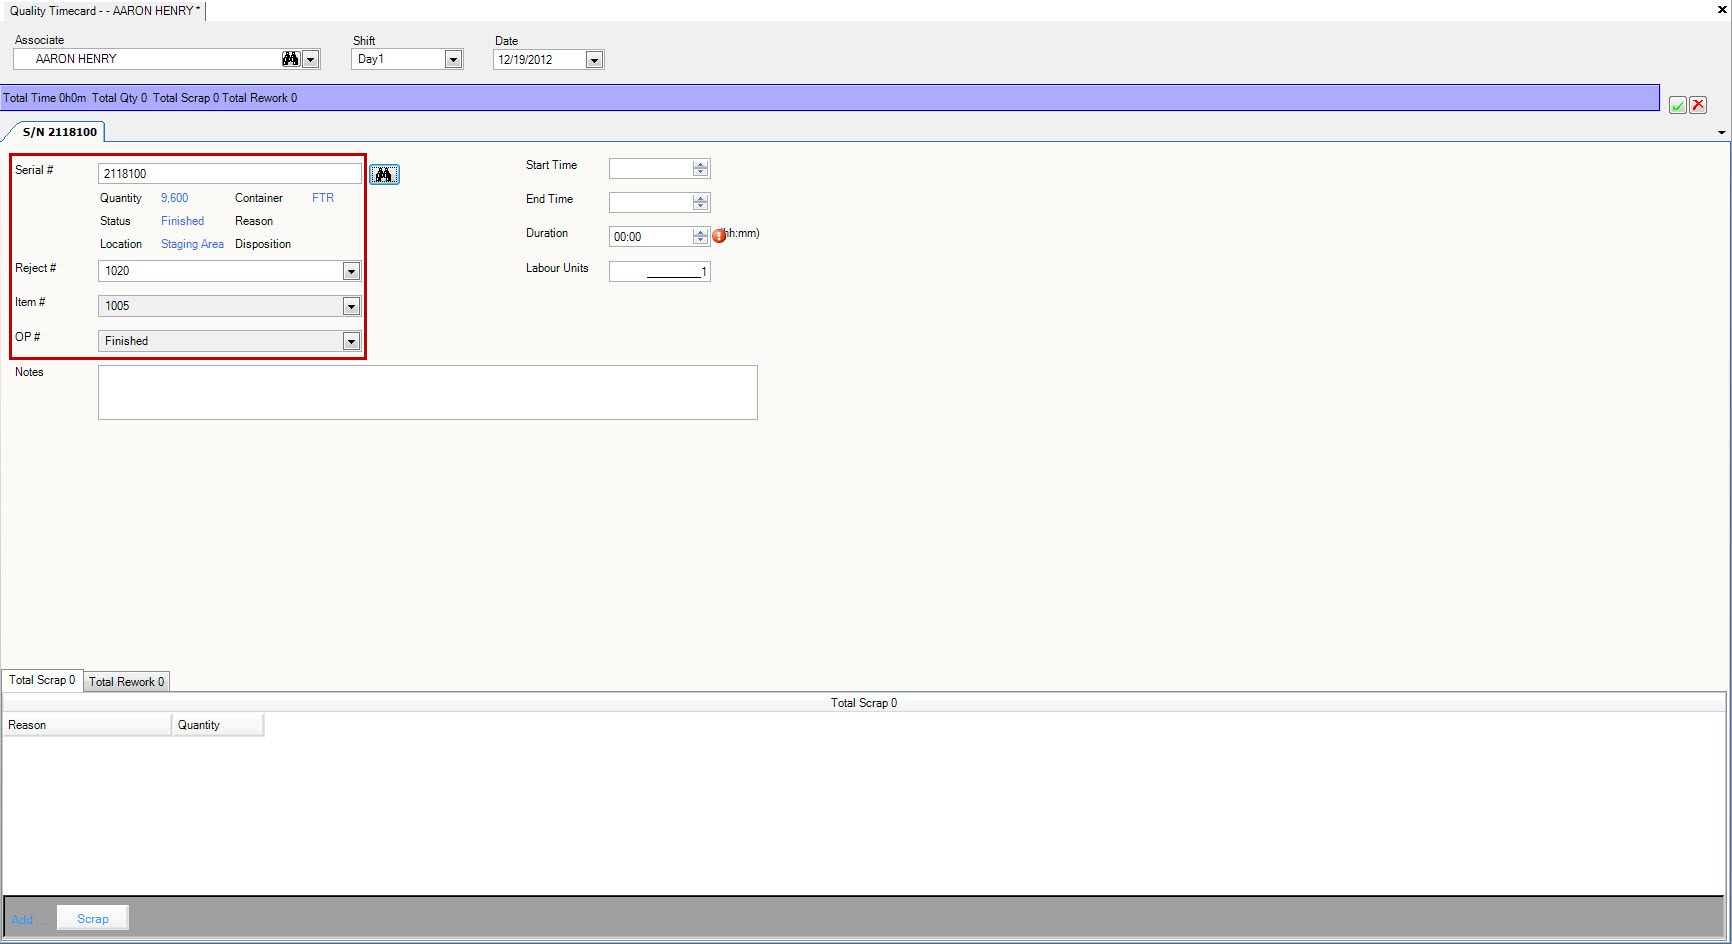
The next area that needs to be filled out is the Serial #, Reject #, ‘Item #’, ‘OP #’.
The Serial # can be entered or the  button can be used to open the
serial number lookup screen.

Once the Serial # has been selected or entered the Reject #, Item #, OP # will be automatically populated based on the Serial # information. The Reject # is only populated if the
Serial # has been assigned to a reject #, a reject # is mandatory so if it is blank you can use the  button to display
the list of reject numbers.
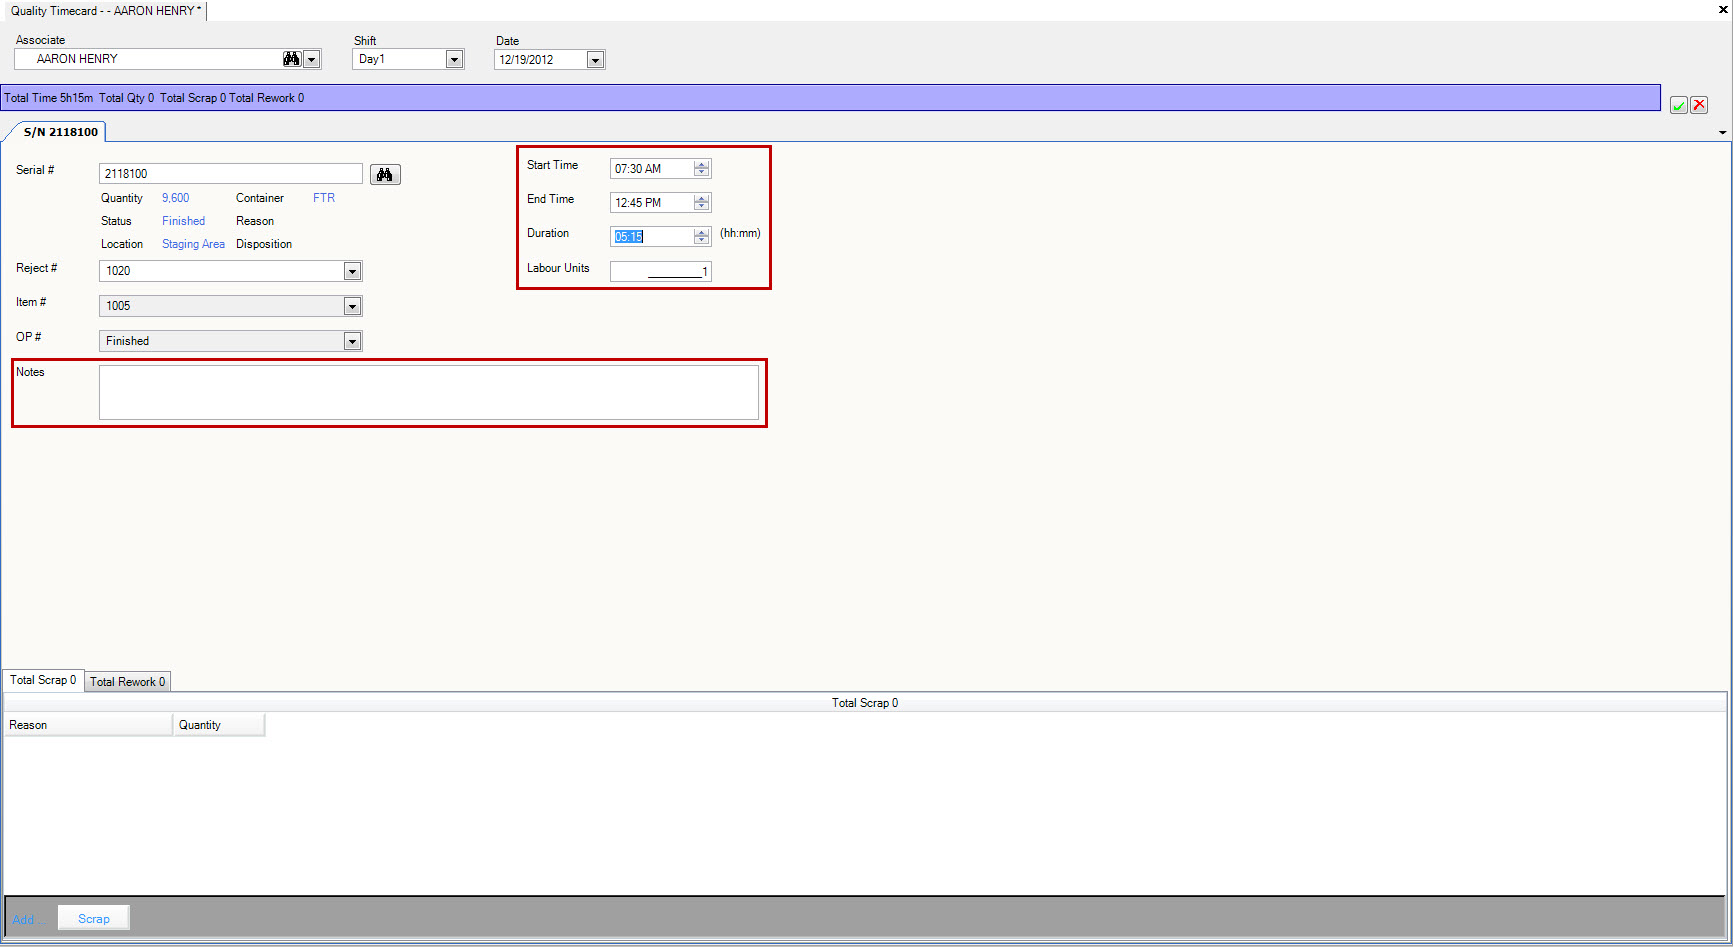
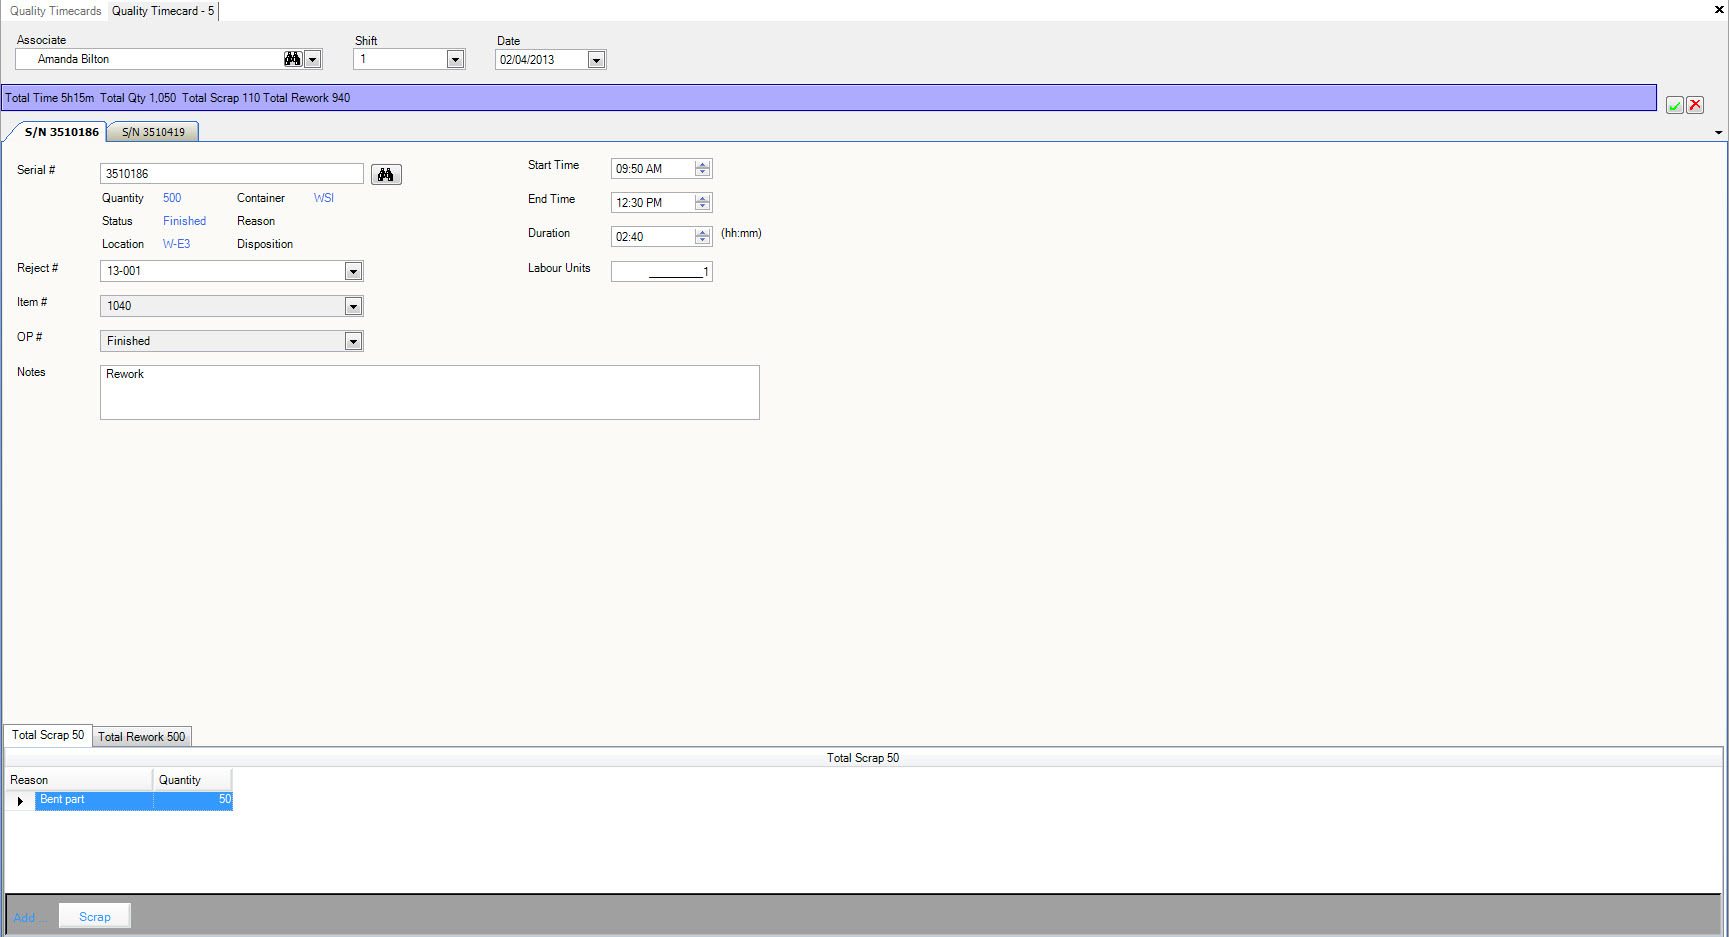
Enter Notes, Labour Units and the Start and End Time or Duration. If the Start and End Time are entered the Duration is calculated and automatically populated. The Labour units are the number of employees involved in the sorting/reworking.
zero level title or level too high for title Entering in Scrap and level 7 and len(char) 6
To enter in scrap click on the  tab,
click the
  button and the Scrap row will be displayed so that the scrap information can be entered.
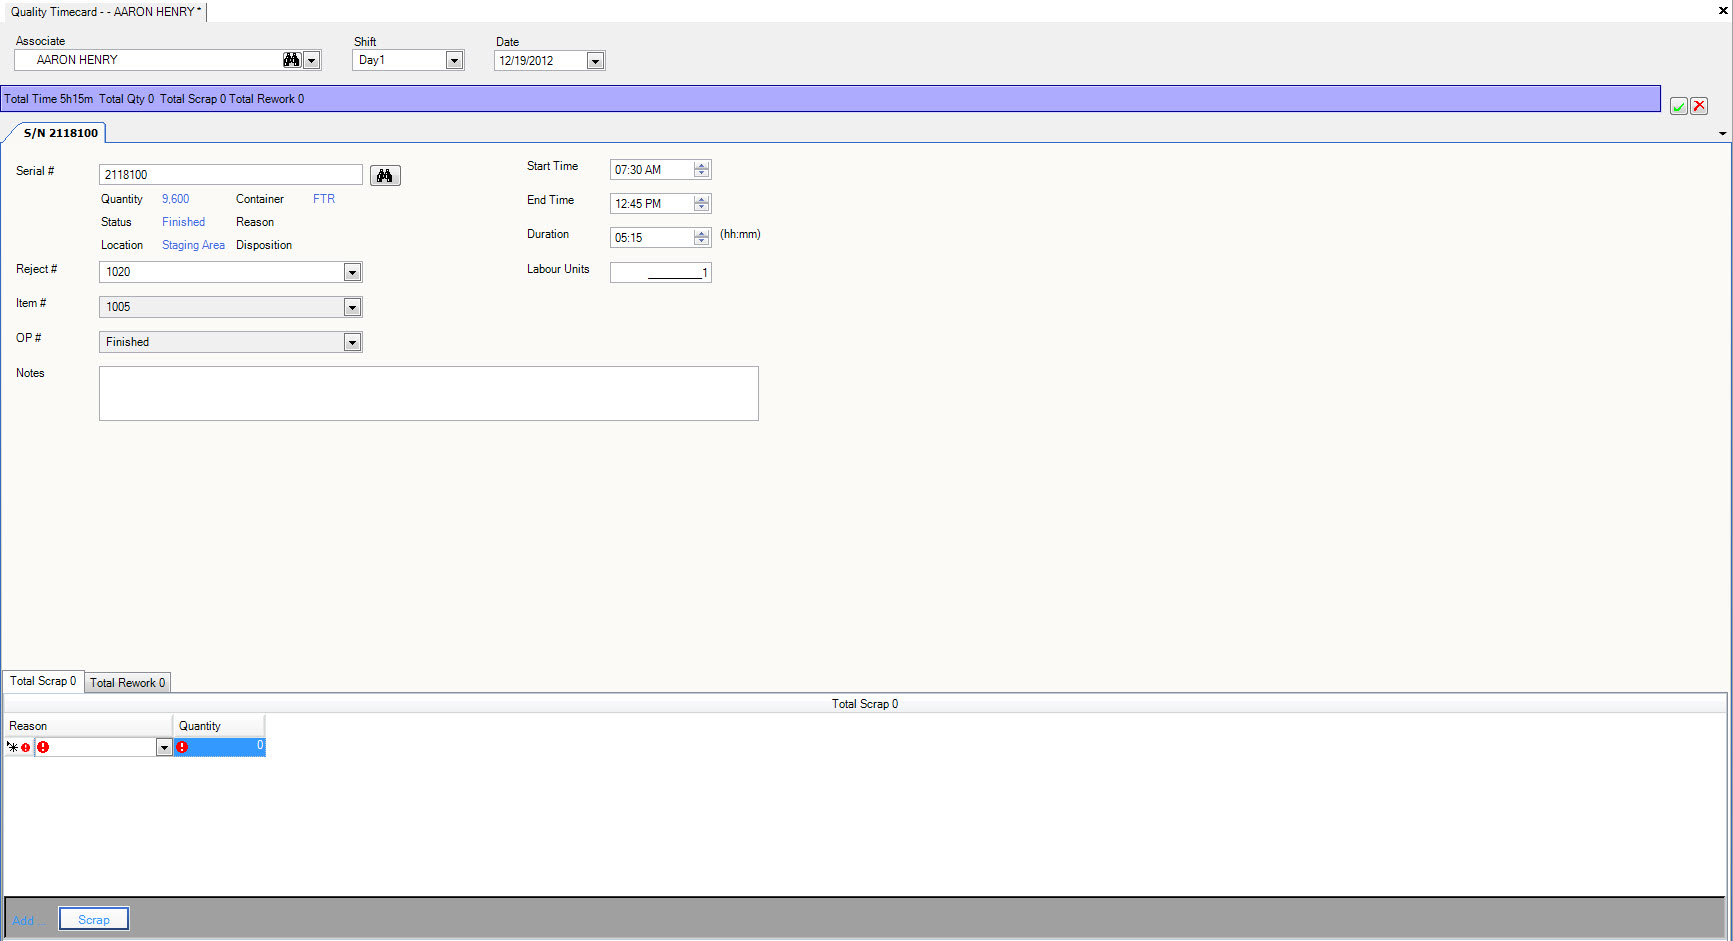
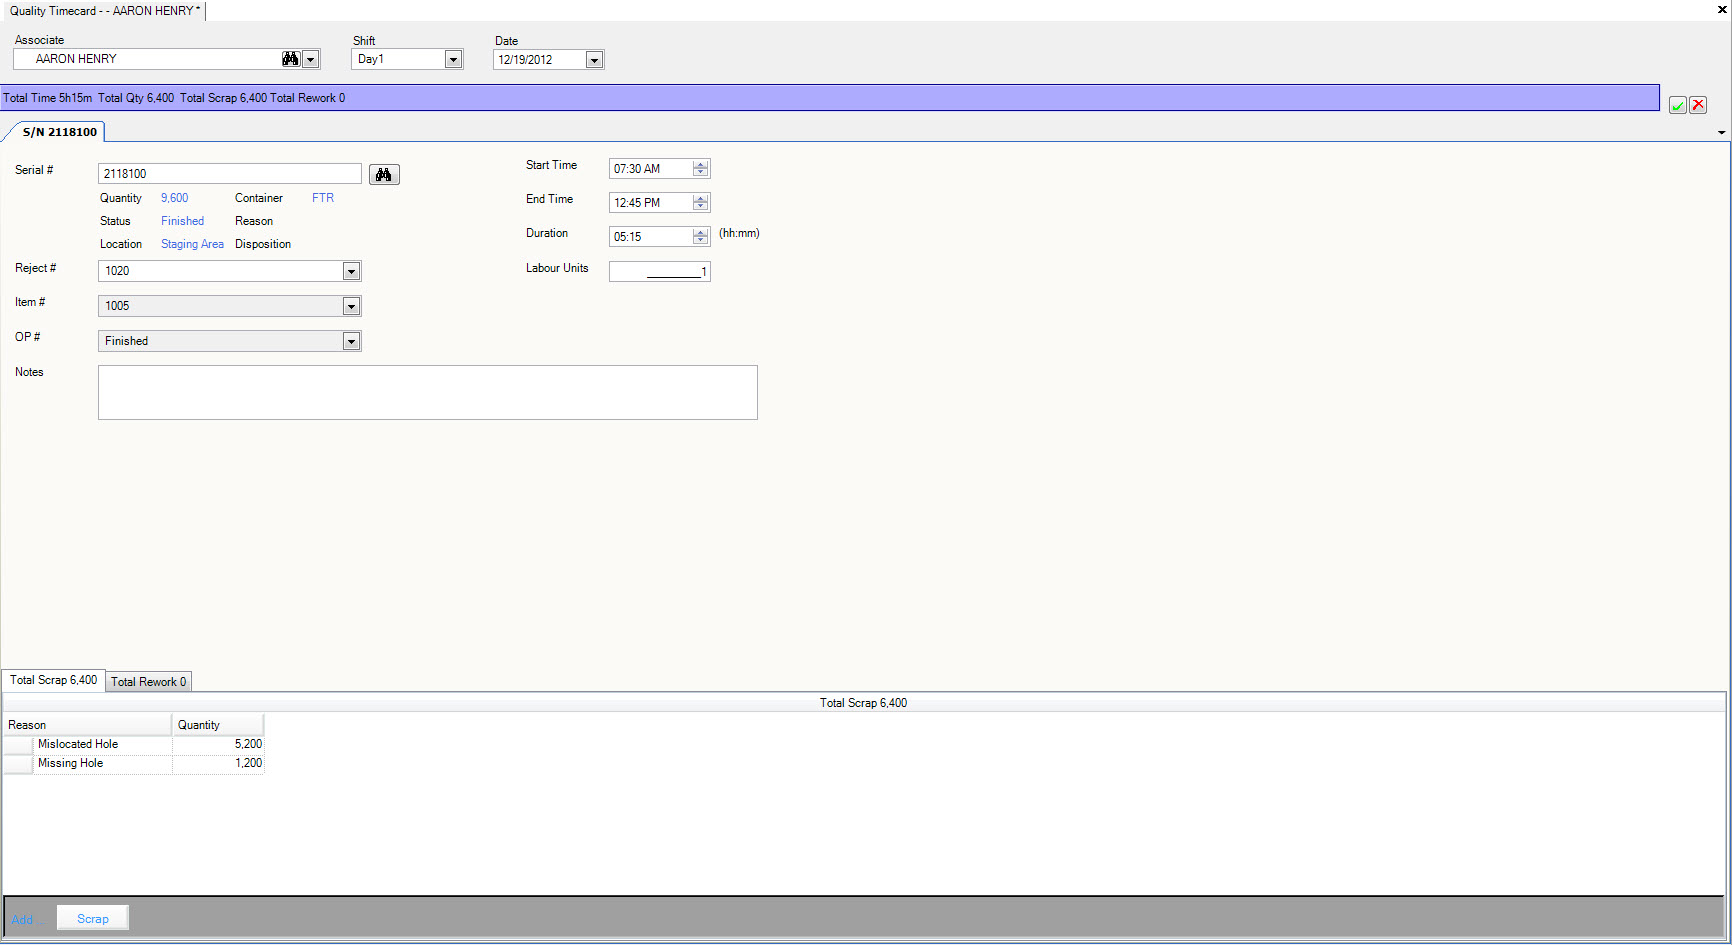
Select the scrap reason from the dropdown box and enter the quantity. If you wish to add additional scrap reasons and quantities,
click the  button and a new Scrap row will be displayed.
zero level title or level too high for title Entering in Rework and level 7 and len(char) 6
To enter in rework click on the  tab,
click the
  button and the Rework row will be displayed so that the rework information can be entered.
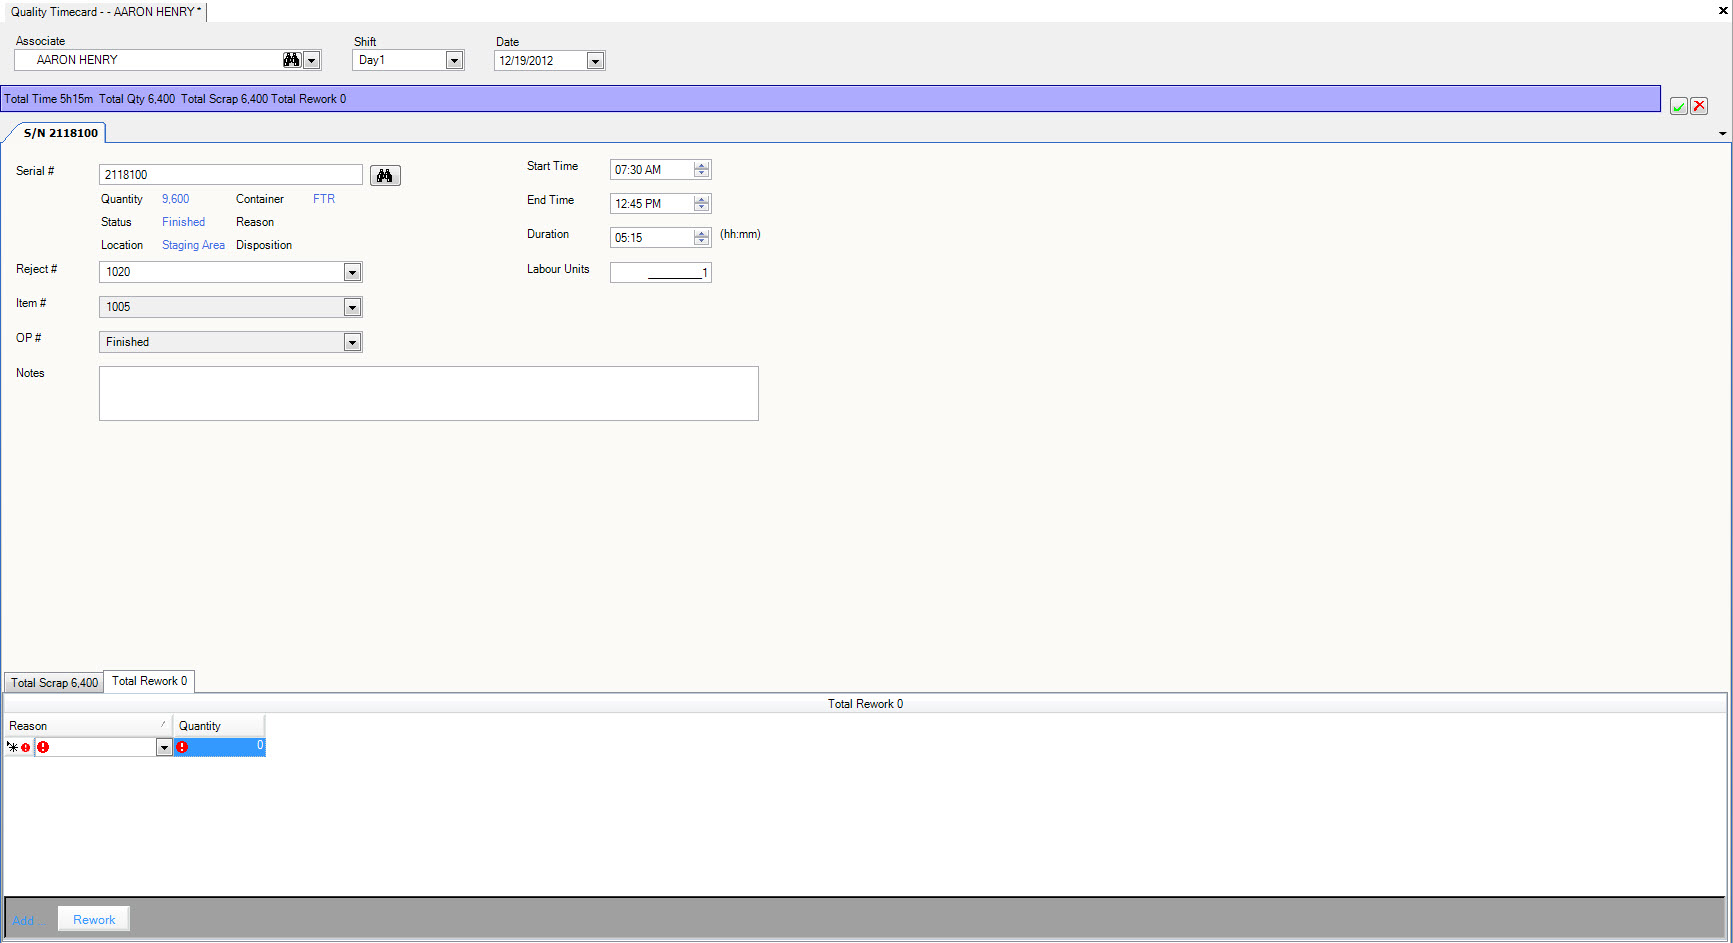
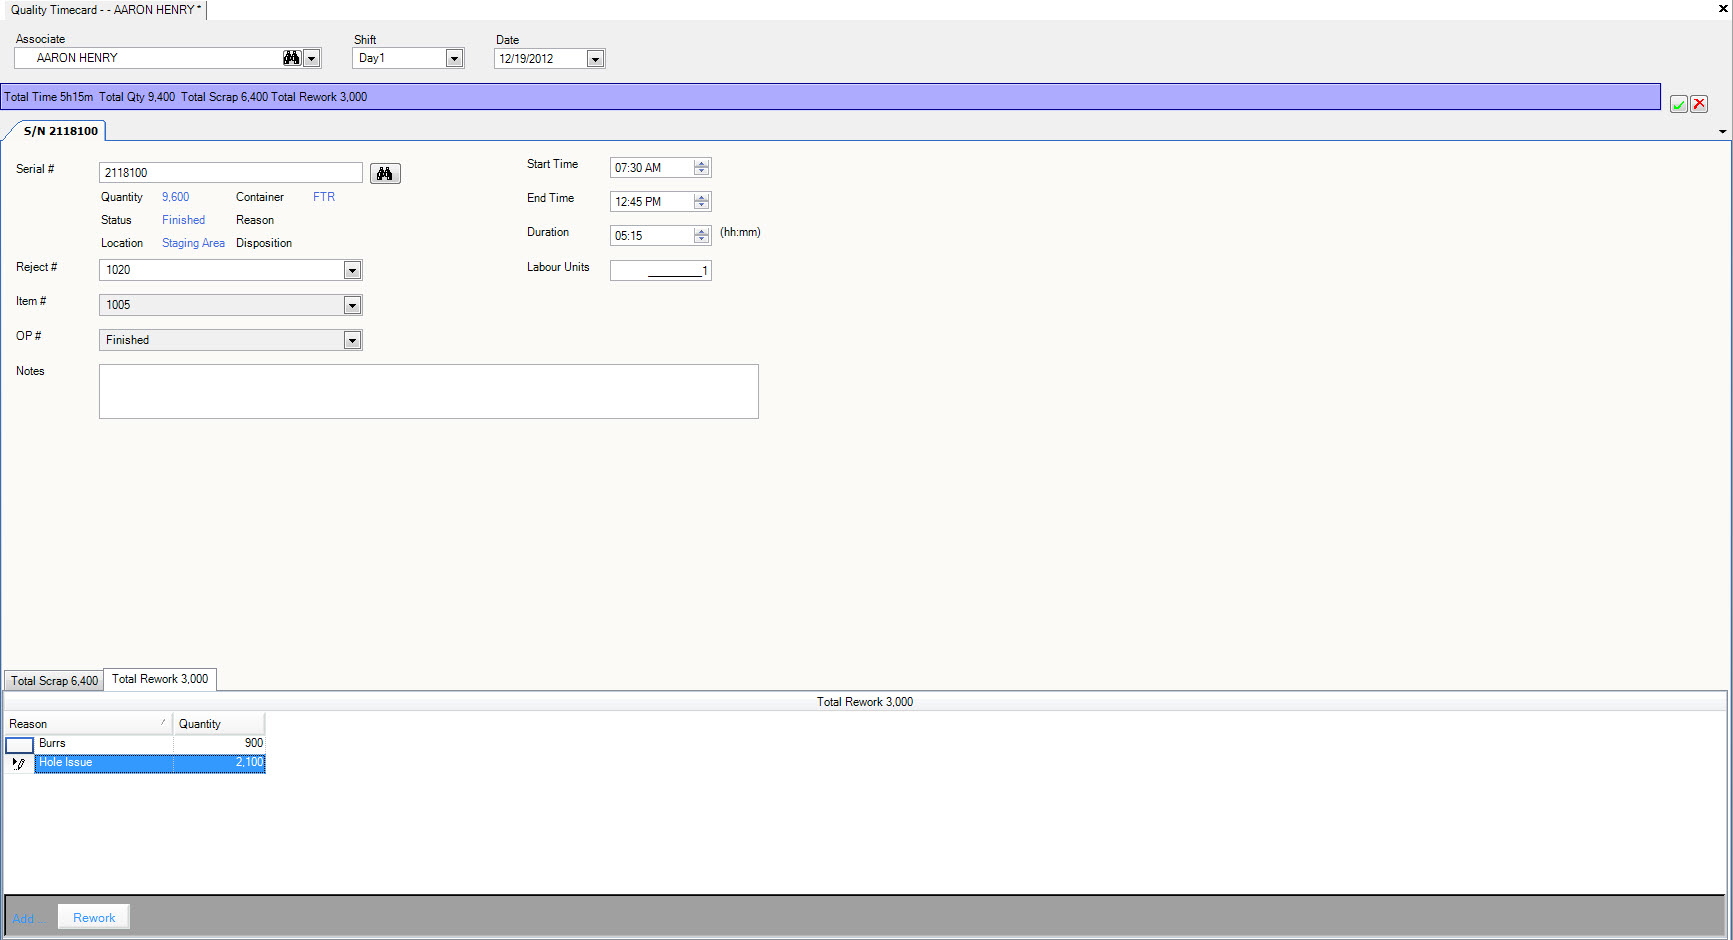
Select the rework reason from the dropdown box and enter the quantity. If you wish to add additional rework reasons and quantities,
click the  button and a new Rework row will be displayed.
Adding Additional Timecards for an Employee
You may encounter a situation where an employee works on more than one QA job in a shift. In this case, it’s important to record all hours, scrap and rework and track the QA time for the employee. You must add more than one quality timecard for that employee.
To add a new Quality timecard click on the  button. This will add an additional quality timecard to be filled out for the employee.
The start time will default from the previous quality timecard, if the start and end time were entered on the previous timecard.
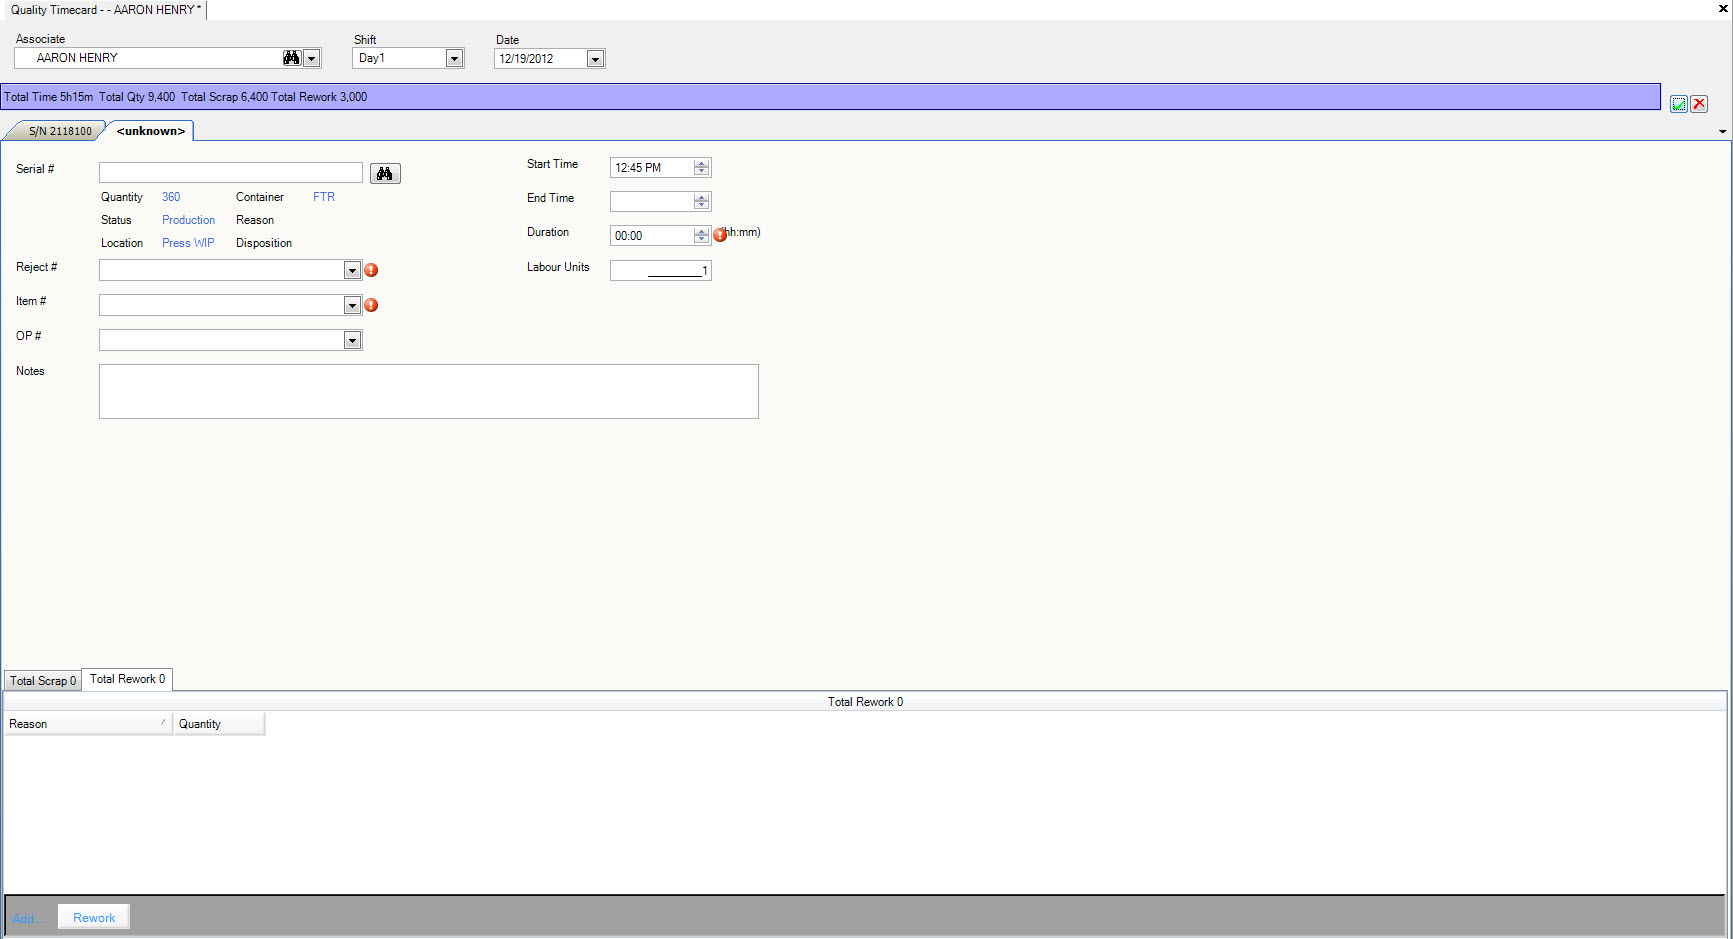
Enter the Serial # or use the  button to open the serial number lookup screen.
Once the Serial # has been selected or entered the Reject #, Item #, OP # will be automatically populated based on the Serial # information.
The Reject # is only populated if the Serial # has been assigned to a reject #, a reject # is mandatory so if it is blank you can use the
 button to display the list of reject numbers.
Enter Notes, Labour Units and the Start and End Time or Duration.
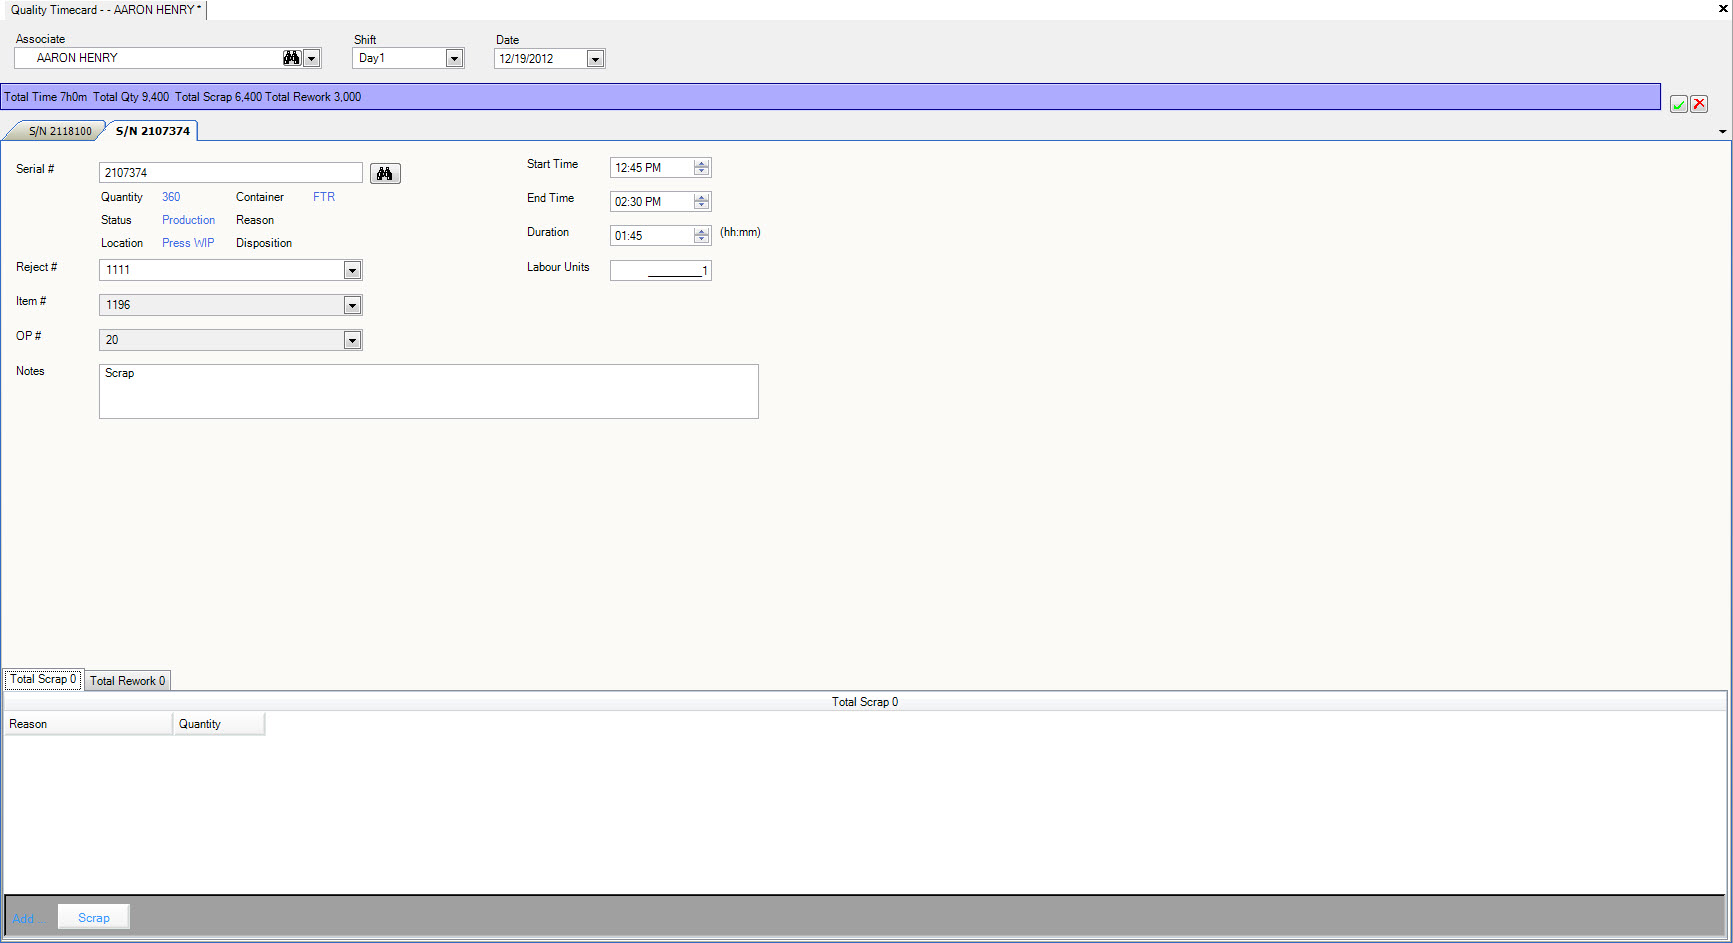
zero level title or level too high for title Entering in Scrap and level 7 and len(char) 6
To enter in scrap click on the  tab,
click the
  button and the Scrap row will be displayed so that the scrap information can be entered.
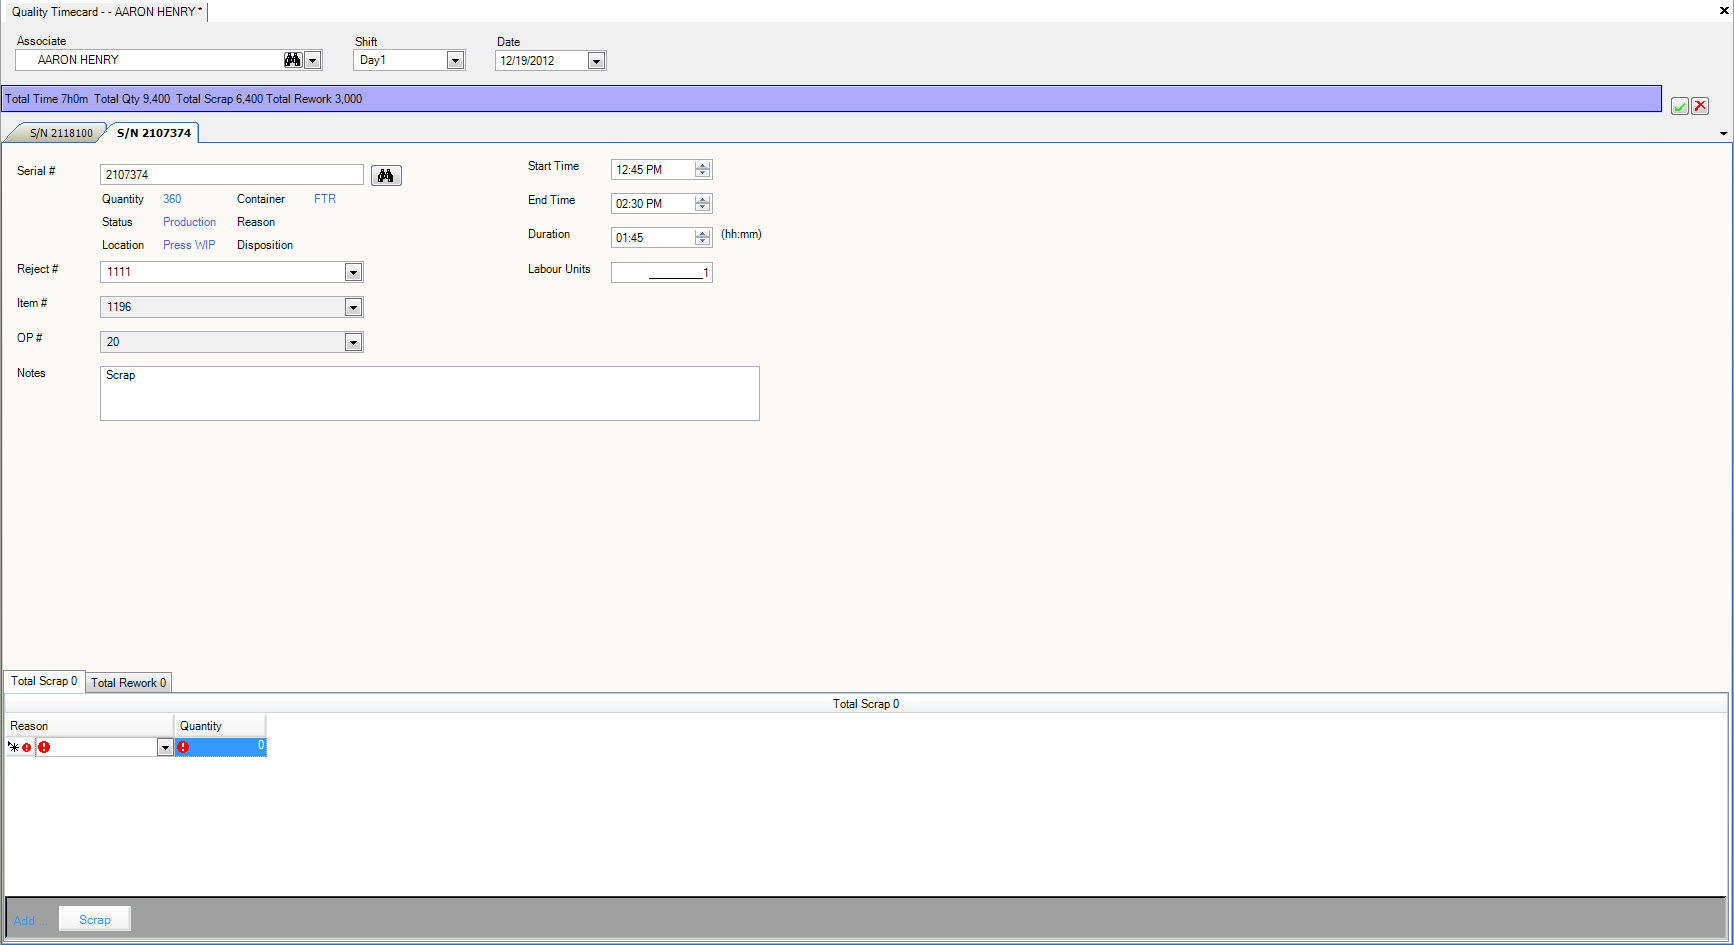
Select the scrap reason from the dropdown box and enter the quantity. If you wish to add additional scrap reasons and quantities,
click the  button and a new Scrap row will be displayed.
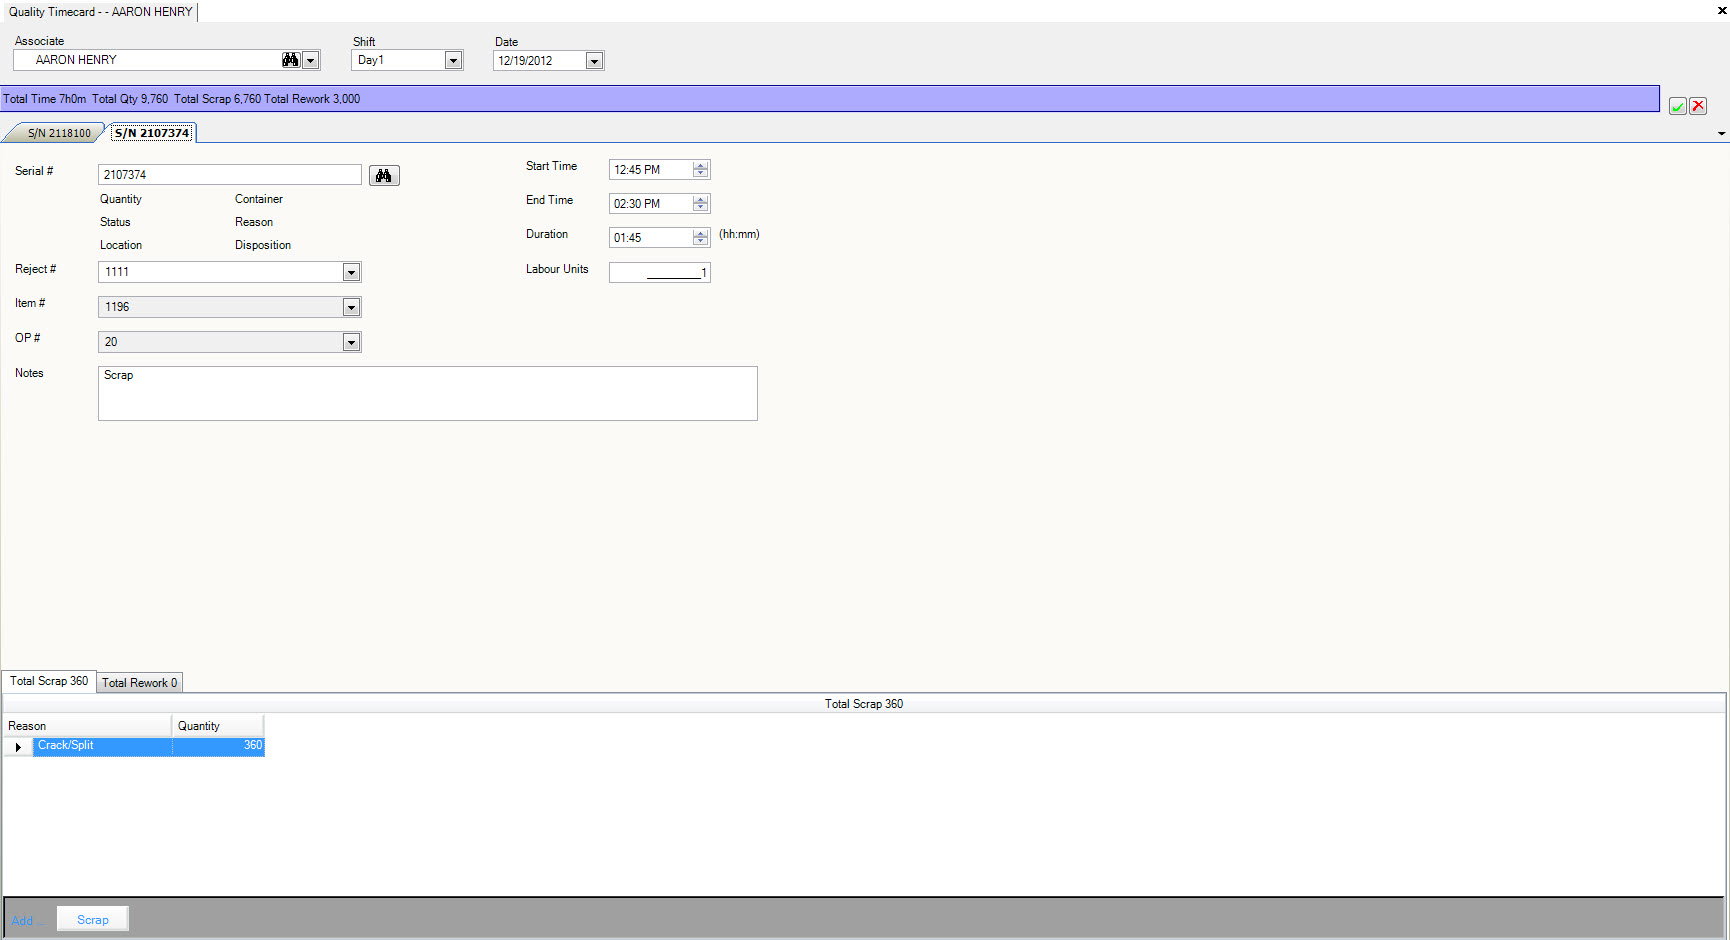
zero level title or level too high for title Entering in Rework and level 7 and len(char) 6
To enter in rework click on the  tab,
click the
  button and the Rework row will be displayed so that the rework information can be entered.
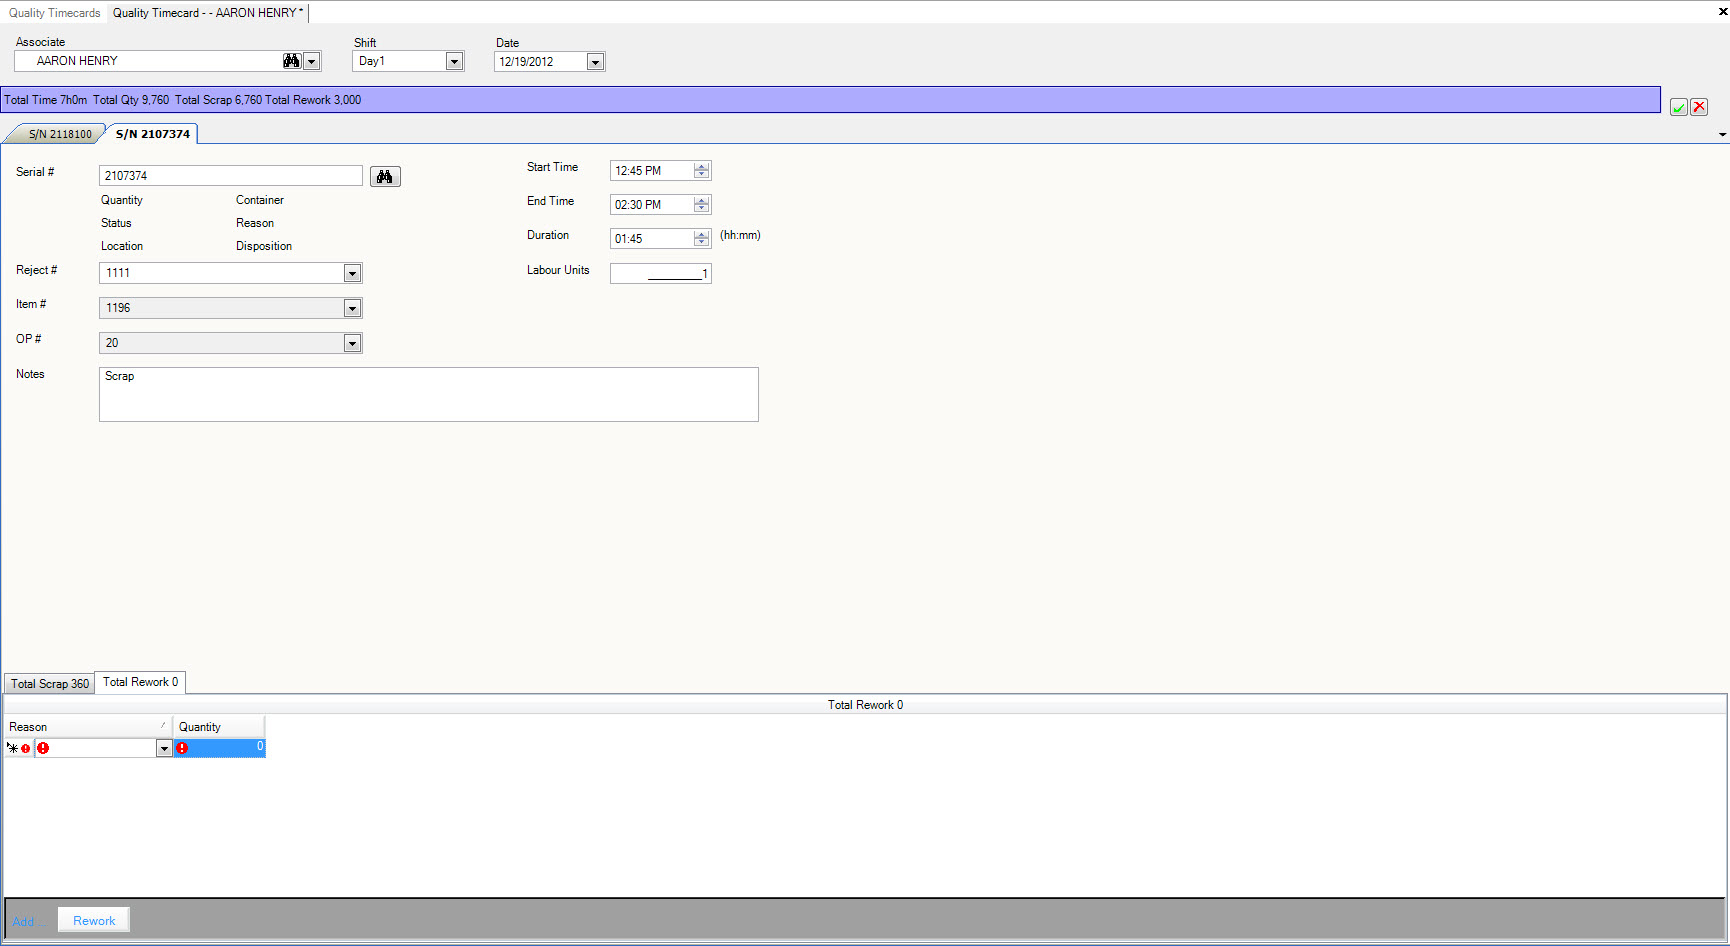
Select the rework reason from the dropdown box and enter the quantity. If you wish to add additional rework reasons and quantities,
click the  button and a new Rework row will be displayed.
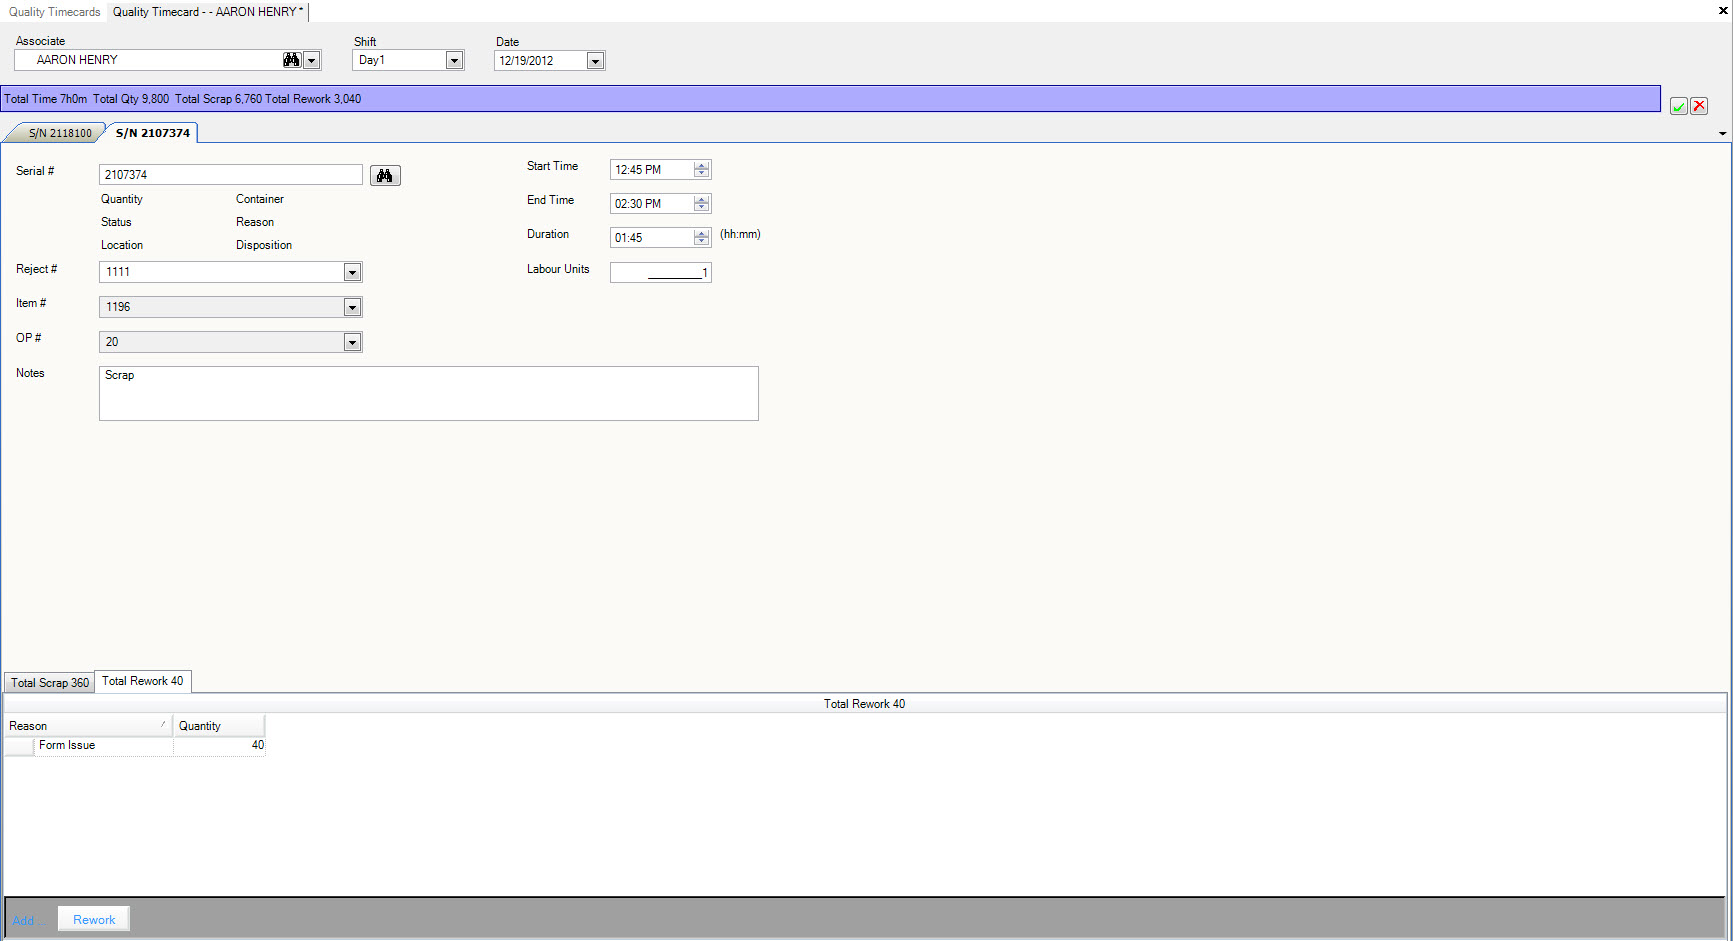
Click the  icon to save.
Maintaining Quality Timecards
To make changes to an existing Quality Timecard navigate to the  tab, click on the
 ![]() icon.
The ‘Quality Timecard Lookup’ will be displayed, search for the timecard you wish to maintain. Double-click on the timecard row to bring up the ‘Quality Timecard Detail’
screen.
icon.
The ‘Quality Timecard Lookup’ will be displayed, search for the timecard you wish to maintain. Double-click on the timecard row to bring up the ‘Quality Timecard Detail’
screen.
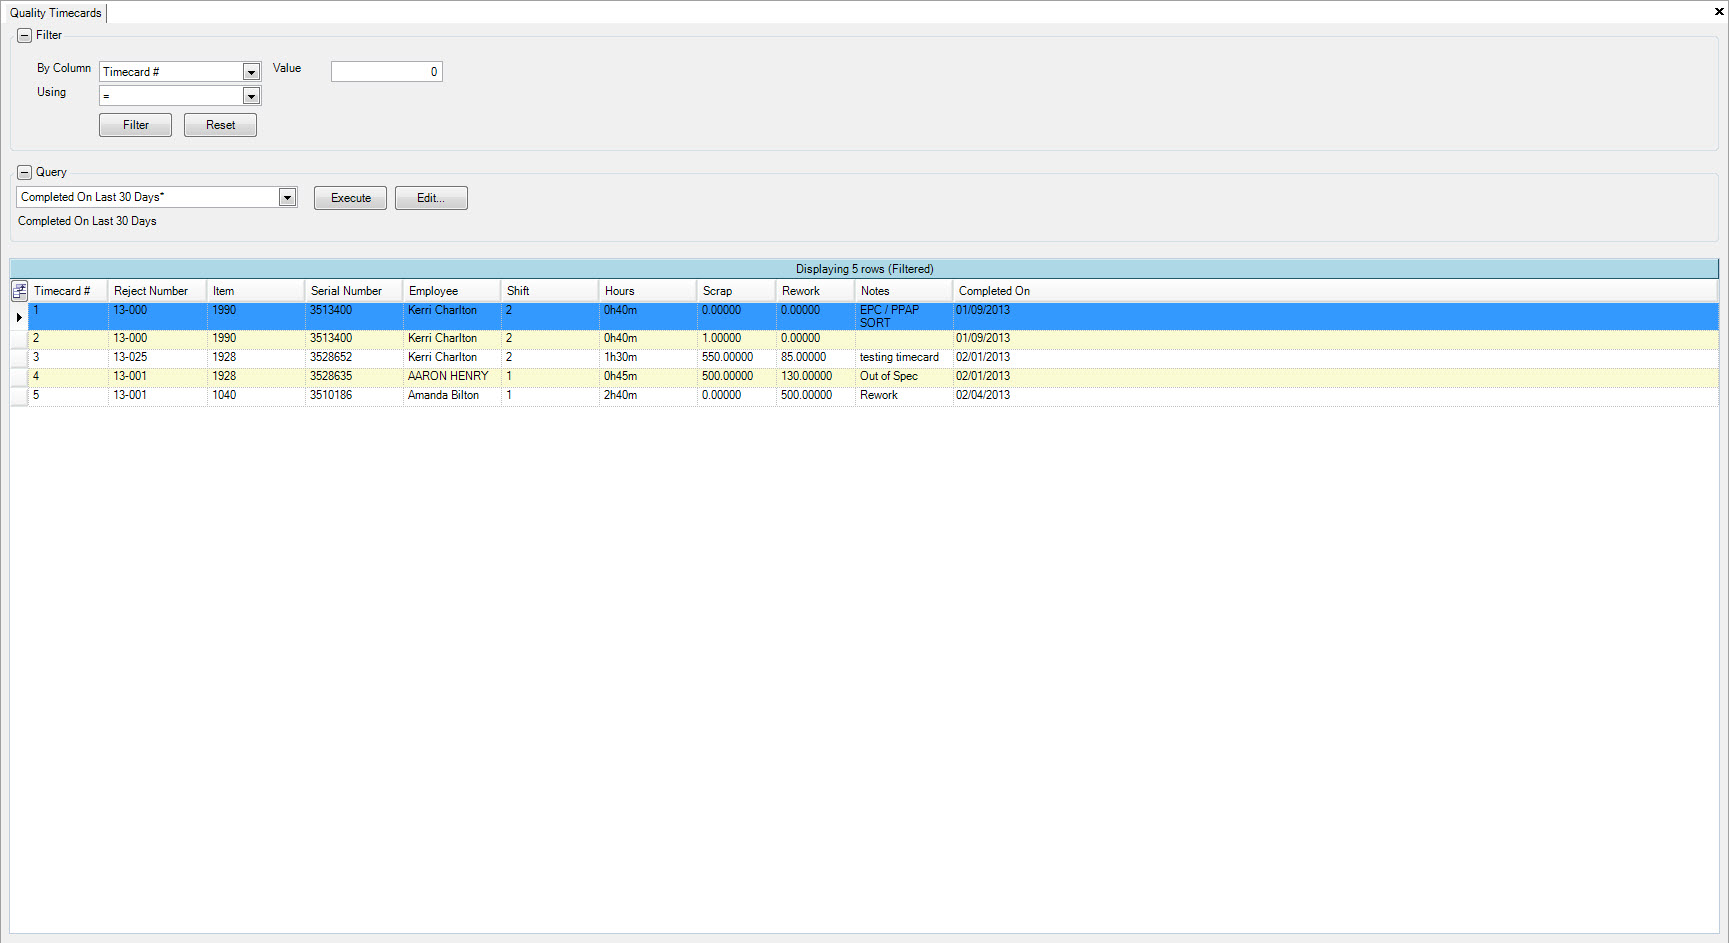
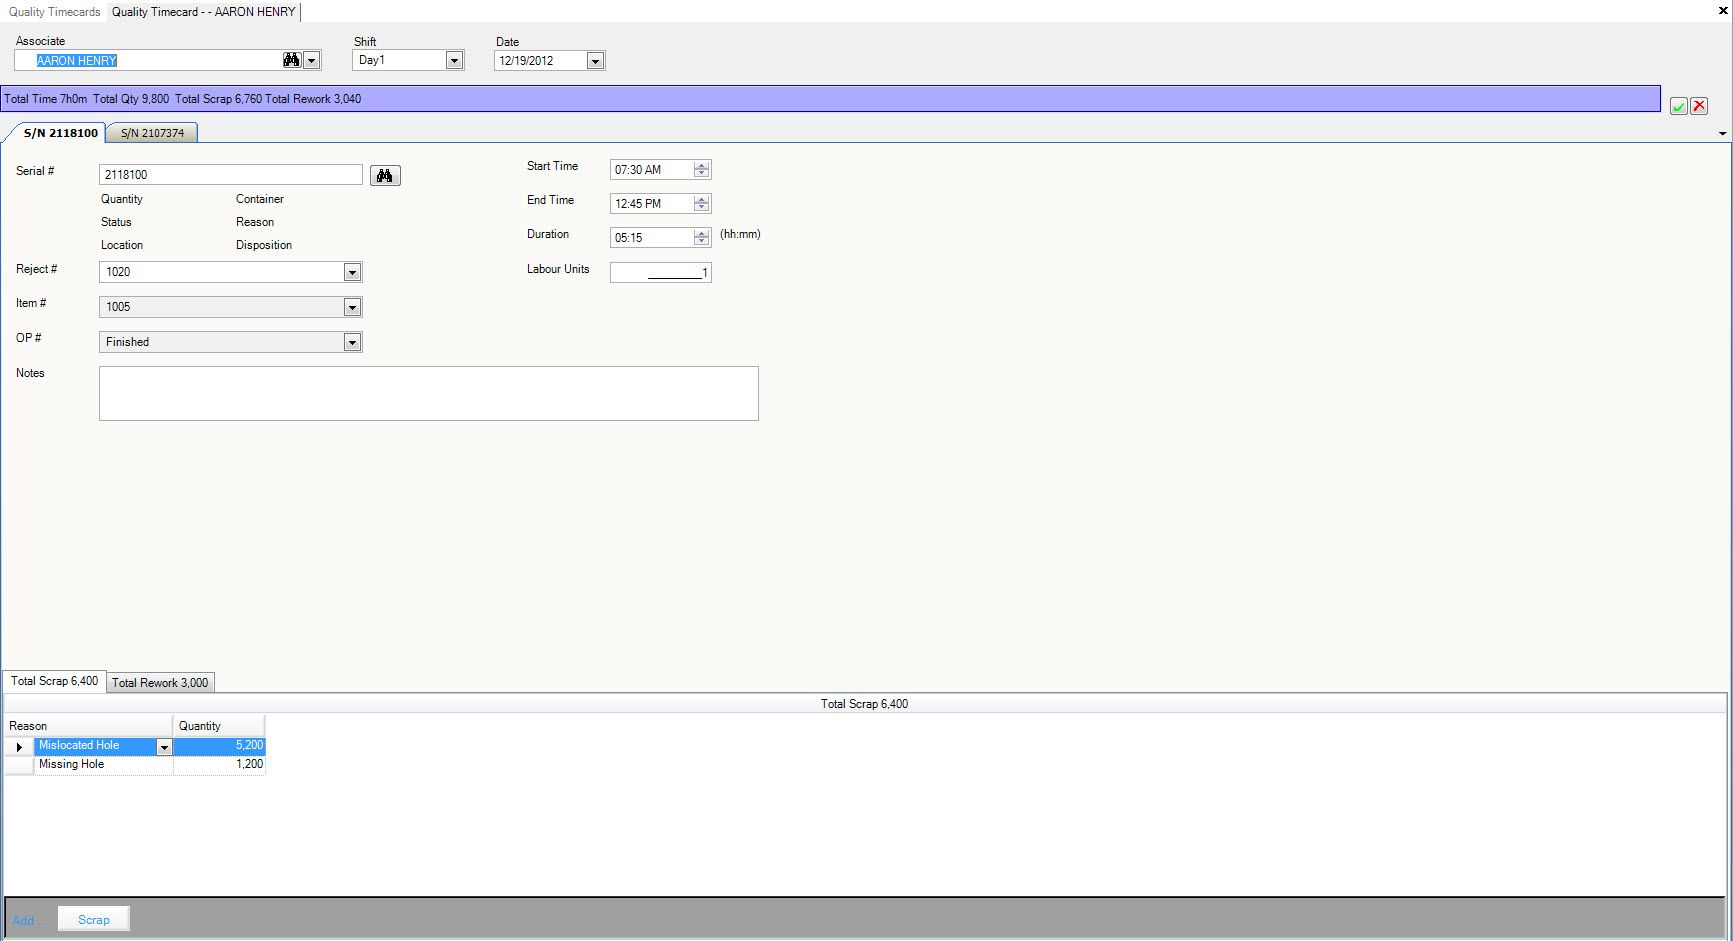
Modify the Item #, Op #, Workcenter, Counter Start, Counter End, Start Time and End Time.
Click the  icon to save.
Adding Additional Timecards for an Employee
You may encounter a situation where an employee works on more than one QA job in a shift. In this case, it’s important to record all hours, scrap and rework and track the QA time for the employee. You must add more than one quality timecard for that employee.
To add a new Quality timecard click on the  button. This will add an additional quality timecard to be filled out for the employee.
The start time will default from the previous quality timecard, if the start and end time were entered on the previous timecard.

Enter the Serial # or use the  button to open the serial number lookup screen.
Once the Serial # has been selected or entered the Reject #, Item #, OP # will be automatically populated based on the Serial # information.
The Reject # is only populated if the Serial # has been assigned to a reject #, a reject # is mandatory so if it is blank you can use the
 button to display the list of reject numbers.
Enter Notes, Labour Units and the Start and End Time or Duration.

Entering in Scrap
To enter in scrap click on the  tab,
click the
  button and the Scrap row will be displayed so that the scrap information can be entered.

Select the scrap reason from the dropdown box and quantity . If you wish to add additional scrap reasons and quantities,
click the  button and a new Scrap row will be displayed.

Entering in Rework
To enter in rework click on the  tab,
click the
  button and the Rework row will be displayed so that the rework information can be entered.

Select the rework reason from the dropdown box and quantity . If you wish to add additional rework reasons and quantities,
click the  button and a new Rework row will be displayed.

Click the  icon to save.
Deleting a Timecard for an Employee
To delete a timecard for an employee simply click on the timecard you wish to delete, and click the  .
.

Click the  icon to save.
Deleting Scrap or Rework on the Timecard
To delete the scrap on the timecard, click and highlight the row you wish to delete, then press the Delete key on the keyboard.
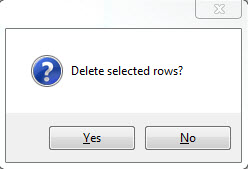
A window with the message ‘Delete selected rows?’ will appear, click the  button. The scrap will be removed from the timecard.
To delete the rework on the timecard, click and highlight the row you wish to delete, then press the Delete key on the keyboard.

A window with the message ‘Delete selected rows?’ will appear, click the  button. The rework will be removed from the timecard.

Click the  icon to save.
Viewing a Quality Timecard
To view an existing Quality Timecard navigate to the  tab, click on the
 ![]() icon.
The ‘Quality Timecard Lookup’ will be displayed, search for the quality timecard you are looking for. Double-click on the quality timecard row to bring up the ‘Quality Timecard Detail’
screen.
icon.
The ‘Quality Timecard Lookup’ will be displayed, search for the quality timecard you are looking for. Double-click on the quality timecard row to bring up the ‘Quality Timecard Detail’
screen.


Note
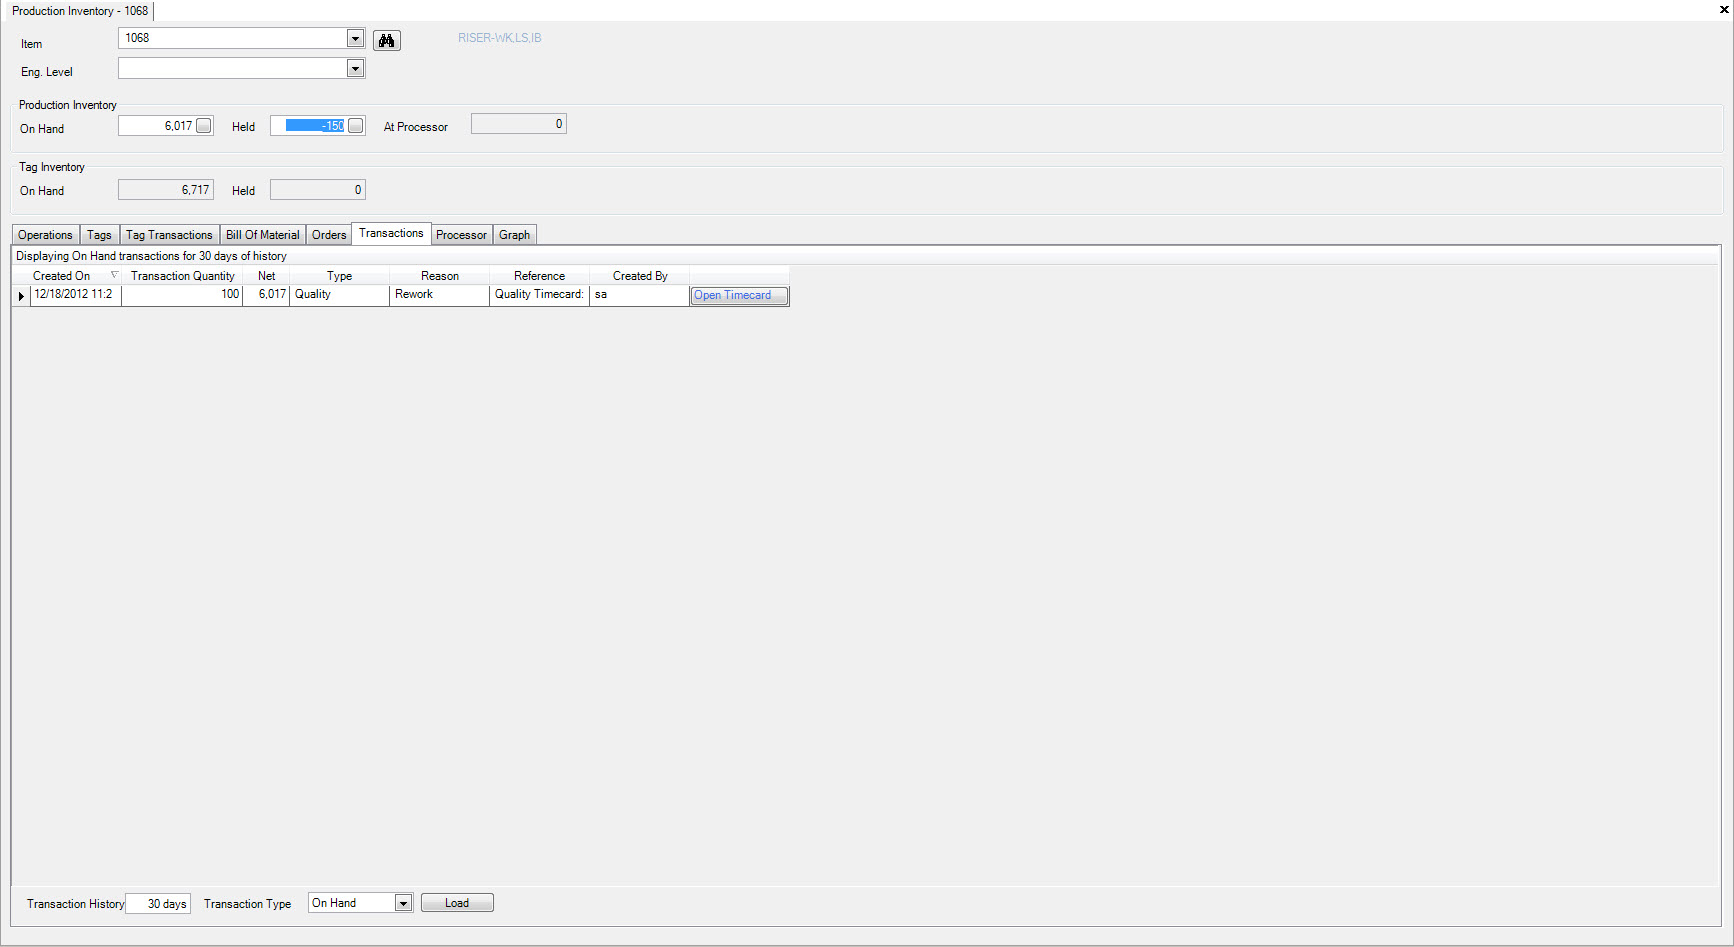
**Quality Timecards can also be viewed and maintained from Production Inventory. Navigate to the  tab,
click on the
  icon. Enter an item and select the
  tab,
and here you can see packing slips (P/S) that were shipped and timecards that were entered. Click on the ‘Open Timecard’ button to view or maintain a Quality timecard when it is opened.
Quality Schedule
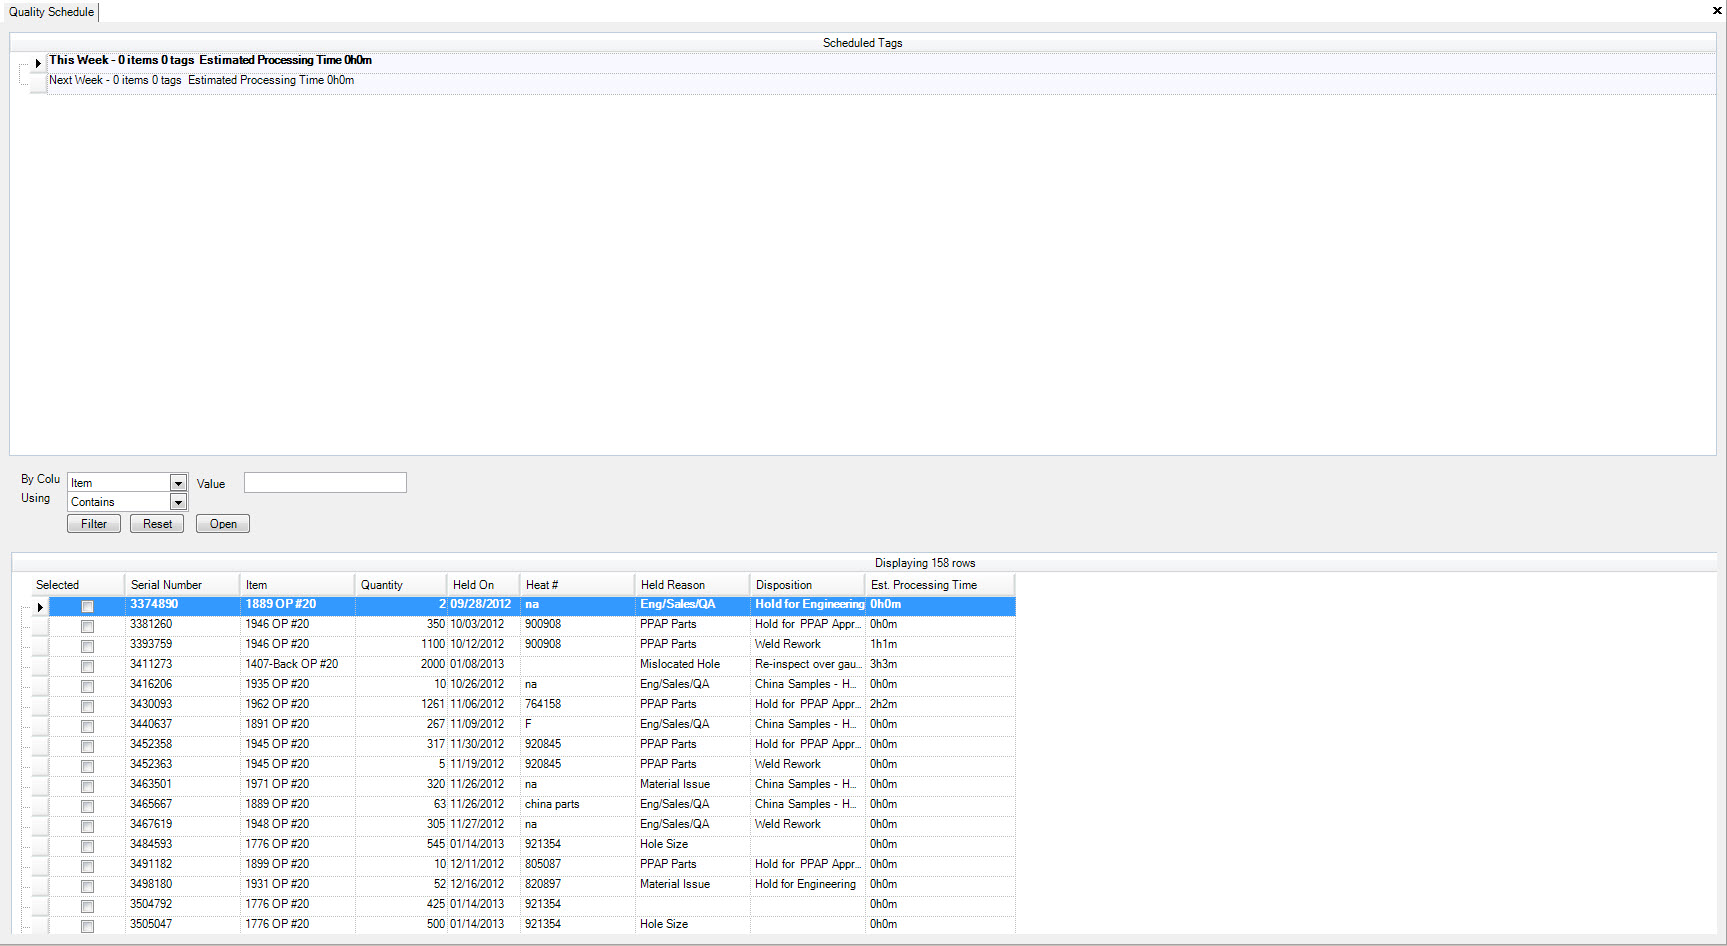
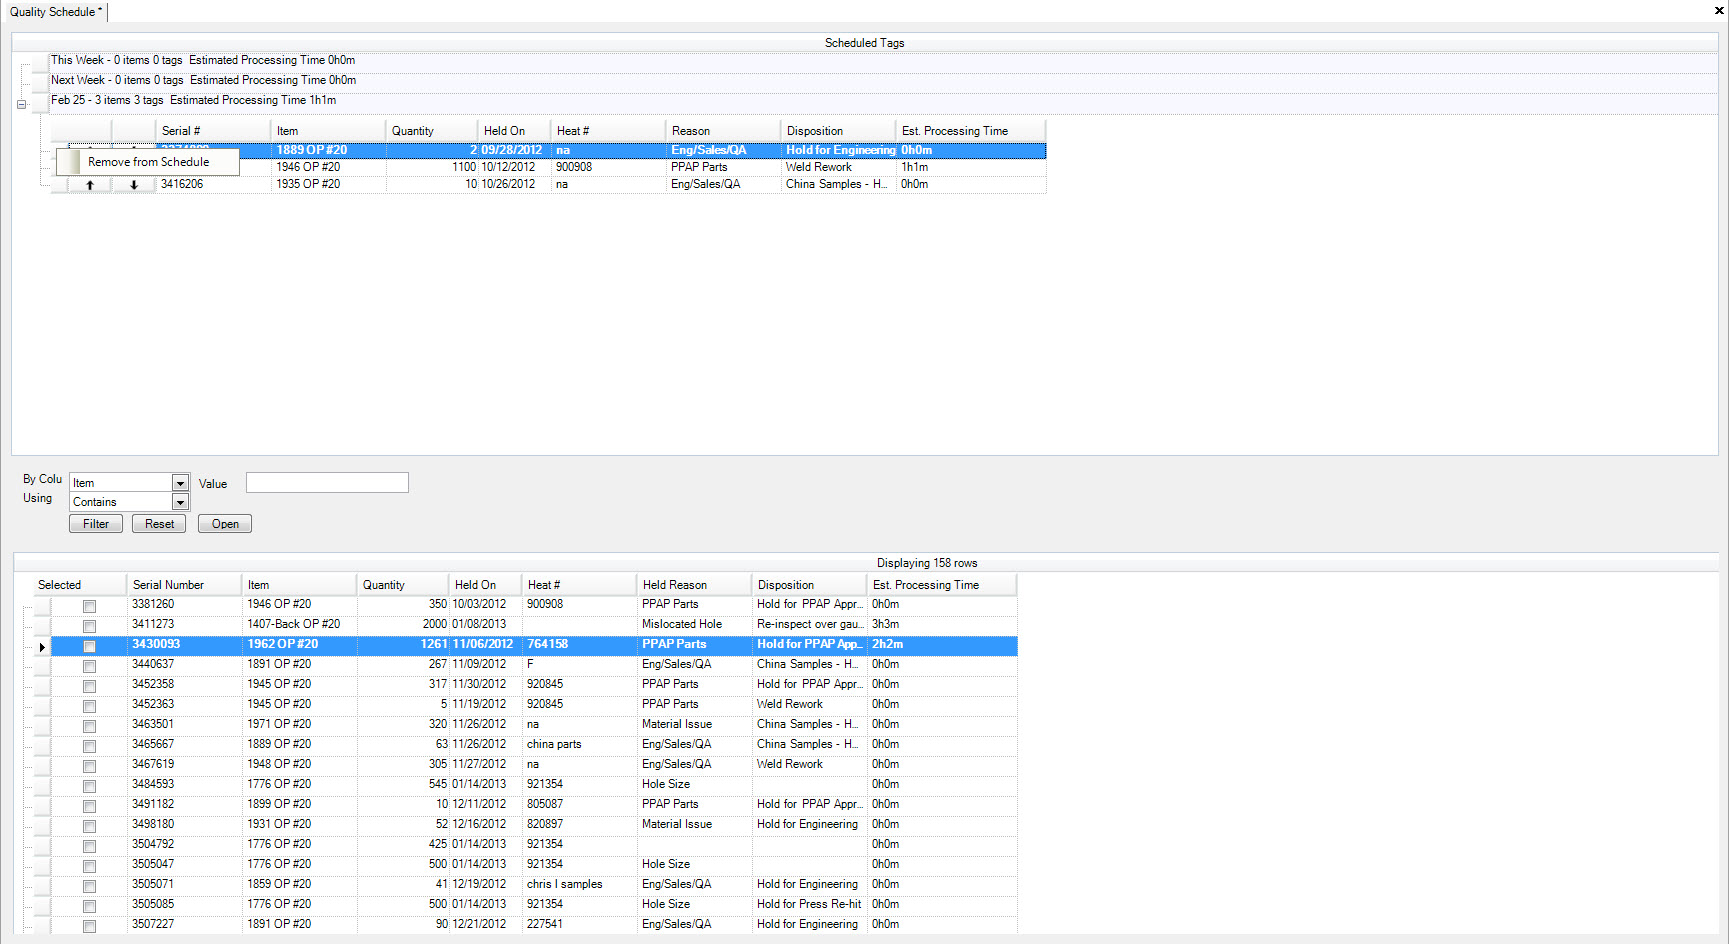
Quality Scheduling enables labour planning for the QA Hold Area. All the serial numbers that exist with a held status are displayed. The serial numbers can be selected and placed in weekly scheduling buckets, they can also be prioritized.
To Schedule the QA Hold Area, navigate to the  button, and then select the
 ![]() option.
This will open the Quality Schedule screen.
option.
This will open the Quality Schedule screen.
Adding Serial Numbers to the Schedule
Select the serial numbers to be scheduled by clicking the  in the row next to the serial number.
When all the serial numbers have been selected right-click on the row and the dropdown menu will be displayed.
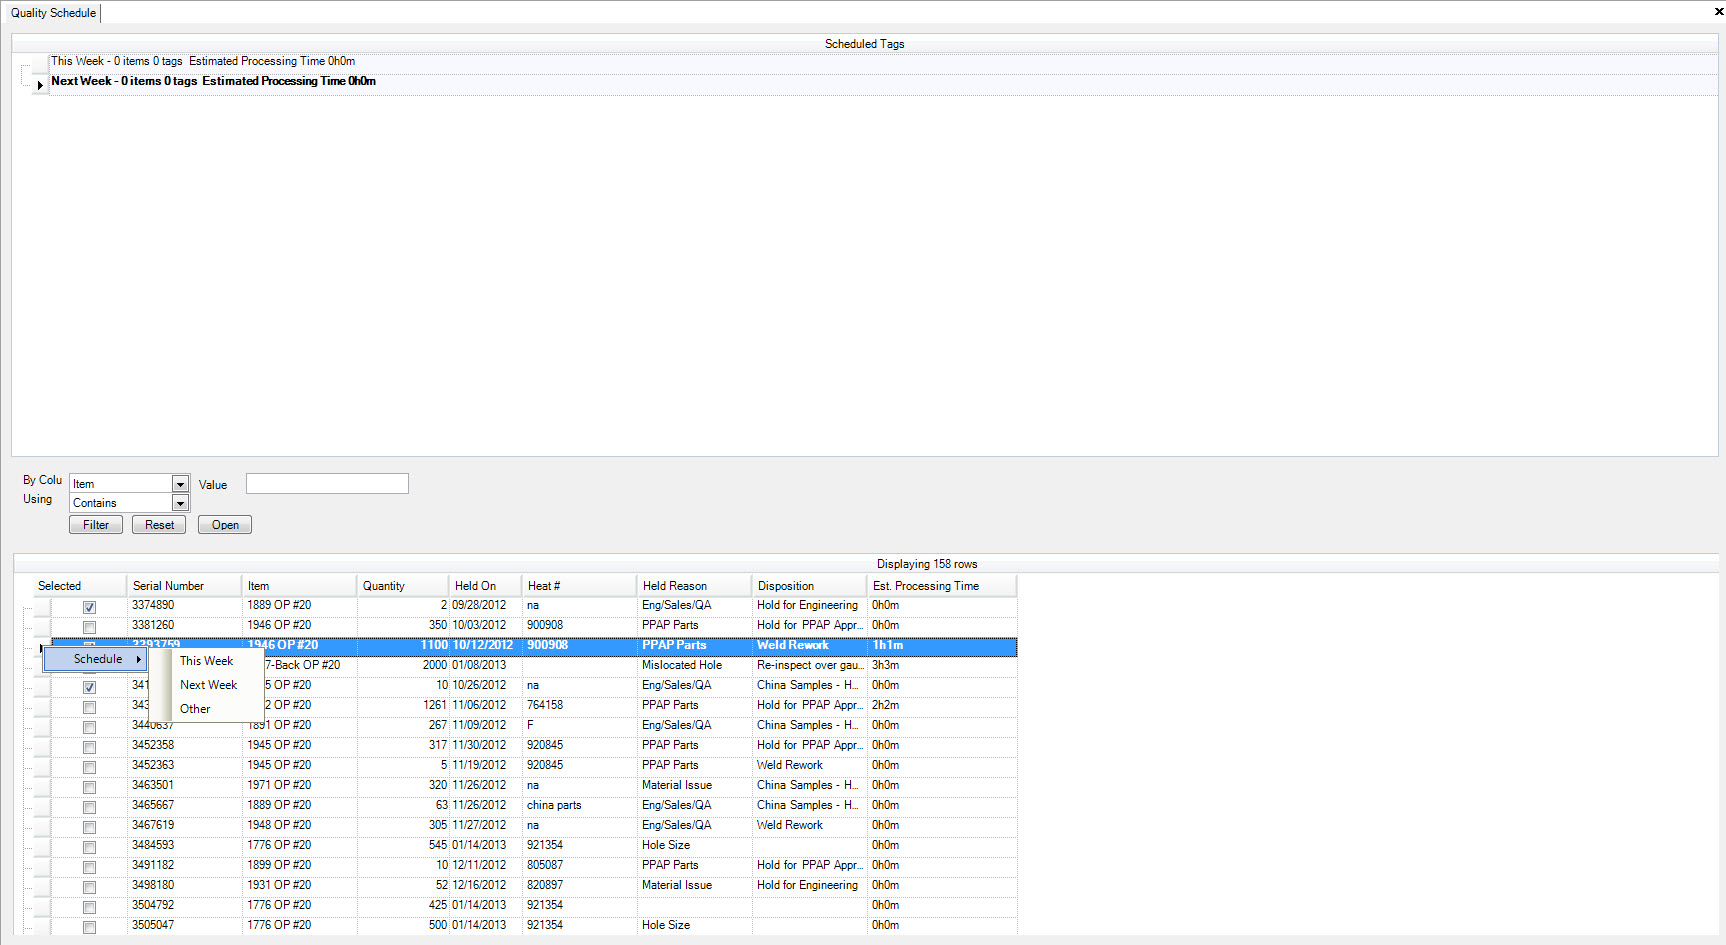
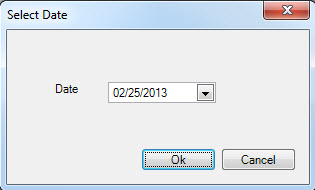
Select This Week or Next Week or Other. If Other is selected a Select Date window will be displayed to allow the user to select the date when they wish to schedule.
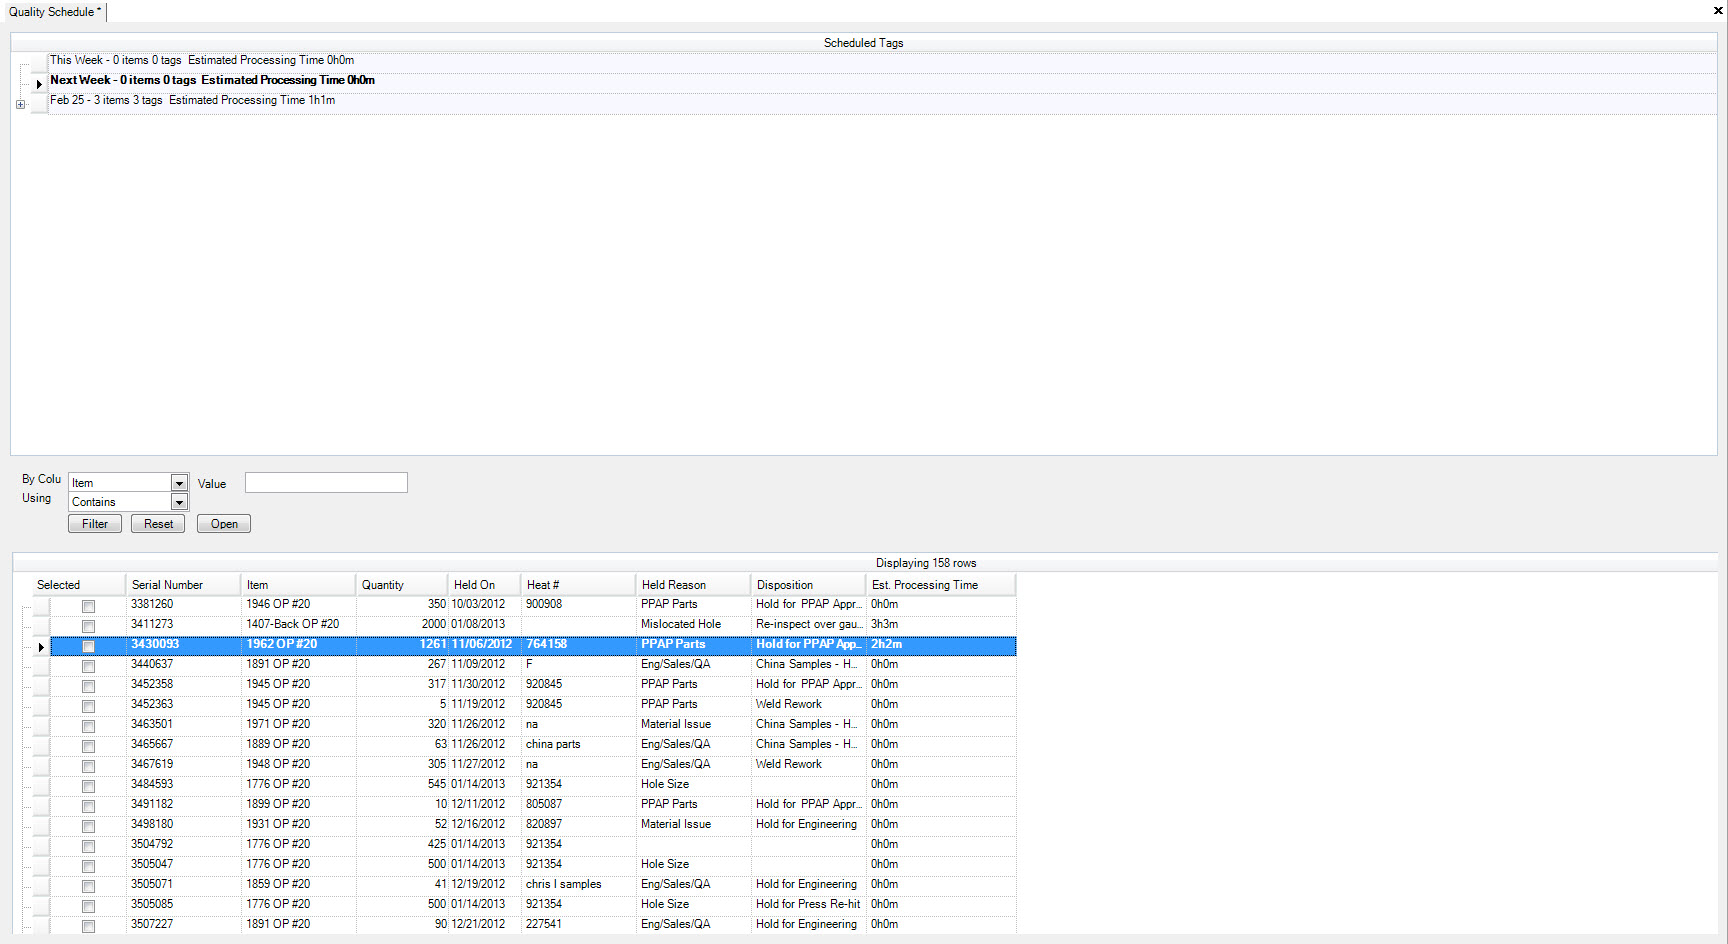
All the selected serial numbers will be added to the schedule for This Week or Next Week or the selected date.
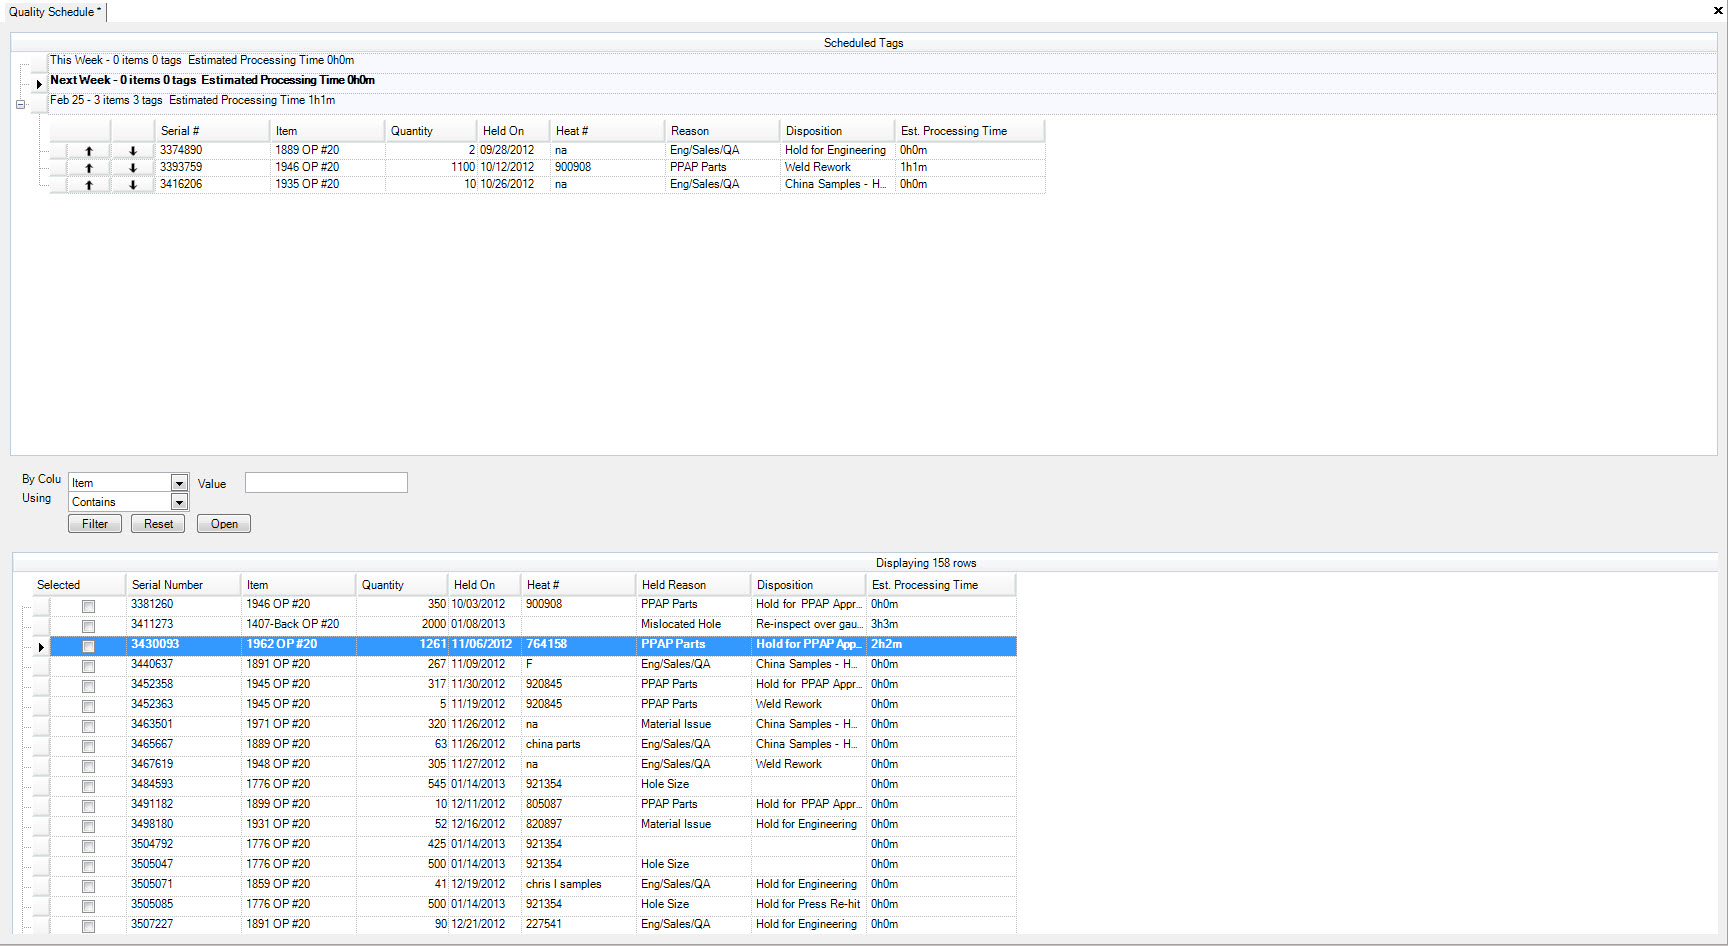
By selecting the  next to the schedule the serial numbers will be displayed for the week.
By using the  or
or  the serial numbers within a week can be prioritized by moving them up or down
the sequence.
Removing Serial Numbers from the Schedule
Select the serial number to be removed from the schedule by right-clicking on the row and the Remove From Schedule dropdown menu will be displayed. Click Remove From Schedule and the serial number will be returned to the list of serial numbers in the lower half of the screen.
Standard Processing Times
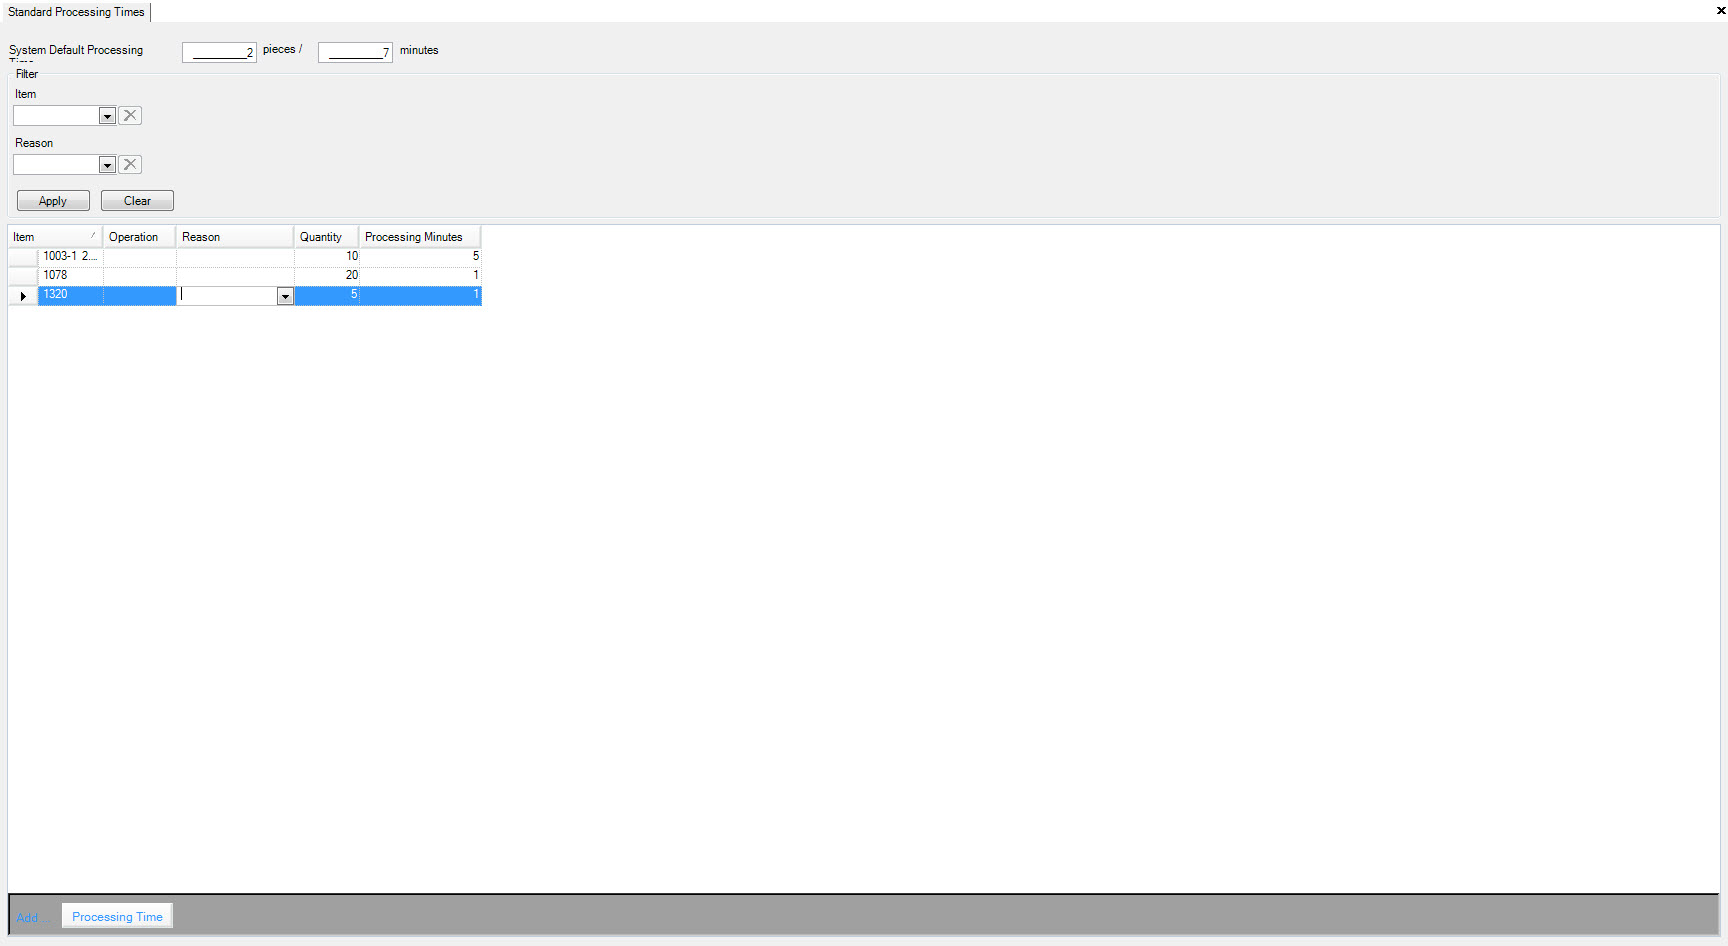
The Standard Processing Times are used by ShopEdge to compute the estimated processing. When computing the estimated processing time for a particular serial number, ShopEdge will first look for a sorting rate for the held reason at the item/op level. If one does not exist at the held reason-item/op level, the default for the item/op level will apply, if it exists. If not Shopedge will check for a system default for the held reason. If it does not exist, then the system default will apply.
To maintain the Standard Processing Times, navigate to the  button, and then select the
 ![]() option.
This will open the Standard Processing Times screen.
option.
This will open the Standard Processing Times screen.
Quality Reject Transactions
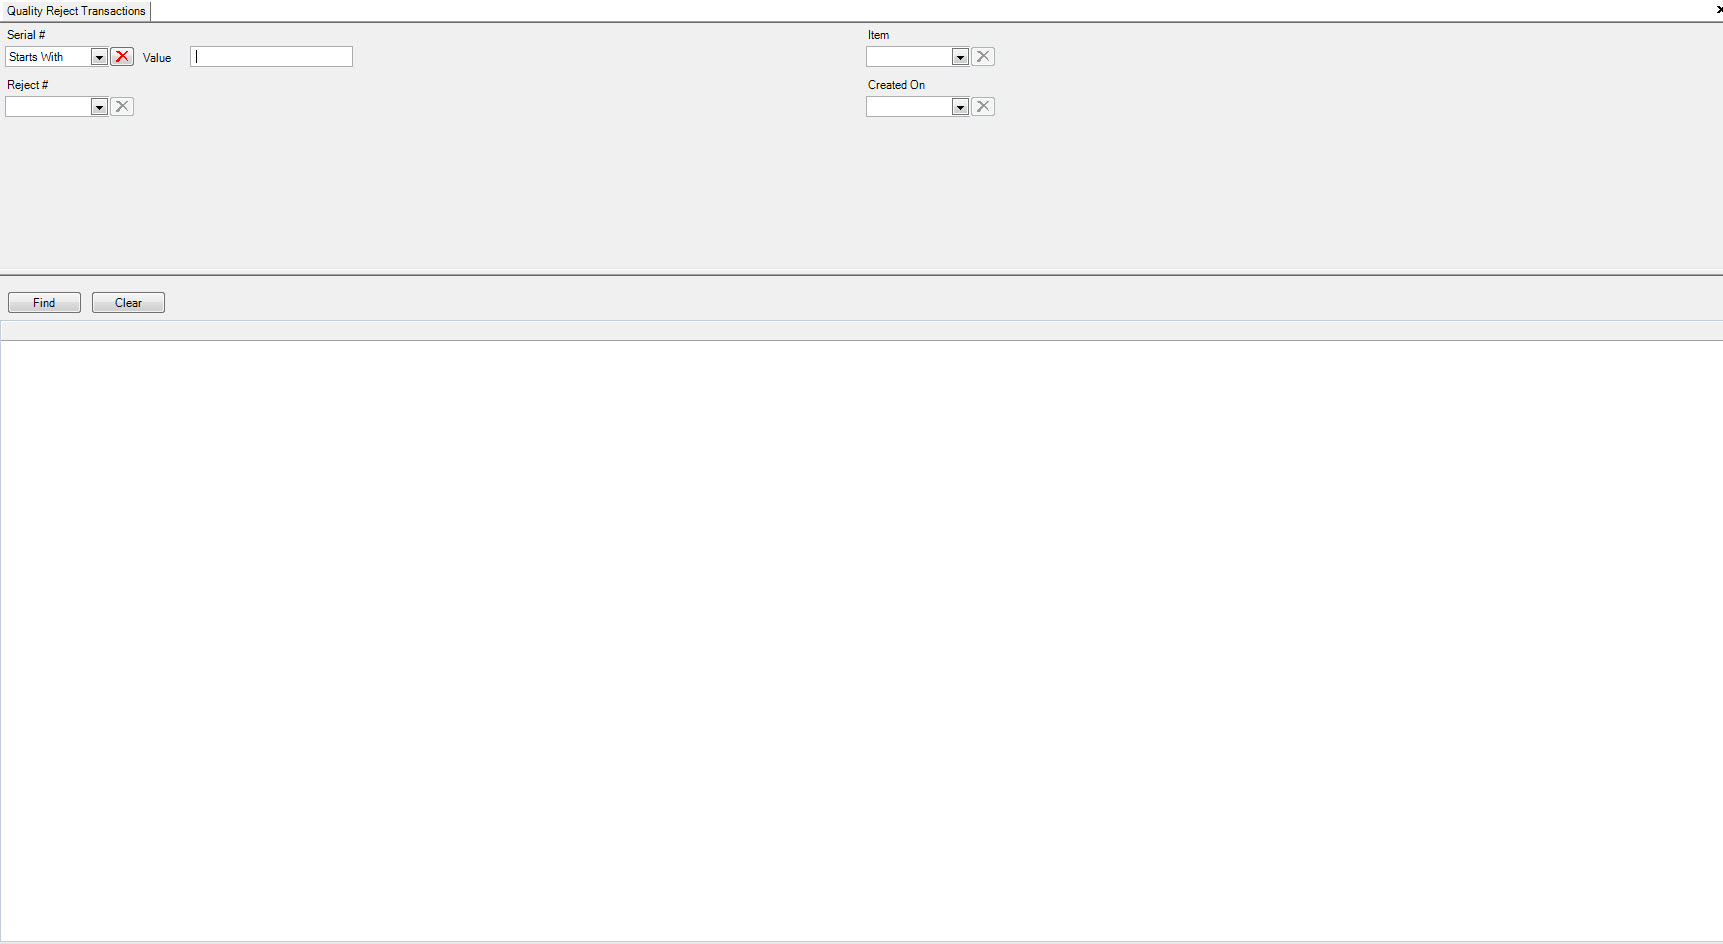
To display the Quality Reject Transactions, navigate to the  button, and then select the
 ![]() option.
This will open the Quality Reject Transactions Screen.
option.
This will open the Quality Reject Transactions Screen.
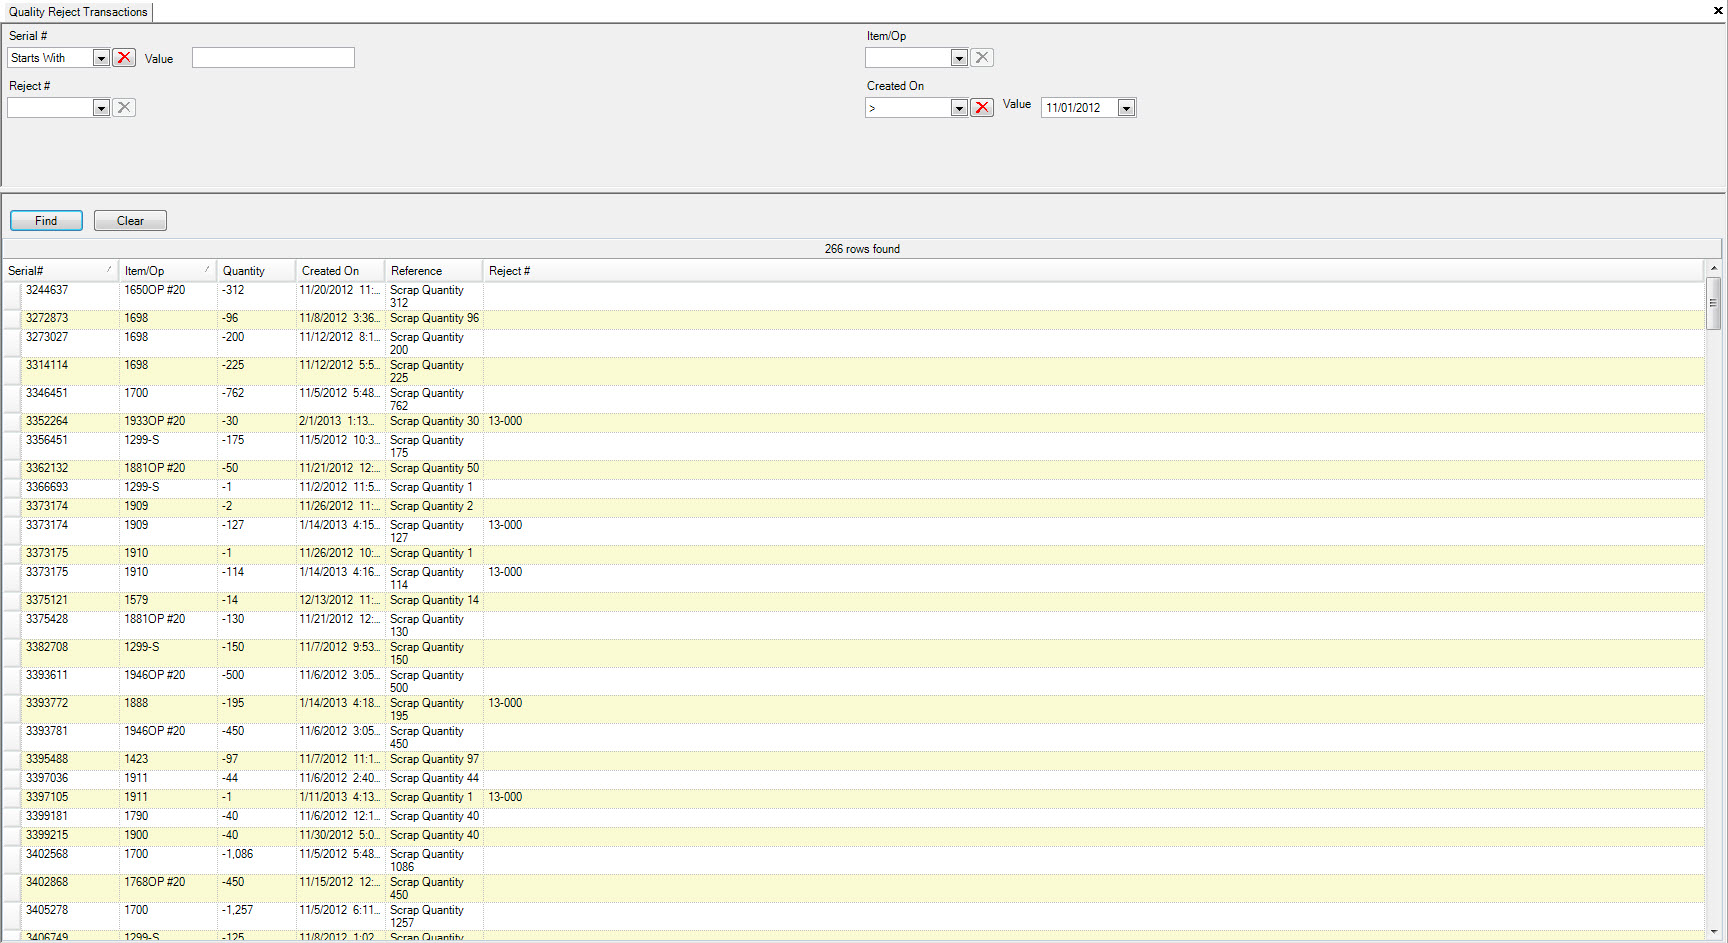
Enter the selection and click the  button and the Quality Reject Transactions will be displayed.
Reports
There are various reports available within the QA module. To view these reports, navigate to the  button, and then select the
  option.
This will open the ‘Report Viewer Screen’.
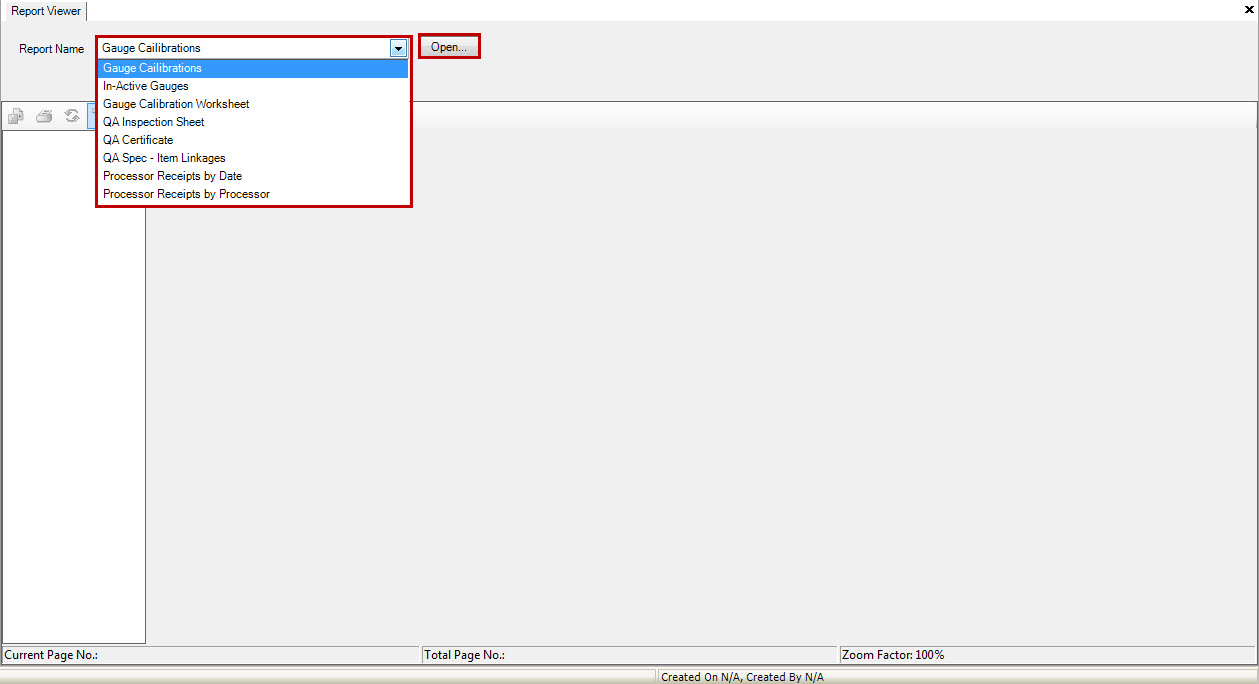
The ‘Report Name’ drop-down window contains a list of options that can be used to produce a report. Select an option and click on the  button to set the parameters of your report.
Administration
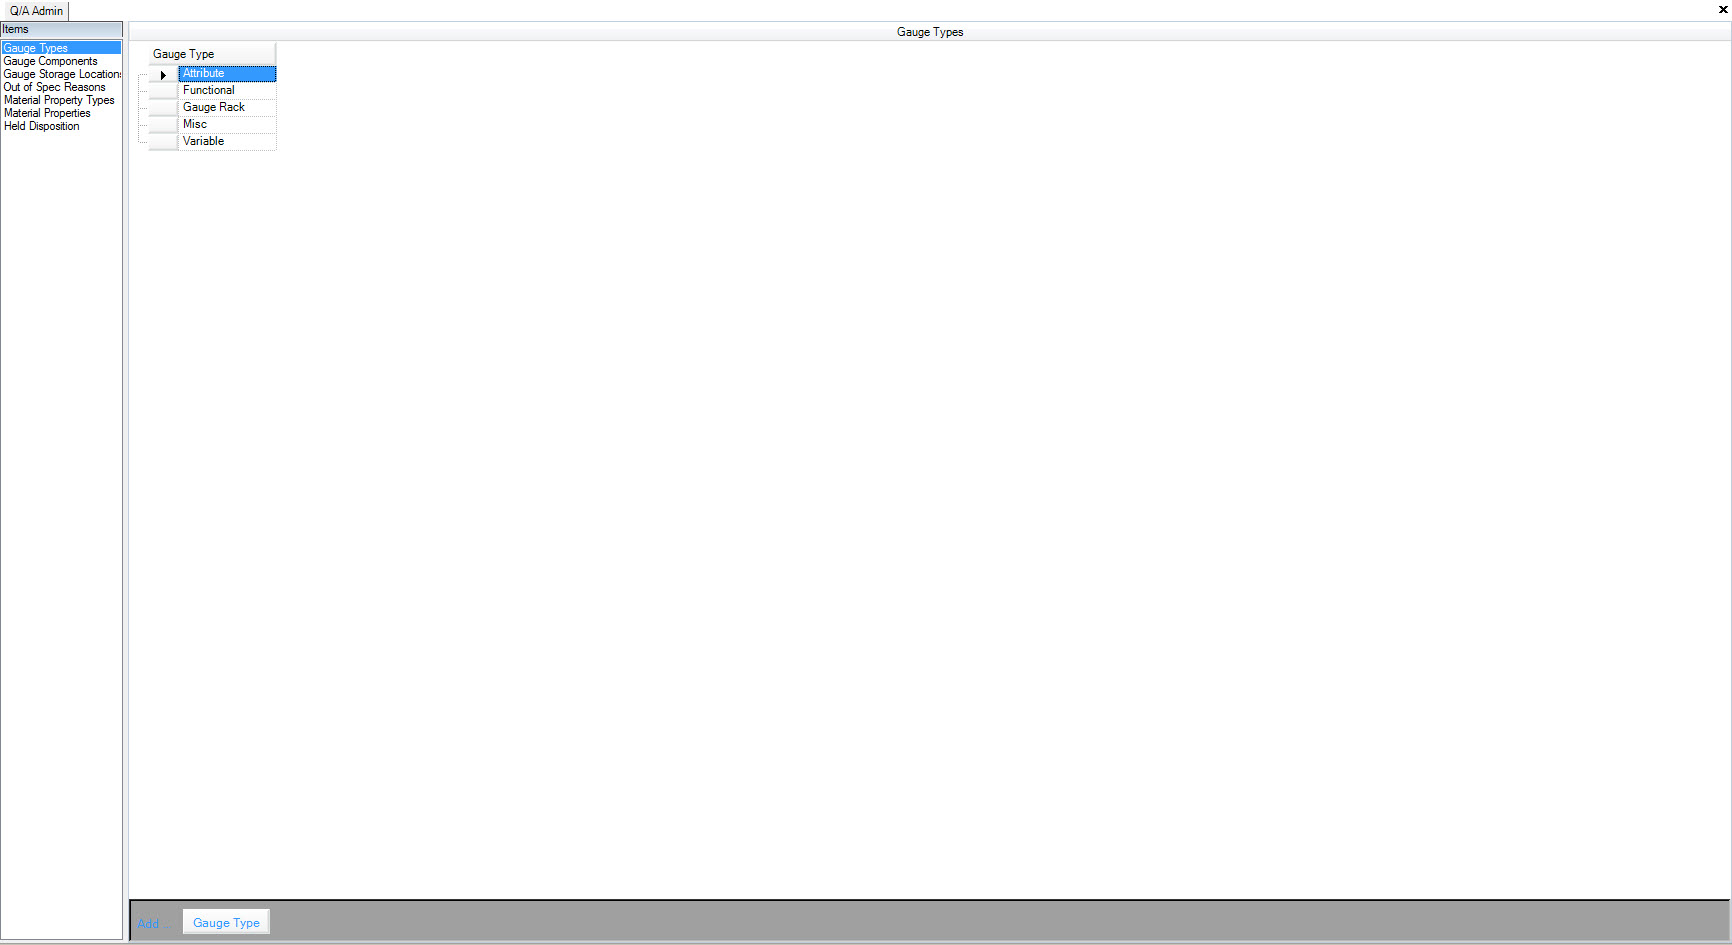
QA Administration is used to add and maintain ‘Gauge Types’, ‘Gauge Components’, ‘Gauge Storage Locations’ and ‘Out of Spec Reasons’ that are used throughout the ‘QA’ Module and the entire system.
To navigate to QA Administration click on the  button, and then select the
  option. This will open the
‘QA Admin Screen’.
Adding a Gauge Type
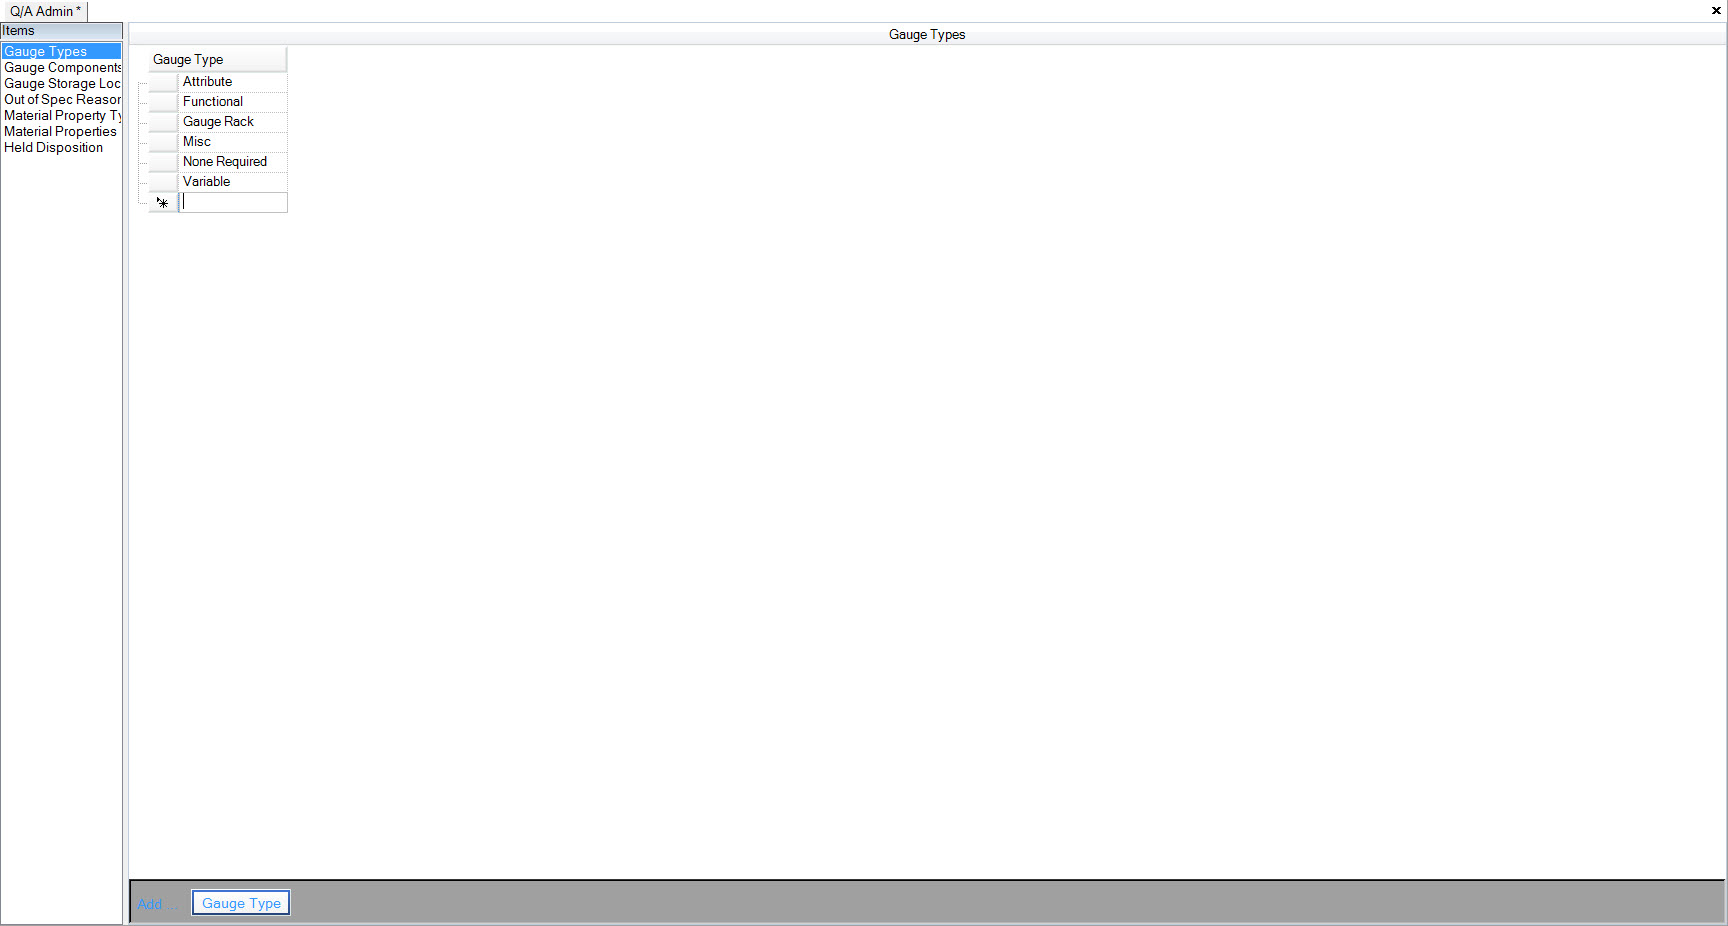
To add a new Gauge Type, make sure it is highlighted on the left of the screen under ‘Items’. Add a gauge type by clicking on the  button at the bottom of the screen.
A new line will be added to the Gauge Type list. Fill out the new ‘Type’ and save your changes.
Adding a Gauge Component
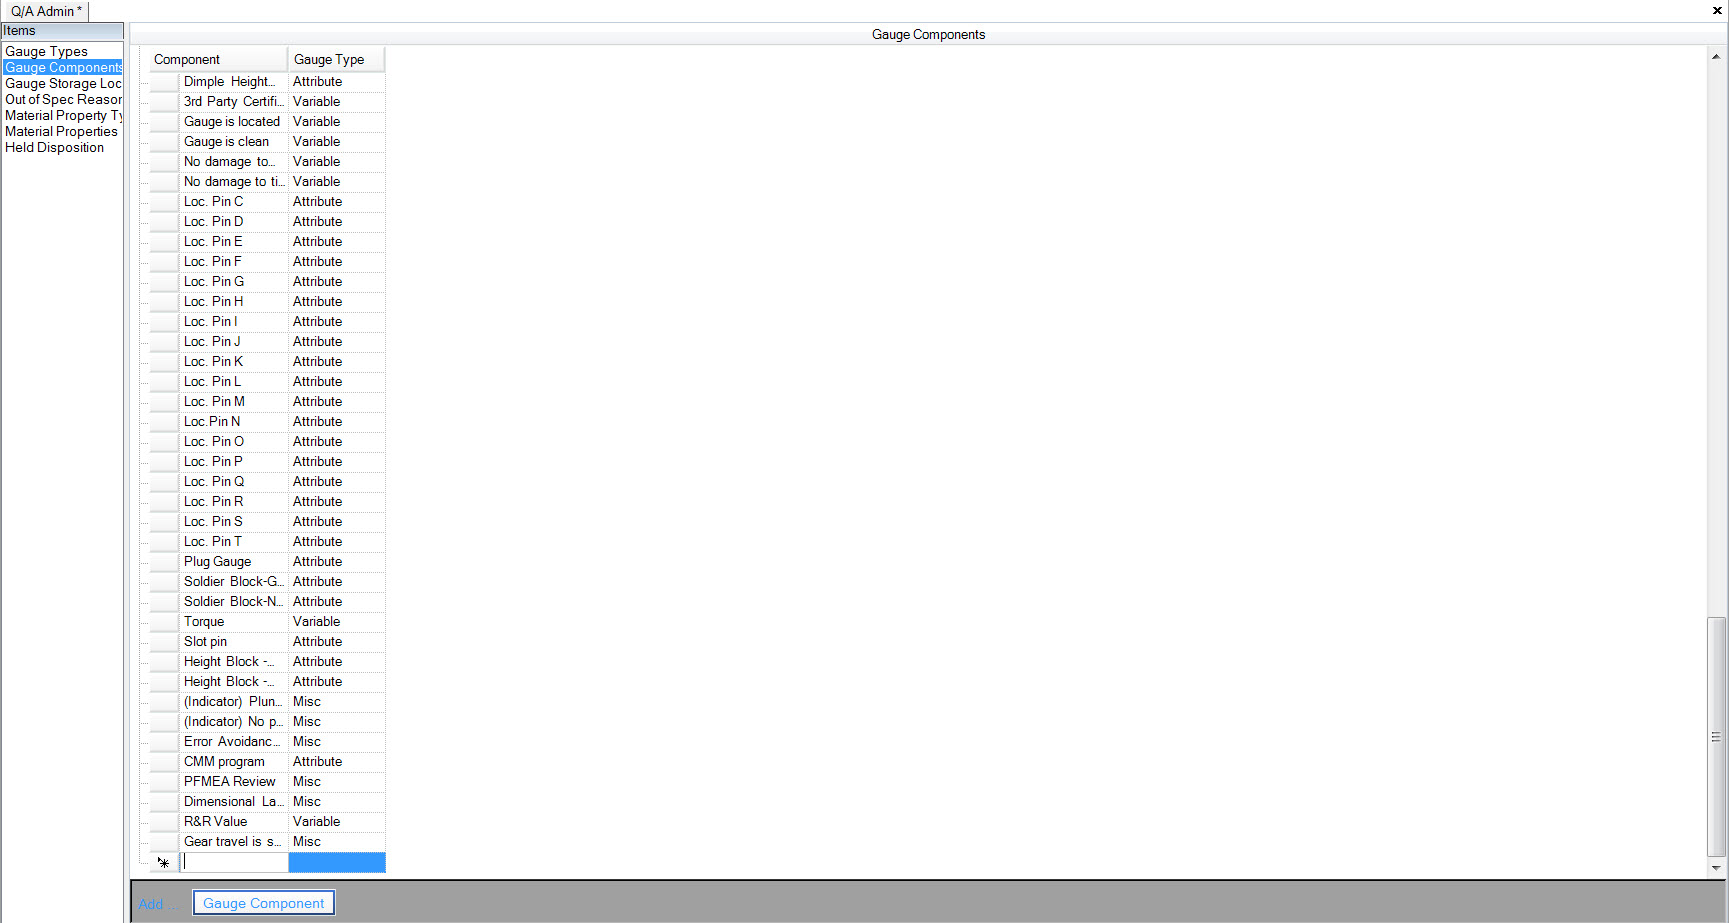
Gauge Components are the part of a gauge that needs calibrating (i.e. a dial). To add a Gauge Component, make sure it is highlighted on the left of the screen under ‘Items’. Add a component by clicking on the  button at the bottom of the screen.
A new line will be added to the Gauge Component list. First select the ‘Gauge Type’ from the drop down, and then enter in the ‘Component’ in the text box provided. Save your changes.
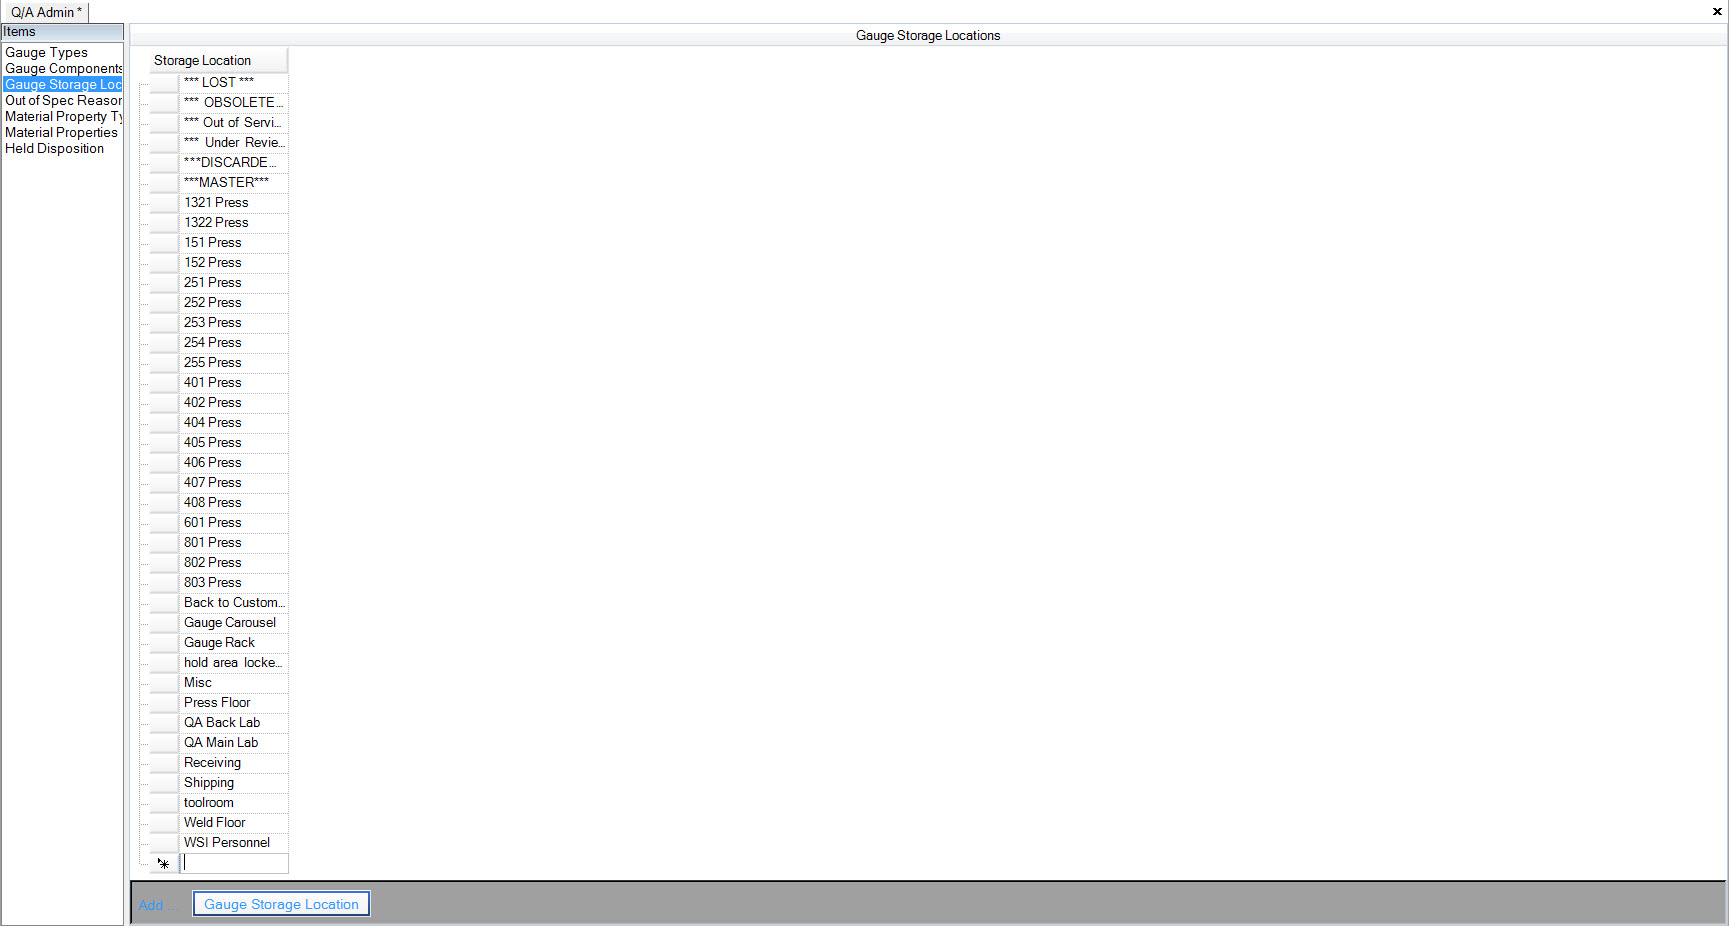
Adding a Gauge Storage Location
To add a Gauge Storage Location, make sure it is highlighted on the left of the screen under ‘Items’. Add a location by clicking on the  button at the bottom of the screen.
A new line will be added to the Gauge Storage Locations list. Fill out the ‘Storage Location’, and save your changes before exiting the screen.
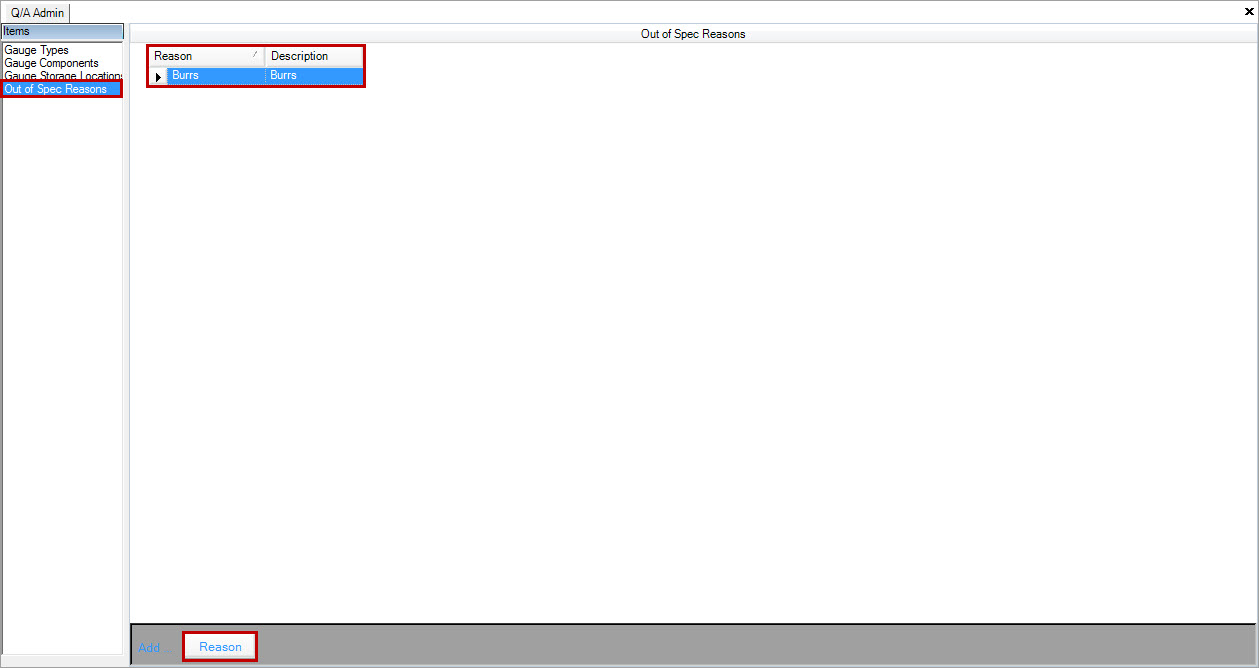
Adding an Out of Spec Reason
To add a new Out of Spec reason, make sure it is highlighted on the left of the screen under ‘Items’. Add a reason by clicking on the  button at the bottom of the screen.
A new line will be added to the Out of Spec Reasons list. Fill out the ‘Reason’ and ‘Description’, and save your changes before exiting the screen.
