Navigation
This section can be used as a guide for users on how to navigate through the ShopEdge System main application.
Menu Bar
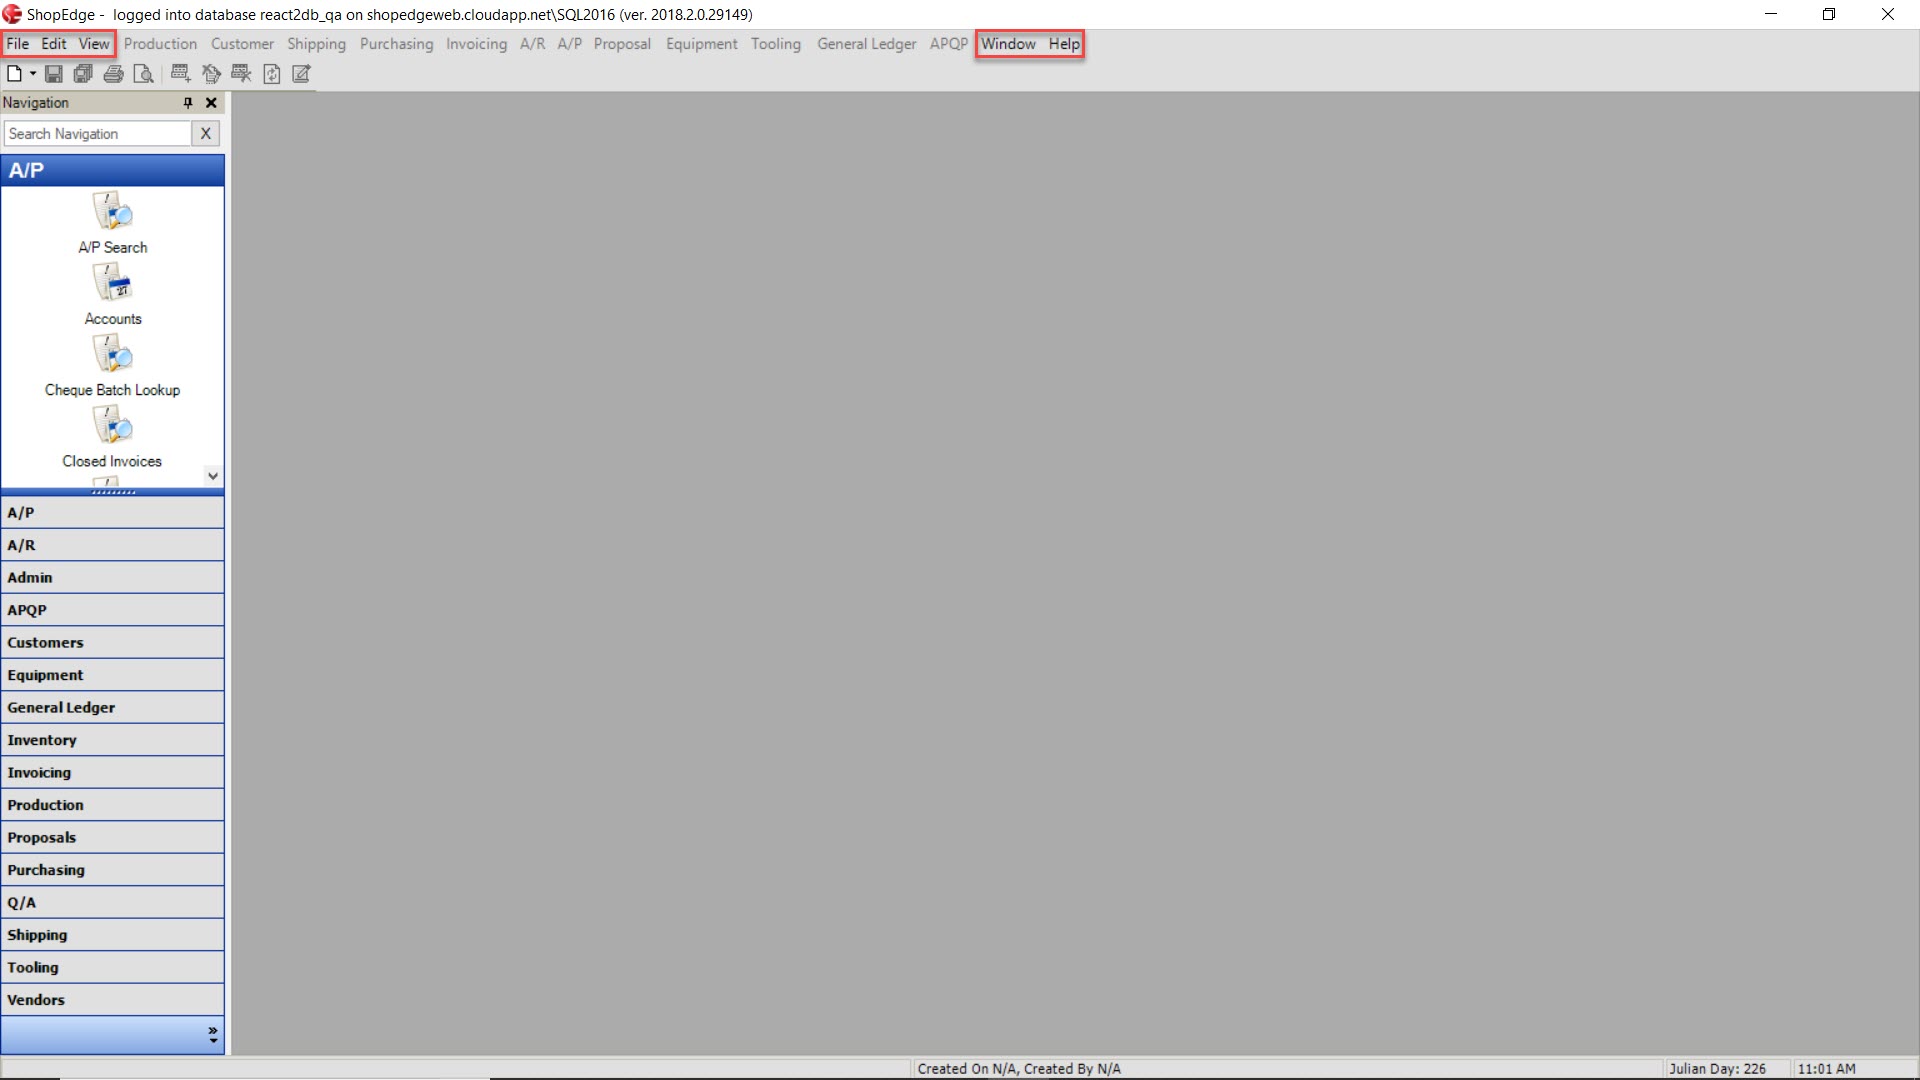
The menu bar is located at the top of the system screen when the system is opened. The menu bar consists of functions for both the entire system as a whole and for the individual modules of the system.
Main Menu Functions
The main menu functions relate to the entire system as a whole and consist of File, Edit, View, Window, and Help menus.
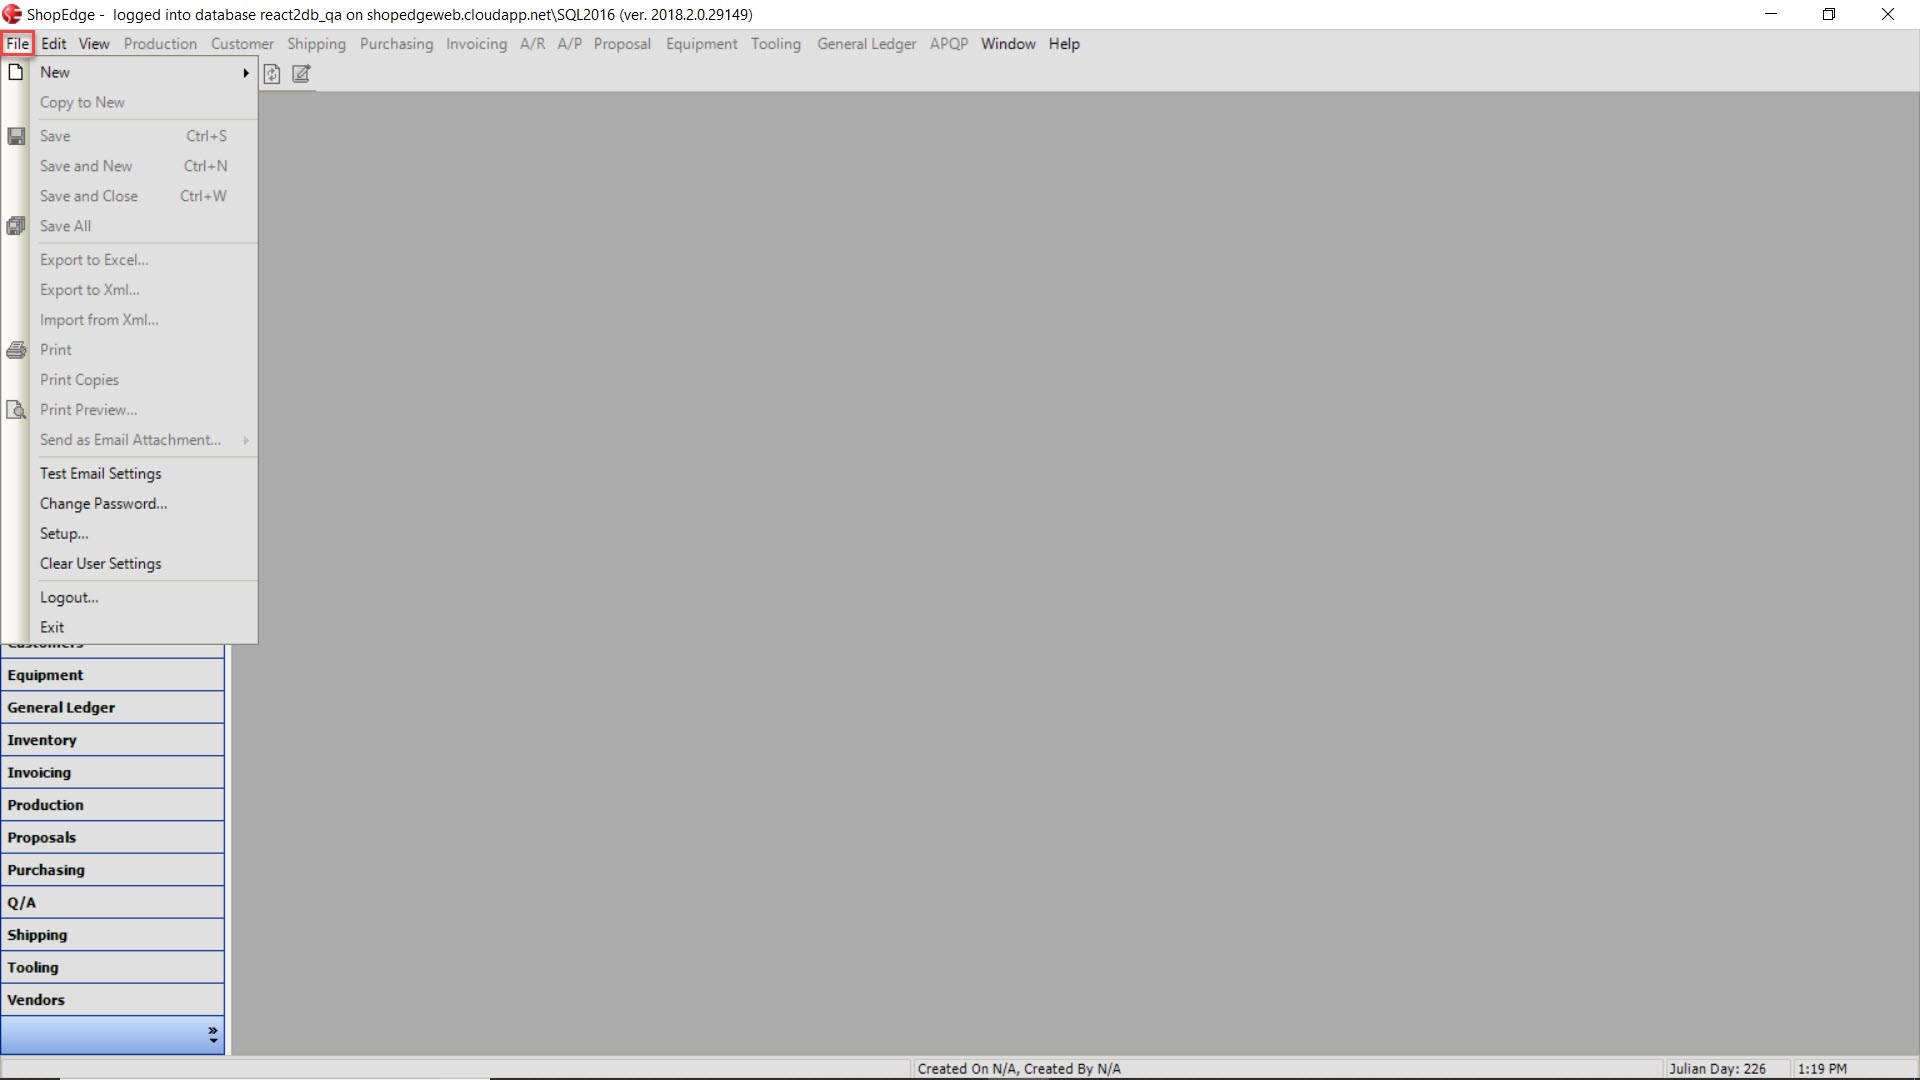
The File menu provides options such as:
- New: ability to open new entries in the system
- Copy to New: ability to copy information to a new entry
- Save: ability to save
- Save and New: ability to save and open a new entry
- Save and Close: ability to save and have the entry close
- Save All: ability to save all unsaved open screens
- Export to Excel: ability to export data to an excel wordsheet
- Export to Xml: ability to export data to an Xml file
- Import from Xml: ability to import data from an Xml file
- Print: ability to print
- Print Copies: ability to print copies
- Print Preview: ability to view before printing
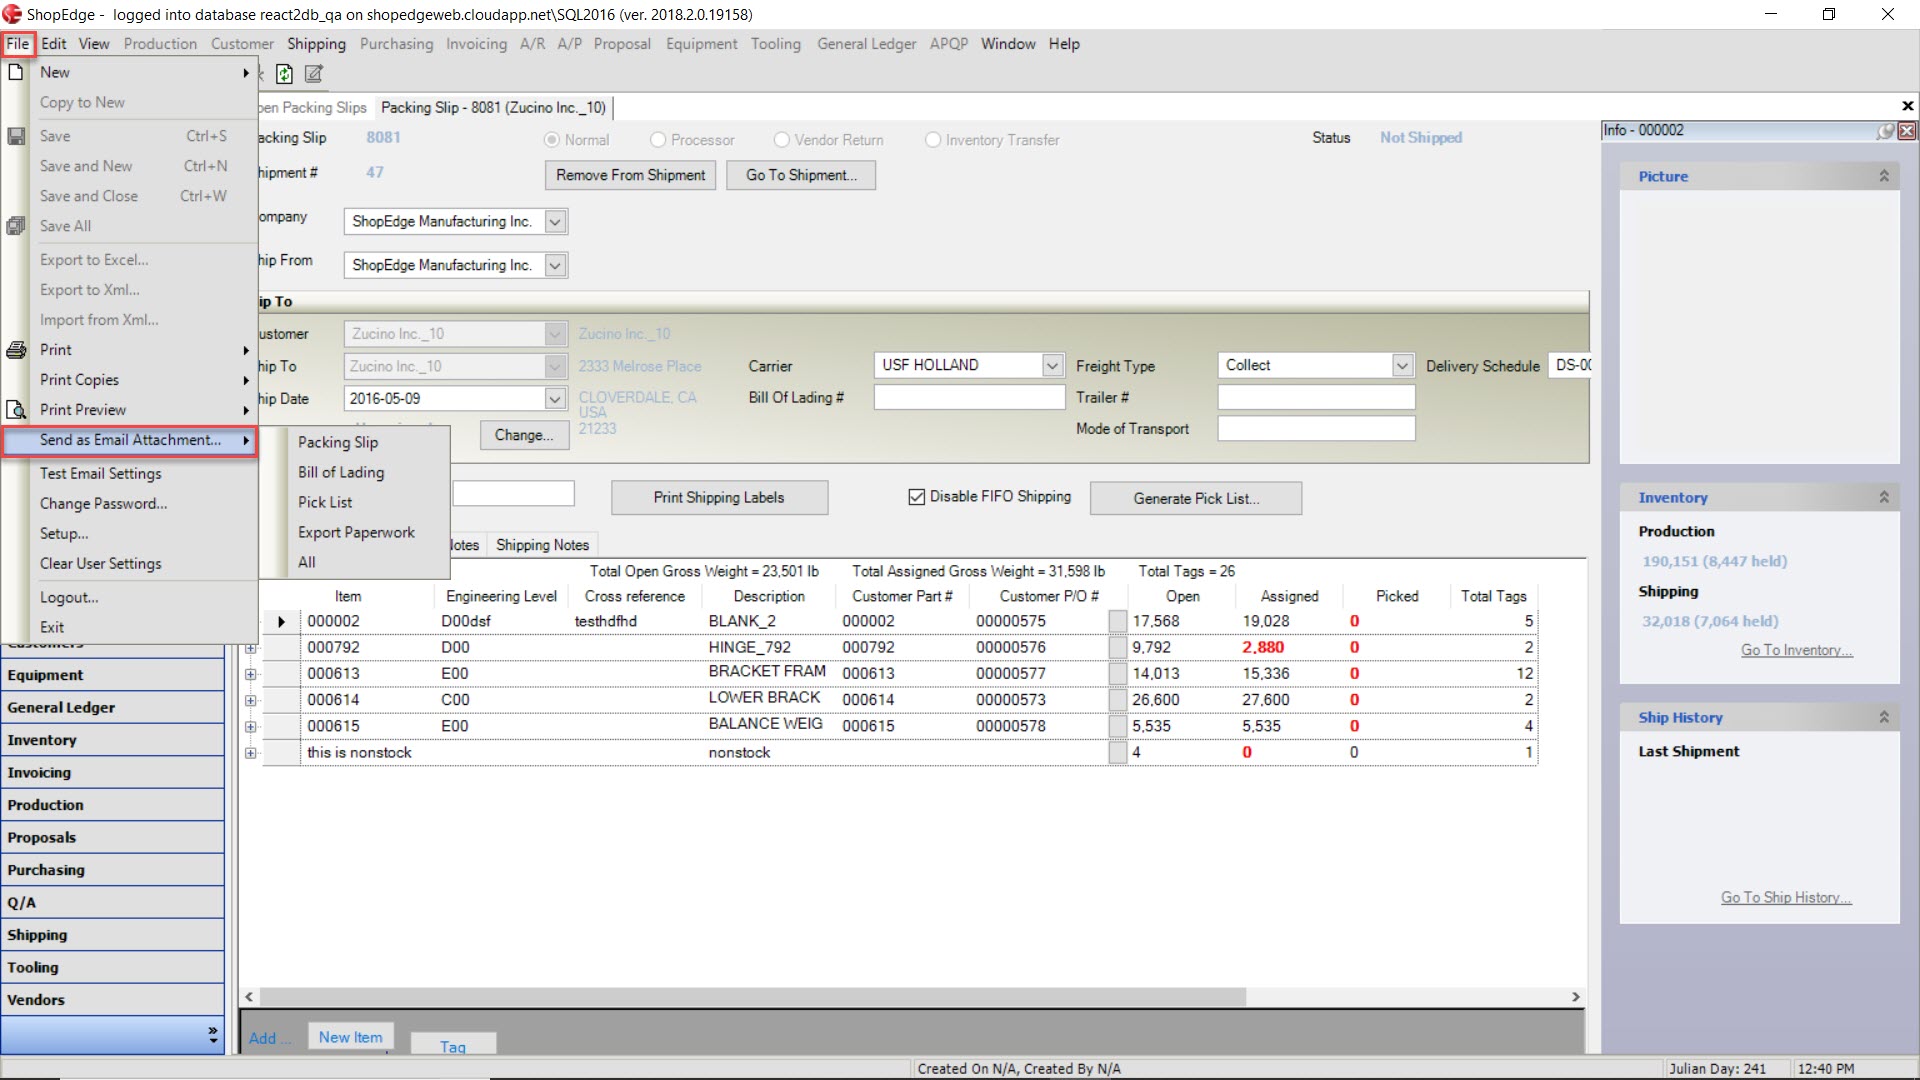
- Send as Email Attachment: ability to send entry as an email attachment
- Test Email Settings: ability to test sending an email
- Change Password: ability to change a login password
- Setup: ability to select specific settings for different modules in the system
- Clear User Settings: ability to clear all user settings
- Logout: ability to logout of the ShopEdge Application
- Exit: ability to exit and close the ShopEdge Application
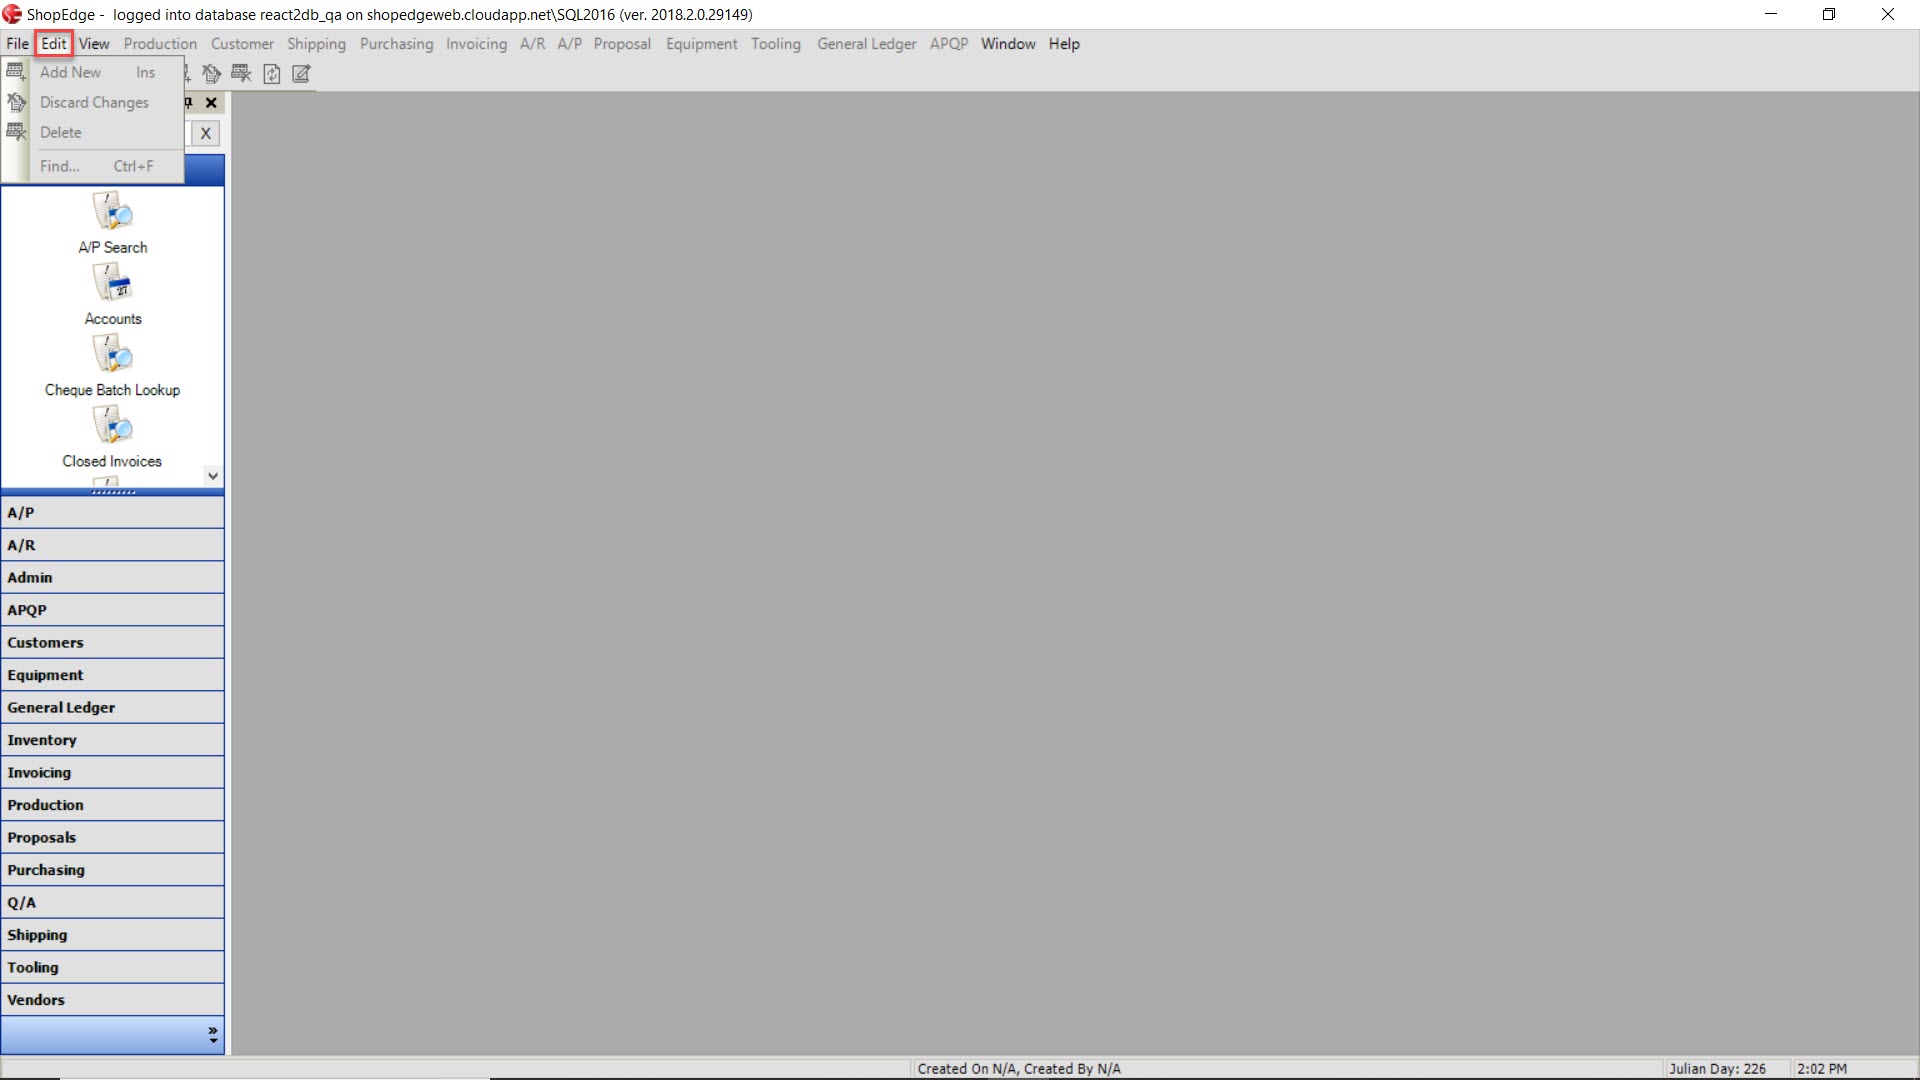
The Edit menu provides options such as:
- Add New: ability to add a new row to entries in the system where applicable
- Discard Changes: ability to discard unwanted changes when editing entries in the system
- Delete: ability to delete where applicable in the system
- Find: ability to search the system
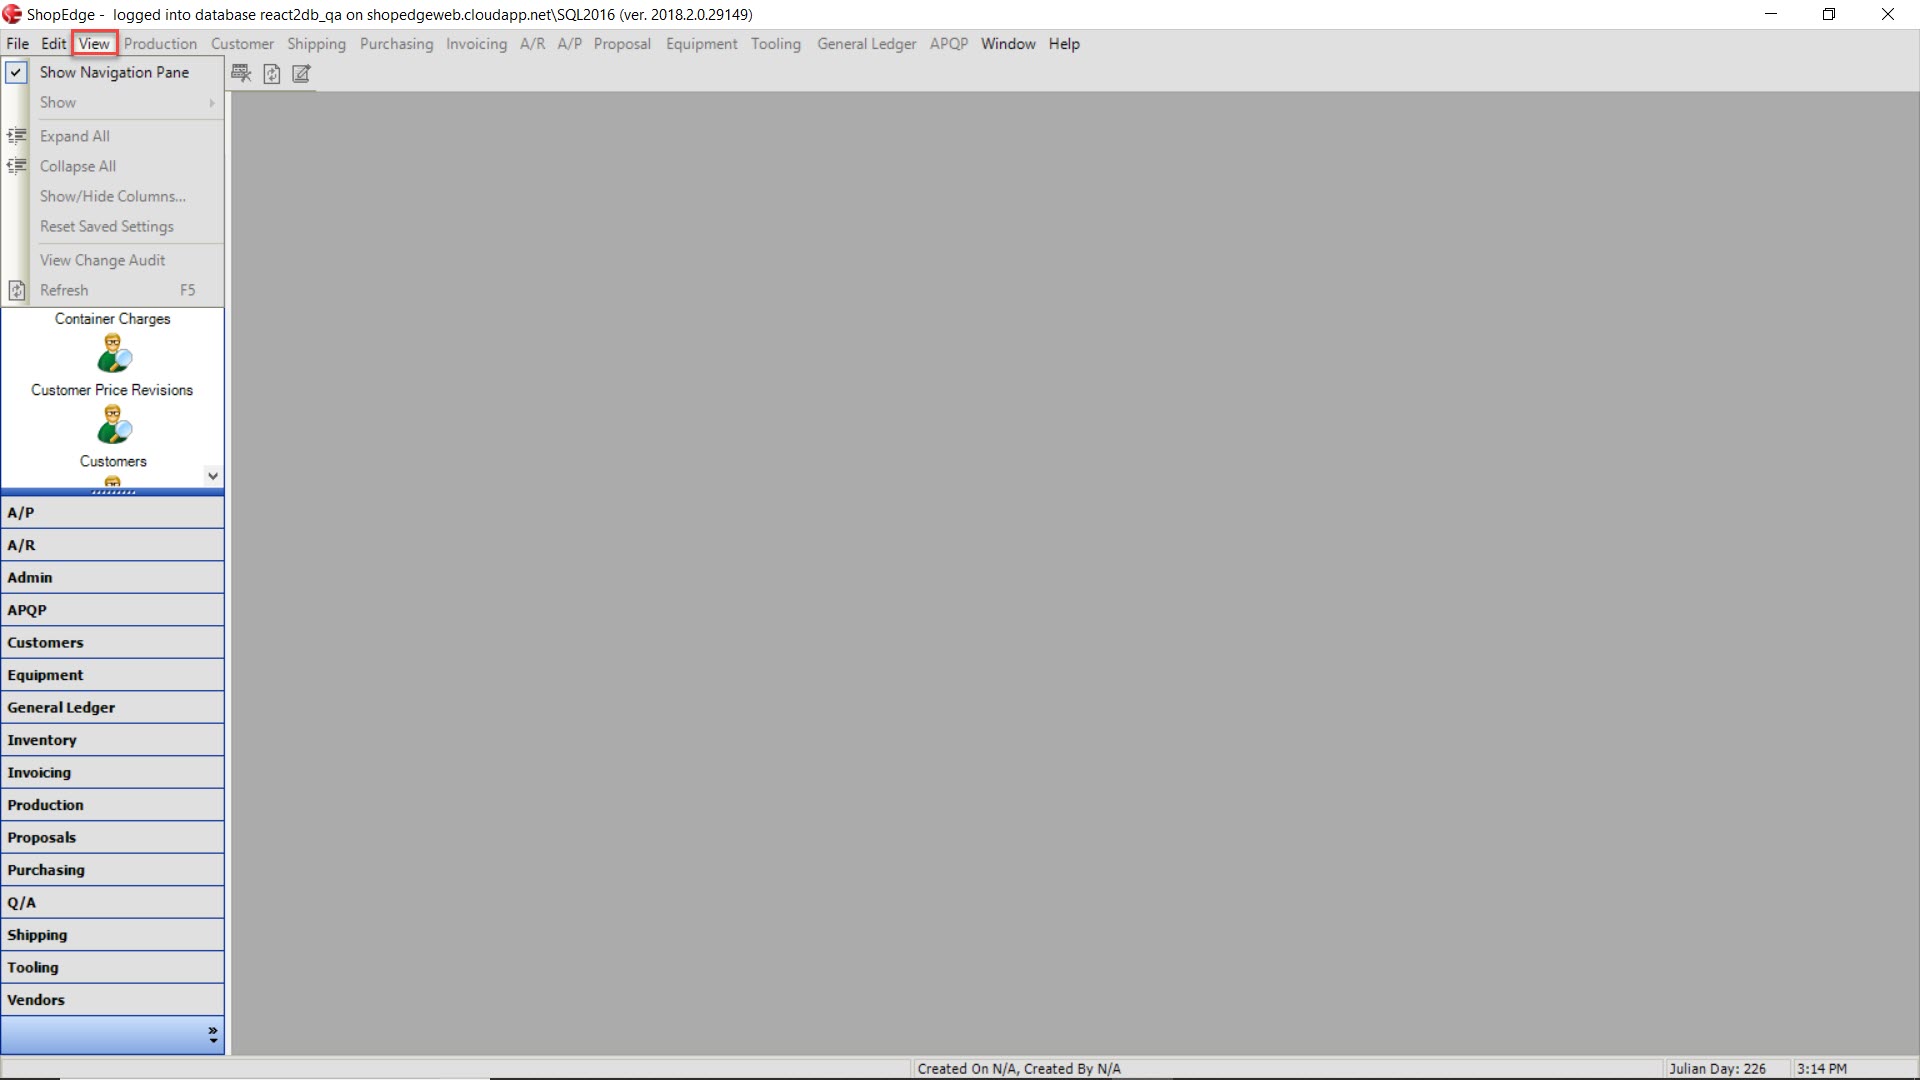
The View menu provides options such as:
- Show Navigation Pane: ability to view or not view the navigation pane
- Show: ability to display more details on certain screens where applicable
- Expand All: ability to expand rows
- Colapse All: ability to colapse rows
- Show/Hide Columns: ability to show or hide columns on screens in the system
- Reset Saved Settings: ability to reset saved settings in the system
- View Change Audit: ability to view changes made to entries in the system where applicable
- Refresh: ability to refresh screens in the system to view data that has been updated
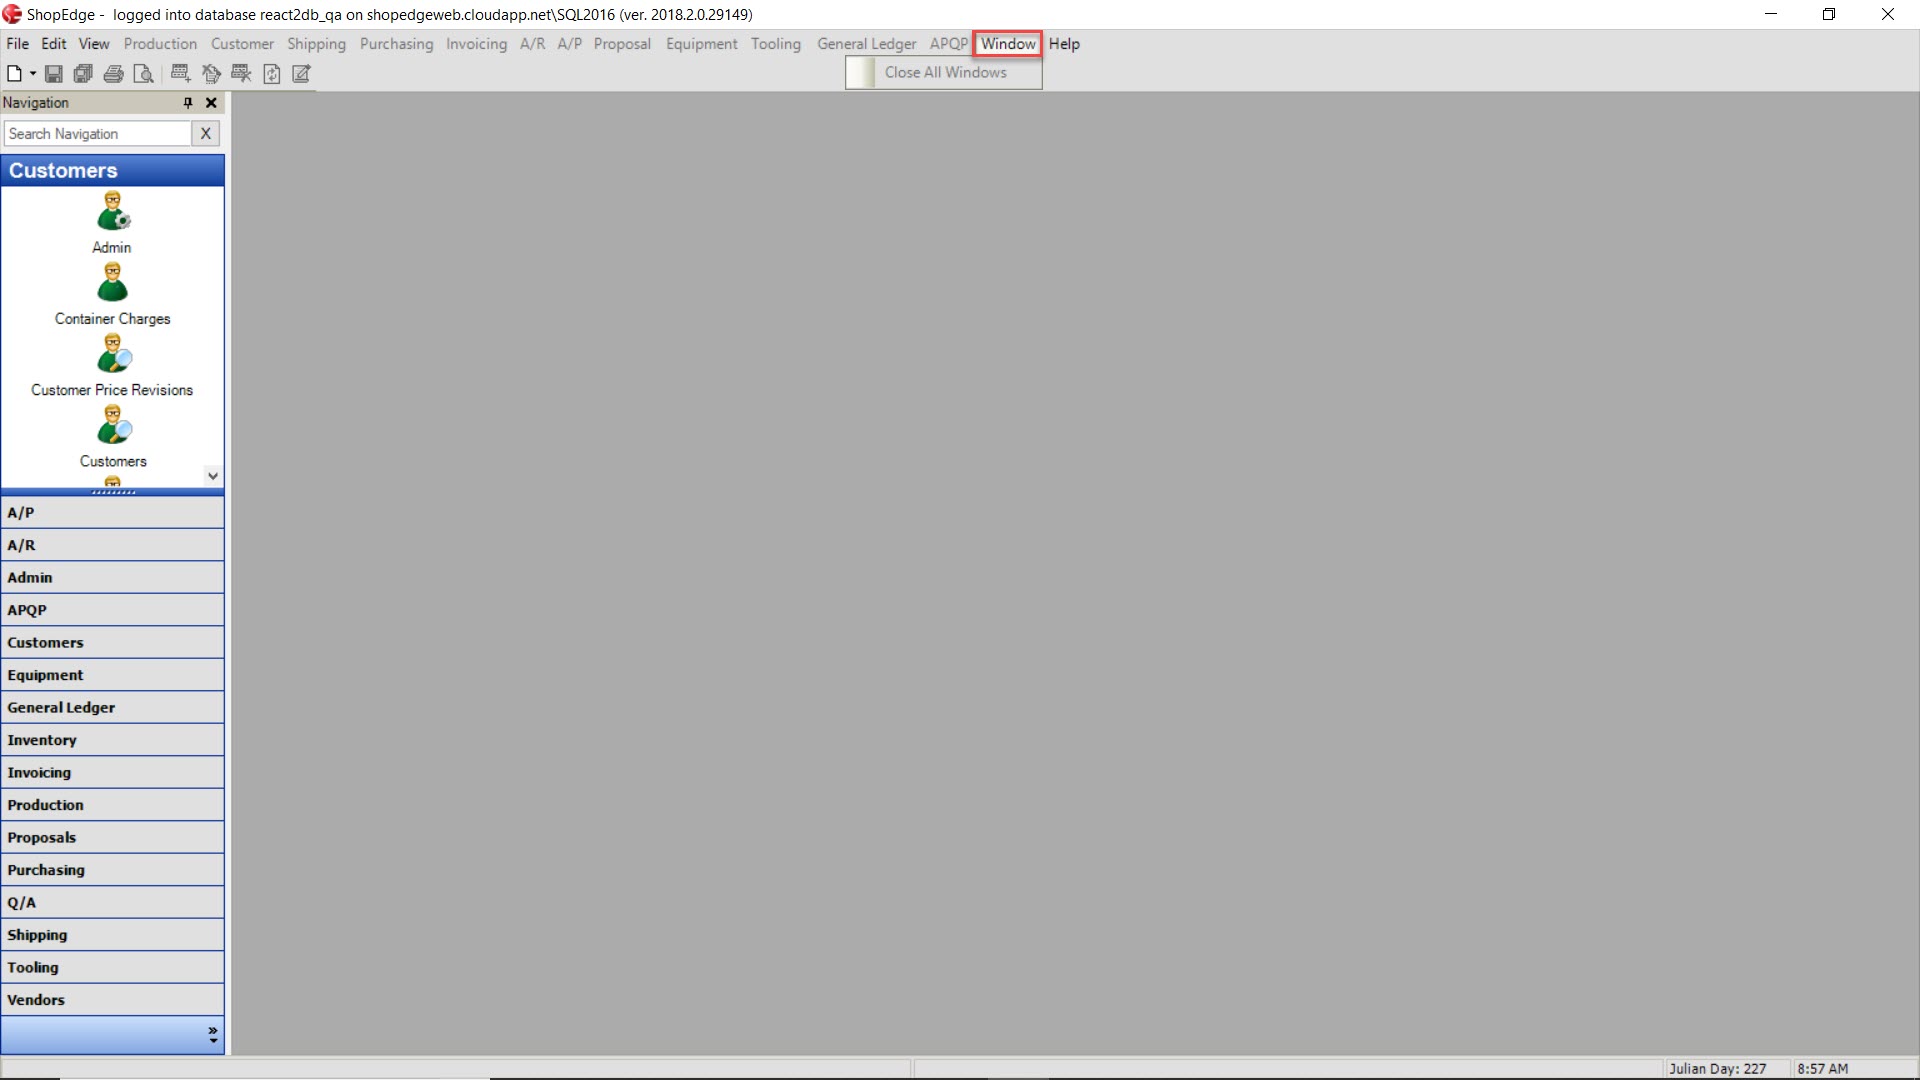
The Window menu provides options such as:
- Close All Windows: ability to close all open windows in the system
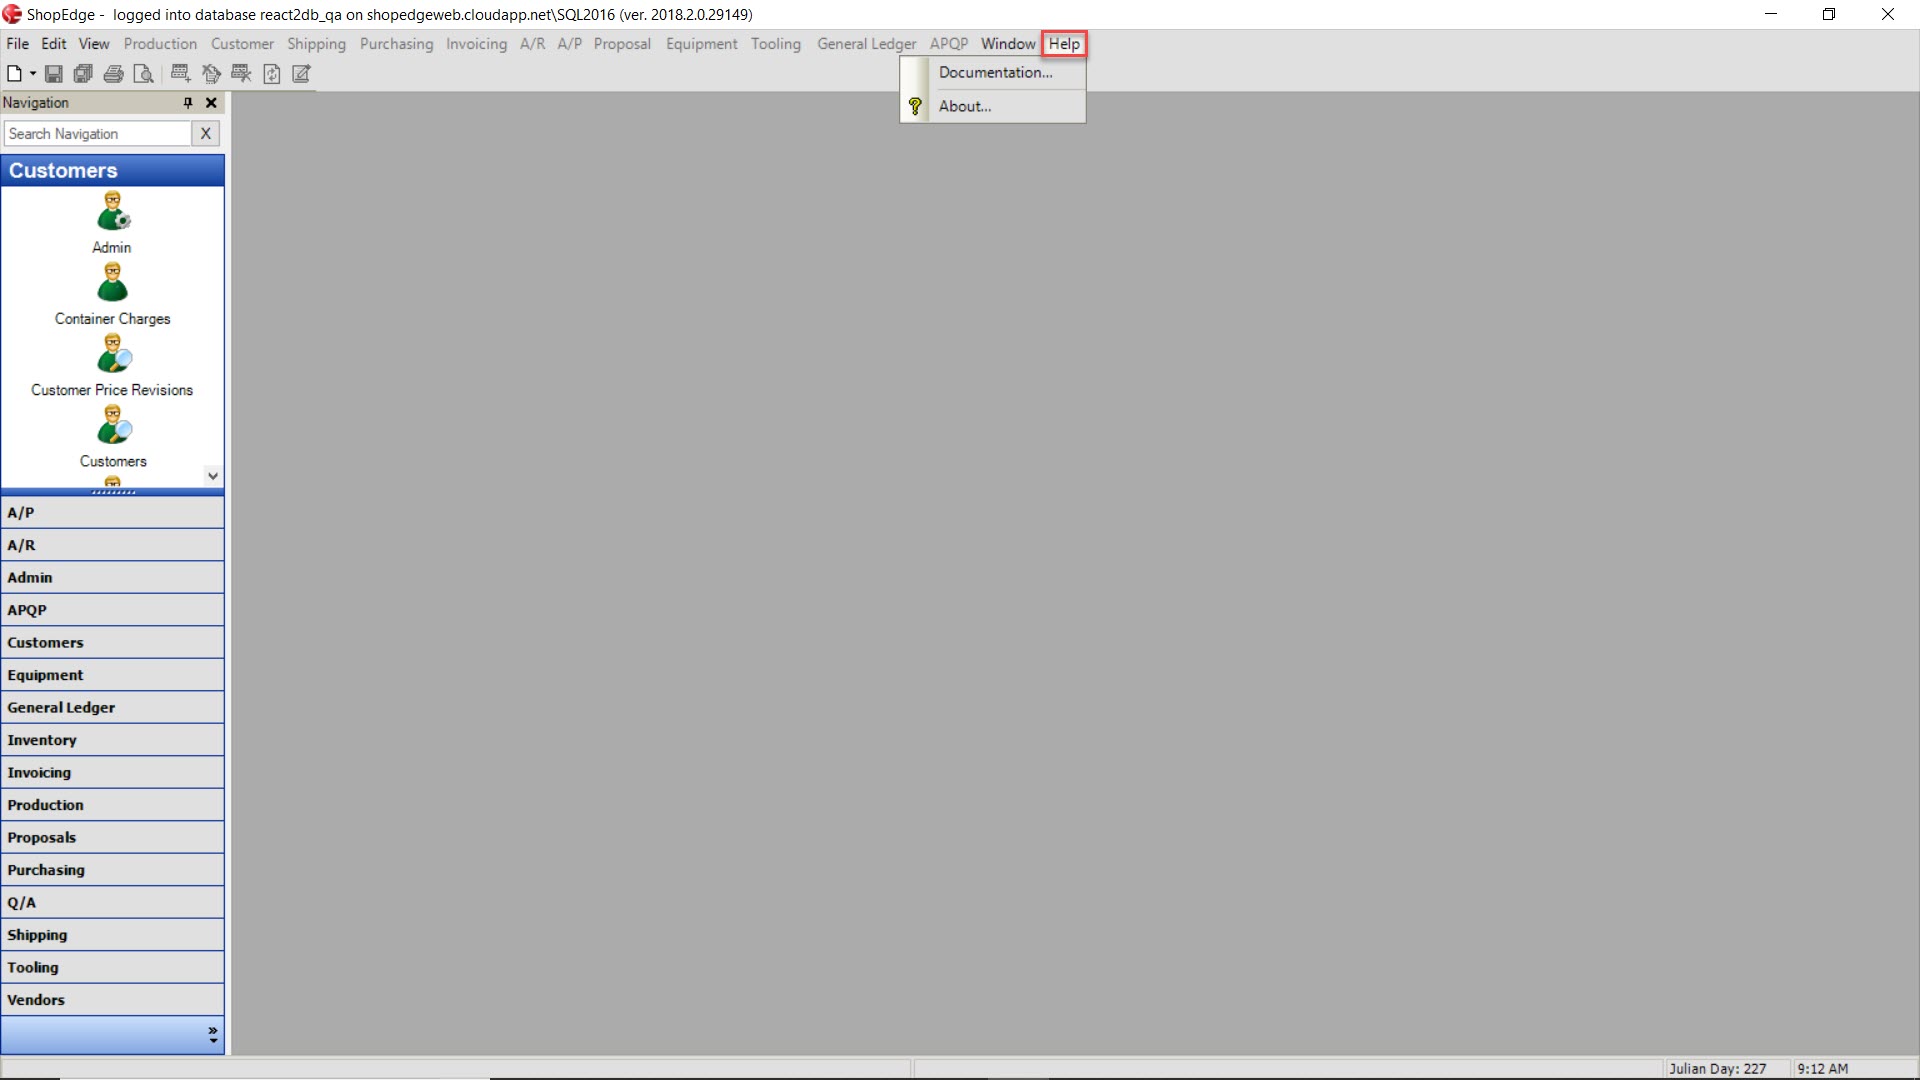
The Help menu provides options such as:
- Documentation: ability to view the online ShopEdge documentation for guidance
- About: ability to learn more about the system
Module Menu Functions
For most of the modules in the system, there are menu functions that become available when certain screens are open. Menu functions appear for modules such as Production, Customers, Shipping, Purchasing, Invoicing, A/R, A/P, Proposals, Equipment, Tooling, General Ledger, and APQP.
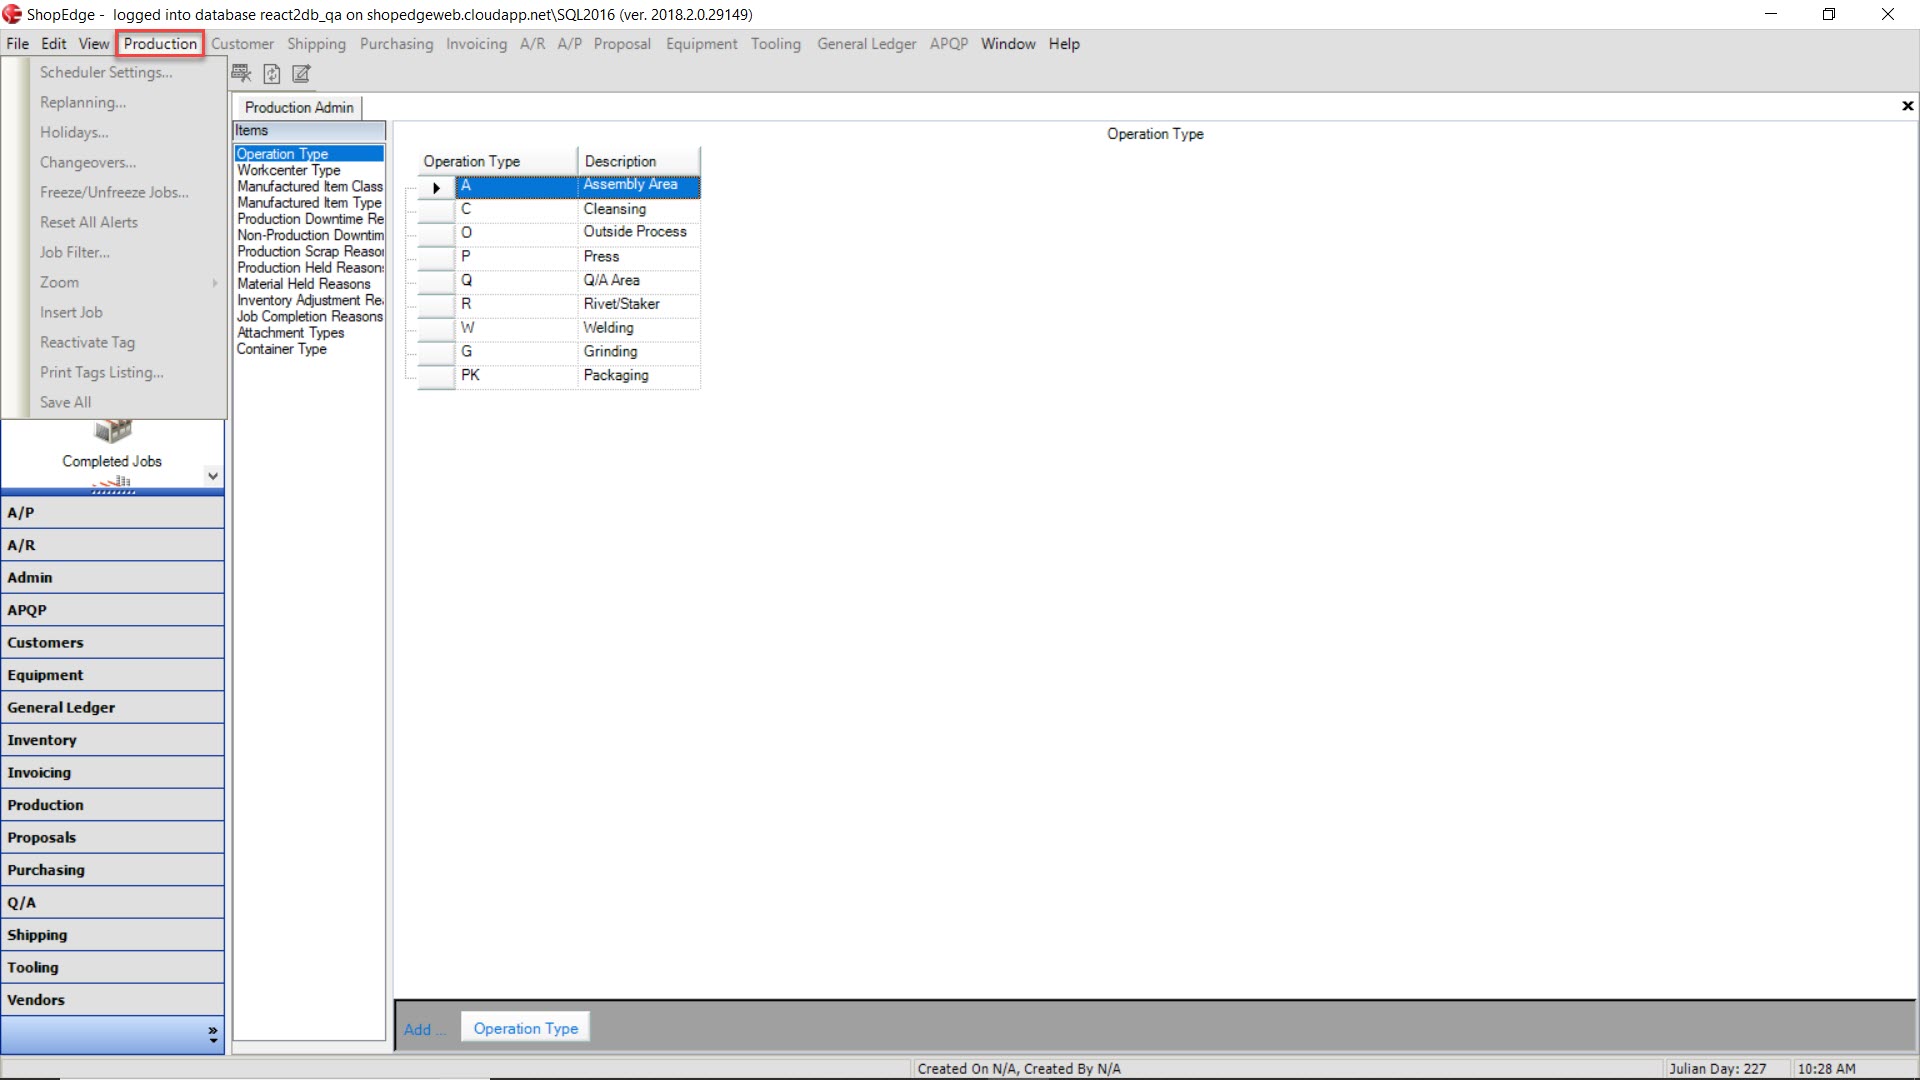
Under the Production menu the options that appear are:
- Scheduler Settings: ability to select specific settings when the Master Production Schedule screen is open
- Replanning: ability to replan releases/jobs when the Master Production Schedule screen is open
- Holidays: ability to schedule holidays when the Master Production Schedule screen is open
- Changeovers: ability to view changeovers on the schedule when the Master Production Schedule screen is open
- Freeze/Unfreeze Jobs: ability to freeze and/or unfreeze jobs on the schedule when the Master Production Schedule screen is open
- Reset All Alerts: ability to reset all alerts on the Master Production Schedule screen
- Job Filter: ability to filters job that are scheduled on the Master Production Schedule screen
- Zoom: ability to zoom by hour, day, or week on the Master Production Schedule screen
- Insert Job: ability to insert a job on the Master Production Schedule screen
- Reactivate Tag: ability to reactivate a tag on the Master Production Schedule screen
- Print Tags Listing: ability to print tags listing
- Save All: ability to save all changes to any Production screens
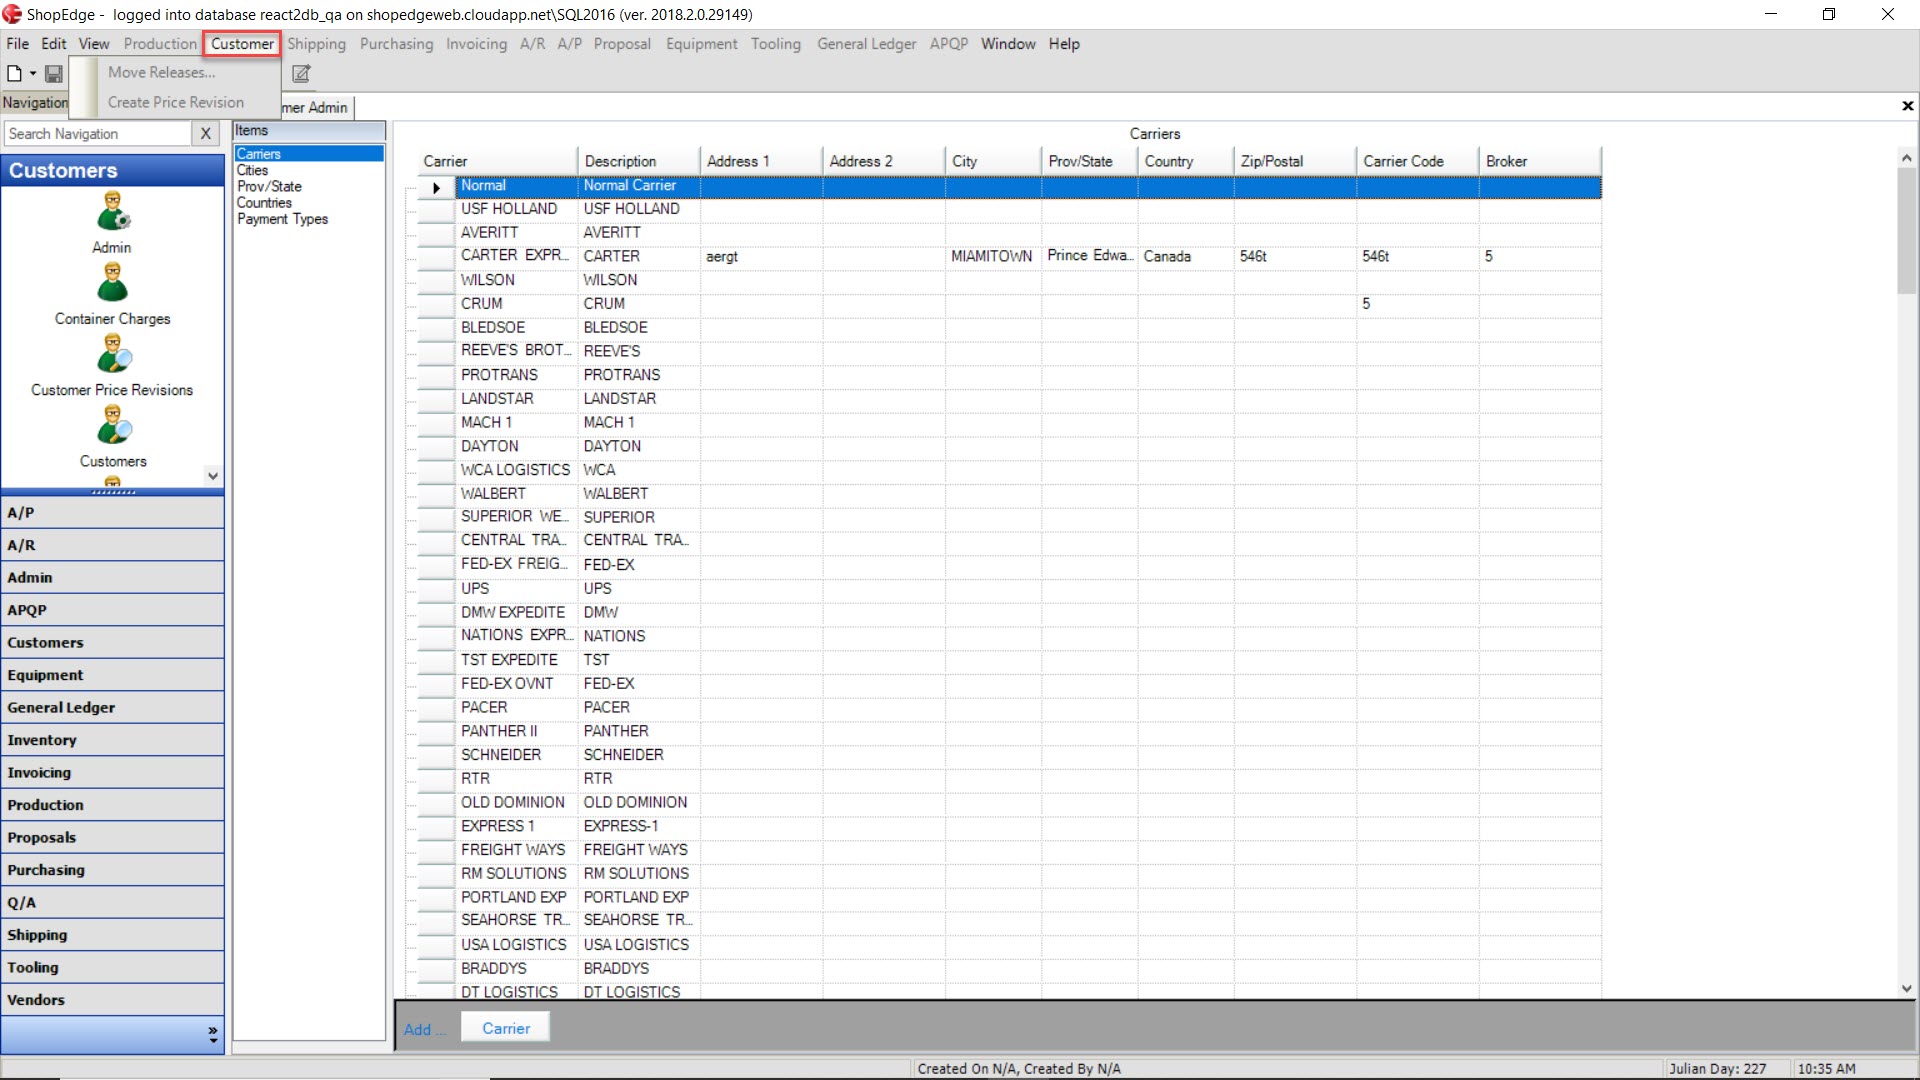
Under the Customer menu the options that appear are:
- Move Releases: ability to move releases
- Customer Price Revision: ability to create a customer price revision when the Orders screen is open
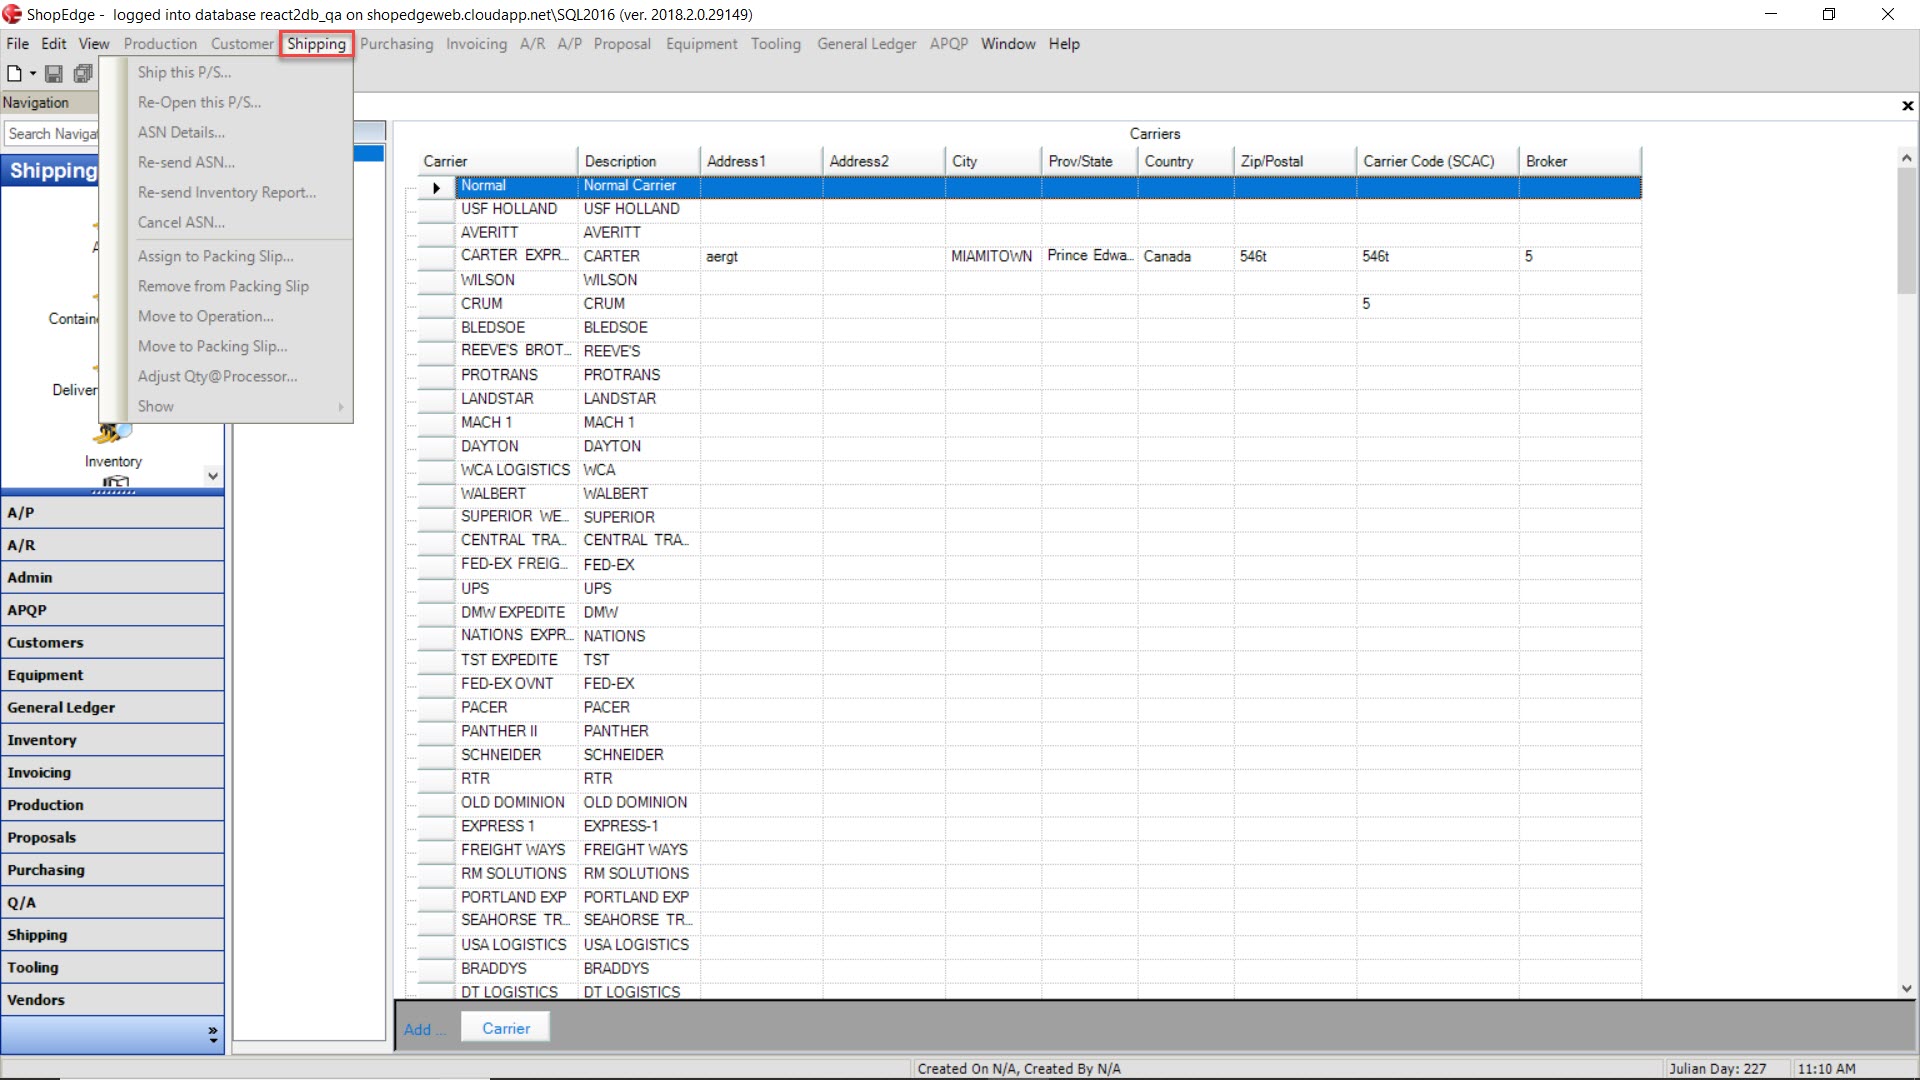
Under the Shipping menu the options that appear are:
- Ship this P/S: ability to ship a packing slip after it has been created
- Re-open this P/S: ability to re-open a a packing slip
- ASN Details: ability to view ASN details
- Re-send ASN: ability to re-send ASN
- Re-send Inventory Report: ability to re-send an inventory report
- Cancel ASN: ability to cancel ASN
- Assign to Packing Slip: ability to assign a serial number from the Shipping Inventory screen to a packing slip
- Remove from Packing Slip: ability to remove an assigned serial number from a packing slip on the Shipping Inventory screen
- Move to Operation: ability to move a serial number from the Shipping Inventory screen to an operation
- Move to Packing Slip: ability to move a serial number to a packing slip
- Adjust Qty @ Processor: ability to adjust the quantity at processor on the Processor Transactions screen
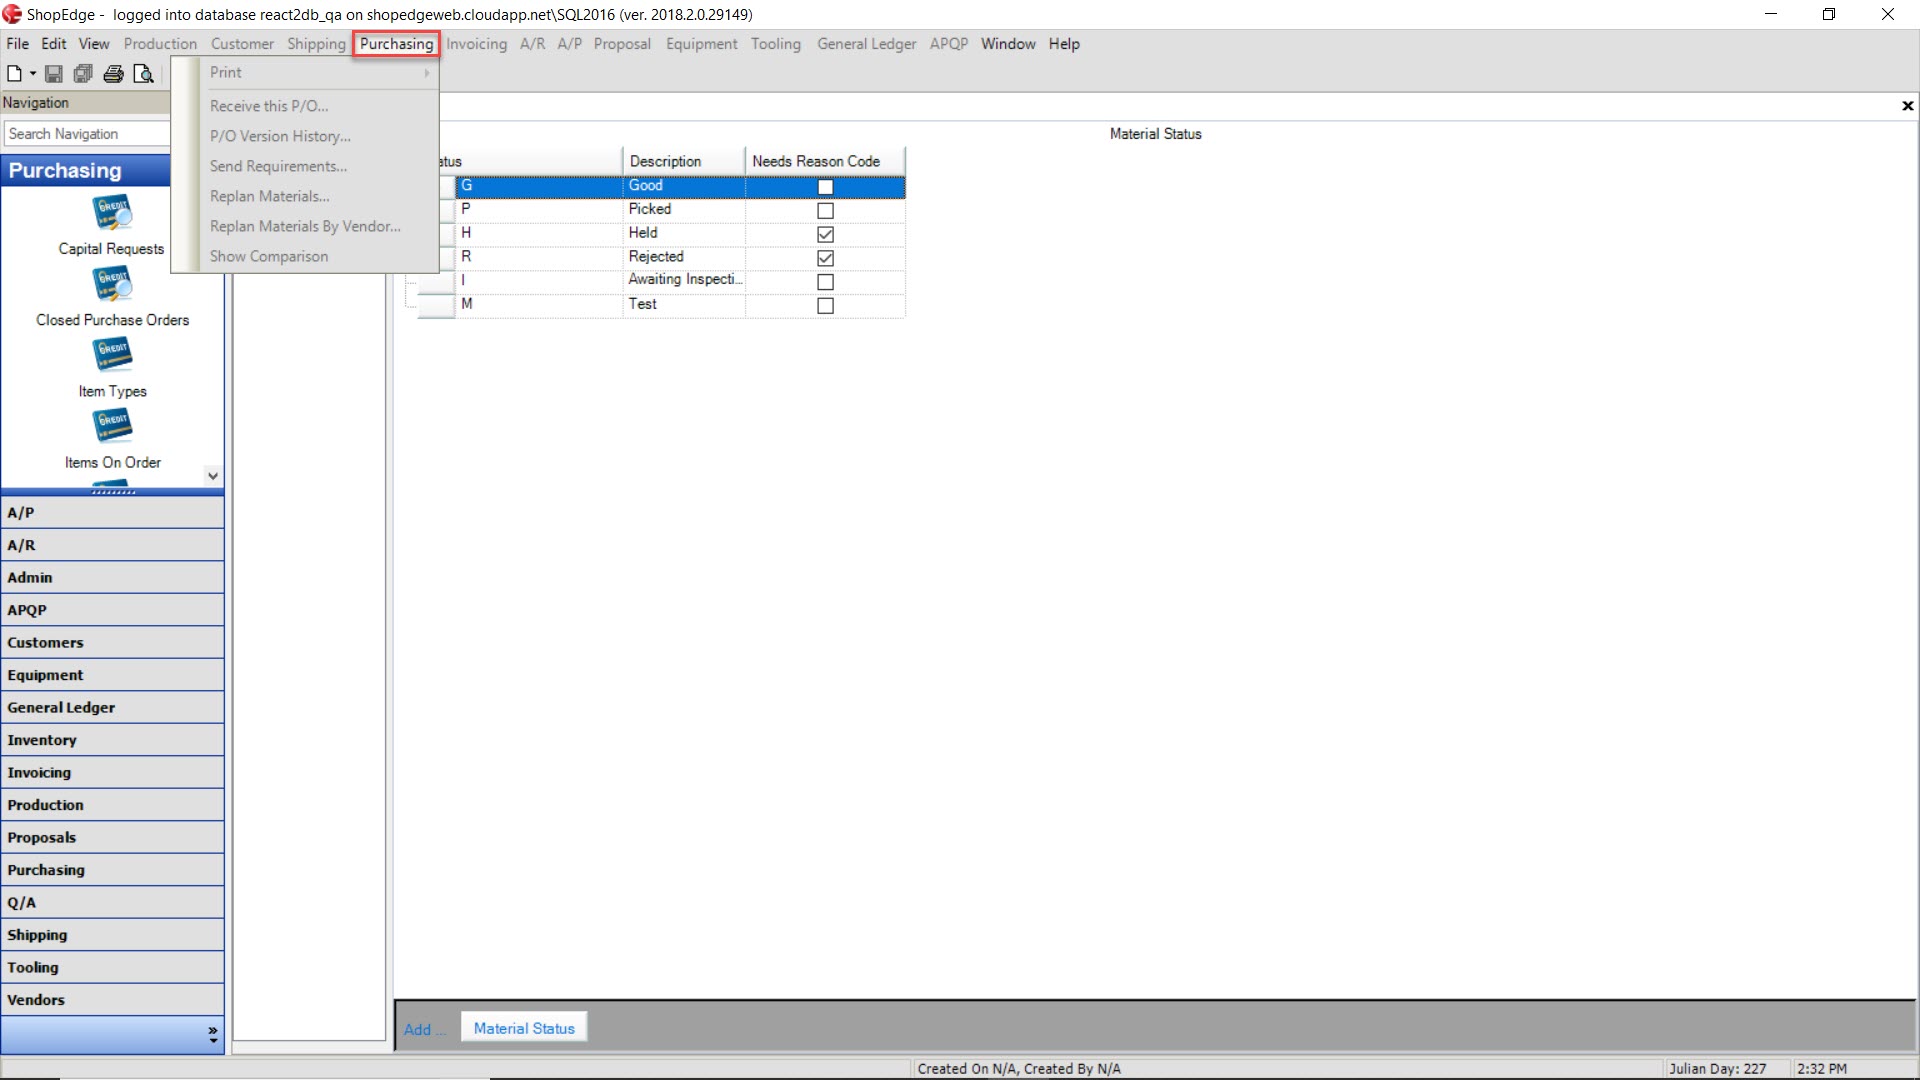
Under the Purchasing menu the options that appear are:
- Print: ability to print the Delivery Schedule, Purchase Order, Contract Pricing, or Q/A Inspection
- Receive this P/O: ability to receive a purchase order
- P/O Version History: ability to view the version history of a purchase order
- Send Requirements: ability to send purchase order requirements
- Replan Materials: ability to replan materials on the Material Requirements screen
- Replan Materials by Vendor: ability to replan materials by vendor on the Material Requirements screen
- Show Comparison: ability to show comparisons between materials on the Material Requirements screen
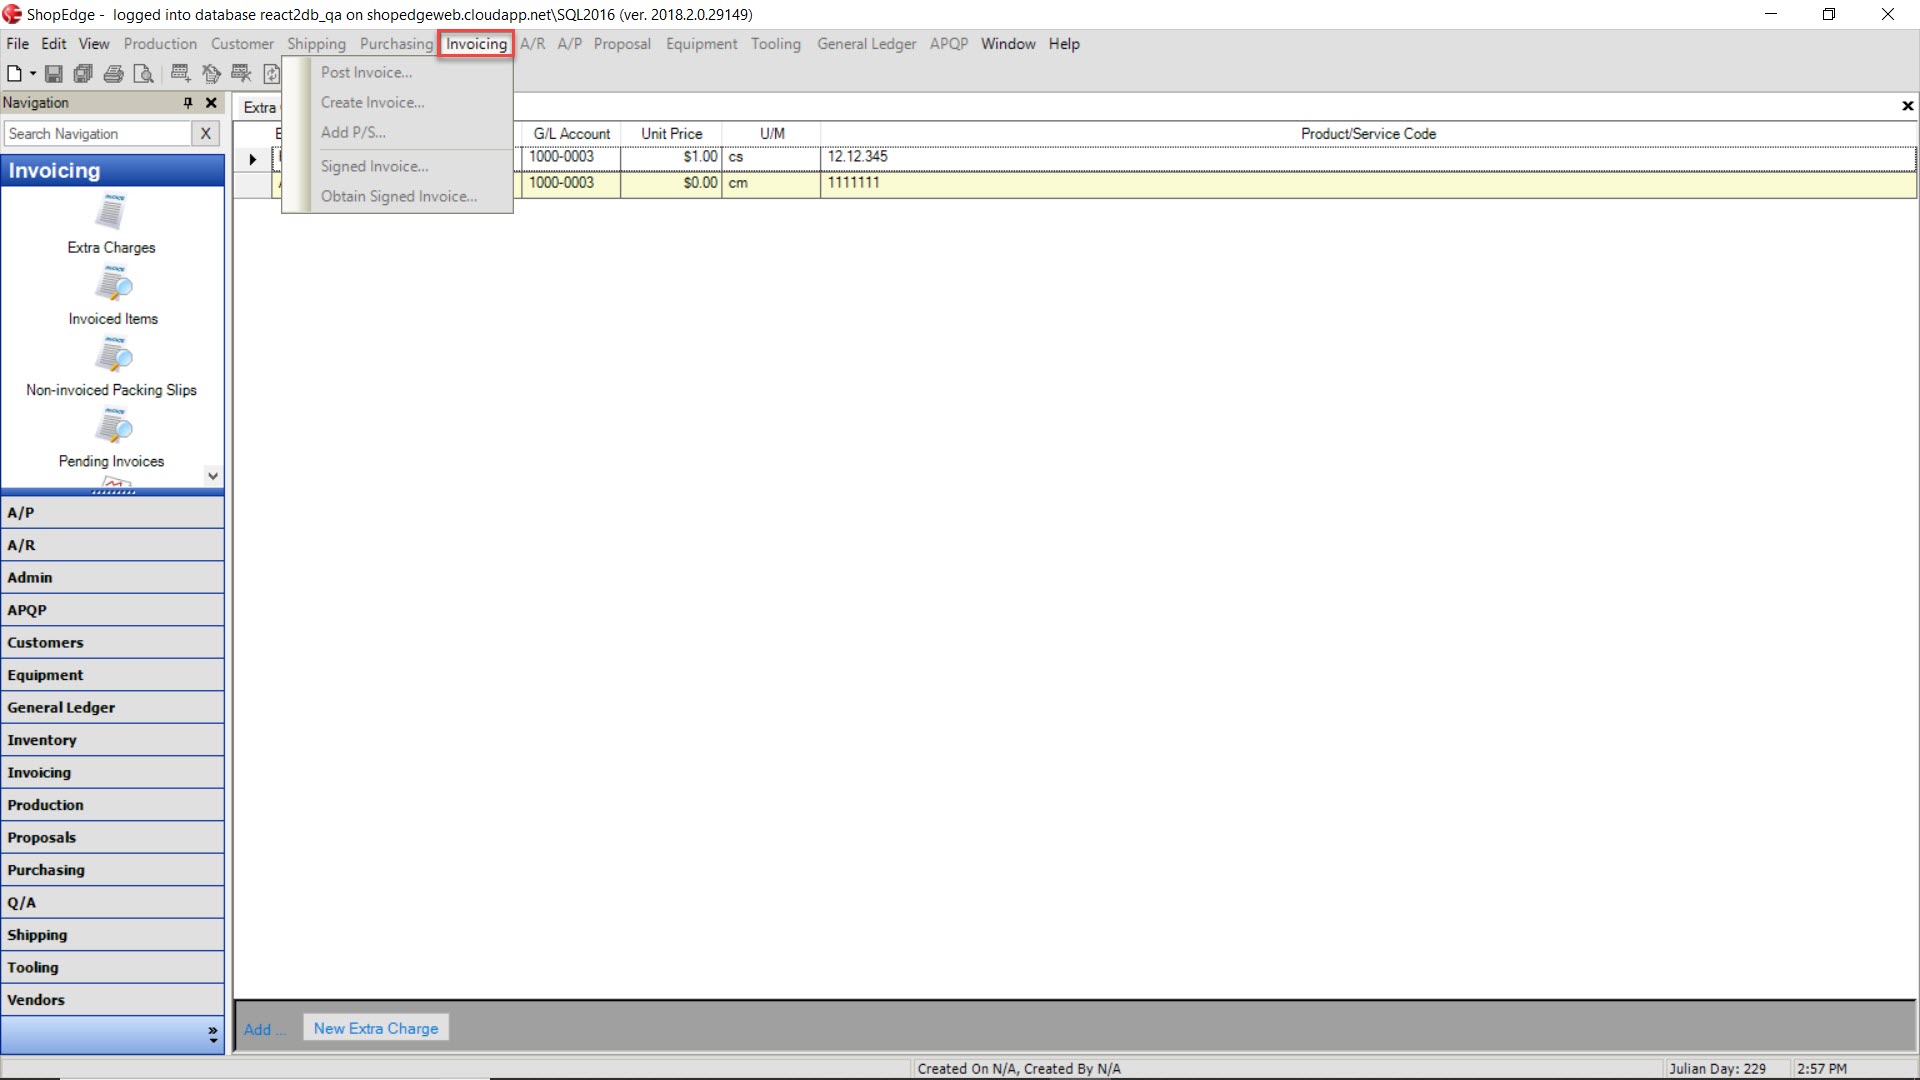
Under the Invoicing menu the options that appear are:
- Post Invoice: ability to post an invoice that is non-invoiced
- Create Invoice: ability to create an incoive from the Non-invoiced Packing Slips lookup screen
- Add P/S: ability to add an item from an invoice to a packing slip
- Signed Invoice: ability to make an invoiced signed
- Obtain Signed Invoice: ability to submit a signed invoice for certification
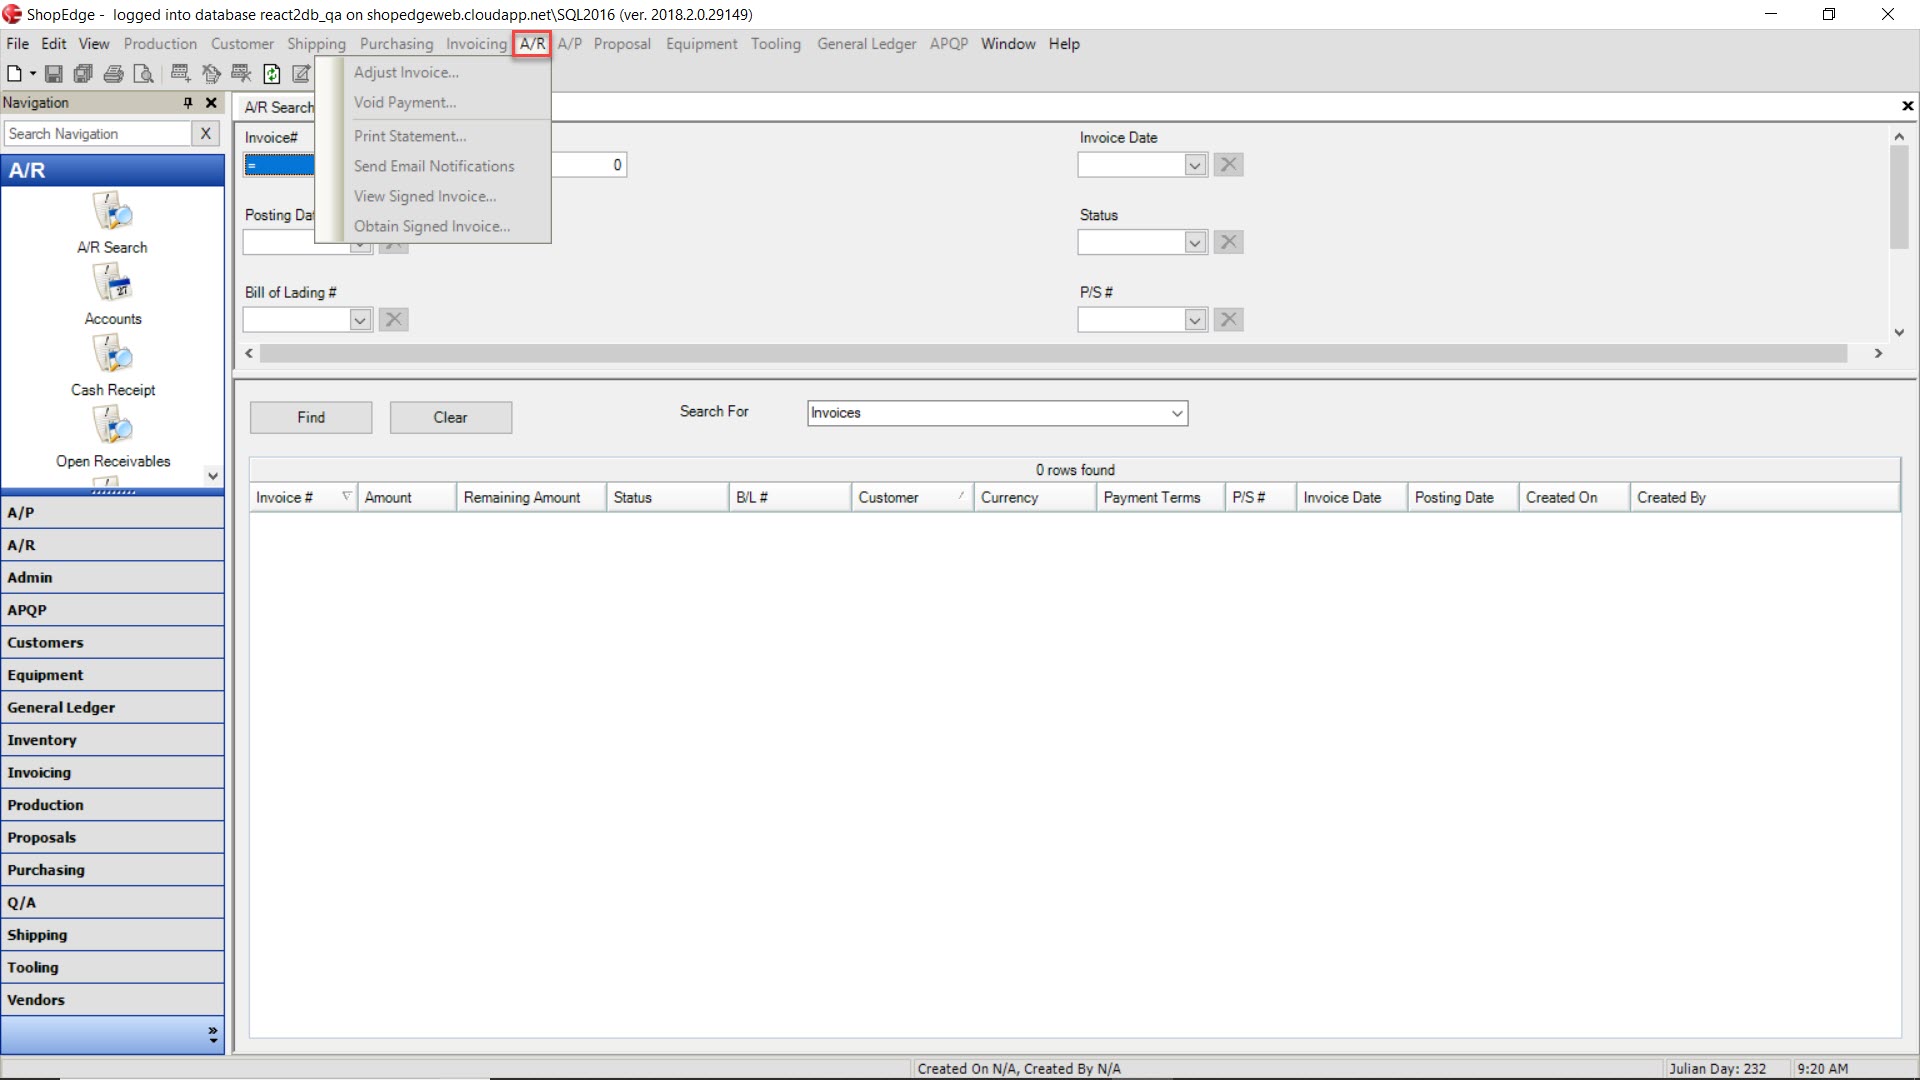
Under the A/R menu the options that appear are:
- Adjust Invoice: ability to adjust on invoice on the A/R Accounts screen
- Void Payment: ability to void a payment on the A/R Customer Payment detail screen
- Print Statement: ability to print invoices/statements
- Send Email Notifications: ability to send email notifications when applicable
- View Signed Invoice: ability to view an invoiced that has been signed
- Obtain Signed Invoice: ability to submit a signed invoice for certification
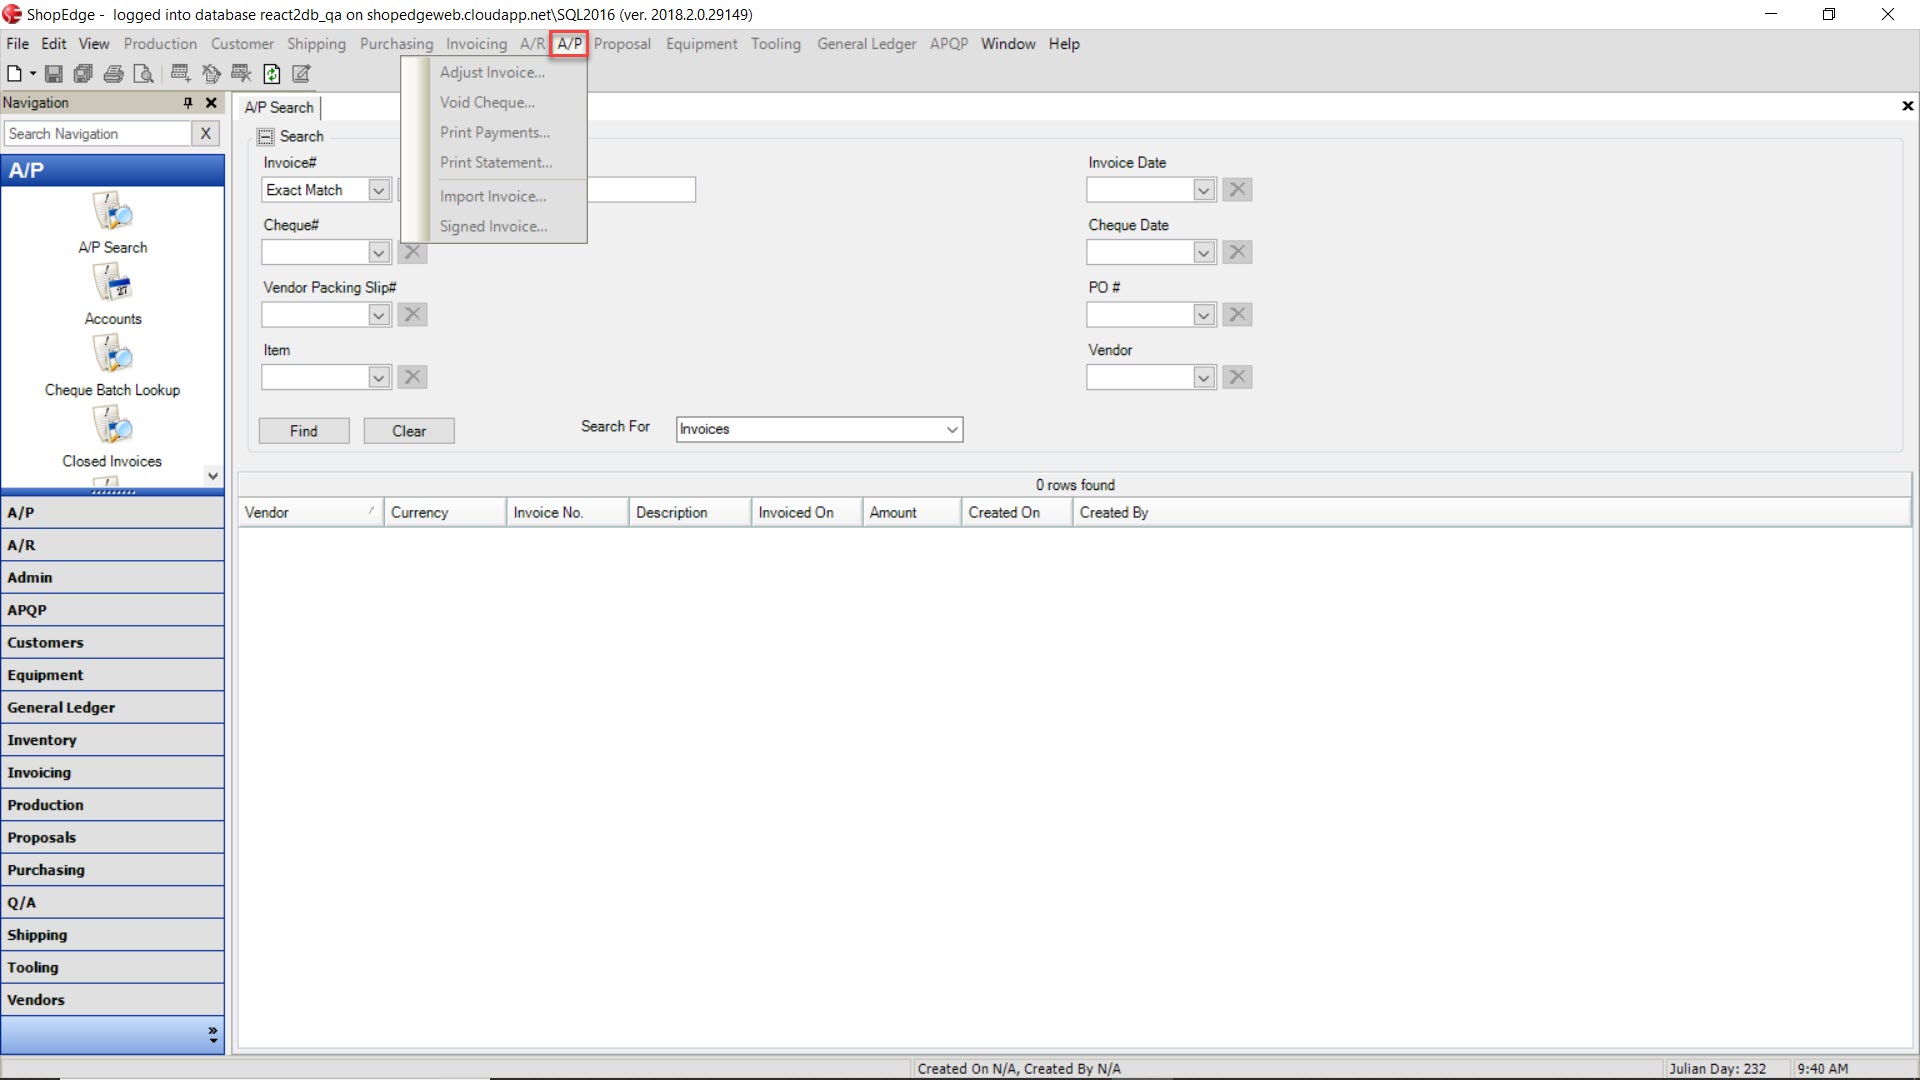
Under the A/P menu the options that appear are:
- Adjust Invoice: ability to adjust an invoice on the Open A/P detail screen
- Void Cheque: ability to void a cheque
- Print Payments: ability to print payments on the Payments screen
- Print Statement: ability to print a statement on the Open A/P detail screen
- Import Invoice: ability to import an invoice from a computer on the Voucher Entry detail screen
- Signed Invoice: ability to sign an invoice on the Voucher Entry detail screen
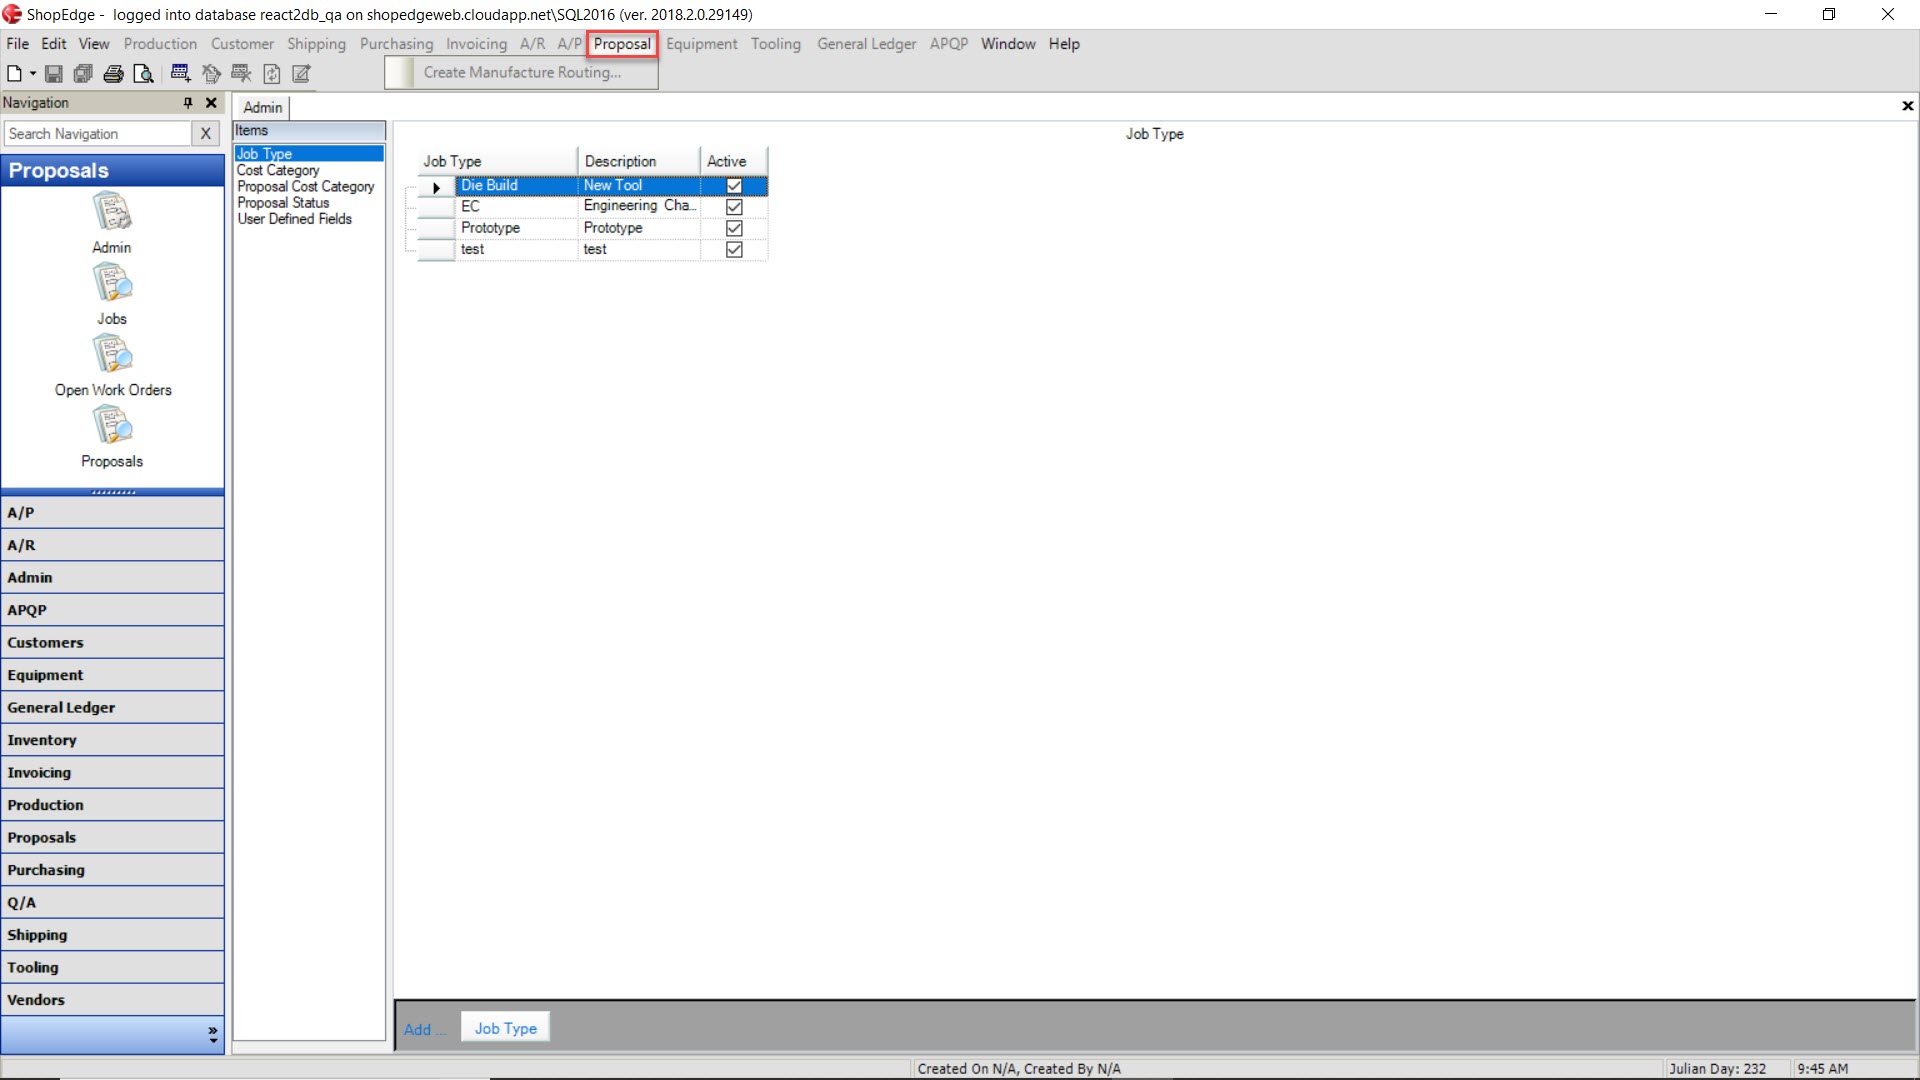
Under the Proposal menu the option that appears is:
- Create Manufacture Routing: ability to create a manufacture routing from the Proposal detail screen
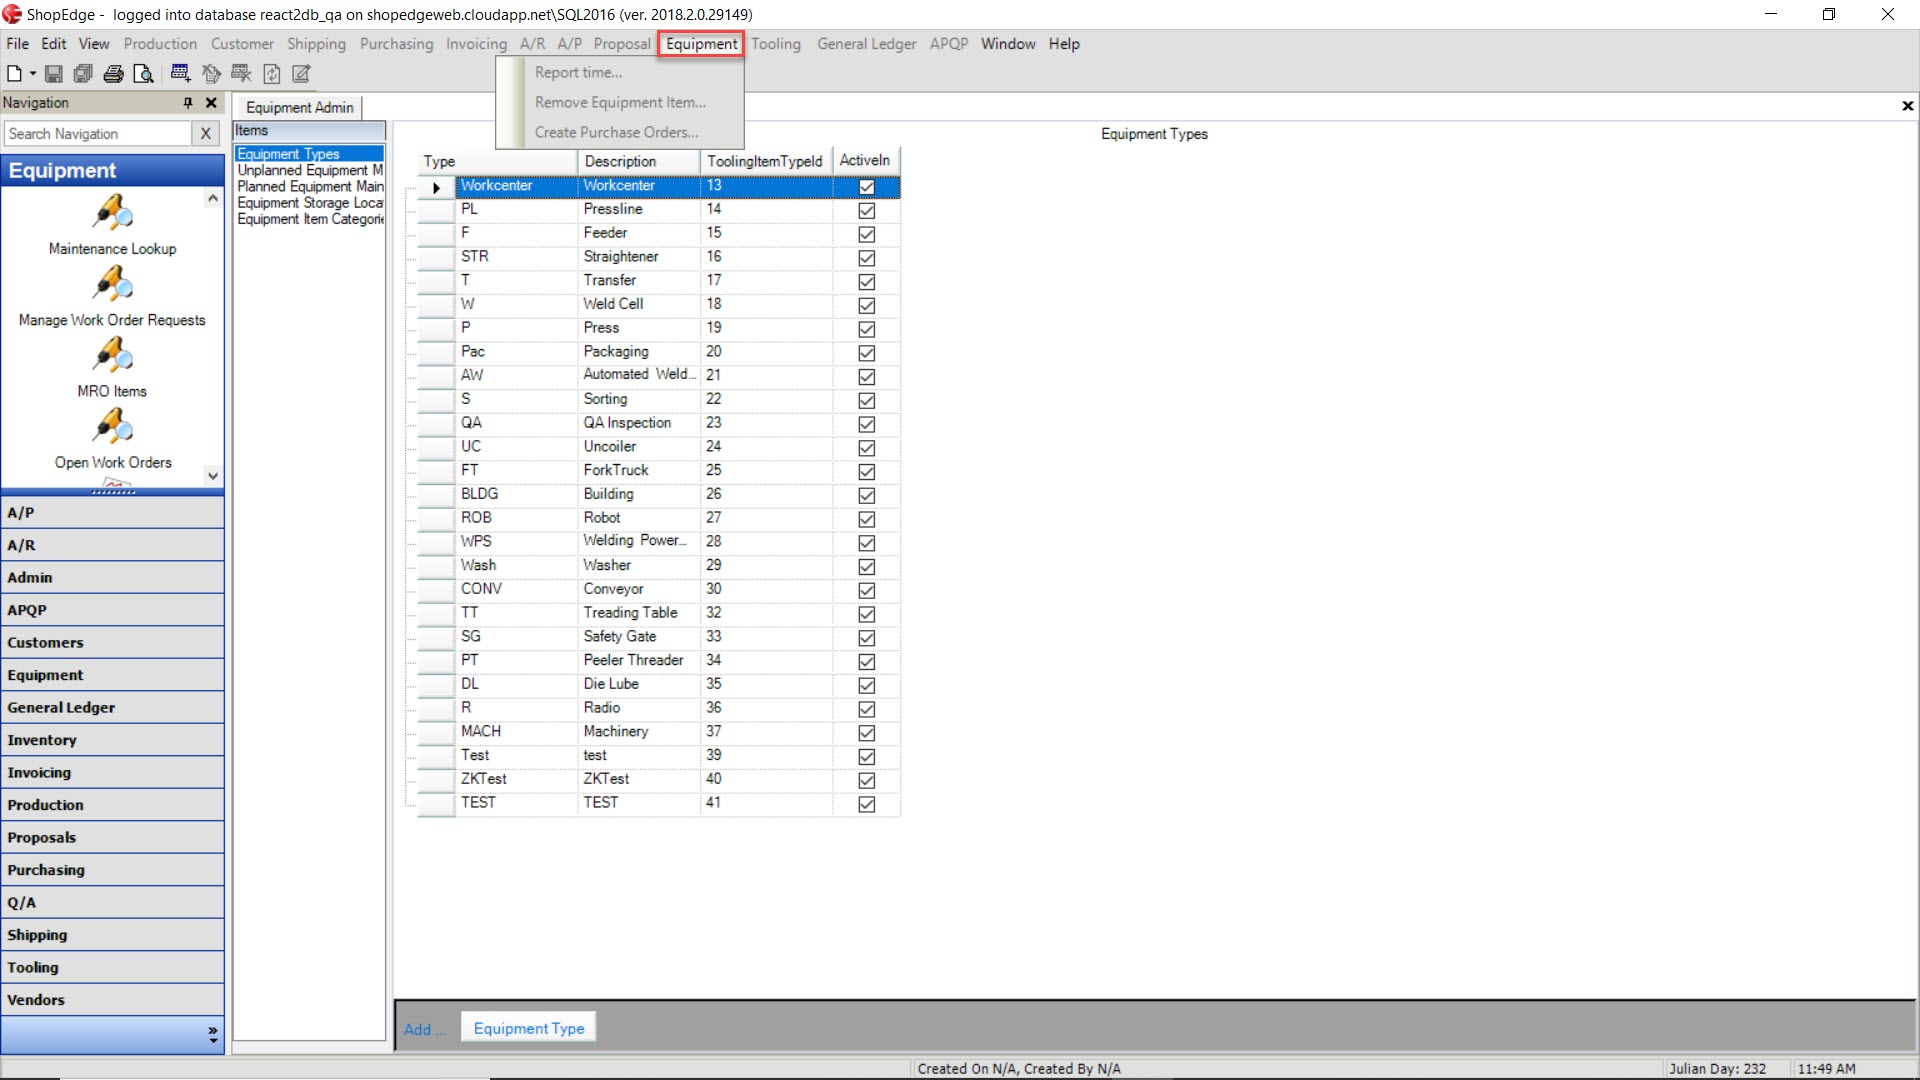
Under the Equipment menu the options that appear are:
- Report Time: ability to report equipment time
- Remove Equipment Item: ability to remove equipment items
- Create Purchase Orders: ability to create a purchase order on the MRO Items screen,
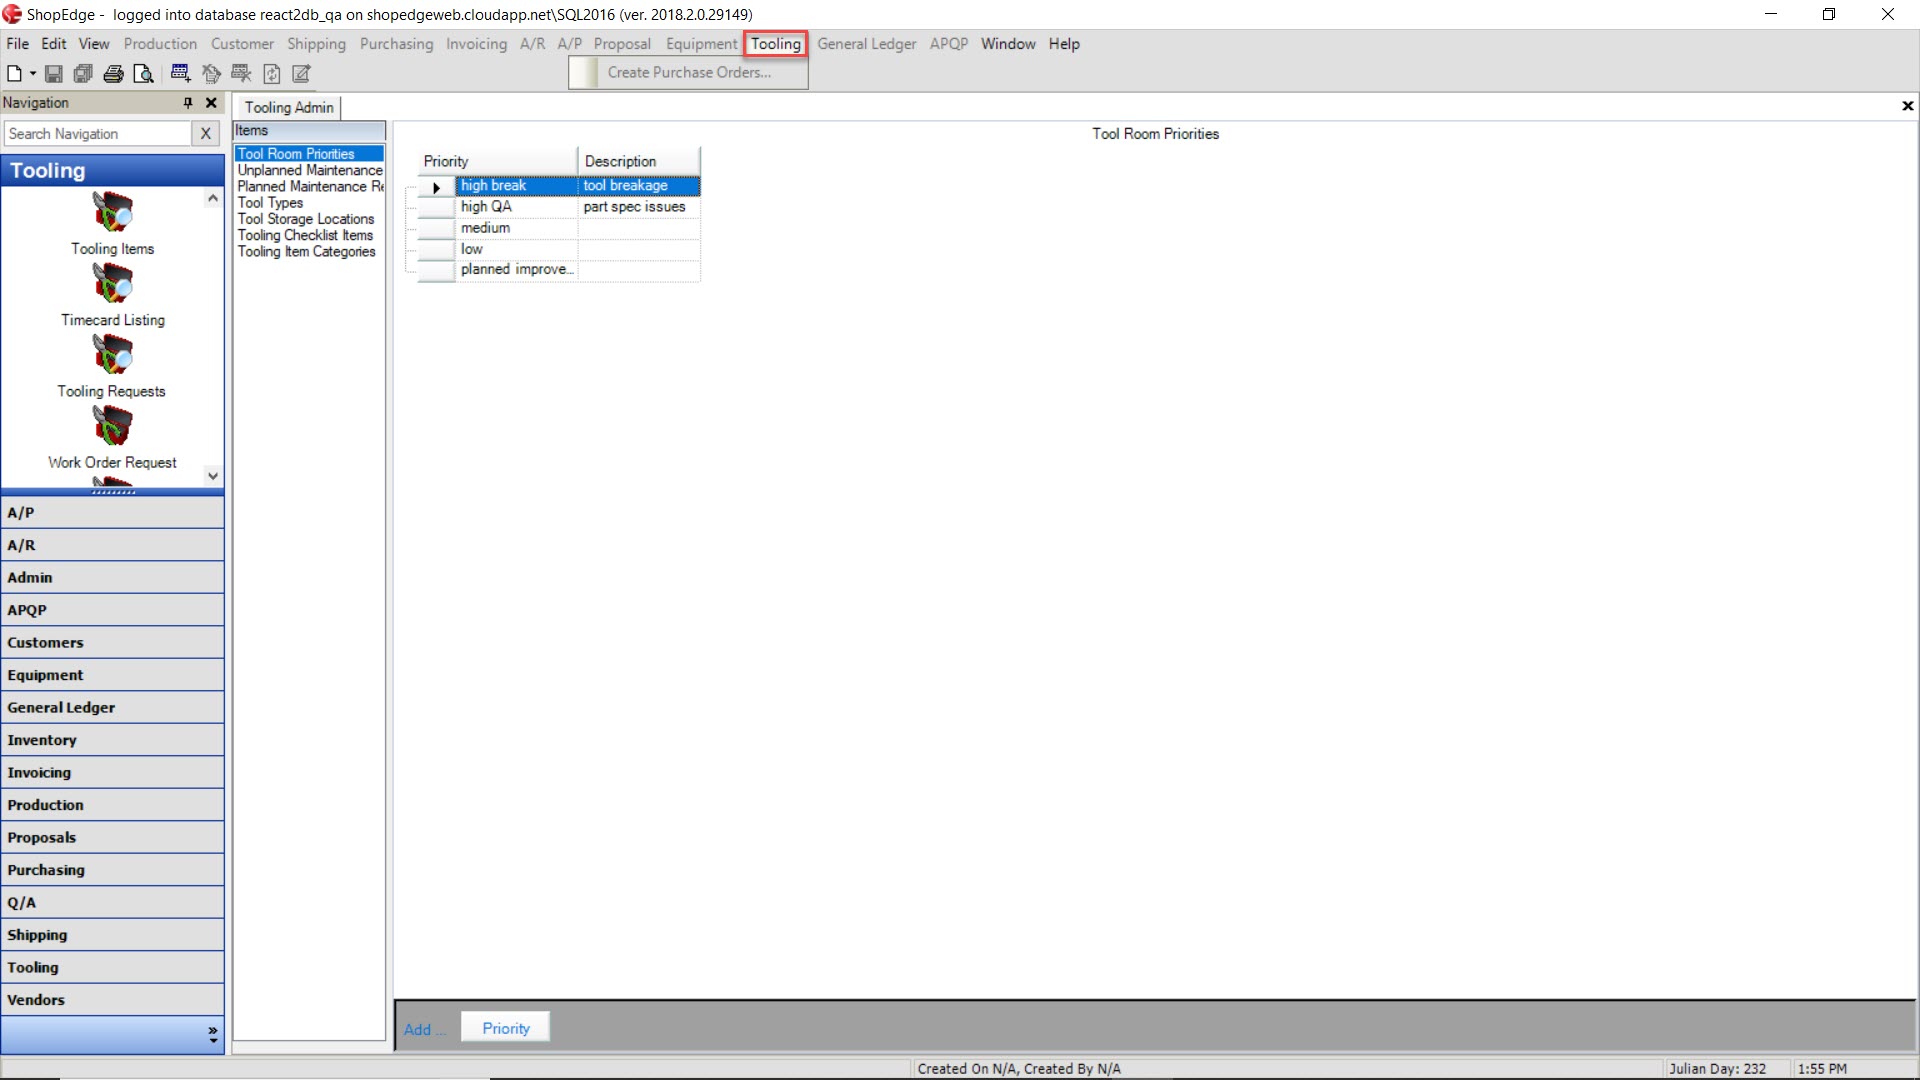
Under the Tooling menu the option that appears is:
- Create Purchase Order: ability to create a purchase order on the MRO Items screen
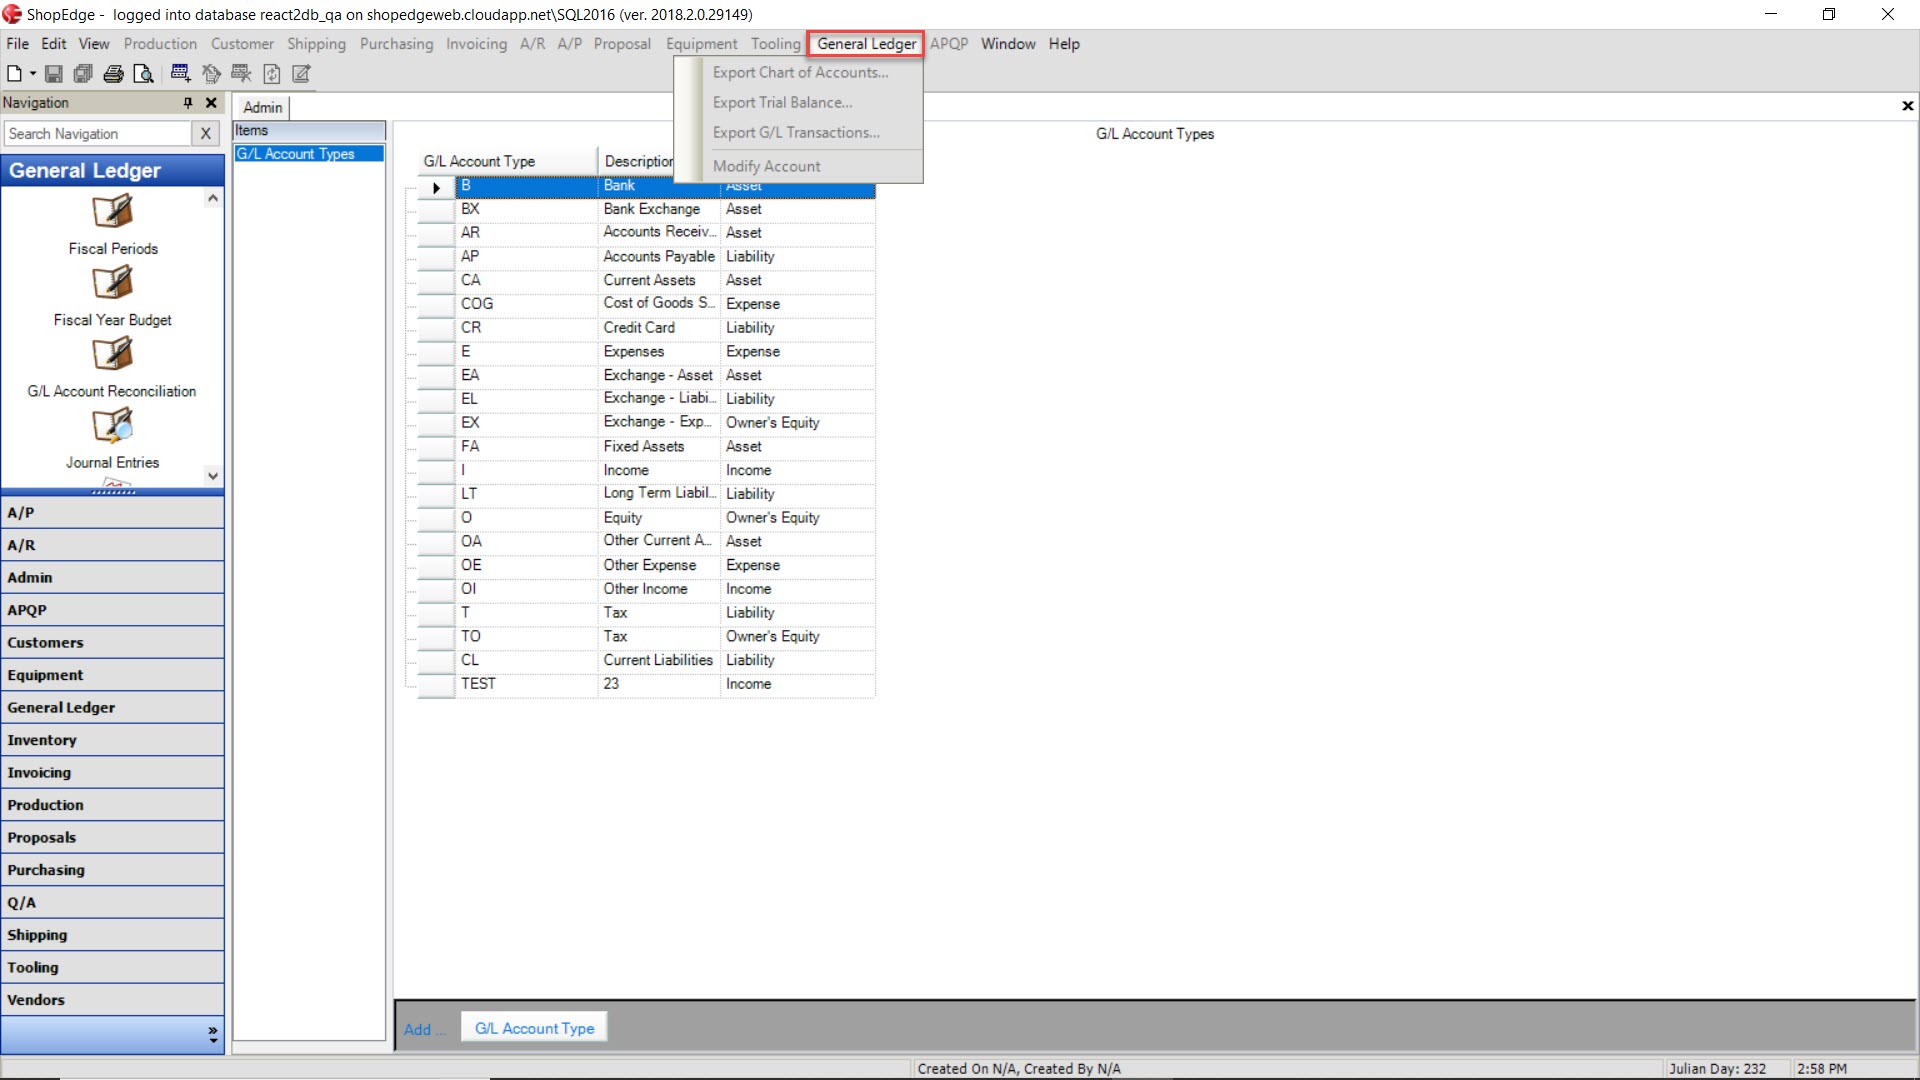
Under the General Ledger menu the options that appear are:
- Export Chart of Accounts: ability to export chart of accounts
- Export Trial Balance: ability to export trial balance
- Export G/L Transactions: ability to export g/l transactions
- Modify Account: ability to modify a G/L Account from the G/L Transactions detail screen and from the Chart of Accounts screen
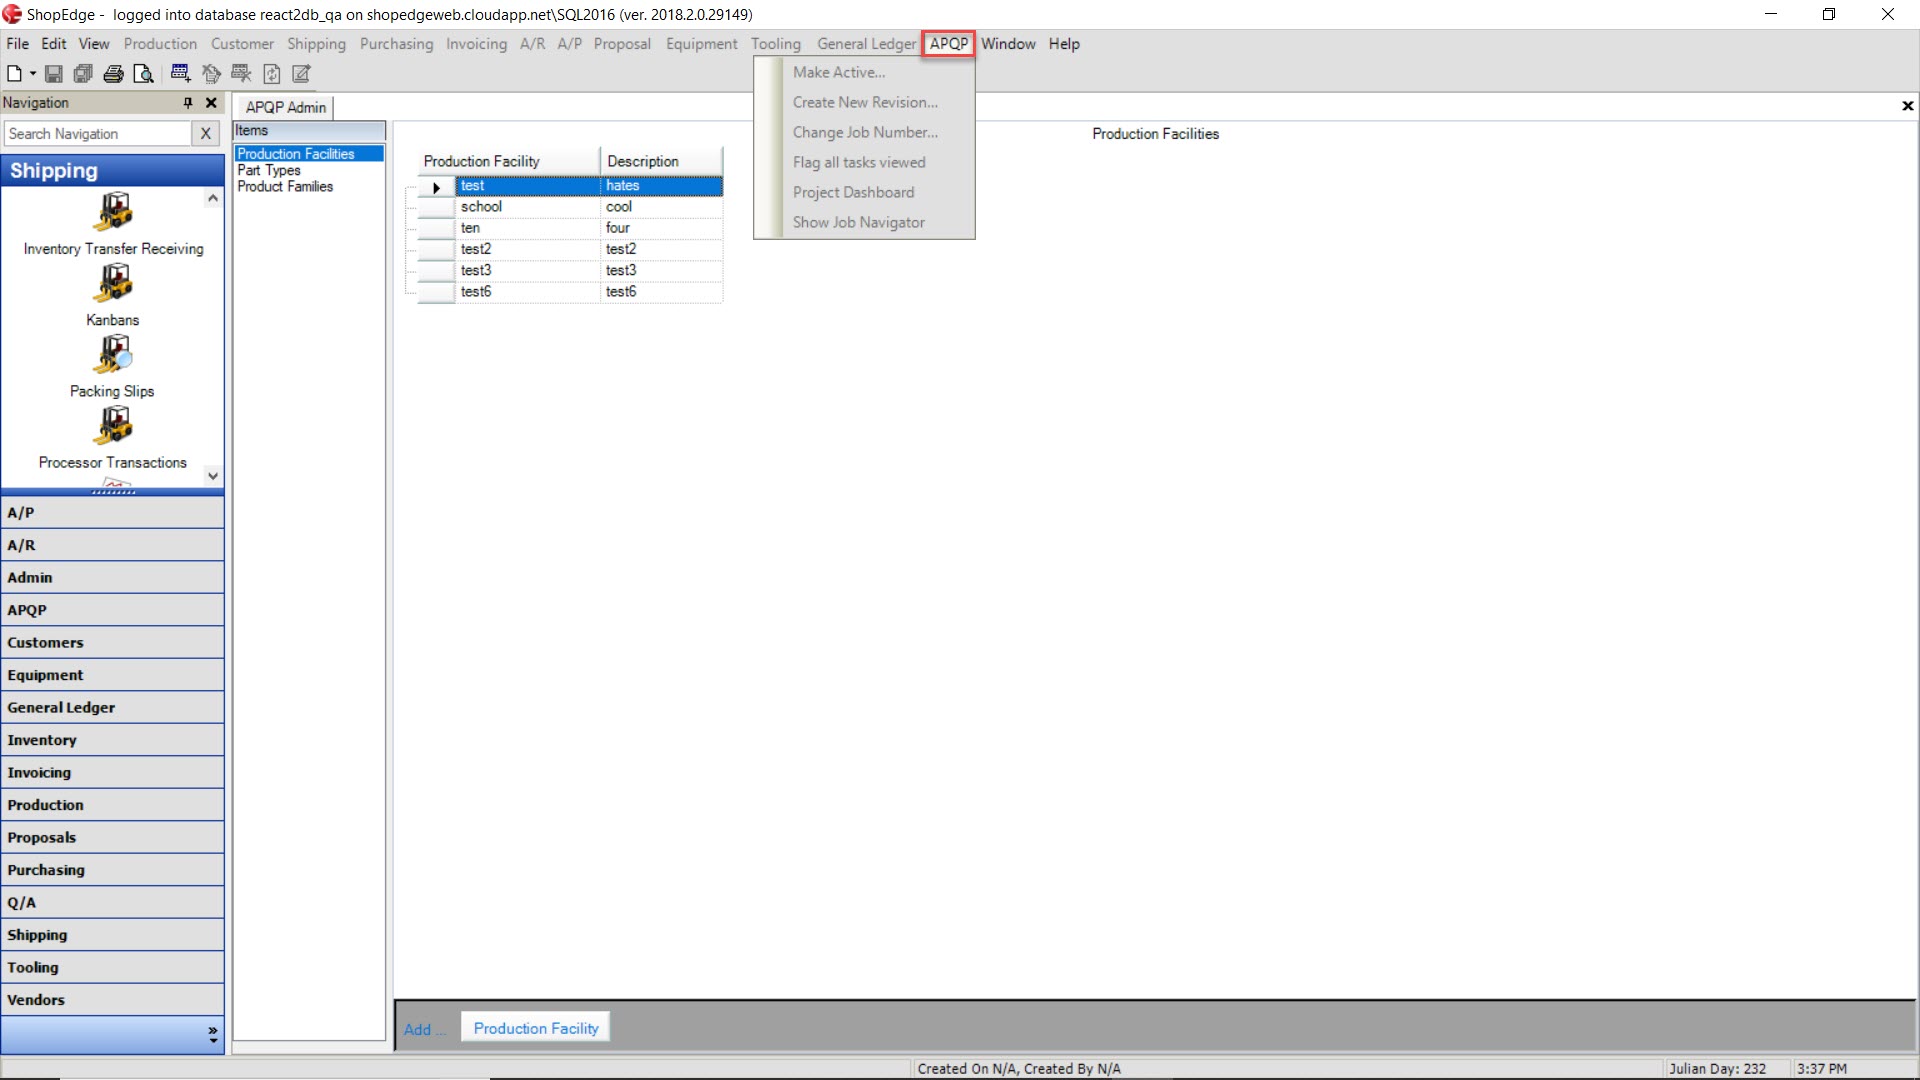
Under the APQP menu the options that appear are:
- Create New Revision: ability to create a new revision for a planned job
- Change Job Number: ability to change a job number on the Planned Job screen
- Flag all tasks reviewed: ability to flag all current tasks as reviewed
- Project Dashboard: ability to view the project dashboard for a specific planned job
- Show Job Navigator: ability to view job navigator
Icon Menu
The icon menu is located below the menu functions. The icons that are available for users are:
- New: ability to create new entries

- Save: ability to save open screens and entries

- Save All: ability to save all open screens and entries at once

- Print: ability to print paperwork

- Print Preview: ability to view paperwork before printing

- Add New: ability to add a new row on entries

- Discard Changes: ability to discard changes made to entries

- Delete: ability to delete a row from entries

- Refresh: ability to refresh screens in the system

- View Change Audit: ability to view change audit

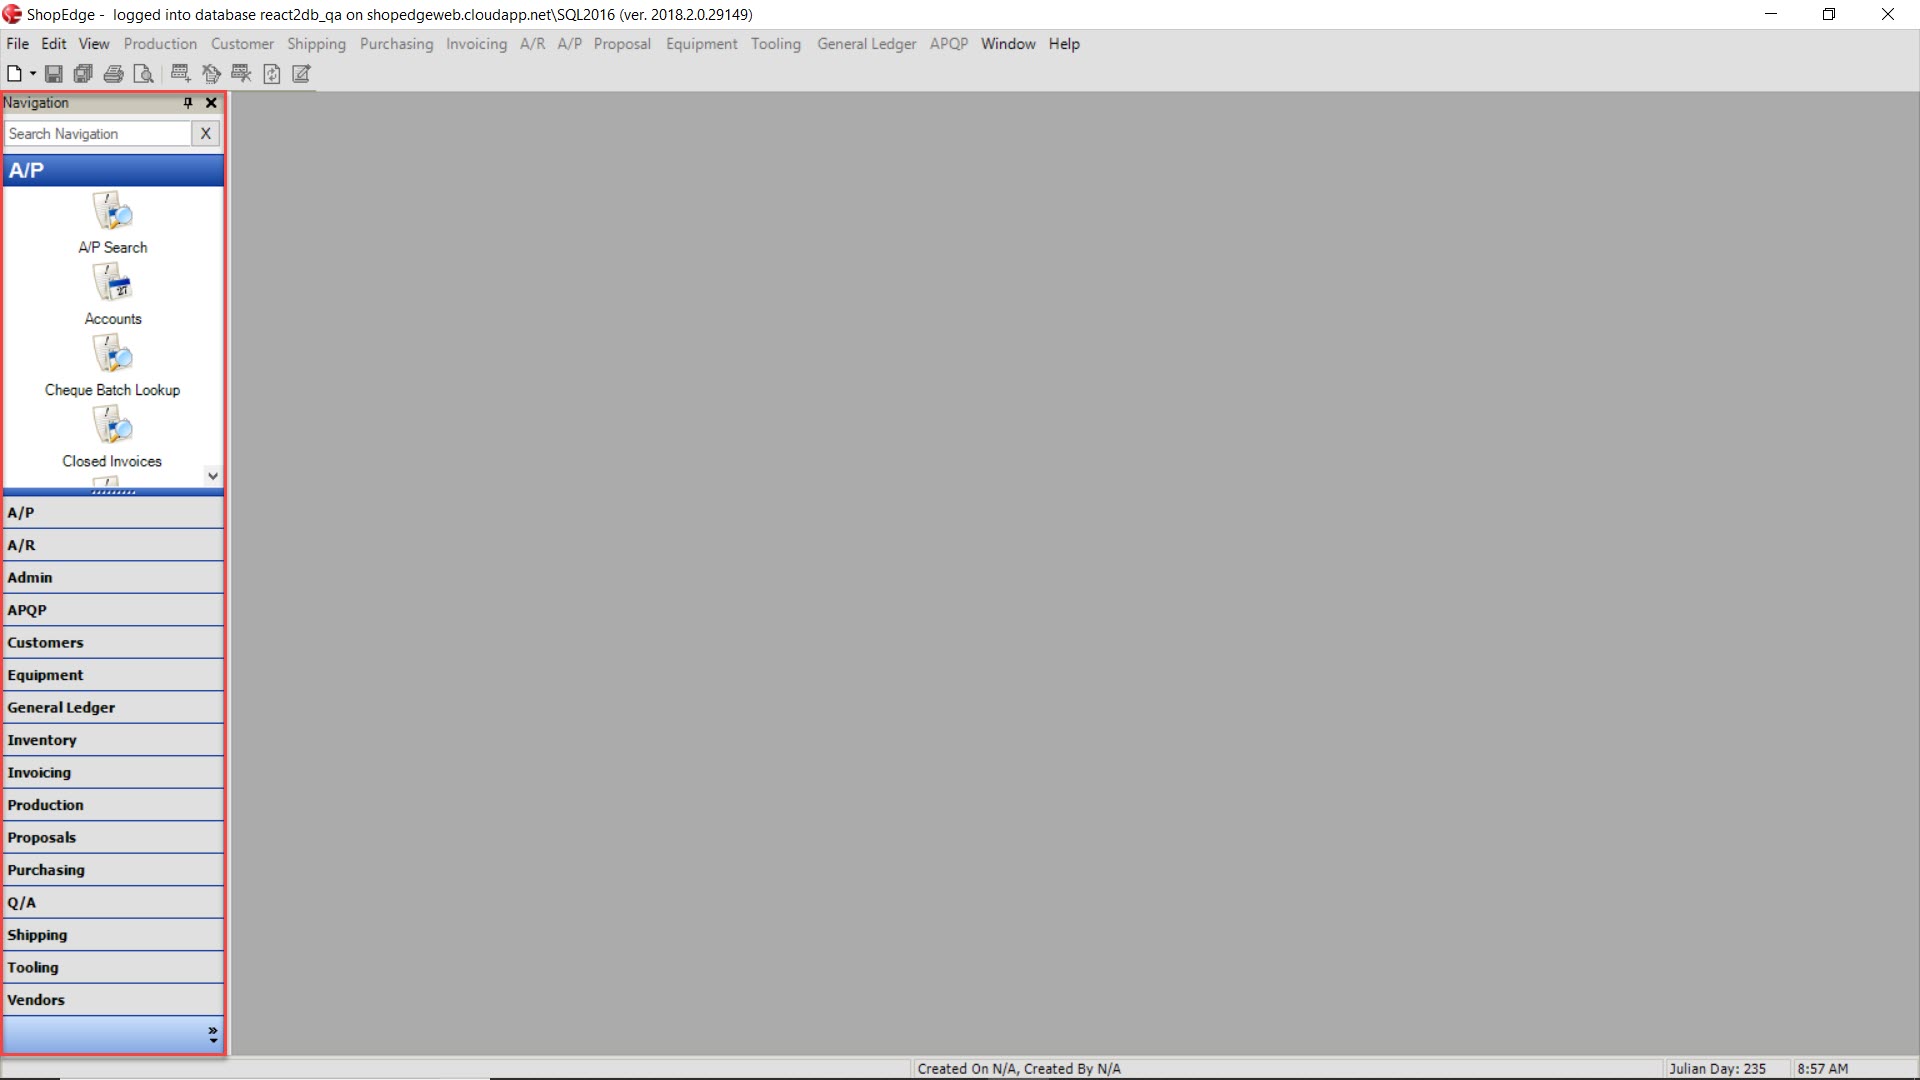
Navigation Pane
The navigation pane is located to the left of the ShopEdge System screen and allows users to navigate through the different modules.
Note
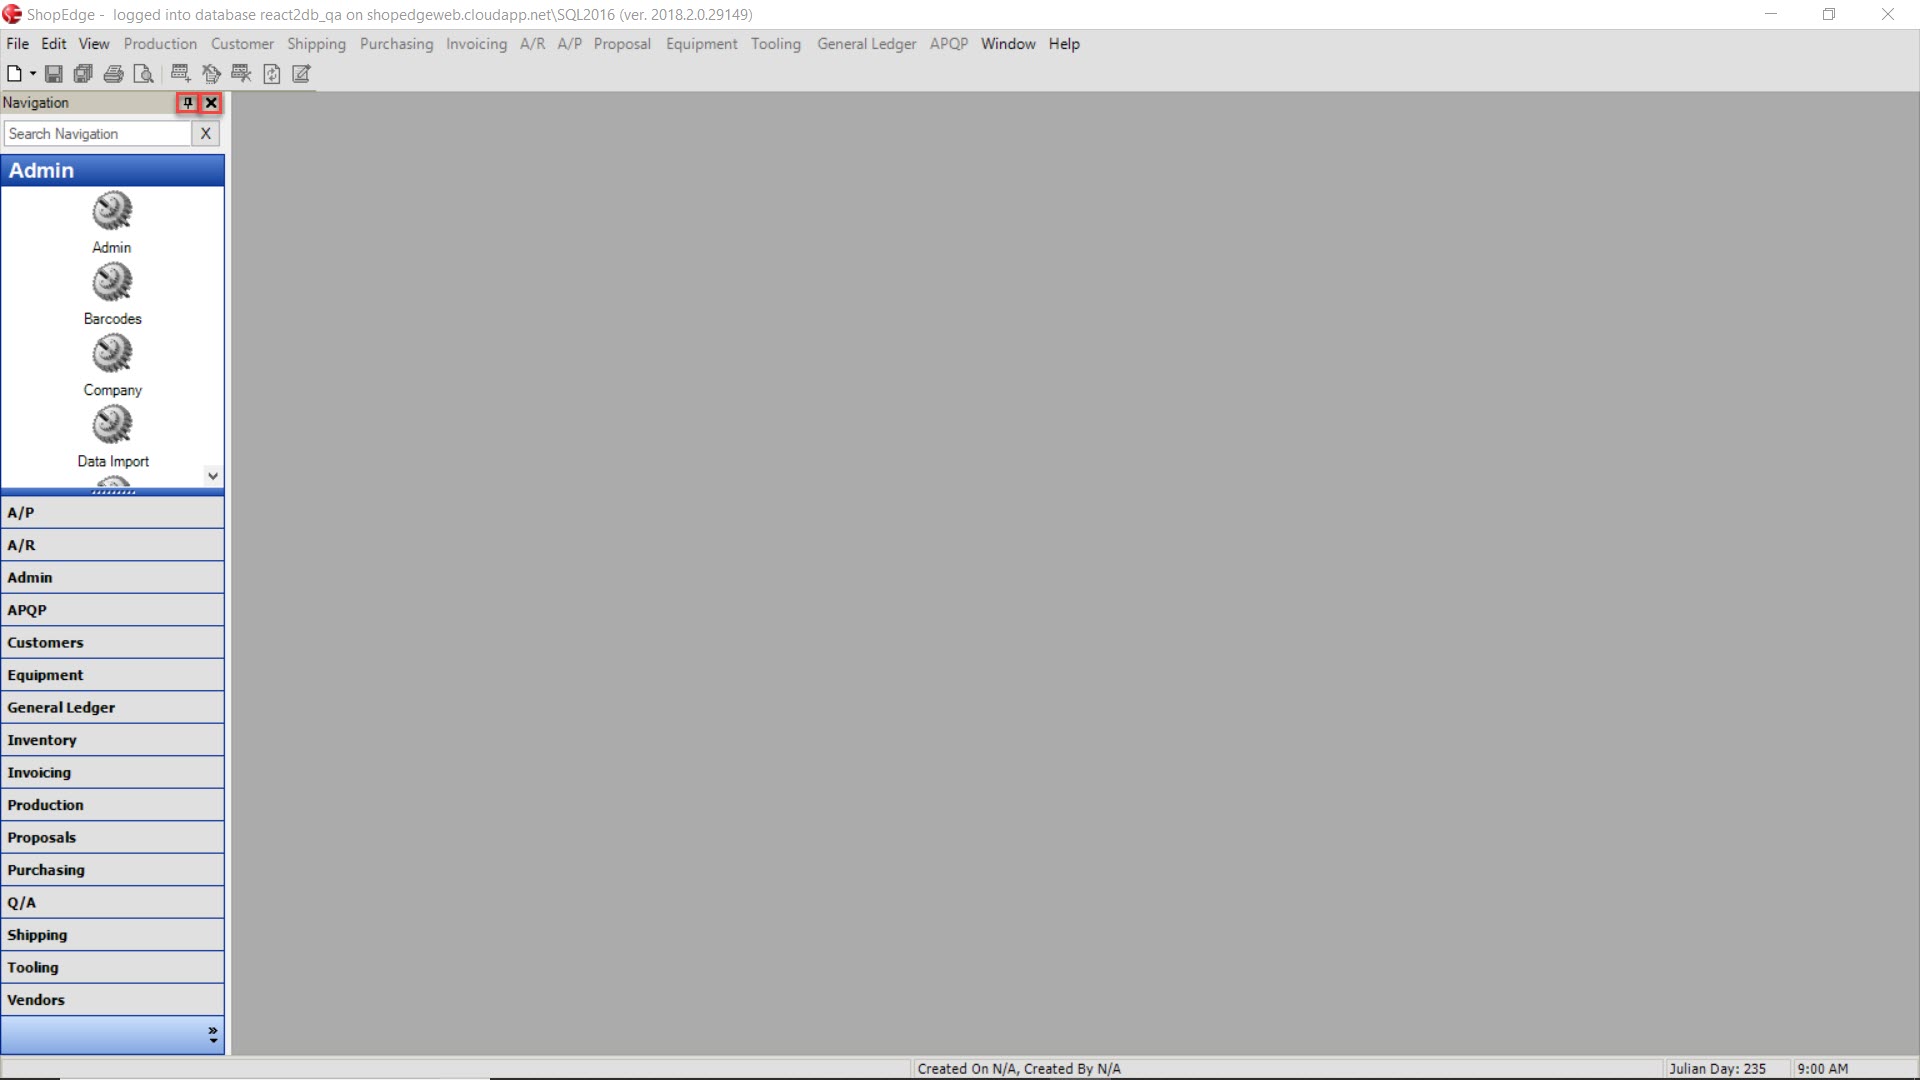
Users can pin the navigation pane to the left side of the screen by clicking the pin button, or they can exit the navigation pane altogether.
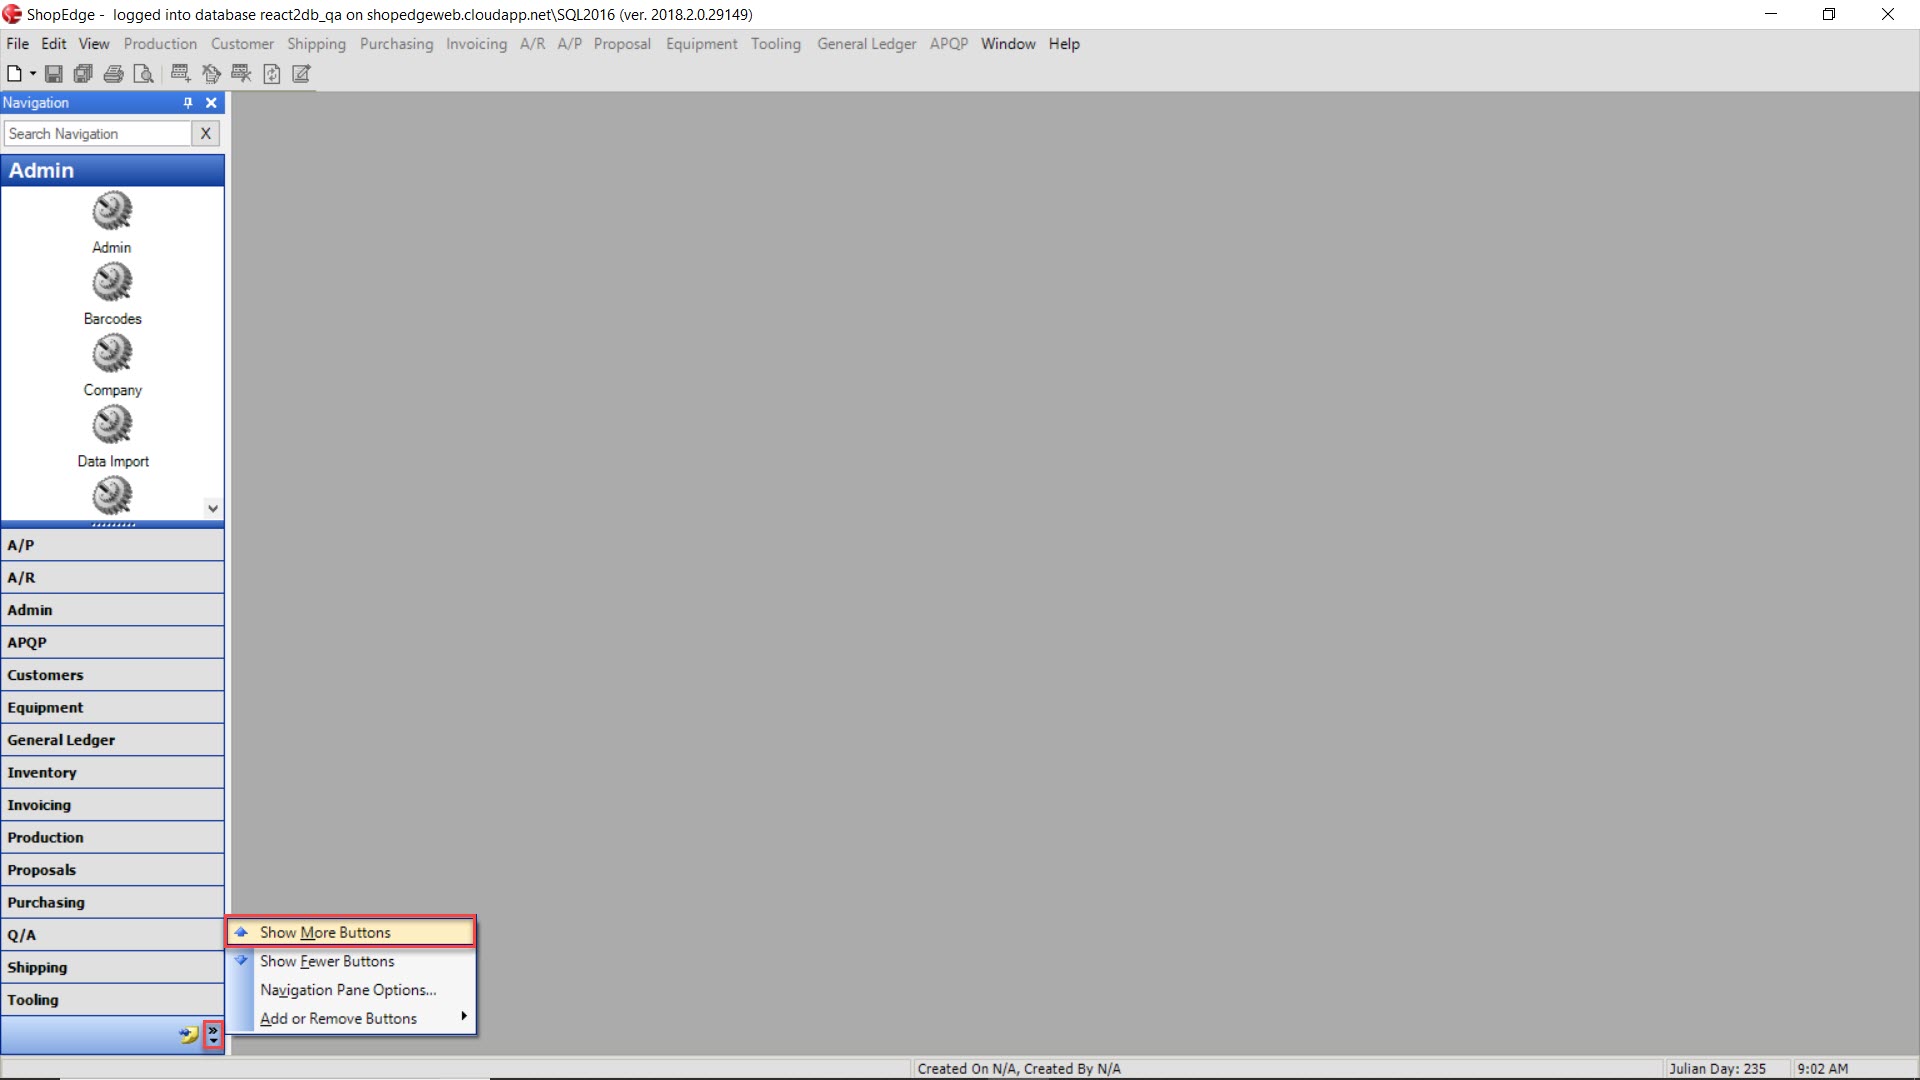
Show More Buttons
To view more buttons on the navigation pane simply click on the arrow menu and select the Show More Buttons option.
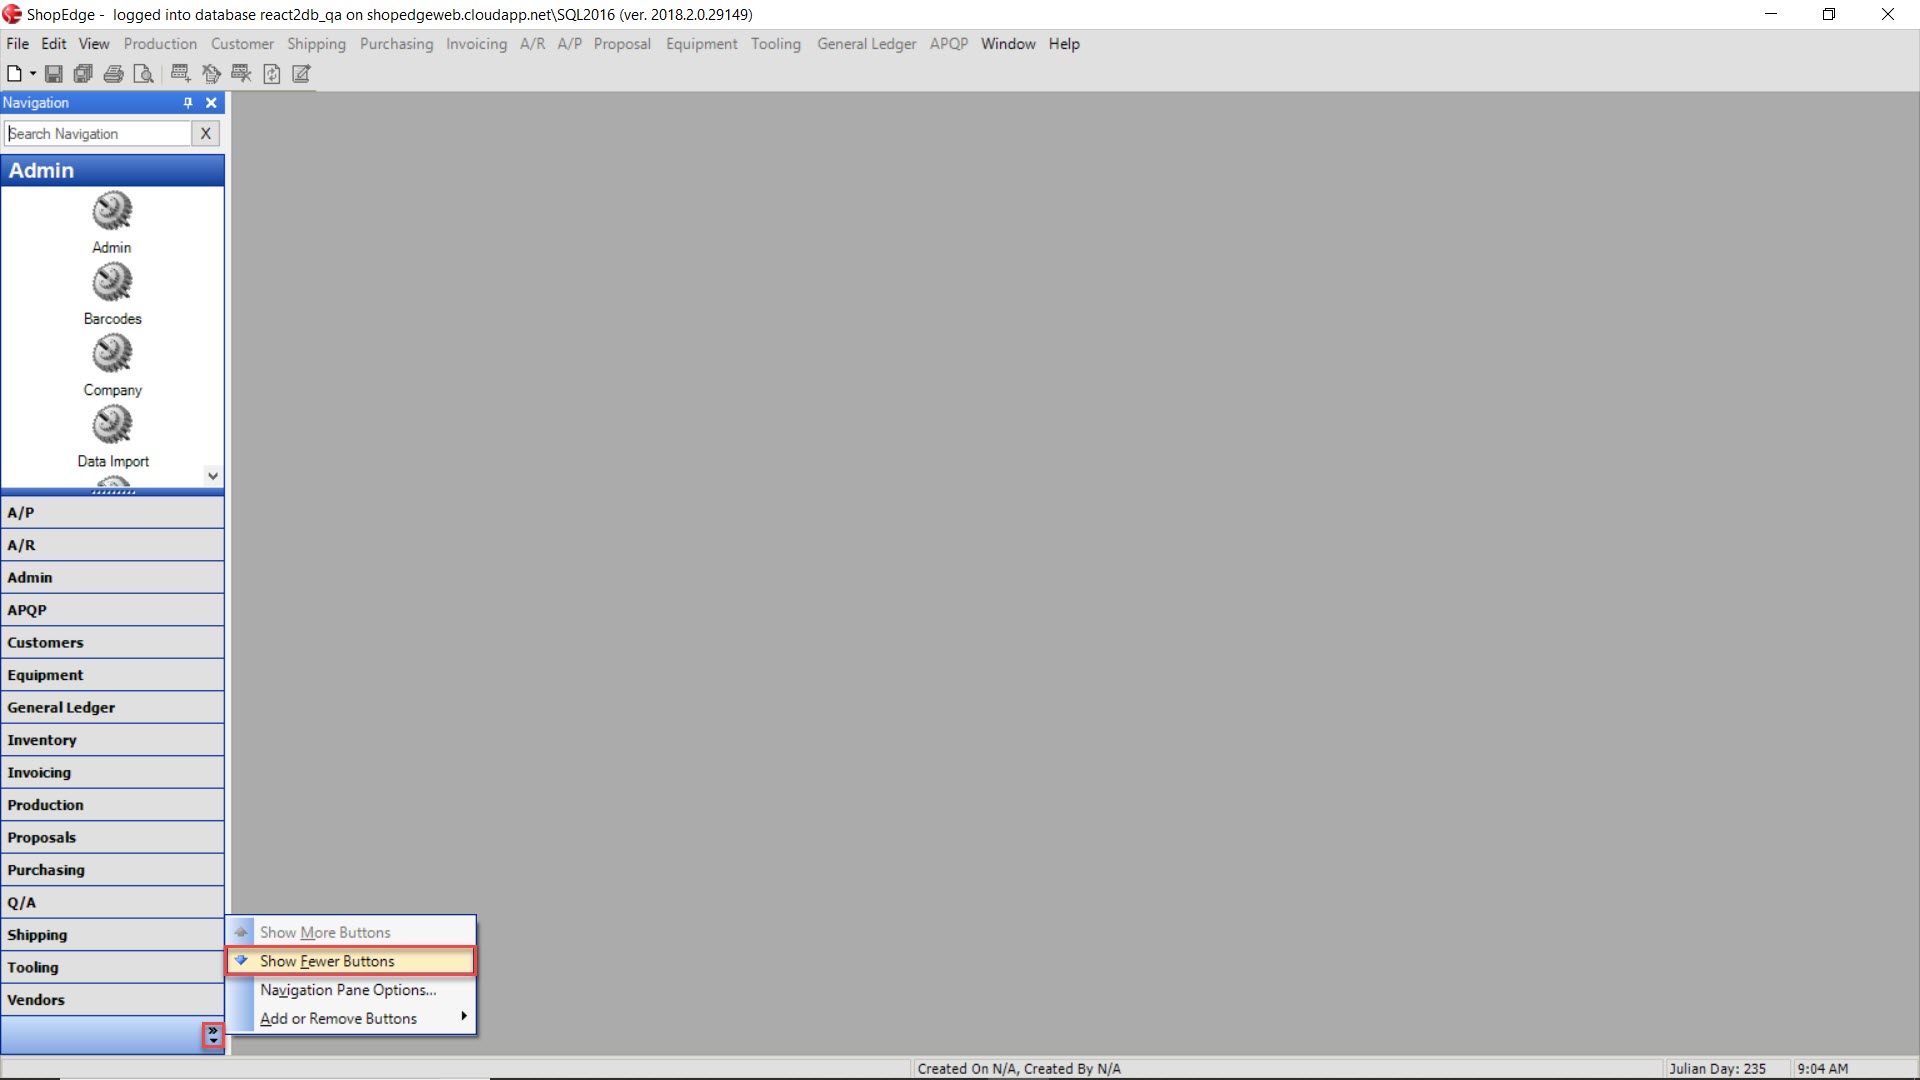
Show Fewer Buttons
To view fewer buttons on the navigation pane simple click on the arrow menu and select the Show Fewer Buttons option.
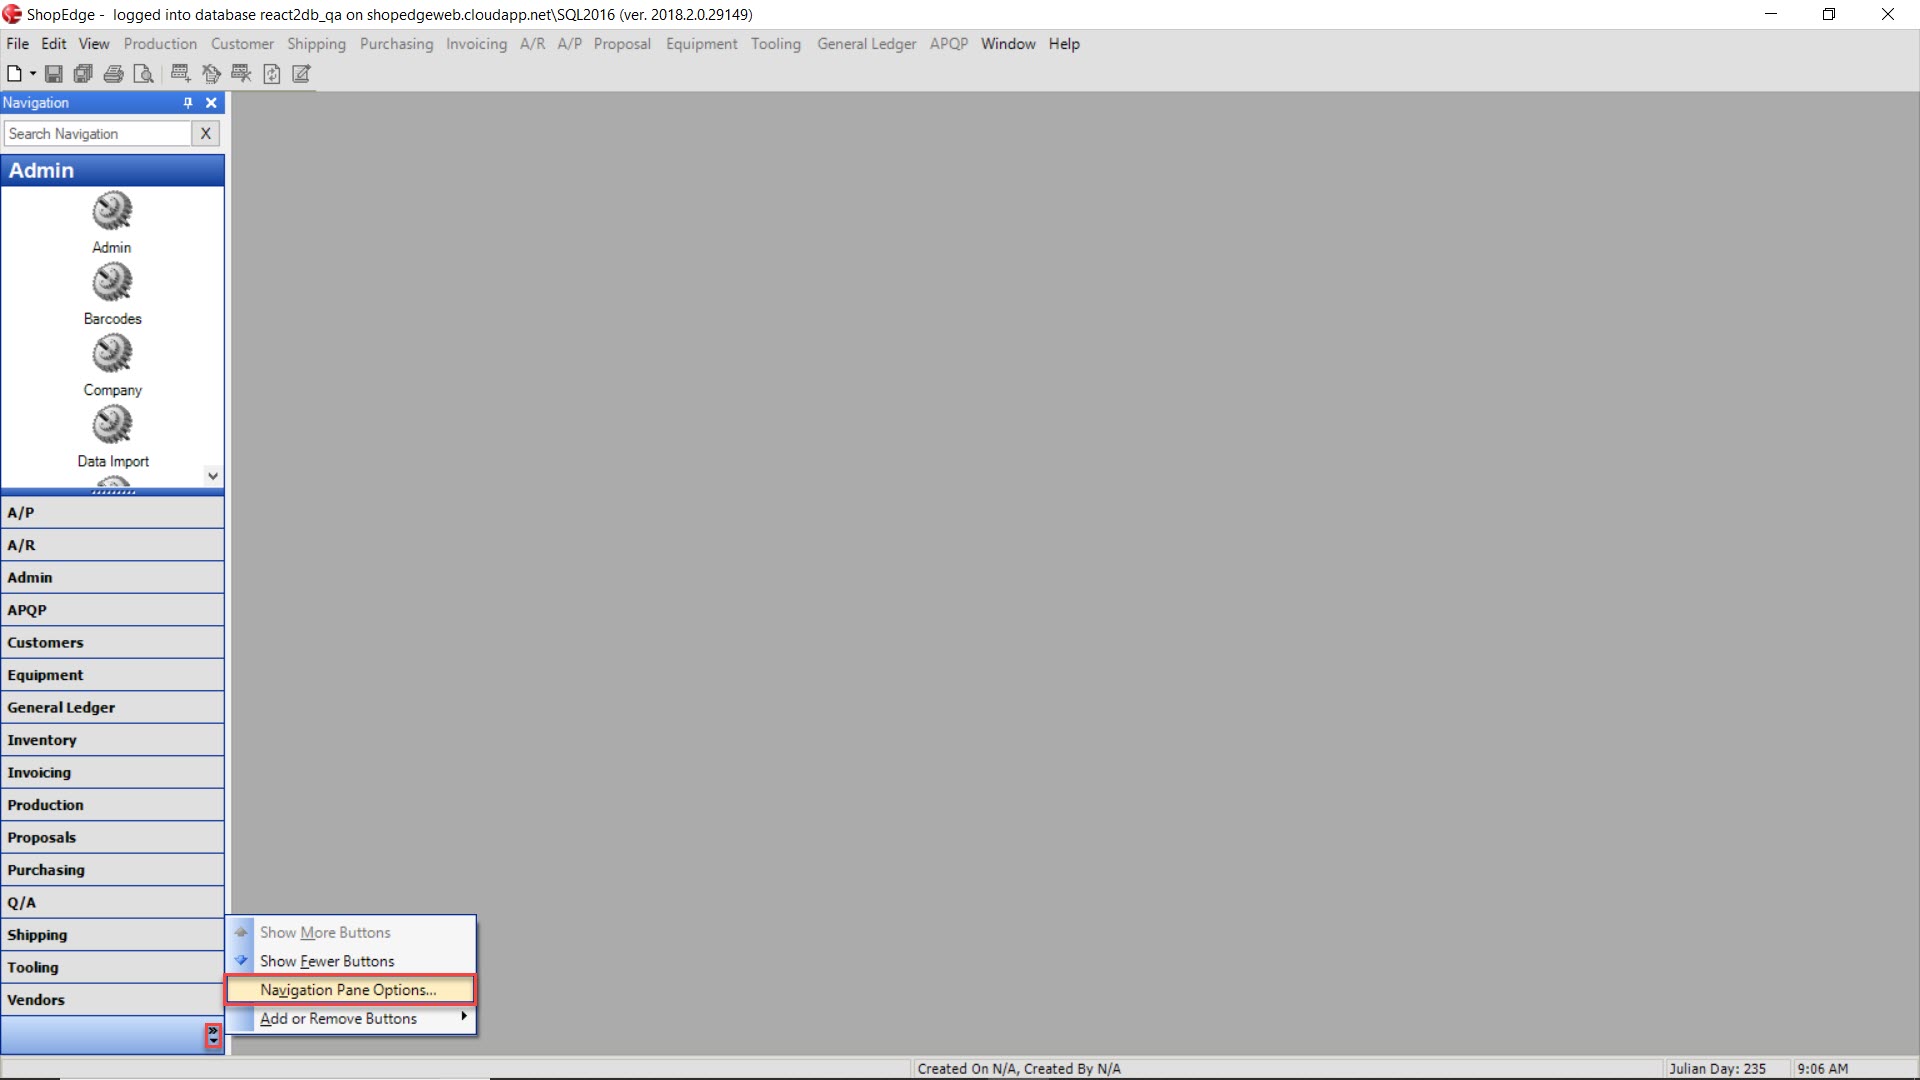
Navigation Pane Options
To view and/or select differen navigation pane options, simply click on the arrow menu and select the Navigation Pane Options option.
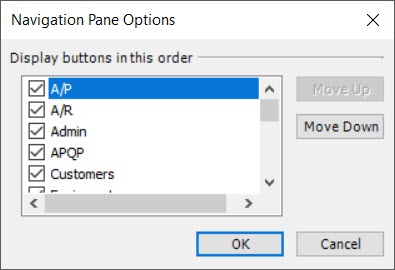
The Navigation Pane Options window will appear where users can select or de-select buttons to be displayed.
Add or Remove Buttons
To add or remove buttons from the navigation pane, simply click on the arrow menu and select the Add or Remove Buttons option.
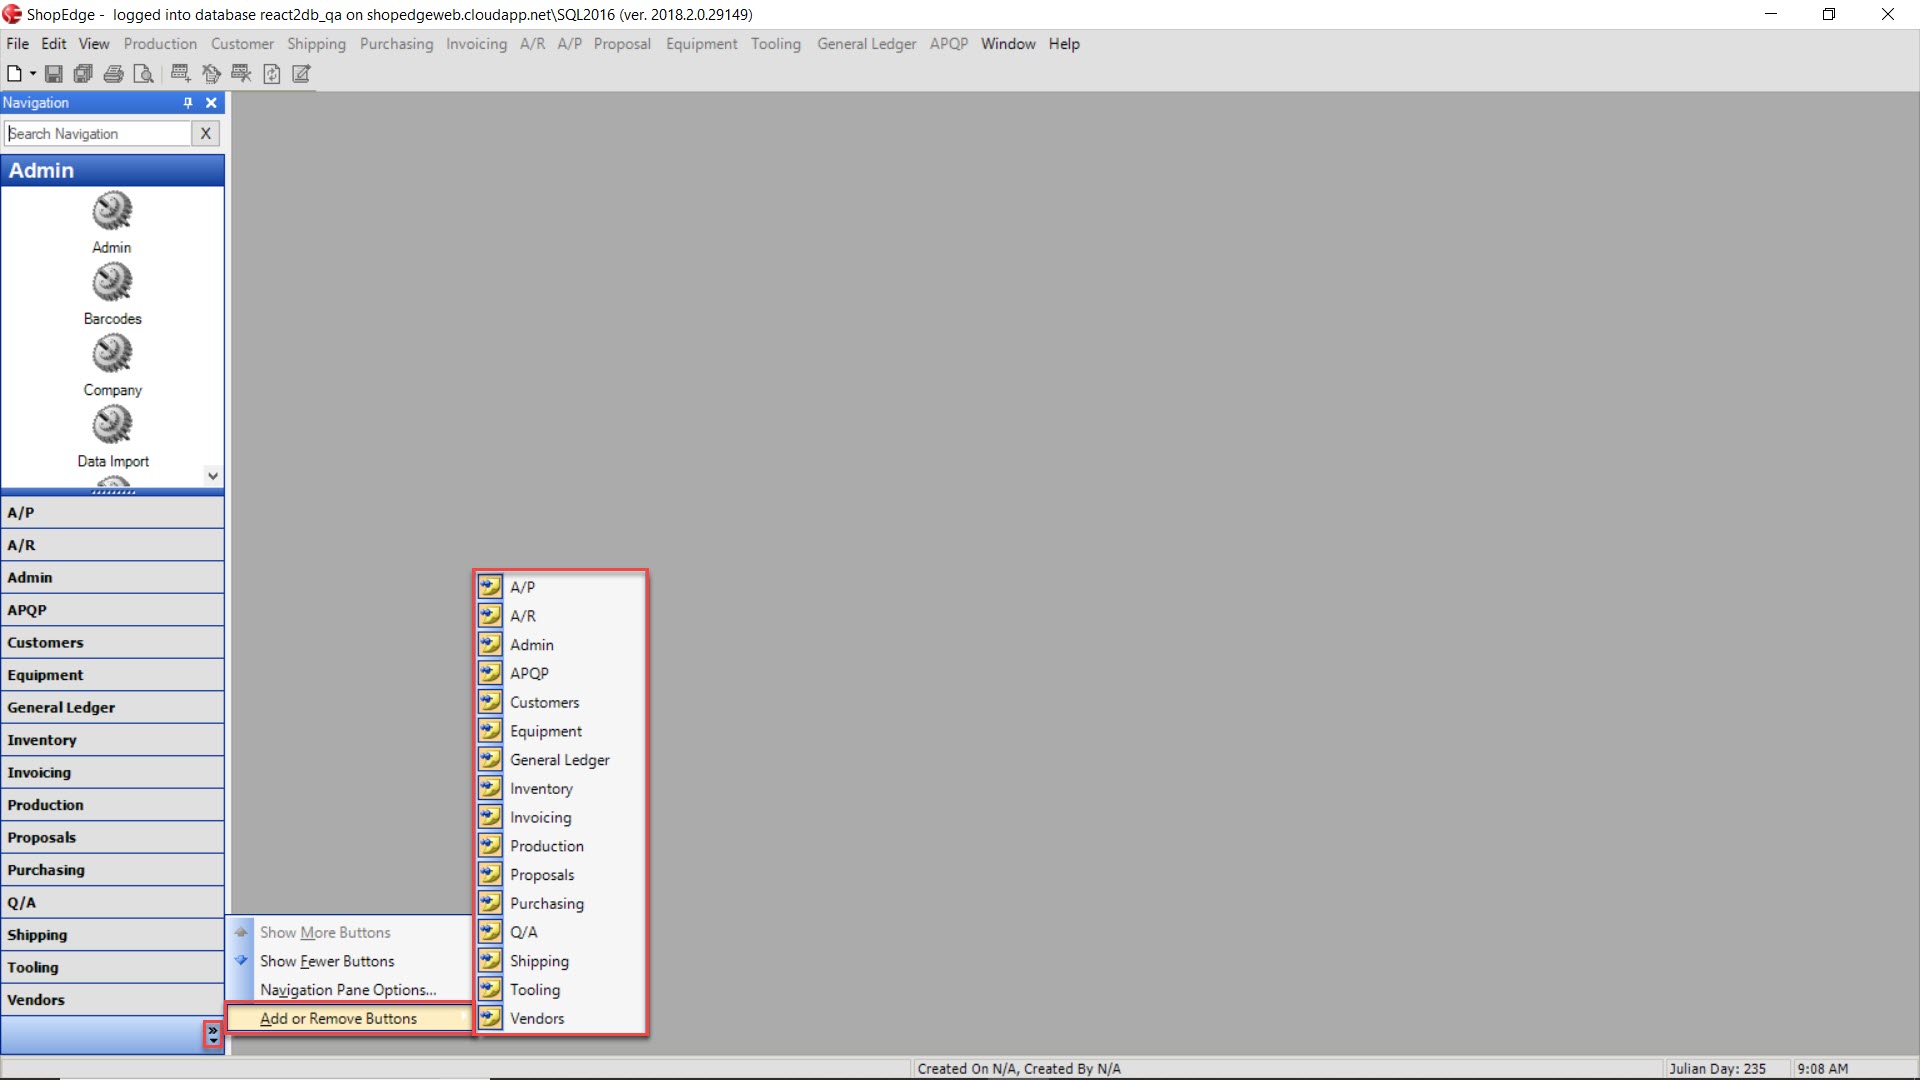
Users can select or de-select buttons of their choice.
Viewing Modules
Modules in the system are located on the left side of the ShopEdge System screen under the navigation pane.
Each modules contains different sections in which users can navigate to in order to perform certain actions.
Under the A/P module, the sections that appear are:
- A/P Search: allows users to locate invoices, cheques, vendor payments, payments, and packing slips
- Accounts:
- Cheque Batch Lookup
- Closed Invoices
- Non-Invoiced Packing Slips
- Open Invoices
- Open Payables
- Payments
- Reporting Services Reports
- Uncashed Cheques
- Vendor Payment Batch Lookup
Under the A/R modules, the sections that appear are:
- A/R Search
- Accounts
- Cash Receipts
- Open Receivables
- Payment Lookup
- Reporting Services Reports
- SAT Upload
Under the Admin module, the sections that appear are:
- Admin
- Barcodes
- Company
- Data Import
- Email Templates
- Employees
- Event Subscriptions
- Payment Terms
- Print Address Labels
- Printed Forms
- Reporting Services Reports
- Security
- User Default Forms
Under the Customers module, the sections that appear are:
- Admin
- Container Chargers
- Customer Price Revisions
- Customers
- EDI Receipts
- Import Customer Orders
- Item Pricing
- Market Types
- Order
- Releases
- Reporting Services Reports
Under the Equipment module, the sections that appear are:
- Admin
- Approval Groups
- Equipment Items
- Import MRO Items
- Maintenance Lookup
- Manage Work Order Requests
- MRO Items
- Open Work Orders
- Reporting Services Reports
- Timecard Entry
- Timecard Listing
- Work Order Request
- Work Order Request Approval
Under the General Ledger module, the sections that appear are:
- Admin
- Chart of Accounts
- Control Accounts
- Currencies
- Current Fiscal Year
- Financial Reports
- Fiscal Year Budget
- G/L Account Reconciliation
- Journal Entries
- Reporting Services Reports
- Year-End Rollover
Under the Inventory module, the sections that appear are:
- Cycle Counts
- Locations
- Reporting Services Reports
Under the Invoicing module, the sections that appear are:
- Extra Charges
- Invoiced Items
- Non-Invoiced Packing Slips
- Pending Invoices
- Reporting Services Reports
Under the Production module, the sections that appear are:
- Active Jobs
- Admin
- Capacity Planning
- Completed Jobs
- Containers
- Engineering Level Management
- Manufacture Routings
- Master Production Schedule
- Operator Schedule
- Plant Operations
- Production Inventory
- Production Targets
- R/M Inventory
- R/M Inventory Listing
- Reporting Services Reports
- Sales Forecasts
- Shift Availability
- Std Cost Lookup
- Timecards
- Visual Checks
- Workcenter Monitor
- Workcenter Schedule
- Workcenters
Under the Proposals module, the sections that appear are:
- Admin
- Jobs
- Open Work Orders
- Proposals
Under the Purchasing module, the sections that appear are:
- Admin
- Capital Request Approvals
- Capital Requests
- Closed Purchase Orders
- Item Types
- Items on Order
- Material Requirements
- P/O Receipts
- Pending Receipts
- Purchase Order Approvals
- Purchase Orders
- Purchased Items
- Purchasing Search
- Receiving
- Reporting Services Reports
- Request for Quotations
- Spending Approval Groups
- Spending Groups
- Steel Receiving
- Vendor Pricing
Under the Q/A module, the sections that appear are:
- Active Heats
- Admin
- Dock Audit Lookup
- Dock Audit Management
- Gauge Listing
- Held Purchased Tags
- Held Tags
- Manufactured Item Tag Lookup
- Material Specs
- Pending Heats
- PPAP
- Purchased Item Tag Lookup
- Quality Inspection Lookup
- Quality Inspection Review
- Quality Inspection Template Lookup
- Quality Reject Transactions
- Quality Rejects
- Quality Requests
- Quality Schedule
- Quality Timecards
- R/M Tag Listing
- Reporting Services Reports
- Standard Processing Times
- Vendor Returns
Under the Shipping module, the sections that appear are:
- Admin
- Container Receiving
- Delivery Schedules
- Inventory
- Inventory Transfer Receiving
- Kanbans
- Packing Slips
- Processor Transactions
- Reporting Services Reports
- Shipments
- Shipped Items
- Shipped Packing Slips
- Shipping Requirements
- Transfer Order Lookup
Under the Tooling module, the sections that appear are:
- Admin
- Approval Groups
- Improt MRO Items
- Maintenance Lookup
- Manage Work Order Requests
- MRO Items
- Open Work Orders
- Planned Maintenance
- Reporting Services Reports
- Timecard Entry
- Tooling Items
- Timecard Listing
- Tooling Requests
- Work Order Requests
- Work Order Request Approval
Under the Vendors module, the sections that appear are:
- Admin
- EDI Receipts
- Import Vendor Packing Slips
- Vendors
Re-sequencing Module Icons
Users have the ability to re-sequence module icons in the system.
Simply click and drag an icon in the module of your choice and move it up or down until a black line appears.
Once the black line appears, un-click the icon.
Creating Favourites
If users wish to create a module with the most used sections from other modules, simply right-click on the icon(s) and select Add to Favourites.
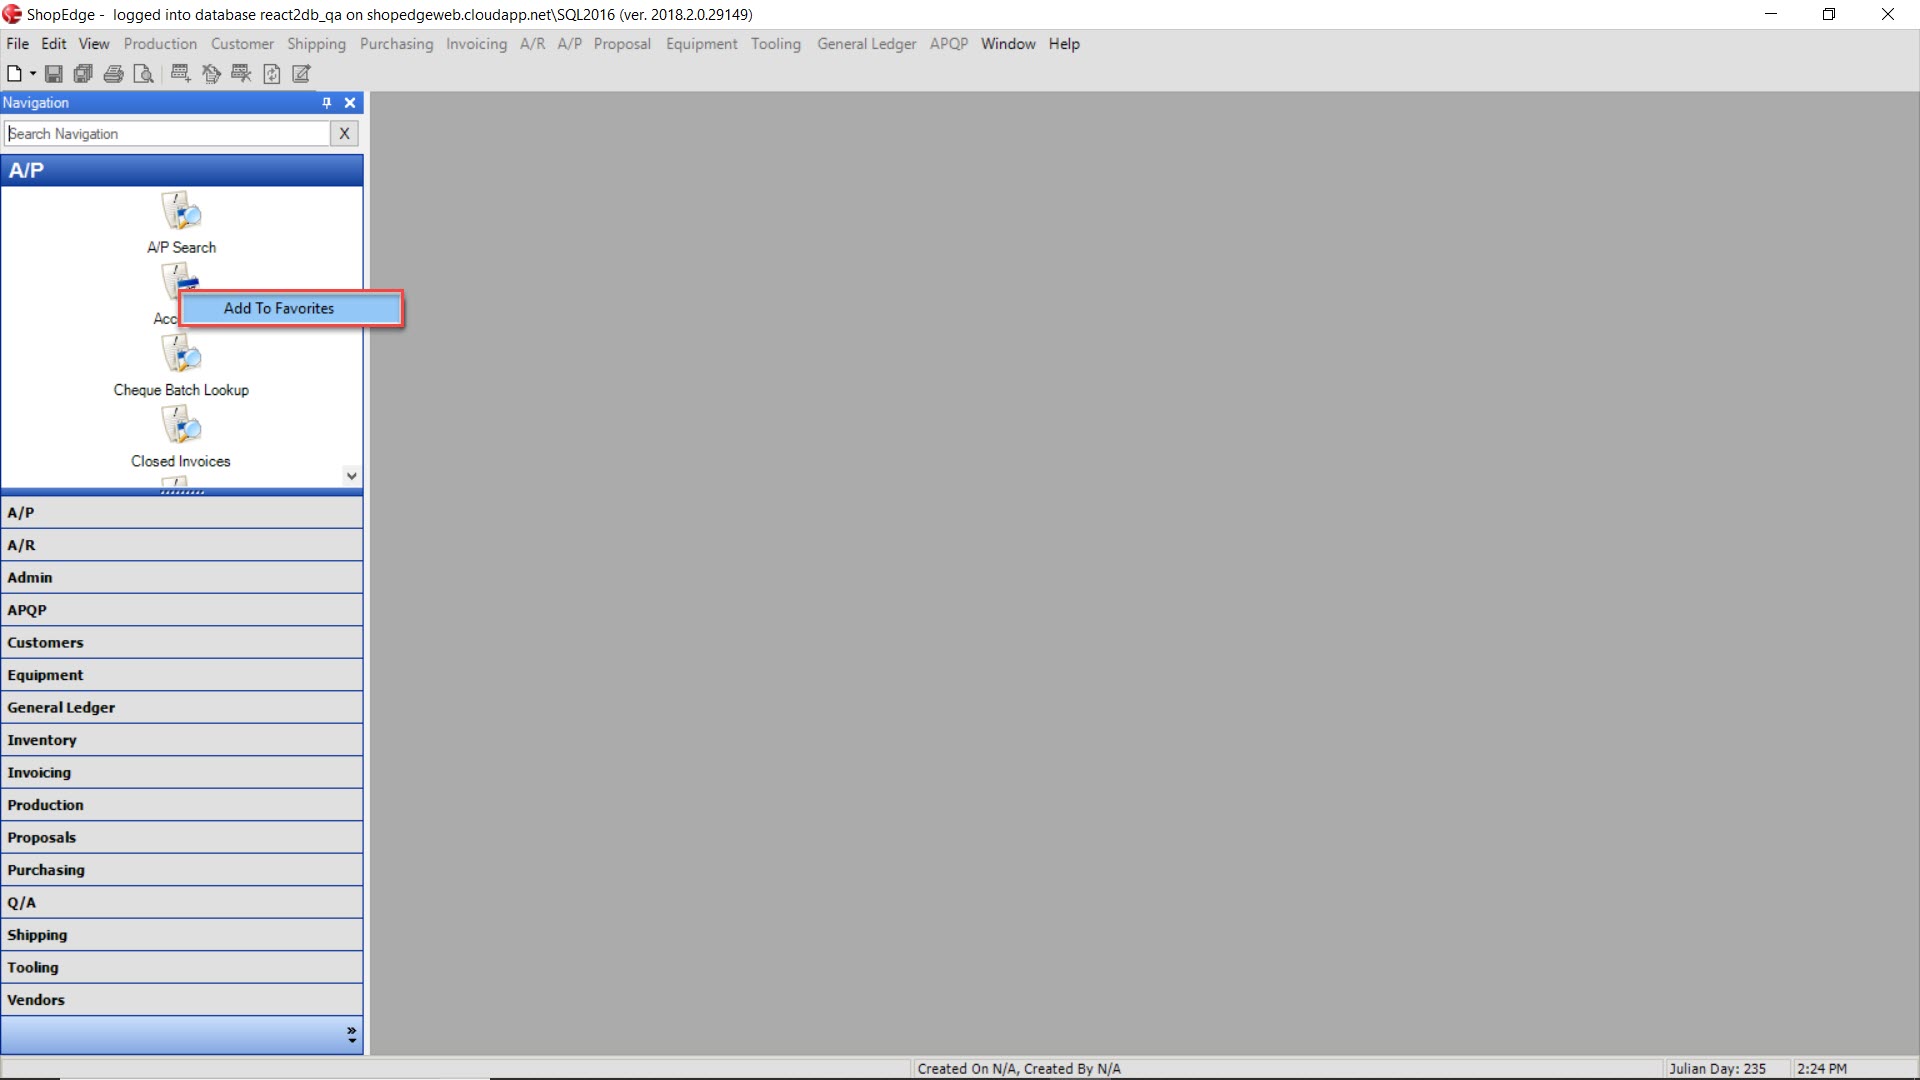
The system will create a new module called Favourites where the icon(s) will be added for ease of access.
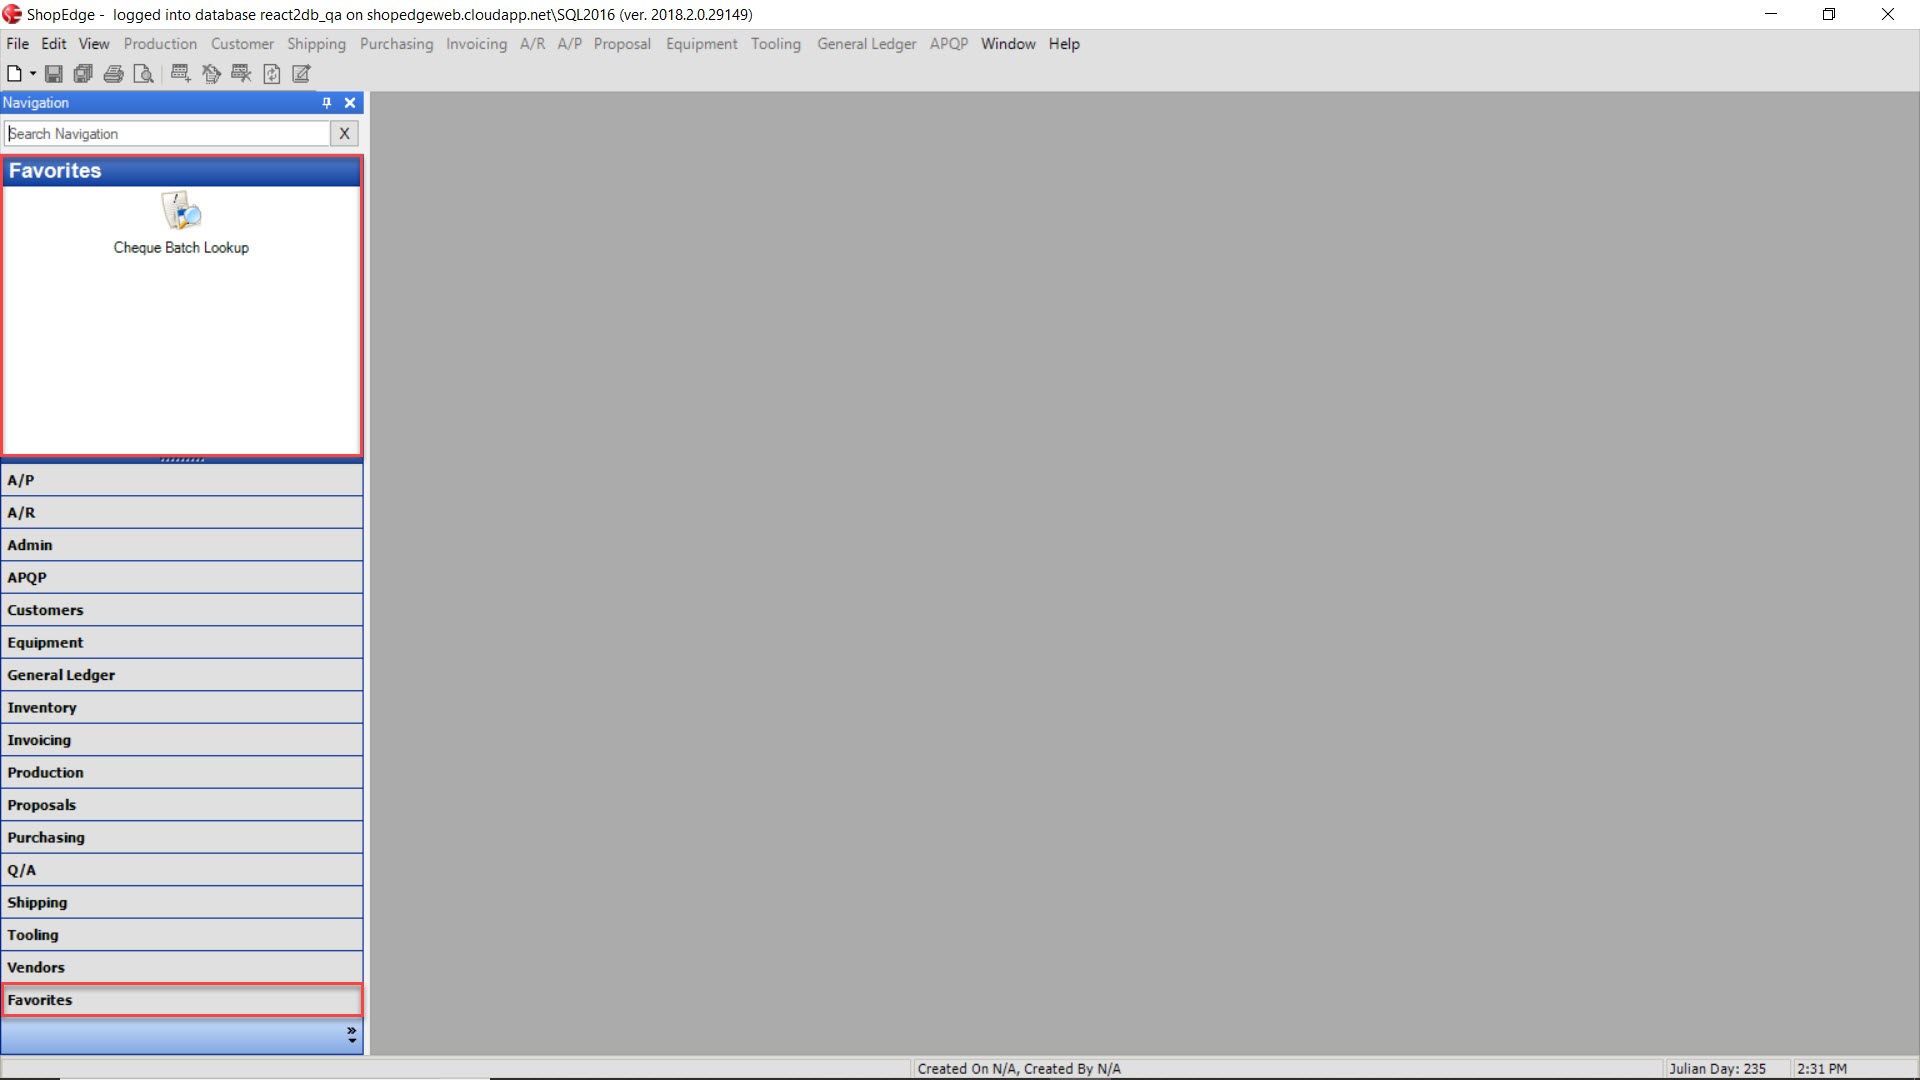
Note
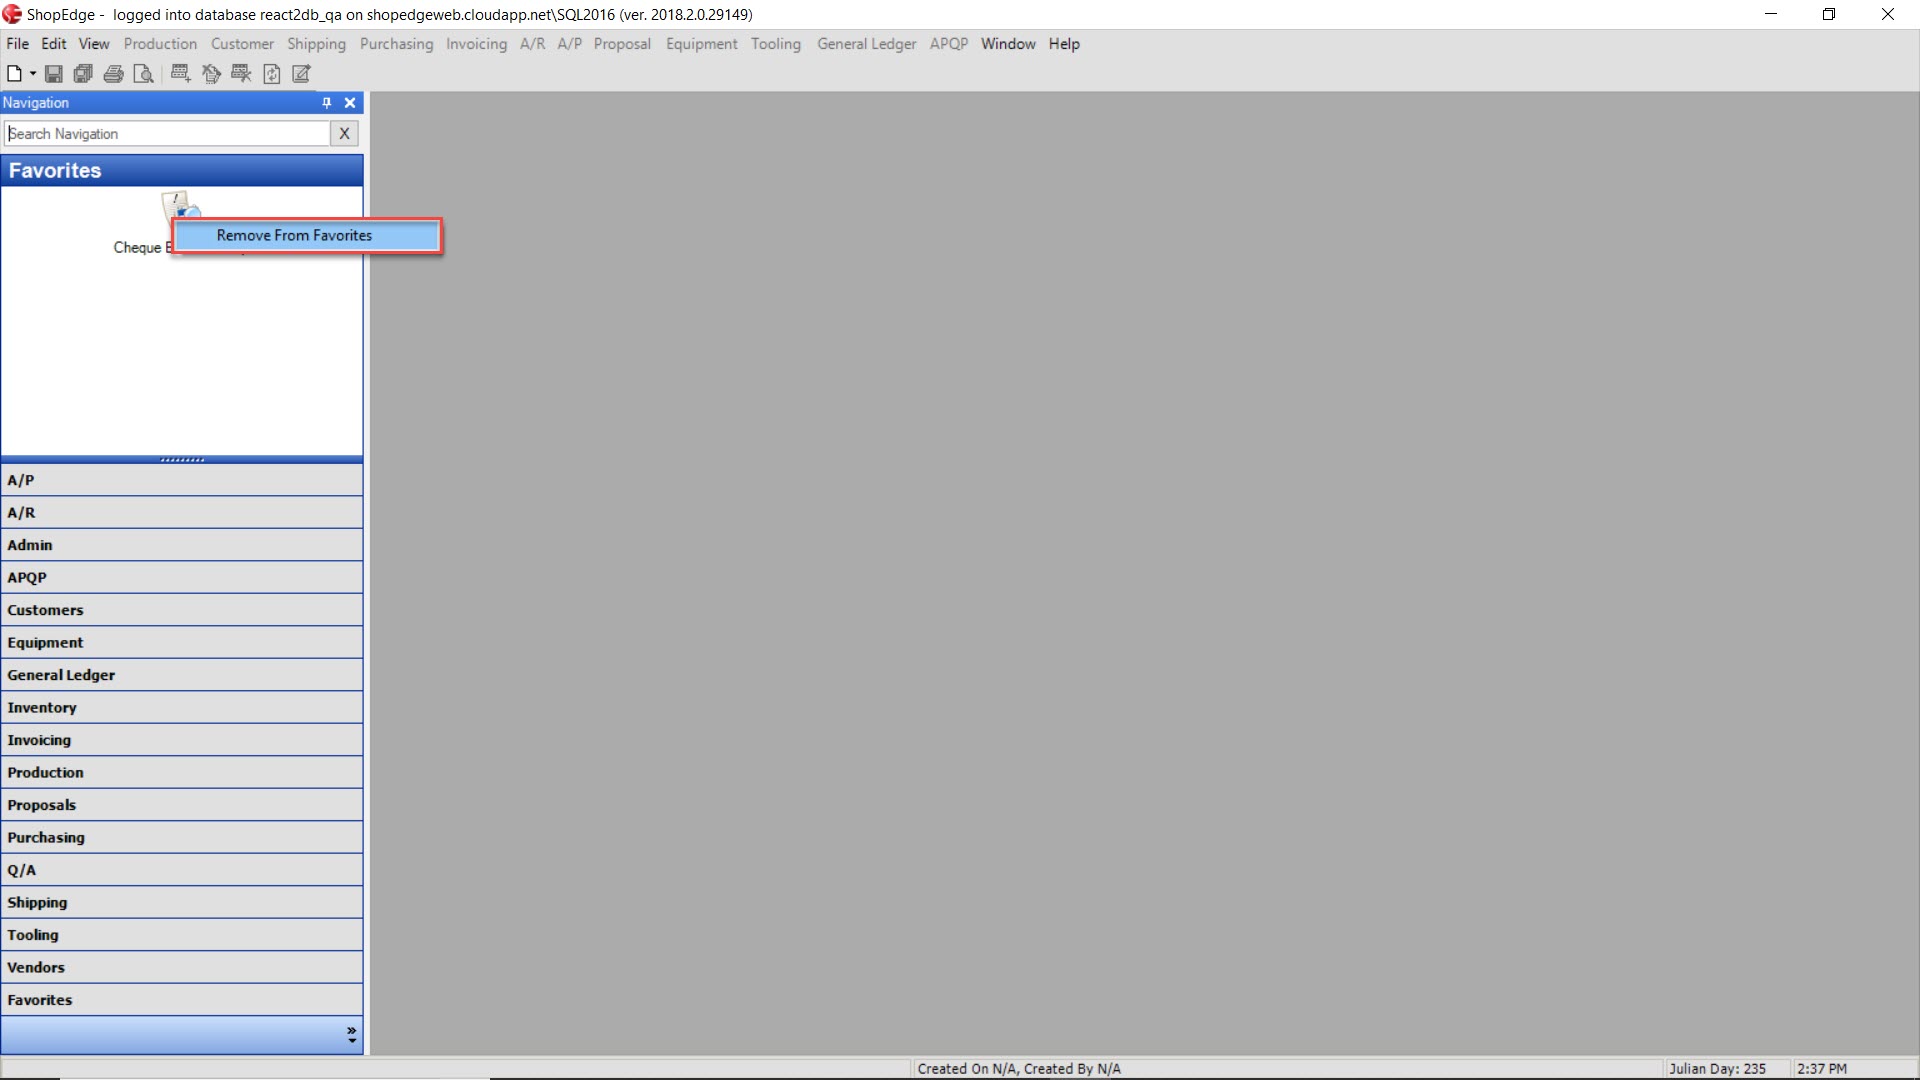
Users can also remove a module from Favourites by right-clicking on the module they wish to remove and selecting Remove from Favourites.
Lookup Screens
Lookup screen can be found throughout the ShopEdge System when navigation through the different modules.
Filtering
Filtering can be done on most lookup screens in the system.
Users can filter lookup screens by using the available drop-down menus and textboxes located at the top of each lookup screen.

The Filter button can then be clicked to filter the search.
The Reset button can be used to clear the selected search filters for the lookup screen.
Columns
Columns can be re-arranged or re-sized on all lookup screens in the system.
To re-arrange a column, simply click and drag to the location of your choice within the grid.
To re-size a column, simply click on the left or right side and drag to make the column smaller or larger.
Sorting
Columns can be sorted on each lookup screen by double-clicking on a column heading.
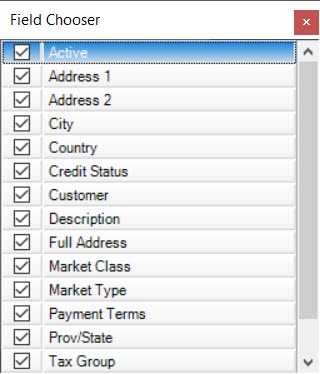
Field Chooser
The field chooser allows user to select or de-select column headings to appear on lookup screens.
To view the field chooser, click on the  button.
The Field Chooser window will appear where users can select or de-select column headings.
Building Queries
On most lookup screens in the ShopEdge system users are able to create queries in order to help with further searching.
To create a new query, click on the  button under the Query section of a lookup screen.

The Query Editor window will open. Click on the  button and the New Query window will appear.
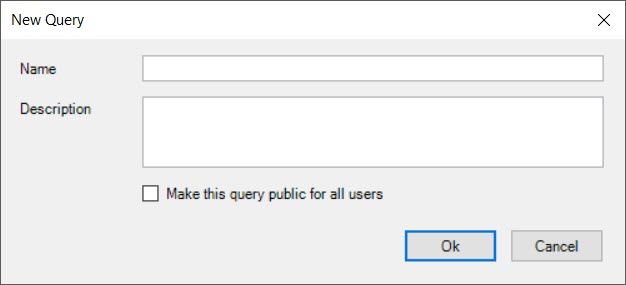
Enter in the Name and Descriptiom, and whether or not the query is public. Click on the  button on the New Query window and then again on the
Query Editer window.
The new query will be created and can be viewed in the drop-down menu under the Query section.
Selection Windows
Selection windows appear when users add data to new and/or existing screens in the system.
Filters
Selection windows contain a filter section which makes it easier to search for data.
Users can filter selection windows by using the available drop-down menus and textboxes located at the top of each selection window.

The Filter button can then be clicked to filter the search.
The Reset button can be used to clear the selected search filters for the selection window.
Note
Sometimes there may be another search filter option on selection windows that may further the detail of your search. These vary depending on the particular selection window that is opened.
Selecting Rows
Selection windows give users the option to select rows using three possible methods.
The first way is to highlight the row(s) by selecting with your mouse and then clicking the  button.
The second way is to double-click on the row(s) you wish to add.
The last way is to select the checkbox of the row(s) you wish to add where applicable and then clicking the  button.
Re-arranging Open System Screens
When there are muiltple screens opened at one time in the ShopEdge System, users have the ability to re-arrange them based on personal prefereance.
To do so, simply click on the screen tab that you wish to re-arrange and drag it to the location of your choice, then release the screen.
Creating New Entries
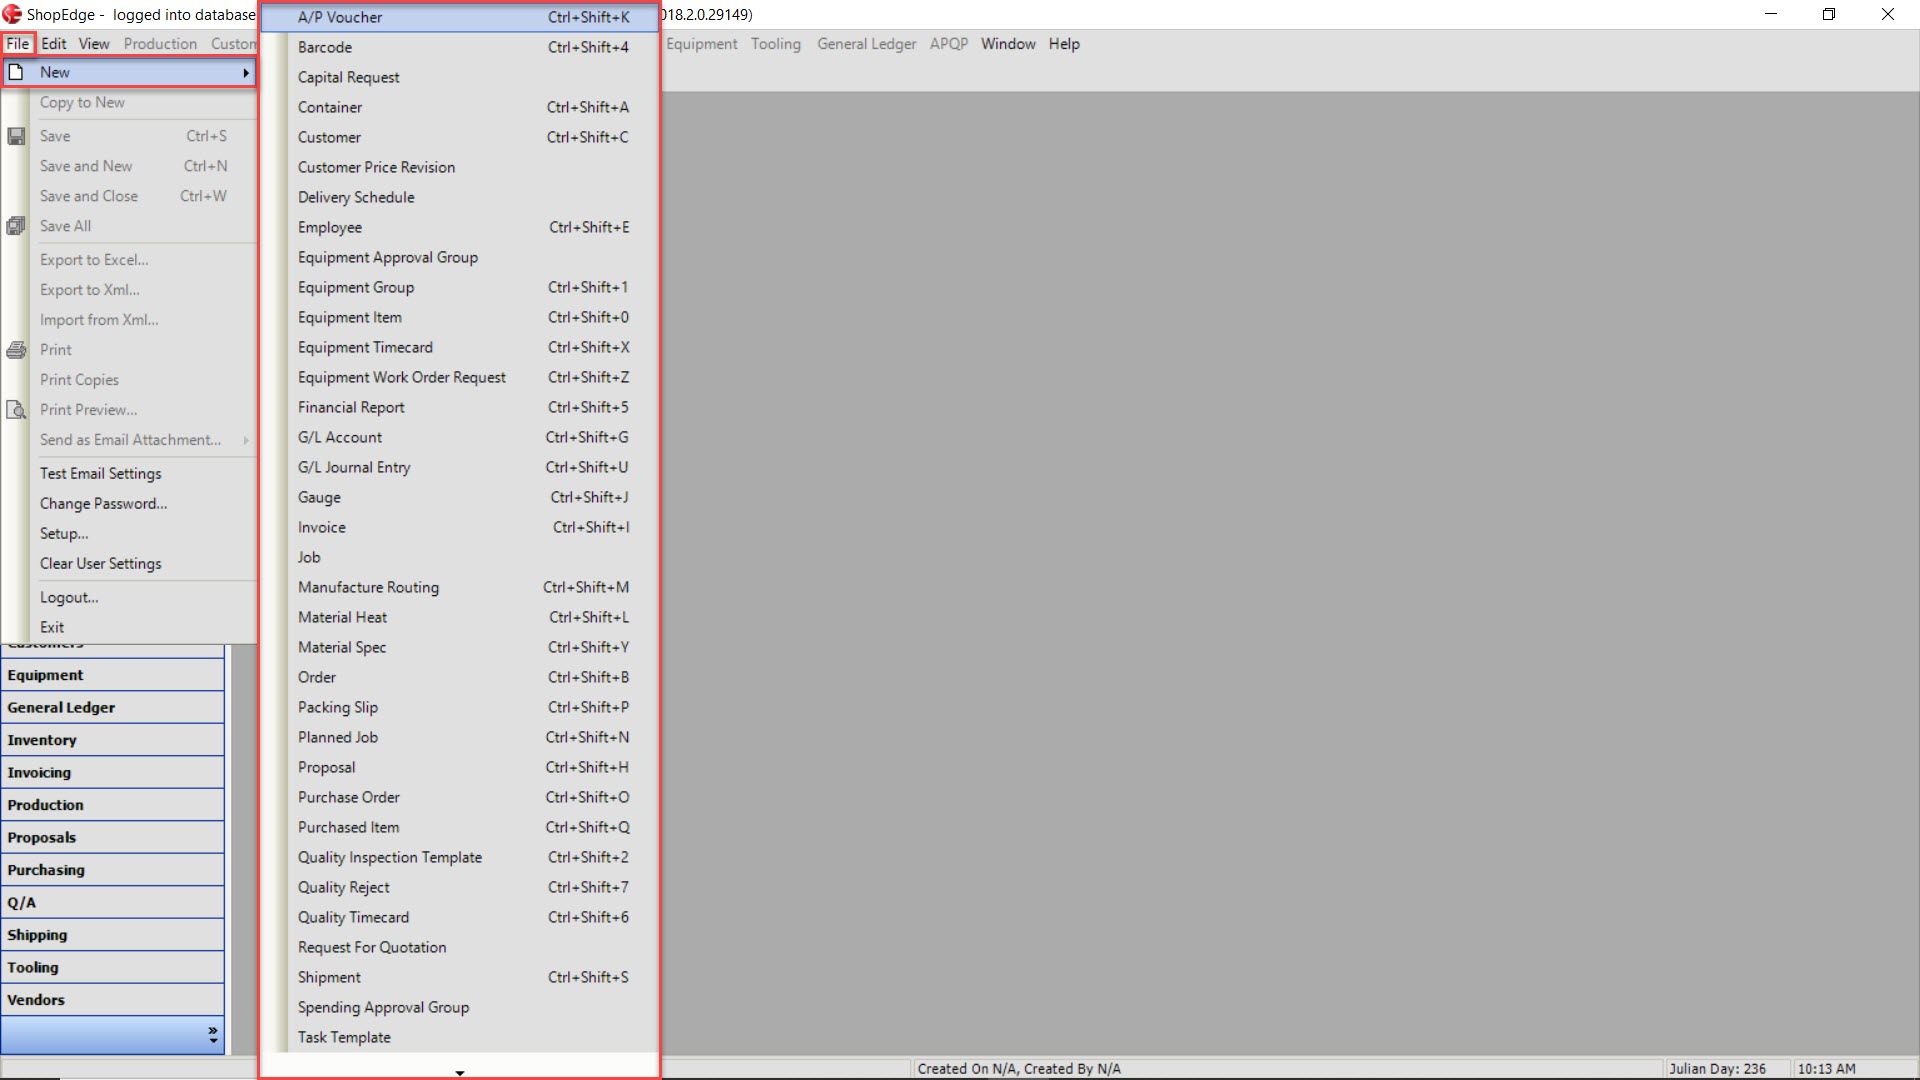
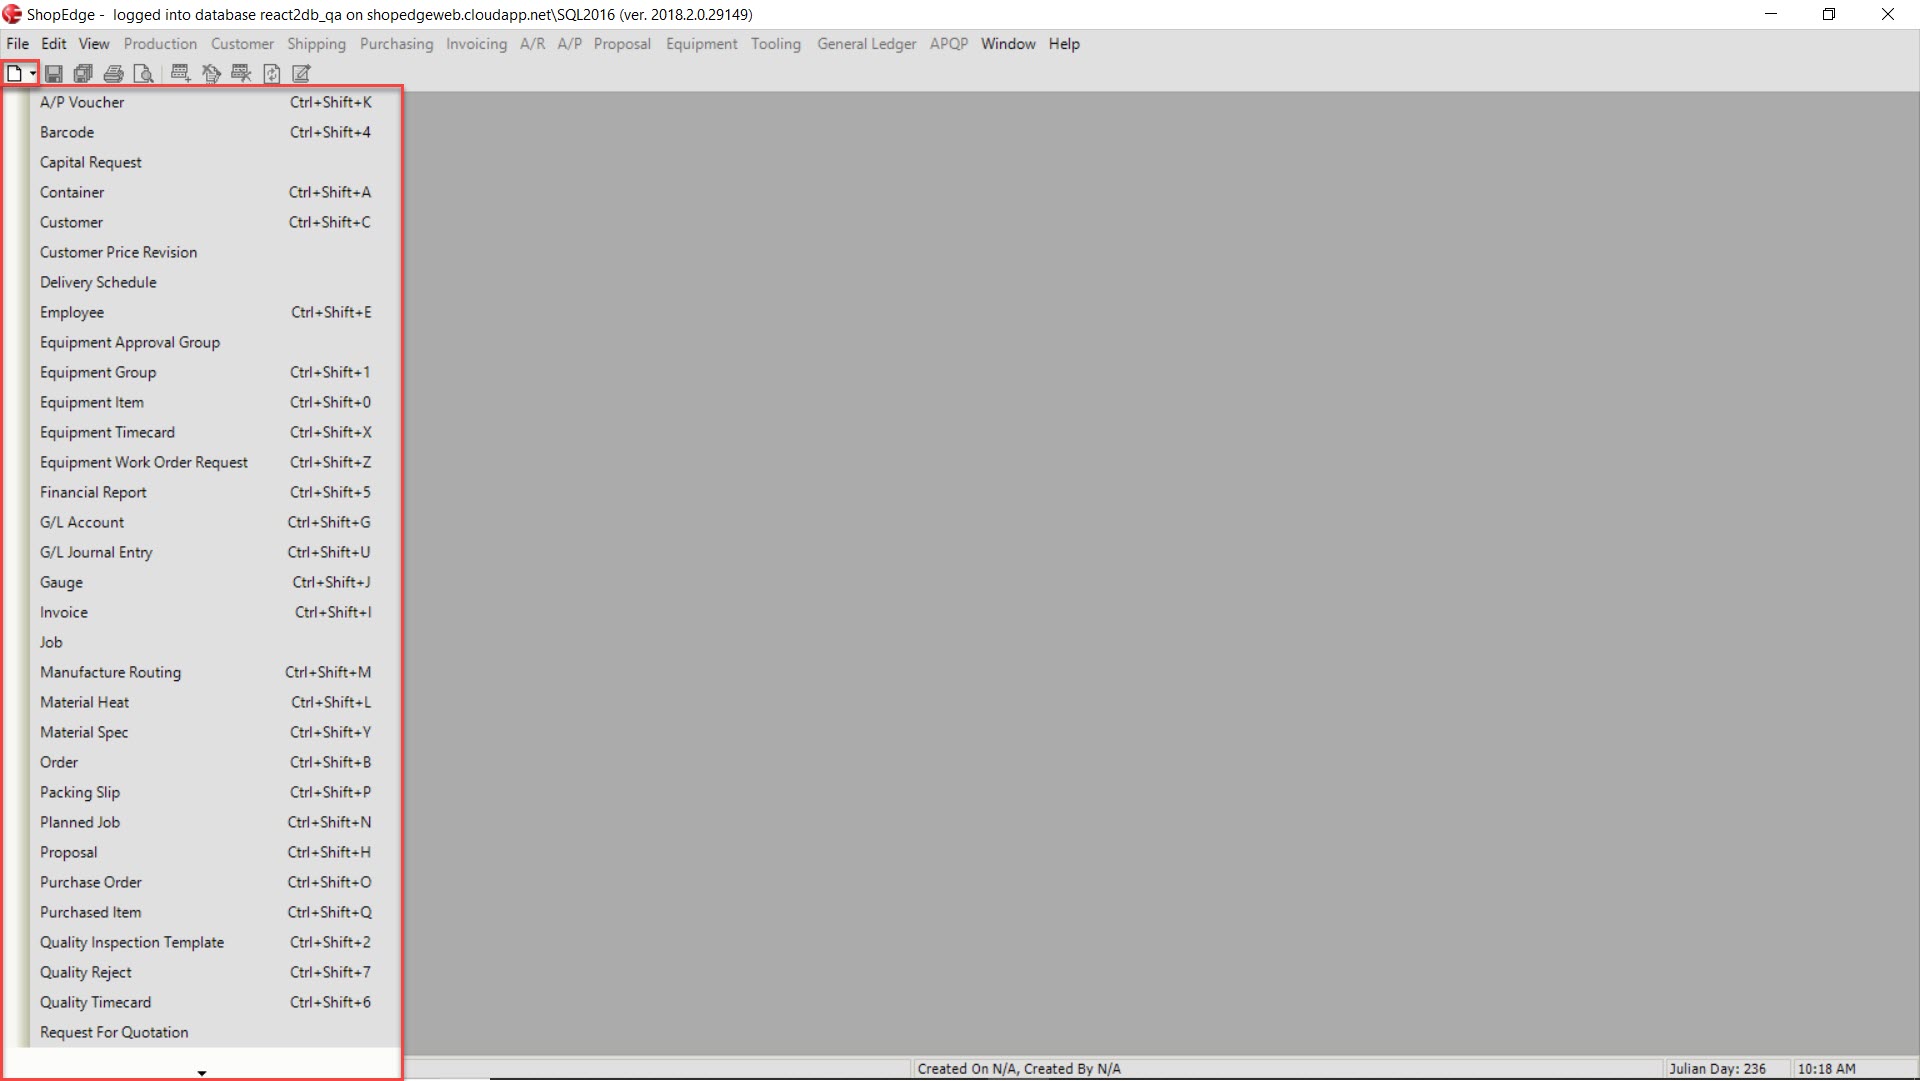
There are two ways to create new entries in the ShopEdge system.
The first way is to navigate to File and select the New option. From there, select the new entry you wish to open.
The second way is to navigate to the  button and select the new entry you wish to open.
Adding to Existing Entries
Users have the ability to add to exiting entries where applicable.
To do so, open an existing entry and make the necessary changes.
One the necessary changes have been made, make sure to save before exiting the screen.
Emailing Items
ShopEdge provides the option for users to email documents/paperwork where applicable, for example a Packing Slip or an Invoice.
To do so, open the screen you wish to email items from and navigate to File > Send as Email Attachment... and select the document/paperwork you wish to send.
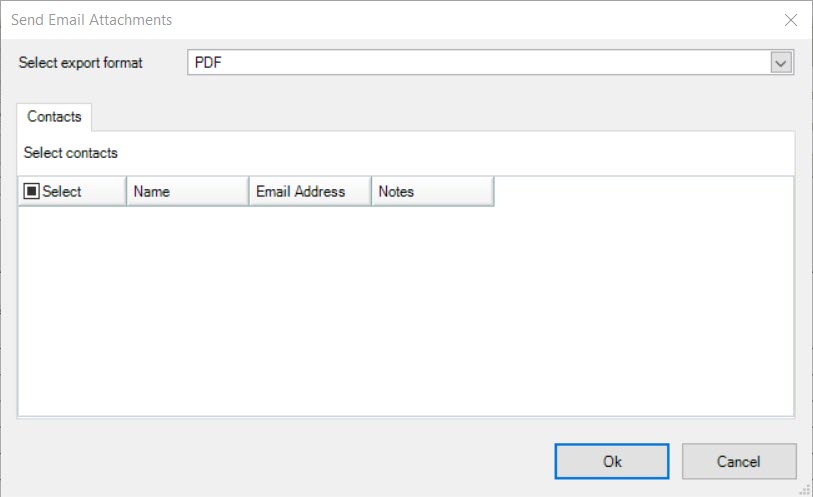
The Send Email Attachments window will appear. Select the Export format and the Contact(s). Then, click on the  button.
Your email will open with the selected document/paperwork to send. Users can complete the email and send it.
The selected document/paperwork will be emailed.